#linuxcontainers
Explore tagged Tumblr posts
Visit Tumblr Blog
Explore Tumblr blogs with no restrictions, modern design and the best experience.
Last Seen Tumblr Blogs


Fun Fact
In February 2021, Tumblr had 518.6 million blog accounts.
Video
youtube
Apple releases new Linux container tools for Mac - Sub-second start times? 👋🏽🤓🍏 https://applevideos.co.uk/mac-studio/apple-releases-new-linux-container-tools-for-mac-subsecond-start-times
0 notes
Text
#Containerization#LinuxTechnology#Namespaces#ControlGroups#SELinux#ResourceManagement#SecurityEnhancement#AppDeployment#DigitalTransformation#SystemAdministration#EfficientApplications#TechInnovation#DevOps#LinuxContainers#ITInfrastructure
0 notes
Text
“Not what we say about our blessings, but how we use them, is the true measure of our thanksgiving.” ― W. T. Purkiser Demystifying LXC The Linux Containers project (LXC) is an open source container platform that provides a set of tools, templates, libraries, and language bindings. It delivers containers that include a complete Linux system, much like a VM, with its own file system, networking and multiple applications. LXC has a simple command line interface that improves the user experience when starting containers (RedHat, 2020). Through a powerful API and simple tools, it lets Linux users easily create and manage system or application containers. Before containerd, Docker was built on top of LXC but they have since moved to containerd. Features of LXC Current LXC uses the following kernel features to contain processes: Source: LinuxContainers Kernel namespaces (ipc, uts, mount, pid, network and user) Apparmor and SELinux profiles Seccomp policies Chroots (using pivot_root) Kernel capabilities CGroups (control groups) Demystifying LXD LXD is a next generation system container manager. It is an amazing interface used to manage LXC system containers and should not be misconstrued as a platform or type of container. The features of LXD include snapshots and image control. As you can guess, LXD increases the capabilities of LXC technology. It offers a user experience similar to virtual machines but using Linux containers instead. Features of LXD Source: LinuxContainers Some of the biggest features of LXD are: Secure by design (unprivileged containers, resource restrictions and much more) Scalable (from containers on your laptop to thousand of compute nodes) Intuitive (simple, clear API and crisp command line experience) Image based (with a wide variety of Linux distributions published daily) Support for Cross-host container and image transfer (including live migration with CRIU) Advanced resource control (cpu, memory, network I/O, block I/O, disk usage and kernel resources) Device passthrough (USB, GPU, unix character and block devices, NICs, disks and paths) Network management (bridge creation and configuration, cross-host tunnels, …) Storage management (support for multiple storage backends, storage pools and storage volumes) Installation of LXC/LXD on CentOS 8 If you would wish to try out LXC/LXD on your CentOS 8 server to run some applications, the following steps will help you get the platform ready for use in as quick a manner as possible. Step 1: Update and prepare Server This is a very crucial step where we ensure that our house is well furnished by making sure the latest patches and packages are installed. Proced to run the following commmands to prepare your server. sudo dnf update -y sudo dnf install -y vim curl nano Disable SELinux This is an optional step if you are good at managing SELinux contexts. To make it permissive, run the following commands sudo setenforce 0 sudo sed -i 's/^SELINUX=.*/SELINUX=permissive/g' /etc/selinux/config Step 2: Enable and configure EPEL repo Run the following command to install and enable EPEL repo on a CentOS 8 and then update the server to get latest packages from Epel. sudo yum install https://dl.fedoraproject.org/pub/epel/epel-release-latest-8.noarch.rpm sudo dnf update Step 3: Install snapd on CentOS 8 In this setup, we ar going to install Snappy’s LXD package due to its simplicity and support that Snap packages enjoy. For that reason, we need to install snapd on our server as follows: sudo yum install snapd -y Once installed, the systemd unit that manages the main snap communication socket needs to be enabled: sudo systemctl enable --now snapd.socket To enable classic snap support, enter the following to create a symbolic link between /var/lib/snapd/snap and /snap: sudo ln -s /var/lib/snapd/snap /snap Either log out and back in again or restart your system to ensure snap’s paths are updated correctly. Once we have snap installed, let us continue to the next step.
Step 4: Add Kernel Parameters There are some important Kernel options that are required by LXD and we are going to enabled on the server. Configure them by running the following commands on your terminal as root. $ sudo su - # grubby --args="user_namespace.enable=1" --update-kernel="$(grubby --default-kernel)" # grubby --args="namespace.unpriv_enable=1" --update-kernel="$(grubby --default-kernel)" # echo "user.max_user_namespaces=3883" | sudo tee -a /etc/sysctl.d/99-userns.conf After these settings are configured, it is required that the server be rebooted since core Kernel features have been altered. Reboot your server. sudo reboot Step 5: Install the lxd snap on CentOS 8 Finally, after your server is back up, it is time to get out package of interest, LXD, installed from the Snap store. As simple as Snap was made, we simply need to run the command below and our LXD will be installed. sudo snap install --classic lxd Step 6: Launching a test LXD container Thus far, we have already installed LXC/LXD but we have no containers yet that will hold the applications we are interested in deploying. Therefore, before we can launch some containters, let us add our user account to the group lxd for it to manage LXD containers without permission restrictions. sudo usermod -aG lxd $USER newgrp lxd Note: The newgrp command is used to change the current group ID during a login session. If the optional – flag is given, the user’s environment will be reinitialized as though the user had logged in, otherwise the current environment, including current working directory, remains unchanged. newgrp changes the current real group ID to the named group. Next, we let us configure LXD environment or “initialize” it by running the following command. It will take you through a few questions. Please answer them in accordance to the needs of your environment. I used default values for the blank ones. $ lxd init Would you like to use LXD clustering? (yes/no) [default=no]: Do you want to configure a new storage pool? (yes/no) [default=yes]: Name of the new storage pool [default=default]: Name of the storage backend to use (btrfs, dir, lvm, ceph) [default=btrfs]: lvm Create a new LVM pool? (yes/no) [default=yes]: Would you like to use an existing empty block device (e.g. a disk or partition)? (yes/no) [default=no]: Size in GB of the new loop device (1GB minimum) [default=9GB]: 5GB Would you like to connect to a MAAS server? (yes/no) [default=no]: Would you like to create a new local network bridge? (yes/no) [default=yes]: What should the new bridge be called? [default=lxdbr0]: What IPv4 address should be used? (CIDR subnet notation, “auto” or “none”) [default=auto]: What IPv6 address should be used? (CIDR subnet notation, “auto” or “none”) [default=auto]: Would you like LXD to be available over the network? (yes/no) [default=no]: Would you like stale cached images to be updated automatically? (yes/no) [default=yes] Would you like a YAML "lxd init" preseed to be printed? (yes/no) [default=no]: The above command will create a bridge lxdbr0. We shall add this bridge interface to the trusted zone so that connections will go through. In other words, we shall allow all incoming traffic via lxdbr0. Execute below firewall commands sudo firewall-cmd --add-interface=lxdbr0 --zone=trusted --permanent sudo firewall-cmd --reload Creating Containers Once lxd is initialized and your user is given permissions to launch and manage containers via the lxc command, let us create a container. The following syntax can be used as a guide: lxc launch images:[distro]/[version]/[architecture] [your-container-name] We are enlightened enough now and without further ado, let us create a test CentOS 8 and Ubuntu 20.04 containers by running the following commands: $ lxc launch images:centos/8/amd64 cent8 Creating cent8 Retrieving image: Unpack: 100% (4.22GB/s) Starting cent8 Launch Ubuntu container by running: $ lxc launch ubuntu:20.04 ubuntu20
Creating ubuntu20 Starting ubuntu20 Once they have been launched, you can easily list your containers thus: $ lxc list +-------+---------+---------------------+-----------------------------------------------+-----------+-----------+ | NAME | STATE | IPV4 | IPV6 | TYPE | SNAPSHOTS | +-------+---------+---------------------+-----------------------------------------------+-----------+-----------+ | cent8 | RUNNING | 10.80.35.177 (eth0) | fd42:b3a2:efa8:5aa5:216:3eff:fe1d:38c3 (eth0) | CONTAINER | 0 | +-------+---------+---------------------+-----------------------------------------------+-----------+-----------+ You can also Stop, start, restart, delete, as well as check more info of your container like below where is the name of the container as shown in lxc list command. lxc start lxc stop lxc restart lxc delete For example lxc stop ubuntu20 lxc delete ubuntu20 Note that you have to stop a running container before you can delete it. Get info about a container using info command option $ lxc info container ##For example $ lxc info cent8 Sample brilliant output: Name: cent8 Location: none Remote: unix:// Architecture: x86_64 Created: 2020/11/07 11:25 UTC Status: Running Type: container Profiles: default Pid: 2724 Ips: eth0: inet 10.80.35.177 veth975e84ff eth0: inet6 fd42:b3a2:efa8:5aa5:216:3eff:fe1d:38c3 veth975e84ff eth0: inet6 fe80::216:3eff:fe1d:38c3 veth975e84ff lo: inet 127.0.0.1 lo: inet6 ::1 Resources: Processes: 13 Disk usage: root: 737.98MB CPU usage: CPU usage (in seconds): 1 Memory usage: Memory (current): 93.32MB Memory (peak): 98.56MB Network usage: eth0: Bytes received: 3.57kB Bytes sent: 2.22kB Packets received: 30 Packets sent: 22 lo: Bytes received: 0B Bytes sent: 0B Packets received: 0 Packets sent: 0 Step 7: Execute ad hoc commands in containers: Just like the way you can “exec” into a Docker container, you can also run commands inside lxd containers. The syntax is like so. $ lxc exec Examples of executing commands is as follows: $ lxc exec cent8 -- yum -y update CentOS-8 - AppStream 538 kB/s | 5.8 MB 00:11 CentOS-8 - Base 619 kB/s | 2.2 MB 00:03 CentOS-8 - Extras 8.1 kB/s | 8.1 kB 00:01 Dependencies resolved. Nothing to do. Complete! Let us install Apache in the container $ lxc exec cent8 -- yum -y install httpd Last metadata expiration check: 0:00:41 ago on Sat Nov 7 12:56:38 2020. Dependencies resolved. ====================================================================================================================================== Package Architecture Version Repository Size ======================================================================================================================================Installing: httpd x86_64 2.4.37-21.module_el8.2.0+494+1df74eae AppStream 1.7 M Installing dependencies: apr x86_64 1.6.3-9.el8 AppStream 125 k apr-util x86_64 1.6.1-6.el8 AppStream 105 k After installation, we can log into the container, create a sample page, start the web-server and check its status $ lxc exec cent8 -- /bin/bash ##We are now in the container [root@cent8 ~]# systemctl start httpd
[root@cent8 ~]# systemctl status httpd ● httpd.service - The Apache HTTP Server Loaded: loaded (/usr/lib/systemd/system/httpd.service; disabled; vendor preset: disabled) Active: active (running) since Sat 2020-11-07 12:58:09 UTC; 5s ago Docs: man:httpd.service(8) Main PID: 175 (httpd) Status: "Started, listening on: port 80" Tasks: 213 (limit: 11069) Memory: 27.6M CGroup: /system.slice/httpd.service ├─175 /usr/sbin/httpd -DFOREGROUND ├─176 /usr/sbin/httpd -DFOREGROUND ├─177 /usr/sbin/httpd -DFOREGROUND ├─178 /usr/sbin/httpd -DFOREGROUND └─179 /usr/sbin/httpd -DFOREGROUND Create a sample page in the container to be served by Apache for demonstration [root@cent8 ~]# vi /var/www/html/index.html Spoon-Knife About SELinux SELinux gives you the ability to limit the privileges associated with executing processes and reduce the damage that could result from system and applications vulnerabilities exploitation. For this reason, it is recommended to keep SELinux in enforcing mode unless you have a good reason to disable it. Modes The other available mode for running SELinux in enabled state is Permissive. In this mode, SELinux policy is not enforced and access is not denied but denials are logged for actions that would have been denied if running in enforcing mode. Then restart Apache inside the container and exit. [root@cent8 ~]# systemctl restart httpd Step 8: Accessing you applications inside containers externally Well, now that you have deployed your application on a given container (For example, Apache from above command), how exactly will your target audience going to access what you are hosting from outside? You can either use firewall rules or more elegantly, you can deploy a reverse proxy to route traffic to your applications. Using a reverse proxy server such as Nginx Install Nginx web server on your CentOS 8 host system: sudo yum -y install vim nginx Setup Nginx HTTP proxy for the service Create a new configuration file. sudo nano /etc/nginx/conf.d/app1.conf Modify this configuration snippet to fit your setup. Note that Nginx will be listening on port 9090 and then redirect the traffic to the container having Apache running at port 80. ##App1 Upstreams upstream app1 server 10.80.35.177:80; ##Notice the IP of the container here. server listen 9090; server_name app1.computingforgeeks.com; access_log /var/log/nginx/app1_access.log; error_log /var/log/nginx/app1_error.log; # Proxy settings proxy_read_timeout 720s; proxy_connect_timeout 720s; proxy_send_timeout 720s; proxy_set_header X-Forwarded-Host $host; proxy_set_header X-Forwarded-For $proxy_add_x_forwarded_for; proxy_set_header X-Forwarded-Proto $scheme; proxy_set_header X-Real-IP $remote_addr; # Request for root domain location / proxy_redirect off; proxy_pass http://app1; # Gzip gzip_types text/css text/less text/plain text/xml application/xml application/json application/javascript; gzip on; A valid DNS record is required for external (Public) access of your application. Check your configuration syntax: $ sudo nginx -t nginx: the configuration file /etc/nginx/nginx.conf syntax is ok nginx: configuration file /etc/nginx/nginx.conf test is successful If the settings return a positive feedback, restart nginx service. sudo systemctl restart nginx Allow port 9090 on the firewall sudo firewall-cmd --permanent --add-port=9090/tcp sudo firewall-cmd --reload We are now ready to access our application. Open your favorite browser and point it to the FQDN or IP address and port of Nginx proxy we just finished configuring. http://:9090. You should see a page like below. Conclusion We have finally managed to install, manage and administer lxd/lxc containers together with hosting a simple application in one of them.
We hope the guide was as informative as you expected and all worked well for you. To see you on the blog is enough for us to return our appreciation for visiting and for the mad support. Check below for other beautiful guides.
0 notes
Text
Docker Training - IDESTRAININGS
What is Docker?
Docker is an open source containerization stage. It empowers engineers to bundle applications into holders — normalized executable parts joining application source code with the working framework (OS) libraries and conditions expected to run that code in any climate. Holders improve on conveyance of circulated applications, and have become progressively well known as associations shift to cloud-local turn of events and crossover multicloud conditions.
Designers can make holders without Docker, however the stage makes it more straightforward, less difficult, and more secure to fabricate, send and oversee compartments. Docker is basically a tool compartment that empowers designers to construct, convey, run, update, and stop holders utilizing straightforward orders and work-saving mechanization through a solitary API.
Docker additionally alludes to Docker, Inc. (connect lives outside IBM), the organization that sells the business variant of Docker, and to the Docker open source project (interface dwells outside IBM), to which Docker, Inc. what's more, numerous different associations and people contribute.

How compartments work, and for what reason they're so famous
Compartments are made conceivable by process confinement and virtualization capacities incorporated into the Linux piece. These capacities -, for example, control gatherings (Cgroups) for distributing assets among processes, and namespaces for limiting a cycles access or perceivability into different assets or region of the framework - empower numerous application parts to share the assets of a solitary occurrence of the host working framework similarly that a hypervisor empowers various virtual machines (VMs) to share the CPU, memory and different assets of a solitary equipment server.
Thus, holder innovation offers all the usefulness and advantages of VMs - including application separation, practical adaptability, and superfluity - in addition to significant extra benefits:
Lighter weight: Unlike VMs, compartments don't convey the payload of a whole OS occurrence and hypervisor; they incorporate just the OS cycles and conditions important to execute the code. Compartment sizes are estimated in megabytes (versus gigabytes for some VMs), utilize equipment limit, and have quicker startup times.
More noteworthy asset effectiveness: With holders, you can run a few fold the number of duplicates of an application on a similar equipment as you can utilizing VMs. This can lessen your cloud spending.
Further developed designer efficiency: Compared to VMs, holders are quicker and more straightforward to convey, arrangement and restart. This makes them ideal for use in nonstop combination and persistent conveyance (CI/CD) pipelines and a superior fit for improvement groups taking on Agile and DevOps rehearses.
Why use Docker?
Docker is so famous today that "Docker" and "holders" are utilized conversely. In any case, the main holder related advances were accessible for a really long time — even many years (connect dwells outside IBM) — before Docker was delivered to people in general in 2013.
Most outstandingly, in 2008, LinuXContainers (LXC) was executed in the Linux bit, completely empowering virtualization for a solitary occurrence of Linux. While LXC is as yet utilized today, more up to date advances utilizing the Linux part are accessible. Ubuntu, a cutting edge, open-source Linux working framework, likewise gives this capacity.
Docker upgraded the local Linux containerization capacities with advances that empower:
Improved — and consistent — versatility: While LXC holders frequently reference machine-explicit designs, Docker compartments run without alteration across any work area, server farm and cloud climate.
Considerably lighter weight and more granular updates: With LXC, numerous cycles can be joined inside a solitary holder. With Docker holders, just a single cycle can run in every compartment. This makes it conceivable to fabricate an application that can keep running while one of its parts is brought down for an update or fix.
Computerized holder creation: Docker can consequently fabricate a compartment in view of use source code.
Holder forming: Docker can follow renditions of a compartment picture, roll back to past variants, and follow who fabricated a rendition and how. It could in fact transfer just the deltas between a current rendition and another one.
Holder reuse: Existing compartments can be utilized as base pictures — basically like layouts for building new holders.
Shared holder libraries: Developers can get to an open-source vault containing large number of client contributed compartments.
Today Docker containerization additionally works with Microsoft Windows server. Also, most cloud suppliers offer explicit administrations to assist designers with building, boat and run applications containerized with Docker.
0 notes
Text
chromeOS - da kommt was NEUES

Was passiert denn da gerade? Daran arbeitet das chromeOS Entwicklerteam derzeit. Könnte es interessant werden?
Wer sein Chromebook nicht voll ausnutzt und auch keine Programme schreibt oder Linux Anwendungen benötigt dem mag das was da gerade passiert recht egal sein. Dabei ist es eben gerade ein extrem wichtiges Feature Linux Anwendungen auf einem Chromebook nutzen zu können. Ganz extrem wichtig! Persönlich muss ich sagen ohne den Linuxcontainer würde ich nicht ohne einen weiteren PC auskommen können. Also natürlich nutze ich Linux Anwendungen intensiv und betreibe mein Chromebook auch im Beta Kanal. Logisch! Und im Beta landete nun die Version 103.0.5060.22 (Offizieller Build) beta (64-Bit).
Nachdem Update stellt man sofort fest, da ist was neu! Eines der Dinge ist eine neue Vorauswahl für SSH Verbindungen mit entsprechendem Anmeldeverfahren. Auch neu ist das man andieser Stelle nun auf die ganzen Einstellungen zugreifen kann und von dort aus auch den Terminal anpassen kann. Bisher war das zwar auch möglich diese Dinge zu nutzen, doch es gab keinen direkten Einstieg nach dem Öffnen des Terminalfensters wie dies nun der Fall ist.
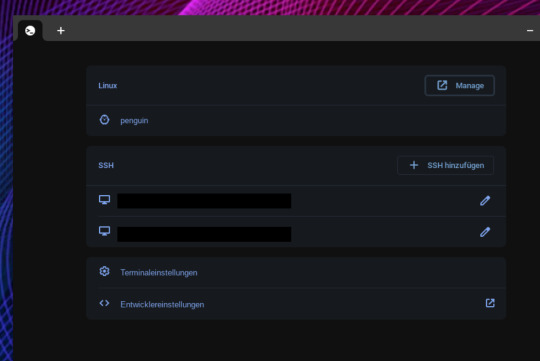
Aber nochetwas fällt auf. Die aktivierten Container werden angezeigt. Der nennt sich standardmäßig penguin. Doch was könnte das bedeuten? Schon eine Weile gibt es Hinweise darauf das man künftig weitere Container erstellen können soll. Das könnte interessant sein um bestimmte Entwicklerthemen seperat zu handhaben oder eben einen Container nutzen zu können um dort Dinge zu machen welche man als experimentell bezeichnen könnte.
Würde man den Container dann einmal löschen müssen wären die anderen Anwendungen im anderen "stabilen" Container weiterhin erhalten. Nur mal so ein Beispiel, wie auch immer man das nutzen möchte. Es zeigt aber vor allem hier wird gearbeitet. Wir dürfen uns also wohl darauf einstellen das an diesem Punkt sich in Kürze einiges Neues ergeben wird.
0 notes
Photo

Linux Container Fedora CoreOS Released For Public Use: Download Now! | MrHacker.Co #coreos #coreoscontainerlinux #fedoraatomichost #fedoracoreos #linuxcontainer #hacker #hacking #cybersecurity #hackers #linux #ethicalhacking #programming #security #mrhacker
0 notes
Text
Basic Linux Commands For Beginners: With Examples
Hello friend, and welcome to the Basic Linux Commands Tutorial For Beginners.
In this post, you are going to learn the fundamentals of Linux command line that will help you do get your hands wet in the Linux world.
With that said I’m also going to make sure not to overwhelm you with unnecessary information or any in-depth working of a command, but at the same time making your understanding clear.
I’ll be showing you the syntax of a command and giving an example with it so that you can try them on your own Linux machine and understand a command better.
This is a complete practical tutorial and you must implement these commands, in order to get hold of it properly.
You can either try these commands on your personal Linux machine or you can just go to linuxcontainers and you will be provided with a free Linux server session where you can practice these basic Linux commands.
READ THE FULL POST: BASIC LINUX COMMANDS FOR BEGINNERS APPEARED FIRST ON HACKINGPRESS
0 notes
Text
LXD as developer isolation
I'm a developer. Loving it. What I hate is all the cruft my machine accumulates over the passing months. Have you ever tried NodeJS? Prepare for megabytes of javascript sprinkled over your system. Android development (or Java in general) is even worse.
Sure there are way of mitigating this problem somewhat. For Ruby you have rvm (or rbenv or ...), for Python there's virtual_env and for Node there's nvm. In my humble opinion these solutions are nothing more than dirty shell hacks. God forbid if anything ever goes wrong. Or if you have to compile native binaries. This all ends in tears.
Long since I've been working my way to developer nirvana. I've created Ansible scripts to provision throwaway VPS's, I've explored the wonderous realm of Chromebook development (there's nothing to screw up!). AndI have really tried to love Docker. The promise is significant. Just spin up a new Docker image and your problems go away!
First of Docker is for production environments where all the experimentation has been done. Second the Dockerfile is terrible. Just some wonky DSL which really is just a shell script. Third starting several services is no fun. Sure there's Compose but who whats all the complexity on you development machine.
LXD
Enter LXD. Which really is an easier LXC. Which really is an easier libvirt. Which really is an easier cgroups. Or so I think.
LXD let's you start Linux containers right on your laptop. Shutting them down won't delete all the changes you've done there. LXD is fast, networking recently became easy and sharing volumes never felt so relaxed. Copying files back and forth is easy too. I'll let you read the docs instead of me explaining everything again here.
One confusing bit; there are two LXC's. The first is the project you find on linuxcontainers.org and the other is the CLI client which ships with LXD. Forget about the first one. You start the daemon lxd with which you interact with the CLI client lxc.
My setup
I have a prj directory with all my source ever which I share in each and every container I spin up.
I edit my code on my host machine and execute the code in the container.
If I mess up I delete the container.
Bliss
Wanna give Alpine Linux a try (you should)? Go for it. Really need that sweet Ubuntu packaged piece of kit? Spin up that container!
I've been using LXD for my experiments in machine learning (Tensorflow) and to follow the excellent Python video tutorials of sentdex. Crystal has it's own container too. And all my clients nowadays are neatly seperated too! Good times.
Downsides
Obviously there are downsides. When doing stuff with hardware I had mediocre success. My Arduino works but adb can't find my Android phone in the container (perhaps fixed in the latest release).
And I image anything non terminal is going to mess things up. IPython works great for me as this just runs on a port. But I doubt Android studio would work (but I don't care since I edit my code on the host).
Hattip
Major props for the main developer of LXD Stéphane Graber. I feel he and his team have made the right design choices with regard to the interface and API, he's also super helpful on his blog and on Twitter. Keep up the absolutely great work.
0 notes
Video
youtube
Cloudezz helps developers to focus on developing code & not on setting up and maintaining servers. Cloudezz supports numerous technologies thus helping you launch your applications in a fast secure & scalable manner. This is done by converting your computing resources into a turn-key private cloud by giving you an option to scale up & scale down within seconds.
0 notes