#m5stickc
Explore tagged Tumblr posts
Visit Tumblr Blog
Explore Tumblr blogs with no restrictions, modern design and the best experience.
Last Seen Tumblr Blogs


Fun Fact
Tumblr has 16.74 million mobile monthly users in the US.
Text
USB-BLE MIDIインターフェイスを作る - 環境構築編
1000円ちょっとでUSB-BLE MIDIインターフェイスを作ってみようという話です。
最近Bluetooth LE(BLE)を使って無線でMIDI信号をやり取りするのが流行ってますね。しかし、WindowsではBLE MIDIの対応があまりよろしくなく、Bluetoothが使えるPCでもBLE MIDIを使うのは難儀な感じです。ということで、いわゆるMIDI端子に接続して無線化するBLE MIDIインターフェイスを買うかな……と思っていたわけですが、そんな折ふとワイヤレスMIDI製品で知られるQUICCO SOUND��通販サイトを見てみたらBluetooth MIDI基板なるものが。
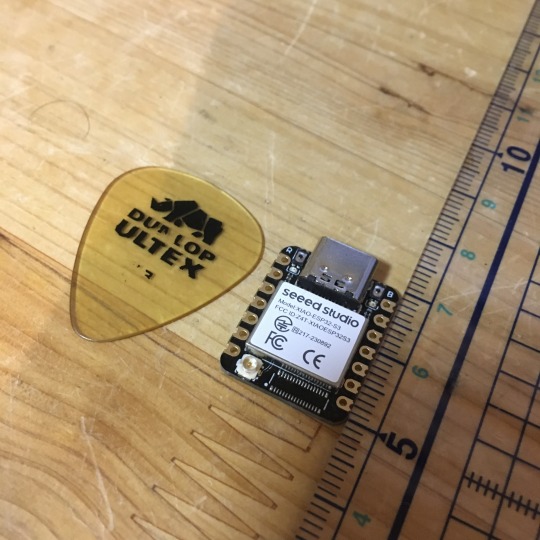
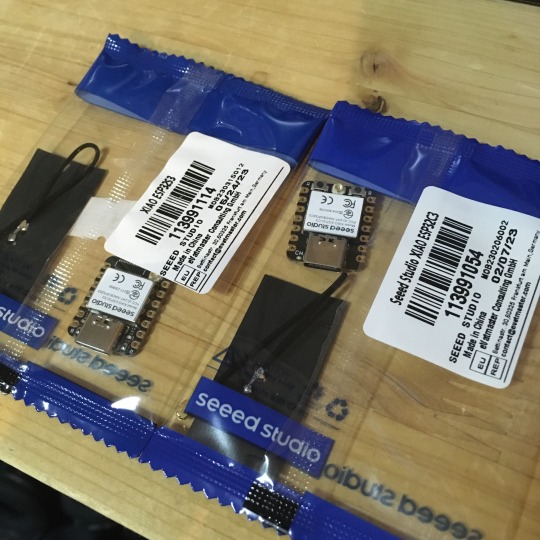
これ、小型IoTボードのSeeed Studio XIAOシリーズに似ているよなあ、XIAOシリーズはBLE対応しているし、USBポートも搭載されているからこれでUSB-BLE MIDIインターフェイスを作れるのでは? と思い立ち、早速秋葉原でボード2種類を買ってきました。
XIAOシリーズには複数の製品ラインアップがあるのですが、そのなかでも安いのが「ESP32C3」というモデル(税込940円)と、「ESP32S3」というモデルです(税込み1,150円)。
軽くネットで調べたところ、どちらも少なくとも公開されているBLE MIDIライブラリには対応しているようでした。また、USB MIDIに関しては、少なくともESP32S3についてはネットでUSB MIDIデバイス化させている記事(「蛇腹楽器型MIDIコントローラーV2 ~ USB MIDIデバイスの作り方」)がありました。
ということで、とりあえずESP32S3で試してみましょう。
開発環境を整備する
Seeed StudioのXIAOシリーズはArduino IDEで開発やプログラム書き込みが行えるのですが、そのためにはArduino IDEに追加のライブラリやボード情報をインストールする必要があります。設定方法はSeeed StudioのWebサイトに詳しく書かれているので、この手順通りボードマネージャURLの追加���行えばOKです。
USB MIDIやBLE MIDIに関しては、Arduino MIDI Libraryと組み合わせて利用できるライブラリが公開されており、これを導入することで簡単に利用できるようになるようです。いくつか選択肢もあるようですが、今回は次の3つを導入しました。いずれもArduino IDEのライブラリマネージャからインストール可能です。
Adafruit TinyUSB Library
Arduino BLE-MIDI Transport
NimBLE-Arduino
動作テスト用コードの実装
まずはこれで本当にUSB MIDIデバイスやBLE MIDIデバイスとして動作するのかを検証するため、MIDIのnote on/note offメッセージだけをやり取りするコードを書いてみます。前出の「蛇腹楽器型MIDIコントローラーV2 ~ USB MIDIデバイスの作り方」や、「NimBLE + BLE MIDIで音を出した」、「M5StickC で、BLE-MIDI ドラム」などを参考に、こんな感じでコードを書いてみました。

やっている処理は
各インターフェイスの初期化
BLE MIDI側で受け取ったnote on/offメッセージをそのままUSB MIDI側に送信
USB MIDI側で受け取ったnote on/offメッセージをそのままBLE MIDI側に送信
の3つだけです。BLE MIDIの接続時にLEDを光らせる部分のコードはそのままコピペしたのですがコンパイルエラーになったのでとりあえずコメントアウトしています。
ビルドと書き込み
ボード設定はこんな感じです。
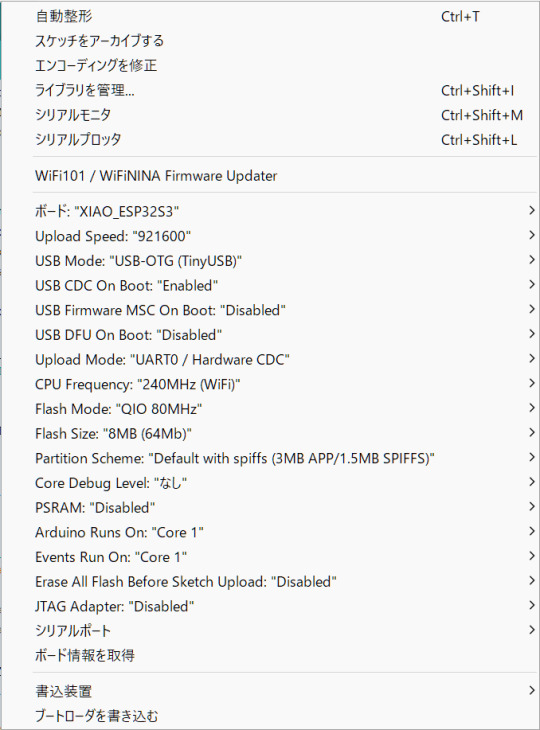
ボードとして「XIAO_ESP32S3」を選択し、それに加えてUSB Modeとして「USB-OTG (TinyUSB)」を選択しておく必要があります。また、色々とライブラリを使用しているためかArduino IDEがOutOfMemoryでフリーズしたので、前回記事で紹介したArduino IDEのメモリ設定の変更も行っています。
書き込み自体はボードをUSBでPCに接続し、シリアルポートを適切に選択して書き込みを実行するだけ行えます。念のため書き込み後はいったんUSBケーブルをポートから取り外して、再度USBポートに差し込んで再起動させています。
動かしてみる
BLE MIDI対応デバイスと言えばiPhoneやiPadですね。ということで、PC上のAbleton LiveからMIDI信号を送ってiPad上のGarageBandを鳴らしてみました。Ableton Liveからは問題なくUSBデバイスとして認識され、またiPadからも問題なくBLE MIDIデバイスとして認識されました。MIDIノートの送信もできています。
ただ、若干発音タイミングがヨレています。このあたりは改善したいところですが、果たしてできるのでしょうか?
(続く)
5 notes
·
View notes
Text
Découverte du Kit Montre M5StickC Plus : Pour les Projets IoT Portables
Le Kit Montre M5StickC Plus transforme la carte de développement M5StickC Plus en un véritable appareil portable. Ce kit inclut un bracelet de montre personnalisable et des accessoires pour explorer des possibilités infinies dans le domaine de l’IoT (Internet des Objets). Ce qui le distingue ? Il ne s’agit pas d’une simple montre intelligente, mais d’une plateforme innovante pour des projets…
0 notes
Text
0 notes
Text
第12回パラダイスコンサートの演出を担当しました
2021年12月26日(日) 、第12回パラダイスコンサートでのプロジェクション・マッピング演出を担当しました。
作業円滑化のため助手1名に手伝ってもらったほか、新たな演出手段にもチャレンジしました。

新しい取り組み
複数人での演出内容検討
指揮者が腕を強く振ると雷光が落ちる演出(加速度センサー使用)
MadMapperをゲームパッドで操作(誤操作防止および演出内容を手動操作するため)
0 notes
Photo

RT @tnkmasayuki: 格安電波時計ノア精密 マグT-692を分解する – Lang-ship 受信モジュールが高かったので部品取りに出来そうなの開けてみました。M5StickCからJJY信号出して時間同期もできました! https://t.co/jx7lb4nYAf
1 note
·
View note
Text
Maker Faire Tokyo 2022に出展しました。
2022年9月3日と4日の2日間、東京ビックサイトで開催されたMaker Faire Tokyo 2022に出展しました。

Maker Faire Tokyo 2022 - コネクト・ミー https://makezine.jp/event/makers-mft2022/m0056/
今年は「マジックネコワンド」を制作しました。この作品は、Maker Faire Tokyo 2020に制作した「BRAIN MAGIC NYAN」の改良版になります。
前回の作品は、脳波を読み取るセンサーデバイスである米Emotiv社の「EMOTIV Insight」を使用したのですが3点課題がありました。
1)脳波センサーデバイスは操作が難しいので展示会向きでない 「EMOTIV Insight」は、脳波(EEG)を読み取るためにセンサー付きデバイス器具を頭部に装着し、利用者毎に脳波を測定してキャリブレーションの設定をして、さらに脳波コントロールするための機械学習の設定が必要になります。設定後の脳波を使ったデバイス操作もコツが必要で慣れるには時間がかかります(私も試しましたが、どうにか1つコマンドを動かせるくらい)。脳波センサーデバイス自体は非常に面白いのですが、来場者がすぐに体験して楽しんでもらうのは難しいデバイスでした。
2)コロナ渦では、身体に密着したデバイスの体験は難しい 前回の開催月である2020年10月は、コロナが収束しつつある谷間の時期でした。なので、どうにかオフライン開催はできましたが、展示品を触るという行為は自粛になってました。よって来場者が頭に装着して体験することはできず、作品展示と制作者によるデモンストレーションのみとなりました。2022年も不明瞭な状況でしたので、仮に体験できる場合でも、できるだけ機器への接触が少ない作品を��作する必要がありました。
3) 2.4GHz帯のBLEは展示会場では使い物にならない こちらは以前からも変わらない課題ですが、展示会場は電波が混線して、特に2.4GHz帯を使用する無線通信はほぼ使えません。それを見越して「EMOTIV Insight」を有線通信できるようなオプションの装置を購入したのですが、装置のファームウエア不良で使用できずデモンストレーションもままならない状態でした。
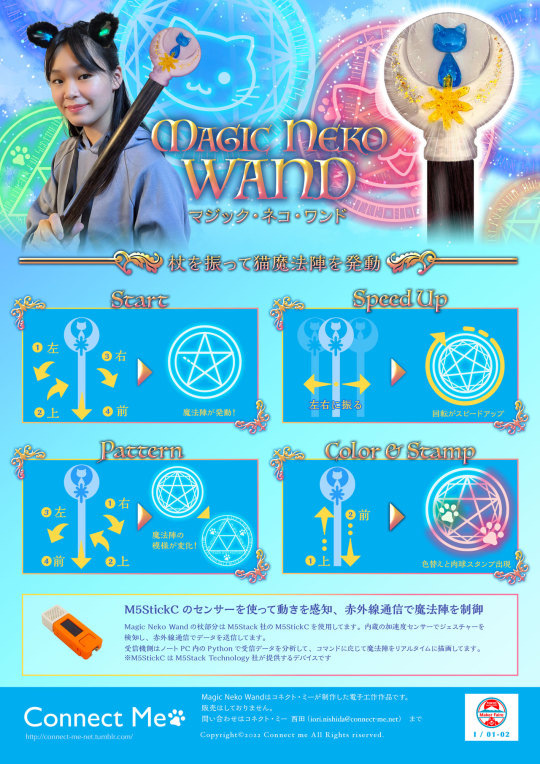
今回制作した「マジックネコワンド」の仕組みはこちら。
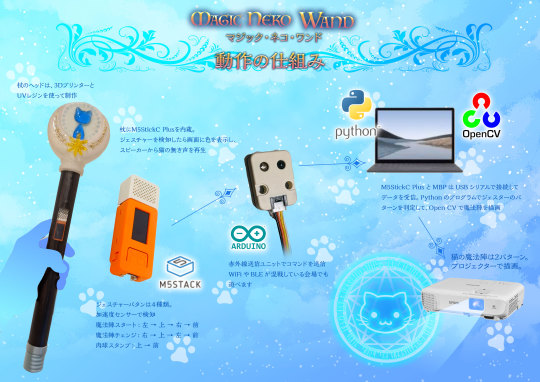
マジックネコワンドの杖の中には、M5Stack社の「M5StickC Plus」を内蔵し、加速度センサーと赤外線センサーを使用しました。加速度センサーで杖の傾きを検知し、傾きの順番をコマンドとして認識します(例:←↑→)。コマンドを認識すると赤外線でコマンドが送信されるので、赤外線の受信機側でコマンドを受信、PCを経由してプロジェクターで魔法陣を描画する。というシンプルな仕組みです。赤外線通信を採用することで会場内の通信環境に影響することなく遠隔操作を可能にできました。また杖の頭部はオリジナルのデザインです。オリジナルデザインを3Dプリンタで造形し、レジンを使ってデコレーションしました。
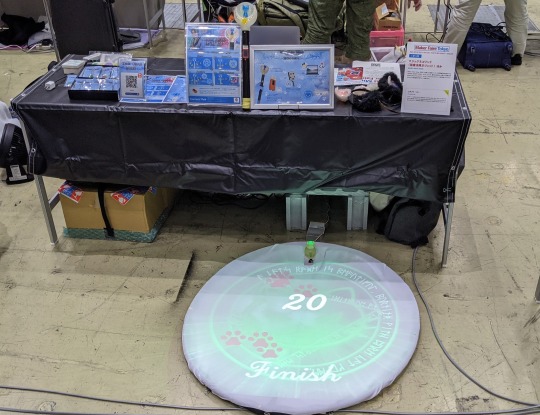
会場での展示風景はこんな感じです。

持っている杖が「マジックネコワンド」。子どもでも持てるくらいのサイズと重さです。写真のようにスクリーンの近くで杖を振ると魔法陣が描画されます。

今回の作品は、多くの子どもたちに楽しんでもらえました。夢中になって杖を振ったり、勢い余って壊したり笑。遊んだあとに「あれが欲しかったー」と言ってくれたり、自分のお小遣いでアクセサリーを買おうとしてくれたり(お父さんが買ってくれた)、あげたシールを自分のケータイの裏に貼って見せにきてくれたり、みていると溜まった疲れが癒やされました。大学生っぽい若い青年や、おじさん達、他メイカーの方とも仕組みについて談議や昔の苦労話も聞けて、我々も楽しむことができました。

レジンを使用したアクセサリーも制作して物販もしました。こちらも子どもたちが保護者の方にねだって買っていただきました(笑)。ありがとうございます。

2022年もコロナ禍で開催が難しい状況のなか、こういう場を提供し続けてくれる運営の皆さまには本当に感謝。メイカーのコミュニティってやっぱり楽しいですね。という事で、今年も無事に終了。ご来場ありがとうございました! 次回のネタはこれから。またお逢いしましょう。
コネクト・ミー Maker Faire Tokyo 2022 出展メンバー: Iori Nishida, Futoshi Iwasebari, Akira Ito, Mika Hoshino
0 notes
Text
Will guide you to how to use a Wappsto IoT Cloud and to build your first project with Wappsto. Things used in this project Hardware componentsM5Stack M5StickC ESP32-PICO Mini IoT Development Board×1Arduino 101×1Software apps and online servicesArduino IDEwappsto Story Introduction: Here are some information about Wappsto, this information was taken from (https://wappsto.seluxit.com/about/) What is Wappsto? Wappsto is a web app store where you can share and, in the future, even sell your data and buy my data. But why would I want to buy and sell data? Data is the key to enriching my personal smart life. If, for example, my neighbor already has a weather station, I can save myself the trouble and buy his data. Okay, so why would I want my neighbor’s data? For example, with weather data, I could better control my floor heating. But how do I put the data to use? Wappsto! Wappsto is the AppStore that Steve Jobs might have dreamt of as a web app store. No SDK, just web standards. Wappsto where data exchange between you and me is improving our smart life. It is a sophisticated way to get your smart things and services to work together. Inspired by the AppStore, Wappsto is a web app store where you can find web apps to automate the stuff in your life. We call them ‘wapps’. Wappsto is also a web-based tool to create and run wapps. Wappsto brings together the capabilities of talented developers with the highly personalized needs of individual end-users. Because developers create programs with javascript, they have powerful flexibility, enabling end-users to tackle even the most challenging automation tasks with ease. Wappsto’s Mission We created Wappsto in response to recurring high-level challenges that we were facing when developing solutions for our customers within the Internet of Things (IoT). Our customers wanted to automate the interaction of their devices, but their customers also wanted to include third-party things and services in their automation. The desired automation was often complex, but they wanted flexible configurations in a straightforward user interface. We realized that there is no one-size-fits-all solution for these problems, so we developed a software framework to make creating these personalized solutions easier. Wappsto’s Vision Many hands make light work. We want to share the framework that we created with as many as possible because if we help individuals realize their own highly personalized ideas for combining things and services, there’s a lot of work to be done. But we have to work smart. We’ve taken our inspiration from the AppStore because a market is optimal to generate and capture value. All market participants stand to gain value. By employing a proven unified data model, Wappsto can represent any service or device of any producer. Wappsto is democratizing the process of integrating services and IoT devices. The more developers work together; the more powerful the platform will become. As it grows, more creative combinations are possible, and more end-users attract more developers in a positive cycle. So, I think now you guys have some understanding of Wappsto and it's services, now we are moving into a simple project that explains how we can use Wappsto into our IoT solutions?. Step-1 : Setting up Wappsto Cloud Service First you have to set up your Wappsto Cloud acount to use the Wappsto. Just type https://wappsto.com/ in your browser. Now we are in the Cloud Portal of Wappsto. Simply create a new account with your information or email ID, then click on login. After the login, you can see the home page of our dashboard. First we have to add our IoT devices to the Wappstro, and then we can visualize the data by charts and widgets. Wappstro uses certificates in order to communicate with cloud service, also you can use multiple mode of communication example (python, Arduino). We can generate the ce
rtificates by two modes, one is by using python script and another one is using the web certification method. In this demo, I'm going to show you the second way of generating the certification. Navigate to store tab in the Wappsto dashboard, and you can see the IoT certification manager, click on that and install that. Once you installed the certification, click on open, and it will direct to the certification page. Here you can see two types of certification, select the Arduino certification and just click on download. Once you downloaded the certification, click on the WappstoIoT for Arduino. It will redirect you to the GitHub page of Wappsto IoT, This repo includes the Arduino example source codes. Download this entire repo, we have to add this in our Arduino library. Step-2 : Setting up Arduino IDE Next, open up the Arduino IDE then goto Sketch→Include Library→Add Zip and select the downloaded the GitHub repo. Once you added the library, then open the File→example→Library Example. Select the Wappsto, and generic Temperature example. First, we have to add our certificate in this code for that save as this example in another name and location. Add the downloaded certification file into that project folder. Next, close your Arduino IDE and open up again. Now you can see the certification file added into the project. Now change the Wi-Fi SSID and Password in the project file. Then just compile the project. Once compilation successful, then upload to your ESP32 board. In this tutorial we are going to use M5Stick C, it's made upon esp32 core. Select correct board and com port, then click on upload. After upload, open up the serial monitor and see for the results, wait to complete the connection. Step-3 : Setting up Wappsto Cloud Dashboard Next move on to the Wappsto dashboard and navigate to the devices, there you can see our ESP32. Next, add widget, and select for the chart type. Then select the device data variable. Here is Temperature. Next move on to the chart customization and make as per your wish. Now you can see your data in the dashboard. Conclusion: In this tutorial I have shown how to use Wappsto and how to build your first project with Wappsto, Next will show how to build a GPS tracker based on ESP32 and Wappsto.
0 notes
Photo

ポーラミュージアムアネックス 菅野創『かぞくっち』 M5StickCを使って動く謎生命体がかわいい。 ブロックチェーンで家族関係が記録されていくみたい。 https://t.co/2e7uF7EMLI yskmjp さんのツイートから
0 notes
Quote
こんな情報を見つけたよ 洗濯物の乾き具合を知りたくて、M5StickCで物干し部屋の湿度を測って Azure IoT Central で分かるようにしてみた https://t.co/ZWtP9E1qwh — 壊れbot 2号 (@broken_bot_2) Sep 27, 2021 September 28, 2021 at 03:05AM
https://twitter.com/broken_bot_2/status/1442551065354846210
0 notes
Text
SIGMUS 132 に参加しました
2021年9月16日(木)、情報処理学会 第132回音楽情報科学研究発表会 での一般発表に参加しました。
発表タイトル: 3軸加速度データを用いた指揮法の評価手法の開発

紹介したシステムのデモ

使用した3軸加速度センサー(M5StickC)
0 notes
Text
参考まで。🐶 パルスオキシメーターを自作しよう——スイッチサイエンス「M5StickC 心拍センサ Hat」発売 | fabcross https://t.co/hIP3oZlpO5
参考まで。🐶 パルスオキシメーターを自作しよう——スイッチサイエンス「M5StickC 心拍センサ Hat」発売 | fabcross https://t.co/hIP3oZlpO5
— ua5aw98z (@ua5aw98z) Aug 24, 2021
August 25, 2021 at 06:15AM
0 notes
Text
A simple IoT based Temperature monitoring system using M5Stick C and Qubitro IOT platform. Things used in this project Hardware componentsM5Stack M5StickC ESP32-PICO Mini IoT Development Board×1DFRobot Gravity: Analog LM35 Temperature Sensor For Arduino×1Software apps and online servicesArduino IDEQubitro Story Introduction: In my last project, I demonstrated how to get started with the Qubitro IoT platform using the M5Stick C microcontroller; in this project, I'll show you how to send real-time temperature data to Qubitro. What is need ? an active Qubitro account, an ESP32 board (I'm using the M5Stick C), an LM35 temperature sensor, and the Arduino IDE for programming Let's Start Please go there and watch my last project if you haven't already. I'll skip the Qubitro setup because I'm assuming you've already seen my previous project. Let's start with the Arduino IDE, where I've written few lines of code to retrieve the data from the LM35 and send it to Qubitro. I connected the data pin of the LM35 to pin 33 of the M5Stick and performed some analogue to digital conversion calculations. Sum = 0; for (int k = 1; k
0 notes
Link
This is without watch accessories,If you like with watch accessories >>>with watch accessories: Click here to BUY<<< >>>More M5Stack Item: Click here to open<<< Description: M5Stick is a ...
0 notes
Text
M5StickC ESP32 PICO Color LCD Mini IoT Development Board Finger Computer
M5StickC ESP32 PICO Color LCD Mini IoT Development Board Finger Computer
The Latest Upgraded Version : Click to buy 1720510 This is without watch accessories,If you like with watch accessories >>>with watch accessories: Click here to BUY<<< >>>More M5Stack Item: Click here to open<<< Description: M5Stick is a mini M5Stack, powered by ESP32. It is a portable, easy-to-use, open source, IoT development board. What it can do? This tiny block is able to realize your…

View On WordPress
0 notes
Link
👍 💥 M5Stack M5StickC PLUS ESP32-PICO Mini IoT Development Board Kit 💰 18.99$ anzichè ✖29.22$ 💫 35% di sconto 🔗 https://it.banggood.com/custlink/KGGyFNa5Ty ⏰ scade il 31 dicembre https://www.couponsofferte.it/offerta/M5Stack-M5StickC-PLUS-ESP32-PICO-Mini-IoT-Development-Board-Kit/14976
0 notes
Text
M5StickC/ATOM on MacOS Catalina can't upload/ ESP32: Timed out waiting for packet header solution | M5Stack Community [はてなブックマーク]

M5StickC/ATOM on MacOS Catalina can't upload/ ESP32: Timed out waiting for packet header solution | M5Stack Community
@m5stack Sorry ... Extremely new with a M5StickC. Having issues trying to connect M5StickC to UIFlow. I think this is the issue I am having , since I have MacOS (Catalina), downloaded Solution2 file, not familiar with terminal commands. I can't make this file to run... help File - Get Info -Shari...


from kjw_junichiのはてなブックマーク https://ift.tt/3iFs7S2
0 notes