#maccall patterns
Text

McCall's PATTERNS: Krimmer Effectively Trims a New Russian Suit. White a Smart Frock Shows an Attractive Combination of Plaid Taffeta and Serge. McCall's magazine, November 1915.
#illustration#1915#fashion illustration#maccall#maccall patterns#pattern#dress pattern#1910s pattern#art nouveau#Russian suit#1910s#art#suit#frock#mccalls magazine#american#American fashion#women's magazine#november#november issue#krimmer#1910s fashion#winter#winter fashion#fashion history#history of fashion#historical clothing#historical fashion#19th century fashion#mccall's magazine
72 notes
·
View notes
Photo
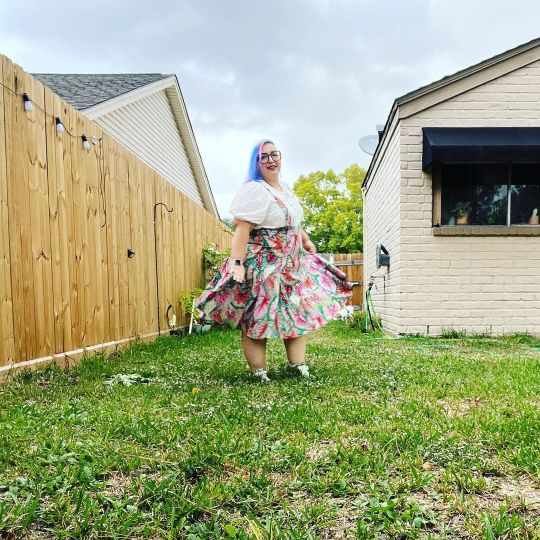
I didn’t manage any selfies at the show today but this was todaysQuilt Fest outfit. It’s a @mccallpatterncompany pattern with @freespiritfabrics Kaffe Fassett fabric. #kaffefassett #maccalls #maccallspatterns #m7184 #mccalls7184 #freespiritfabrics #memade #imakemyownclothes #sewing #sewistofinstagram (at Houston, Texas) https://www.instagram.com/p/CkjpIwFuEME/?igshid=NGJjMDIxMWI=
#kaffefassett#maccalls#maccallspatterns#m7184#mccalls7184#freespiritfabrics#memade#imakemyownclothes#sewing#sewistofinstagram
0 notes
Text
Weiss Schnee Sweetheart Neckline Dress
Materials/ tools needed:
Pattern: Maccall’s M7321
Fabric: I used was Navy Blue Lycra and a metallic silver that was a cotton mix (not to sure about the fabric typing for the silver one)
Fabric hardener: the hardener can be a light to medium stiffness
Boning: you can use plastic or metal boning, whatever one you will like to use. I did plastic boning.
Thread within the same colours of the navy blue and silver used.
Fabric paint: I used two small white fabric paint bottles for this project alone.
ZIpper within the length you want and the same colour as the dress.
Tools you will need: Sewing machine, pins for the fabric, the pattern listed, iron and ironing board and lastly a measuring tape.
Tutorial:
Sometimes I have a hard time being these blog tutorials. I sometimes don’t know what to say at first to get anyone interested and excited to do these projects. Well, I guess i’ll try this, let’s get comfortable and set up our craft space with a hot or cold drink I prefer a cup of tea with some music or youtube video playing while I’m doing projects to help me focus than time for the working part to this cosplay.
The whole long and tedious task of cutting out the pattern for the cosplay, pulling out the pattern pieces that come on long pages of like wax tissue paper which can rip easier than I would want it to. Please don’t rush cutting out the pattern pieces within the right size for you, if you are not sure about where to measurement yourself, there are all measurements are put on the back of the pattern paper bag thing that it comes in which can help you know what measurements it says for what part of the body the pattern piece is for.
While I am cutting out the pattern, I will have all the fabrics washing to see if any of the fabrics will shrink or become discoloured in any way. More than half the time, washing and drying the fabric takes less time than cutting out all the pieces of the patterns.
Once all of that stuff is done, you can start pinning the pattern pieces to the fabric making sure to follow if it needs to be on a folded line or instructions paper tells you to do but to be honest, I don’t follow the cutting guideline it gives me because I am a rebel. Which we are on the topic of cutting fabric, I forget if it says to cut four each piece that is for the top of the dress. You will need to sew two tops of the dress one for the boning that will not need the fabric hardener and the other one in the fabric hardener on the side of the fabric which will not be showing when it is being worn.
Now, we can setup up our machines to do the next part to this project which is putting pieces together to start the progress of cosplay making. If you have a serger machine, you can use that to finish the ends of your freshly cut fabric edging which can help prevent fraying in the long run. Just a side note, I cut two and a half pieces of the skirt pattern to make sure I had enough skirt which I will need to pleat in a little bit.
Once finished sewing both tops for the dress, take the one which doesn’t have the fabric hardener and add the boning to wrong side of the fabric ( wrong side of the fabric is the side which will not be showing when you are wearing it).
Boning is attracted and ready for the next step which can be a bit of annoying. Take the top part with the boning and the top part with fabric hardener and face the right sides together and pin them. Than sew 5/8s at the top to join those two pieces together, than once they are attracted, flip the whole piece to where you can see the right sides of the pattern. Please make sure to iron this part of the project to get a beautiful and crisp line before sewing along the top to prevent the top from flipping back to the wrong side and to keep the crisp line at the top of the sweetheart neckline.
Now, I started on the skirt part. I first pinned all the skirt pieces together and sewed them then took this long piece of fabric to the ironing board and got all the seam lines nice and crisp which helps in seeing how long this part is. Almost looks like a long blanket but for a little dog or baby maybe.
Time to get the puffy skirt going. It took me a bit to figure out how I was going to achieve this part. Weiss’s dress is a bit of a pain in the butt because it looks like a circle skirt with volume and pleating in a way. So I tried a few different ways and I went with a box pleat to get the volume and pleating look that I wanted. To be honest, you could do this a few different ways but I just the way it looked. Each box pleat I did at 1 inch to 1 ½ inches in length, pin and sew the top off the length of the fabric than iron the pleated top.
Now attract the dress top to the skirt, than add the zipper in the back of the almost completed dress. Please make sure to use the zipper foot on your sewing machine, it will make your life easier.
Since this dress is almost done, you can try it on to see how it fits and the length you want skirt to be at. Also make sure you try it on with a tulle petticoat or a petticoat that you are planning on wearing with it before you finish the bottom. Pin where you want it to be at for length than cut whatever fabric is not going to be used and fold the end before sewing and completing this part.
Now last things we will need to do to get this project will be add the silver fabric to the top of the sweetheart neckline which is a detail that weiss’s dress has. When you have added the silver fabric please iron the band which will make it look better and whitening up the bottom of the dress for an ombre look to it.
The fabric painting will take a while, take it slow, do not rush this part at all. With fabric paint, you can water down a bit to have more control over the amount of white is added to the bottom. Tools that I used for this part is a fabric paint brush and a little cup of the mixed white fabric paint and a little bit of water. I measurements the length of what I wanted to do the ombre to start up the dress than I was able to do the first layer of the fabric paint on, wait for it to dye, this might take two hours or I left it for a day than added another layer. Once you like it, use the rit fabric dye fixative to protect your work with the ombre.
Lastly, you can add sparkling gems and white ribbon under the bottom of the dress. This part is up to you, in other words you are now done!
Thank you so much for your time and I hope this tutorial helped you with your cosplay or future projects that you are wanting to do. Until next time!
Kimeyos.
#rwby#weissschnee#dress#cosplay tutorial#cosplay#cosplayers#roosterteeth#diy projects#diy ideas#my art#my life
12 notes
·
View notes
Text
Fabric Sweater Vest
Hey everyone! Hope your cosplay making us doing amazing!!! This tutorial is hopefully not going to be too long but full of juice details that you will need to complete this project!
Before I get started with this tutorial, you can use this pattern for more than just a sweater vest look alike. I don’t know how to knit or anything in that specific area of crafts.
Tools you will need:
MacCall’s Pattern #M6964
Fabric (whatever colour you will need for the cosplay, I picked a cotton blend fabric for mine)
Fabric scissors
Measuring tape
Fabric pins
Sewing Machine
Serger (if you have one, not needed though)
Tutorial Time!
I normally wash all my fabrics before I start cutting them or laying out my patterns just in case of shrieking or stretching within the fabric itself. This can depend on that fabric type you have chosen.
Cut out the pattern pieces from pattern you got. I mark down what piece I will need to complete this project. I used the pattern A for this.
Lay out your pattern on the fabric on a table or where ever you have been cutting your fabrics out on. Please remember to lay the pattern out close ish together but not too close. This is so you can still cut the pattern out but have enough fabric left out in case of a mistake or anything you are wanting to add later on.
Cut out the pattern, make sure to remove all the pins you used. It’s a pain in the butt if you forgive one pin in than get stabbed later on with that lonely one.
Now just follow the instructions from the pattern.
Once done. Go over your finished shirt to clean up any threads that you might have forgotten to clean up.
Congratz! You have now finished your lookalike fabric sweater vest. I hope my tutorials help all you amazing cosplay people out there. Also more tutorials will be on there way. See you all next time!
Kimeyos
#cosplay#cosplay tutorial#tutorial#sweater vest#fabric sweater vest#vest#Maka Albarn#maka albarn cosplay#soul eater#soul eater cosplay#my cosplay life#cosplay is for everyone#cosplay help#everything cosplay
2 notes
·
View notes
Last Seen Blogs


minervamagicka
just another day in paradise.


mature-charm
Mature Charm

kraciasta
oh to be a nobleman in 17th century Poland