#might just start making these photosets instead of gifs
Text
Photoshopping/giffing tips and tricks pt. 2
[in addition to this post i previously made]. Before we start, I want to say that i’m no expert in any way, and everyone should work in ways they're most comfortable with, i just want to share some knowledge i collected over the years with everyone who might find it useful and maybe improve their skills in making content. So, let’s get started! WARNING: IMAGE/GIF HEAVY!
Save workspaces. You can have multiple workspaces for different needs. For example, i’m making gifs more often, but sometimes i make edits as well, so having to switch the timeline panel off when it gets in a way, then go back to the view menu, then bringing it back again... idk, call me lazy, but it seems like a few extra clicks for me 💀 What you can do instead is save your current workspace and easily switch between them any time you want. To do that, align all your tools and menus as you want, then find this icon at the top right corner

Scroll down to New Workspace, and this window will pop up


Name your workspace however you want, and chose what you want to save. You can save keyboard shortcuts, menus and tools. When you click save and change your layout, nothing will happen. That is because you need to reset your Essentials workspace first (the one that’s usually the default). Now when you switch between your workspaces (if you saved multiple) everything should work as expected
How to change the speed of gif without converting to frame animation (PS 2021 and above). THANK GOD Adobe fixed the glitch where the frame rate gets all messed up when you switch to video timeline, so i would suggest upgrading whatever version of PS you currently have if you can, working with timeline is MUCH easier in my opinion. To change the speed, after you imported the video (photoshop reads only .mp4’s btw, so be sure to check if you have the correct format), click the little play button

and type in whatever number you want: 25% — the lowest value, but you can also speed the gif up by entering a number higher than 100%. Remember to do that BEFORE you convert your gif to a smart object (& before resizing it, bc after applying the changes video automatically converts into a smart object), because once you convert it, the speed can’t be changed without going back a few steps). When you slow a gif down, photoshop “eats” some parts of it (usually towards the end), so you need to extend the gif by dragging it to the right until you reach the end of your scene to fix that
Normal speed

Slowed down to 60%. Sometimes slowed down gifs may look choppy, i explained the trick on how to fix it in pt. 1 (click the first link in the post).

Use plugins. There are so many great ones! For example, i found this plugin called Better Grids: it creates grids and converts them into shapes or frames AUTOMATICALLY based on the numbers you set within the plugin. It’s a lifesaver for me when it comes to photosets! DL (Google drive. M1 Mac users: for the plugin to work, you need to run Photoshop under Rosetta mode first. To do that, right-click the app, go to get Info and check Open using Rosetta if you have that option available)
If your disk space allows, do not convert media. It’s time consuming, messes up the original quality, and usually extremely hard on processors, especially not very powerful ones. Instead, just change the container to open your file in photoshop, It’s faster & less power consuming. I use Subler (mac) and Avidemux (mac & windows) to change the container to mp4, bc for me it’s the simplest ones to use
Handy thansform tool trick. When you try to fit your image into a certain sized canvas, this is probably what you’ll caught yourself doing
there's actually a much faster and easier way to resize stuff. when you activate transform tool, you'll see these boxes with numbers in the top panel
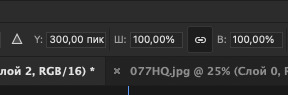
watch what happens when i change one of the numbers

isn't that neat? (make sure that little chain button is checked to mantain proportions. x and y values are for stretching the image horizontally or vertically)
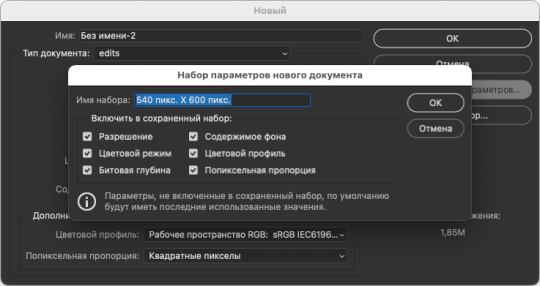
Save document presets. In new document window, type in your desired dimmensions, then click "Save Preset", choose which options you want to save, name it however you want, click ok and you're done — congrats, now you have a saved canvas preset for further use!
So, i hope these little tips were useful. Have fun creating guys 🌸
43 notes
·
View notes
Note
how do you make gifs?
Hi anon, I don’t really know how to explain it on text and I don’t have much time to do a video, so I did a “quick” tutorial and I found a few resources that can be helpful and if you have questions about one specific step or if you’re struggling with certain settings, please come back and I will help you.
Here’s my little tutorial on this gif:

So these are the things you have to take into consideration when making gifs:
Download the video you want to gif: For this you have several options, personally I recommend using 4K Video Downloader, this is a program you need to install in your computer and you can download videos from several sites (including YouTube). Once you install it, you just need to copy and paste the link of your video and the program will give you options regarding the quality of the video, I recommend getting the best quality possible and mp4 format.
Make the gif: Once you have your video saved on your computer you need to follow these steps in order to make your gif
1. Import the frames: Open Photoshop and select File > Import > Video frames to layers. You will need to select your video and a window like this will pop:

2. Select “Selected range only” + Limit To Every 2 Frames, then with the arrows in the player, select the section of the video you want to gif. Once you do that, you will get something similar to this:

3. Now you have to do several things, this is my order:
I first review in the timeline section that all the imported frames are the ones I want to use, if not, you can delete them, just make sure you delete them in the layers section as well.
Then I select the dimensions I want my gif to be, you can find a guide to tumblr photoset dimensions here. Make sure you cut and resize your gif correctly.
Now I set my frame delay. I do that by selecting all my frames in the timeline section and clicking right on the time section marked in yellow, I usually select Other > and set the time to 0.09 seconds. It really depends on the gif but that’s my to go frame delay


4. Now, with all your frames selected click on the three lines at the right of the timeline and select Convert to Video Timeline, like it’s showed in the next image:

5. Once you have your Video Timeline created we will make sure that your timeline needs to be placed at the begging of the gif, you do that by clicking the arrow marked in red

6. Now go to you layers and select them all, then go to Filter > Convert for Smart Filters, you will notice that now you only have one layer instead of several layers, this is because we mixed all our layers together so it’s easier to color and edit the gif.
You now have your gif ready and you can save it like that if you want, the next step is optional but I find it the most important since this will improve the quality and originality of your gif
Sharpening and coloring:
Let’s start by sharpening, and here we have a few options. If your just starting making gifs you can just download a sharpening action and load it into your photoshop. You can find some on tumblr. You just need to select your layer, make a copy and apply the action to that copy, you can even play with the opacity of your layer so the effect is more or less visibile.
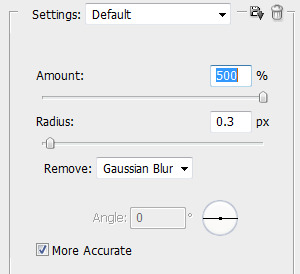
If you don’t want to use a sharpening action, you can make a copy of your layer and apply a sharpen filter. So, select your layer, go to the menu and select Filter > Sharpen > Smart Sharpen and my usual settings are these, but they really depend on the gif and the quality of the video

Finally we do some coloring and if you’re just starting making gifs I will suggest go and look for some PSDs on tumblr or deviant art, you download those that might work with your gif. You can even play with the levels and some other settings and maybe you will start making your own PSDs. I’m not the best at coloring, that’s why I recommend you look for some tutorials here or on YouTube.
Saving your gif
Go to File > Export > Save for Web (Legacy), these are the setting I use for all my gifs:

I’m using my own PSDs for this gif and this is the final result. Remember that the maximum gif size on tumblr is 3 MB, don’t exceed that.
I really hope this was useful for you, don’t hesitate to reach out if you have other doubts
95 notes
·
View notes
Photo
i’ve been receiving a few messages asking if i had any tips and tricks for making hd/crisp looking gifs, so i thought i’d do a mini tutorial of sorts.
this isn’t a tutorial on the process of making gifs themselves and requires basic gif making knowledge. these are just tips n tricks on how to make your gifs look better, i guess?
tip 1: find the highest quality download that you can.
if a show is airing currently, wait until whatever site you use to download shows uploads a webrip version. 720p hdtv versions might be 720p, so you'd assume that's hd, but they are not the highest quality format. 1080p webrips are the absolute best format when it comes to shows that are airing at the moment. if you don't have enough disk space, download 720p webrips instead.
for comparison:
720p hdtv:
1080p webrip:
if a show has finished and has been released on bluray, download the bluray version. these files can often be very large in size, but you should be able to find versions that aren't so large. i tend to ignore bluray downloads that are too large, and opt for the smaller ones. i prefer 1080p bluray downloads, but 720p bluray is fine.
as always, if possible, support the shows you love by buying them on dvd or watching them live when they air.
tip 2: capture every frame and set it to a fluid speed.
when looking at some gifs, i find that they are often jittery with obviously missing frames. i'm guilty of removing frames myself when a gif is being niggly and just won't work, but it always looks better when you capture every frame.
i used to use kmplayer, but now i use potplayer to capture and my settings look like this:
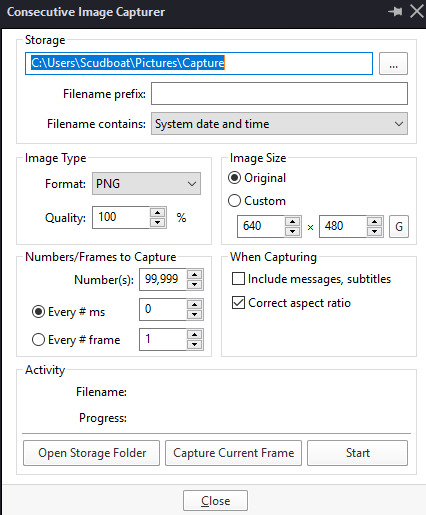
this way, you will capture every frame and your gifs will look more fluid.
for comparison:
a gif where i captured every second frame:
a gif where i captured every frame:
when it comes to speed, i find that 0.05 is the best speed for frames. anything lower than that is way too fast, in my opinion, and anything higher than 0.07 is too slow.
on my newer gifs, i tend to use 0.06 because i find it works better with less frames and wider/taller gifs.
for comparison:
0.02 speed:

0.05 speed:

0.09 speed:

tip 3: experiment with colouring.
there are a lot of colouring tutorials on tumblr and across the web, as well as psds you can use as a guide.
there is no 'right' way to colour, really, but i personally prefer more vibrant, brighter gifs, but not so vibrant and bright that it hurts your eyes or characters look too heavily contrasted and you get a sort of white and pixelated, almost featureless face.
i prefer warmer gifs and often add a LOT of red in a colour balance layer to my gifs. i also nearly always add a selective colour layer and darken the blacks.
i do not like the trend of pale, pastel psds, especially when used on characters of colour, as i feel it whitewashes their skintone and makes them look sick. it IS possible to do pastel colouring without whitewashing, though. if you go through the poc psd tag, there are a lot of options there.
it really is about teaching yourself, though. i started gifing six or seven years ago, and over the years my style has changed and improved.
here are some psds that i have made.
tip 4: sharpen and save for web settings.
here are my sharpen settings:
here are my save for web settings:

sometimes i change the web settings if a gif is too large and i don't want to change the colouring/amount of frames to make it smaller. i use diffusion more often than not, but on particularly grainy scenes, i find noise works better.
for example, on my darlene gif here, i used noise because of the grain of the dark scene.
also, the version of photoshop you use doesn't really matter, tbh. i use cs5 and that's considered kind of old, i guess? i dislike the newer versions.
remember to keep your gifs under 3mb!
tip 5. use correct dimensions!
it took me a while to grow out of the old tumblr format of 500px wide gifs, mainly because most themes had 500px wide posts, but there are many themes now that have 540px wide options.
the theme i'm using at the moment allows 500px wide and 540px wide photosets to be displayed correctly, so old photosets will show up fine, but i tend to avoid reblogging 500px wide gifs now.
540px wide looks better on the tumblr desktop as well on themes now.
if your theme doesn't support 540px, you can always enable it to do so using this code.
- - -
that's basically it for this 'tutorial'. if you have any questions, feel free to drop me an ask and i'll see if i can help you out!
627 notes
·
View notes
Last Seen Blogs

tokitounyaa
Toki

d-a-holley
D. A. Holley

x-wings
test
bettafishblr
fish are friends

vejuhadudo
Untitled