#mongodb command line
Explore tagged Tumblr posts
Visit Tumblr Blog
Explore Tumblr blogs with no restrictions, modern design and the best experience.
Last Seen Tumblr Blogs


Fun Fact
The most popular pages on Tumblr are about Minecraft, GIFs, and David J. Peterson.
Text
The Ultimate Guide to Developing a Multi-Service App Like Gojek

In today's digital-first world, convenience drives consumer behavior. The rise of multi-service platforms like Gojek has revolutionized the way people access everyday services—from booking a ride and ordering food to getting a massage or scheduling home cleaning. These apps simplify life by merging multiple services into a single mobile solution.
If you're an entrepreneur or business owner looking to develop a super app like Gojek, this guide will walk you through everything you need to know—from ideation and planning to features, technology, cost, and launching.
1. Understanding the Gojek Model
What is Gojek?
Gojek is an Indonesian-based multi-service app that started as a ride-hailing service and evolved into a digital giant offering over 20 on-demand services. It now serves millions of users across Southeast Asia, making it one of the most successful super apps in the world.
Why Is the Gojek Model Successful?
Diverse Services: Gojek bundles transport, delivery, logistics, and home services in one app.
User Convenience: One login for multiple services.
Loyalty Programs: Rewards and incentives for repeat users.
Scalability: Built to adapt and scale rapidly.
2. Market Research and Business Planning
Before writing a single line of code, you must understand the market and define your niche.
Key Steps:
Competitor Analysis: Study apps like Gojek, Grab, Careem, and Uber.
User Persona Development: Identify your target audience and their pain points.
Service Selection: Decide which services to offer at launch—e.g., taxi rides, food delivery, parcel delivery, or healthcare.
Monetization Model: Plan your revenue streams (commission-based, subscription, ads, etc.).
3. Essential Features of a Multi-Service App
A. User App Features
User Registration & Login
Multi-Service Dashboard
Real-Time Tracking
Secure Payments
Reviews & Ratings
Push Notifications
Loyalty & Referral Programs
B. Service Provider App Features
Service Registration
Availability Toggle
Request Management
Earnings Dashboard
Ratings & Feedback
C. Admin Panel Features
User & Provider Management
Commission Tracking
Service Management
Reports & Analytics
Promotions & Discounts Management
4. Choosing the Right Tech Stack
The technology behind your app will determine its performance, scalability, and user experience.
Backend
Programming Languages: Node.js, Python, or Java
Databases: MongoDB, MySQL, Firebase
Hosting: AWS, Google Cloud, Microsoft Azure
APIs: REST or GraphQL
Frontend
Mobile Platforms: Android (Kotlin/Java), iOS (Swift)
Cross-Platform: Flutter or React Native
Web Dashboard: Angular, React.js, or Vue.js
Other Technologies
Payment Gateways: Stripe, Razorpay, PayPal
Geolocation: Google Maps API
Push Notifications: Firebase Cloud Messaging (FCM)
Chat Functionality: Socket.IO or Firebase
5. Design and User Experience (UX)
Design is crucial in a super app where users interact with multiple services.
UX/UI Design Tips:
Intuitive Interface: Simplify navigation between services.
Consistent Aesthetics: Maintain color schemes and branding across all screens.
Microinteractions: Small animations or responses that enhance user satisfaction.
Accessibility: Consider voice commands and larger fonts for inclusivity.
6. Development Phases
A well-planned development cycle ensures timely delivery and quality output.
A. Discovery Phase
Finalize scope
Create wireframes and user flows
Define technology stack
B. MVP Development
Start with a Minimum Viable Product including essential features to test market response.
C. Full-Scale Development
Once the MVP is validated, build advanced features and integrations.
D. Testing
Conduct extensive testing:
Unit Testing
Integration Testing
User Acceptance Testing (UAT)
Performance Testing
7. Launching the App
Pre-Launch Checklist
App Store Optimization (ASO)
Marketing campaigns
Beta testing and feedback
Final round of bug fixes
Post-Launch
Monitor performance
User support
Continuous updates
Roll out new features based on feedback
8. Marketing Your Multi-Service App
Marketing is key to onboarding users and service providers.
Strategies:
Pre-Launch Hype: Use teasers, landing pages, and early access invites.
Influencer Collaborations: Partner with local influencers.
Referral Programs: Encourage user growth via rewards.
Local SEO: Optimize for city-based searches.
In-App Promotions: Offer discounts and bundle deals.
9. Legal and Compliance Considerations
Don't overlook legal matters when launching a multi-service platform.
Key Aspects:
Licensing: Depending on your country and the services offered.
Data Protection: Adhere to GDPR, HIPAA, or local data laws.
Contracts: Create terms of service for providers and users.
Taxation: Prepare for tax compliance across services.
10. Monetization Strategies
There are several ways to make money from your app.
Common Revenue Models:
Commission Per Transaction: Standard in ride-sharing and food delivery.
Subscription Plans: For users or service providers.
Ads: In-app promotions and sponsored listings.
Surge Pricing: Dynamic pricing based on demand.
Premium Features: Offer enhanced services at a cost.
11. Challenges and How to Overcome Them
A. Managing Multiple Services
Solution: Use microservices architecture to manage each feature/module independently.
B. Balancing Supply and Demand
Solution: Use AI to predict demand and onboard providers in advance.
C. User Retention
Solution: Gamify the app with loyalty points, badges, and regular updates.
D. Operational Costs
Solution: Optimize cloud resources, automate processes, and start with limited geography.
12. Scaling the App
Once you establish your base, consider expansion.
Tips:
Add New Services: Include healthcare, legal help, or finance.
Geographical Expansion: Move into new cities or countries.
Language Support: Add multi-lingual capabilities.
API Integrations: Partner with external platforms for payment, maps, or logistics.
13. Cost of Developing a Multi-Service App Like Gojek
Costs can vary based on complexity, features, region, and team size.
Estimated Breakdown:
MVP Development: $20,000 – $40,000
Full-Feature App: $50,000 – $150,000+
Monthly Maintenance: $2,000 – $10,000
Marketing Budget: $5,000 – $50,000 (initial phase)
Hiring an experienced team or opting for a white-label solution can help manage costs and time.
Conclusion
Building a multi-service app like Gojek is an ambitious but achievable project. With the right strategy, a well-defined feature set, and an expert development team, you can tap into the ever-growing on-demand economy. Begin by understanding your users, develop a scalable platform, market effectively, and continuously improve based on feedback. The super app revolution is just beginning—get ready to be a part of it.
Frequently Asked Questions (FAQs)
1. How long does it take to develop a Gojek-like app?
Depending on complexity and team size, it typically takes 4 to 8 months to build a fully functional version of a multi-service app.
2. Can I start with only a few services and expand later?
Absolutely. It's recommended to begin with 2–3 core services, test the market, and expand based on user demand and operational capability.
3. Is it better to build from scratch or use a white-label solution?
If you want custom features and long-term scalability, building from scratch is ideal. White-label solutions are faster and more affordable for quicker market entry.
4. How do I onboard service providers to my platform?
Create a simple registration process, offer initial incentives, and run targeted local campaigns to onboard and retain quality service providers.
5. What is the best monetization model for a super app?
The most successful models include commission-based earnings, subscription plans, and in-app advertising, depending on your services and user base.
#gojekcloneapp#cloneappdevelopmentcompany#ondemandcloneappdevelopmentcompany#ondemandappclone#multideliveryapp#ondemandserviceapp#handymanapp#ondemandserviceclones#appclone#fooddeliveryapp
0 notes
Text
Top 5 Technologies Every Full Stack Development Learner Must Know
In today’s rapidly evolving digital landscape, Full Stack Development has emerged as a highly valued skill set. As companies strive to develop faster, smarter, and more scalable web applications, the demand for proficient full stack developers continues to grow. If you're planning to learn Full Stack Development in Pune or anywhere else, understanding the core technologies involved is crucial for a successful journey.
Whether you're starting your career, switching fields, or looking to enhance your technical expertise, being well-versed in both front-end and back-end technologies is essential. Many reputable institutes offer programs like the Java Programming Course with Placement to help learners bridge this knowledge gap and secure jobs right after training.
Let’s dive into the top 5 technologies every full stack development learner must know to thrive in this competitive field.
1. HTML, CSS, and JavaScript – The Front-End Trinity
Every aspiring full stack developer must begin with the basics. HTML, CSS, and JavaScript form the foundation of front-end development.
Why they matter:
HTML (HyperText Markup Language): Structures content on the web.
CSS (Cascading Style Sheets): Styles and enhances the appearance of web pages.
JavaScript: Adds interactivity and dynamic elements to web interfaces.
These three are the building blocks of modern web development. Without mastering them, it’s impossible to progress to more advanced technologies like frameworks and libraries.
🔹 Pro Tip: If you're learning full stack development in Pune, choose a program that emphasizes hands-on training in HTML, CSS, and JavaScript along with live projects.2. Java and Spring Boot – The Back-End Backbone
While there are many languages used for back-end development, Java remains one of the most in-demand. Known for its reliability and scalability, Java is often used in enterprise-level applications. Learning Java along with the Spring Boot framework is a must for modern backend development.
Why learn Java with Spring Boot?
Java is platform-independent and widely used across industries.
Spring Boot simplifies backend development, making it faster to develop RESTful APIs and microservices.
Integration with tools like Hibernate and JPA makes database interaction smoother.
Several institutes offer a Java Programming Course with Placement, ensuring that learners not only understand the theory but also get job-ready skills and employment opportunities.
3. Version Control Systems – Git and GitHub
Managing code, especially in team environments, is a key part of a developer's workflow. That’s where Git and GitHub come in.
Key Benefits:
Track changes efficiently with Git.
Collaborate on projects through GitHub repositories.
Create branches and pull requests to manage code updates seamlessly.
Version control is not optional. Every developer—especially full stack developers—must know how to work with Git from the command line as well as GitHub’s web interface.
🔹 Learners enrolled in a full stack development course in Pune often get dedicated modules on Git and version control, helping them work professionally on collaborative projects.
4. Databases – SQL & NoSQL
Full stack developers are expected to handle both front-end and back-end, and this includes the database layer. Understanding how to store, retrieve, and manage data is vital.
Must-know Databases:
MySQL/PostgreSQL (SQL databases): Ideal for structured data and relational queries.
MongoDB (NoSQL database): Great for unstructured or semi-structured data, and widely used with Node.js.
Understanding the difference between relational and non-relational databases helps developers pick the right tool for the right task. Courses that combine backend technologies with database management offer a more complete learning experience.
5. Frameworks and Libraries – React.js or Angular
Modern web development is incomplete without frameworks and libraries that enhance efficiency and structure. For front-end, React.js and Angular are two of the most popular choices.
Why use frameworks?
They speed up development by offering pre-built components.
Help in creating Single Page Applications (SPAs).
Ensure code reusability and maintainability.
React.js is often preferred for its flexibility and component-based architecture. Angular, backed by Google, offers a full-fledged MVC (Model-View-Controller) framework.
🔹 Many students who learn full stack development in Pune get to work on live projects using React or Angular, making their portfolios industry-ready.
Final Thoughts
To become a successful full stack developer, one must be comfortable with both the visible and behind-the-scenes aspects of web applications. From mastering HTML, CSS, and JavaScript, diving deep into Java and Spring Boot, to efficiently using Git, managing databases, and exploring modern frameworks—the journey is challenging but rewarding.
In cities like Pune, where tech opportunities are abundant, taking a structured learning path like a Java Programming Course with Placement or a full stack bootcamp is a smart move. These programs often include real-world projects, interview preparation, and job assistance to ensure you hit the ground running.
Quick Recap: Top Technologies to Learn
HTML, CSS & JavaScript – Core front-end skills
Java & Spring Boot – Robust backend development
Git & GitHub – Version control and collaboration
SQL & NoSQL – Efficient data management
React.js / Angular – Powerful front-end frameworks
If you're serious about making your mark in the tech industry, now is the time to learn full stack development in Pune. Equip yourself with the right tools, build a strong portfolio, and take that first step toward a dynamic and future-proof career.
0 notes
Text
Docker Tutorial for Beginners: Learn Docker Step by Step
What is Docker?
Docker is an open-source platform that enables developers to automate the deployment of applications inside lightweight, portable containers. These containers include everything the application needs to run—code, runtime, system tools, libraries, and settings—so that it can work reliably in any environment.
Before Docker, developers faced the age-old problem: “It works on my machine!” Docker solves this by providing a consistent runtime environment across development, testing, and production.
Why Learn Docker?
Docker is used by organizations of all sizes to simplify software delivery and improve scalability. As more companies shift to microservices, cloud computing, and DevOps practices, Docker has become a must-have skill. Learning Docker helps you:
Package applications quickly and consistently
Deploy apps across different environments with confidence
Reduce system conflicts and configuration issues
Improve collaboration between development and operations teams
Work more effectively with modern cloud platforms like AWS, Azure, and GCP
Who Is This Docker Tutorial For?
This Docker tutorial is designed for absolute beginners. Whether you're a developer, system administrator, QA engineer, or DevOps enthusiast, you’ll find step-by-step instructions to help you:
Understand the basics of Docker
Install Docker on your machine
Create and manage Docker containers
Build custom Docker images
Use Docker commands and best practices
No prior knowledge of containers is required, but basic familiarity with the command line and a programming language (like Python, Java, or Node.js) will be helpful.
What You Will Learn: Step-by-Step Breakdown
1. Introduction to Docker
We start with the fundamentals. You’ll learn:
What Docker is and why it’s useful
The difference between containers and virtual machines
Key Docker components: Docker Engine, Docker Hub, Dockerfile, Docker Compose
2. Installing Docker
Next, we guide you through installing Docker on:
Windows
macOS
Linux
You’ll set up Docker Desktop or Docker CLI and run your first container using the hello-world image.
3. Working with Docker Images and Containers
You’ll explore:
How to pull images from Docker Hub
How to run containers using docker run
Inspecting containers with docker ps, docker inspect, and docker logs
Stopping and removing containers
4. Building Custom Docker Images
You’ll learn how to:
Write a Dockerfile
Use docker build to create a custom image
Add dependencies and environment variables
Optimize Docker images for performance
5. Docker Volumes and Networking
Understand how to:
Use volumes to persist data outside containers
Create custom networks for container communication
Link multiple containers (e.g., a Node.js app with a MongoDB container)
6. Docker Compose (Bonus Section)
Docker Compose lets you define multi-container applications. You’ll learn how to:
Write a docker-compose.yml file
Start multiple services with a single command
Manage application stacks easily
Real-World Examples Included
Throughout the tutorial, we use real-world examples to reinforce each concept. You’ll deploy a simple web application using Docker, connect it to a database, and scale services with Docker Compose.
Example Projects:
Dockerizing a static HTML website
Creating a REST API with Node.js and Express inside a container
Running a MySQL or MongoDB database container
Building a full-stack web app with Docker Compose
Best Practices and Tips
As you progress, you’ll also learn:
Naming conventions for containers and images
How to clean up unused images and containers
Tagging and pushing images to Docker Hub
Security basics when using Docker in production
What’s Next After This Tutorial?
After completing this Docker tutorial, you’ll be well-equipped to:
Use Docker in personal or professional projects
Learn Kubernetes and container orchestration
Apply Docker in CI/CD pipelines
Deploy containers to cloud platforms
Conclusion
Docker is an essential tool in the modern developer's toolbox. By learning Docker step by step in this beginner-friendly tutorial, you’ll gain the skills and confidence to build, deploy, and manage applications efficiently and consistently across different environments.
Whether you’re building simple web apps or complex microservices, Docker provides the flexibility, speed, and scalability needed for success. So dive in, follow along with the hands-on examples, and start your journey to mastering containerization with Docker tpoint-tech!
0 notes
Text
fullstack developer tools you should try
As a full-stack developer, you work across the front-end and back-end of web applications, so having the right tools is essential for productivity, efficiency, and quality. Here's a curated list of tools to enhance your workflow:
Code Editors & IDEs
Visual Studio Code: A lightweight, powerful code editor with a vast ecosystem of extensions.
Recommended Extensions: Prettier, ESLint, Live Server, GitLens.
JetBrains WebStorm/IntelliJ IDEA: Feature-rich IDEs for JavaScript and web development.
Sublime Text: Fast and efficient for lightweight coding tasks.
Version Control & Collaboration
Git: The industry standard for version control.
GitHub, GitLab, Bitbucket: Code hosting platforms with CI/CD integration.
GitKraken: A visual Git client for easier version control management.
Front-End Development Tools
React, Vue, or Angular: Popular JavaScript frameworks.
Tailwind CSS: A utility-first CSS framework for fast UI building.
Webpack or Vite: Bundlers for optimized asset management.
Figma: Design and prototyping tool for collaboration with designers.
Storybook: A UI component explorer for React, Vue, Angular, and more.
Back-End Development Tools
Node.js: A runtime environment for building server-side applications.
Express.js: Minimal and flexible Node.js web framework.
Django or Flask: Python frameworks for robust back-end systems.
Postman: API development, testing, and documentation tool.
Docker: For containerization and deployment of your applications.
Database Tools
PostgreSQL or MySQL: Relational databases for structured data.
MongoDB: NoSQL database for unstructured or semi-structured data.
Prisma: A modern ORM for working with databases in JavaScript and TypeScript.
Adminer: Lightweight database management tool.
DevOps & Deployment
AWS, Azure, or Google Cloud: Cloud platforms for hosting and scaling.
Heroku: Simple PaaS for small to medium projects.
Netlify or Vercel: Front-end-focused deployment platforms.
Jenkins or GitHub Actions: For CI/CD pipelines.
Testing Tools
Jest: A JavaScript testing framework for unit and integration tests.
Cypress: End-to-end testing for web applications.
Postman: For API testing.
Selenium: For browser automation and testing.
Productivity & Workflow
Notion: For documentation and project management.
Slack: Team collaboration and communication.
Trello or Asana: Project management tools for task tracking.
Zsh + Oh My Zsh: A powerful shell for an efficient command line experience.
Monitoring & Debugging
Sentry: Application error tracking.
Posthog: Open-source analytics platform.
Chrome DevTools: Built-in browser tools for debugging and performance analysis.
Fullstack course in chennai Fullstack developer course in chennai

0 notes
Text
Part 4: How to use EF Core with MongoDb in Blazor Server Web Application
In part 4 of the series, I'm going to show you how to use EF Core with MongoDb in Blazor Server Web Application.
Articles in this series:
Part 1: Getting started with Blazor Server Web App Development using .NET 8
Part 2: How to implement Microsoft Entra ID Authentication in Blazor Server Web App in .NET 8
Part 3: How to implement Multilanguage UI in Blazor Server Web App in .NET 8
Part 4: How to use EF Core with MongoDb in Blazor Server Web Application
Part 5: How to show Dashboard with Radzen Bar and Pie Chart controls in in Blazor Server Web App
Part 6: How to support Authorization in Blazor server web app when using Microsoft Entra ID authentication
Part 7: How to implement Radzen Grid Control with dynamic paging, filtering, shorting in in Blazor Server Web App
Part 8: How to implement Data Entry form in Blazor server web app
Part 9: How to use SignalR to show real time updates in Blazor server web app
Entity Framework Core (EF Core) is a popular Object-Relational Mapper (ORM) framework for .NET applications. While primarily designed for relational databases, it has expanded its capabilities to support NoSQL databases, including MongoDB. This article will guide you through the process of using EF Core with MongoDB in your .NET 8 projects
Introduction
Before diving into the code, it's crucial to understand the nuances of using EF Core with MongoDB. Unlike relational databases, MongoDB is a NoSQL database, meaning it doesn't adhere to the traditional table-row structure. This introduces certain limitations and differences in how EF Core operates with MongoDB compared to relational databases.
In Part 1 of this series, I've explained the development environment setup for this article, that I will repeat here for the users who have not gone through it.
Before we start
In order to follow along with this articles, you will need:
.NET 8 SDK and .NET 8 Runtime installation
If you are planning to use Visual Studio 2022, make sure you have all latest updates installed (v17.8.2)
Install MongoDb Community Server, MongoDb Compass, and Mongodb version of Northwind database (Covered in this blog)
You may need Microsoft Azure (trial will also work) to setup Entra ID App in Azure and configure it to use
If you are fan of command line tools or want to know more about the tooling, see ASP.NET Core Blazor Tooling
How to setup MongoDB for development on windows
If you are not familiar with setting up MongoDB for development on windows, here is a quick walkthrough of what you will need:
Go to MongoDB download center and download MongoDB Community Server MSI package and install.
Next you will need MongoDB compass MSI and install it. You will need this tool to connect with your MongoDB Community Server and do the database administration related activities. If you are familiar with Microsoft SQL Server world, MongoDB compass is like SQL Server Management Studio of MongoDB world.
Next, download MongoDB Command line Database Tool which we will need to import an existing sample database.
We will be using a sample existing database called Northwind that I've downloaded from here
Import Northwind Mongodb Database
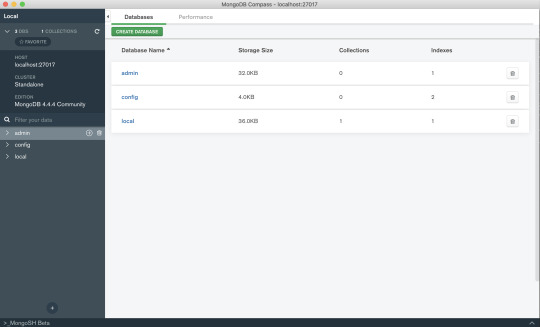
Open MongoDB Compass and connect to localhost:27017 which is a default port when you install MongoDB Server on windows.
Click on the databases in the left navigation and create a new database with name northwind and collection sample.
Go to github repository here in your browser, click on code in the top right and then download zip menu to download the zip file.
Extract MongoDB command line database tools zip file
Open mongo-import.sh inside the root folder and change the mongoimport keyword with the actual full path of mongoimport.exe that is part of MongoDb command line database tools zip file. The resulting line will look like below: "C:\temp\import\mongodb-database-tools\bin\mongoimport" -d "$1" -c "$collection" --type json --file "$file"
Open command prompt and go to root folder where you have mongo-import.sh file and run command ./mongo-import.sh northwind
If everything is done correctly, you will see console message that displays the json file name and the number of documents imported.
If you switch back to MongoDB Compass, select northwind database and click on the refresh at the top right corner of the sidebar, you will see collections like customers, employees etc.
We are going to use this sample database to build something interesting that makes sense and has a real-life use cases instead of just a sample table with a few fields.
Setting Up the Project
Create ASP.NET Core Blazor Server Web Application
Start visual studio and select create new project.
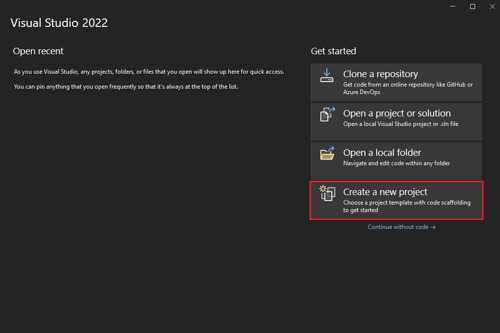
In the Create a new project window, type Blazor on the search box and hit Enter.
Select the Blazor Web App template and select Next.

In the Configure your new project window, enter BlazorAppPart4 as the project name and select Next.
In the Additional information window, select .NET 8.0 (Long Term Support) in the Framework drop-down if not already selected and click the Create button.
Build and run the application once so that you have your application url that you can copy from the browser and save it for later.
Add the nuget package
Open Tools > nuget package manager > Nuget package manager console and type following command:
install-package MongoDb.EntityFrameworkCore
view rawPackageManager.ps hosted with ❤ by GitHub
This will install all the necessary files needed for accessing northwind database that we created in MongoDb using Entity Framework Core Code First.
Add Model for Customer table
In the example northwind database, there is already a customers table with some data in it. We are going to display the first name and last name of the customer. So, let's create a folder in the root called Model and add new file called Customer.cs that contains following class definition.
using MongoDB.Bson;
using MongoDB.Bson.Serialization.Attributes;
using MongoDB.EntityFrameworkCore;
namespace BlazorAppPart4.Model
{
[Collection("customers")]
public class Customer
{
[BsonId]
public int Id { get; set; }
[BsonElement("last_name")]
public string? LastName { get; set; }
[BsonElement("first_name")]
public string? FirstName { get; set; } }}
view rawCustomer.cs hosted with ❤ by GitHub
Create Entity Framework Core AppDbContext class
Next, we are going to create a new class called AppDbContext that inherits from DbContext class of entity framework core. Add another cs file called AppDbContext.cs in the models folder and paste following code.
using Microsoft.EntityFrameworkCore;
namespace BlazorAppPart4.Model
{
public class AppDbContext: DbContext
{
public DbSet<Customer> Customers { get; init; }
public AppDbContext(DbContextOptions options) :
base(options)
{
}
protected override void OnModelCreating(ModelBuilder modelBuilder)
{
base.OnModelCreating(modelBuilder);
modelBuilder.Entity<Customer>();
}
}
}
view rawAppDbContext.cs hosted with ❤ by GitHub
Create Customer Repository
Next, we want to use repository pattern to ensure data access code is separate and testable. Add another folder in the root of your project called Repositories and add a new cs file called ICustomerRepository.cs with below code:
using BlazorAppPart4.Model;
namespace BlazorAppPart4.Repositories
{
public interface ICustomerRepository
{
Task<List<Customer>> GetAllAsync();
}
}
view rawICustomerRepository.cs hosted with ❤ by GitHub
Once you are done, add 1 more file called CustomerRepository.cs with below code:
using BlazorAppPart4.Model;
using Microsoft.EntityFrameworkCore;
namespace BlazorAppPart4.Repositories
{
public class CustomerRepository : ICustomerRepository
{
private readonly AppDbContext _db;
public CustomerRepository(AppDbContext db)
{
_db = db;
}
public async Task<List<Customer>> GetAllAsync()
{
return await _db.Customers.ToListAsync();
}
}
}
view rawCustomerRepository.cs hosted with ❤ by GitHub
Create AppSettings.json settings
The AppDbContext context will require MongoDb connectionstring and database name. It is recommended to create an application wide setting section in the AppSettings.json. Open your AppSettings.json and 'AppConfig' section from below. I'm showing my full AppSettings.json file for your reference:
{
"AppConfig": {
"Database": {
"ConnectionString": "mongodb://localhost:27017",
"DatabaseName": "northwind"
}
},
"Logging": {
"LogLevel": {
"Default": "Information",
"Microsoft.AspNetCore": "Warning"
}
},
"AllowedHosts": "*"
}
view rawAppSettings.json hosted with ❤ by GitHub
Create AppConfig class for settings
Add AppConfig.cs class in your project and then add below code in the class definition:
namespace BlazorAppPart4
{
public class AppConfig
{
public AppConfig() {
Database = new DbConfig();
}
public DbConfig Database { get; set; }
}
public class DbConfig { public string? ConnectionString { get; set; }
public string? DatabaseName { get; set;
}
}
}
view rawAppConfig.cs hosted with ❤ by GitHub
Configure Dependencies in Program.cs
Next, we want to configure dependency injection so that Repository and AppDbContext classes that we created in our project can be injected where required. Here is my Program.cs:
using BlazorAppPart4;
using BlazorAppPart4.Components;
using BlazorAppPart4.Model;
using BlazorAppPart4.Repositories;
using Microsoft.EntityFrameworkCore;
var builder = WebApplication.CreateBuilder(args);
// Add services to the container.
builder.Services.AddRazorComponents()
.AddInteractiveServerComponents();
var appConfig = builder.Configuration.GetSection("AppConfig").Get<AppConfig>();
if (appConfig == null)
{
throw new InvalidOperationException("Db connectionstring not found");
}
builder.Services.AddDbContext<AppDbContext>(options =>
options.UseMongoDB(appConfig.Database.ConnectionString ?? "", appConfig.Database.DatabaseName ?? ""));
builder.Services.AddTransient<ICustomerRepository, CustomerRepository>();
var app = builder.Build();
// Configure the HTTP request pipeline.
f (!app.Environment.IsDevelopment())
{
app.UseExceptionHandler("/Error", createScopeForErrors: true);
// The default HSTS value is 30 days. You may want to change this for production scenarios, see https://aka.ms/aspnetcore-hsts. app.UseHsts();
}
app.UseHttpsRedirection();
app.UseStaticFiles()
;app.UseAntiforgery();
app.MapRazorComponents<App>()
.AddInteractiveServerRenderMode();
app.Run();
view rawProgram.cs hosted with ❤ by GitHub
Please note on line 13 above, we are reading our AppSettings.json section called AppConfig and then convert it to AppConfig class object. On line 18, we are configuring Entity Framework Core MongoDb data access connection string. On line 21, we are resolving the customer repository. The other part of the file has no changes.
Show customers
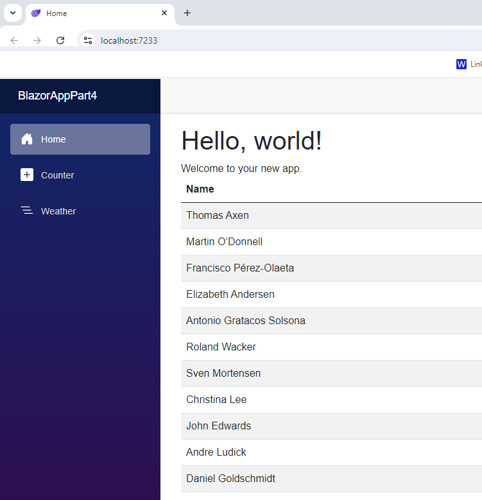
And finally, open Components/Pages/Home.razor and replace the content of the file with below:
@page "/"
@using BlazorAppPart4.Repositories
@using BlazorAppPart4.Model
@inject ICustomerRepository customerRepo
@rendermode RenderMode.InteractiveServer
<PageTitle>Home</PageTitle>
<h1>Hello, world!</h1>
Welcome to your new app.
@if(customers.Any())
{
<table class="table table-striped table-responsive">
<thead>
<th>Name</th>
</thead>
<tbody>
@foreach (var cust in customers)
{
<tr>
<td>
@cust.FirstName @cust.LastName
</td>
</tr>
}
</tbody>
</table>
}
else{
<p>No customers found</p>
}
@code {
List<Customer> customers;
protected override async Task OnInitializedAsync()
{
customers = await customerRepo.GetAllAsync();
}
}
view rawHome.razor hosted with ❤ by GitHub
Here is the output of the whole exercise
Conclusion
In this article, we covered the step by step tutorial of How to use EF Core with MongoDb in Blazor Server Web Application of the blazor web app development series.
Ready to unlock the full potential of Blazor for your product development? Facile Technolab, top Blazor Development Company in India providing Blazor development services can help you bring your vision of product mvp to reality.
0 notes
Text
How to Get Started with MEAN Stack Development: A Beginner's Guide
Do you want to pursue a career in full-stack development as a web developer? If so, MEAN stack development is undoubtedly something you've heard about. The MongoDB, Express.js, Angular, and Node.js stack, or MEAN stack, is a potent set of tools for creating dynamic online applications. We'll walk you through the fundamentals of MEAN stack development in this beginner's tutorial to help you get going.
What is the mean stack?
Web applications are developed using JavaScript-based technologies called the MEAN stack. Each component of the MEAN stack serves a specific purpose:
MongoDB: This NoSQL database uses a flexible format similar to JSON to store data. It is renowned for being user-friendly and scalable, which makes it the perfect option for contemporary online applications.
Express.js: Express.js is a web application framework for Node.js. It simplifies the process of building web servers and handling HTTP requests, making it easier to develop backend logic for your application.
Angular: Google maintains the Angular frontend JavaScript framework. It offers an organized method for adding features and functionality to HTML to create dynamic web applications.
Node.js: This server-side JavaScript runtime enables you to execute JavaScript scripts without a web browser. Building scalable and high-performing backend systems for online applications is a typical usage.
Getting Started with MEAN Stack Development
Now that you are familiar with the fundamental elements of the MEAN stack, let's discuss how to begin developing MEAN stack applications:
Set up your development environment.
You must first set up your development environment before you can begin developing MEAN stack applications. Verify that Node.js and the Node Package Manager (npm) are installed on your system. The official Node.js website has them available for download and installation.
Install MongoDB
Installing MongoDB, the MEAN stack's database component is the next step. On its website, MongoDB provides official installation instructions for several operating systems. Verify that MongoDB is operating on your local computer after installation.
Create a new Express.js project.
It's time to start a new Express.js project, which will be your MEAN stack application's backend. With the following command, you can quickly create a new Express.js project using the Express Generator tool:
“px express-generator my-mean-app”
Please enter the name of your project in place of "my-mean-app." After the project has been created, use npm to install its dependencies by navigating to its directory:
“cd my-mean-app
npm install”
Set up Angular
Now that the backend is established, Angular has to be used to configure the frontend. The following command can be used with the Angular CLI (Command Line Interface) to start a new Angular project:
“npx @angular/cli new my-mean-app-frontend”
You should substitute the name of your Angular project for "my-mean-app-frontend." After the project has been created, use npm to install its dependencies by navigating to its directory:
“cd my-mean-app-frontend
npm install”
Connect Express.js with MongoDB.
It's time to link Express.js and MongoDB now that the front end and back end are configured. Installing the MongoDB Node.js driver requires npm.
“npm install MongoDB”
After that, you can use your Express.js routes to execute CRUD (Create, Read, Update, Delete) operations directly from your MongoDB database by connecting to it using the MongoDB driver.
Build Your Angular Frontend
At this point, you can begin developing the components, services, and other Angular elements that will make up your Angular front. The robust CLI provided by Angular may be used to create new modules, services, and components, which you can subsequently incorporate into your application.
Test and deploy your MEAN Stack application.
It's critical to extensively test your MEAN stack application after it has been developed to make sure everything functions as it should. You can test your Express.js routes with tools like Chai and Mocha and your Angular code with tools like Jasmine and Karma.
You can deploy your application to a hosting provider of your choosing once it has been tested and is operational. Hosting MEAN stack apps can be done on a variety of platforms, such as Heroku, AWS, and DigitalOcean.
Conclusion
JavaScript-based technologies can be used to create modern web apps with great power and flexibility when employing MEAN stack development. You can start developing your own dynamic web applications using the MEAN stack by following the instructions provided in this beginner's tutorial. The MEAN stack offers benefits to developers of all experience levels, from novices to experts. Why then wait? Get creating with MEAN right now!
Zoople Technologies are the ones who have been in the field of software training for 14 years. We provide the most trending course, MeanStack, that can be learned in 3 months. Those who are interested in learning about MeanStack can contact Zoople Technologies.
To read more content like this visit https://zoople.in/blog
Visit our website https://zoople.in
#machine learning#kerala#digital marketing#kochi#seo#google#programming#python#artificial intelligence#software engineering
0 notes
Text
Which tools are used for web development?
Web development involves a variety of tools across different stages of the development process. Here are some commonly used tools for web development:
Text Editors and IDEs:
Examples: Visual Studio Code, Sublime Text, Atom, PhpStorm
Purpose: Writing and editing code efficiently.
Version Control:
Examples: Git, GitHub, GitLab
Purpose: Managing and tracking changes in code, collaboration.
Web Browsers:
Examples: Google Chrome, Mozilla Firefox, Safari
Purpose: Testing and debugging web applications.
Command Line Tools:
Examples: Command Prompt, Terminal, PowerShell
Purpose: Running scripts, managing dependencies.
Package Managers:
Examples: npm (Node Package Manager), yarn
Purpose: Installing and managing project dependencies.
Graphics and Design Tools:
Examples: Adobe Photoshop, Sketch, Figma
Purpose: Creating visual assets, designing user interfaces.
Frontend Frameworks:
Examples: React, Angular, Vue.js
Purpose: Building interactive and dynamic user interfaces.
Backend Frameworks:
Examples: Django (Python), Ruby on Rails, Express.js (Node.js)
Purpose: Building server-side logic and APIs.
Database Management:
Examples: MySQL Workbench, PostgreSQL, MongoDB Compass
Purpose: Managing and interacting with databases.
API Testing:
Examples: Postman, Insomnia
Purpose: Testing and debugging APIs.
Text and Code Editors:
Examples: Sublime Text, Visual Studio Code, Atom
Purpose: Writing and editing code efficiently.
Task Runners and Build Tools:
Examples: Grunt, Gulp, Webpack
Purpose: Automating repetitive tasks, optimizing builds.
Content Management Systems (CMS):
Examples: WordPress, Drupal, Joomla
Purpose: Simplifying content creation and management.
Responsive Design Testing:
Examples: Browser Developer Tools, Responsive Design Mode
Purpose: Testing how websites look on different devices.
Performance Monitoring:
Examples: Google Lighthouse, GTmetrix
Purpose: Analyzing and optimizing website performance.
Collaboration and Communication:
Examples: Slack, Microsoft Teams, Trello
Purpose: Facilitating communication and project management.
Security Tools:
Examples: OWASP ZAP, SSL/TLS Certificates
Purpose: Ensuring web application security.
Continuous Integration/Continuous Deployment (CI/CD):
Examples: Jenkins, Travis CI, CircleCI
Purpose: Automating testing and deployment processes.
These tools cater to different aspects of web development, and the choice of tools often depends on the specific requirements of the project and the preferences of the development team.
1 note
·
View note
Text
Full Stack
“Full Stack“ refers to the development of both the front-end (client-side) and back-end (server-side) of a web application. Top Skilled is the Best Full Stack Training in Pondicherry. In Top Skilled a full-stack developer who is proficient in working with both the “front end” and the “back end” of a web application, meaning they can handle tasks related to the user interface, user experience, and server-side logic.

FRONT-END (CLIENT-SIDE):
HTML/CSS: Creating the structure and styling of web pages. JavaScript: Programming the behavior and interactivity of web pages. Front-End Frameworks/Libraries: Knowledge of frameworks like React.js, Angular, or Vue.js for efficient UI development.
BACK-END (SERVER-SIDE):
Server-Side Programming Languages: Proficiency in languages like Node.js (JavaScript), Python, Ruby, Java, PHP, etc. Server-Side Frameworks: Familiarity with frameworks such as Express.js (Node.js), Django (Python), Ruby on Rails (Ruby), Laravel (PHP), etc. Database Management: Working with databases, including SQL databases (e.g., MySQL, PostgreSQL) and NoSQL databases (e.g., MongoDB). API (Application Programming Interface) Development: Creating APIs to facilitate communication between the front end and back end.
DATABASE MANAGEMENT:
Database Design: Creating and managing the structure of databases. Querying: Writing and optimizing database queries. ORMs/ODMs: Working with Object-Relational Mapping or Object-Document Mapping tools.
VIRSION CONTROL:
Git: Managing and collaborating on code using Git and platforms like GitHub or GitLab.
WEB DEVELOPMENT TOOLS AND PRACTICES:
Development Environments: Setting up and using development environments and tools. Package Managers: Using tools like npm or yarn to manage project dependencies. Command Line: Proficiency in the command line for tasks like scripting, automation, and project setup.
FRONT-END AND BACK-END INTEGRATION:
API Integration: Connecting front-end components with back-end services through APIs. Data Transfer Formats: Understanding and working with data formats like JSON.
DEVELOPMENT AND HOSTING:
Deployment Strategies: Deploying applications to servers or cloud platforms. Cloud Services: Familiarity with cloud services like AWS, Azure, or Heroku.
SECURITY:
Web Security: Understanding and implementing security best practices, including data encryption, authentication, and authorization.
TESTING:
Unit Testing: Writing and executing unit tests for code components. Integration Testing: Testing the interaction between different components.
SOFT SKILLS:
Communication: Effective communication within development teams and with stakeholders. Problem-Solving: Strong analytical and problem-solving skills.
Full-stack developers play a crucial role in the entire web development process, from designing the user interface to implementing server-side logic and ensuring the overall functionality and performance of the application. The Best IT Institute in Pondicherry is Top Skilled Academy they offer the best course for Full Stack Development. They are often involved in all stages of the development life cycle and are capable of taking on a variety of tasks within a project.
0 notes
Text
Mastering the Craft: Essential Skills for a 3-Year Experienced Full Stack Developer
Certainly! I’m excited to delve into the world of full-stack development with you. My expertise in this field has grown significantly over time. Selenium has emerged as a widely acknowledged and extensively utilized practice spanning various industries. Advance your career in Full-Stack Developer at a Top Institution in Chennai, like ACTE Technologies.

With three years of experience as a full-stack developer, it’s essential to possess a comprehensive skill set covering both front-end and back-end technologies, alongside key proficiencies.
Below Is A Skill Checklist Tailored For A Seasoned Professional:
1. Front-End Technologies:
Expertise in HTML5, CSS3, and JavaScript. Proven experience with front-end frameworks such as React, Angular, or Vue.js. Accomplished in responsive web design and ensuring cross-browser compatibility.
2. Back-End Technologies:
Mastery of at least one back-end programming language: JavaScript (Node.js), Python, Ruby, Java, or PHP. Command over a corresponding back-end framework (e.g., Express.js, Django, Ruby on Rails, Spring Boot, Laravel).
3. Databases:
In-depth knowledge of both relational databases (e.g., PostgreSQL, MySQL) and NoSQL databases (e.g., MongoDB). Proficient in database design, optimization, and query optimization.
4. APIs:
Expertise in designing, building, and consuming RESTful and/or GraphQL APIs. Understanding of intricate API authentication and authorization mechanisms.
5. Version Control:
Proficiency in version control systems, particularly Git.
6. DevOps and Deployment:
Practical experience with deployment tools like Docker. Understanding of continuous integration/continuous deployment (CI/CD) pipelines. Knowledgeable about cloud platforms such as AWS, Azure, or Google Cloud.
7. Testing:
Mastery of testing techniques and tools ensuring code reliability. Competence in executing unit testing, integration testing, and end-to-end testing.
8. Command Line and Unix:
Proficient in basic command line usage and Unix commands for streamlined development workflows.
9. Web Application Architecture:
Deep understanding of common web application architectures, encompassing client-server models and MVC/MVVM patterns.
10. Build Tools and Package Managers:
Familiarity with build tools (e.g., Webpack) and package managers (e.g., npm, yarn).
11. Web Security Practices:
Expertise in security best practices for web development, including authentication and authorization.
12. Soft Skills:
Strong communication and collaboration abilities within cross-functional teams. Exceptional problem-solving and critical-thinking skills.
13. Continuous Learning:
Commitment to staying updated with the latest technologies and frameworks.
14. Project Management:
Familiarity with project management methodologies and tools.
15. Leadership Skills:
Capability to mentor junior developers and lead development teams.

Remember, this list is a general guide, and the specific skills needed may vary based on the technologies in use and the unique requirements of your role and industry. Continuous learning and staying informed about industry trends remain pivotal for sustained career growth.
If you’re keen on exploring a Full-stack Developer course in Chennai, I highly recommend considering Top Institutions like ACTE Technologies. They provide certification programs and job placement opportunities, guided by experienced instructors to enhance your learning journey. These resources are available both online and in person. Enrolling in a course step by step could prove to be a valuable decision if it aligns with your interests.
I trust this addresses your query adequately. If you have more questions or need further clarification, please feel free to ask in the comments section.
If you’ve found this information valuable, I invite you to follow me on this platform and give it an upvote to encourage more discussions and insights about Full-stack Development. Your time and engagement are greatly appreciated, and I wish you a wonderful day ahead.
0 notes
Text
What is Express.js? A Comprehensive Guide to Beginners
Let’s start with web development.
When we talk about web development, we are basically essentially talking about the front-end and back-end (also referred to as server-side). Express is a backend development Nodejs framework.
What is a Nodejs Framework?
This section is for those who are not familiar with frameworks. If you already know what a framework is, please feel free to skip ahead.
Writing an application from scratch is time-consuming and tedious, especially in today’s fast-paced world, and initial setup may involve a lot of boilerplate code, such as setting up ports and defining route handlers; frameworks help to save time and effort by providing a pre-built set of tools and libraries that can be used to quickly and easily create a web application. This can free up developers to focus on the things that matter most — writing logic and advanced functionalities.
What is Express js?
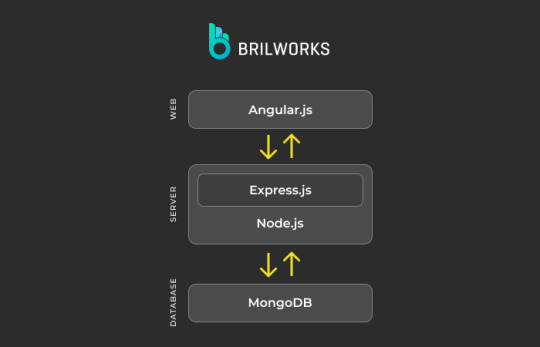
The image shows how a tech stack contributes to complete web development. For instance, when it comes to data storage, a Database (e.g., MongoDB) is required, and for writing the front end, various frameworks exist today, such as Angular.js.(in MEAN stack).
Similarly, you need to use a backend-specific language or framework for the backend. Some popular backend languages include Python, Java, JavaScript (Node.js), and PHP, while Django, Express.js, and Flask are some of the popular backend frameworks.
If you want to use JavaScript in the backend, you typically need to use the Node.js runtime environment. Node.js allows you to run JavaScript code outside of a web browser, which makes it possible to use JavaScript for both the front end and back end of a web application.
On top of Nodejs, several frameworks have been created, among which is Express. More precisely, it is a layer built around Node.js that significantly simplifies the process of working within the Node.js environment and reduces development complexity.
Express is an open-source web application framework for Node.js. It provides a robust set of features for building web and mobile applications, including routing, middleware, template engines, seamless database integration, and a wealth of features for developing advanced features and functions.
Note: In this article, when we refer to web applications with Express, we are explicitly referring to the development of “back-end services or APIs.”
Features of Express
1. An array of pre-built tools
The framework includes an array of tools for web applications, routing, and middleware for building and deploying large-scale, enterprise-ready applications.
2. Node package manager
It comes up with a Node package manager and a command-line interface(CLI), allowing you to create project structures, generate routes, controllers, and other components, as well as manage dependencies and configuration settings.
3. Middleware
Middleware in Express is used as snippets of code that intercept requests and responses, manage errors, and perform various other tasks, helping you to perform actions like validation, logging, and authentication in a reusable and modular way.
4. Routing
ExpressJS offers developers a straightforward routing system that simplifies the handling of HTTP requests. In addition, it allows you to define your own special paths and rules for these requests.
Applications of Expressjs
It is termed as a versatile framework that developers employ for constructing APIs, single page and real-time applications, microservices, proxy servers, CMSs, backend for mobile applications, authentication, authorization mechanisms, and many more services. Below is a list of the application you can build using Express js.
1. APIs for Single Page Application
Single-page applications (SPAs) are a popular type of web application that loads all of the content for the page in one go. This means that the user does not have to wait for the page to reload when they interact with it, which can provide a smoother and more responsive experience.
Some popular examples of SPAs include Gmail, Google Maps, and Spotify. These apps are able to provide a great user experience because they only need to load the content once, and then they can dynamically update the content based on the user’s actions. This makes for a very fluid and interactive experience. Express is used for developing back-end services, or APIs, for single-page applications to fetch data.
2. Real-time applications
Real-time applications are increasingly popular as they allow users to interact with each other in real time. Some popular examples of real-time applications include multiplayer games, chat apps, and collaboration tools. Express is used in developing real-time applications.
It helps you build the basic structure, like handling web pages and buttons, and when you want your website to instantly update without needing to refresh the page, Express.js and socket.io can work together.
Express.js can take care of the regular stuff your website needs, like showing pages and handling regular requests. While WebSockets enables real-time data exchange between the server and clients.
3. Streaming applications
Streaming applications are becoming increasingly popular as they allow users to watch movies, TV shows, and other content on demand. Some popular examples of streaming applications include Netflix, Hulu, and Disney+.
You can leverage Express in streaming applications for a variety of tasks, including handling requests, serving media files, developing authentication and authorization modules, implementing search and recommendations, and many more functionalities.
4. Fintech application
Some popular fintech applications that are built with Express.js include Robinhood, Coinbase, and PayPal. Leveraging the robust functionalities of Express.js, these applications efficiently manage intricate financial transactions.
5. APIs
APIs are software intermediaries that allow different systems to communicate with each other. They are widely utilized by different systems for integrating payment gateways, social media integrations, and e-commerce integrations. Brillworks has developed a suite of APIs and applications for the business consulting and media preservation industries, which includes critical functions such as company setup, visa services, corporate services, file management, customer portal, CMS portal, bulk upload, etc.
Read more: https://www.brilworks.com/blog/what-is-express-js-comprehensive-guide-to-beginners/
0 notes
Text
Your Guide to Becoming a Full-Stack Developer from Scratch
Are you eager to embark on a rewarding journey to become a full-stack developer but don't know where to start? Don't worry; I've got you covered. In this blog, we'll break down the process into simple steps, helping you pave your way to success in the world of web development.

Step 1: Understand What a Full-Stack Developer Does
Before diving into the coding, it's essential to have a clear understanding of what a full-stack developer does. A full-stack developer is someone who can handle both the front-end and back-end aspects of web development. They work with databases, servers, systems, and user interfaces, making them versatile professionals.
Step 2: Learn the Basics of Web Development
To become a full-stack developer, you'll need to grasp the fundamentals. Here's a simplified breakdown of the key components:
Front-end: This involves creating the visual part of a website that users see and interact with. Learn HTML, CSS, and JavaScript, as they are the building blocks of the web.
Back-End: This deals with the behind-the-scenes operations. Get acquainted with programming languages like Python, Ruby, or JavaScript (Node.js) for server-side development. You'll also need to understand databases like MySQL, PostgreSQL, or MongoDB.
Version Control: Familiarize yourself with tools like Git to manage your code efficiently.
Command Line: Learn how to navigate your computer's file system and execute commands. This is crucial for working with servers.
Step 3: Choose Your Tech Stack
Selecting the technologies you want to specialize in is a critical decision. Your choice depends on your interests and market demand. For instance, you might opt for the MEAN (MongoDB, Express.js, Angular, Node.js) stack or the MERN (MongoDB, Express.js, React, Node.js) stack for JavaScript-based full-stack development. Make sure to explore different options and decide what suits you best.
Step 4: Explore Front-End Development
Start by creating static web pages to get a grip on HTML and CSS. As you grow more comfortable, add interactivity with JavaScript. Master popular front-end frameworks like React, Angular, or Vue.js to build dynamic, user-friendly interfaces.
Step 5: Dive into Back-End Development
Understand server-side programming using your chosen language (e.g., Node.js, Python, or Ruby). You'll also need to learn about RESTful APIs, server-side frameworks (e.g., Express.js), and databases. Practice building server applications and connecting them to databases.
Step 6: Database Management
Become proficient in database management. Learn how to design and optimize databases, write SQL queries, and work with NoSQL databases like MongoDB.
Step 7: Build Projects
The best way to solidify your skills is by building real-world projects. Start with small ones, like a to-do list app, and gradually work your way up to more complex applications. This will help you apply what you've learned and build a portfolio to showcase your work.

Becoming a full-stack developer from scratch is an exciting journey. Remember that it takes time, dedication, and perseverance. Start small, practice consistently, and don't be discouraged by challenges.
If you want to learn more about full-stack development, I highly recommend that you contact ACTE Technologies because they offer certifications and job placement opportunities. Experienced teachers can help you learn better. You can find these services both online and offline. Take things step by step and consider enrolling in a course if you’re interested. I hope I answered your question successfully. If not, feel free to mention it in the comments area. I believe I still have much to learn. If you feel that my response has been helpful, make sure to follow me and give it an upvote to encourage me to upload more content about full-stack development. Thank you for spending your valuable time and upvotes here. Have a great day.
0 notes
Text
Creating Of Database Step
To create a database, you'll typically follow these steps:Choose a Database Management System (DBMS): Decide on a system like MySQL, PostgreSQL, SQLite, or MongoDB, based on your project's requirements.Install the DBMS: Download and install the chosen DBMS on your system or server.Design Schema: Plan your database structure, including tables, columns, and relationships. Use a visual tool or SQL statements to define the schema.Create Database: Use the DBMS's interface or command-line tool to create a new database.Create Tables: Define tables within the database, specifying their columns, data types, and constraints.Insert Data: Add data to your tables using SQL INSERT statements.Query and Manage Data: Utilize SQL SELECT, UPDATE, DELETE, and other statements to interact with and manage your data.Indexing and Optimization: Improve performance by creating indexes on columns used frequently in queries.Backup and Security: Implement regular backups and set up appropriate security measures to protect your data.Test and Refine: Continuously test your database setup, making adjustments as needed based on performance and usage patterns.Remember, the specific steps may vary depending on the DBMS you choose. It's a good idea to refer to the documentation of the chosen DBMS for detailed instructions.
0 notes
Text
Web Development Roadmap
To start a career in the web development field, you need to choose either front-end web development or back-end web development and if you want to be a full-stack developer you can choose both. Here we will discuss both paths. First, we will talk about what things you should learn and use to go on either path.
Here are some core technologies and tools you need to learn for both frontend and backend roadmap tasks.
Git -
One of the most popular version control systems. It's not possible to live without Git anymore. Git is a software for tracking changes in any set of files, usually used for coordinating work among programmers. It’s goals include speed, data integrity and non-linear workflows.
SSH -
SSH stands for Secure Shell. It is a Cryptographic Network Protocol for operating network services securely over an unsecured network. Typically applications include Remote Command Line, Login and Remote Command Execution. Every network service can be secured with SSH.
It is a popular networking concept every web developer should know.
HTTP/HTTPS -
HTTP stands for Hypertext Transfer Protocol and HTTPS stands for Hypertext Transfer Protocol Secure.
Hypertext Transfer Protocol Secure is an Extension of Hypertext Transfer Protocol. It is widely used over the Internet. For Secure Communication over a computer network, HTTPS is a good way to communicate. HTTP Protocol is the Backbone of the web, and to be a Web Developer you should have good knowledge of both HTTP and HTTPS.
Linux Command - Basic Terminal Uses -
Linux command is the utility of the Linux Operating System. All basic and advanced tasks can be done by executing commands. The commands are executed on the Linux Terminal. The terminal is a Command Line Interface. It is used to interact with the system, it is similar to Command Prompt in Windows.
Not just a Web Developer but for any Programmer, Command Line is a very important factor.
Data Structures & Algorithms -
A Data Structure is a named location which can be used to store and organize data. An Algorithm is a collection of steps which help you to solve a problem. Learning Data Structure and Algorithms allows us to write efficient and optimized computer programs
These are the building blocks for every program and better knowledge of data structure and algorithm. It is vital for your next job or doing well at your current job..
Character Encoding -
If you are creating global applications that show information in multiple languages, across the world then you should have a good knowledge of character encoding.
Character Encoding is used in Computing, Data Storage and Data Transmission to represent a collection of characters by some kind of encoding system. This technique assigns a number to each character for digital representation.
Github -
There is no doubt that every developer or programmer uses Github and Git for getting code information and give some mock tests to check the performance in coding.
Both Git and Github are the standard terms in code repositories.
Github is a provider of internet hosting for software development and version control using Git. It offers the Distributed Version Control and Source Code management functionality.
Now we will discuss both the roadmaps, step by step.
Frontend Developer Roadmap -
If you want to become a Frontend Developer then you should have knowledge in some coding technologies.
In the starting phase, you should have knowledge about some basics of HTML, CSS and JavaScript.
In HTML you should know about the basics of html, semantic html, basic seo and accessibility.
In CSS you should know about the basics of css, making layout, media queries and also CSS3. You should know roots, positioning, display, box model, css grid and flex box.
In JavaScript, you should have a knowledge about syntax and basic constructs, learn dom manipulation, learn fetch api, ajax, ecmascript 6 and modular javascript.
Then you need to start learning about Package Managers, in this you can learn npm and yarn. npm is the latest technology, but still behind yarn in some features. You can select one of them.
Then you have to learn about CSS Preprocessors, which should be SASS and PostCSS.
You can learn about CSS Frameworks, in this you should know about Bootstrap 4.
You can start learning about CSS Architecture, with modern frontend frameworks, there is more push towards CSS in JS methodologies.
Now you can build tools, Task Runners, Module Bundlers, Linters and Formatters. In task runners, you can use npm scripts. In module bundlers, you can use webpack and rollers.
After completing all these steps you need to choose a Framework, it should be Reactjs, Angular and Vue.js. Then use CSS in JS and then test your apps.
Web Development Basics -
It's pretty apparent that if you want to become a web developer, then you should know the basics of the internet, web applications, protocols like http. In general you have knowledge about web development.
HTML and CSS -
HTML and CSS are the backbones of any website, html provides the structure and css provides the style and helps them to look better. If you want to become a serious frontend developer then you must master these two.
JavaScript -
Just like the four pillars of object oriented programming, encapsulation, abstraction, polymorphism and inheritance. Web Development has three pillars, which are HTML, CSS and JavaScript.
HTML and CSS provide structure and style but Javascript makes them alive by adding Interactiveness.
TypeScript -
Just like in programming, we should know about C and C++, the same as TypeScript, which is considered as JavaScript++.
TypeScript is also a programming language developed by Microsoft and also maintained by Microsoft. It is a superset of JavaScript. It is designed for the development of large applications.
Angular -
Angular is a web application framework. It is a typescript based free and open source framework. It is developed by the Angular Team of Google. Angular is an enhanced form of AngularJS, it is completely rewrite.
In the starting phase you should have knowledge about HTML, CSS and JavaScript. But these days, most of them work on Angular, Vue.js, Reactjs and Typescript.
They provide short and simple code which consumes low storage.
Reactjs -
Like Angular, Reactjs is also a very popular library to develop web applications. Reactjs is developed and maintained by Facebook Team. Most people work on reactjs instead of php and other programming languages.
Reactjs is an enhanced form of PHP and we can also include HTML, CSS and JavaScript.
Backend Web Developer Roadmap -
To become a backend web developer, you need to know about some languages.
So the first step is to pick a language.
It should be Functional Language and Scripting Language.
In functional language you need to learn about Java and .Net and in Scripting language you need to learn about Python, Ruby, PHP, Node.js and Typescript.
After learning all these languages, you need to start doing practice, as a beginner you need to do the practice.
Implement those commands you have learned. Learn about the Package manager and start implementing this. Learn about Testing and Bug Fixing.
Start knowing about Relational Database and Framework. You can learn MongoDB Database, it is enough to know about databases and uses of databases. Then start gaining knowledge of Web Server like Apache.
Node.js -
Same as reactjs, node.js is mostly used by maximum web developers. Like reactjs, node.js allows you to make complete web applications using a single language which is Node.js.
Java -
Mostly in the starting phase, people start learning about java. And almost all made their first application using java. Java is a very old language but its popularity is not gone till now like C. Java provides 99% features of object-oriented programming.
Python -
Python is a trending Language, you should have a focus on python. You can make your career bright by learning Python. If you want to develop the back-end code using python then you can use Django. It is a Full Stack Web Development Framework for Python Programmers.
#webdevelopment#websitedevelopment#appdevelopment#ecommercedevelopment#mobileappdevelopment#digitalmarketing#seo
8 notes
·
View notes
Text
Install Mongodb In Mac Catalina
Install Mongodb In Mac Catalina Os
How To Install Mongodb On A Mac
Install Mongodb In Mac Catalina Operating System
Install Mongodb Osx Catalina
Install Mongodb In Mac Catalina Free
However, if you are using latest Mac version Catalina then the root folder is no longer writable. Brew has an updated version of mongodb to use a new path (which it creates itself), /usr/local/var/mongodb and following these instructions will fix the issue: Follow the link to install and update mongodb-community-edition. In this article, I will share how to install MongoDB on MacOS Catalina. First, I created a directory under the Library folder as shown below. If you have already done this for a previous installation of MongoDB, you can skip this step. To install MongoDB, run the following command in your macOS Terminal application: brew install [email protected]. Created with Sketch. Alternatively, you can specify a previous version of MongoDB if desired.
In this tutorial I am going to talk about how you can install MongoDB on MacOS in an easy way. I have gone through many tutorials online, but I have been really upset with those tutorials. Most of the tutorials are outdated and old. So I decided to create this tutorial in which i can show you a better and easy way to setup MongoDB on MacOS.
Install MongoDB on MacOS using Homebrew
In order to install MongoDB on MacOs, I would suggest using Homebrew.
Install Mongodb In Mac Catalina Os
Please open up the MacOs command line tool and paste the following command to setup MongoDB on MacOS.
Once you entered the given above command, your MacOS terminal will start some process. Those processes are nothing but related to creating some folder in your local machine where all the Homebrew related settings are kept.
After finishing the installation process, check your Homebrew dependencies.
Hit the below commands to install MongoDB
After MongoDB successfully installed in your machine, then create a folder to store MongoDB data using given below command
Use the given below command to assign the proper permission to MongoDB data folder.

We’ve successfully installed the MongoDB on MacOS also assigned the proper permission. Now it’s time to run mongo daemon service. This service makes the connection and performs the task in the background. Hit the following command to run MongoDB.
Now your apps are all set to communicate with MongoDB. Mongo is correctly working in the background with the help of mongo daemon. You might also check which MongoDB version you are working on, just hit the below command in the terminal.
How To Install Mongodb On A Mac
mongo --version output
Install Mongodb In Mac Catalina Operating System
Above command will tell you which MongoDB version is running in your local machine. Using the latest version has always been a good practice. It protects you from compatibility chaos with client-side app.
Install Mongodb Osx Catalina
However, if you are using latest Mac version Catalina then the root folder is no longer writable.
Brew has an updated version of mongodb to use a new path (which it creates itself), /usr/local/var/mongodb and following these instructions will fix the issue:
Install Mongodb In Mac Catalina Free
Follow the link to install and update mongodb-community-edition
1 note
·
View note
Text
После установки монго и запуска в одной из строк:
"error":"NonExistentPath: Data directory C:\\data\\db\\ not found. Create the missing directory or specify another path using (1) the --dbpath command line option, or (2) by adding the 'storage.dbPath' option in the configuration file."
mongod.exe --dbpath E:\mongoBase
-переназначает директорию для хранения
{"t":{"$date":"2021-05-18T01:33:27.191+03:00"},"s":"I", "c":"NETWORK", "id":23015, "ctx":"listener","msg":"Listening on","attr":{"address":"127.0.0.1"}} {"t":{"$date":"2021-05-18T01:33:27.191+03:00"},"s":"I", "c":"NETWORK", "id":23016, "ctx":"listener","msg":"Waiting for connections","attr":{"port":27017,"ssl":"off"}}
Тут прописан сервер и порт.
Изменить можно в: C:\Program Files\MongoDB\Server\4.4\bin\mongod.cfg
2 notes
·
View notes
Text
Which Is The Best PostgreSQL GUI? 2021 Comparison
PostgreSQL graphical user interface (GUI) tools help open source database users to manage, manipulate, and visualize their data. In this post, we discuss the top 6 GUI tools for administering your PostgreSQL hosting deployments. PostgreSQL is the fourth most popular database management system in the world, and heavily used in all sizes of applications from small to large. The traditional method to work with databases is using the command-line interface (CLI) tool, however, this interface presents a number of issues:
It requires a big learning curve to get the best out of the DBMS.
Console display may not be something of your liking, and it only gives very little information at a time.
It is difficult to browse databases and tables, check indexes, and monitor databases through the console.
Many still prefer CLIs over GUIs, but this set is ever so shrinking. I believe anyone who comes into programming after 2010 will tell you GUI tools increase their productivity over a CLI solution.
Why Use a GUI Tool?
Now that we understand the issues users face with the CLI, let’s take a look at the advantages of using a PostgreSQL GUI:
Shortcut keys make it easier to use, and much easier to learn for new users.
Offers great visualization to help you interpret your data.
You can remotely access and navigate another database server.
The window-based interface makes it much easier to manage your PostgreSQL data.
Easier access to files, features, and the operating system.
So, bottom line, GUI tools make PostgreSQL developers’ lives easier.
Top PostgreSQL GUI Tools
Today I will tell you about the 6 best PostgreSQL GUI tools. If you want a quick overview of this article, feel free to check out our infographic at the end of this post. Let’s start with the first and most popular one.
1. pgAdmin
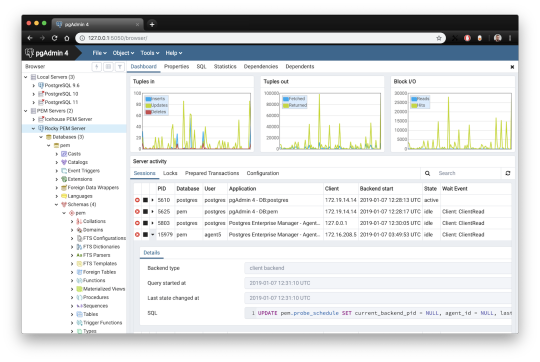
pgAdmin is the de facto GUI tool for PostgreSQL, and the first tool anyone would use for PostgreSQL. It supports all PostgreSQL operations and features while being free and open source. pgAdmin is used by both novice and seasoned DBAs and developers for database administration.
Here are some of the top reasons why PostgreSQL users love pgAdmin:
Create, view and edit on all common PostgreSQL objects.
Offers a graphical query planning tool with color syntax highlighting.
The dashboard lets you monitor server activities such as database locks, connected sessions, and prepared transactions.
Since pgAdmin is a web application, you can deploy it on any server and access it remotely.
pgAdmin UI consists of detachable panels that you can arrange according to your likings.
Provides a procedural language debugger to help you debug your code.
pgAdmin has a portable version which can help you easily move your data between machines.
There are several cons of pgAdmin that users have generally complained about:
The UI is slow and non-intuitive compared to paid GUI tools.
pgAdmin uses too many resources.
pgAdmin can be used on Windows, Linux, and Mac OS. We listed it first as it’s the most used GUI tool for PostgreSQL, and the only native PostgreSQL GUI tool in our list. As it’s dedicated exclusively to PostgreSQL, you can expect it to update with the latest features of each version. pgAdmin can be downloaded from their official website.
pgAdmin Pricing: Free (open source)
2. DBeaver

DBeaver is a major cross-platform GUI tool for PostgreSQL that both developers and database administrators love. DBeaver is not a native GUI tool for PostgreSQL, as it supports all the popular databases like MySQL, MariaDB, Sybase, SQLite, Oracle, SQL Server, DB2, MS Access, Firebird, Teradata, Apache Hive, Phoenix, Presto, and Derby – any database which has a JDBC driver (over 80 databases!).
Here are some of the top DBeaver GUI features for PostgreSQL:
Visual Query builder helps you to construct complex SQL queries without actual knowledge of SQL.
It has one of the best editors – multiple data views are available to support a variety of user needs.
Convenient navigation among data.
In DBeaver, you can generate fake data that looks like real data allowing you to test your systems.
Full-text data search against all chosen tables/views with search results shown as filtered tables/views.
Metadata search among rows in database system tables.
Import and export data with many file formats such as CSV, HTML, XML, JSON, XLS, XLSX.
Provides advanced security for your databases by storing passwords in secured storage protected by a master password.
Automatically generated ER diagrams for a database/schema.
Enterprise Edition provides a special online support system.
One of the cons of DBeaver is it may be slow when dealing with large data sets compared to some expensive GUI tools like Navicat and DataGrip.
You can run DBeaver on Windows, Linux, and macOS, and easily connect DBeaver PostgreSQL with or without SSL. It has a free open-source edition as well an enterprise edition. You can buy the standard license for enterprise edition at $199, or by subscription at $19/month. The free version is good enough for most companies, as many of the DBeaver users will tell you the free edition is better than pgAdmin.
DBeaver Pricing
: Free community, $199 standard license
3. OmniDB
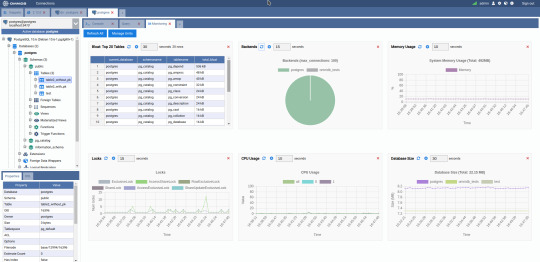
The next PostgreSQL GUI we’re going to review is OmniDB. OmniDB lets you add, edit, and manage data and all other necessary features in a unified workspace. Although OmniDB supports other database systems like MySQL, Oracle, and MariaDB, their primary target is PostgreSQL. This open source tool is mainly sponsored by 2ndQuadrant. OmniDB supports all three major platforms, namely Windows, Linux, and Mac OS X.
There are many reasons why you should use OmniDB for your Postgres developments:
You can easily configure it by adding and removing connections, and leverage encrypted connections when remote connections are necessary.
Smart SQL editor helps you to write SQL codes through autocomplete and syntax highlighting features.
Add-on support available for debugging capabilities to PostgreSQL functions and procedures.
You can monitor the dashboard from customizable charts that show real-time information about your database.
Query plan visualization helps you find bottlenecks in your SQL queries.
It allows access from multiple computers with encrypted personal information.
Developers can add and share new features via plugins.
There are a couple of cons with OmniDB:
OmniDB lacks community support in comparison to pgAdmin and DBeaver. So, you might find it difficult to learn this tool, and could feel a bit alone when you face an issue.
It doesn’t have as many features as paid GUI tools like Navicat and DataGrip.
OmniDB users have favorable opinions about it, and you can download OmniDB for PostgreSQL from here.
OmniDB Pricing: Free (open source)
4. DataGrip

DataGrip is a cross-platform integrated development environment (IDE) that supports multiple database environments. The most important thing to note about DataGrip is that it’s developed by JetBrains, one of the leading brands for developing IDEs. If you have ever used PhpStorm, IntelliJ IDEA, PyCharm, WebStorm, you won’t need an introduction on how good JetBrains IDEs are.
There are many exciting features to like in the DataGrip PostgreSQL GUI:
The context-sensitive and schema-aware auto-complete feature suggests more relevant code completions.
It has a beautiful and customizable UI along with an intelligent query console that keeps track of all your activities so you won’t lose your work. Moreover, you can easily add, remove, edit, and clone data rows with its powerful editor.
There are many ways to navigate schema between tables, views, and procedures.
It can immediately detect bugs in your code and suggest the best options to fix them.
It has an advanced refactoring process – when you rename a variable or an object, it can resolve all references automatically.
DataGrip is not just a GUI tool for PostgreSQL, but a full-featured IDE that has features like version control systems.
There are a few cons in DataGrip:
The obvious issue is that it’s not native to PostgreSQL, so it lacks PostgreSQL-specific features. For example, it is not easy to debug errors as not all are able to be shown.
Not only DataGrip, but most JetBrains IDEs have a big learning curve making it a bit overwhelming for beginner developers.
It consumes a lot of resources, like RAM, from your system.
DataGrip supports a tremendous list of database management systems, including SQL Server, MySQL, Oracle, SQLite, Azure Database, DB2, H2, MariaDB, Cassandra, HyperSQL, Apache Derby, and many more.
DataGrip supports all three major operating systems, Windows, Linux, and Mac OS. One of the downsides is that JetBrains products are comparatively costly. DataGrip has two different prices for organizations and individuals. DataGrip for Organizations will cost you $19.90/month, or $199 for the first year, $159 for the second year, and $119 for the third year onwards. The individual package will cost you $8.90/month, or $89 for the first year. You can test it out during the free 30 day trial period.
DataGrip Pricing
: $8.90/month to $199/year
5. Navicat

Navicat is an easy-to-use graphical tool that targets both beginner and experienced developers. It supports several database systems such as MySQL, PostgreSQL, and MongoDB. One of the special features of Navicat is its collaboration with cloud databases like Amazon Redshift, Amazon RDS, Amazon Aurora, Microsoft Azure, Google Cloud, Tencent Cloud, Alibaba Cloud, and Huawei Cloud.
Important features of Navicat for Postgres include:
It has a very intuitive and fast UI. You can easily create and edit SQL statements with its visual SQL builder, and the powerful code auto-completion saves you a lot of time and helps you avoid mistakes.
Navicat has a powerful data modeling tool for visualizing database structures, making changes, and designing entire schemas from scratch. You can manipulate almost any database object visually through diagrams.
Navicat can run scheduled jobs and notify you via email when the job is done running.
Navicat is capable of synchronizing different data sources and schemas.
Navicat has an add-on feature (Navicat Cloud) that offers project-based team collaboration.
It establishes secure connections through SSH tunneling and SSL ensuring every connection is secure, stable, and reliable.
You can import and export data to diverse formats like Excel, Access, CSV, and more.
Despite all the good features, there are a few cons that you need to consider before buying Navicat:
The license is locked to a single platform. You need to buy different licenses for PostgreSQL and MySQL. Considering its heavy price, this is a bit difficult for a small company or a freelancer.
It has many features that will take some time for a newbie to get going.
You can use Navicat in Windows, Linux, Mac OS, and iOS environments. The quality of Navicat is endorsed by its world-popular clients, including Apple, Oracle, Google, Microsoft, Facebook, Disney, and Adobe. Navicat comes in three editions called enterprise edition, standard edition, and non-commercial edition. Enterprise edition costs you $14.99/month up to $299 for a perpetual license, the standard edition is $9.99/month up to $199 for a perpetual license, and then the non-commercial edition costs $5.99/month up to $119 for its perpetual license. You can get full price details here, and download the Navicat trial version for 14 days from here.
Navicat Pricing
: $5.99/month up to $299/license
6. HeidiSQL
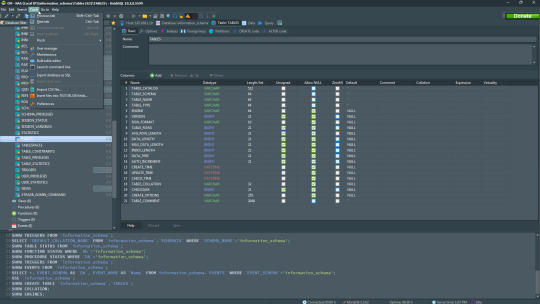
HeidiSQL is a new addition to our best PostgreSQL GUI tools list in 2021. It is a lightweight, free open source GUI that helps you manage tables, logs and users, edit data, views, procedures and scheduled events, and is continuously enhanced by the active group of contributors. HeidiSQL was initially developed for MySQL, and later added support for MS SQL Server, PostgreSQL, SQLite and MariaDB. Invented in 2002 by Ansgar Becker, HeidiSQL aims to be easy to learn and provide the simplest way to connect to a database, fire queries, and see what’s in a database.
Some of the advantages of HeidiSQL for PostgreSQL include:
Connects to multiple servers in one window.
Generates nice SQL-exports, and allows you to export from one server/database directly to another server/database.
Provides a comfortable grid to browse and edit table data, and perform bulk table edits such as move to database, change engine or ollation.
You can write queries with customizable syntax-highlighting and code-completion.
It has an active community helping to support other users and GUI improvements.
Allows you to find specific text in all tables of all databases on a single server, and optimize repair tables in a batch manner.
Provides a dialog for quick grid/data exports to Excel, HTML, JSON, PHP, even LaTeX.
There are a few cons to HeidiSQL:
Does not offer a procedural language debugger to help you debug your code.
Built for Windows, and currently only supports Windows (which is not a con for our Windors readers!)
HeidiSQL does have a lot of bugs, but the author is very attentive and active in addressing issues.
If HeidiSQL is right for you, you can download it here and follow updates on their GitHub page.
HeidiSQL Pricing: Free (open source)
Conclusion
Let’s summarize our top PostgreSQL GUI comparison. Almost everyone starts PostgreSQL with pgAdmin. It has great community support, and there are a lot of resources to help you if you face an issue. Usually, pgAdmin satisfies the needs of many developers to a great extent and thus, most developers do not look for other GUI tools. That’s why pgAdmin remains to be the most popular GUI tool.
If you are looking for an open source solution that has a better UI and visual editor, then DBeaver and OmniDB are great solutions for you. For users looking for a free lightweight GUI that supports multiple database types, HeidiSQL may be right for you. If you are looking for more features than what’s provided by an open source tool, and you’re ready to pay a good price for it, then Navicat and DataGrip are the best GUI products on the market.
Ready for some PostgreSQL automation?
See how you can get your time back with fully managed PostgreSQL hosting. Pricing starts at just $10/month.
While I believe one of these tools should surely support your requirements, there are other popular GUI tools for PostgreSQL that you might like, including Valentina Studio, Adminer, DB visualizer, and SQL workbench. I hope this article will help you decide which GUI tool suits your needs.
Which Is The Best PostgreSQL GUI? 2019 Comparison
Here are the top PostgreSQL GUI tools covered in our previous 2019 post:
pgAdmin
DBeaver
Navicat
DataGrip
OmniDB
Original source: ScaleGrid Blog
3 notes
·
View notes