#my Scrap Quilt Drawer for the various sized pieces for the Scrap quilt
Text
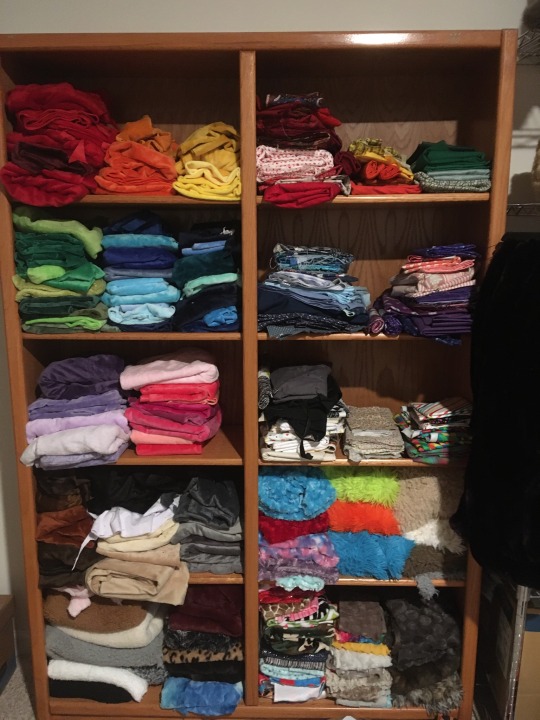
Most of my fabric is unpacked and organized!
I need to like totally overhaul how I store scrap quilting fabric, and I’m not quite sure how I’m going to do that, but most of my fabric is unpacked!
#fabric#the person behind the yarn#it’s more than a little funny to me that my stash#which includes WAIT I FORGOT A BOX#I was going to say my stash is like 75% for plushies despite inheriting my grandma’s destash#but I FORGOT an entire damn box of fabric#I am not as done as I thought I was :(#but on the other hand…more fabric! :D#the scrap overhaul is previously I had a little plastic tote box thing#where I stored scraps smaller than a fat eighth before cutting them to usable sizes#my Scrap Quilt Drawer for the various sized pieces for the Scrap quilt#and then the tiny scraps (less than 2.5 inches) were sorted into my crumb piecing boxes#one color per box#but my pre-sorting scraps are outgrowing the plastic tote#and some of them idk that I really want in this scrap quilt?#I might save them for a slightly less scrappy patchwork#but I need to organize them first
20 notes
·
View notes
Text
My Day on the Spring Clean Your Studio Blog Hop
Welcome to my day on the Spring Clean Your Studio Blog Hop!
Four years ago (yes, that long!) I wrote a series of posts giving you a tour of my sewing studio. You’ll find links to those posts at the end of this post. I share my sewing room with my husband who is also self-employed. The room is over the garage and so it’s larger than a normal bedroom.
Here’s what my studio looked like back then…
When I got serious about quilting as a business four years ago, I came up with a plan for organizing my space. Although I’m pretty computer savvy, I used simple grid paper to design my sewing room. You could use grid paper too!
The photo on the left shows the original arrangement. Within a few months, I decided that I needed more organization so purchased a cabinet from Ikea and moved the sofa table from the living room up to my sewing room to use for a cutting table.
As you can see on the map, my computer desk and my sewing table (Kate’s desk) and two filing cabinets form an L shape in which I mostly work. The Ikea cabinet is close by and it has a small cutting mat on it and a small ironing board. This forms the heart of my sewing area.
On the other side of the filing cabinets, I placed my sofa table and on top of that, my large cutting mat. I have several bookcases in which I store my fabrics, batting, tools, and projects. (The tools and projects are stored in plastic containers marked with labels.)
Under the sofa table, I placed an Ikea set of sliding drawers. I organized my fabric scraps by size in these drawers—1/2 to 1”, 2-2-1/2”, and so on.
As wonderful as I thought I my setup was, over time I kept finding little things that I thought I could improve. I kept collecting these ideas and then one day, I knew it was time to implement my changes.
My Sewing Studio 2.0
Recently, my husband replaced his desk with a much smaller one so I decided it was finally time to redo my sewing studio.
Before I get into the details, here is a short video tour of what my studio looks now.
Switching my sewing table and my desk
One of the things I didn’t like about my old set up was how the sun would come in the windows and shine on my computer screen. Likewise, I didn’t like how little sun shone on my sewing machine table. So duh, I switched them, placing my sewing machine closer to the windows and my computer further away.
Now the sun shines brightly on my sewing area and doesn’t glare on my computer monitor.
Improving the cutting and pressing area
Next, I liked the idea of having a place for my large cutting mat, but the sofa table simply wasn’t wide enough. So I moved the sofa table close to the windows, and placed the Ikea drawer unit underneath (the one with my fabric scraps). My desk used to butt up against the window, so when I switched the desk and my sewing machine table, I left a space next to the window big enough to put the sofa table.
By putting my sofa table next to the Ikea cabinet, I created one long table against the window. Now I have room for my ironing station, cutting mat, and my Accuquilt GO! cutter in one place (a recent addition to my sewing studio.)
Notice how I can move the cutting mat to the sofa table to create a larger area for pressing and arranging pieces for sewing. I love the flexibility of this new area.
So what about my big cutting mat? Well, I replaced the sofa table with a folding table from Costco. The new table is wide enough for the big cutting mat with room to spare. I use this cutting area to trim quilts and to cut long borders.
I’ve placed the table on risers to make it the perfect height for cutting. As a plus, this also gives me plenty of space underneath to organize my other sewing machines, sewing machine totes, photo backgrounds, printed patterns and such.
Making space for photography
As a blogger and social media maven <grin> I’ve learned that photography is important. To get beautiful photos you need lots of light. Although I have a wall of windows in my studio, they don’t get a lot of light in them, especially later in the afternoon when I tend to take pictures. So for Christmas I got myself a photo cube. That’s the big black cube you see next to my big cutting table here. Inside it has lights and a vinyl background I can switch out when I want a different color.
As I was rearranging my studio, I kept in mind that I needed to have a place for the photo cube. In the end, I put it on top of one of my filing cabinets. That moves it out of the way of my sewing/computer area, yet keeps it convenient when I need to take studio shots.
A place for books…(and more importantly—fabric!)
During the big reorganization, I straightened my husband’s books on our built-in bookshelf and found room for my quilting books. That freed up some space on my short bookshelf for my black and white fabrics and current works in progress.
By moving my black and white fabrics from my two big bookshelves, I freed up space for fabric that’s been sitting around in bags on the floor waiting for some place for me to put it. (Oops! <wink>)
Keeping the batting from driving me batty
I had most of my batting stored above my bookshelves, with batting scraps in one of the fabric drawers of my Ikea cabinet. This kinda worked but I wanted my batting all together.
More importantly though, I wanted to organize my batting by size to make it easier to find batting that was big enough for my current project. So during my reorganization, I took all my new batts and wrote the size on one end with a marker so I could tell their size from the floor.
Then I took my batting scraps and pinned a small piece of paper with the size to each one. I placed those batting scraps in two boxes—10” or less wide (any length) and 30” or more. Guess I don’t have any batting in between? <grin>
A home for my printer
Big on my wish list during my reorganization was to find a convenient place for my printer and pattern papers. The printer used to be closer to my husband’s desk and to get to it I had to walk around my desk and large cutting table (and a bunch of bags on the floor) to the other side of the room. To say this was inconvenient was an understatement.
When I moved the quilt books and subsequently moved my black and white fabrics, that small bookshelf had just enough room for my current projects. Since they used to sit on a small black cabinet near the stairs (in a completely unorganized pile—not even in boxes!) that cabinet top suddenly became free! So I put the printer and paper on it. This little change has literally changed my life and made things so much easier! (The cabinet by the way holds tools I don’t use much, plus foundation papers and other specialty items.)
Organizing my thread
The final item on my wish list was to get my thread and my Island Batiks organized.
I’d bought a lot of Aurifil sets as several Markets and they needed to be organized into my existing thread collection, sorted by color. So I went to JoAnns and bought more thread organizers for all the new thread and solved that problem.
I just love looking at all this thread!
I kept two of the little thread collection cases—they now hold the basic colors I piece with. I keep them near my sewing machine so they are so handy! Previously I would haul down the right thread collection case and sort through it to find the perfect white, grey, beige or black that I needed. Another problem solved!
organizing my Island Batiks
My Island Batiks on the other hand, were always a bit disorganized. New collections were placed in the Ikea fabric drawers while older pieces were stored in several cardboard boxes, tucked in various places of my sewing room. Since I’m an Island Batik Ambassador, I like to share the name of the Island Batik collections I use in my quilts so my readers can find those same fabrics too if they want, and that takes a lot of organization on my part. So this was a must do.
First I gathered my batiks from their various hidey-holes, sorted the older pieces by color and placed them in the fabric drawers of my Ikea cabinet. I organized the new collections (including the collections I can’t share with you just yet) and placed them in one of the open sections of the Ikea cabinet. Having them out in the open reminds me to use them (as soon as I’m allowed) for my monthly Island Batik Ambassador challenges.
Having all my Island Batiks in one place organized by color has made a huge difference since I am constantly designing and quilting with batiks. My life is so easy now and all it took was this one little change!
While organizing my batiks into the drawers of the Ikea cabinet, I took the opportunity to organize other items I use often such as my postal supplies, fusibles, and giveaways. Now the Ikea cabinet contains the things I use most often instead of a bunch of miscellaneous supplies I thought might fit in the drawers.
My dream design wall…
The final change wasn’t really a change but a fix. Years ago, my husband installed a design wall for me. I made it in sections so it could be portable. That also allowed me to take it off the wall if I wanted.
Originally we attached it using Contact strips. But it kept pulling away from the wall in a few places. And I never did use it elsewhere so having it portable seemed silly. So I had him screw it into the wall. Now it’s nice and steady.
I love my big design wall!
Well that’s my studio! Here’s what I learned:
When organizing your studio, don’t sweat it. Sometimes it takes living and working in your sewing room to figure out what you really need and where.
Think about how you work. What do you use daily? What do you want to have nearby? (Hint: you probably will want your ironing and cutting areas near your sewing machine for convenience.)
Consider light. Another thing that was big on my list during the redo was light. I just can’t see things as well as I used to. So I upgraded my light bulbs to LED which are brighter and cooler (I hate getting hot!). I also added a bright light by my sewing machine. Love it! I still need to add more lights over by my design wall but that means a trip to Ikea so it’ll have to wait for now.
Little things mean a lot. Sometimes all you need is a little change. Labeling my batting with the sizes has saved me so much time! So has organizing my batiks. And my thread. I lived with the disorganization and made it work but taking the time to organize those three things has made my life so much easier! So don’t let the idea of organizing your studio overwhelm you. Start with the one thing that bugs you the most, and change that.
Thanks for stopping by!
Be sure to visit the other blogs on the hop!
The hop just started a few days ago so you haven’t missed much yet! To catch up, visit
April 1 - Sam Hunter - Hunter Design Studio
April 2 - Marian Pena - Seams to be Sew
Tomorrow is Martha’s turn.
April 4 - Martha Wolf - Pinwheel Productions
The hop continues through April 27th, one studio per day. For the rest of the blog hop schedule, click the on the QAL and Blog Hops tab above and choose Spring Clean Your Studio Blog Hop!
you might also like
TEll me…what would you most like to change about your sewing studio?
0 notes
Note
I havent been here for the quilting saga, very cool that you're done your squares, what were you going for with this quilt? Like what were ur quilt goals, why did u choose those fabrics? Is it meaningful or all just stuff you like?
This latest quilt is my scrap quilt, which means it's entirely made of fabric scraps from previous quilts I've made.
Well, mostly from quilts I've made, plus one bag's worth of scrap fabric from a local quilt shop, plus a few scraps from various peoples' destashes I've been given over the years?
So there wasn't really an overarching goal, per se, except to use up fabric scraps because I couldn't bring myself to throw them away but didn't have enough of any one color palette to make a cohesive quilt top. I put zero thought or effort into color distribution except to try to keep different pieces of the same fabric from touching each other, and I had a few very dark fabrics that stand out against my usual "everything is as bright as possible" color choices so I made sure those were distributed evenly across the quilt.
As for the quilt pattern itself, it's made of two kinds of 12" blocks.
Block A is made of six rows of 2.5" strips. I made them by sewing my 2.5" strips into a very long single piece of fabric and then cutting that into 12.5" by 2.5" rectangles, then sewing those together
Block B is basically a 4 patch block, but the upper right and lower left squares are made of smaller 4 patch blocks. So it's two 6.5" squares and eight 3.5" squares per Block B.
I chose those sizes because they were small enough to be easy to cut even out of small scraps and scaled well with each other to make a pattern I would not get bored sewing. Every few weeks I'd collect my fabric scraps, iron them, cut them down to those sizes and put them in the scrap quilt drawer until I had enough to make the quilt top I'm working on now
#ask away!#scrap management#I mean that said I did make some of my 6.5 and 3.5 inch blocks with crumb sewing#which means that instead of being a single piece of fabric it's a whole bunch of tiny irregularly shaped pieces sewn together#I also made a bunch of the 3.5 inch squares with half square triangles and quarter square triangles#because I got a tool thing that makes them super easy to cut#and had a lot of fun with that#most of the fabrics are kind of meaningful in that I can look at them and remember the quilts I made with those fabrics#some of them the memory is just 'I cannot resist a bin of scrap fabric at the local quilt shop'#but it's still a lot of memories!#and I'm really proud of myself for sticking to it for this long#I'm usually not the best with long-term crafting projects because I lose interest#but I worked on this a little bit at a time over the years#and now it's almost done!#I should look back and see when I made my earliest scrap management post so I can see when I started it
5 notes
·
View notes
Last Seen Blogs


jkbpacks
ִֶָ

bcstcopilot
His Co-Pilot

slutdreams
Desi gurl

dreamland03
Here To Get Away From The Day