#mysql query from file
Explore tagged Tumblr posts
Visit Tumblr Blog
Explore Tumblr blogs with no restrictions, modern design and the best experience.
Last Seen Tumblr Blogs


Fun Fact
After the announcement of the deal with Yahoo!, there were 170K signatures of unhappy Tumblr users petitioning to prevent the sale in 2013.
Text
Complete PHP Tutorial: Learn PHP from Scratch in 7 Days
Are you looking to learn backend web development and build dynamic websites with real functionality? You’re in the right place. Welcome to the Complete PHP Tutorial: Learn PHP from Scratch in 7 Days — a practical, beginner-friendly guide designed to help you master the fundamentals of PHP in just one week.
PHP, or Hypertext Preprocessor, is one of the most widely used server-side scripting languages on the web. It powers everything from small blogs to large-scale websites like Facebook and WordPress. Learning PHP opens up the door to back-end development, content management systems, and full-stack programming. Whether you're a complete beginner or have some experience with HTML/CSS, this tutorial is structured to help you learn PHP step by step with real-world examples.
Why Learn PHP?
Before diving into the tutorial, let’s understand why PHP is still relevant and worth learning in 2025:
Beginner-friendly: Easy syntax and wide support.
Open-source: Free to use with strong community support.
Cross-platform: Runs on Windows, macOS, Linux, and integrates with most servers.
Database integration: Works seamlessly with MySQL and other databases.
In-demand: Still heavily used in CMS platforms like WordPress, Joomla, and Drupal.
If you want to build contact forms, login systems, e-commerce platforms, or data-driven applications, PHP is a great place to start.
Day-by-Day Breakdown: Learn PHP from Scratch in 7 Days
Day 1: Introduction to PHP & Setup
Start by setting up your environment:
Install XAMPP or MAMP to create a local server.
Create your first .php file.
Learn how to embed PHP inside HTML.
Example:
<?php echo "Hello, PHP!"; ?>
What you’ll learn:
How PHP works on the server
Running PHP in your browser
Basic syntax and echo statement
Day 2: Variables, Data Types & Constants
Dive into PHP variables and data types:
$name = "John"; $age = 25; $is_student = true;
Key concepts:
Variable declaration and naming
Data types: String, Integer, Float, Boolean, Array
Constants and predefined variables ($_SERVER, $_GET, $_POST)
Day 3: Operators, Conditions & Control Flow
Learn how to make decisions in PHP:
if ($age > 18) { echo "You are an adult."; } else { echo "You are underage."; }
Topics covered:
Arithmetic, comparison, and logical operators
If-else, switch-case
Nesting conditions and best practices
Day 4: Loops and Arrays
Understand loops to perform repetitive tasks:
$fruits = ["Apple", "Banana", "Cherry"]; foreach ($fruits as $fruit) { echo $fruit. "<br>"; }
Learn about:
for, while, do...while, and foreach loops
Arrays: indexed, associative, and multidimensional
Array functions (count(), array_push(), etc.)
Day 5: Functions & Form Handling
Start writing reusable code and learn how to process user input from forms:
function greet($name) { return "Hello, $name!"; }
Skills you gain:
Defining and calling functions
Passing parameters and returning values
Handling HTML form data with $_POST and $_GET
Form validation and basic security tips
Day 6: Working with Files & Sessions
Build applications that remember users and work with files:
session_start(); $_SESSION["username"] = "admin";
Topics included:
File handling (fopen, fwrite, fread, etc.)
Reading and writing text files
Sessions and cookies
Login system basics using session variables
Day 7: PHP & MySQL – Database Connectivity
On the final day, you’ll connect PHP to a database and build a mini CRUD app:
$conn = new mysqli("localhost", "root", "", "mydatabase");
Learn how to:
Connect PHP to a MySQL database
Create and execute SQL queries
Insert, read, update, and delete (CRUD operations)
Display database data in HTML tables
Bonus Tips for Mastering PHP
Practice by building mini-projects (login form, guest book, blog)
Read official documentation at php.net
Use tools like phpMyAdmin to manage databases visually
Try MVC frameworks like Laravel or CodeIgniter once you're confident with core PHP
What You’ll Be Able to Build After This PHP Tutorial
After following this 7-day PHP tutorial, you’ll be able to:
Create dynamic web pages
Handle form submissions
Work with databases
Manage sessions and users
Understand the logic behind content management systems (CMS)
This gives you the foundation to become a full-stack developer, or even specialize in backend development using PHP and MySQL.
Final Thoughts
Learning PHP doesn’t have to be difficult or time-consuming. With the Complete PHP Tutorial: Learn PHP from Scratch in 7 Days, you’re taking a focused, structured path toward web development success. You’ll learn all the core concepts through clear explanations and hands-on examples that prepare you for real-world projects.
Whether you’re a student, freelancer, or aspiring developer, PHP remains a powerful and valuable skill to add to your web development toolkit.
So open up your code editor, start typing your first <?php ... ?> block, and begin your journey to building dynamic, powerful web applications — one day at a time.

0 notes
Text
Live Support Chat Nulled Script 5.1.3

Unlock Real-Time Customer Engagement with Live Support Chat Nulled Script Looking for a powerful, real-time communication solution for your website? The Live Support Chat Nulled Script is the ultimate tool to boost user satisfaction and convert casual visitors into loyal customers. With seamless integration, robust features, and complete customization options, this nulled script gives you the edge of professional-grade live chat without the hefty price tag. What is Live Support Chat Nulled Script? The Live Support Chat Nulled Script is a feature-rich, real-time live chat system designed for businesses, startups, and agencies that want to provide instant customer support. This PHP-based solution is ideal for integrating directly into your website and allows your support team to chat with users, resolve issues, and convert leads — all in real time. Since this is a nulled version, you get complete access to premium features without any licensing restrictions or costs. Why Choose the Live Support Chat Nulled Script? Today’s digital consumers expect immediate responses, and this is where live chat becomes a game-changer. With the Live Support Chat , you’ll provide seamless support, monitor user activity, and increase customer satisfaction. No need to pay extra for live chat services — this nulled solution delivers high-end results for free. Technical Specifications Platform: PHP-based, compatible with all modern browsers Database: MySQL Responsiveness: Fully responsive and mobile-friendly UI Security: Role-based access control, chat encryption support Customization: Easy branding and UI modifications via built-in panel Key Features and Benefits Real-Time Messaging: Engage visitors with real-time conversations to resolve queries instantly. Multi-Agent Support: Allow multiple support agents to assist different users at once. User Monitoring: Track visitor movements, pages visited, and time spent on site. File Sharing: Securely send and receive files during chat sessions. Chat Transcripts: Save and review chat histories for quality and training purposes. Offline Messaging: Capture user inquiries even when your team is offline. Custom Alerts: Notify agents of new visitors, messages, and support tickets in real-time. Who Should Use This Script? The Live Support Chat Nulled Script is perfect for: E-commerce Websites: Help customers instantly with product queries and order assistance. Agencies: Provide immediate consultation and project updates to your clients. SaaS Platforms: Offer technical support without expensive third-party tools. Educational Platforms: Answer student queries and boost engagement. Easy Installation and Setup Guide Download the Live Support Chat Nulled Script from our secure platform. Upload the files to your web hosting account using FTP or cPanel. Configure the database settings by updating the config file. Run the installation wizard to finalize setup. Customize the chat interface to match your website branding. You don’t need to be a developer to get started. With detailed documentation and a user-friendly interface, this nulled script can be set up in minutes. Frequently Asked Questions (FAQs) Is it safe to use the Live Support Chat Nulled Script? Yes, the script is thoroughly scanned and tested for security vulnerabilities. Just ensure your website hosting is secure, and you’re good to go. Can I customize the interface to match my branding? Absolutely! The script includes a built-in customization panel where you can modify colors, fonts, logos, and more. Does it support multiple languages? Yes, the Live Support Chat is fully translation-ready, making it perfect for multilingual support environments. Can I use this script with WordPress? While it's not a native WordPress plugin, it can be easily integrated into any WordPress site using custom pages or widgets. Get More With Our Collection of nulled plugins Why stop at live chat? Explore our vast library of professionally nulled plugins to supercharge your site without spending a dime.
Whether you need SEO tools, backup systems, or security add-ons, we’ve got you covered. Need more advanced tools? Check out UpdraftPlus Premium nulled for hassle-free backups and restoration solutions at zero cost. Final Thoughts The Live Support Chat offers a reliable, scalable, and cost-effective way to provide instant customer service. Whether you’re a small business or a growing enterprise, this script has everything you need to support your users 24/7 — without draining your budget. Download it today and transform your customer experience forever.
0 notes
Text
PHP, LAMP (Linux Apache MySQL PHP)
The LAMP stack — Linux, Apache, MySQL, and PHP — has been a cornerstone of web development for over two decades. It’s an open-source suite of software components that work together to serve dynamic websites and web applications. Among these, PHP plays a central role, acting as the scripting language responsible for generating dynamic page content. Despite the rise of modern development stacks like MERN or JAMstack, LAMP remains a reliable, accessible, and widely used platform for developers around the world.
What is LAMP?

LAMP is an acronym that stands for:
Linux: The operating system.
Apache: The web server software.
MySQL: The relational database management system.
PHP: The server-side scripting language.
Each component of LAMP is free and open-source, which contributed to its massive adoption in the early 2000s. Even today, LAMP powers a significant portion of the web, including popular platforms like WordPress, Drupal, and Joomla.
PHP: The Dynamic Power of LAMP

PHP (Hypertext Preprocessor) is the scripting language used in LAMP to process user requests and generate dynamic content. It integrates seamlessly with HTML, making it easy for developers to embed logic within web pages. PHP scripts are executed on the server, and the output is sent to the client’s browser in the form of standard HTML.
PHP supports a vast range of features including form handling, file management, database access, and session tracking. It’s easy to learn for beginners, yet powerful enough to build complex web applications. PHP is constantly evolving, with the latest versions offering improved performance, better error handling, and strong security features.
The Role of Each Component in LAMP

Here’s a breakdown of how each element in the LAMP stack functions together:
1. Linux
Linux acts as the foundation for the LAMP stack. It’s known for its stability, flexibility, and security. Most servers run on some version of Linux because of its ability to handle high volumes of traffic and customizable nature. Common Linux distributions used in LAMP setups include Ubuntu, CentOS, and Debian.
2. Apache
Apache is a powerful and flexible open-source web server that handles HTTP requests from users’ browsers. It is responsible for delivering web pages to the client and includes modules for URL rewriting, authentication, and more. Apache can be customized using .htaccess files, making it easy to manage server behavior for specific directories.
3. MySQL
MySQL is a robust relational database management system used to store and manage application data. From user accounts to blog posts, all information can be efficiently queried and updated using SQL (Structured Query Language). PHP and MySQL often work hand in hand, with PHP scripts using MySQL queries to interact with the database.
4. PHP
PHP pulls it all together by connecting the front-end interface with the back-end logic. Whether it’s fetching blog posts from a database or processing user input from a form, PHP makes the content dynamic and personalized. PHP also supports object-oriented programming, error handling, and integration with third-party libraries.
Find Out More About This
Why Developers Still Choose LAMP

Despite the introduction of newer stacks, LAMP remains popular for a few key reasons:
Maturity and Stability: With decades of development, LAMP is well-documented and stable.
Community Support: A large community ensures that developers can find tutorials, tools, and forums for help.
Cost Efficiency: Being open-source, it significantly reduces hosting and licensing costs.
Flexibility: Suitable for projects of all sizes, from small blogs to enterprise-level applications.
Compatibility: Most hosting providers support LAMP out of the box.

PHP and the LAMP stack have stood the test of time in the world of web development. They offer a dependable, efficient, and accessible way to build and maintain dynamic websites. Whether you’re launching a personal blog or developing a business application, the LAMP stack remains a solid choice. As PHP continues to evolve and the ecosystem matures, LAMP proves that reliable technology doesn’t always need to be the newest — sometimes, it just needs to work exceptionally well.
0 notes
Text
Understanding DP-900: Microsoft Azure Data Fundamentals
The DP-900, or Microsoft Azure Data Fundamentals, is an entry-level certification designed for individuals looking to build foundational knowledge of core data concepts and Microsoft Azure data services. This certification validates a candidate’s understanding of relational and non-relational data, data workloads, and the basics of data processing in the cloud. It serves as a stepping stone for those pursuing more advanced Azure data certifications, such as the DP-203 (Azure Data Engineer Associate) or the DP-300 (Azure Database Administrator Associate).
What Is DP-900?
The DP-900 exam, officially titled "Microsoft Azure Data Fundamentals," tests candidates on fundamental data concepts and how they are implemented using Microsoft Azure services. It is part of Microsoft’s role-based certification path, specifically targeting beginners who want to explore data-related roles in the cloud. The exam does not require prior experience with Azure, making it accessible to students, career changers, and IT professionals new to cloud computing.
Exam Objectives and Key Topics
The DP-900 exam covers four primary domains:
1. Core Data Concepts (20-25%) - Understanding relational and non-relational data. - Differentiating between transactional and analytical workloads. - Exploring data processing options (batch vs. real-time).
2. Working with Relational Data on Azure (25-30%) - Overview of Azure SQL Database, Azure Database for PostgreSQL, and Azure Database for MySQL. - Basic provisioning and deployment of relational databases. - Querying data using SQL.
3. Working with Non-Relational Data on Azure (25-30%) - Introduction to Azure Cosmos DB and Azure Blob Storage. - Understanding NoSQL databases and their use cases. - Exploring file, table, and graph-based data storage.
4. Data Analytics Workloads on Azure (20-25%) - Basics of Azure Synapse Analytics and Azure Databricks. - Introduction to data visualization with Power BI. - Understanding data ingestion and processing pipelines.
Who Should Take the DP-900 Exam?
The DP-900 certification is ideal for: - Beginners with no prior Azure experience who want to start a career in cloud data services. - IT Professionals looking to validate their foundational knowledge of Azure data solutions. - Students and Career Changers exploring opportunities in data engineering, database administration, or analytics. - Business Stakeholders who need a high-level understanding of Azure data services to make informed decisions.
Preparation Tips for the DP-900 Exam
1. Leverage Microsoft’s Free Learning Resources Microsoft offers free online training modules through Microsoft Learn, covering all exam objectives. These modules include hands-on labs and interactive exercises.
2. Practice with Hands-on Labs Azure provides a free tier with limited services, allowing candidates to experiment with databases, storage, and analytics tools. Practical experience reinforces theoretical knowledge.
3. Take Practice Tests Practice exams help identify weak areas and familiarize candidates with the question format. Websites like MeasureUp and Whizlabs offer DP-900 practice tests.
4. Join Study Groups and Forums Online communities, such as Reddit’s r/AzureCertification or Microsoft’s Tech Community, provide valuable insights and study tips from past exam takers.
5. Review Official Documentation Microsoft’s documentation on Azure data services is comprehensive and frequently updated. Reading through key concepts ensures a deeper understanding.
Benefits of Earning the DP-900 Certification
1. Career Advancement The certification demonstrates foundational expertise in Azure data services, making candidates more attractive to employers.
2. Pathway to Advanced Certifications DP-900 serves as a prerequisite for higher-level Azure data certifications, helping professionals specialize in data engineering or database administration.
3. Industry Recognition Microsoft certifications are globally recognized, adding credibility to a resume and increasing job prospects.
4. Skill Validation Passing the exam confirms a solid grasp of cloud data concepts, which is valuable in roles involving data storage, processing, or analytics.
Exam Logistics
- Exam Format: Multiple-choice questions (single and multiple responses). - Duration: 60 minutes. - Passing Score: 700 out of 1000. - Languages Available: English, Japanese, Korean, Simplified Chinese, and more. - Cost: $99 USD (prices may vary by region).
Conclusion
The DP-900 Microsoft Azure Data Fundamentals certification is an excellent starting point for anyone interested in cloud-based data solutions. By covering core data concepts, relational and non-relational databases, and analytics workloads, it provides a well-rounded introduction to Azure’s data ecosystem. With proper preparation, candidates can pass the exam and use it as a foundation for more advanced certifications. Whether you’re a student, IT professional, or business stakeholder, earning the DP-900 certification can open doors to new career opportunities in the growing field of cloud data management.
1 note
·
View note
Text
SQL Database Fundamentals

SQL (Structured Query Language) is the standard language used to interact with relational databases. Whether you're building a small app or working on a large enterprise system, SQL is essential for storing, retrieving, and managing data effectively. This post introduces the key concepts and commands every beginner should know.
What is a Database?
A database is a structured collection of data that allows for easy access, management, and updating. SQL databases (like MySQL, PostgreSQL, and SQLite) organize data into tables that are related to each other.
What is SQL?
SQL stands for Structured Query Language. It is used to:
Create and manage databases
Insert, update, delete, and retrieve data
Control access and permissions
Basic SQL Commands
CREATE: Create a new database or table
INSERT: Add new data to a table
SELECT: Query and retrieve data
UPDATE: Modify existing data
DELETE: Remove data from a table
Example: Creating a Table
CREATE TABLE Users ( id INT PRIMARY KEY, name VARCHAR(100), email VARCHAR(100) );
Inserting Data
INSERT INTO Users (id, name, email) VALUES (1, 'Alice', '[email protected]');
Retrieving Data
SELECT * FROM Users;
Updating Data
UPDATE Users SET email = '[email protected]' WHERE id = 1;
Deleting Data
DELETE FROM Users WHERE id = 1;
Key Concepts to Learn
Tables and Rows: Tables store data in rows and columns.
Primary Keys: Unique identifier for each record.
Relationships: Data in one table can reference data in another.
Joins: Combine data from multiple tables.
Constraints: Rules for data integrity (e.g., NOT NULL, UNIQUE, FOREIGN KEY).
Common Types of SQL Databases
MySQL: Open-source and widely used for web development.
PostgreSQL: Advanced features and great performance.
SQLite: Lightweight, file-based database for small apps.
Microsoft SQL Server: Enterprise-grade database by Microsoft.
Helpful Resources
W3Schools SQL Tutorial
SQLZoo Interactive Learning
Codecademy Learn SQL
PostgreSQL Documentation
Conclusion
SQL is a foundational skill for anyone working with data or building applications. With just a few basic commands, you can begin managing and analyzing structured data effectively. Start practicing on a sample database and experiment with different queries — it’s the best way to learn!
0 notes
Text
Understanding Caching Strategies for Faster Web Applications
In today’s fast-moving digital world, website speed plays a crucial role in user experience and search rankings. A slow-loading website can frustrate visitors and drive them away. One effective way to speed up web applications is through caching. But what exactly is caching, and how can it help improve website performance? Let’s break it down in simple terms.
What is Caching?
Caching is the process of storing frequently accessed data in a temporary storage space, so it can be quickly retrieved when needed. Instead of fetching information from the main database every time a user visits a site, cached data allows for faster access, reducing load times and server strain.
Why is Caching Important for Web Applications?
Speeds up website performance – Cached content loads faster, improving user experience.
Reduces server load – Fewer requests to the main database mean less processing power is needed.
Enhances scalability – Websites can handle more visitors without slowing down.
Improves SEO ranking – Faster websites perform better in search engine results.
Common Caching Strategies
There are several caching methods used to optimize web applications. Choosing the right approach depends on your website’s needs and traffic patterns.
1. Browser Caching
Browser caching stores static files like images, CSS, and JavaScript on a user’s device. The next time they visit the site, their browser loads these files locally instead of downloading them again. This reduces page load time significantly.
Best for: Websites with returning visitors.
How to implement: Set expiration headers in the website’s .htaccess file or use a content delivery network (CDN).
2. Page Caching
Page caching stores fully rendered web pages on the server. When a user requests a page, they receive a pre-generated version instead of processing it from scratch.
Best for: Blogs, news websites, and content-heavy platforms.
How to implement: Use caching plugins (for CMS platforms like WordPress) or configure caching settings in the web server.
3. Object Caching
Object caching saves the results of database queries, preventing repetitive data retrieval. This method is useful for dynamic websites that frequently fetch information from a database.
Best for: eCommerce platforms and membership-based websites.
How to implement: Use caching solutions like Memcached or Redis.
4. CDN Caching
A Content Delivery Network (CDN) caches website content on multiple servers worldwide. This ensures users can load pages from a nearby server instead of relying on the original server, improving speed and reliability.
Best for: Global websites with high traffic.
How to implement: Use CDN services like Cloudflare, Akamai, or Amazon CloudFront.
5. Database Caching
Database caching stores frequently used queries, reducing the need for repeated database calls. This helps improve performance, especially for sites with large amounts of data.
Best for: Large-scale applications and data-heavy websites.
How to implement: Configure database settings or use caching tools like Redis and MySQL query caching.
How to Choose the Right Caching Strategy
The best approach depends on your website’s structure, traffic volume, and the type of content you deliver. A combination of different caching techniques often yields the best results.
For static content: Browser caching and page caching work well.
For dynamic websites: Object caching and database caching help speed up data retrieval.
For global audiences: CDN caching ensures fast content delivery.
Common Caching Challenges and Solutions
While caching significantly improves speed, it can sometimes cause issues if not managed properly. Here are some common problems and how to fix them:
Stale Content: Cached versions of a page might not update immediately after changes.
Solution: Use cache expiration policies or enable cache purging.
Storage Limitations: Overloaded caches can slow down performance.
Solution: Set cache size limits and use automated cleanup.
Cache Invalidation Issues: If outdated data remains in the cache, users may see incorrect information.
Solution: Implement cache versioning or manual refresh options.
The Role of Web Development Agencies in Caching Optimization
Many businesses rely on expert guidance to implement caching effectively. Some of the best web development agencies in India specialize in optimizing caching strategies to enhance website performance. These agencies analyze website traffic, content structure, and database interactions to design a caching system that delivers optimal results.
Final Thoughts
Caching is an essential technique for improving website speed and efficiency. By selecting the right caching strategy, businesses can provide a seamless experience to users while reducing server costs. Whether you’re running a small blog or a large-scale eCommerce platform, implementing caching can make a significant difference in performance.For businesses looking to maximize their website’s speed and user experience, partnering with one of the best web development agencies in India can help ensure proper caching implementation and long-term success.
#website development company in india#web design company india#website designing company in india#best web development agencies india#digital marketing agency india#online reputation management companies in india
0 notes
Text
MySQL insights: Database Management for Beginners and Experts
Databases form the backbone of every online application, from social media platforms to e-commerce stores. MySQL stands out as one of the most widely used relational database management systems (RDBMS) globally. Whether you are a beginner looking to learn MySQL or an expert seeking advanced database management techniques, this blog will provide valuable insights into MySQL's capabilities, features, and best practices.
What is MySQL?
MySQL is an open-source relational database management system (RDBMS) that organizes data into tables. Developed by MySQL AB and now owned by Oracle Corporation, MySQL is widely used for managing structured data efficiently. It is known for its reliability, scalability, and ease of use, making it the preferred choice for small businesses, startups, and large enterprises alike.
Why Choose MySQL?
Open-Source & Free: MySQL is open-source, meaning it is free to use and modify.
High Performance: It is optimized for speed and handles large amounts of data efficiently.
Scalability: MySQL can scale from small applications to large enterprise solutions.
Secure: Features like encryption, authentication, and access control make MySQL a secure choice.
Cross-Platform Support: Runs on multiple operating systems, including Windows, Linux, and macOS.
Integration with Popular Technologies: Works seamlessly with PHP, Python, Java, and more.
MySQL Installation Guide
To install MySQL on your system, follow these steps:
Download MySQL: Visit the official MySQL website and download the latest version for your OS.
Run the Installer: Open the installer and follow the setup wizard instructions.
Configure MySQL: Choose the server type and set a root password.
Start MySQL Server: Use the MySQL Workbench or command line to start the MySQL service.
MySQL Basic Commands for Beginners
If you are new to MySQL, here are some essential SQL commands to get started:

Advanced MySQL Techniques
1. Indexing for Performance Optimization
Indexing is crucial for improving the speed of database queries. Without indexes, MySQL scans the entire table, which slows down performance.
CREATE INDEX idx_users_email ON users(email);
2. Using Joins to Combine Data from Multiple Tables
Joins help retrieve data from multiple related tables efficiently.

3. Stored Procedures for Automation
Stored procedures help automate complex queries and improve efficiency.

4. MySQL Replication for High Availability
Replication allows data to be copied from one server to another, ensuring high availability and load balancing.

START SLAVE;
Common MySQL Errors & Troubleshooting
Error: Access Denied for User 'root'@'localhost' Solution: Reset MySQL root password using the command line.
Error: MySQL Server Has Gone Away Solution: Increase the max_allowed_packet size in the MySQL configuration file.
Error: Table Doesn't Exist Solution: Check the table name and ensure it exists in the database.
MySQL vs Other Database Management Systems

Best Practices for MySQL Optimization
Use Indexing Efficiently to speed up queries.
Normalize Your Database to avoid redundancy.
Avoid Using SELECT* to reduce unnecessary data load.
Regularly Backup Your Database to prevent data loss.
Monitor Performance Metrics using MySQL Workbench.
Future of MySQL in Database Management
With the rise of cloud computing, MySQL continues to evolve. Cloud-based solutions such as Amazon RDS, Google Cloud SQL, and Azure Database for MySQL make it easier to deploy and manage databases at scale. New features like JSON support, improved indexing, and machine learning integration further solidify MySQL’s position as a leading database solution.
Conclusion
MySQL remains a powerful and versatile database management system for both beginners and professionals. With its ease of use, scalability, and extensive community support, it continues to be a preferred choice for web developers, data analysts, and businesses worldwide. By mastering MySQL’s features and best practices, you can build high-performance applications that handle data efficiently.
0 notes
Text
How to Connect Power BI to MySQL Without Writing a Single Line of Code
Introduction
Power BI is an excellent tool for visualizing data, but getting that data from MySQL into Power BI can be a headache—especially if you’re not a database expert. Many people run into issues with ODBC drivers, authentication errors, or slow data refreshes.
What if you could skip all that and connect MySQL to Power BI effortlessly? That’s exactly what no-code SaaS integration tools like Konnectify help with.
In this guide, we’ll cover:
Traditional methods vs. no-code alternatives for connecting MySQL to Power BI
How to set up a seamless, automated MySQL-Power BI connection
Real-world examples of businesses that benefit from no-code integration
Let’s dive in. 🚀

Traditional Ways to Connect Power BI to MySQL (And Why They’re a Pain)
Before we talk about the easier, no-code method, let’s go over the traditional ways you might connect Power BI to MySQL:
1️⃣ ODBC Drivers & Power BI Connector
Microsoft provides an ODBC (Open Database Connectivity) driver for MySQL. In theory, this should allow Power BI to pull data from your MySQL database. But here’s what usually happens:
🔸 You install the MySQL ODBC driver (which can be a hassle). 🔸 You configure DSN (Data Source Name) settings, which requires technical knowledge. 🔸 Power BI might struggle with large datasets, leading to slow performance. 🔸 You have to manually refresh the connection to get updated data.
2️⃣ Direct Query Mode
Power BI has a DirectQuery mode, which allows live connections to MySQL databases. However:
⚠️ Query performance is often slow when dealing with large datasets. ⚠️ Permissions & security settings must be correctly configured. ⚠️ Data updates may be limited depending on your MySQL version.
3️⃣ Manual Data Exports & CSV Uploads
Many businesses simply export MySQL data as CSV files and manually upload them to Power BI. But this method is:
🚫 Time-consuming—you have to re-export data each time. 🚫 Prone to errors—outdated or incomplete data can lead to mistakes. 🚫 Not scalable—imagine doing this daily for multiple reports.
The No-Code Way: Using SaaS Integration to Connect Power BI & MySQL
A much simpler approach is to use a no-code integration platform like Konnectify. Instead of dealing with drivers, SQL queries, and data refresh headaches, you can automate the entire process in just a few clicks.
Here’s why this method is a game-changer:
✅ No coding required—anyone can set it up. ✅ Automated data sync—no manual exports or uploads. ✅ Faster performance—optimized connections prevent lag. ✅ Secure & reliable—ensures data integrity and security.
How to Set Up MySQL-Power BI Integration with Konnectify
Follow these simple steps to connect MySQL to Power BI without writing a single line of code:
Step 1: Sign Up on Konnectify
Head over to Konnectify and sign up for an account. It takes just a minute.
Step 2: Connect Your MySQL Database
🔹 Enter your MySQL database credentials. 🔹 Choose the tables and fields you want to sync. 🔹 Konnectify automatically configures the connection.
Step 3: Integrate with Power BI
🔹 Select Power BI as the destination for your data. 🔹 Choose how often you want your data to refresh. 🔹 Done! Your Power BI dashboards will now pull live data from MySQL.
🚀 Real-World Example: A Finance Team’s Data Challenge
A fast-growing SaaS company needed real-time financial data in Power BI. Their finance team was manually exporting MySQL reports every day, leading to delays and errors.
The Problem
Manual work—exporting CSVs, cleaning data, and uploading.
Slow updates—finance reports were always a day behind.
Human errors—misplaced files and incorrect data entries.
The Solution
They used SaaS integration via Konnectify to automate everything:
Connected MySQL to Power BI in minutes.
Set up automatic data refreshes every hour.
Built real-time dashboards to track revenue & expenses.
The Result
✅ 90% time saved—no more manual work. ✅ Instant updates—finance reports now refresh automatically. ✅ Better decision-making—leaders have up-to-date insights at all times.
🤔 Why Not Use Zapier or Other Automation Tools?
Zapier is great for basic automation but has limitations for complex data integrations like Power BI & MySQL. Here’s how Konnectify compares:

For real-time business intelligence dashboards, Konnectify is the better choice.
💡 Final Thoughts
If you’re still struggling with slow, manual Power BI-MySQL connections, it’s time to upgrade to a no-code solution. Whether running financial reports, analyzing customer data, or tracking inventory, automating your Power BI & MySQL integration will save you time, effort, and frustration.
🔹 Want to set it up now? Get started with Konnectify. 🔹 Need more guidance? Check out this step-by-step blog.
Let’s make data connectivity easy—no coding required. 🚀
#saas#saas platform#saas technology#saas development company#software development#software#information technology#b2b saas#ipaas#it services
0 notes
Text
Building a Scalable Web Application for Long-Term Success
Introduction
In today's fast-paced digital world, web applications must be designed for scalability to ensure long-term success.
A scalable application can efficiently handle increasing user traffic, maintain high performance, and adapt to evolving business needs.
Whether you're developing an e-commerce site, a SaaS platform, or a social media network, adopting the right architecture and best practices is crucial.
This guide outlines the key principles, architectural patterns, and technologies needed to build a web application that scales efficiently over time.
1. Understanding Scalability
What is Scalability?
Scalability refers to a system's ability to handle increased workloads efficiently by leveraging additional resources such as computing power, storage, and network bandwidth. A well-designed scalable web application can support more users and process greater data loads without performance degradation.
Types of Scalability
Vertical Scaling (Scaling Up): Expanding a single server's resources (CPU, RAM, storage) to improve performance.
Horizontal Scaling (Scaling Out): Adding more servers to distribute workloads and enhance reliability.
Horizontal scaling is generally preferred for long-term success due to its resilience and ability to handle traffic spikes effectively.
2. Choosing the Right Architecture
A well-structured architecture is fundamental to scalability. Popular architectural patterns include:
Monolithic vs. Microservices
Monolithic Architecture: A single codebase integrating all components. While easier to develop initially, scaling becomes complex as the application grows.
Microservices Architecture: A modular approach where independent services communicate via APIs, allowing flexible scaling of individual components.
Serverless Architecture
Serverless computing enables developers to focus on code while cloud providers manage infrastructure dynamically, making it highly scalable and cost-effective.
3. Database Design for Scalability
Choosing the Right Database
Selecting a database that aligns with your application’s needs is crucial:
Relational Databases (SQL): MySQL, PostgreSQL – Ideal for structured data and transactional consistency.
NoSQL Databases: MongoDB, Cassandra – Suitable for unstructured data and large-scale applications.
Database Optimization Strategies
Sharding: Distributes data across multiple database instances.
Replication: Creates copies of data for redundancy and load balancing.
Indexing: Enhances query speed.
Caching: Uses tools like Redis or Memcached to store frequently accessed data in memory.
4. Efficient Backend and API Design
REST vs. GraphQL
REST APIs: Stateless architecture, widely used but may lead to over-fetching of data.
GraphQL: Allows clients to request only necessary data, optimizing bandwidth usage.
Asynchronous Processing
Using message queues (RabbitMQ, Kafka) enables background task processing, improving application responsiveness.
5. Frontend Scalability Considerations
Selecting the Right Framework
Popular frontend frameworks such as React, Angular, and Vue.js support scalable development with their component-based structures.
Frontend Performance Optimization
Lazy Loading: Loads only necessary components to enhance performance.
Code Splitting: Reduces initial load time by dividing JavaScript bundles.
CDN (Content Delivery Network): Improves load times by serving assets from distributed locations.
6. Load Balancing and Caching Strategies
Load Balancing
Distributing traffic across multiple servers prevents bottlenecks. Common solutions include Nginx, HAProxy, and AWS Elastic Load Balancer.
Caching Strategies
Client-Side Caching: Stores static files in the user's browser.
Server-Side Caching: Uses Redis or Memcached for frequently requested data.
Edge Caching: CDNs (Cloudflare, AWS CloudFront) serve cached content closer to users.
7. Security and Compliance
Implementing Security Best Practices
HTTPS Everywhere: Encrypts communication with TLS/SSL.
Authentication & Authorization: Uses OAuth, JWT, or OpenID Connect for secure user access.
Data Encryption: Protects sensitive information.
Rate Limiting & DDoS Protection: Prevents abuse using security services like Cloudflare.
Compliance Standards
Ensuring compliance with regulations such as GDPR, HIPAA, and PCI DSS protects user data and meets legal requirements.
8. Automated Testing and Continuous Deployment
Testing Strategies
Unit Testing: Validates individual components (Jest, Mocha, JUnit).
Integration Testing: Ensures smooth service interactions.
Load Testing: Simulates high traffic using JMeter and Locust.
CI/CD Pipelines
Automating deployment with GitHub Actions, Jenkins, and GitLab CI/CD ensures faster and more reliable releases.
9. Monitoring and Logging
Observability Tools
Tracking application health and performance is essential for scalability:
Logging: ELK Stack (Elasticsearch, Logstash, Kibana), Fluentd.
Monitoring: Prometheus, Grafana, New Relic.
Error Tracking: Sentry, Rollbar.
Automated Alerts
Using tools like PagerDuty ensures proactive issue resolution before they impact users.
10. Cloud Infrastructure and Hosting Choices
Cloud Providers
Choosing a scalable cloud platform ensures flexibility. Popular options include:
AWS (Amazon Web Services)
Google Cloud Platform (GCP)
Microsoft Azure
Containerization and Orchestration
Docker: Ensures consistency across development environments.
Kubernetes: Manages containerized applications at scale, providing resilience and efficiency.
Conclusion
Building a scalable web application requires thoughtful planning, robust architecture, and best practices in database management, API design, frontend optimization, and security.
Leveraging cloud infrastructure, automation, and monitoring tools ensures your application remains resilient and adaptable over time.
By following these principles, you can develop a high-performance, future-proof web application capable of handling increasing user demand and evolving business requirements.
0 notes
Text
How to Develop a Website Using PHP
How to Develop a Website Using PHP
In today's digital era, websites play a crucial role in business growth and online presence. One of the most widely used server-side scripting languages for web development is PHP (Hypertext Preprocessor). It is open-source, easy to learn, and widely supported by web servers and databases. This guide will walk you through the step-by-step process of developing a website using PHP.

Why Choose PHP for Web Development?
Before diving into the development process, let’s explore some key reasons why PHP is a great choice for website development:
1. Open-Source: PHP is free to use, making it cost-effective for developers.
2. Cross-Platform Compatibility: Runs on Windows, Linux, and macOS without compatibility issues.
3. Database Support: Easily integrates with MySQL, PostgreSQL, and other databases.
4. Scalability: Suitable for both small websites and large-scale web applications.
5. Large Community Support: Extensive documentation and active developer communities for troubleshooting and learning.
Prerequisites for PHP Web Development
To develop a website using PHP, you need the following tools:
1. Text Editor or IDE: VS Code, Sublime Text, or PHPStorm.
2. Local Server: XAMPP, WAMP, or MAMP for running PHP scripts.
3. Database System: MySQL or PostgreSQL for data storage.
4. Web Browser: Chrome, Firefox, or Edge for testing the website.
Step-by-Step Guide to Developing a Website Using PHP
1. Setting Up Your Development Environment
To begin developing a PHP website, follow these steps:
· Install XAMPP (or WAMP/MAMP) to create a local server.
· Using the XAMPP Control Panel, launch Apache and MySQL.
· Navigate to htdocs in the XAMPP directory to store PHP project files.
2. Creating the Project Structure
Organizing your files properly enhances maintainability. A typical PHP project structure:
project-folder/
│-- index.php
│-- config.php
│-- assets/
│ ├── css/
│ ├── js/
│ ├── images/
│-- includes/
│ ├── header.php
│ ├── footer.php
│-- pages/
│ ├── about.php
│ ├── contact.php
│-- database/
│ ├── db_connect.php
3. Writing Your First PHP Script
Create an index.php file and add the following code:
<?php
echo "Welcome to My PHP Website!";
?>
Save the file and access it in the browser by navigating to http://localhost/project-folder/.
4. Connecting PHP with MySQL Database
To manage dynamic content, connect PHP with a MySQL database.
Create a Database
1. Open phpMyAdmin from XAMPP.
2. Create a new database, e.g., my_website.
3. Add a users table with fields id, name, email, and password.
Database Connection Code (db_connect.php)
<?php
$servername = "localhost";
$username = "root";
$password = "";
dbname = "my_website";
$conn = new mysqli($servername, $username, $password, $dbname);
if ($conn->connect_error) {
die("Connection failed: " . $conn->connect_error);
}
?>
5. Creating a User Registration System
A simple user registration form using PHP and MySQL.
Registration Form (register.php)
<form method="POST" action="register.php">
<input type="text" name="name" placeholder="Full Name" required>
<input type="email" name="email" placeholder="Email" required>
<input type="password" name="password" placeholder="Password" required>
<button type="submit" name="register">Register</button>
</form>
Handling User Registration (register.php)
<?php
include 'database/db_connect.php';
if(isset($_POST['register'])) {
$name = $_POST['name'];
$email = $_POST['email'];
$password = password_hash($_POST['password'], PASSWORD_BCRYPT);
$sql = "INSERT INTO users (name, email, password) VALUES ('$name', '$email', '$password')";
if ($conn->query($sql) === TRUE) {
echo "Registration successful!";
} else {
echo "Error: " . $conn->error;
}
}
?>
6. Implementing User Login System
Login Form (login.php)
<form method="POST" action="login.php">
<input type="email" name="email" placeholder="Email" required>
<input type="password" name="password" placeholder="Password" required>
<button type="submit" name="login">Login</button>
</form>
Handling Login Authentication (login.php)
<?php
session_start();
include 'database/db_connect.php';
if(isset($_POST['login'])) {
$email = $_POST['email'];
$password = $_POST['password'];
$result = $conn->query("SELECT * FROM users WHERE email='$email'");
$user = $result->fetch_assoc();
if(password_verify($password, $user['password'])) {
$_SESSION['user'] = $user;
echo "Login successful!";
} else {
echo "Invalid credentials!";
}
}
?>

7. Adding Navigation and Styling
· Use Bootstrap or CSS frameworks to improve UI.
· Include a header.php and footer.php for better navigation.
8. Deploying the PHP Website
Once development is complete, deploy your PHP website using:
· Shared Hosting with cPanel for easy management.
· Cloud Hosting (AWS, DigitalOcean) for high performance.
· Domain & SSL Certificate for a secure and professional website.
Conclusion
Developing a website using PHP is an efficient way to create dynamic and interactive websites. By following this step-by-step guide, you can build a PHP-based website from scratch, implement database interactions, user authentication, and deploy your project successfully. Start your PHP development journey today and create powerful web applications!
#web development#seo services#web designing#social media marketing#graphic design#digital marketing#digitalmarketing#marketing#digitalindia#seo
1 note
·
View note
Text
DBMS Tutorial Explained: Concepts, Types, and Applications

In today’s digital world, data is everywhere — from social media posts and financial records to healthcare systems and e-commerce websites. But have you ever wondered how all that data is stored, organized, and managed? That’s where DBMS — or Database Management System — comes into play.
Whether you’re a student, software developer, aspiring data analyst, or just someone curious about how information is handled behind the scenes, this DBMS tutorial is your one-stop guide. We’ll explore the fundamental concepts, various types of DBMS, and real-world applications to help you understand how modern databases function.
What is a DBMS?
A Database Management System (DBMS) is software that enables users to store, retrieve, manipulate, and manage data efficiently. Think of it as an interface between the user and the database. Rather than interacting directly with raw data, users and applications communicate with the database through the DBMS.
For example, when you check your bank account balance through an app, it’s the DBMS that processes your request, fetches the relevant data, and sends it back to your screen — all in milliseconds.
Why Learn DBMS?
Understanding DBMS is crucial because:
It’s foundational to software development: Every application that deals with data — from mobile apps to enterprise systems — relies on some form of database.
It improves data accuracy and security: DBMS helps in organizing data logically while controlling access and maintaining integrity.
It’s highly relevant for careers in tech: Knowledge of DBMS is essential for roles in backend development, data analysis, database administration, and more.
Core Concepts of DBMS
Let’s break down some of the fundamental concepts that every beginner should understand when starting with DBMS.
1. Database
A database is an organized collection of related data. Instead of storing information in random files, a database stores data in structured formats like tables, making retrieval efficient and logical.
2. Data Models
Data models define how data is logically structured. The most common models include:
Hierarchical Model
Network Model
Relational Model
Object-Oriented Model
Among these, the Relational Model (used in systems like MySQL, PostgreSQL, and Oracle) is the most popular today.
3. Schemas and Tables
A schema defines the structure of a database — like a blueprint. It includes definitions of tables, columns, data types, and relationships between tables.
4. SQL (Structured Query Language)
SQL is the standard language used to communicate with relational DBMS. It allows users to perform operations like:
SELECT: Retrieve data
INSERT: Add new data
UPDATE: Modify existing data
DELETE: Remove data
5. Normalization
Normalization is the process of organizing data to reduce redundancy and improve integrity. It involves dividing a database into two or more related tables and defining relationships between them.
6. Transactions
A transaction is a sequence of operations performed as a single logical unit. Transactions in DBMS follow ACID properties — Atomicity, Consistency, Isolation, and Durability — ensuring reliable data processing even during failures.
Types of DBMS
DBMS can be categorized into several types based on how data is stored and accessed:
1. Hierarchical DBMS
Organizes data in a tree-like structure.
Each parent can have multiple children, but each child has only one parent.
Example: IBM’s IMS.
2. Network DBMS
Data is represented as records connected through links.
More flexible than hierarchical model; a child can have multiple parents.
Example: Integrated Data Store (IDS).
3. Relational DBMS (RDBMS)
Data is stored in tables (relations) with rows and columns.
Uses SQL for data manipulation.
Most widely used type today.
Examples: MySQL, PostgreSQL, Oracle, SQL Server.
4. Object-Oriented DBMS (OODBMS)
Data is stored in the form of objects, similar to object-oriented programming.
Supports complex data types and relationships.
Example: db4o, ObjectDB.
5. NoSQL DBMS
Designed for handling unstructured or semi-structured data.
Ideal for big data applications.
Types include document, key-value, column-family, and graph databases.
Examples: MongoDB, Cassandra, Redis, Neo4j.
Applications of DBMS
DBMS is used across nearly every industry. Here are some common applications:
1. Banking and Finance
Customer information, transaction records, and loan histories are stored and accessed through DBMS.
Ensures accuracy and fast processing.
2. Healthcare
Manages patient records, billing, prescriptions, and lab reports.
Enhances data privacy and improves coordination among departments.
3. E-commerce
Handles product catalogs, user accounts, order histories, and payment information.
Ensures real-time data updates and personalization.
4. Education
Maintains student information, attendance, grades, and scheduling.
Helps in online learning platforms and academic administration.
5. Telecommunications
Manages user profiles, billing systems, and call records.
Supports large-scale data processing and service reliability.
Final Thoughts
In this DBMS tutorial, we’ve broken down what a Database Management System is, why it’s important, and how it works. Understanding DBMS concepts like relational models, SQL, and normalization gives you the foundation to build and manage efficient, scalable databases.
As data continues to grow in volume and importance, the demand for professionals who understand database systems is also rising. Whether you're learning DBMS for academic purposes, career development, or project needs, mastering these fundamentals is the first step toward becoming data-savvy in today’s digital world.
Stay tuned for more tutorials, including hands-on SQL queries, advanced DBMS topics, and database design best practices!
0 notes
Text
TicketGo Nulled Script 4.2.2

Download TicketGo Nulled Script for Free – The Ultimate Support Ticket System If you're looking for a reliable, efficient, and feature-rich support ticket management solution, the TicketGo Nulled Script is the perfect choice for your business or project. Whether you're running a digital agency, a tech startup, or an eCommerce store, TicketGo empowers you to manage customer support like a pro—without spending a dime. Now available for free download, this nulled script opens the door to premium features without the premium price tag. What is TicketGo Nulled Script? The TicketGo Nulled Script is a robust, fully-featured PHP-based support ticket system designed to streamline and automate your customer service workflows. It enables businesses to handle support queries, assign agents, prioritize tickets, and track progress through an intuitive dashboard. Best of all, you can download this premium-grade tool for free and integrate it easily into your existing system. Why Choose TicketGo Nulled Script? Support ticket systems are crucial for any service-based business. With the TicketGo Nulled Script, you get a polished, powerful backend with clean code, easy installation, and rich customization options. It’s a complete support system solution at zero cost—perfect for startups and developers who need professional tools without breaking the bank. Technical Specifications Language: PHP Database: MySQL Framework: Laravel Responsive Design: Fully mobile-optimized License: Nulled (No license required) Key Features & Benefits 1. Advanced Ticket Management Organize and manage support tickets with ease using the integrated dashboard. The system supports ticket categorization, priority tagging, and real-time updates to ensure efficient resolution. 2. Multi-Agent Support Assign different agents to specific tickets or departments. With the TicketGo Nulled Script, collaboration is seamless, boosting your team’s productivity. 3. Customizable Email Notifications Keep your users informed with automatic email alerts for ticket updates, agent responses, and ticket closures. You can customize templates to match your brand voice. 4. User-Friendly Interface The intuitive, clean design ensures a smooth user experience for both customers and agents. No steep learning curve—just plug and play. 5. Analytics & Reporting Gain insight into your support operations with built-in analytics. Monitor agent performance, ticket trends, and response times directly from the dashboard. Common Use Cases Freelancers: Manage client queries and feedback efficiently. Startups: Deliver professional-grade customer support from day one. eCommerce Platforms: Handle order-related issues and customer complaints systematically. Software Developers: Track bugs and feature requests from users. How to Install TicketGo Nulled Script Download the TicketGo Nulled Script zip file from our website. Extract the files and upload them to your server directory using FTP or cPanel. Create a MySQL database and import the included SQL file. Configure your .env file with the correct database credentials. Access your domain in the browser to complete the setup wizard. Frequently Asked Questions (FAQs) Is TicketGo Nulled Script safe to use? Yes, the version provided has been tested for malware and backdoors. However, it's always recommended to scan any file before installation. Do I need a license to use TicketGo? No. The TicketGo Nulled Script available on our platform is fully nulled and does not require any license for use. Can I use it for commercial projects? Absolutely! This script is ideal for both personal and commercial projects. Just install, configure, and start managing tickets professionally. Where can I download other helpful tools? We offer a wide range of nulled plugins to support your development and design needs. Looking for top-tier WordPress security? Check out the powerful iThemes Security Pro NULLED for complete protection of your WordPress site—absolutely free!
Conclusion With the TicketGo , you can build a high-functioning, client-friendly support system without the high costs. It’s the ideal solution for anyone seeking a streamlined, efficient way to handle support tickets while enjoying full control over the features and appearance. Download now and elevate your support game—no licenses, no subscriptions, just pure performance.
0 notes
Text
Explore how ADF integrates with Azure Synapse for big data processing.
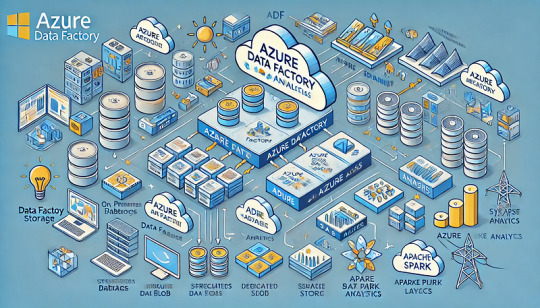
How Azure Data Factory (ADF) Integrates with Azure Synapse for Big Data Processing
Azure Data Factory (ADF) and Azure Synapse Analytics form a powerful combination for handling big data workloads in the cloud.
ADF enables data ingestion, transformation, and orchestration, while Azure Synapse provides high-performance analytics and data warehousing. Their integration supports massive-scale data processing, making them ideal for big data applications like ETL pipelines, machine learning, and real-time analytics. Key Aspects of ADF and Azure Synapse Integration for Big Data Processing
Data Ingestion at Scale ADF acts as the ingestion layer, allowing seamless data movement into Azure Synapse from multiple structured and unstructured sources, including: Cloud Storage: Azure Blob Storage, Amazon S3, Google
Cloud Storage On-Premises Databases: SQL Server, Oracle, MySQL, PostgreSQL Streaming Data Sources: Azure Event Hubs, IoT Hub, Kafka
SaaS Applications: Salesforce, SAP, Google Analytics 🚀 ADF’s parallel processing capabilities and built-in connectors make ingestion highly scalable and efficient.
2. Transforming Big Data with ETL/ELT ADF enables large-scale transformations using two primary approaches: ETL (Extract, Transform, Load): Data is transformed in ADF’s Mapping Data Flows before loading into Synapse.
ELT (Extract, Load, Transform): Raw data is loaded into Synapse, where transformation occurs using SQL scripts or Apache Spark pools within Synapse.
🔹 Use Case: Cleaning and aggregating billions of rows from multiple sources before running machine learning models.
3. Scalable Data Processing with Azure Synapse Azure Synapse provides powerful data processing features: Dedicated SQL Pools: Optimized for high-performance queries on structured big data.
Serverless SQL Pools: Enables ad-hoc queries without provisioning resources.
Apache Spark Pools: Runs distributed big data workloads using Spark.
💡 ADF pipelines can orchestrate Spark-based processing in Synapse for large-scale transformations.
4. Automating and Orchestrating Data Pipelines ADF provides pipeline orchestration for complex workflows by: Automating data movement between storage and Synapse.
Scheduling incremental or full data loads for efficiency. Integrating with Azure Functions, Databricks, and Logic Apps for extended capabilities.
⚙�� Example: ADF can trigger data processing in Synapse when new files arrive in Azure Data Lake.
5. Real-Time Big Data Processing ADF enables near real-time processing by: Capturing streaming data from sources like IoT devices and event hubs. Running incremental loads to process only new data.
Using Change Data Capture (CDC) to track updates in large datasets.
📊 Use Case: Ingesting IoT sensor data into Synapse for real-time analytics dashboards.
6. Security & Compliance in Big Data Pipelines Data Encryption: Protects data at rest and in transit.
Private Link & VNet Integration: Restricts data movement to private networks.
Role-Based Access Control (RBAC): Manages permissions for users and applications.
🔐 Example: ADF can use managed identity to securely connect to Synapse without storing credentials.
Conclusion
The integration of Azure Data Factory with Azure Synapse Analytics provides a scalable, secure, and automated approach to big data processing.
By leveraging ADF for data ingestion and orchestration and Synapse for high-performance analytics, businesses can unlock real-time insights, streamline ETL workflows, and handle massive data volumes with ease.
WEBSITE: https://www.ficusoft.in/azure-data-factory-training-in-chennai/
0 notes
Text
How to Move Your WordPress Site from Localhost to a Live Server
Developing a WordPress site on localhost is a great way to build and test your website in a controlled environment. However, the real challenge arises when it's time to move the site from your local server to a live hosting environment. If not done correctly, you could encounter broken links, missing images, or even database errors.
In this blog, we'll guide you through a step-by-step process to successfully move your WordPress site from localhost to a live server.

Step 1: Choose the Right Hosting Provider
Your first step is to select a reliable web hosting provider that meets your website’s needs. Look for:
Server Speed: Fast servers for better performance.
Uptime Guarantee: At least 99.9% uptime to ensure availability.
Ease of Use: User-friendly dashboards and tools.
WordPress Support: Hosting optimized for WordPress websites.
Popular options include Bluehost, SiteGround, and WP Engine.
Step 2: Export Your Local WordPress Database
The database is the backbone of your WordPress site. To export it:
Open phpMyAdmin on your local server (e.g., XAMPP or WAMP).
Select your WordPress database.
Click on the Export tab and choose the Quick Export method.
Save the .sql file to your computer.
Step 3: Upload Your WordPress Files to the Live Server
To move your files:
Compress Your WordPress Folder: Zip your local WordPress installation folder.
Access Your Hosting Account: Use a file manager or an FTP client like FileZilla.
Upload the Files: Transfer the zipped folder to your hosting server's root directory (usually public_html).
Unzip the Folder: Extract the files once uploaded.
Step 4: Create a Database on the Live Server
Now, set up a new database on your live hosting server:
Log in to your hosting control panel (e.g., cPanel).
Navigate to the MySQL Databases section.
Create a new database, database user, and password.
Assign the user to the database with full privileges.
Step 5: Import the Database to the Live Server
Open phpMyAdmin in your hosting control panel.
Select the new database you created.
Click the Import tab.
Choose the .sql file you exported from your localhost.
Click Go to import the database.
Step 6: Update the wp-config.php File
To connect your site to the live database:
Locate the wp-config.php file in your WordPress installation.
Open the file in a text editor.
Update the following lines: define('DB_NAME', 'your_live_database_name'); define('DB_USER', 'your_live_database_user'); define('DB_PASSWORD', 'your_live_database_password'); define('DB_HOST', 'localhost'); // Keep this unless your host specifies otherwise.
Save the file and upload it to your server via FTP.
Step 7: Update URLs in the Database
Your localhost URLs need to be replaced with your live site URLs.
Use a tool like Search Replace DB or run SQL queries in phpMyAdmin.
In phpMyAdmin, run the following query: UPDATE wp_options SET option_value = 'http://your-live-site.com' WHERE option_name = 'siteurl'; UPDATE wp_options SET option_value = 'http://your-live-site.com' WHERE option_name = 'home';
Step 8: Test Your Live Website
Once everything is uploaded and configured, check your website by entering its URL in a browser. Test for:
Broken Links: Fix them using plugins like Broken Link Checker.
Missing Images: Ensure media files were uploaded correctly.
Functionality: Verify forms, buttons, and features work as expected.
Step 9: Set Up Permalinks
To ensure proper URL structure:
Log in to your WordPress admin dashboard on the live site.
Go to Settings > Permalinks.
Choose your preferred permalink structure and click Save Changes.
Step 10: Secure Your Live Website
After migrating, secure your site to prevent vulnerabilities:
Install an SSL Certificate: Most hosting providers offer free SSL certificates.
Update Plugins and Themes: Ensure everything is up to date.
Set Up Backups: Use plugins like UpdraftPlus for regular backups.
Conclusion
Moving your WordPress site from localhost to a live server may seem daunting, but by following these steps, you can ensure a smooth and error-free migration. A successful move allows you to showcase your site to the world, engage your audience, and achieve your goals.
Start today and take your WordPress project live with confidence!
0 notes
Text
Apple is well known for its simple design and excellent performance. Simplicity and high performance are the main reasons that all web designers prefer MACs as their working computer. They are many tools that are built to stay entertained and being highly productive. Mac acts as a great platform for making a great development because of its popular apps that are easily available to download. Here is a list of some popular applications that are beneficial for web designers and developers. Streamline Your Workflow With Must-Have Mac OS X Applications Website development is a time taking process, and creating even a single one requires dedication and time. And so, web developers offering iPhone Application Development Services usually have to make more deliberate efforts and spend a lot of time, in order to successfully complete the development process. Fortunately, there are numerous applications available on the web that help web developers to better web development productivity for every platform. In this post, we will discuss some of the must-have OS X Applications that developers should consider adding to their web development toolbox. Xcode Xcode has everything that you'll need to build great applications for Apple's devices. You can download it for free from the Mac App Store. It's a must-have application for developers who're serious about app development. Xcode enables developers to design, code, test and debug their apps in a unified workflow. It boasts exemplary features Xcode IDE, Swift language, iOS Simulators and many more. Espresso Whether you're working on a small or a large-scale project, Espresso can boost your workflow with the help of its rich set of features. It's a web editor that provides developers with a better development environment. It boasts a Navigator that sketch out your documents hierarchical structure. No matter, how complex your code may be Espresso can help you manage it without any hassle. This application comes packed with several programmer-centric features that helps web professionals to have better control over complicated documents. It's available for a 15 day trial period, and after the trial period is over you can choose to purchase it for $75. Sequel Pro MySQL is one of the most popular open-source database, which is used by a number of websites for storing their databases. In case you're a MAC OS X developer and want to manage databases in MySQL (on your local or remote server), then Sequel Pro is the right application for you. This is an easy-to-use, native Mac OS X application, built with Cocoa. Inlets you create, export, import, filter databases, and execute MySQL queries via your app. ImageOptim Sometimes the size of your app can become pretty heavy – when it comprises of plenty of images. ImageOptim is a great application that makes it easy for the developers to cut down the app's size. Additionally, you can also use ImageOptim to shrink down the size of your images. This will eventually help to lessen the time that images take to load. Cloud If you're a developer and working on any project, then you might want to share your work with your team. Cloud application makes it extremely easy for web professionals to share their files online in the fastest way. Once you've uploaded this application, you can easily share anything like the screenshots, documents, code snippets and so much more for free. It even helps you keep a track of how many people have viewed your file. Firebug While working on your site's web page design, Firebug renders the ability to make changes to your code and view what happens once the changes are made instantly. With the Firebug extension added into your browser, you can find the defined elements, style them and then tweak them to perfection. Dropbox Next on our list is Dropbox, an ideal application for storing or keeping a backup of your files. Often when working on Mac OS X web development project, there are chances that you might accidentally modify or delete a file.
But, what if you need the file for reference again? A viable option is to sync your documents and files with Dropbox. And so, in case you got any of your file or document deleted, you can easily restore it (remember that the deleted files are kept for 30 days). Keka Most of the file packages that we want to download are often compressed either in zip, or rar formats. Though Mac system comes with a built-in feature that helps extract the different file formats, it is limited. Keka is an open-source Mac OS X app – that can be used for the compression and extraction of any files. It primarily supports three main file formats such as zip, rar, and tar. Other than that, the Keka application also compresses several other file formats like Gzip, DMG, ISO, etc., and can extract EXE, PAX and ACE file formats as well. IPhone Emulator Nowadays, the need for developing a mobile-optimized website has become inevitable. More and more people today are using their mobile devices to access the web, and thus you certainly require some tool that tests your site optimization on mobile platforms. You can test your site by accessing it via a mobile phone and tablet or just use a simulator application such as the iPhone Simulator. Alfred If you're a developer and want to save your time that you otherwise spend on finding files and information on your Mac, then Alfred is the perfect application for you. It's a highly recognized Mac OS X productivity app that makes finding files and information become a breeze. That's not it! It even helps to make you more productive, by bringing up hotkeys, and several essential file actions easily accessible. Developer Color Picker Every web project involves a lot of work, and thus remembering color values may make you rack your brains, especially when you're using different color schemes in your project. This is where Panic’s developer color picker comes to your rescue. It lets you copy the declaration of color in formats such as “NSColor” and “UIColor”. Coda Coda is the major reason for web designers to switch over to Mac. This intuitive app of Mac makes the web development workflow to move like a breeze. The main purpose of this application is to partition the website building process for better team collaboration. This comes for an affordable cost only. TextMate This broad text editor application is purposely designed for Mac Computers. This clearly explains the working functionality of text editors. It is the must-have the application of all web designers. Think This remarkable application let to focus on the task that is in the current process. The “Illumination Panel” of this application replaces Mac OS dock by creating a numerous application, which is preferred by the user to focus on. This is a perfect application for those who get easily distracted by other applications like Facebook, Twitter, Emails, Instant messaging, Instagram. Paparazzi This basic tool of Mac OS X enables the user to capture screenshots of whole web pages without any external editing. Paparazzi rely on Webkit Framework and Cocoa API and written in C. This application acts as a great tool for web designers who frequently need to seize the web page for representing design mockup presentation or to fix simple web graphics on the web page they are crafting. Aquamacs Emac Aquamacs Emac is a robust text editor of Emac and also an extended version of Original Emac text editor. This comes with a new look of Aqua and renders a look-and-feel comfort in order to make the application blend right into Mac OS UI (User Interface). This Aquamac Emac editor is great to the web designers who repeatedly work with HTML, Java, Python, C, C++, PHP, Ruby, Perl, LaTeX and many more. Nvu This is a high-performance WYSIWYG editor, which offers better What You See Is What You Get effect. This application is built around rendering engine of Mozilla based browsers called Gecko. Also, this application runs over Mac X 10.2.8 and other higher versions which can make the web design even better for beginner level web designers.
Smultron This gratuitous text editor is the best substitution for a default text editor that comes along with Mac OS in default. Smultron is easy to use and also this text editor is versatile. This application is meant to use in Mac OS X Leopard 10.5 and can also be used as a basic text editor to complete Script and HTML editors. Scribus This is the open source application for crafting high-quality page layouts for Linux and Mac users. Scribus is the most intensive aspect set of impressive and clean GUI. The publishing features of this colossal application includes Editing, Separations, CMYK color, ICC Color Management, and stretchy PDF Authoring characteristics. Legacy Apps: Not Available Anymore Xee This straightforward Mac application let people browse images directly with ease. This is the best replacement for existing Image viewer applications that are pre-installed on Mac Operating system. It works in a smooth and fast manner by using very little system resource as well. The application offers a load of shortcuts and also a streamlined user interface to represent the list of available features. Seashore This is the most popular image editor that completely uses Mac OS X's Cocoa Framework. This fully fledged image editor, which offers Photoshop a run to for gaining money, renders loads of features to all its end users. The characteristics include Gradient, Textures and other anti-aliasing options for tools like brush and text. Other than those options, it also supports the alpha channel and editing over multiple layers. This impressive image editor is on the budget for all Mac users. Wrapping Up! If you're a developer and looking for Mac OS X applications that enables you to streamline your workflow and increase your productivity, then the aforementioned list of top Max OS X applications will definitely help you accomplish your objectives. Do you have any Mac application that you can’t live without? Have you tried any of the above-listed applications? Please do share your experience with us! We would love to hear your comments!! This is article is contributed by Addison Cohen & Raji Chidu. Addison Cohen is a blogger cum iPhone app developer. At present, he is employed with Appsted Ltd, a renowned company delivering top-notch mobile apps development services. He loves sharing the latest information on mobile app development processes. Raji Chidu is a web content writer in ChennaiWebDevelopment and all time blogger who loves to expose her thoughts and information founded by her day to day life as well as surfing from the internet. She enjoys writing content for famous blogs. Article Updates Updated on June 2019: Fixed broken links and updated to HTTPS links.
0 notes
Text
MERN/MEAN Full Stack Developer Course with AI & IoT Integrated
Join TechEntry's MERN/MEAN Full Stack Development Course. Learn to build advanced web applications with AI and IoT integration. Master Node.js, Angular, React, and MongoDB. Enroll now to kickstart your successful career!
Why Settle for Just Full Stack Development? Become an AI Full Stack Engineer!
The tech industry is evolving fast, and companies are no longer just looking for MERN/MEAN stack developers. They want professionals who can integrate cutting edge technologies like AI and IoT into their development processes. This is where TechEntry stands out.
Kickstart Your Development Journey!
Frontend Development:
React: Build Dynamic, Modern Web Experiences:
What is Web?
Markup with HTML & JSX
Flexbox, Grid & Responsiveness
Bootstrap Layouts & Components
Frontend UI Framework
Core JavaScript & Object Orientation
Async JS promises, async/await
DOM & Events
Event Bubbling & Delegation
Ajax, Axios & fetch API
Functional React Components
Props & State Management
Dynamic Component Styling
Functions as Props
Hooks in React : useState, useEffect
Material UI
Custom Hooks
Supplement: Redux & Redux Toolkit
Version Control: Git & Github
Angular: Master a FullFeatured Framework:
What is Web?
Markup with HTML & Angular Templates
Flexbox, Grid & Responsiveness
Angular Material Layouts & Components
Core JavaScript & TypeScript
Asynchronous Programming Promises, Observables, and RxJS
DOM Manipulation & Events
Event Binding & Event Bubbling
HTTP Client, Ajax, Axios & Fetch API
Angular Components
Input & Output Property Binding
Dynamic Component Styling
Services & Dependency Injection
Angular Directives (Structural & Attribute)
Routing & Navigation
Reactive Forms & Templatedriven Forms
State Management with NgRx
Custom Pipes & Directives
Version Control: Git & GitHub
Backend:
Node.js: Power Your BackEnd with JavaScript:
Networking and HTTP
REST API overview
Node.js and NPM setup
Creating basic HTTP servers
JavaScript for Backend
Node.js modules and file handling
Process management in Node.js
Asynchronous programming: callbacks, Promises, async/await
Building APIs with Express.js
Express server setup and routing
Handling HTTP requests and responses
JSON parsing and form handling
Templating engines (EJS, Handlebars)
CRUD API creation and RESTful services
Middleware setup and error handling
Database Integration:
SQL and NoSQL database basics
CRUD operations with SQL and NoSQL
Database connection setup (e.g., MongoDB, PostgreSQL)
Querying and data handling
Authentication & Authorization:
User authentication basics
JSON Web Tokens (JWT) for security
Rolebased access control
Advanced API Concepts:
Pagination, filtering, and sorting
Caching techniques for faster response
Rate limiting and security practices
Database:
MongoDB (NoSQL)
Introduction to NoSQL and MongoDB
Understanding Collections and Documents
Basic CRUD Operations in MongoDB
MongoDB Query Language (MQL) Basics
Inserting, Finding, Updating, and Deleting Documents
Using Filters and Projections in Queries
Understanding Data Types in MongoDB
Indexing Basics in MongoDB
Setting Up a Simple MongoDB Database (e.g., MongoDB Atlas)
Connecting to MongoDB from a Simple Application
Basic Data Entry and Querying with MongoDB Compass
Data Modeling in MongoDB: Embedding vs. Referencing
Overview of Aggregation Framework in MongoDB
SQL
Introduction to SQL (Structured Query Language)
Basic CRUD Operations: Create, Read, Update, Delete
Understanding Tables, Rows, and Columns
Primary Keys and Unique Constraints
Simple SQL Queries: SELECT, WHERE, and ORDER BY
Filtering Data with Conditions
Using Aggregate Functions: COUNT, SUM, AVG
Grouping Data with GROUP BY
Basic Joins: Combining Tables (INNER JOIN)
Data Types in SQL (e.g., INT, VARCHAR, DATE)
Setting Up a Simple SQL Database (e.g., SQLite or MySQL)
Connecting to a SQL Database from a Simple Application
Basic Data Entry and Querying with a GUI Tool
Data Validation Basics
Overview of Transactions and ACID Properties
AI and IoT:
Introduction to AI Concepts
Getting Started with Node.js for AI
Machine Learning Basics with TensorFlow.js
Introduction to Natural Language Processing
Practical AI Project Ideas
Introduction to IoT Fundamentals
Building IoT Solutions with Node.js
IoT Communication Protocols
Building IoT Applications and Dashboards
IoT Security Basics
You're Ready to Become an IT Professional
Master the Skills and Launch Your Career: Upon mastering Frontend, Backend, Database, AI, and IoT, you’ll be fully equipped to launch your IT career confidently.
TechEntry Highlights
InOffice Experience: Engage in a collaborative inoffice environment (onsite) for handson learning and networking.
Learn from Software Engineers: Gain insights from experienced engineers actively working in the industry today.
Career Guidance: Receive tailored advice on career paths and job opportunities in tech.
Industry Trends: Explore the latest software development trends to stay ahead in your field.
1on1 Mentorship: Access personalized mentorship for project feedback and ongoing professional development.
HandsOn Projects: Work on realworld projects to apply your skills and build your portfolio.
What You Gain:
A deep understanding of Frontend React.js and Backend Node.js.
Practical skills in AI tools and IoT integration.
The confidence to work on realtime solutions and prepare for highpaying jobs.
The skills that are in demand across the tech industry, ensuring you're not just employable but soughtafter.
Frequently Asked Questions
Q: What is Node.js, and what is it used for?
A: Node.js is a runtime environment that allows you to execute JavaScript code outside of a web browser, typically on a server. It is used for building scalable server side applications, handling I/Oheavy operations, realtime applications, APIs, and microservices.
Q: What is the difference between class based components and functional components with hooks in React?
A: Class based components maintain state via instances, while functional components use hooks for state management and other side effects. Hooks have made functional components more popular due to their simplicity and flexibility.
Q: What are the popular frameworks for building web applications with Node.js?
A: Popular frameworks include Express.js, Koa.js, and Nest.js. They provide higher level abstractions and utilities to simplify building web applications.
Q: What is Angular, and why should I learn it?
A: Angular is a powerful framework for building dynamic, single page web applications. It provides a comprehensive solution with builtin tools for routing, forms, and dependency injection, making it highly valued in the job market.
Q: Why is Express.js preferred for beginners?
A: Express.js has a minimalistic and straightforward approach, making it easier for beginners to grasp core web development concepts without being overwhelmed by too many builtin features. It also has a large community and abundant resources.
Q: What are Angular’s life cycle hooks, and how are they used?
A: Angular’s life cycle hooks are methods that allow you to tap into specific moments in a component’s life cycle (e.g., initialization, change detection, destruction). Examples include ngOnInit, ngOnChanges, and ngOnDestroy.
Q: What is React, and why is it popular?
A: React is a JavaScript library for building user interfaces, particularly for single page applications. It is popular due to its reusable components, fast performance with virtual DOM, and one way data flow, making the code predictable and easy to debug.
Q: What are the job roles available for someone skilled in Node.js, Express.js, React, and Angular?
A: Job roles include Backend Developer, Frontend Developer, Full Stack Developer, API Developer, UI/UX Developer, DevOps Engineer, and Systems Architect.
Q: What is JSX in React?
A: JSX is a syntax extension of JavaScript used to create React elements. It allows you to write HTML elements and JavaScript together, making it easier to structure components and manage the user interface.
Q: What are some realworld applications built with these technologies?
A: Realworld applications include platforms like Netflix, LinkedIn, and PayPal (Node.js and Express.js); dynamic singlepage applications (React); and enterpriselevel applications (Angular). These technologies are used to handle high traffic, realtime features, and complex user interfaces.
For more, visit our website:
https://techentry.in/courses/nodejs-fullstack-mean-mern-course
0 notes