#networkinterfaces
Explore tagged Tumblr posts
Visit Tumblr Blog
Explore Tumblr blogs with no restrictions, modern design and the best experience.
Last Seen Tumblr Blogs


Fun Fact
Tumblr.com is the 103rd most visited website in the world.
Text
Network interfaces configuration in Linux

In this tutorial, I will show how to create or modify a Network interface configuration in Linux. This procedure is essential to know the network interface through which we connect to the internet or local network, as well as its connection and configuration for a new connection to the network. Read the full article
0 notes
Photo
ALBのIPアドレスを調査する https://ift.tt/2v1baO6
1. 概要
2. ALBのプライベートIP調べ方 — 2.1. nslookupコマンドで、ALBのIPアドレスを調べる — 2.2. EC2 のENIからIPアドレスを調べる — 2.3. CloudTrailからIPアドレスがいつ変わったかを調べる
概要
ALB(Application Load Balancer)は、スケールアウトやALBが代替されるタイミングで割り当てられている IPアドレスが変わります。そのため、ALBへのアクセスはDNS名を使用しますが、トラブルシューティングやパケットキャプチャを行う際にALB のIPアドレスを把握したい場合があります。
今回は、Internalに配置しているALB のIPアドレスを調査する方法をご紹介します。
ALBのプライベートIP調べ方
nslookupコマンドで、ALBのIPアドレスを調べる
Route 53を使用し、backend.oji-cloud.net のレコードにALB のDNS名を登録していると仮定します。ALB に対して、nslookupを行い、ALBのIPアドレスを確認します。
この方法を使用することで、internalに配置しているALB も IPアドレスを調査することが可能です。
niikawa@niikawa1:~$ nslookup backend.oji-cloud.net Server: 10.0.2.4 Address: 10.0.2.4#53 Non-authoritative answer: Name: backend.oji-cloud.net Address: 10.10.2.55 Name: backend.oji-cloud.net Address: 10.10.3.111
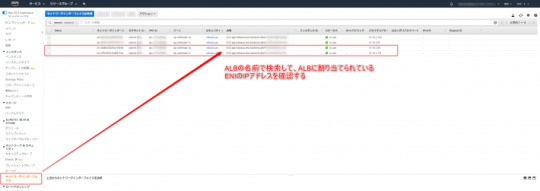
EC2 のENIからIPアドレスを調べる
EC2のAWSコンソールを使用し、フィルターからALBに設定されている名前で検索します。検索結果より、現在ALB に割り当てられているENI(Elastic Network Interface)のIPアドレスを確認します。
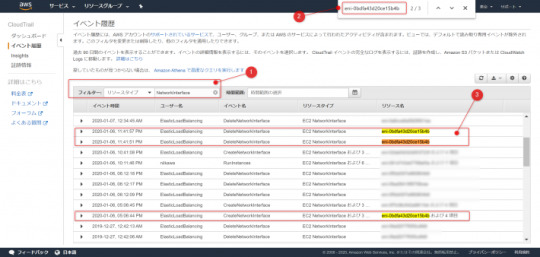
CloudTrailからIPアドレスがいつ変わったかを調べる
nslookupやEC2のAWSコンソールでは、現在のALB IPアドレスを調べることができますが、以前のIPアドレスがいつから使えなくなったのか?、現在のIPアドレスはいつ変わったのか?を知ることはできません。
そこでCloudTrail を使って、Network Interface の履歴を調べます。
イベント履歴より、フィルターに”リソースタイプ” / “NetworkInterface” を指定します。
この履歴からIPアドレスは分かりませんが、前述のEC2のAWSコンソールから調べたENIの id を元に、ALB に使用していたNetwork Interfaceの作成された日時、削除された日時を追うことが可能です。
元記事はこちら
「ALBのIPアドレスを調査する」
January 21, 2020 at 12:00PM
0 notes
Text
全世界の夜更かしさんに送る、Google Home(mini) + Nature Remo + 鯖(Synology NAS) + Node.jsでつくる夜更かし防止装置のすヽめ(google-home-notifier未使用)
from https://qiita.com/delmontz/items/5e31bb6ff11132942501?utm_campaign=popular_items&utm_medium=feed&utm_source=popular_items
はじめに
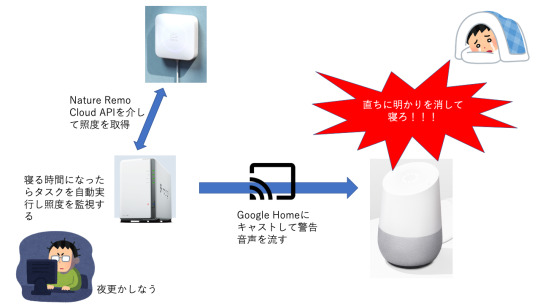
ついつい夜更かしをしてしまうの方に向けにGoogle HomeとNature Remoを組み合わせて「指定した時間以降、部屋が明るければGoogle Homeより早く寝るように警告を発する装置」をNode.jsで実装する作例をご紹介します!! 市販品を組み合わせるだけなのでお手頃に作れます!!(たぶん)
ちなみに似たような作例はよくありますが、多くの記事では「google-home-notifier」と呼ばれるGoole Homeに簡単にプッシュ発話をさせるライブラリが使われており、google-ttsの仕様に依存していたり、バグが多かったりして動かないことが多いのでなるべく根本ロジックから実装する方法でやっていきます。
構成
必要なもの
Nature Remo
所謂スマートリモコン。TVやエアコンなどの赤外線リモコン信号を記憶し、WiFiに繋がったこの製品から記録した赤外線信号を発することで、スマホからまとめて家電操作を可能にする製品。 帰宅前に会社からエアコンを操作して部屋を冷やしとくなどの使い方ができます。 色々なメーカーから類似品が大量に販売されていますが、このNature Remoには温度、湿度、照度、人感センサーなどが搭載されており、しかも外部APIから値を取得することができるのです!! このAPIを応用して部屋の照度を取得します。
Google Home (miniでも可)
言わずと知れたGoogle製スマートスピーカー。 このGoogle Homeより「早く寝ろ!!」といった感じに音声で警告するようにします。しかし、現状の公式SDKでは自発的に発音させることができません。。。 そこで、Google製スマートデバイスで搭載されている「キャスト機能」を活用します。キャスト機能とは、「音楽や動画をストリーミングデータとして他のデバイスに配信する」機能のことで、スマホのYoutubeアプリからTV(クロムキャスト)に飛ばして再生したり、Spotifyアプリから音楽をGoogle Homeに飛ばして再生することができます。 このキャスト機能を応用することで、任意の音声ファイルをGoogle Homeに再生させることができます。
ローカルサーバーか何か(RaspberryPiやNASなど)
基本的にGoogle Homeにキャストできるのはローカルデバイスに限られるので、ローカルネットワーク内で常時動かせるNode.js環境が必要になります。 ルータに穴を開ける、ngrokを使って中継させる方法もあるようです?? 今回は、自宅に置いてあるSynology製NASのNode.js上でタスクスケジューラーを起点に動かします。 (一から用意する人は、お手軽なWiFi搭載マイコンボードESP8266がコスパ最強かも? 「ESP8266 から Google Home に喋らせるライブラリ」 https://qiita.com/horihiro/items/4ab0edf415916a2cd542)
設計
照度の取得
「Nature Remo Cloud API」より取得します。 アクセストークンの発行が必要です。 https://developer.nature.global/
音声合成
警告音声の生成には無料で手軽に使える音声合成API「VoiceText Web API」を使います。 感情の操作もでき、本家にも劣らないほど流暢です。 使うにはAPIキーが必要なので、下記より利用申請しましょう。 「VoiceText Web API」(レファレンス) https://cloud.voicetext.jp/webapi
ゴリゴリにリクエストパラメータを書いて実装も良いですが、面倒なので有志の方が作られたNode.js向けライブラリもあるのでそちらを使います。 「node-voicetext」 https://github.com/pchw/node-voicetext
どんな感じの音声か知りたい人はこちらから⬇️ http://voicetext.jp/samplevoice/
キャスト機能
キャスト機能の機器間の詳細なプロトコル情報はGoogle公式からは公開されていないよう??ですが、有志の方が解析して再現したライブラリ?があるのでそちらを使いキャスト機能のクライアント部分を実装します。 「castv2」 https://github.com/thibauts/node-castv2
当初、VoiceText Web APIで生成したmp3音声ファイルをGoogle Homeにストリーミングで投げればいけると思っていましたが、どうやらGoogle Homeが受け取れるのはURL情報だけっぽい?ので、mp3ファイルを配信するWEBサーバを建てる実装も必要になります。
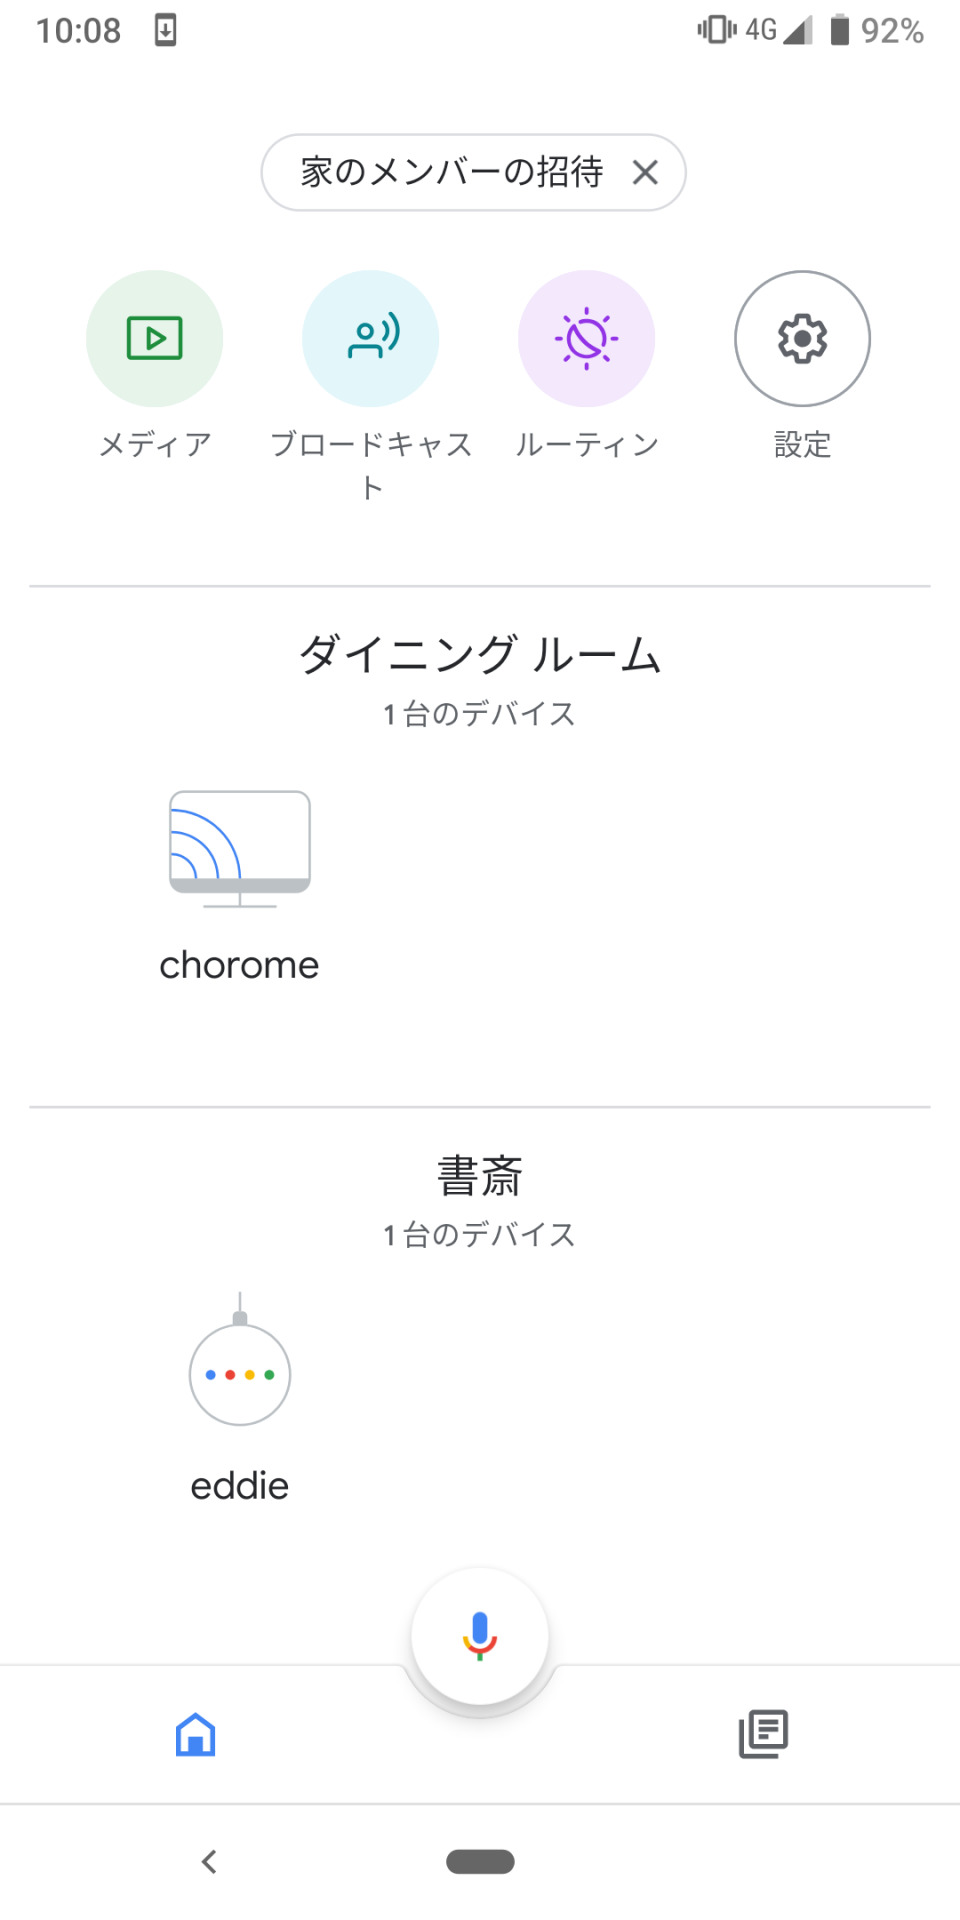
Google HomeのIPアドレスの特定
キャストするには相手先のIPアドレス特定する必要があります。幸い、Google Homeは「mDNS」というプロトコルに対応しており、マルチキャストアドレス224.0.0.251、UDP5353ポートに向けてmDNS queryと呼ばれるメッセージを投げると対応している機器が一斉にIPアドレスを返します。また、この応答情報内のTXTレコードにGoogle Homeのデバイス名情報があるので、それで識別することができます。こちらも一から実装するのは面倒なのでライブラリに頼ります。 「mdns」 https://github.com/agnat/node_mdns
interfaceIndex: 6, type: ServiceType { name: 'googlecast', protocol: 'tcp', subtypes: [], fullyQualified: true }, replyDomain: 'local.', flags: 2, name: 'Google-Home-Mini-ccebf2ba7hogehogehoge5ff2e9', networkInterface: 'en0', fullname: 'Google-Home-Mini-ccebhogehogehoge._googlecast._tcp.local.', host: 'ccebf2ba-7c7d-ed85-6986-c0af325ff2e9.local.', port: 8009, rawTxtRecord: <Buffer 23 69 64 3d 63 63 65 62 66 32 62 61 37 63 99 64 65 64 38 35 36 39 38 36 63 30 61 66 33 32 99 66 66 32 65 39 23 63 64 3d 36 42 44 33 99 33 33 36 36 30 ... >, txtRecord: { id: 'ccebf2ba7c7ded9999af325ff2e9', cd: '6BD343366053C3C999990F6AF76C', rm: 'E705D56999969244F', ve: '05', md: 'Google Home Mini', ic: '/setup/icon.png', fn: 'ダイニング ルーム', ca: '198660', st: '0', bs: 'FA8FCA855A41', nf: '1', rs: '' }, addresses: [ '192.168.1.21' ]
実装
照度の取得
レファレンスに書いてある通りヘッダーにアクセストークンを入れてリクエストを投げます。
async function getIl(){ return axios.get('https://api.nature.global/1/devices', { headers: { 'Accept': 'application/json', 'Authorization': 'Bearer AjmyJhogehogKSRFg3owta-DfnahogehodksQ2g.ezTpIVtf-V8znl7HSfg-PYhogehoge0r0WxXTFA' }, data: {} }).then(response => { return response.data[0].newest_events.il.val; }).catch(err => { console.log(err); reject(err); }); }
音声ファイルの生成
話者、感情値などの各種パラメータを設定しVoiceText Web APIより音声ファイルを取得してローカルに保存します。
function convertToText(text) { return new Promise(function (resolve, reject) { voice .speaker(voice.SPEAKER.TAKERU) .emotion(voice.EMOTION.HAPPINESS) .emotion_level(voice.EMOTION_LEVEL.HIGH) .volume(150) .format('mp3') .speak(text, function (e, buf) { if (e) { console.error(e); reject(e); } else { fs.writeFileSync(OUT_PATH, buf, 'binary'); resolve(); } }); }); }
キャスト用音声ファイル配信WEBサーバを建てる
ExpressでWEBサーバーを建て、キャスト用のmp3音声ファイルを配信します。
function startSever(){ const server = app.listen(PORT, console.log('port: ' + PORT)); app.get(`/audio/${FILE_NAME}`, (req, res) => { fs.readFile(`./${FILE_NAME}`, (err, data) => { if (err) res.status(400).send(err.toString()); else { res.setHeader('Content-Length', data.length); res.write(data); res.end(); } }); }); return server; }
Google HomeのIPアドレスを取得
mdnsクエリーを投げてレスポンスを数秒待ちます。 検索結果の中より対象デバイス名のIPアドレスを抜き出します。
function searchDeviceIp(device_name){ let device_ip = ''; return new Promise((resolve, reject) => { browser.start(); // serviceUpイベントより情報を抜き出す browser.on('serviceUp', (service) => { if(device_name.replace(/\s+/g, '') === service.txtRecord.fn.replace(/\s+/g, '')){ device_ip = service.addresses[0]; } }); // 検索時間 setTimeout(()=>{ browser.stop(); resolve(device_ip); }, SEARCH_TIMEOUT); }); }
キャスト機能
キャストする際にGoogle Homeの音量をコントロールすることができます。エラーで死んだ時に必ずコネクションをクローズ!!
function say(host, content){ const server = startSever(); const client = new Client(); client.connect(host, () => { client.setVolume({ level: 0.5 }, (err, newvol) => { if(err)console.log("there was an error setting the volume"); }); client.launch(DefaultMediaReceiver, (err, player) => { if (err) { console.log(err); server.close(); return; } player.on('status', status => { console.log(`status broadcast playerState=${status.playerState}`); }); const media = { contentId: content, contentType: 'audio/mp3', streamType: 'BUFFERED' }; player.load(media, { autoplay: true }, (err, status) => { client.close(); server.close(); }); }); }); client.on('error', err => { console.log(`Error: ${err.message}`); client.close(); server.close(); }); };
最終実装
/*****************************************************************/ /* コンフィグ&パラメーター */ /*****************************************************************/ const NAS_IP = '192.168.22.9' /* NASのIPアドレス */ const PORT = 8083; /* NASのポート */ const FILE_NAME = 'voice.mp3'; /* 音声合成出力ファイル名 */ const GOOGLE_HOME_NAME = 'ダイニング ルーム'; const VOICE_MESSAGE = '寝る時間です! 直ちに歯磨きをして就寝しましょう!!' const NATURE_REMO_API_KEY = 'AjmyJV5syfoghogehogeREJdksQ2g.ezTpIVtf-V8znl7HJjrF0r0WxXTFA'; /* Nature Remo Cloud API アクセストークン */ const VOICE_TEXT_API_KEY = 'w7ahogehogebiam'; /* VoiceText Web API アクセストークン */ /* パラメーター */ const SEARCH_TIMEOUT = 2000; /* Goole Homeの探索時間(ms) */ const IL_THRESHOLD = 100; /* 照度の閾値 */ const ATTENTION_INTERVAL = 90 * 1000; /* 警告のインターバル(ms) */ const MONITORING_ENDTIME = dayjs().hour(3).minute(15).add(1, 'day'); /* 監視終了時間 次の日の3時15分(日本時間)*/ const GOOGLE_HOME_VOLUME = 0.5; /* Google Homeのボリューム*/ /*****************************************************************/ /* ライブラリ */ /*****************************************************************/ /* 各種ライブラリ */ const fs = require('fs'); const axios = require('axios'); const app = require('express')(); const Client = require('castv2-client').Client; const DefaultMediaReceiver = require('castv2-client').DefaultMediaReceiver; const VoiceText = require('voicetext'); const voice = new VoiceText(VOICE_TEXT_API_KEY); const mdns = require('mdns'); const browser = mdns.createBrowser(mdns.tcp('googlecast')); /* 日付ライブラリ&日本ロケール設定 */ require('dayjs/locale/ja'); const dayjs = require('dayjs'); dayjs.locale('ja'); /*****************************************************************/ /* メインルーチン */ /*****************************************************************/ const OUTPUT_PATH = `./${FILE_NAME}`; /* 音声ファイル出力先 */ const URL = `http://${NAS_IP}:${PORT}/audio/${FILE_NAME}`; /* NAS上の音声ファイルURL */ const google_home_ip = searchDeviceIp(GOOGLE_HOME_NAME); (async () => { // 音声データ作成 await convertToText(VOICE_MESSAGE, OUTPUT_PATH); // 初回チェック if(!await isSleep()){ say(google_home_ip, URL, GOOGLE_HOME_VOLUME); } // 監視開始 const id = setInterval(async () => { if(!await isSleep()){ say(GOOGLE_HOME_IP, URL, GOOGLE_HOME_VOLUME); }else if(dayjs().isAfter(MONITORING_ENDTIME)){ // 監視終了 clearInterval(id); } }, ATTENTION_INTERVAL); })(); /*****************************************************************/ /* 各種関数 */ /*****************************************************************/ function searchDeviceIp(device_name){ let device_ip = ''; return new Promise((resolve, reject) => { browser.start(); // serviceUpイベントより情報を抜き出す browser.on('serviceUp', (service) => { if(device_name.replace(/\s+/g, '') === service.txtRecord.fn.replace(/\s+/g, '')){ device_ip = service.addresses[0]; } }); // 検索時間 setTimeout(()=>{ browser.stop(); resolve(device_ip); }, SEARCH_TIMEOUT); }); } function startSever(port, file_name){ const server = app.listen(port, console.log('port: ' + port)); // ルーティング設定 app.get(`/audio/${file_name}`, (req, res) => { fs.readFile(`./${file_name}`, (err, data) => { if (err) res.status(400).send(err.toString()); else { res.setHeader('Content-Length', data.length); res.write(data); res.end(); } }); }); return server; } function say(host, content, volume){ const server = startSever(PORT, FILE_NAME); const client = new Client(); // デバイスへの接続 client.connect(host, () => { // 音量設定 client.setVolume({ level: volume }, (err, newvol) => { if(err)console.log("there was an error setting the volume"); }); // キャストの開始 client.launch(DefaultMediaReceiver, (err, player) => { if (err) { console.log(err); server.close(); return; } player.on('status', status => { console.log(`status broadcast playerState=${status.playerState}`); }); const media = { contentId: content, contentType: 'audio/mp3', streamType: 'BUFFERED' }; // 音声再生 player.load(media, { autoplay: true }, (err, status) => { client.close(); server.close(); }); }); }); // 接続できない場合のエラー処理 client.on('error', err => { console.log(`Error: ${err.message}`); client.close(); server.close(); }); }; function convertToText(text, output_path) { return new Promise((resolve, reject) => { voice .speaker(voice.SPEAKER.TAKERU) .emotion(voice.EMOTION.HAPPINESS) .emotion_level(voice.EMOTION_LEVEL.HIGH) .volume(150) .format('mp3') .speak(text, (e, buf) => { if (e) { console.error(e); reject(e); } else { fs.writeFileSync(output_path, buf, 'binary'); resolve(); } }); }); } async function getIl(api_key){ return axios.get('https://api.nature.global/1/devices', { headers: { 'Accept': 'application/json', 'Authorization': `Bearer ${api_key}` }, data: {} }).then(res => { return res.data[0].newest_events.il.val; }).catch(err => { console.log(err); reject(err); }); } async function isSleep(){ const il = await getIl(NATURE_REMO_API_KEY); return (il < IL_THRESHOLD); }
運用
Google Homeのデバイス名の確認
自分で設定したデバイス名をお忘れの方は、スマホのGoogle Homeアプリより確認することができます。
NASへの設置、タスクスケジューラーの設定
NASの適当なディレクトリに実装したソースファイルを設置し、消灯時間に自動実行するようにタスクスケジューラーに登録します。 SynologyNASであれば、コントロールパネル→タスクスケジューラーより登録できます!
これで夜更かし生活ともおさらば!!
0 notes
Text
Sample configuration files:
No encryption, Auto-IP NetworkInterface=WiFi WiFiNetwork=MyWiFi [email protected] WPA-2 encryption, static IP NetworkInterface=WiFi WiFiNetwork=MyNetwork WiFiPassword=MyPassword WiFiEncryption=WPA2 IpAddress=192.168.0.100 NetMask=255.255.255.0 Gateway=192.168.0.1 DnsServer= 216.231.41.2 DnsServer2= 206.124.64.1 [email protected]
For more information, visit the following website:
https://www.keelog.com/
zx spectrum power supply
zx spectrum psu
atari power supply
atari psu
amiga power supply
amiga psu
c64 psu
c64 power supply
commodore 64 psu
commodore 64 power supply
commodore psu
commodore power supply
usb keylogger
hardware keylogger
keylogger
0 notes
Text
The NetworkInterface getHost function in NetworkInterface cpp in ntopng be
SNPX.com : http://dlvr.it/PQNKLG
0 notes
Photo

AWS CDKでAWS::CloudFormation::Init タイプを使ってEC2インスタンスの環境構築ができるようにしてみた https://ift.tt/2lkBYUK
前回、AWS Cloud Development Kit(AWS CDK)を利用してEC2インスタンスを立ち上げてみたのですが、AWS CDKでAWS::CloudFormation::Initタイプが利用できるのかも確認してみました。
AWS Cloud Development Kit(AWS CDK)でEC2インスタンスを立ち上げてみる – Qiita https://cloudpack.media/48912
AWS::CloudFormation::Init タイプについては下記をご参考ください。
AWS::CloudFormation::Init タイプを使ってEC2インスタンスの環境構築ができるようにしてみた – Qiita https://cloudpack.media/48540
前提
AWSアカウントがある
AWS CLIが利用できる
Node.jsがインストール済み
実装
前回記事の実装をベースにしてAWS::CloudFormation::Initタイプの定義を追加しました。
AWS Cloud Development Kit(AWS CDK)でEC2インスタンスを立ち上げてみる – Qiita https://cloudpack.media/48912
import cdk = require('@aws-cdk/core'); import ec2 = require('@aws-cdk/aws-ec2/lib'); export class UseCdkEc2Stack extends cdk.Stack { constructor(scope: cdk.Construct, id: string, props?: cdk.StackProps) { super(scope, id, props); let vpc = ec2.Vpc.fromLookup(this, 'VPC', { vpcId: this.node.tryGetContext('vpc_id') }); const cidrIp = this.node.tryGetContext('cidr_ip'); const securityGroup = new ec2.SecurityGroup(this, 'SecurityGroup', { vpc }); securityGroup.addEgressRule(ec2.Peer.anyIpv4(), ec2.Port.allTraffic()); securityGroup.addIngressRule(ec2.Peer.ipv4(cidrIp), ec2.Port.tcp(22)); let ec2Instance = new ec2.CfnInstance(this, 'myInstance', { imageId: new ec2.AmazonLinuxImage().getImage(this).imageId, instanceType: new ec2.InstanceType('t3.small').toString(), networkInterfaces: [{ associatePublicIpAddress: true, deviceIndex: '0', groupSet: [securityGroup.securityGroupId], subnetId: vpc.publicSubnets[0].subnetId }], keyName: this.node.tryGetContext('key_pair') }); ec2Instance.addOverride('Metadata', { 'AWS::CloudFormation::Init': { 'config': { 'commands': { 'test': { 'command': "echo $STACK_NAME test", 'env': { 'STACK_NAME': this.stackName } } }, } } }); let userData = ec2.UserData.forLinux(); userData.addCommands( '/opt/aws/bin/cfn-init', `--region ${this.region}`, `--stack ${this.stackName}`, `--resource ${ec2Instance.logicalId}` ); userData.addCommands('echo', 'hoge!'); ec2Instance.userData = cdk.Fn.base64(userData.render()); new cdk.CfnOutput(this, 'Id', { value: ec2Instance.ref }); new cdk.CfnOutput(this, 'PublicIp', { value: ec2Instance.attrPublicIp }); } }
公式ドキュメントを漁ってみたものの良い情報が得られず、下記Issueを参考にしました。
Add support for AWS::CloudFormation::Init · Issue #777 · aws/aws-cdk https://github.com/aws/aws-cdk/issues/777
ec2: cfn-init support in ASGs · Issue #1413 · aws/aws-cdk https://github.com/aws/aws-cdk/issues/1413
feat(aws-ec2): add support for CloudFormation::Init by rix0rrr · Pull Request #792 · aws/aws-cdk https://github.com/aws/aws-cdk/pull/792
追加した実装は以下となります。 ポイントとしてec2Instance.addOverride()でメタデータを追加してAWS::CloudFormation::Initタイプで定義を追加します。 /opt/aws/bin/cfn-initの--resourceオプションでリソース名を指定するのにec2Instanceを作ってからuserDataを設定することで、ec2Instance.logicalIdが利用できるようにしています。ベタ書きでもいいっちゃいいですね。
ec2Instance.addOverride('Metadata', { 'AWS::CloudFormation::Init': { 'config': { 'commands': { 'test': { 'command': "echo $STACK_NAME test", 'env': { 'STACK_NAME': this.stackName } } }, } } }); let userData = ec2.UserData.forLinux(); userData.addCommands( '/opt/aws/bin/cfn-init', `--region ${this.region}`, `--stack ${this.stackName}`, `--resource ${ec2Instance.logicalId}` ); userData.addCommands('echo', 'hoge!'); ec2Instance.userData = cdk.Fn.base64(userData.render()); (略)
デプロイしてみる
> cdk deploy \ -c vpc_id=vpc-xxxxxxxx \ -c key_pair=cdk-test-ec2-key \ -c cidr_ip=xxx.xxx.xxx.xxx/32 This deployment will make potentially sensitive changes according to your current security approval level (--require-approval broadening). Please confirm you intend to make the following modifications: Security Group Changes ┌───┬──────────────────────────┬─────┬────────────┬────────────────────┐ │ │ Group │ Dir │ Protocol │ Peer │ ├───┼──────────────────────────┼─────┼────────────┼────────────────────┤ │ + │ ${SecurityGroup.GroupId} │ In │ TCP 22 │ xxx.xxx.xxx.xxx/32 │ │ + │ ${SecurityGroup.GroupId} │ Out │ Everything │ Everyone (IPv4) │ └───┴──────────────────────────┴─────┴────────────┴────────────────────┘ (NOTE: There may be security-related changes not in this list. See http://bit.ly/cdk-2EhF7Np) Do you wish to deploy these changes (y/n)? y UseCdkEc2Stack: deploying... useCdkEc2Stack: creating CloudFormation changeset... 0/4 | 14:30:29 | CREATE_IN_PROGRESS | AWS::CDK::Metadata | CDKMetadata 0/4 | 14:30:30 | CREATE_IN_PROGRESS | AWS::EC2::SecurityGroup | SecurityGroup (SecurityGroupDD263621) 0/4 | 14:30:32 | CREATE_IN_PROGRESS | AWS::CDK::Metadata | CDKMetadata Resource creation Initiated 1/4 | 14:30:32 | CREATE_COMPLETE | AWS::CDK::Metadata | CDKMetadata 1/4 | 14:30:35 | CREATE_IN_PROGRESS | AWS::EC2::SecurityGroup | SecurityGroup (SecurityGroupDD263621) Resource creation Initiated 2/4 | 14:30:37 | CREATE_COMPLETE | AWS::EC2::SecurityGroup | SecurityGroup (SecurityGroupDD263621) 2/4 | 14:30:39 | CREATE_IN_PROGRESS | AWS::EC2::Instance | myInstance 2/4 | 14:30:40 | CREATE_IN_PROGRESS | AWS::EC2::Instance | myInstance Resource creation Initiated`` 3/4 | 14:30:56 | CREATE_COMPLETE | AWS::EC2::Instance | myInstance 4/4 | 14:30:59 | CREATE_COMPLETE | AWS::CloudFormation::Stack | UseCdkEc2Stack

︎ UseCdkEc2Stack Outputs: UseCdkEc2Stack.PublicIp = xxx.xxx.xxx.xxx UseCdkEc2Stack.Id = i-xxxxxxxxxxxxxxxxx Stack ARN: arn:aws:cloudformation:us-east-1:xxxxxxxxxxxx:stack/UseCdkEc2Stack/72304c90-b41d-11e9-b604-129cd46a326a
デプロイできたらSSHアクセスして実行ログを確認してみます。
> ssh -i cdk-test-ec2-key \ [email protected] $ cat /var/log/cfn-init.log 2019-08-01 05:31:11,740 [INFO] -----------------------Starting build----------------------- 2019-08-01 05:31:11,740 [INFO] Running configSets: default 2019-08-01 05:31:11,741 [INFO] Running configSet default 2019-08-01 05:31:11,742 [INFO] Running config config 2019-08-01 05:31:11,746 [INFO] Command test succeeded 2019-08-01 05:31:11,746 [INFO] ConfigSets completed 2019-08-01 05:31:11,746 [INFO] -----------------------Build complete----------------------- $ cat /var/log/cfn-init-cmd.log 2019-08-01 05:31:11,742 P2090 [INFO] ************************************************************ 2019-08-01 05:31:11,742 P2090 [INFO] ConfigSet default 2019-08-01 05:31:11,743 P2090 [INFO] ++++++++++++++++++++++++++++++++++++++++++++++++++++++++++++ 2019-08-01 05:31:11,743 P2090 [INFO] Config config 2019-08-01 05:31:11,743 P2090 [INFO] ============================================================ 2019-08-01 05:31:11,743 P2090 [INFO] Command test 2019-08-01 05:31:11,746 P2090 [INFO] -----------------------Command Output----------------------- 2019-08-01 05:31:11,746 P2090 [INFO] UseCdkEc2Stack test 2019-08-01 05:31:11,746 P2090 [INFO] ------------------------------------------------------------ 2019-08-01 05:31:11,746 P2090 [INFO] Completed successfully. $ cat /var/log/cloud-init-output.log (略) Updated: bind-libs.x86_64 32:9.8.2-0.68.rc1.60.amzn1 bind-utils.x86_64 32:9.8.2-0.68.rc1.60.amzn1 kernel-tools.x86_64 0:4.14.133-88.105.amzn1 python27-jinja2.noarch 0:2.7.2-3.16.amzn1 vim-common.x86_64 2:8.0.0503-1.46.amzn1 vim-enhanced.x86_64 2:8.0.0503-1.46.amzn1 vim-filesystem.x86_64 2:8.0.0503-1.46.amzn1 vim-minimal.x86_64 2:8.0.0503-1.46.amzn1 Complete! Cloud-init v. 0.7.6 running 'modules:final' at Thu, 01 Aug 2019 05:31:11 +0000. Up 18.18 seconds. hoge! Cloud-init v. 0.7.6 finished at Thu, 01 Aug 2019 05:31:11 +0000. Datasource DataSourceEc2. Up 18.77 seconds
ユーザーデータの/opt/aws/bin/cfn-initコマンド実行でメタデータにAWS::CloudFormation::Initタイプで指定したコマンドが実行されました。やったぜ。
まとめ
メタデータの指定について、もっと良い実装ができそうですが、ひとまずAWS CDKでもAWS::CloudFormation::Initタイプを利用できるのが確認できたので満足です。
参考
AWS Cloud Development Kit(AWS CDK)でEC2インスタンスを立ち上げてみる – Qiita https://cloudpack.media/48912
AWS::CloudFormation::Init タイプを使ってEC2インスタンスの環境構築ができるようにしてみた – Qiita https://cloudpack.media/48540
Add support for AWS::CloudFormation::Init · Issue #777 · aws/aws-cdk https://github.com/aws/aws-cdk/issues/777
ec2: cfn-init support in ASGs · Issue #1413 · aws/aws-cdk https://github.com/aws/aws-cdk/issues/1413
feat(aws-ec2): add support for CloudFormation::Init by rix0rrr · Pull Request #792 · aws/aws-cdk https://github.com/aws/aws-cdk/pull/792
元記事はこちら
「AWS CDKでAWS::CloudFormation::Init タイプを使ってEC2インスタンスの環境構築ができるようにしてみた」
September 02, 2019 at 04:00PM
0 notes
Photo

AWS Cloud Development Kit(AWS CDK)でEC2インスタンスを立ち上げてみる https://ift.tt/2khBZZm
AWS Cloud Development Kit(AWS CDK)の利用ノウハウを増やすべく、EC2インスタンスを立ち上げてみました。 公式ドキュメントやGitHubのソースを眺めたらだいたいは実装できるのですが、ハマりポイントがちらほらとありました。
AWS Cloud Development Kit(AWS CDK)ってなんぞ?という方は下記をご参考ください。
AWS クラウド開発キット (CDK) – TypeScript と Python 用がご利用可能に | Amazon Web Services ブログ https://aws.amazon.com/jp/blogs/news/aws-cloud-development-kit-cdk-typescript-and-python-are-now-generally-available/
前提
AWSアカウントがある
AWS CLIが利用できる
Node.jsがインストール済み
AWS CDKのインストール
AWS CDKのコマンドが利用できるようにするため、aws-cdkをインストールします。 リリース後も頻繁にアップデートされていますので、インストール済みの方も最新バージョンか確認しておくと良いかもです。
> node -v v10.11.0 > npm -v 6.10.1 > npm i -g aws-cdk # fishの場合 > exec fish -l > cdk --version 1.2.0 (build 6b763b7)
AWS CDKプロジェクト作成
cdk コマンドでプロジェクトを作成します。言語はTypeScriptを利用します。
> mkdir use-cdk-ec2 > cd use-cdk-ec2 > cdk init app --language=typescript Applying project template app for typescript Initializing a new git repository... Executing npm install... npm notice created a lockfile as package-lock.json. You should commit this file. npm WARN [email protected] No repository field. npm WARN [email protected] No license field. # Useful commands * `npm run build` compile typescript to js * `npm run watch` watch for changes and compile * `cdk deploy` deploy this stack to your default AWS account/region * `cdk diff` compare deployed stack with current state * `cdk synth` emits the synthesized CloudFormation template
cdk initコマンドを実行すると以下のようにファイルが自動生成されました。 コマンド実行したディレクトリの名前が反映されました。
> tree . -L 2 . ├── README.md ├── bin │ └── use-cdk-ec2.ts ├── cdk.json ├── lib │ └── use-cdk-ec2-stack.ts ├── node_modules (略) ├── package-lock.json ├── package.json └── tsconfig.json 3 directories, 5 files
@aws-cdk/aws-ec2のインストール
@aws-cdk/aws-ec2をインストールして利用できるようにします。
aws-cdk/packages/@aws-cdk/aws-ec2 at master · aws/aws-cdk https://github.com/aws/aws-cdk/tree/master/packages/%40aws-cdk/aws-ec2
> npm install -s @aws-cdk/aws-ec2 + @aws-cdk/[email protected] added 4 packages from 1 contributor and audited 538 packages in 8.417s found 0 vulnerabilities
実装する
@aws-cdk/aws-ec2を利用してEC2インスタンスが立ち上がるように実装します。 EC2インスタンスを立ち上げるには、VPC、サブネット、セキュリティグループが必要になります。
bin/use-cdk-ec2.ts
#!/usr/bin/env node import 'source-map-support/register'; import cdk = require('@aws-cdk/core'); import { UseCdkEc2Stack } from '../lib/use-cdk-ec2-stack'; const app = new cdk.App(); new UseCdkEc2Stack(app, 'UseCdkEc2Stack', { env: { account: process.env.CDK_DEFAULT_ACCOUNT, region: process.env.CDK_DEFAULT_REGION } });
lib/use-cdk-ec2-stack.ts
import cdk = require('@aws-cdk/core'); import ec2 = require('@aws-cdk/aws-ec2/lib'); export class UseCdkEc2Stack extends cdk.Stack { constructor(scope: cdk.Construct, id: string, props?: cdk.StackProps) { super(scope, id, props); let vpc = ec2.Vpc.fromLookup(this, 'VPC', { vpcId: this.node.tryGetContext('vpc_id') }); const cidrIp = this.node.tryGetContext('cidr_ip'); const securityGroup = new ec2.SecurityGroup(this, 'SecurityGroup', { vpc }); securityGroup.addEgressRule(ec2.Peer.anyIpv4(), ec2.Port.allTraffic()); securityGroup.addIngressRule(ec2.Peer.ipv4(cidrIp), ec2.Port.tcp(22)); let ec2Instance = new ec2.CfnInstance(this, 'myInstance', { imageId: new ec2.AmazonLinuxImage().getImage(this).imageId, instanceType: new ec2.InstanceType('t3.small').toString(), networkInterfaces: [{ associatePublicIpAddress: true, deviceIndex: '0', groupSet: [securityGroup.securityGroupId], subnetId: vpc.publicSubnets[0].subnetId }], keyName: this.node.tryGetContext('key_pair') }); new cdk.CfnOutput(this, 'Id', { value: ec2Instance.ref }); new cdk.CfnOutput(this, 'PublicIp', { value: ec2Instance.attrPublicIp }); } }
実装のポイントをいくつか上げてみます。
既存VPCをインポートする
VPCはAWS CDKで作成することもできますが、既存のVPCをインポートすることもできます。下記は実装例となります。
aws-cdk/integ.import-default-vpc.lit.ts at master · aws/aws-cdk https://github.com/aws/aws-cdk/blob/master/packages/%40aws-cdk/aws-ec2/test/integ.import-default-vpc.lit.ts
ec2.Vpc.fromLookup() を利用してインポートしますが、その場合スタックのインスタンス作成時にアカウントとリージョン情報を渡す必要があります。そうするとAWS CDKが指定されたアカウント、リージョンからVPCの情報を取得してくれます。
bin/use-cdk-ec2.ts
#!/usr/bin/env node import 'source-map-support/register'; import cdk = require('@aws-cdk/core'); import { UseCdkEc2Stack } from '../lib/use-cdk-ec2-stack'; const app = new cdk.App(); new UseCdkEc2Stack(app, 'UseCdkEc2Stack', { env: { account: process.env.CDK_DEFAULT_ACCOUNT, region: process.env.CDK_DEFAULT_REGION } });
envを指定しないと以下のようなエラーが発生します。
> cdk synth Cannot retrieve value from context provider vpc-provider since account/region are not specified at the stack level. Either configure 'env' with explicit account and region when you define your stack, or use the environment variables 'CDK_DEFAULT_ACCOUNT' and 'CDK_DEFAULT_REGION' to inherit environment information from the CLI (not recommended for production stacks) Subprocess exited with error 1
envについて詳しくはこちらが参考になります。
Environments – AWS Cloud Development Kit (AWS CDK) https://docs.aws.amazon.com/cdk/latest/guide/environments.html
ec2.Vpc.fromLookupの第3パラメータでVPCの絞り込み条件が指定できます。詳細は下記が詳しいです。
interface VpcLookupOptions · AWS CDK https://docs.aws.amazon.com/cdk/api/latest/docs/@aws-cdk_aws-ec2.VpcLookupOptions.html
今回は、vpcIdを指定します。
lib/use-cdk-ec2-stack.ts
(略) let vpc = ec2.Vpc.fromLookup(this, 'VPC', { vpcId: this.node.tryGetContext('vpc_id') }); (略)
scopeでなくthisを指定する
cdk.Stackを継承したクラス内で各リソースを定義するのに、第一パラメータにscope: cdk.Constructを指定する必要がありますが、個々で指定するべきは、クラスのconstructorにあるscopeではなく、thisを渡す必要があります。 VS Codeを利用しているとメソッドの説明でscopeとあるので、つい指定してしまいがちですが、エラーになります。
詳細は下記を参考ください。
TODO:リンク貼る
> cdk synth -v (略) No stack could be identified for the construct at path Subprocess exited with error 1 Error: Subprocess exited with error 1 at ChildProcess.proc.on.code (/Users/xxx/.anyenv/envs/ndenv/versions/v10.11.0/lib/node_modules/aws-cdk/lib/api/cxapp/exec.ts:110:23) at ChildProcess.emit (events.js:182:13) at ChildProcess.EventEmitter.emit (domain.js:442:20) at Process.ChildProcess._handle.onexit (internal/child_process.js:240:12)
外部から値を指定するにはContextを利用する
実装に含めたくない値がある場合、cdkコマンドの--context(または -c)オプションで指定することができます。 実装ではthis.node.tryGetContext('KEY')で値が取得できます。
値が複数ある場合、--context(または -c)オプションを複数指定します。
> cdk synth \ -c KEY=VALUE \ -c KEY2=VALUE2
EC2インスタンスのパラメータ指定
EC2インスタンスはec2.CfnInstanceクラスを利用して定義します。パラメータについては下記が詳しかったです。 この辺を把握するにはCFnの利用経験がないとちょっと厳しいかもしれません。
Interface CfnInstanceProps https://docs.aws.amazon.com/cdk/api/latest/typescript/api/aws-ec2/cfninstanceprops.html#aws_ec2_CfnInstanceProps
デプロイしてみる
実装ができたらデプロイしてみます。環境変数に設定するAWSアカウント番号(12桁の数値)とリージョン、--contextオプションで指定する既存VPCのIDやキーペア、SSHアクセスを許可するIPアドレスについては各自のを指定してください。
cdkコマンドを実行する前にnpm run buildを忘れないようにしましょう。(大敗
> npm run build > [email protected] build /Users/kai/dev/aws/cdk/use-cdk-ec2 > tsc > export CDK_DEFAULT_ACCOUNT=999999999999 > export CDK_DEFAULT_REGION=us-east-1 > cdk deploy \ -c vpc_id=vpc-xxxxxxxx \ -c key_pair=cdk-test-ec2-key \ -c cidr_ip=xxx.xxx.xxx.xxx/32 This deployment will make potentially sensitive changes according to your current security approval level (--require-approval broadening). Please confirm you intend to make the following modifications: Security Group Changes ┌───┬──────────────────────────┬─────┬────────────┬────────────────────┐ │ │ Group │ Dir │ Protocol │ Peer │ ├───┼──────────────────────────┼─────┼────────────┼────────────────────┤ │ + │ ${SecurityGroup.GroupId} │ In │ TCP 22 │ xxx.xxx.xxx.xxx/32 │ │ + │ ${SecurityGroup.GroupId} │ Out │ Everything │ Everyone (IPv4) │ └───┴──────────────────────────┴─────┴────────────┴────────────────────┘ (NOTE: There may be security-related changes not in this list. See http://bit.ly/cdk-2EhF7Np) Do you wish to deploy these changes (y/n)? y UseCdkEc2Stack: deploying... UseCdkEc2Stack: creating CloudFormation changeset... 0/4 | 15:22:17 | CREATE_IN_PROGRESS | AWS::EC2::SecurityGroup | SecurityGroup (SecurityGroupDD263621) 0/4 | 15:22:17 | CREATE_IN_PROGRESS | AWS::CDK::Metadata | CDKMetadata 0/4 | 15:22:20 | CREATE_IN_PROGRESS | AWS::CDK::Metadata | CDKMetadata Resource creation Initiated 1/4 | 15:22:20 | CREATE_COMPLETE | AWS::CDK::Metadata | CDKMetadata 1/4 | 15:22:22 | CREATE_IN_PROGRESS | AWS::EC2::SecurityGroup | SecurityGroup (SecurityGroupDD263621) Resource creation Initiated 2/4 | 15:22:23 | CREATE_COMPLETE | AWS::EC2::SecurityGroup | SecurityGroup (SecurityGroupDD263621) 2/4 | 15:22:26 | CREATE_IN_PROGRESS | AWS::EC2::Instance | myInstance 2/4 | 15:22:27 | CREATE_IN_PROGRESS | AWS::EC2::Instance | myInstance Resource creation Initiated 3/4 | 15:22:43 | CREATE_COMPLETE | AWS::EC2::Instance | myInstance 4/4 | 15:22:45 | CREATE_COMPLETE | AWS::CloudFormation::Stack | UseCdkEc2Stack

︎ UseCdkEc2Stack Outputs: UseCdkEc2Stack.PublicIp = xxx.xxx.xxx.xxx UseCdkEc2Stack.Id = i-xxxxxxxxxxxxxxxxx Stack ARN: arn:aws:cloudformation:us-east-1:999999999999:stack/UseCdkEc2Stack/59b2a500-b292-11e9-8257-12505ef78976
デプロイできたらSSHアクセスしてみます。
> ssh -i cdk-test-ec2-key \ [email protected] The authenticity of host 'xxx.xxx.xxx.xxx (xxx.xxx.xxx.xxx)' can't be established. ECDSA key fingerprint is SHA256:xxx. Are you sure you want to continue connecting (yes/no)? yes Warning: Permanently added 'xxx.xxx.xxx.xxx' (ECDSA) to the list of known hosts. __| __|_ ) _| ( / Amazon Linux AMI ___|\___|___| https://aws.amazon.com/amazon-linux-ami/2018.03-release-notes/ 10 package(s) needed for security, out of 13 available Run "sudo yum update" to apply all updates. [ec2-user@ip-xxx-xxx-xxx-xxx ~]$
やったぜ。
後片付け
検証が済んだらスタックを削除しておきます。
> cdk destroy \ -c vpc_id=vpc-xxxxxxxx Are you sure you want to delete: UseCdkEc2Stack (y/n)? y UseCdkEc2Stack: destroying... 0 | 15:27:57 | DELETE_IN_PROGRESS | AWS::CloudFormation::Stack | UseCdkEc2Stack User Initiated 0 | 15:27:59 | DELETE_IN_PROGRESS | AWS::CDK::Metadata | CDKMetadata 0 | 15:27:59 | DELETE_IN_PROGRESS | AWS::EC2::Instance | myInstance 1 | 15:28:01 | DELETE_COMPLETE | AWS::CDK::Metadata | CDKMetadata
︎ UseCdkEc2Stack: destroyed
cdk destroyコマンドの-cオプションでvpc_idをつけないと下記のエラーが発生しました。 おそらく、cdk destroyコマンド実行時にもec2.Vpc.fromLookupが走ってしまうためみたいです。チョットフベン
> cdk destroy The filter 'null' is invalid
まとめ
@aws-cdk/aws-ec2パッケージのREADMEにEC2インスタンスについて記載がなく、それがむしろ気になって実装してみましたが、情報を調べつつの実装となり手間取りました。ただ、日頃からプログラミングする人であれば、慣れたらYAMLやJSONで定義するよりもスムーズに実装できる感がありました。
参考
AWS クラウド開発キット (CDK) – TypeScript と Python 用がご利用可能に | Amazon Web Services ブログ https://aws.amazon.com/jp/blogs/news/aws-cloud-development-kit-cdk-typescript-and-python-are-now-generally-available/
aws-cdk/packages/@aws-cdk/aws-ec2 at master · aws/aws-cdk https://github.com/aws/aws-cdk/tree/master/packages/%40aws-cdk/aws-ec2
aws-cdk/integ.import-default-vpc.lit.ts at master · aws/aws-cdk https://github.com/aws/aws-cdk/blob/master/packages/%40aws-cdk/aws-ec2/test/integ.import-default-vpc.lit.ts
Environments – AWS Cloud Development Kit (AWS CDK) https://docs.aws.amazon.com/cdk/latest/guide/environments.html
Vpc.from_lookup in v0.36 (python): Cannot retrieve value from context provider vpc-provider since account/region are not specified at the stack level · Issue #3082 · aws/aws-cdk https://github.com/aws/aws-cdk/issues/3082
interface VpcLookupOptions · AWS CDK https://docs.aws.amazon.com/cdk/api/latest/docs/@aws-cdk_aws-ec2.VpcLookupOptions.html
TODO:リンク貼る
Interface CfnInstanceProps https://docs.aws.amazon.com/cdk/api/latest/typescript/api/aws-ec2/cfninstanceprops.html#aws_ec2_CfnInstanceProps
元記事はこちら
「AWS Cloud Development Kit(AWS CDK)でEC2インスタンスを立ち上げてみる」
September 02, 2019 at 02:00PM
0 notes
Photo

AWS CloudFormationでEC2インスタンスのログがAmazon CloudWatch logsで確認できるようにする https://ift.tt/33zfnVY
AWS CloudFormation(CFn)でEC2インスタンスを作成・管理する際にユーザーデータやAWS::CloudFormation::Initタイプを利用したメタデータで環境構築するのが便利なのですが、スタック作成・更新時のログはEC2インスタンス内にあるため、確認が面倒です。
EC2のログをAmazon CloudWatch Logsへ送信する仕組みとして「CloudWatch Logs エージェント」があると知ったのでCFnでEC2インスタンスを管理する際に利用できるテンプレートを作成してみました。
CloudWatch Logs エージェントのリファレンス – Amazon CloudWatch Logs https://docs.aws.amazon.com/ja_jp/AmazonCloudWatch/latest/logs/AgentReference.html
前提
AWSアカウントがある
AWS CLIがインストール済みで利用可能
CFn、EC2関連の権限がある
テンプレート
下記で作成したテンプレートにawslogsを利用する定義を追加しました。
AWS::CloudFormation::Init タイプを使ってEC2インスタンスの環境構築ができるようにしてみた – Qiita https://cloudpack.media/48540
EC2インスタンスを起動するVPCやサブネットは既存のリソースを利用する前提となります。 SSHアクセスする際のキーペアは事前に作成し、セキュリティグループはインスタンスとあわせて作成しています。 作成するリージョンは検証なので、us-east-1のみとしています。
cfn-template.yaml
Parameters: VpcId: Type: AWS::EC2::VPC::Id SubnetId: Type: AWS::EC2::Subnet::Id EC2KeyPairName: Type: AWS::EC2::KeyPair::KeyName InstanceType: Type: String Default: t3.small MyInstanceSSHCidrIp: Type: String Default: '0.0.0.0/0' Mappings: AWSRegionToAMI: us-east-1: HVM64: ami-0080e4c5bc078760e Resources: MyInstanceSecurityGroup: Type: AWS::EC2::SecurityGroup Properties: GroupName: !Join - " " - - !Ref AWS::StackName - "SecurityGroup" GroupDescription: "MyInstance SecurityGroup" VpcId: !Ref VpcId SecurityGroupEgress: - CidrIp: "0.0.0.0/0" IpProtocol: "-1" SecurityGroupIngress: - CidrIp: !Ref MyInstanceSSHCidrIp Description: !Join - " " - - !Ref AWS::StackName - "SSH Port" IpProtocol: "tcp" FromPort: 22 ToPort: 22 Tags: - Key: "Name" Value: !Join - " " - - !Ref AWS::StackName - "SecurityGroup" MyInstanceIAMRole: Type: "AWS::IAM::Role" Properties: AssumeRolePolicyDocument: Version: "2012-10-17" Statement: - Effect: "Allow" Principal: Service: - "ec2.amazonaws.com" Action: - "sts:AssumeRole" Path: "/" Policies: - PolicyName: "root" PolicyDocument: Version: "2012-10-17" Statement: - Effect: "Allow" Action: - "logs:CreateLogGroup" - "logs:CreateLogStream" - "logs:PutLogEvents" - "logs:DescribeLogStreams" Resource: "arn:aws:logs:*:*:*" MyInstanceIAMInstanceProfile: Type: "AWS::IAM::InstanceProfile" Properties: Path: "/" Roles: - Ref: MyInstanceIAMRole DependsOn: MyInstanceIAMRole MyInstance: Type: AWS::EC2::Instance Metadata: AWS::CloudFormation::Init: config: packages: yum: awslogs: [] files: /etc/awslogs/awslogs.conf: content: !Sub | [general] state_file = /var/lib/awslogs/agent-state [/var/log/cloud-init-output.log] datetime_format = %Y-%m-%d %H:%M:%S.%f file = /var/log/cloud-init-output.log buffer_duration = 5000 log_stream_name = {instance_id}/cloud-init-output.log initial_position = start_of_file log_group_name = /aws/ec2/${AWS::StackName} [/var/log/cfn-init.log] datetime_format = %Y-%m-%d %H:%M:%S.%f file = /var/log/cfn-init.log buffer_duration = 5000 log_stream_name = {instance_id}/cfn-init.log initial_position = start_of_file log_group_name = /aws/ec2/${AWS::StackName} [/var/log/cfn-init-cmd.log] datetime_format = %Y-%m-%d %H:%M:%S.%f file = /var/log/cfn-init-cmd.log buffer_duration = 5000 log_stream_name = {instance_id}/cfn-init-cmd.log initial_position = start_of_file log_group_name = /aws/ec2/${AWS::StackName} [/var/log/cfn-hup.log] datetime_format = %Y-%m-%d %H:%M:%S.%f file = /var/log/cfn-hup.log buffer_duration = 5000 log_stream_name = {instance_id}/cfn-hup.log initial_position = start_of_file log_group_name = /aws/ec2/${AWS::StackName} mode: "000644" owner: "root" group: "root" /etc/cfn/cfn-hup.conf: content: !Sub | [main] stack = ${AWS::StackName} region = ${AWS::Region} mode: "000400" owner: "root" group: "root" /etc/cfn/hooks.d/cfn-auto-reloader.conf: content: !Sub | [cfn-auto-reloader-hook] triggers = post.update path = Resources.MyInstance.Metadata.AWS::CloudFormation::Init action = /opt/aws/bin/cfn-init -v --stack ${AWS::StackName} --resource MyInstance --region ${AWS::Region} runas = root mode: "000400" owner: "root" group: "root" commands: test: command: "echo $STACK_NAME test" env: STACK_NAME: !Ref AWS::StackName services: sysvinit: cfn-hup: enabled: "true" files: - /etc/cfn/cfn-hup.conf - /etc/cfn/hooks.d/cfn-auto-reloader.conf awslogs: enabled: "true" packages: - awslogs files: - /etc/awslogs/awslogs.conf Properties: InstanceType: !Ref InstanceType KeyName: !Ref EC2KeyPairName ImageId: !FindInMap [ AWSRegionToAMI, !Ref "AWS::Region", HVM64 ] IamInstanceProfile: !Ref MyInstanceIAMInstanceProfile NetworkInterfaces: - AssociatePublicIpAddress: True DeviceIndex: 0 GroupSet: - !Ref MyInstanceSecurityGroup SubnetId: !Ref SubnetId Tags: - Key: 'Name' Value: !Ref AWS::StackName UserData: Fn::Base64: !Sub | #!/bin/bash echo "start UserData" /opt/aws/bin/cfn-init --stack ${AWS::StackName} --resource MyInstance --region ${AWS::Region} /opt/aws/bin/cfn-signal -e $? --stack ${AWS::StackName} --resource MyInstance --region ${AWS::Region} echo "finish UserData" CreationPolicy: ResourceSignal: Timeout: PT5M Outputs: ClientInstanceId: Value: !Ref MyInstance ClientPublicIp: Value: !GetAtt MyInstance.PublicIp
ポイント
IAMロールを作成する
EC2インスタンスからAmazon CloudWatch Logsへログを送るのに権限が必要となるためIAMロールを作成します。 必要となる権限については下記を参考にしました。
クイックスタート: 実行中の EC2 Linux インスタンスに CloudWatch Logs エージェントをインストールして設定する – Amazon CloudWatch Logs https://docs.aws.amazon.com/ja_jp/AmazonCloudWatch/latest/logs/QuickStartEC2Instance.html
cfn-template.yaml_一部抜粋
MyInstanceIAMRole: Type: "AWS::IAM::Role" Properties: AssumeRolePolicyDocument: Version: "2012-10-17" Statement: - Effect: "Allow" Principal: Service: - "ec2.amazonaws.com" Action: - "sts:AssumeRole" Path: "/" Policies: - PolicyName: "root" PolicyDocument: Version: "2012-10-17" Statement: - Effect: "Allow" Action: - "logs:CreateLogGroup" - "logs:CreateLogStream" - "logs:PutLogEvents" - "logs:DescribeLogStreams" Resource: "arn:aws:logs:*:*:*" MyInstanceIAMInstanceProfile: Type: "AWS::IAM::InstanceProfile" Properties: Path: "/" Roles: - Ref: MyInstanceIAMRole DependsOn: MyInstanceIAMRole MyInstance: Type: AWS::EC2::Instance (略) Properties: InstanceType: !Ref InstanceType KeyName: !Ref EC2KeyPairName ImageId: !FindInMap [ AWSRegionToAMI, !Ref "AWS::Region", HVM64 ] IamInstanceProfile: !Ref MyInstanceIAMInstanceProfile (略)
awslogs パッケージを利用する
CloudWatch Logs エージェントはawslogsパッケージとして提供されています。awslogsパッケージはAmazon LinuxとUbuntuに対応しています。
パッケージのインストール、設定ファイル、サービス起動はメタデータで定義して設定変更できるようにしました。 /etc/awslogs/awslogs.confファイルでAmazon CloudWatch Logsに出力するログファイルを定義します。log_stream_nameやlog_group_name は任意で指定が可能です。 ここでは/var/log/内に出力されるメタデータやユーザーデータによる処理のログを対象としました。
cfn-template.yaml_一部抜粋
MyInstance: Type: AWS::EC2::Instance Metadata: AWS::CloudFormation::Init: config: packages: yum: awslogs: [] files: /etc/awslogs/awslogs.conf: content: !Sub | [general] state_file = /var/lib/awslogs/agent-state [/var/log/cloud-init-output.log] datetime_format = %Y-%m-%d %H:%M:%S.%f file = /var/log/cloud-init-output.log buffer_duration = 5000 log_stream_name = {instance_id}/cloud-init-output.log initial_position = start_of_file log_group_name = /aws/ec2/${AWS::StackName} [/var/log/cfn-init.log] datetime_format = %Y-%m-%d %H:%M:%S.%f file = /var/log/cfn-init.log buffer_duration = 5000 log_stream_name = {instance_id}/cfn-init.log initial_position = start_of_file log_group_name = /aws/ec2/${AWS::StackName} [/var/log/cfn-init-cmd.log] datetime_format = %Y-%m-%d %H:%M:%S.%f file = /var/log/cfn-init-cmd.log buffer_duration = 5000 log_stream_name = {instance_id}/cfn-init-cmd.log initial_position = start_of_file log_group_name = /aws/ec2/${AWS::StackName} [/var/log/cfn-hup.log] datetime_format = %Y-%m-%d %H:%M:%S.%f file = /var/log/cfn-hup.log buffer_duration = 5000 log_stream_name = {instance_id}/cfn-hup.log initial_position = start_of_file log_group_name = /aws/ec2/${AWS::StackName} mode: "000644" owner: "root" group: "root" (略) services: sysvinit: (略) awslogs: enabled: "true" packages: - awslogs files: - /etc/awslogs/awslogs.conf
利用方法
パラメータ値を取得
キーペア
EC2インスタンスへSSHログインするのに利用するキーペアを作成します。 既存のキーペアを利用する場合は作成不要です。
# Create KeyPair > aws ec2 create-key-pair \ --key-name cfn-awslogs-test-ec2-key \ --query "KeyMaterial" \ --output text > cfn-awslogs-test-ec2-key.pem > chmod 400 cfn-awslogs-test-ec2-key.pem
VPC、サブネット
既存のVPC、サブネット配下にEC2インスタンスを作成する前提ですので各IDを取得します。
# VpcId > aws ec2 describe-vpcs \ --query "Vpcs" [ { "CidrBlock": "172.31.0.0/16", "DhcpOptionsId": "dopt-b06bd8c8", "State": "available", "VpcId": "vpc-xxxxxxxx", "OwnerId": "xxxxxxxxxxxx", "InstanceTenancy": "default", "CidrBlockAssociationSet": [ { "AssociationId": "vpc-cidr-assoc-2b23e646", "CidrBlock": "172.31.0.0/16", "CidrBlockState": { "State": "associated" } } ], "IsDefault": true }, ] # SubnetId > aws ec2 describe-subnets \ --filters '{"Name": "vpc-id", "Values": ["vpc-xxxxxxxx"]}' \ --query "Subnets" [ { "AvailabilityZone": "us-east-1a", "AvailabilityZoneId": "use1-az2", "AvailableIpAddressCount": 4089, "CidrBlock": "172.31.80.0/20", "DefaultForAz": true, "MapPublicIpOnLaunch": true, "State": "available", "SubnetId": "subnet-xxxxxxxx", "VpcId": "vpc-xxxxxxxx", "OwnerId": "xxxxxxxxxxxx", "AssignIpv6AddressOnCreation": false, "Ipv6CidrBlockAssociationSet": [], "SubnetArn": "arn:aws:ec2:us-east-1:xxxxxxxxxxxx:subnet/subnet-xxxxxxxx" }, ]
自身のグローバルIP
SSHアクセスするためのセキュリティグループに指定するIPアドレスを取得します。 ここではifconfig.ioを利用していますが他の手段でもOKです。
## GlobalIP > curl ifconfig.io xxx.xxx.xxx.xxx
スタック作成
aws cloudformation create-stackコマンドを利用してスタック作成します。 AWSマネジメントコンソールから作成してもOKです。
> aws cloudformation create-stack \ --stack-name cfn-awslogs-test \ --template-body file://cfn-template.yaml \ --capabilities CAPABILITY_IAM \ --region us-east-1 \ --parameters '[ { "ParameterKey": "VpcId", "ParameterValue": "vpc-xxxxxxxx" }, { "ParameterKey": "SubnetId", "ParameterValue": "subnet-xxxxxxxx" }, { "ParameterKey": "EC2KeyPairName", "ParameterValue": "cfn-awslogs-test-ec2-key" }, { "ParameterKey": "MyInstanceSSHCidrIp", "ParameterValue": "xxx.xxx.xxx.xxx/32" } ]'
スタック作成結果を確認
スタック作成ができたか確認します。
> aws cloudformation describe-stacks \ --stack-name cfn-awslogs-test { "Stacks": [ { "StackId": "arn:aws:cloudformation:us-east-1:xxxxxxxxxxxx:stack/cfn-awslogs-test/f1e864b0-a9fd-11e9-aa93-12ccfe651680", "StackName": "cfn-awslogs-test", "Parameters": [ { "ParameterKey": "MyInstanceSSHCidrIp", "ParameterValue": "xxx.xxx.xxx.xxx/32" }, { "ParameterKey": "VpcId", "ParameterValue": "vpc-xxxxxxxx" }, { "ParameterKey": "EC2KeyPairName", "ParameterValue": "cfn-init-test-ec2-key" }, { "ParameterKey": "SubnetId", "ParameterValue": "subnet-xxxxxxxx" }, { "ParameterKey": "InstanceType", "ParameterValue": "t3.small" } ], "CreationTime": "2019-07-19T08:19:36.199Z", "RollbackConfiguration": {}, "StackStatus": "CREATE_COMPLETE", "DisableRollback": false, "NotificationARNs": [], "Capabilities": [ "CAPABILITY_IAM" ], "Outputs": [ { "OutputKey": "ClientPublicIp", "OutputValue": "xxx.xxx.xxx.xxx" }, { "OutputKey": "ClientInstanceId", "OutputValue": "i-xxxxxxxxxxxxxxxxx" } ], "Tags": [], "EnableTerminationProtection": false, "DriftInformation": { "StackDriftStatus": "NOT_CHECKED" } } ] }
Amazon CloudWatch logsでログを確認する
> aws logs describe-log-streams \ --log-group-name /aws/ec2/cfn-awslogs-test \ --query "logGroups[*].logGroupName" [ "i-xxxxxxxxxxxxxxxxx/cfn-hup.log", "i-xxxxxxxxxxxxxxxxx/cfn-init-cmd.log", "i-xxxxxxxxxxxxxxxxx/cfn-init.log", "i-xxxxxxxxxxxxxxxxx/cloud-init-output.log" ] > aws logs get-log-events \ --log-group-name /aws/ec2/cfn-awslogs-test \ --log-stream-name i-xxxxxxxxxxxxxxxxx/cfn-hup.log \ --query "events[*].message" [ "2019-07-19 08:22:57,542 [DEBUG] CloudFormation client initialized with endpoint https://cloudformation.us-east-1.amazonaws.com", "2019-07-19 08:22:57,543 [DEBUG] Creating /var/lib/cfn-hup/data", "2019-07-19 08:22:57,551 [INFO] No umask value specified in config file. Using the default one: 022", "2019-07-19 08:37:57,714 [INFO] cfn-hup processing is alive." ] > aws logs get-log-events \ --log-group-name /aws/ec2/cfn-awslogs-test \ --log-stream-name i-xxxxxxxxxxxxxxxxx/cfn-init-cmd.log \ --query "events[*].message" \ [ "2019-07-19 08:22:49,803 P2190 [INFO] ************************************************************", "2019-07-19 08:22:49,803 P2190 [INFO] ConfigSet default", "2019-07-19 08:22:49,804 P2190 [INFO] ++++++++++++++++++++++++++++++++++++++++++++++++++++++++++++", "2019-07-19 08:22:49,804 P2190 [INFO] Config config", "2019-07-19 08:22:55,092 P2190 [INFO] ============================================================", "2019-07-19 08:22:55,092 P2190 [INFO] yum install awslogs", "2019-07-19 08:22:56,958 P2190 [INFO] -----------------------Command Output-----------------------", "2019-07-19 08:22:56,958 P2190 [INFO] \tLoaded plugins: priorities, update-motd, upgrade-helper", "2019-07-19 08:22:56,958 P2190 [INFO] \tResolving Dependencies", "2019-07-19 08:22:56,958 P2190 [INFO] \t--> Running transaction check", "2019-07-19 08:22:56,958 P2190 [INFO] \t---> Package awslogs.noarch 0:1.1.4-1.12.amzn1 will be installed", "2019-07-19 08:22:56,958 P2190 [INFO] \t--> Processing Dependency: aws-cli-plugin-cloudwatch-logs(python27) for package: awslogs-1.1.4-1.12.amzn1.noarch", "2019-07-19 08:22:56,959 P2190 [INFO] \t--> Running transaction check", "2019-07-19 08:22:56,959 P2190 [INFO] \t---> Package aws-cli-plugin-cloudwatch-logs.noarch 0:1.4.4-1.16.amzn1 will be installed", "2019-07-19 08:22:56,959 P2190 [INFO] \t--> Finished Dependency Resolution", "2019-07-19 08:22:56,959 P2190 [INFO] \t", "2019-07-19 08:22:56,959 P2190 [INFO] \tDependencies Resolved", "2019-07-19 08:22:56,959 P2190 [INFO] \t", "2019-07-19 08:22:56,959 P2190 [INFO] \t================================================================================", "2019-07-19 08:22:56,959 P2190 [INFO] \t Package Arch Version Repository Size", "2019-07-19 08:22:56,959 P2190 [INFO] \t================================================================================", "2019-07-19 08:22:56,959 P2190 [INFO] \tInstalling:", "2019-07-19 08:22:56,959 P2190 [INFO] \t awslogs noarch 1.1.4-1.12.amzn1 amzn-main 9.2 k", "2019-07-19 08:22:56,959 P2190 [INFO] \tInstalling for dependencies:", "2019-07-19 08:22:56,960 P2190 [INFO] \t aws-cli-plugin-cloudwatch-logs noarch 1.4.4-1.16.amzn1 amzn-main 71 k", "2019-07-19 08:22:56,960 P2190 [INFO] \t", "2019-07-19 08:22:56,960 P2190 [INFO] \tTransaction Summary", "2019-07-19 08:22:56,960 P2190 [INFO] \t================================================================================", "2019-07-19 08:22:56,960 P2190 [INFO] \tInstall 1 Package (+1 Dependent package)", "2019-07-19 08:22:56,960 P2190 [INFO] \t", "2019-07-19 08:22:56,960 P2190 [INFO] \tTotal download size: 81 k", "2019-07-19 08:22:56,960 P2190 [INFO] \tInstalled size: 246 k", "2019-07-19 08:22:56,960 P2190 [INFO] \tDownloading packages:", "2019-07-19 08:22:56,960 P2190 [INFO] \t--------------------------------------------------------------------------------", "2019-07-19 08:22:56,960 P2190 [INFO] \tTotal 250 kB/s | 81 kB 00:00 ", "2019-07-19 08:22:56,960 P2190 [INFO] \tRunning transaction check", "2019-07-19 08:22:56,961 P2190 [INFO] \tRunning transaction test", "2019-07-19 08:22:56,961 P2190 [INFO] \tTransaction test succeeded", "2019-07-19 08:22:56,961 P2190 [INFO] \tRunning transaction", "2019-07-19 08:22:56,961 P2190 [INFO] \t Installing : aws-cli-plugin-cloudwatch-logs-1.4.4-1.16.amzn1.noarch 1/2 ", "2019-07-19 08:22:56,961 P2190 [INFO] \t Installing : awslogs-1.1.4-1.12.amzn1.noarch 2/2 ", "2019-07-19 08:22:56,961 P2190 [INFO] \t Verifying : awslogs-1.1.4-1.12.amzn1.noarch 1/2 ", "2019-07-19 08:22:56,961 P2190 [INFO] \t Verifying : aws-cli-plugin-cloudwatch-logs-1.4.4-1.16.amzn1.noarch 2/2 ", "2019-07-19 08:22:56,961 P2190 [INFO] \t", "2019-07-19 08:22:56,962 P2190 [INFO] \tInstalled:", "2019-07-19 08:22:56,962 P2190 [INFO] \t awslogs.noarch 0:1.1.4-1.12.amzn1 ", "2019-07-19 08:22:56,962 P2190 [INFO] \t", "2019-07-19 08:22:56,962 P2190 [INFO] \tDependency Installed:", "2019-07-19 08:22:56,962 P2190 [INFO] \t aws-cli-plugin-cloudwatch-logs.noarch 0:1.4.4-1.16.amzn1 ", "2019-07-19 08:22:56,962 P2190 [INFO] \t", "2019-07-19 08:22:56,962 P2190 [INFO] \tComplete!", "2019-07-19 08:22:56,962 P2190 [INFO] ------------------------------------------------------------", "2019-07-19 08:22:56,962 P2190 [INFO] Completed successfully.", "2019-07-19 08:22:56,965 P2190 [INFO] ============================================================", "2019-07-19 08:22:56,965 P2190 [INFO] Command test", "2019-07-19 08:22:56,969 P2190 [INFO] -----------------------Command Output-----------------------", "2019-07-19 08:22:56,969 P2190 [INFO] \tcfn-awslogs-test test", "2019-07-19 08:22:56,969 P2190 [INFO] ------------------------------------------------------------", "2019-07-19 08:22:56,970 P2190 [INFO] Completed successfully." ] > aws logs get-log-events \ --log-group-name /aws/ec2/cfn-awslogs-test \ --log-stream-name i-xxxxxxxxxxxxxxxxx/cfn-init.log \ --query "events[*].message" [ "2019-07-19 08:22:49,801 [INFO] -----------------------Starting build-----------------------", "2019-07-19 08:22:49,802 [INFO] Running configSets: default", "2019-07-19 08:22:49,803 [INFO] Running configSet default", "2019-07-19 08:22:49,804 [INFO] Running config config", "2019-07-19 08:22:56,962 [INFO] Yum installed [u'awslogs']", "2019-07-19 08:22:56,970 [INFO] Command test succeeded", "2019-07-19 08:22:56,975 [INFO] enabled service cfn-hup", "2019-07-19 08:22:57,568 [INFO] Restarted cfn-hup successfully", "2019-07-19 08:22:57,607 [INFO] enabled service awslogs", "2019-07-19 08:22:59,648 [INFO] Restarted awslogs successfully", "2019-07-19 08:22:59,649 [INFO] ConfigSets completed", "2019-07-19 08:22:59,650 [INFO] -----------------------Build complete-----------------------", "2019-07-19 08:23:00,249 [DEBUG] CloudFormation client initialized with endpoint https://cloudformation.us-east-1.amazonaws.com", "2019-07-19 08:23:00,250 [DEBUG] Signaling resource MyInstance in stack cfn-awslogs-test with unique ID i-xxxxxxxxxxxxxxxxx and status SUCCESS" ] > aws logs get-log-events \ --log-group-name /aws/ec2/cfn-awslogs-test \ --log-stream-name i-xxxxxxxxxxxxxxxxx/cloud-init-output.log \ --query "events[*].message" (略) "Updated:\n java-1.7.0-openjdk.x86_64 1:1.7.0.211-2.6.17.1.79.amzn1 \n kernel-tools.x86_64 0:4.14.128-87.105.amzn1 \n perl.x86_64 4:5.16.3-294.43.amzn1 \n perl-Pod-Escapes.noarch 1:1.04-294.43.amzn1 \n perl-libs.x86_64 4:5.16.3-294.43.amzn1 \n perl-macros.x86_64 4:5.16.3-294.43.amzn1 \n python27-jinja2.noarch 0:2.7.2-3.16.amzn1 \n wget.x86_64 0:1.18-5.30.amzn1 \n", "Complete!", "Cloud-init v. 0.7.6 running 'modules:final' at Fri, 19 Jul 2019 08:22:49 +0000. Up 20.37 seconds.", "start UserData", "finish UserData", "Cloud-init v. 0.7.6 finished at Fri, 19 Jul 2019 08:23:00 +0000. Datasource DataSourceEc2. Up 31.51 seconds" ]
まとめ
CloudWatch Logs エージェントを利用することでCFnでEC2インスタンス作成・更新時のログをAmazon CloudWatch Logsへ出力することができました。 個人的にはこれでCFnで実行エラーによるロールバックでEC2インスタンスが削除されてログが確認できない悲しみがなくなって満足です^^
参考
CloudWatch Logs エージェントのリファレンス – Amazon CloudWatch Logs https://docs.aws.amazon.com/ja_jp/AmazonCloudWatch/latest/logs/AgentReference.html
AWS::CloudFormation::Init タイプを使ってEC2インスタンスの環境構築ができるようにしてみた – Qiita https://cloudpack.media/48540
クイックスタート: 実行中の EC2 Linux インスタンスに CloudWatch Logs エージェントをインストールして設定する – Amazon CloudWatch Logs https://docs.aws.amazon.com/ja_jp/AmazonCloudWatch/latest/logs/QuickStartEC2Instance.html
元記事はこちら
「AWS CloudFormationでEC2インスタンスのログがAmazon CloudWatch logsで確認できるようにする」
August 14, 2019 at 12:00PM
0 notes
Photo

AWS::CloudFormation::Init タイプを使ってEC2インスタンスの環境構築ができるようにしてみた https://ift.tt/2P2V4wW
cloudpack あら便利カレンダー 2019の記事となります。誕生秘話はこちら。
AWS CloudFormation(CFn)でEC2インスタンスを作成するのに、AWS::CloudFormation::Initタイプを利用すると、インスタンス起動後にパッケージのインストールやファイル作成、コマンド実行を含めることができて便利そうだったのでお試ししてみました。
個人的に一番のメリットはスタック更新時にメタデータの変更も検知して再実行させることができる点です。
AWS::CloudFormation::Init – AWS CloudFormation https://docs.aws.amazon.com/ja_jp/AWSCloudFormation/latest/UserGuide/aws-resource-init.html
利用するのにいくつかのドキュメントを渡り歩く必要があったので、必要最低限のテンプレートと利用方法、ポイントをまとめました。
前提
AWSアカウントがある
AWS CLIがインストール済みで利用可能
CFn、EC2関連の権限がある
テンプレート
EC2インスタンスを作成・管理するテンプレートとなります。
EC2インスタンスを起動するVPCやサブネットは既存のリソースを利用前提となります。 SSHアクセスする際のキーペアは事前に作成し、セキュリティグループはインスタンスとあわせて作成しています。 作成するリージョンは検証なので、us-east-1のみとしています。
cfn-template.yaml
Parameters: VpcId: Type: AWS::EC2::VPC::Id SubnetId: Type: AWS::EC2::Subnet::Id EC2KeyPairName: Type: AWS::EC2::KeyPair::KeyName InstanceType: Type: String Default: t3.small MyInstanceSSHCidrIp: Type: String Default: '0.0.0.0/0' Mappings: AWSRegionToAMI: us-east-1: HVM64: ami-0080e4c5bc078760e Resources: MyInstanceSecurityGroup: Type: AWS::EC2::SecurityGroup Properties: GroupName: !Join - " " - - !Ref AWS::StackName - "SecurityGroup" GroupDescription: "MyInstance SecurityGroup" VpcId: !Ref VpcId SecurityGroupEgress: - CidrIp: "0.0.0.0/0" IpProtocol: "-1" SecurityGroupIngress: - CidrIp: !Ref MyInstanceSSHCidrIp Description: !Join - " " - - !Ref AWS::StackName - "SSH Port" IpProtocol: "tcp" FromPort: 22 ToPort: 22 Tags: - Key: "Name" Value: !Join - " " - - !Ref AWS::StackName - "SecurityGroup" MyInstance: Type: AWS::EC2::Instance Metadata: AWS::CloudFormation::Init: config: files: /etc/cfn/cfn-hup.conf: content: !Sub | [main] stack = ${AWS::StackName} region = ${AWS::Region} interval = 1 mode: "000400" owner: "root" group: "root" /etc/cfn/hooks.d/cfn-auto-reloader.conf: content: !Sub | [cfn-auto-reloader-hook] triggers = post.update path = Resources.MyInstance.Metadata.AWS::CloudFormation::Init action = /opt/aws/bin/cfn-init -v --stack ${AWS::StackName} --resource MyInstance --region ${AWS::Region} runas = root mode: "000400" owner: "root" group: "root" commands: test: command: "echo $STACK_NAME test" env: STACK_NAME: !Ref AWS::StackName services: sysvinit: cfn-hup: enabled: "true" files: - /etc/cfn/cfn-hup.conf - /etc/cfn/hooks.d/cfn-auto-reloader.conf Properties: InstanceType: !Ref InstanceType KeyName: !Ref EC2KeyPairName ImageId: !FindInMap [ AWSRegionToAMI, !Ref "AWS::Region", HVM64 ] IamInstanceProfile: !Ref AWS::NoValue NetworkInterfaces: - AssociatePublicIpAddress: True DeviceIndex: 0 GroupSet: - !Ref MyInstanceSecurityGroup SubnetId: !Ref SubnetId Tags: - Key: 'Name' Value: !Ref AWS::StackName UserData: Fn::Base64: !Sub | #!/bin/bash echo "start UserData" /opt/aws/bin/cfn-init --stack ${AWS::StackName} --resource MyInstance --region ${AWS::Region} /opt/aws/bin/cfn-signal -e $? --stack ${AWS::StackName} --resource MyInstance --region ${AWS::Region} echo "finish UserData" CreationPolicy: ResourceSignal: Timeout: PT5M Outputs: ClientInstanceId: Value: !Ref MyInstance ClientPublicIp: Value: !GetAtt MyInstance.PublicIp
ポイント
AWS::CloudFormation::Initタイプを利用する
AWS::CloudFormation::Initタイプを利用すると、EC2インスタンスでcfn-initヘルパースクリプト用のメタデータとして取り込まれて実行されます。 cfn-initヘルパースクリプトはメタデータに応じて以下のような操作を行います。
CFnのメタデータの取得と解析
パッケージのインストール
ディスクへのファイルの書き込み
Linux/UNIXグループ・ユーザー作成
ソースのダウンロード・展開
コマンド実行
サービスの有効化/無効化と開始/停止
詳しくは下記が参考になります。
AWS::CloudFormation::Init – AWS CloudFormation https://docs.aws.amazon.com/ja_jp/AWSCloudFormation/latest/UserGuide/aws-resource-init.html
cfn-init – AWS CloudFormation https://docs.aws.amazon.com/ja_jp/AWSCloudFormation/latest/UserGuide/cfn-init.html
今回のテンプレートではメタデータでファイル書き込み、コマンド実行とサービス有効化する定義をしています。詳細は後ほど。
cfn-template.yaml_一部抜粋
MyInstance: Type: AWS::EC2::Instance Metadata: AWS::CloudFormation::Init: config: files: /etc/cfn/cfn-hup.conf: content: !Sub | [main] stack = ${AWS::StackName} region = ${AWS::Region} interval = 1 mode: "000400" owner: "root" group: "root" /etc/cfn/hooks.d/cfn-auto-reloader.conf: (略) commands: test: command: "echo $STACK_NAME test2" env: STACK_NAME: !Ref AWS::StackName services: sysvinit: cfn-hup: (略)
cfn-init ヘルパースクリプトをUserDataで実行する
AWS::CloudFormation::Initタイプを利用してメタデータを定義しただけだと、スタック作成時にcfn-initヘルパースクリプトは実行されないため、ユーザーデータを定義して実行します。 ユーザーデータについては下記が参考になります。
Linux インスタンスでの起動時のコマンドの実行 – Amazon Elastic Compute Cloud https://docs.aws.amazon.com/ja_jp/AWSEC2/latest/UserGuide/user-data.html
今回のテンプレートでは/opt/aws/bin/cfn-initでエラーとなった場合、リソース作成失敗となるように/opt/aws/bin/cfn-signalも実行するようにしています。/opt/aws/bin/cfn-signalを利用する場合には、CreationPolicyを定義しておく必要があり��す。 cfn-signalヘルパースクリプトについては下記が参考になります。
cfn-signal – AWS CloudFormation https://docs.aws.amazon.com/ja_jp/AWSCloudFormation/latest/UserGuide/cfn-signal.html
cfn-template.yaml_一部抜粋
MyInstance: (略) Properties: (略) UserData: Fn::Base64: !Sub | #!/bin/bash echo "start UserData" /opt/aws/bin/cfn-init --stack ${AWS::StackName} --resource MyInstance --region ${AWS::Region} /opt/aws/bin/cfn-signal -e $? --stack ${AWS::StackName} --resource MyInstance --region ${AWS::Region} echo "finish UserData" CreationPolicy: ResourceSignal: Timeout: PT5M
cfn-hup ヘルパーでメタデータ更新時に対応する
メタデータとユーザーデータの定義だけだと、メタデータを変更してスタック更新しても変更が検知されず、EC2インスタンスに反映されないため、cfn-hup ヘルパーを利用する必要があります。cfn-hupヘルパーはEC2インスタンスでデーモンとして実行が可能です。 cfn-hupデーモンを実行するためにはcfn-hup.confとhooks.confファイルを用意する必要があるため、メタデータで定義しています。 cfn-hupヘルパーについては下記が参考になります。
cfn-hup – AWS CloudFormation https://docs.aws.amazon.com/ja_jp/AWSCloudFormation/latest/UserGuide/cfn-hup.html
cfn-template.yaml_一部抜粋
MyInstance: Type: AWS::EC2::Instance Metadata: AWS::CloudFormation::Init: config: files: /etc/cfn/cfn-hup.conf: content: !Sub | [main] stack = ${AWS::StackName} region = ${AWS::Region} interval = 1 mode: "000400" owner: "root" group: "root" /etc/cfn/hooks.d/cfn-auto-reloader.conf: content: !Sub | [cfn-auto-reloader-hook] triggers = post.update path = Resources.MyInstance.Metadata.AWS::CloudFormation::Init action = /opt/aws/bin/cfn-init -v --stack ${AWS::StackName} --resource MyInstance --region ${AWS::Region} runas = root mode: "000400" owner: "root" group: "root" commands: (略) services: sysvinit: cfn-hup: enabled: "true" files: - /etc/cfn/cfn-hup.conf - /etc/cfn/hooks.d/cfn-auto-reloader.conf
利用方法
パラメータ値を取得
キーペア
EC2インスタンスへSSHログインするのに利用するキーペアを作成します。 既存のキーペアを利用する場合は作成不要です。
# Create KeyPair > aws ec2 create-key-pair \ --key-name cfn-init-test-ec2-key \ --query "KeyMaterial" \ --output text > cfn-init-test-ec2-key.pem > chmod 400 cfn-init-test-ec2-key.pem
VPC、サブネット
既存のVPC、サブネット配下にEC2インスタンスを作成する前提ですので各IDを取得します。
# VpcId > aws ec2 describe-vpcs \ --query "Vpcs" [ { "CidrBlock": "172.31.0.0/16", "DhcpOptionsId": "dopt-b06bd8c8", "State": "available", "VpcId": "vpc-xxxxxxxx", "OwnerId": "xxxxxxxxxxxx", "InstanceTenancy": "default", "CidrBlockAssociationSet": [ { "AssociationId": "vpc-cidr-assoc-2b23e646", "CidrBlock": "172.31.0.0/16", "CidrBlockState": { "State": "associated" } } ], "IsDefault": true }, ] # SubnetId > aws ec2 describe-subnets \ --filters '{"Name": "vpc-id", "Values": ["vpc-xxxxxxxx"]}' \ --query "Subnets" [ { "AvailabilityZone": "us-east-1a", "AvailabilityZoneId": "use1-az2", "AvailableIpAddressCount": 4089, "CidrBlock": "172.31.80.0/20", "DefaultForAz": true, "MapPublicIpOnLaunch": true, "State": "available", "SubnetId": "subnet-xxxxxxxx", "VpcId": "vpc-xxxxxxxx", "OwnerId": "xxxxxxxxxxxx", "AssignIpv6AddressOnCreation": false, "Ipv6CidrBlockAssociationSet": [], "SubnetArn": "arn:aws:ec2:us-east-1:xxxxxxxxxxxx:subnet/subnet-xxxxxxxx" }, ]
自身のグローバルIP
SSHアクセスするためのセキュリティグループに指定するIPアドレスを取得します。 ここではifconfig.ioを利用していますが他の手段でもOKです。
## GlobalIP > curl ifconfig.io xxx.xxx.xxx.xxx
スタック作成
aws cloudformation create-stackコマンドを利用してスタック作成します。 AWSマネジメントコンソールから作成してもOKです。
> aws cloudformation create-stack \ --stack-name cfn-init-test \ --template-body file://cfn-init-template.yaml \ --capabilities CAPABILITY_IAM \ --region us-east-1 \ --parameters '[ { "ParameterKey": "VpcId", "ParameterValue": "vpc-xxxxxxxx" }, { "ParameterKey": "SubnetId", "ParameterValue": "subnet-xxxxxxxx" }, { "ParameterKey": "EC2KeyPairName", "ParameterValue": "cfn-init-test-ec2-key" }, { "ParameterKey": "MyInstanceSSHCidrIp", "ParameterValue": "xxx.xxx.xxx.xxx/32" } ]'
スタック作成結果を確認
スタック作成ができたか確認します。
> aws cloudformation describe-stacks \ --stack-name cfn-init-test { "Stacks": [ { "StackId": "arn:aws:cloudformation:us-east-1:xxxxxxxxxxxx:stack/cfn-init-test/a1dc6aa0-a9e6-11e9-b171-0a515b01a4a4", "StackName": "cfn-init-test", "Parameters": [ { "ParameterKey": "MyInstanceSSHCidrIp", "ParameterValue": "xxx.xxx.xxx.xxx/32" }, { "ParameterKey": "VpcId", "ParameterValue": "vpc-xxxxxxxx" }, { "ParameterKey": "EC2KeyPairName", "ParameterValue": "cfn-init-test-ec2-key" }, { "ParameterKey": "SubnetId", "ParameterValue": "subnet-xxxxxxxx" }, { "ParameterKey": "InstanceType", "ParameterValue": "t3.small" } ], "CreationTime": "2019-07-19T05:32:43.477Z", "RollbackConfiguration": {}, "StackStatus": "CREATE_COMPLETE", "DisableRollback": false, "NotificationARNs": [], "Capabilities": [ "CAPABILITY_IAM" ], "Outputs": [ { "OutputKey": "ClientPublicIp", "OutputValue": "xxx.xxx.xxx.xxx" }, { "OutputKey": "ClientInstanceId", "OutputValue": "i-xxxxxxxxxxxxxxxxx" } ], "Tags": [], "EnableTerminationProtection": false, "DriftInformation": { "StackDriftStatus": "NOT_CHECKED" } } ] }
EC2インスタンスで確認
テンプレートのOutputsでEC2インスタンスのIPアドレス(‘ClientPublicIp’ )が出力されるようにしているので、SSHログインして各ログを確認します。 CFnでEC2インスタンスを作成するといくつかのログファイルが作成されますが、下記のファイル確認しておくとだいたいは把握できます。
> ssh -i cfn-init-test-ec2-key.pem [email protected] $ cat /var/log/cfn-init.log 2019-07-19 06:53:00,454 [INFO] -----------------------Starting build----------------------- 2019-07-19 06:53:00,455 [INFO] Running configSets: default 2019-07-19 06:53:00,455 [INFO] Running configSet default 2019-07-19 06:53:00,456 [INFO] Running config config 2019-07-19 06:53:00,460 [INFO] Command test succeeded 2019-07-19 06:53:00,467 [INFO] enabled service cfn-hup 2019-07-19 06:53:00,768 [INFO] Restarted cfn-hup successfully 2019-07-19 06:53:00,769 [INFO] ConfigSets completed 2019-07-19 06:53:00,769 [INFO] -----------------------Build complete----------------------- 2019-07-19 06:53:01,055 [DEBUG] CloudFormation client initialized with endpoint https://cloudformation.us-east-1.amazonaws.com 2019-07-19 06:53:01,055 [DEBUG] Signaling resource MyInstance in stack cfn-init-test with unique ID i-xxxxxxxxxxxxxxxxx and status SUCCESS $ cat /var/log/cfn-init-cmd.log 2019-07-19 06:53:00,455 P2208 [INFO] ************************************************************ 2019-07-19 06:53:00,455 P2208 [INFO] ConfigSet default 2019-07-19 06:53:00,456 P2208 [INFO] ++++++++++++++++++++++++++++++++++++++++++++++++++++++++++++ 2019-07-19 06:53:00,456 P2208 [INFO] Config config 2019-07-19 06:53:00,457 P2208 [INFO] ============================================================ 2019-07-19 06:53:00,457 P2208 [INFO] Command test 2019-07-19 06:53:00,460 P2208 [INFO] -----------------------Command Output----------------------- 2019-07-19 06:53:00,460 P2208 [INFO] cfn-init-test test 2019-07-19 06:53:00,460 P2208 [INFO] ------------------------------------------------------------ 2019-07-19 06:53:00,460 P2208 [INFO] Completed successfully. $ cat /var/log/cloud-init-output.log (略) Updated: java-1.7.0-openjdk.x86_64 1:1.7.0.211-2.6.17.1.79.amzn1 kernel-tools.x86_64 0:4.14.128-87.105.amzn1 perl.x86_64 4:5.16.3-294.43.amzn1 perl-Pod-Escapes.noarch 1:1.04-294.43.amzn1 perl-libs.x86_64 4:5.16.3-294.43.amzn1 perl-macros.x86_64 4:5.16.3-294.43.amzn1 python27-jinja2.noarch 0:2.7.2-3.16.amzn1 wget.x86_64 0:1.18-5.30.amzn1 Complete! Cloud-init v. 0.7.6 running 'modules:final' at Fri, 19 Jul 2019 05:33:29 +0000. Up 19.60 seconds. start UserData finish UserData Cloud-init v. 0.7.6 finished at Fri, 19 Jul 2019 05:33:31 +0000. Datasource DataSourceEc2. Up 20.79 seconds
スタック更新に関わるログとファイルは以下となります。 cfn-hupデーモンが定期的にCFnスタックのメタデータを取得しmetadata_db.jsonに保存、メタデータとファイルに差分があるとcfn-auto-reloader.confで指定したアクション(コマンド)が実行される仕組みになっています。 なので、スタック作成後、cfn-hupデーモンが1度もメタデータ取得していないタイミングでスタック更新しても、metadata_db.jsonが存在していないと変更が検知されないみたいです。(1敗
$ cat /var/log/cfn-hup.log 2019-07-19 06:53:00,750 [DEBUG] CloudFormation client initialized with endpoint https://cloudformation.us-east-1.amazonaws.com 2019-07-19 06:53:00,750 [DEBUG] Creating /var/lib/cfn-hup/data 2019-07-19 06:53:00,756 [INFO] No umask value specified in config file. Using the default one: 022 $ sudo cat /var/lib/cfn-hup/data/metadata_db.json {"cfn-auto-reloader-hook|Resources.MyInstance.Metadata.AWS::CloudFormation::Init": {"config": {"files": {"/etc/cfn/cfn-hup.conf": {"owner": "root", "content": "[main]\nstack = cfn-init-test\nregion = us-east-1\ninterval = 1\n", "group": "root", "mode": "000400"}, "/etc/cfn/hooks.d/cfn-auto-reloader.conf": {"owner": "root", "content": "[cfn-auto-reloader-hook]\ntriggers = post.update\npath = Resources.MyInstance.Metadata.AWS::CloudFormation::Init\naction = /opt/aws/bin/cfn-init -v --stack cfn-init-test --resource MyInstance --region us-east-1\nrunas = root\n", "group": "root", "mode": "000400"}}, "services": {"sysvinit": {"cfn-hup": {"files": ["/etc/cfn/cfn-hup.conf", "/etc/cfn/hooks.d/cfn-auto-reloader.conf"], "enabled": "true"}}}, "commands": {"test": {"command": "echo $STACK_NAME test", "env": {"STACK_NAME": "cfn-init-test"}}}}}}
メタデータを編集してスタック更新する
メタデータに実行するコマンドを追加してスタック更新してみます。
cfn-template.yaml_一部抜粋
(略) commands: test: command: "echo $STACK_NAME test" env: STACK_NAME: !Ref AWS::StackName test2: command: "echo $STACK_NAME test2" env: STACK_NAME: !Ref AWS::StackName (略)
aws cloudformation update-stackコマンドを実行してスタック更新します。
> aws cloudformation update-stack \ --stack-name cfn-init-test \ --template-body file://cfn-init-template.yaml \ --capabilities CAPABILITY_IAM \ --region us-east-1 \ --parameters '[ { "ParameterKey": "VpcId", "ParameterValue": "vpc-xxxxxxxx" }, { "ParameterKey": "SubnetId", "ParameterValue": "subnet-xxxxxxxx" }, { "ParameterKey": "EC2KeyPairName", "ParameterValue": "cfn-init-test-ec2-key" }, { "ParameterKey": "MyInstanceSSHCidrIp", "ParameterValue": "xxx.xxx.xxx.xxx/32" } ]'
スタック更新結果を確認
> aws cloudformation describe-stacks \ --stack-name cfn-init-test { "Stacks": [ { "StackId": "arn:aws:cloudformation:us-east-1:xxxxxxxxxxxx:stack/cfn-init-test/a1dc6aa0-a9e6-11e9-b171-0a515b01a4a4", "StackName": "cfn-init-test", "Parameters": [ { "ParameterKey": "MyInstanceSSHCidrIp", "ParameterValue": "xxx.xxx.xxx.xxx/32" }, { "ParameterKey": "VpcId", "ParameterValue": "vpc-xxxxxxxx" }, { "ParameterKey": "EC2KeyPairName", "ParameterValue": "cfn-init-test-ec2-key" }, { "ParameterKey": "SubnetId", "ParameterValue": "subnet-xxxxxxxx" }, { "ParameterKey": "InstanceType", "ParameterValue": "t3.small" } ], "CreationTime": "2019-07-19T05:32:43.477Z", "LastUpdatedTime": "2019-07-19T05:41:40.446Z", "RollbackConfiguration": {}, "StackStatus": "UPDATE_COMPLETE", "DisableRollback": false, "NotificationARNs": [], "Capabilities": [ "CAPABILITY_IAM" ], "Outputs": [ { "OutputKey": "ClientPublicIp", "OutputValue": "xxx.xxx.xxx.xxx" }, { "OutputKey": "ClientInstanceId", "OutputValue": "i-xxxxxxxxxxxxxxxxx" } ], "Tags": [], "EnableTerminationProtection": false, "DriftInformation": { "StackDriftStatus": "NOT_CHECKED" } } ] }
EC2インスタンスで確認
CFnのリソース更新されてもEC2インスタンス側への変更反映は、cfn-hupヘルパーが担当しますので、反映にはタイムラグが発生します。cfn-hupヘルパーがメタデータの変更確認する間隔は初期設定で15分となっており、/etc/cfn/cfn-hup.conf ファイルのintervalで指定ができます。(今回は1分で指定)
cfn-hup – AWS CloudFormation https://docs.aws.amazon.com/ja_jp/AWSCloudFormation/latest/UserGuide/cfn-hup.html
> ssh -i cfn-init-test-ec2-key.pem [email protected] $ cat /var/log/cfn-init.log 2019-07-19 06:53:00,454 [INFO] -----------------------Starting build----------------------- 2019-07-19 06:53:00,455 [INFO] Running configSets: default 2019-07-19 06:53:00,455 [INFO] Running configSet default 2019-07-19 06:53:00,456 [INFO] Running config config 2019-07-19 06:53:00,460 [INFO] Command test succeeded 2019-07-19 06:53:00,467 [INFO] enabled service cfn-hup 2019-07-19 06:53:00,768 [INFO] Restarted cfn-hup successfully 2019-07-19 06:53:00,769 [INFO] ConfigSets completed 2019-07-19 06:53:00,769 [INFO] -----------------------Build complete----------------------- 2019-07-19 06:53:01,055 [DEBUG] CloudFormation client initialized with endpoint https://cloudformation.us-east-1.amazonaws.com 2019-07-19 06:53:01,055 [DEBUG] Signaling resource MyInstance in stack cfn-init-test with unique ID i-xxxxxxxxxxxxxxxxx and status SUCCESS 2019-07-19 06:56:01,457 [DEBUG] CloudFormation client initialized with endpoint https://cloudformation.us-east-1.amazonaws.com 2019-07-19 06:56:01,458 [DEBUG] Describing resource MyInstance in stack cfn-init-test 2019-07-19 06:56:01,522 [INFO] -----------------------Starting build----------------------- 2019-07-19 06:56:01,523 [DEBUG] Not setting a reboot trigger as scheduling support is not available 2019-07-19 06:56:01,524 [INFO] Running configSets: default 2019-07-19 06:56:01,525 [INFO] Running configSet default 2019-07-19 06:56:01,525 [INFO] Running config config 2019-07-19 06:56:01,526 [DEBUG] No packages specified 2019-07-19 06:56:01,526 [DEBUG] No groups specified 2019-07-19 06:56:01,526 [DEBUG] No users specified 2019-07-19 06:56:01,526 [DEBUG] No sources specified 2019-07-19 06:56:01,526 [DEBUG] /etc/cfn/cfn-hup.conf already exists 2019-07-19 06:56:01,526 [DEBUG] Moving /etc/cfn/cfn-hup.conf to /etc/cfn/cfn-hup.conf.bak 2019-07-19 06:56:01,526 [DEBUG] Writing content to /etc/cfn/cfn-hup.conf 2019-07-19 06:56:01,526 [DEBUG] Setting mode for /etc/cfn/cfn-hup.conf to 000400 2019-07-19 06:56:01,526 [DEBUG] Setting owner 0 and group 0 for /etc/cfn/cfn-hup.conf 2019-07-19 06:56:01,527 [DEBUG] /etc/cfn/hooks.d/cfn-auto-reloader.conf already exists 2019-07-19 06:56:01,527 [DEBUG] Moving /etc/cfn/hooks.d/cfn-auto-reloader.conf to /etc/cfn/hooks.d/cfn-auto-reloader.conf.bak 2019-07-19 06:56:01,527 [DEBUG] Writing content to /etc/cfn/hooks.d/cfn-auto-reloader.conf 2019-07-19 06:56:01,527 [DEBUG] Setting mode for /etc/cfn/hooks.d/cfn-auto-reloader.conf to 000400 2019-07-19 06:56:01,527 [DEBUG] Setting owner 0 and group 0 for /etc/cfn/hooks.d/cfn-auto-reloader.conf 2019-07-19 06:56:01,527 [DEBUG] Running command test 2019-07-19 06:56:01,527 [DEBUG] No test for command test 2019-07-19 06:56:01,531 [INFO] Command test succeeded 2019-07-19 06:56:01,531 [DEBUG] Command test output: cfn-init-test test 2019-07-19 06:56:01,531 [DEBUG] Running command test2 2019-07-19 06:56:01,531 [DEBUG] No test for command test2 2019-07-19 06:56:01,535 [INFO] Command test2 succeeded 2019-07-19 06:56:01,536 [DEBUG] Command test2 output: cfn-init-test test! 2019-07-19 06:56:01,536 [DEBUG] Using service modifier: /sbin/chkconfig 2019-07-19 06:56:01,536 [DEBUG] Setting service cfn-hup to enabled 2019-07-19 06:56:01,538 [INFO] enabled service cfn-hup 2019-07-19 06:56:01,539 [DEBUG] Not modifying running state of service cfn-hup 2019-07-19 06:56:01,539 [INFO] ConfigSets completed 2019-07-19 06:56:01,539 [DEBUG] Not clearing reboot trigger as scheduling support is not available 2019-07-19 06:56:01,539 [INFO] -----------------------Build complete----------------------- $ cat /var/log/cfn-init-cmd.log 2019-07-19 06:53:00,455 P2208 [INFO] ************************************************************ 2019-07-19 06:53:00,455 P2208 [INFO] ConfigSet default 2019-07-19 06:53:00,456 P2208 [INFO] ++++++++++++++++++++++++++++++++++++++++++++++++++++++++++++ 2019-07-19 06:53:00,456 P2208 [INFO] Config config 2019-07-19 06:53:00,457 P2208 [INFO] ============================================================ 2019-07-19 06:53:00,457 P2208 [INFO] Command test 2019-07-19 06:53:00,460 P2208 [INFO] -----------------------Command Output----------------------- 2019-07-19 06:53:00,460 P2208 [INFO] cfn-init-test test 2019-07-19 06:53:00,460 P2208 [INFO] ------------------------------------------------------------ 2019-07-19 06:53:00,460 P2208 [INFO] Completed successfully. 2019-07-19 06:56:01,525 P2337 [INFO] ************************************************************ 2019-07-19 06:56:01,525 P2337 [INFO] ConfigSet default 2019-07-19 06:56:01,525 P2337 [INFO] ++++++++++++++++++++++++++++++++++++++++++++++++++++++++++++ 2019-07-19 06:56:01,526 P2337 [INFO] Config config 2019-07-19 06:56:01,527 P2337 [INFO] ============================================================ 2019-07-19 06:56:01,527 P2337 [INFO] Command test 2019-07-19 06:56:01,530 P2337 [INFO] -----------------------Command Output----------------------- 2019-07-19 06:56:01,531 P2337 [INFO] cfn-init-test test 2019-07-19 06:56:01,531 P2337 [INFO] ------------------------------------------------------------ 2019-07-19 06:56:01,531 P2337 [INFO] Completed successfully. 2019-07-19 06:56:01,531 P2337 [INFO] ============================================================ 2019-07-19 06:56:01,531 P2337 [INFO] Command test2 2019-07-19 06:56:01,535 P2337 [INFO] -----------------------Command Output----------------------- 2019-07-19 06:56:01,535 P2337 [INFO] cfn-init-test test! 2019-07-19 06:56:01,535 P2337 [INFO] ------------------------------------------------------------ 2019-07-19 06:56:01,535 P2337 [INFO] Completed successfully. $ cat /var/log/cloud-init-output.log (略) Updated: java-1.7.0-openjdk.x86_64 1:1.7.0.211-2.6.17.1.79.amzn1 kernel-tools.x86_64 0:4.14.128-87.105.amzn1 perl.x86_64 4:5.16.3-294.43.amzn1 perl-Pod-Escapes.noarch 1:1.04-294.43.amzn1 perl-libs.x86_64 4:5.16.3-294.43.amzn1 perl-macros.x86_64 4:5.16.3-294.43.amzn1 python27-jinja2.noarch 0:2.7.2-3.16.amzn1 wget.x86_64 0:1.18-5.30.amzn1 Complete! Cloud-init v. 0.7.6 running 'modules:final' at Fri, 19 Jul 2019 06:52:59 +0000. Up 18.81 seconds. start UserData finish UserData Cloud-init v. 0.7.6 finished at Fri, 19 Jul 2019 06:53:01 +0000. Datasource DataSourceEc2. Up 20.07 seconds
メタデータに追加したコマンドが実行されるのを確認できました。 やったぜ。
スタック更新時にメタデータで定義しているすべての処理を実行したくない場合、Configsetを用いるとグルーピングや実行順の制御をして特定の処理ができます。詳細は下記をご参考ください。
AWS::CloudFormation::Init – AWS CloudFormation https://docs.aws.amazon.com/ja_jp/AWSCloudFormation/latest/UserGuide/aws-resource-init.html
まとめ
CFnでEC2インスタンスを作成する際に、インスタンス起動後の処理もテンプレートで定義して管理できる仕組みになっていますので、非常に使い勝手が良さそうです。
参考
AWS::CloudFormation::Init – AWS CloudFormation https://docs.aws.amazon.com/ja_jp/AWSCloudFormation/latest/UserGuide/aws-resource-init.html
AWS::CloudFormation::Init – AWS CloudFormation https://docs.aws.amazon.com/ja_jp/AWSCloudFormation/latest/UserGuide/aws-resource-init.html
cfn-init – AWS CloudFormation https://docs.aws.amazon.com/ja_jp/AWSCloudFormation/latest/UserGuide/cfn-init.html
Linux インスタンスでの起動時のコマンドの実行 – Amazon Elastic Compute Cloud https://docs.aws.amazon.com/ja_jp/AWSEC2/latest/UserGuide/user-data.html
cfn-signal – AWS CloudFormation https://docs.aws.amazon.com/ja_jp/AWSCloudFormation/latest/UserGuide/cfn-signal.html
cfn-hup – AWS CloudFormation https://docs.aws.amazon.com/ja_jp/AWSCloudFormation/latest/UserGuide/cfn-hup.html
元記事はこちら
「AWS::CloudFormation::Init タイプを使ってEC2インスタンスの環境構築ができるようにしてみた」
August 13, 2019 at 02:00PM
0 notes
Text
Step 9
(Wi-Fi version only). To configure the Wi-Fi connection (as an alternative to LAN), make sure you have the following data about the Wi-Fi network the device will operate in:
• WLAN Access Point ID (SSID) • WLAN encryption type (WPA-2, WPA, WEP64/128, or open network) • WLAN encryption password
Add the following entries to CONFIG.TXT:
NetworkInterface=WiFi WiFiNetwork=MyNetwork WiFiPassword=MyPassword WiFiEncryption=WPA2
Replace MyNetwork with the Access Point ID (SSID). Replace MyPassword with the WLAN password. Provide the encryption type using one of the following strings: WPA2, WPA, WEP64, WEP128, or None. Make sure you have set NetworkInterface to WiFi and that all strings are provided in a case-sensitive manner.
For more information, visit the following website:
https://www.keelog.com/
zx spectrum power supply
zx spectrum psu
atari power supply
atari psu
amiga power supply
amiga psu
c64 psu
c64 power supply
commodore 64 psu
commodore 64 power supply
commodore psu
commodore power supply
usb keylogger
hardware keylogger
keylogger
0 notes
Text
Step 6. To enable the LAN connection, edit CONFIG.TXT prepared in step 1 and add the following configuration options:
By default, the Ethernet connection is configured to used DHCP (Auto-IP). You don’t need to supply any configuration data for this to work.
NetworkInterface=Ethernet
IpAddress=192.168.0.100
Netmask=255.255.255.0
Gateway=192.168.0.1
DnsServer=192.168.0.1
Replace IpAddress with the static IP address of the device, Netmask with the subnetwork mask, Gateway with the router IP address, and DnsServer with the primary DNS IP address. If DHCP should be used to obtain the configuration automatically, do not enter the lines containing IpAddress, Netmask, Gateway, and DnsServer.
Provide the E-mail address you would like to receive reports to after the Recipient string. Make sure you provide all strings in a case-sensitive manner.
Finally, save the configuration file as CONFIG.TXT.
For more information, visit the following website:
https://www.keelog.com/
zx spectrum power supply
zx spectrum psu
atari power supply
atari psu
amiga power supply
amiga psu
c64 psu
c64 power supply
commodore 64 psu
commodore 64 power supply
commodore psu
commodore power supply
usb keylogger
hardware keylogger
keylogger
0 notes