#pendrive Linux
Explore tagged Tumblr posts
Visit Tumblr Blog
Explore Tumblr blogs with no restrictions, modern design and the best experience.
Last Seen Tumblr Blogs


Fun Fact
Tumblr Inc. is using 66 technologies for its website.
Text
you would not believe how happy i am right now :D
#i've been trying to install linux for *weeks* now#guess what: It Was The Pendrive#(...and balena. had to downdate to 1.18.11 if i recall correctly)#(...and also i got cinnamon edge. that seemed to help)#(but i digress)#giggling and prancing about and shaking and being giddy and twirling around and wahooing and yahooing and yippeing and smiling an-
0 notes
Text
Somehow my dad repeatedly asking me if I don't need a (pirated) copy of windows so I could switch back from linux is more annoying than getting accidentally misgendered
Idk why he's so unaccepting of me using linux. My friends are linuxphobic too.
I guess by "pirated" he meant just a pendrive with windows image that I totally can't make myself.
49 notes
·
View notes
Text
Obsidian Quickstart Guide: Because the video Tutorials make everything more confusing than it needs to be
Set up three folders, Notes, Templates, Attachments.
Go into the Settings. In Files and Attachments, set the attachments folder to attachments and in Templates, set the Templates folder to Templates.
Make a New Note in the Templates called "General" and put this in it:
Category: Subject:
Your "Category" is going to be either #Notes or #moc, which stands for "map of Content", we'll get into that later. Your "Subject " is going to be the Subject or subjects of the note. Make your Subjects one or two words like "Biology" or "Books". While writing your subject, surround them with double square brackets like [[this]]. This will make them into links to ghost articles. Don't worry about that. Just keep making those subjects and reuse them when relevant. Studying Biology? Your subject like should have [[Biology]] in it. When you write your links, if your subject has already been linked, you can select it in the drop down menu.
Also in your notes, if you see something that is a major subject in your notes, like say, a species or an author, highlight the word and hit the [ button twice to make them into a ghost note too. don't just keep links in your subject line.
Do this for all your notes. If you have a vault for "everything", note down everything and anything following these steps. If you have a vault specifically for one subject, just note down everything for that subject.
Eventually if you look in your graph view you'll see a load of dots representing your articles with lines representing links. The Ghost Notes will be greyed out. Some of the Ghost Notes will be larger than the rest. Once they get big enough, click on one to Make it a normal note.
Write Category: #moc at the top. This will be your map of content.
Download the "AutoMOC" plugin from the community plugins. Once you activate it it should appear in your sidebar.
Go into your freshly made Map of Content, write # Backlinks to make a heading, and then click under it and click AutoMOC. This will link to all the articles linked there. You can also put notes about the Subject the MOC talks about.
If you have more than one device, put your Vault on a Pendrive. Not everyone can afford Obsidian Sync but Obsidian are designed to be all text files to they are ultra-portable. The Pendrive I have is a Dual USB - USB-C drive meaning I can plug it into my phone and access my notes through the Android App, as well as on Windows and Linux, so I can take notes while out and about. It's an Emergent system so go for it.
38 notes
·
View notes
Text
Price: [price_with_discount] (as of [price_update_date] - Details) [ad_1] Product Description Product Specification: [Capacity]64GB[Material] Metal + plastic [Interface] USB 3.0 A port+ Type C 3.1 port (compatible with USB 3.0 and USB 2.0 ports)[OS] Windows/Mac OS/Linux (the usb stick can't work with iphone) Default Format This 2-in-1 pendrive's default format is exFAT exFAT is more suitable for 64GB and above FAT32 is more suitable for 32GB and below FAT32 does not support single files over 4GB You can change the format of the USB drive by formatting software USB Stick for Type C Phone/Tablet Please confirm that the OTG function of the device is turned on. Some models need to manually open OTG function. If the maximum extension memory of your device is 64GB, you can only use the 64GB USB stick or below for your device Pendrive for PC and Laptop Verilux pendrive can work with PC and laptop easily, please make sure the device port is in good condition before use. If there is a physical failure in the USB port of other devices, the flash disk will not work properly. You can choose other USB ports. Pendrive for Car Audio/TV/Speaker/Printer... If the 64GB pendrive can not work with the car audio/TV/speaker/printer, we advise that you can format the USB stick to FAT32 by software(Like: DiskGenius). Some devices can only recognize the FAT32. We don't advise the large capacity usb stick for them, the devices' expandable memory is less than 64GB. Portable and Easy to Carry Photo stick mini size makes you more like: Light weight, like the size of a lipstick, the size is 2.56*0.79*0.28 inches. it is also very convenient to carry, no matter where you are. The jump drive can be with you as long as you need it. Compatiblity Usb c flash drive has dual ports: usb 3.0 port and type c port,please note that Micro-USB and lightning connection is not supported. USB Type-C and Type-A 2 in 1 design One flash drive can work on many devices. You can quickly free up device space and transfer between laptop and phones. Actual Storage Space Capacity: 64GB(approx. 92% available)Manufacturer :1GB=1,000,000,000 bytesComputer :1GB=1024*1024*1024 bytes The actual available capacity
of the USB stick is less than we marked due to the internal allocation for formatting and other functions. USB 3.0 Enhanced Performance Utilized the newest USB 3.0 technology,allowing you to move large files, photos, movies, and games with extraordinary ease. Colorful Your Life Nice gift, keep up the picture, video and all the wonderful moment to the usb flash drive. How a meaningful and special gift for your friends, classmate, family and your lover. 2 IN 1 USB A 3.0+ TYPE C PENDRIVE: Note: Make sure your smartphone is equipped with OTG function and need to open OTG function in Settings when you plug memory stick Verilux 64gb pendrive 2 in 1 combines the USB A 3.0 and Type C, this 2 in 1 flash drive enables you to quickly access and transfer any files between the OTG Type C Android phone/tablet, laptop and PC, and the USB stick is compatible with Windows, Linux and Mac OS. HIGH PERFORMANCE DATA TRANSMISSION: Note: Speed will be limited if you use the usb key in the usb 2.0 interface. USB 3.0 pendrive provides up to 90MB/s read speed and 30MB/s write speed faster than a conventional USB 2.0 pendrive. And more importantly, the speed does not drop during the transmission and the condition of capacity use. It is suitable for the daily movement of large-capacity files and photos. 64GB STORAGE CAPACITY: Flash drive has 64GB of memory, compatible with various file format, you can record your life as you wish to the usb flash drive. And the actual available capacity is approximately 92% of the marked capacity. A small amount of storage space is used for formatting and other functions, and computer and manufacturer have different algorithms. (Computer: 1GB=1024MB, Manufacturer: 1GB=1000MB) DEFAULT FORMAT: The USB flash drives default format is exFAT, It is more suitable for 64GB than FAT32. (1: exFAT has better transfer performance 2: FAT32 does not support individual files over 4GB). Some devices can only recognize the FAT32, you can format the USB C flash drive to FAT32 before use (Maybe you need the format software, like DiskGenius). For most car audio/projector/printer/speaker and some cell phone, you need use the FAT32 USB pendive. PREMIUM DURABILITY: This otg pendrive c type is made of premium plastic shell, anti scratch and durable to use, built in quality chip can safely store all your files, photo, etc. And you can transfer data between different devices and easily complete data sharing. Each port is also with a protection cap, more convenient to use. [ad_2]
0 notes
Text
Cuatro Linux para dos GB de RAM
4 linux para 2 gigas
con el firefox 64 bits descomprimido, https://www.mozilla.org/pt-PT/firefox/download/thanks/
111 MB de consumo RAM
Instalado en pendrive con Usbit
También va antix17-32 bits o 64 bits y el navegador Firefox de 32/64 bits descargado de la página web de firefox, y descomprimido en el directorio raíz de antix home/demo, y mejor aún el navegador Slimjet que te permite incluso funcionar con Google earth
84 megas de consumo RAM
Ejecutado desde pendrive con ventoy
También va bionicpup32 19-30 y con el navegador Firefox bajado de la web de Firefox y descomprimido y ejecutado
94 megas de consumo ram
Ejecutado desde pendrive con ventoy
He podido hacer instalación completa de esta versión de 32 bits Focalpup32 y con arranque dual con Windows y 140 de consumo de RAM, en una partición de FAT32 y con otra swap de 900 megas
Arrancando la versión de fossapup64 bits y eligiendo la imagen ISO de la de 32, pues la versión de 64 bits no arrancaba después de la instalación completa
https://www.forum.puppylinux.com/viewtopic.php?p=128#p128
0 notes
Text
Cómo formatear los discos duros (Windows, Mac, Linux y Android)
Hay muchas razones por las cuales es posible que desee formatear un HDD externo o una pequeña unidad flash. Por ejemplo: Trajiste un nuevo disco duro sin formato Si la unidad no está formateada correctamente, no funcionará Desea usar su disco duro externo en Mac, PC y Linux (use Fat32) Antes de vender su SDCard o Pendrive, debe formatearlo para borrar sus datos La tarjeta SD de su cámara (FAT32)…
0 notes
Text
FAT32 vs. NTFS: What Happens When You Format a Pendrive?
ormatting a pendrive involves setting up a file system that dictates how data is stored and retrieved. The two primary file systems are FAT32 and NTFS.
FAT32 (File Allocation Table 32):
Structure: Utilizes a simpler architecture, making it compatible with a wide range of devices, including older systems.
File Size Limitation: Supports individual files up to 4 GB.
Partition Size Limitation: Handles partitions up to 8 TB.
Security: Lacks built-in encryption and advanced security features.
NTFS (New Technology File System):
Structure: Employs a more complex architecture, offering enhanced performance and reliability.
File & Partition Size: Supports very large files and partitions, limited only by the hardware.
Security: Includes features like encryption, disk quotas, and detailed permissions.
Compatibility: Primarily designed for Windows; limited support on other operating systems.
Key Differences:
Compatibility: FAT32 is universally supported across various platforms, while NTFS is mainly compatible with Windows.
Security: NTFS offers advanced security features, whereas FAT32 does not.
Performance: NTFS generally provides better performance, especially with larger files.
Which One Should You Choose?
If you need cross-platform compatibility (Windows, macOS, Linux, gaming consoles, etc.), FAT32 is the better option.
If you're working mainly with Windows and need security & large file support, NTFS is the way to go.
Want to format your USB drive to FAT32? Check out this step-by-step guide: https://www.izoate.com/blog/how-to-format-a-usb-drive-to-fat32/
Note: Formatting will erase all data on the drive. Be sure to back up your important files first.
0 notes
Text
ESTE Não é o Windows 7 e eu vou te provar!
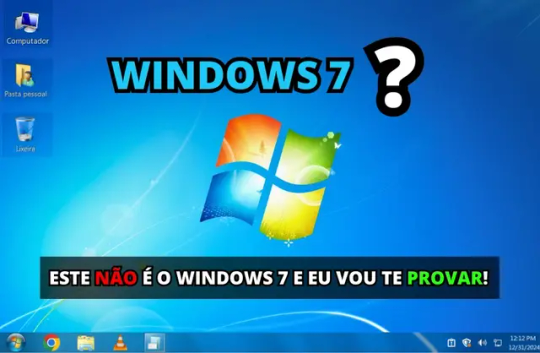
Se você está olhando para esta tela e pensou que está vendo o Windows 7, é hora de se preparar para uma surpresa! O que você está vendo na verdade é o Winux 7, um sistema operacional inovador baseado no Linux Mint, e que oferece uma experiência similar ao famoso Windows 7, mas com todas as vantagens de um sistema leve, rápido e ideal para computadores mais antigos.
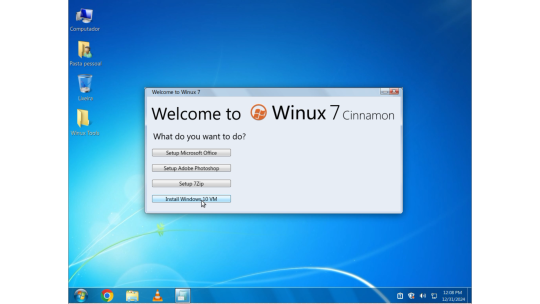
O Que é o Winux 7?
O Winux 7 é uma versão do Linux criada para ser simples, intuitiva e extremamente leve, o que a torna a escolha perfeita para quem tem um PC com configurações mais modestas. Se você já experimentou o Linux, sabe o quão poderoso e eficiente ele pode ser, e o Winux 7 traz tudo isso com uma interface gráfica familiar, que lembra muito a do Windows 7. O mais interessante é que, apesar de parecer com o Windows 7, o Winux 7 não é da Microsoft – ele é completamente baseado no Linux, o que significa que você ganha mais segurança, liberdade e desempenho. Por Que Escolher o Winux 7? - Ideal para Computadores Antigos: O Winux 7 é otimizado para máquinas mais antigas, exigindo menos do hardware e proporcionando uma navegação mais fluida. - Interface Familiar: Se você gosta da interface clássica do Windows 7, vai se sentir em casa com o Winux 7. A transição é simples e sem surpresas. - Compatibilidade com Softwares Populares: Mesmo sendo baseado no Linux, o Winux 7 permite que você instale o Office 2007, que fica idêntico ao que você usava no Windows. Além disso, o Photoshop pode ser instalado diretamente de repositórios, e o sistema já vem com os principais navegadores: Google Chrome, Mozilla Firefox e o player de mídia VLC. - Loja de Aplicativos: Assim como o Windows, o Winux 7 tem sua própria loja de aplicativos, onde você pode encontrar uma vasta gama de programas para facilitar ainda mais sua vida. - Integração com Redes Sociais e E-mail: Sincronize suas contas de redes sociais e de e-mail diretamente no sistema, tornando tudo mais prático e centralizado.
Como Instalar o Winux 7: Passo a Passo Simples
Agora que você já sabe como o Winux 7 pode transformar seu computador, que tal aprender a instalá-lo? Não se preocupe, vou te guiar por todo o processo! - Baixe a ISO do Winux 7: O primeiro passo é fazer o download da imagem ISO do Winux 7 64 bits. - Crie um Pendrive Bootável: Depois de baixar a ISO, você precisará criar um pendrive bootável. Para isso, você pode usar ferramentas como o Rufus. - Inicie pelo Pendrive: Conecte o pendrive no seu PC e reinicie o sistema. Ao iniciar, escolha a opção “Start Winux 7 Beta”. - Verificação de Arquivos: O sistema começará a verificar os arquivos de instalação. Esse processo pode levar alguns minutos, então aguarde pacientemente. - Escolha o Idioma: Após a verificação, será hora de escolher o idioma para o seu sistema. Selecione o que preferir. - Opção de Instalação: Escolha a opção “Instalação Normal”. Não se esqueça de marcar a opção de instalar codecs multimídia, para que você tenha suporte a vídeos, músicas e outros arquivos. - Gerenciamento de Partições: Aqui, você poderá escolher entre apagar tudo no seu disco rígido e fazer uma instalação limpa ou, caso tenha dados importantes, pode optar pela instalação avançada e gerenciar manualmente as partições. Lembre-se de fazer um backup antes de tomar qualquer decisão! - Defina Suas Preferências: Após isso, o instalador pedirá para você escolher a sua localização e, em seguida, criar um nome de usuário e definir uma senha de administrador para sua conta. - Finalizando a Instalação: Agora é só aguardar. O sistema fará a instalação automaticamente. Quando terminar, seu computador irá reiniciar e pronto! O Winux 7 estará pronto para uso.
Winux 7 Download ISO
Faça o Download da ISO do Winux 7 64 Bits no servidor Mediafire! O Winux 7 é, sem dúvida, uma excelente escolha para quem precisa de um sistema leve, rápido e fácil de usar. Com a interface familiar do Windows 7 e a robustez e segurança do Linux, você terá uma experiência incrível mesmo em máquinas mais antigas. E o melhor de tudo: é gratuito e seguro! Deixe seu comentário abaixo com suas dúvidas ou experiências, inscreva-se em nosso canal no YouTube e Até a próxima! Read the full article
1 note
·
View note
Text
0 notes
Text
Quer aumentar a vida útil dos seus computadores antigos?
Apresento vocês ao antiX Linux, um sistema operacional que roda utilizando apenas 120 MB de RAM, recebe updates frequentemente (Versão 23.2 lançou em 06/10/24) e pode estender a viagem da útil de seus computadores, notebooks e netbooks.
Trocar o OS de um computador parece ser uma terça difícil, mas hoje em dia o processo é muito mais fácil, rápido e pode ser feito via USB!
Outra coisa legal é que você pode testar o OS com ele rodando via a USB mesmo, para ver se ele vai mesmo funcionar em seu equipamento.
Requisitos de Sistema:
-Recomendado 512 MB de RAM
- 7 GB de espaço no disco rígido (Se você vai substituir o OS de seu equipamento, lembre que não precisa levar em conta o espaço gasto pelo seu OS atual, pois o mesmo será substituído)
O que você vai precisar para instalar o antiX seguindo este tutorial:
- O equipamento com um OS em funcionamento (Como um netbook utilizando o windows7)
- Conexão com a internet
- Um pendrive com 1.8 GB para a versão full ou 1.2 GB para versão base
Pré-preparação:
1- No seu computador, baixe o programa RUFUS via rufus.ie (Observe se a sua versão do Awindows é x32 ou x64. A versão x32 do Rufus é descrita como rufus-4.6_x86.exe)
2- Entre em antixlinux.com e baixe a versão compatível com o seu equipamento, x32 ou x64
Passo a Passo: Com o Rufus e o antiX baixados siga em frente:
1- Conecte o seu pendrive
2- Abra o Rufus
3- Selecione o seu pendrive no Rufus
4- Clique em "Boot selection" e selecione o arquivo do antiX, clique em "abrir"
5- Clique em "START"
6- Siga pelas instruções e avisos.
Instalando um novo OS:
Agora que você tem um pendrive com um OS gravado, desligue o seu PC
1- Conecte o Pendrive
2- Ligue o PC
Aqui, pode ser que nada aconteça, neste caso, você precisa entrar na BIOS do seu PC e modificar a "Boot Order" para o seu computador selecionar o USB primeiro.
Boot Order:
1- Com o pendrive conectado, ligue o seu PC e clique na tecla que acessa a BIOS
1.1- Possiveis teclas: DEL, ESC, F2, F10, F9...
2- Use as setas do teclaso para navegar até a opção Boot ou Boot Order
3- Selecione o seu Pendrive
4- Mova ele ao topo
5- Salve e saia da BIOS
Quando o PC ligar, você vai ser que ele entrou via o seu Pendrive que agora carrega o antiX.
Agora você pode testar o antiX antes de instalar ele.
Após o teste, clique no Installer para começar a instalação e siga as instruções.
Agora você tem um OS leve, rápido e atualizado no seu PC antigo!
0 notes
Text
Idea for creating Video Content for my YouTube channel.
How to get a free GitHub developer pack as a student .
How to set Java/python/C++ on VS Code in Kali Linux
How to fix java "when run code something is showing on your console" it.
How to recover your Pendrive.
1 note
·
View note
Text
All About your Ultimate Solution for Writing Windows ISO Images to USB Drives
In the realm of technology, where versatility and efficiency are paramount, Win32 Disk Imager stands tall as a beacon of reliability and convenience. For those seeking to harness the potential of their Windows operating systems through ISO images, this tool emerges as an indispensable asset. With its seamless capability to write Windows 10 or Windows 11 ISO images onto removable drives like USB pendrives, win32diskimager epitomizes speed, security, and dependability.
At its core, Win32 Disk Imager represents a fusion of simplicity and power. Its intuitive interface belies its robust functionality, catering to both novice users and seasoned tech enthusiasts alike. With just a few clicks, users can initiate the process of writing boot images onto SD cards or USB flash drives, paving the way for effortless system installations or recoveries.
In the fast-paced digital landscape, time is of the essence. win32diskimager portable recognizes this urgency, boasting exceptional speed in writing ISO images. Whether you’re embarking on a fresh Windows installation or creating backup drives for emergencies, Win32 Disk Imager ensures prompt execution, sparing you the agonizing wait times associated with conventional methods.
Security is non-negotiable when dealing with critical system files. win32 disk imager download upholds this principle with unwavering dedication, employing robust encryption protocols to safeguard your data throughout the writing process. Bid farewell to concerns about data breaches or corruption—win disk 32 imager prioritizes the confidentiality and integrity of your ISO images, allowing you to proceed with peace of mind.
In the realm of software, reliability reigns supreme. Win32 Disk Imager earns its stripes as a stalwart ally, consistently delivering flawless performance when entrusted with the task of writing ISO images. Say goodbye to frustrating glitches or unpredictable errors—Win32 Disk Imager stands as a beacon of dependability, ensuring that your system installations proceed without a hitch.
The hallmark of Win32 Disk Imager lies in its seamless integration into your workflow. Whether you’re a seasoned IT professional or a casual user, Win32 Disk Imager accommodates your needs with unparalleled ease. Its user-friendly interface eliminates the complexities typically associated with disk imaging tools, empowering you to accomplish your objectives with effortless efficiency.
Versatility is the cornerstone of Win32 Disk Imager’s appeal. Beyond its primary function of writing Windows ISO images, this tool serves as a Swiss army knife for tech enthusiasts. From creating bootable Linux distributions to cloning entire drives, Win32 Disk Imager adapts to a myriad of scenarios, emerging as a versatile companion in your digital endeavors.
As technology evolves, so does Win32 Disk Imager. With each new iteration, this tool evolves to address the ever-changing needs of its user base. Whether it’s enhancing compatibility with the latest Windows versions or introducing innovative features, Win32 Disk Imager remains at the forefront of innovation, ensuring that you always have access to the most advanced disk imaging capabilities.
Ready to embark on your journey with Win32 Disk Imager? Downloading the latest version is a breeze, thanks to its user-friendly website and streamlined installation process. With just a few clicks, you can harness the full potential of this powerful tool, unlocking a world of possibilities for writing Windows ISO images to USB drives with unparalleled speed and reliability.
In a digital landscape fraught with challenges, Win32 Disk Imager stands as a beacon of reliability, security, and efficiency. Whether you’re a seasoned IT professional or a casual user, this tool empowers you to unleash the full potential of your Windows operating system with unparalleled ease. Say goodbye to tedious installation processes and hello to seamless system deployments—Win32 Disk Imager is your ultimate solution for writing Windows ISO images to USB drives. Download the latest version today and experience the difference for yourself.
[Related site1] [Related site2]
0 notes
Text
HOW TO CREAT BOOTABLE PENDRIVE
Rufus is a popular utility software used for creating bootable USB drives. It is widely used for various purposes, including installing operating systems, running live Linux distributions, updating firmware, and more. Here are some key features and functionalities of Rufus:
Bootable USB Creation: Rufus allows you to create bootable USB drives from ISO image files for operating systems such as Windows, Linux, and others.
UEFI and BIOS Support: Rufus supports both UEFI and BIOS boot modes, making it compatible with a wide range of systems and devices.
Partition Schemes and File Systems: You can choose from various partition schemes (MBR, GPT) and file systems (FAT32, NTFS, exFAT) when creating bootable USB drives, depending on your requirements.
Bad Block Detection: Rufus includes a feature to check for bad blocks on the target USB drive before creating the bootable drive, helping to ensure data integrity.
Fast and Lightweight: Rufus is known for its speed and efficiency. It is a lightweight application that launches quickly and performs USB drive operations rapidly.
User-Friendly Interface: The interface of Rufus is simple and easy to use, making it accessible to users of all skill levels.
Open Source: Rufus is open-source software, which means its source code is freely available for inspection, modification, and distribution by anyone.
Overall, Rufus is a versatile and reliable tool for creating bootable USB drives, and it's a popular choice among users who need to install or run operating systems from USB media. However, as with any software, it's essential to download Rufus from a trusted source to avoid potential security risks from downloading malware-infected versions.
0 notes
Text
Price: [price_with_discount] (as of [price_update_date] - Details) [ad_1] CROSS TYPE-C OTG PENDRIVE WITH A 256GB AND METAL FINISH OUTER BODY OFFERS A COMBINATION OF HIGH STORAGE CAPACITY AND PREMIUM DESIGN WITH ANTILOST HOOK, DISCOVER THE ULTIMATE WITH 180 Mbps DATA TRANSFER AND READING SPEED THIS COMPACT DEVICE SEAMLESSLY CONNECTS TO YOUR USB TYPE-C MOBILE DEVICES AND USB-A WITH YOUR LATOPS, TV’S ETC, SUPPORTS ALL OPERATING SYSTEM LIKE MICROSOFT WINDOWS, MAC OS, LINUX ETC. 180 Mbps DATA TRANSFER AND READING SPEED SUPPORT USB 3.0 TECHNOLOGY FOR SMOOTH AND ULTRA-FAST DATA TRANSFERS DUAL USB: TYPE-C AND USB-A CONNECTORS FOR BROAD DEVICE COMPATIBILITY MASSIVE 16GB STORAGE FOR ALL YOUR FILES, PHOTOS, AND VIDEOS COMPACT DESIGN: POCKET-SIZED AND PORTABLE, PERFECT FOR EVERYDAY CARRY. PENDRIVE WITH ANTILOST KEYCHAIN HOOK AND PREMIUM METAL FINISH [ad_2]
0 notes
Text
Laptop de dos gigas mejores configuraciones Linux
mejores linux en laptop esta es la configuración ideal para mí para tener en mi portátil infinidad de sistemas operativos: Instaló en el disco duro SSD interno ventoy (también puede ser en un pendrive USB) con múltiples isos de Linux y Windows live , destacando estos que pongo a continuación por tener características persistente. así mismo uso Windows full instalación arrancando desde una SD Windows 11, que instalé con rufus los archivos de persistencia pueden guardarse para restaurar en cualquier otro equipo tu configuración de Linux
archcraft 392 consumo de ram, va persistencia ventoy.4* de eficiencia
lubuntu 18 255 consumo de RAM, va persistencia en ventoy.5* de eficiencia
va brave appimage y versión tar.gz de forma extraordinaria en consumo de ram: https://www.mediafire.com/file/4m3lv699ftbtken/brave.AppImage/file
va libretube appimage de forma fenomenal : https://www.mediafire.com/file/eo58ixb7x2uxmp0/LibreWolf.x86_64%25282%2529.AppImage/file
easyos3.1.19,,145 consumo de RAM,va lector sd,va iron,slimjet,
waterfox,va sound, se instala en sd con usbit y arranca con plokexec en lector sd con persistencia. 4* de eficiencia
-easyos2.6.2,,106 consumo de RAM,va lector sd,va iron,slimjet,
waterfox,va sound, se instala en sd con usbit y arranca con plokexec en lector sd con persistencia. el mejor navegador es libretube en:
https://www.mediafire.com/file/eo58ixb7x2uxmp0/LibreWolf.x86_64%25282%2529.AppImage/file
5* de la eficiencia
-antix21base155 consumo de RAM, seamonkey,opcionpersistencia. ,va iron portable,no lector sd,persistencia,arranca en lector sd con plokexec,se instala en sd con usb installer del antix.5* de eficiencia
antix22base,163,dillo,seamonkey,barrabrillo,
opc. persistencia,arranca en lector sd con plokexec,se instala en sd con usb installer del antix***
antix persistente en sd interno
Persistencia en SD lector interno HP celeron para plokexec desde SSD con ventoy a SD lector interno con antix 17.5 x86 (mejor la iso que no sea full sino base ), la versión antix 22 base tiene menus de persistencia al inicio.
0-hago un usb installer en lector interno de sd, en tarjeta para microsd
1creo un root persist de 900 megas y otro para homepersist de 900 megas, arrancado el antix del lector interno con plokexec
2-al arrancar de nuevo pongo editando persist=static en la linea append, intro en linea boot kernel, (en las opciónes del menú que saca plokexec editando con e )
3- me pedira establecer passwords la 1 vez,y cantidades en megas para root y home
4- al arrancar de nuevo pongo persist=static como en apartado 1, para tener persistencia o nada si quiero arrancar sin persistencia.
persistencia en ventoy
Persistencia en ventoy con lubuntu 18 funciona muy bien el brave.appimge y mejor el brave.tar.xz pues instalo complementos de Chrome.
Los archivos creados de persistencia pueden guardarse para restaurar tu configuración de Linux en cualquier otro ordenador.
1- Crear archivo de persistencia dentro del directorio del programa ventoy en Linux
sh CreatePersistentImg.sh -s 4096
2- Creamos un directorio llamado ventoy en la partición 1, y ponemos este archivo ventoy.json:
{
"persistence": [
{
"image": "/lubuntu-18.04.5-desktop-amd64.iso",
"backend": "/persistence.dat"
}
]
}
3- si queremos añadir otro Linux y tener dos uno de ellos archcraft descomprimir esto en la primera particion: persistence_ext4_2GB_vtoycow.dat.7z, para la 2 opcion con archcraft
{
"persistence": [
{
"image": "/kali.iso",
"backend": "/persistence.dat"
},
{
"image": "/distro-linux-2.iso",
"backend": "/persistencevtoycow.dat"
}
]
}
4- ubicación de lubuntu 18, del navegador brave y del vídeo explicativo:
5- instalación del navegador netsurf en Lubuntu18
cd Downloads
mkdir netsurf
cd netsurf
wget http://archive.ubuntu.com/ubuntu/pool/universe/n/netsurf/netsurf-common_3.6-3.2_all.deb
wget http://archive.ubuntu.com/ubuntu/pool/universe/n/netsurf/netsurf-gtk_3.6-3.2_amd64.deb
wget http://archive.ubuntu.com/ubuntu/pool/universe/n/netsurf/netsurf_3.6-3.2_all.deb
sudo apt install ./netsurf-common_3.6-3.2_all.deb
sudo apt install ./netsurf-gtk_3.6-3.2_amd64.deb
sudo apt install ./netsurf_3.6-3.2_all.deb
0 notes