#powershell input list
Explore tagged Tumblr posts
Visit Tumblr Blog
Explore Tumblr blogs with no restrictions, modern design and the best experience.
Last Seen Tumblr Blogs


Fun Fact
Mobile Tumblr US users spend an average of 4.04 minutes per session on the app.
Text

Do you wanna join me (@scoobydoodean) in trying to make gifs of the highest quality possible using only free tools, with workflows as painless as possible??? Here you can find gif-making tutorials, software tests, and comparison and example sets of gifs made using free tools!
Navigation
Very very basic "How a Gif Works"
Best Practices for Quality/Best Visual Result When Uploading Gifs to Tumblr (regardless of gif-making method)
How To Reduce The File Size of A Gif
Sourcing Video Files
Full tool list on Google Sheets with filters

TUTORIAL 1 | RECOLORED GIFS
Making GIFs with DaVinci Resolve and FFmpeg or Gifski
LINK | EXAMPLE SETS
This is how I usually make my gifs. I find it to be the most efficient and most versatile (in terms of coloring, captioning, clipping) of all the methods I've tried for making quality gif sets. This method also does not require the traditional process of screencapping a scene frame by frame which to me is a huge bonus.
Operating systems: Mac, Windows, and Linux. DaVinci Resolve is a pretty high power software though and it does have hardware minimum requirements.
Needed software: DaVinci Resolve and either FFmpeg or Gifski (GUI or CLI version).
Difficulty: Moderate
Time: 🐢🐢 _ _ _ (example set took me 17 minutes)
Input: video files
Competencies: Some general familiarity with video editors and using your computer's shell helps but isn't required. Mac and Windows users: There is a workaround that allows you to avoid the command line. Familiarity with recoloring tools is great but not required.

TUTORIAL 2 | NON-RECOLORED GIFS
Giphy Capture and Gifski
LINK | EXAMPLE SETS
If you are on Mac and just getting into Gif-Making, this is a great way to learn the ropes with what is probably the most intuitive gif-making tool I have ever used. I would just recommend giffing scenes that take place outdoors or in well-lit rooms since you can't make color adjustments.
Operating systems: Mac
Needed software: Giphy Capture and Gifski (GUI version)
Quality potential: High for non-recolored sets! Watch out for odd frame rate effects.
Difficulty: Easy AF
Time: 🐢 _ _ _ _
Input: Any video you can play on your screen that doesn't have screencapture protections in place.
Competencies: None. Very very beginner friendly.

TUTORIAL 3 | RECOLORED GIFS
Pure FFmpeg: Making GIFs with Command Line Scripts
LINK | EXAMPLE SETS
If you love command lines, this one might be fun to you—and YES—you do get visuals. Command line haters: check out Tutorial 4 for a similar process but in a GUI tool.
Operating systems: Mac, Windows, and Linux
Software needed: FFmpeg
Difficulty: Advanced as far as gif-making, but this is actually a good first shell scripting project in my opinion if you've ever wanted to learn how. (I learned a lot about how my command line works while making this tutorial!) For people familiar with bash scripts, I think this will probably be easy!
Time: 🐢🐢🐢🐢🐢
Input: Video files OR frame by frame screencaps if you have them already.
Competencies: General familiarity with your computer's shell (Powershell on Windows, Terminal on Mac) helps a lot! I will try to make it as easy as possible to follow.
NOTE (for Command Line Aficionados): If you are interested in expanding on/improving this tutorial, or making a video -> GIFs version instead of videos -> frames -> GIFs, this is very possible to do. There is also a wealth of troubleshooting help and community-based example scripts for FFmpeg available online through r/FFMPEG and Stack Exchange, and almost all visual filter and complex filter options can be used on any input/output combination in FFmpeg.

TUTORIAL 4 | RECOLORED GIFS
Making Gifs for Free With PhotoScape X
LINK | EXAMPLE SETS
I really like this method as far as the quality you can achieve, and it's pretty easy to use. I plan to try to make more sets with this method later.
Operating systems: Mac and Windows
Quality potential: High
Software needed: PhotoScape X; a frame by frame screencapoing method (See FRAME BY FRAME SCREENCAPPING METHODS/TOOLS section below for a list of methods for this that I've catalogued).
Difficulty: Moderate.
Time: 🐢🐢🐢 _ _
Input: Frame by frame screencaps.
Competencies: General familiarity with photo editors helps but is not required to follow this tutorial.

TUTORIAL 5 | RECOLORED GIFS
Making Quality Gifs For Free On iOS and Android
LINK
If you don't have a computer, just an Android or iOS device, you can still make GIFs! This ones for you!
Operating systems: iOS and Android
Software needed: VITA and a video-to-gif utility or app (ezgif.com or Better Gif Maker shortcut (iOS only))
Time: 🐢🐢 _ _ _
Input: Video files
Difficulty: Moderate.
Requirements: General familiarity with photo editors helps but is not required to follow this tutorial.

EXTERNAL TUTORIAL 1 | NON-RECOLORED GIFS
u/ChemicalOle's "GIMP Gifs 101"
LINK | EXAMPLE SETS
This tutorial is 8 years old. See External Tutorial 2 for a newer tutorial or see NOTE 1 below.
Operating systems: Mac*, Windows, and Linux
Needed software: GIMP with AnimStack; FFmpeg; VLC Media Player
Quality potential: Untested (tutorial needs to be updated)
Difficulty: Untested (largely—I haven't tested captioning with AnimStack yet)
Time: 🐢🐢🐢 _ _
Input: Frame by frame screencaps.
Competencies: Some general familiarity with GIMP and your computer's shell helps but isn't required to follow the tutorial.
LIMITATIONS: 1) Frame by Frame gif-making methods can take up a lot of space on your drive in the interim. 2) A community-contributed GIMP plugin called AnimStack is required. Plugins could break after a GIMP update or developers could simply abandon them at any time.
____
NOTE 1: If you want to try this tutorial, note that 1) There is no longer any need to install GAP separately. It is now part of your regular GIMP install. 2) Filters > Animation > Optimize (for GIF) can be used in place of the color index step. 3) *Author states the tutorial is Linux and Windows, but I see no reason here in 2023 that you can't also follow this tutorial on Mac.
NOTE 2, for Mac users: You may not have to do this, but I had to manually create the scripts folder on Mac to place animstack.scm there. If you need to make the scripts folder, you should place it within the Library/Application Support/GIMP/2.10 folder.
EXTERNAL TUTORIAL 2 | RECOLORED GIFS
DekaythePunk's "How to Make Gifs On GIMP"
LINK
Dekaythepunk has made many tutorials on using GIMP to make gifs and graphics using special coloring techniques and edits. You can find all of their tutorials here.
Operating systems: Windows, Mac*, and Linux.
Needed software: GIMP with AnimStack, G'MIC-QT or McGIMP*, and Layers Effects plugins; a way to screencap frame by frame.
Difficulty: Untested (I'm working on it :D).
Time: 🐢🐢🐢 _ _
Input: Frame by frame screencaps.
Competencies: Some general familiarity with GIMP is helpful but isn't required to follow the tutorial.
LIMITATIONS: 1) Frame by frame gif-making methods can take up a lot of space on your drive in the interim. 2) Community-contributed GIMP plugins are required. These plugins could break after a GIMP update or developers could simply abandon them at any time. (Mac users: also see NOTE 1).
*NOTES (for Mac users):
A G'MIC-QT installer is no longer officially supported for Mac by the makers of the plugin. However, you should be able to install McGIMP on Mac which includes G'MIC, and will also find and use your AnimStack scripts from regular GIMP (McGIMP page | Homebrew install).
You may not have to do this, but I had to manually create the scripts folder on Mac to place animstack.scm there. If you need to make the scripts folder, you place it within the Library/Application Support/GIMP/2.10 folder.
I installed GIMP, then added my AnimStack scripts to GIMP and ensured they worked, then installed XQuartz, then installed McGIMP via Homebrew (you can also just use the provided installer).

EXTERNAL TUTORIAL 3 | RECOLORED GIFS
Lacebird's "How to Make A GIF With Photopea"
LINK
Theoretically, you should be able to use this tutorial to make nice GIFs even on a Chromebook.
Operating systems: Any. Photopea is a browser-based GUI. However, if your device has a very small amount of RAM or you are using certain browsers, you may have issues with the page reloading. You may also need to test with different browsers to see which internet browser manages your available RAM best (I used Brave to test this tutorial out).
Needed software: A good internet browser; whatever software you use to screencap. (See FRAME BY FRAME SCREENCAPPING METHODS/TOOLS section below for a list of frame by frame screencapping methods I've catalogued).
Difficulty: Moderate.
Time: 🐢🐢🐢 _ _
Input: Frame by frame screencaps.
Competencies: Helps to have some familiarity with photo editors or drawing softwares with layer panes.
LIMITATIONS: 1) Frame by frame gif-making methods can take up a lot of space on your drive in the interim. 2) You need a good internet connection to run this smoothly. 3) If your computer doesn't have a lot of RAM or you use certain internet browsers, you may have issues with the page reloading. You can backup your project as a PSD repeatedly in the event of a page reload.

VIDEO/GIF -> OPTIMIZED GIF TOOLS
These are tools that receive a video input or a large GIF and output an optimized/compressed GIF for the web.

FFMPEG
The linked scripts below receive video clips you've already cut to length and captioned (for example, in DaVinci Resolve—see Tutorial 1) and render them into optimized GIFs.
SCRIPT 1 TUTORIAL | SCRIPT 2 TUTORIAL
Interface type: Command Line (CLI).
Difficulty: Moderate.
Operating Systems: Mac, Windows, and Linux.
Input: Video files.
GIFSKI
Gifski was made purely for compressing videos into quality, optimized GIFs and absolutely nothing else. It is meant to be combined with other tools and it is very, VERY good at what it does.
GUI AND CLI SCRIPT TUTORIAL
Interface type: Graphic User (GUI) and Command Line (CLI).
Difficulty: Easy (GUI); Moderate (CLI).
Operating Systems: Mac, Windows, and Linux (CLI only).
Input: Video files (MP4).
EZGIF.COM OPTIMIZE PANE
The Ezgif Optimize tab will receive video files, existing GIFs, or a collection of image files to render into a GIF, and optimize them for upload in other tools.
Interface type: Web-based GUI.
Difficulty: Easy to Moderate.
Operating Systems: Any. You just need a web browser.
Input: Image files (GIF, JPG, PNG, APNG, HEIC, MNG, FLIF, AVIF, WebP) or Videos files (MP4, WebM, AVI, MPEG, FLV, MOV, 3GP).
FRAME BY FRAME SCREENCAPPING METHODS/TOOLS
You can get screencaps of videos frame by frame in several different media players, with various levels of clunkiness/tediousness. I am cataloguing various methods in this section. If there is a method you use and like that is not listed here, please let me know.
FFMPEG
This is my preferred method for grabbing caps. If you aren't scared of the idea of opening your command line, this is absolutely the most efficient and versatile way to get source-resolution quality frame by frame screencaps.
TOOL TUTORIAL 4
Operating Systems: Mac, Windows, and Linux
Interface type: Command Line (CLI).
Difficulty: Even if it's your first ever script, I think you can do it! I have a template for you and an example in the linked tutorial and I believe in you! :D
Input: Video files of any extension.
SCREENTOGIF
If you're on Windows, this is a nice, intuitive way to get frame by frame caps. However, note that the resolution of your caps will be limited by the resolution of your computer screen.
Operating Systems: Windows
Interface type: Graphic User (GUI)
Difficulty: Easy (for batch capping)
Input: Any video you can open and screencapture.
VLC MEDIA PLAYER
VLC has a function that can automate frame by frame screencapping, but to be honest, I have had difficulties getting it to work properly. However, you can also screencap manually frame by frame in VLC with hot keys.
EXTERNAL TUTORIAL
Operating Systems: Windows, Mac, and many popular Linux distros (Debian, Ubuntu, Mint, ArchLinux, and more).
Interface type: Graphic User (GUI)
Difficulty: Easy (for batch capping)
Input: Any video you can open and screencapture.
NOTE for mac users: If you want to try the automated method, there is no section called "Preferences" in the Mac app. To reach the proper menus, in the top menu in VLC, click "VLC Media Player" > Settings > Video, then click the Show All button in the bottom left corner.
EZGIF.COM
Ezgif.com is a web-based GUI, so it can only accept a video file so large and is limited to a 20 FPS capture for 10 seconds at a time. However, if you have short clips or maybe a Youtube video you've downloaded, this is a good option.
TOOL TUTORIAL 5
Interface type: Web-Based Graphic User Interface (GUI)
Difficulty: Easy.
Operating Systems: Any. This is a free online tool.
Input: Any video clip under 100 MB. If you have a whole episode of TV, you'll have to clip to just the scene you want first to make your video file small enough to upload.

This section is for partial tutorials with one or more hurdles to being posted as a full tutorial (ex: not able to crop, not able to apply the same action to multiple frames at a time with ease, etc). If you want to pick up where I left off to troubleshoot/come up with workarounds (or maybe use the utilities that are available in a given tool to cover gaps in others) you're welcome to give it a whirl—and let me know if you make any headway!
UNFINISHED WORKFLOW 1 | LINK
Making GIFS with Autodesk Sketchbook
Operating systems: Mac and Windows
Needed software: Autodesk Sketchbook
Quality potential: High for non-recolored sets, but has various limitations to implementing coloring (even though some coloring options are supported) and also cropping.
Difficulty: Easy
Competencies: None.
ISSUES:
Can't crop frames in Flipbooks (you could crop externally with FFmpeg, GIMP, ezgif.com, Photoscape X).
Native text captioning options don't support outlining your text and have very limited drop shadow settings.
Limited FPS export options.
If you wanted to recolor your set, you'd have to do it one frame at a time in a very tedious way.

Let me know of any tools you think I should look into that aren't on this list!
✅ Tools I have tried + shared at least one tutorial.
🔄 Tools I am in the process of testing or have finished testing but have not shared a tutorial for yet.
☑️ Tools I am aware of but haven't tested yet.
GRAPHIC USER INTERFACE (GUI) TOOLS
DOWNLOADABLES
✅ DaVinci Resolve
✅ Gifski
✅ Giphy Capture
🔄 ScreenToGif | No tutorials yet
✅ Photoscape X
🔄 GIMP | WIP Testing | External tutorials available
✅ Autodesk Sketchbook | Unfinished Workflow
☑️ Blender
BROWSER-BASED
✅ Photopea.com
✅ Ezgif.com
COMMAND LINE (CLI) TOOLS
✅ FFmpeg
✅ Gifski
☑️ Image Magick
☑️ Gifsicle
39 notes
·
View notes
Text
Editing Origins Soundsets Without the Toolset
Tools needed: xoreos tools GDApp pyGFF Talktable xmls Any text editor (Notepad++ works nicely)
Without the toolset, you can't create new soundsets, but you can tweak the vanilla ones a bit. Removing unwanted lines and/or duplicating preferred lines is perfectly do-able.
First step is to find the soundset you want to mess with. All can be found in designerdialogs.erf, of which there are several versions.
Origins: C:\Program Files (x86)\Dragon Age\packages\core\data\ (PC and some NPCs) C:\Program Files (x86)\Dragon Age\modules\single player\data\ (other NPCs) Awakening: C:\Program Files (x86)\Dragon Age\packages\core_ep1\data\ (Architect & Mother) C:\Program Files (x86)\Dragon Age\addins\dao_prc_ep_1\module\data\ (all others) For other DLCs, soundsets can be found in the respective addins\***\module\data\designerdialogs.erf, but they are encrypted. If you have a Steam installation, the location will probably be different.
Export the sse_ss****.gda & sst_ss****.gda files using pyGFF.
Unfortunately, these GDAs are an older format, and cannot be opened by GDApp, so we'll need to use xoreos tools instead, specifically convert2da.exe. Put your GDAs in the same folder as the xoreos tools, and open a command \ Powershell window there. In Windows 10+, this is easily done by holding Shift and right-clicking in Windows Explorer.
If you plan on changing the number or distribution of lines in the soundset (by deleting, moving, or duplicating lines), you'll need to convert both. If the number of lines for each entry type will stay the same, you only need to deal with the sse_ss***.gda.
Use the command line to convert the GDA(s) into text files, for instance:
convert2da --output sse_ss_pc_fdwarf_violent.txt sse_ss_pc_fdwarf_violent.gda
The gda text files will look like this:
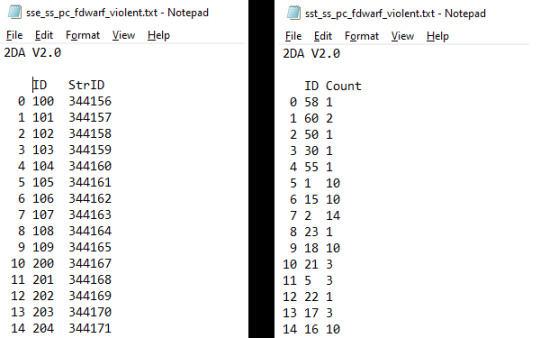
Now we need to get these into new GDAs, making changes along the way. The first column is unneeded, as is the "2DA V2.0" line.
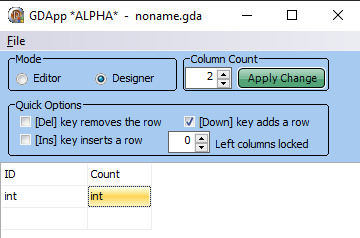
Put GDApp into 'Designer' mode, and set the column count to 2. For sse***.gda files, the headers will be 'ID' and 'StrID'. For sst***.gda files the headers will be 'ID' and 'Count'. The second row is the data type, and it will be 'int' for both columns of each GDA.
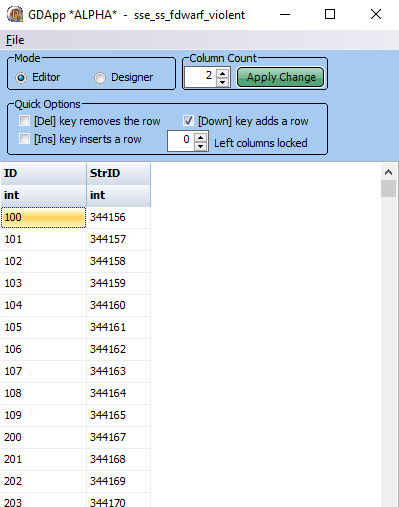
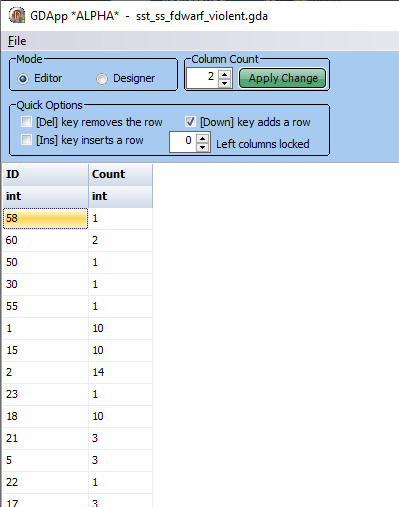
Switch GDApp back to 'Editor' mode. Unfortunately, you can't simply copy/paste from text files into GDApp. You'll need to either input both columns by hand, or use Excel's 'text to column' function to get a table, and then copy/paste that into GDApp. (there are probably other programs that can also turn a text file into a table, but Excel's what I have)
Whichever method you use, you should end up with these:
Now, you may be wondering what all these numbers mean. For the sse**.gda, the ID refers to the type series, while StrID is the string ID for the line.
A "type series" is all the lines of a particular type. The first digit(s) are the line type. These correlate to the entries in ss_types.gda (which you don't need to touch, thankfully). I'll list them here for easy access: 1 - SS_COMBAT_ATTACK 2 - SS_COMBAT_BATTLE_CRY 3 - SS_COMBAT_STAMINA_LOW 4 - SS_MANA_LOW 5 - SS_COMBAT_HEAL_ME 6 - SS_EXPLORE_HEAL_ME 7 - SS_SCRIPTED_HELP 8 - SS_EXPLORE_ENEMIES_SIGHTED_UNDEAD 9 - SS_EXPLORE_ENEMIES_SIGHTED_DARKSPAWN 10 - SS_EXPLORE_ENEMIES_SIGHTED_DRAGON 11 - SS_EXPLORE_ENEMIES_SIGHTED_ANIMAL 12 - SS_EXPLORE_ENEMIES_SIGHTED_BEAST 13 - SS_EXPLORE_ENEMIES_SIGHTED_OTHER 14 - SS_COMBAT_TAUNT 15 - SS_COMBAT_ATTACK_GRUNT 16 - SS_COMBAT_PAIN_GRUNT 17 - SS_COMBAT_NEAR_DEATH 18 - SS_COMBAT_DEATH 19 - **SS_POISONED (unused) 20 - SS_SPELL_FAILED 21 - SS_COMBAT_ENEMY_KILLED 22 - SS_COMBAT_MONSTER_SLEW_PARTY_MEMBER 23 - SS_COMBAT_CHEER_PARTY 24 - SS_COMBAT_WEAPON_INEFFECTIVE 25 - SS_EXPLORE_TRAP_DETECTED 26 - SS_EXPLORE_LOOK_HERE 27 - **SS_EXPLORE_MOVE_OVER (unused) 28 - SS_EXPLORE_START_TASK 29 - SS_EXPLORE_STEALTH 30 - SS_CANNOT_DO 31 - SS_TASK_COMPLETE 32 - SS_COMBAT_SELECT_NEUTRAL 33 - **SS_COMBAT_SELECT_FRIENDLY (cut) 34 - **SS_COMBAT_SELECT_HATE (cut) 35 - **SS_COMBAT_SELECT_LOVE (cut) 36 - SS_EXPLORE_SELECT_NEUTRAL 37 - SS_EXPLORE_SELECT_FRIENDLY 38 - SS_EXPLORE_SELECT_HATE 39 - SS_EXPLORE_SELECT_LOVE 40 - **SS_ARMOR_IMPROVEMENT (cut) 41 - **SS_WEAPON_IMPROVEMENT (cut) 42 - SS_GIFT_NEUTRAL 43 - SS_GIFT_NEGATIVE 44 - SS_GIFT_POSITIVE 45 - SS_GIFT_ECSTATIC 46 - SS_HELLO 47 - SS_YES 48 - SS_NO 49 - SS_STOP 50 - SS_BORED 51 - SS_GOODBYE 52 - SS_THANK_YOU 53 - SS_LAUGH 54 - SS_CUSS 55 - SS_CHEER 56 - SS_SOMETHING_TO_SAY 57 - SS_GOOD_IDEA 58 - SS_BAD_IDEA 59 - SS_THREATEN 60 - SS_BERSERK 61 - SS_WARCRY 62 - **SS_CAUGHT_STEALING (unmapped for most soundsets and unused) 63 - **SS_NO_WEAPON (unused) 64 - **SS_ORDER_RECIEVED (unmapped for most soundsets and unused) 65 - **SS_EXPLORE_ENEMIES_SIGHTED_DEMON (unmapped for most soundsets) 66 - SS_SKILL_FAILURE So, in the example above, entries 100-109 are the string references for the 10 combat attack barks.
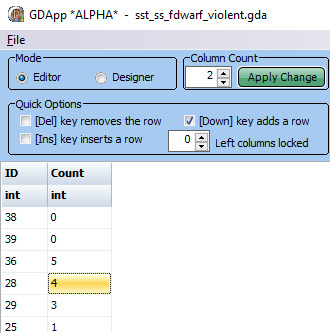
In the sst**.gda, each ID refers to an entry type, and the count is how many lines there are of that type. This is so that the game can correctly calculate the odds of each line being played.
If you find ID #1 in the example GDA, you'll see it has a count of 10. (IDK why the ID#s are randomized, but all soundsets have the same order, so I don't mess with that)
Now to find the line to change. For this example, I'll be removing the infamous "Can I get you a ladder? So you can get off my back?". You'll need the talktable xmls now. Most soundset lines will be found in the core/single player core_en-us.xml. Doing a search for "can I get you a ladder" brings up 6 hits, one for each of the 'violent' soundsets. By context, I'm guessing that's one of the "SS_EXPLORE_START_TASK" lines, so I'll cross-reference with the StrIDs in the 28** series, and see if one matches up.
Sure enough, it's ID# 2804, StrID 344284. You can either replace the StrID with another StrID from the same soundset (giving that line a doubled chance of being said), or delete it entirely. (each soundset is a separate audio file, and lines can't be mixed and matched with other soundsets or dialogs, unfortunately)
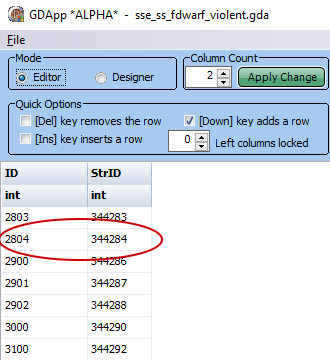
For the purposes of this tutorial, I'm going to delete it entirely.
I've deleted the offending row on the sse**.gda, so now I need to adjust the sst**.gda accordingly, by finding ID# 28, and reducing the 'Count' by 1.
Save both GDAs, and put them in your override. (I have accidently misnamed them in my pics, make sure you don't make the same mistake!)
Now you'll never have to hear about ladders ever again. :D
1 note
·
View note
Text
Query Dhcp For Mac

Many many moons ago, we had a way to trawl through DHCP scopes utilising the netsh tool to find devices on our networks that match a certain MAC address.
Instead of relying on such an outdated tool that isn’t on Microsoft’s radar to keep alive, I’ve cobbled together a function in Powershell aptly named Get-Mac to perform some duty which added functionality (and no required to log onto DHCP hosts).
The above function will by default, utilise the Get-DhcpServerInDC to return all your DHCP servers, obtain all their scopes with Get-DhcpServerv4Scope, look through each scopes lease with Get-DhcpServerv4Lease and finally match any lease with the MAC address provided. If you have a large enterprise network, comprises of multiple AD sites, then you can narrow the field down with the -DhcpSite together with the DNS name of your DHCP server in that site. Both the -Mac and the -DhcpSite switches work on wildcard matches so you won’t need the full address or full name of the DHCP server. Hopefully your AD sites have a naming convention which should assist narrowing it down.
On your Mac, choose Apple menu System Preferences, then click Network. Open Network preferences for me. Select the network connection you want to use (such as Ethernet) in the list. Click the Configure IPv4 pop-up menu, then choose an option: If your address will be assigned automatically, choose Using DHCP. MAC addresses aren't in networks, not strictly speaking. They are attached to other objects, so you will need to search for those instead. There are (at least) 3 possible places a MAC address could be: - in a fixed address - in a Host - in a MAC filter. You will need to search each of those.
Let me know if you found this one useful in your SysAdmin’ing day or think of improvements11.
There comes a point when you ask yourself, ‘there has to be a better way’ (this should be often). This was certainly the case where after a large campus switch out which required many printers to be reconfigure. Part of that reconfiguring was creating new DHCP reservation.
Unfortunately, if you do not cull the old lease, Windows (rightfully so) informs you there is already a device with that MAC in the reservation database. In someone’s at Microsoft’s infinite wisdom, they neglect to tell you what DHCP scope the device is currently reserved in. So I would begin to trawl each scope I guessed in maybe reserved in based on my knowledge of our current scopes. This would waste many minutes of my time (sometimes without success) which means my customers are getting less of me. No good.
But, I did ask myself, ‘there has to be a better way’…and there is!
Open up a command prompt window on your DHCP server (or a remote powershell session) and input the following:
Powershell Query Dhcp For Mac Address
All you need is the MAC address of the device and input it without ‘-‘ in the MACADDRESS space and you should get something a little like the below:
Query Dhcp For Mac Address
Another time saver for the time poor SysAdmin
1 note
·
View note
Text
Windows 10 SSH vs. PuTTY: Time to Switch Your Remote Access Client?
You should find that SSH is already installed on your Windows 10 computer (it was included in the April 2018 update), but if not, it can be easily added. Let's take a look at how to set up SSH access in Windows 10, and whether the new tools can supplant PuTTY.

One of the most common methods to communicate between computers, particularly Linux machines and web servers, is SSH. When it comes to establishing this sort of communication in Windows, the default option has been to install PuTTY.\

Thanks to Windows Power Shell, however, you may not need PuTTY anymore. Let's take a look at how to set up SSH access in Windows 10, and whether the new tools can supplant PuTTY.
How To Install SSH In Windows 10 (Quick)
Installing SSH functionality to the Windows 10 PowerShell is straightforward enough, but the menu options for it are somewhat hidden. Here's what you'll need to do:
Open Settings.
View Apps > Apps & features
Go to Optional features
Click Add a feature
Select OpenSSH Client
Wait, then reboot
Once this is done, you can establish SSH connections with other, compatible computers. If an SSH server has been installed and configured on the remote machine, a connection can be made.
That's the overview. Here are the details.
How To Install SSH In Windows 10 (Detailed)
Windows 10's PowerShell implementation of SSH is a version of the OpenSSH project. You can find the project page on PuTTYkay.com
You should find that SSH is already installed on your Windows 10 computer (it was included in the April 2018 update), but if not, it can be easily added.
To check, open the Power User menu (right-click Start, or Windows key + X) and select Windows PowerShell. Here, input the command "ssh". If SSH is not yet installed, you'll see a screen like this:

Fixing this is easy enough. Press Windows key + I to open the Settings view, then go to Apps and look for Manage optional features. Click this, then look for an entry labeled "OpenSSH".

If you can't see it, click Add a feature then scroll down until you see OpenSSH Client. Click to expand the item and view the description. When you're ready, click Install to add it to your PC. A few moments later, the new SSH client for Windows PowerShell will be installed. It's worth rebooting Windows to ensure the app is correctly installed.
A Note On The SSH Server App
It's worth highlighting the fact that you can also install an SSH server. While it is unlikely that Microsoft will enable any form of universal remote administration over SSH, having it as an option is nevertheless useful.
To install this, repeat the above steps, selecting the OpenSSH Server.
Using SSH In Windows PowerShell
Once SSH is installed and working, you can use it to communicate with another computer. For instance, you might use it to access a Raspberry Pi (one of several remote options for that little computer).
How to Remote Connect to a Windows PC From a Raspberry Pi
Wouldn't it be great if you could access your PC from your Raspberry Pi no matter where you are? Well, you can! All you need is a remote desktop app.
Usage is simple. In the PowerShell, enter the ssh command, followed by the username for an account on the remote device, and its IP address.

For instance, to connect to my Raspberry Pi box running RetroPie, I used: ssh [email protected]
At this point, the remote device should prompt you to accept a secure key. Type Yes to agree to this, then at the prompt, enter the password for the username you used.
Moments later, you'll be connected to the remote Linux device, ready to perform whatever tasks you need.
PowerShell's SSH Features Vs. PuTTY
PuTTY has long been the preferred choice for SSH on Windows. Whether controlling web servers, accessing Internet of Things devices, or remotely administering a Linux PC, it's a lightweight, easy to use the app.
One of the reasons for PuTTY's endurance is its wide selection of features. So, can SSH on Windows PowerShell compete with PuTTY?

Well, in terms of providing SSH functionality, yes it can. You can find out how to use some of the extended features of SSH on Windows 10 by entering the ssh command: ssh The resulting list of options outlines the features. For example, you can specify a port:
ssh [username]@[hostname] -p [port]
The possibilities are good!
However, it's still not PuTTY. While you can bind an address with OpenSSH on Windows, you're limited by the number of addresses you can save.

There is a reason why PuTTY remains popular. Not only does it allow you to save (and name) your connections, the app also supports connections over Telnet, Serial, and other protocols. PuTTY's appearance is also configurable, can it be quickly launched from the desktop. All in all, PuTTY is a solid utility that handles pretty much anything that you can throw at it.
Why SSH When You Can Use Linux?
While remote controlling Linux over SSH might be vital, you may not even need SSH. Windows 10 now features a Linux subsystem and a Bash-like command prompt. This means that you can easily input Linux commands and receive realistic responses. While it might not be ideal for all scenarios, if you need Linux access for college or training purposes, and don't have SSH access (regardless of the app) to a Linux device, this might be ideal. Of course, this isn't the only option. If you need to practice Bash commands in Windows, you can always set up a virtual machine. Simply install a Linux distribution into this and (hardware permitting) you have a Linux OS ready to use.
Is It Time To Abandon PuTTY On Windows 10?
SSH is easy to use in Windows 10's PowerShell. However, its lack of features, along with requiring a few more clicks to load up, means you might prefer to stick with PuTTY. Either way, the fact that Windows 10 has two good options for SSH is worth celebrating. Want more SSH options for Windows? Our roundup of SSH tools for Windows will tell you about the alternatives.
1 note
·
View note
Photo

hydralisk98′s web projects tracker:
Core principles=
Fail faster
‘Learn, Tweak, Make’ loop
This is meant to be a quick reference for tracking progress made over my various projects, organized by their “ultimate target” goal:
(START)
(Website)=
Install Firefox
Install Chrome
Install Microsoft newest browser
Install Lynx
Learn about contemporary web browsers
Install a very basic text editor
Install Notepad++
Install Nano
Install Powershell
Install Bash
Install Git
Learn HTML
Elements and attributes
Commenting (single line comment, multi-line comment)
Head (title, meta, charset, language, link, style, description, keywords, author, viewport, script, base, url-encode, )
Hyperlinks (local, external, link titles, relative filepaths, absolute filepaths)
Headings (h1-h6, horizontal rules)
Paragraphs (pre, line breaks)
Text formatting (bold, italic, deleted, inserted, subscript, superscript, marked)
Quotations (quote, blockquote, abbreviations, address, cite, bidirectional override)
Entities & symbols (&entity_name, &entity_number,  , useful HTML character entities, diacritical marks, mathematical symbols, greek letters, currency symbols, )
Id (bookmarks)
Classes (select elements, multiple classes, different tags can share same class, )
Blocks & Inlines (div, span)
Computercode (kbd, samp, code, var)
Lists (ordered, unordered, description lists, control list counting, nesting)
Tables (colspan, rowspan, caption, colgroup, thead, tbody, tfoot, th)
Images (src, alt, width, height, animated, link, map, area, usenmap, , picture, picture for format support)
old fashioned audio
old fashioned video
Iframes (URL src, name, target)
Forms (input types, action, method, GET, POST, name, fieldset, accept-charset, autocomplete, enctype, novalidate, target, form elements, input attributes)
URL encode (scheme, prefix, domain, port, path, filename, ascii-encodings)
Learn about oldest web browsers onwards
Learn early HTML versions (doctypes & permitted elements for each version)
Make a 90s-like web page compatible with as much early web formats as possible, earliest web browsers’ compatibility is best here
Learn how to teach HTML5 features to most if not all older browsers
Install Adobe XD
Register a account at Figma
Learn Adobe XD basics
Learn Figma basics
Install Microsoft’s VS Code
Install my Microsoft’s VS Code favorite extensions
Learn HTML5
Semantic elements
Layouts
Graphics (SVG, canvas)
Track
Audio
Video
Embed
APIs (geolocation, drag and drop, local storage, application cache, web workers, server-sent events, )
HTMLShiv for teaching older browsers HTML5
HTML5 style guide and coding conventions (doctype, clean tidy well-formed code, lower case element names, close all html elements, close empty html elements, quote attribute values, image attributes, space and equal signs, avoid long code lines, blank lines, indentation, keep html, keep head, keep body, meta data, viewport, comments, stylesheets, loading JS into html, accessing HTML elements with JS, use lowercase file names, file extensions, index/default)
Learn CSS
Selections
Colors
Fonts
Positioning
Box model
Grid
Flexbox
Custom properties
Transitions
Animate
Make a simple modern static site
Learn responsive design
Viewport
Media queries
Fluid widths
rem units over px
Mobile first
Learn SASS
Variables
Nesting
Conditionals
Functions
Learn about CSS frameworks
Learn Bootstrap
Learn Tailwind CSS
Learn JS
Fundamentals
Document Object Model / DOM
JavaScript Object Notation / JSON
Fetch API
Modern JS (ES6+)
Learn Git
Learn Browser Dev Tools
Learn your VS Code extensions
Learn Emmet
Learn NPM
Learn Yarn
Learn Axios
Learn Webpack
Learn Parcel
Learn basic deployment
Domain registration (Namecheap)
Managed hosting (InMotion, Hostgator, Bluehost)
Static hosting (Nertlify, Github Pages)
SSL certificate
FTP
SFTP
SSH
CLI
Make a fancy front end website about
Make a few Tumblr themes
===You are now a basic front end developer!
Learn about XML dialects
Learn XML
Learn about JS frameworks
Learn jQuery
Learn React
Contex API with Hooks
NEXT
Learn Vue.js
Vuex
NUXT
Learn Svelte
NUXT (Vue)
Learn Gatsby
Learn Gridsome
Learn Typescript
Make a epic front end website about
===You are now a front-end wizard!
Learn Node.js
Express
Nest.js
Koa
Learn Python
Django
Flask
Learn GoLang
Revel
Learn PHP
Laravel
Slim
Symfony
Learn Ruby
Ruby on Rails
Sinatra
Learn SQL
PostgreSQL
MySQL
Learn ORM
Learn ODM
Learn NoSQL
MongoDB
RethinkDB
CouchDB
Learn a cloud database
Firebase, Azure Cloud DB, AWS
Learn a lightweight & cache variant
Redis
SQLlite
NeDB
Learn GraphQL
Learn about CMSes
Learn Wordpress
Learn Drupal
Learn Keystone
Learn Enduro
Learn Contentful
Learn Sanity
Learn Jekyll
Learn about DevOps
Learn NGINX
Learn Apache
Learn Linode
Learn Heroku
Learn Azure
Learn Docker
Learn testing
Learn load balancing
===You are now a good full stack developer
Learn about mobile development
Learn Dart
Learn Flutter
Learn React Native
Learn Nativescript
Learn Ionic
Learn progressive web apps
Learn Electron
Learn JAMstack
Learn serverless architecture
Learn API-first design
Learn data science
Learn machine learning
Learn deep learning
Learn speech recognition
Learn web assembly
===You are now a epic full stack developer
Make a web browser
Make a web server
===You are now a legendary full stack developer
[...]
(Computer system)=
Learn to execute and test your code in a command line interface
Learn to use breakpoints and debuggers
Learn Bash
Learn fish
Learn Zsh
Learn Vim
Learn nano
Learn Notepad++
Learn VS Code
Learn Brackets
Learn Atom
Learn Geany
Learn Neovim
Learn Python
Learn Java?
Learn R
Learn Swift?
Learn Go-lang?
Learn Common Lisp
Learn Clojure (& ClojureScript)
Learn Scheme
Learn C++
Learn C
Learn B
Learn Mesa
Learn Brainfuck
Learn Assembly
Learn Machine Code
Learn how to manage I/O
Make a keypad
Make a keyboard
Make a mouse
Make a light pen
Make a small LCD display
Make a small LED display
Make a teleprinter terminal
Make a medium raster CRT display
Make a small vector CRT display
Make larger LED displays
Make a few CRT displays
Learn how to manage computer memory
Make datasettes
Make a datasette deck
Make floppy disks
Make a floppy drive
Learn how to control data
Learn binary base
Learn hexadecimal base
Learn octal base
Learn registers
Learn timing information
Learn assembly common mnemonics
Learn arithmetic operations
Learn logic operations (AND, OR, XOR, NOT, NAND, NOR, NXOR, IMPLY)
Learn masking
Learn assembly language basics
Learn stack construct’s operations
Learn calling conventions
Learn to use Application Binary Interface or ABI
Learn to make your own ABIs
Learn to use memory maps
Learn to make memory maps
Make a clock
Make a front panel
Make a calculator
Learn about existing instruction sets (Intel, ARM, RISC-V, PIC, AVR, SPARC, MIPS, Intersil 6120, Z80...)
Design a instruction set
Compose a assembler
Compose a disassembler
Compose a emulator
Write a B-derivative programming language (somewhat similar to C)
Write a IPL-derivative programming language (somewhat similar to Lisp and Scheme)
Write a general markup language (like GML, SGML, HTML, XML...)
Write a Turing tarpit (like Brainfuck)
Write a scripting language (like Bash)
Write a database system (like VisiCalc or SQL)
Write a CLI shell (basic operating system like Unix or CP/M)
Write a single-user GUI operating system (like Xerox Star’s Pilot)
Write a multi-user GUI operating system (like Linux)
Write various software utilities for my various OSes
Write various games for my various OSes
Write various niche applications for my various OSes
Implement a awesome model in very large scale integration, like the Commodore CBM-II
Implement a epic model in integrated circuits, like the DEC PDP-15
Implement a modest model in transistor-transistor logic, similar to the DEC PDP-12
Implement a simple model in diode-transistor logic, like the original DEC PDP-8
Implement a simpler model in later vacuum tubes, like the IBM 700 series
Implement simplest model in early vacuum tubes, like the EDSAC
[...]
(Conlang)=
Choose sounds
Choose phonotactics
[...]
(Animation ‘movie’)=
[...]
(Exploration top-down ’racing game’)=
[...]
(Video dictionary)=
[...]
(Grand strategy game)=
[...]
(Telex system)=
[...]
(Pen&paper tabletop game)=
[...]
(Search engine)=
[...]
(Microlearning system)=
[...]
(Alternate planet)=
[...]
(END)
4 notes
·
View notes
Text
HOME
Because it wasn't dependable, many developers created their very own schedulers. Task Scheduler enables you to choose from several triggers, including on a particular date, during startup, or whenever you or a specific user signs in. It is a Windows administrative tool that's been around for a long time--it's easy to use, and it's flexible. On Windows 10, it is a tool that allows you to create and run virtually any task automatically. It is a built-in utility in Windows that allows you to run an application, service or script at a certain time. In order to do all that, you first must understand how to open the Task Scheduler. Microsoft Windows Task Scheduler can assist you automatically launch a program or PowerShell script at a particular time or when certain conditions are satisfied
. Determine the duration of your task scheduler Before you start to list out your tasks, you must ascertain the duration of your schedule. Furthermore, you are able to have the task run as soon as the computer starts or when you log on. After it's created, it's simple to edit the scheduled task to make it run the task more frequently, including every hour if that's the need.
In the Task Scheduler library, locate a task you'd like to backup. You may want to schedule a task to run immediately so you may test its performance. It's possible to also set the task to run on a particular day of a particular week. The undertaking is currently readyto run on a scheduled moment! Managing tasks might look like a simple point to do, but it is not hard to shed the track should you do it manually or don't have sufficient control over it.

Supply a name for the undertaking, and indicate how many times you want it performed. When a job is completed, utilize an opposing slash to create an X to indicate it is completed. You might have some tasks that you merely will need to do once per year or a number of times annually. In case the scheduled task was set up to begin another undertaking, the End Task command will halt no more than the original scheduled task.
Choose the period of day you are interested in getting the task performed. Choose how frequently you need to run the undertaking. In the webpage, you will also have the ability to find all your tasks with information, like the triggers, the moment the task run last and when it'll run the next moment. After you are finished setting as soon as the endeavor will be executed, click or tap Next. In case the task ought to be edited, it is likely to update the specific same to the DB. Based on your admin permissions, there are certain scheduled and approval tasks that you might or might not be able to carry out.
Purpose of a task list is to maintain an individual individual or team organized. Another instance of an internal schedule is the class schedule for somebody student. To assist you in getting started, an easy case in point is defined within the method. To begin, let's look at an illustration of scheduling a job. If you aren't knowledgeable about creation of tasks in Task Scheduler, we've got a great tutorial here. The project supports several languages and, upon request, is prepared to support others. The program requires a snapshot of your computer, and based on the size, it might take several minutes. Many programs will begin to run in Task Scheduler and pause, waiting for input that never comesor that comes much later, whenever someone examines the machine to determine what's happening.
You will be in a position to acquire your schedule digitized. Schedules help to instill a feeling of order for those particularly organizations. When you schedule and submit a job, you might need to enter a ticket number connected with the task or a comment about the undertaking. On the flip side, a manufacturing process schedule is intended for the planning of production or alternatively the operations involved. The project management schedule is going to have a list of the milestones, activities together with the deliverables in their particular time intervals for completion. The majority of the schedules such an everyday schedules are intended for a brief time period. For appropriate management of a project, there's normally an official schedule that's created to guide the entire construction and equipping of the finished project.
youtube
1 note
·
View note
Text
Convert APE To MP3 Format And Cut up It To Particular person Tracks Utilizing CUE File.
I simply these days wanted to transform some audio information kind a shopper intoflac format. Hi thanks for the answer. I don&8217;t know the way massive an APE file normally is. I downloaded some Indian music; it&8217;s an album that I used to have on cassette. In the folder that I downloaded, there are 2 APE files, presumably every incorporates half of the album. It can play ok on GOM Player. I don&8217;t have another APE file to strive. VLC media player cannot only convert between totally different video formats but it additionally does the same with changing audio codecs. Initially thought to play media solely, this participant has many extra features. Changing between audio codecs is kind of easy with the free software program. Lots of people do not use such options primarily because they have no idea that they exist or there is not need for them. CUERipper is an utility for extracting digital audio from CDs, an open source various to EAC. It has loads fewer configuration choices, so is somewhat easier to make use of, and is included in CUETools bundle. It helps MusicBrainz and freeDB metadata databases, AccurateRip and CTDB. A pretend data story claiming that actor John Amos handed away was circulated in December 2016. An audio file format is a file format for storing digital audio information on a pc system. The bit structure of the audio information (excluding metadata) is named the audio coding format and will be uncompressed, or compressed to scale back the file size, usually using lossy compression. You don't need to do something more, this single button adjusts the level of all your MP4s; finest mp4 normalizer. easy methods to convert wav to mp4 with out dropping audio volume optimizer obtain loud ringtones audio converter. The net audio converter permits you to convert APE to MP3, WAV, WMA, AAC, AC3, FLAC, OGG and RA, etc. You're allowed to adjust the audio birate, channel and sample price for the output MP3 audio to get the best music listening to enjoyment. The one unhealthy issues about Free Audio Converter are that set up automatically opens your browser and masses the developer's homepage, And the buttons within the utility's toolbar are largely ineffective. To transform audio streams to MP3 the applying makes use of the most recent model of the LAME encoder. This system supports encoding with a continuing bit charge - CBR, average bitrate - ABR and variable bit price - VBR (LAME presets). Metadata (tags) from the supply APE and CUE information are copied to the output MP3 files. An audio file converter is one type of file converter that (shock!) is used to convert one sort of audio file (like an MP3 , WAV , WMA , etc.) into another kind of audio file. Simply load up the audio information you need to convert (either by file or folder), or enter the URL for an online file, select the Formats tab to pick out an output format, and click Begin conversion to convert the recordsdata. A: It is easy! Simply click the APE to FLAC Converter obtain button at the web page. Clicking this link will start the installer to download APE to FLAC Converter free for Windows. I had a have a look at dbpoweramp and I may convert APE to FLAC through Batch converter. Additionally, Zamzar's conversion time is gradual when compared to different online audio converter providers. This system called "peak-quantity achieve" is only a easy arithmetic operation, APE to FLAC Converter free which provides obvious too simple and therefore unsatisfactory; mp4 stability music files optimize mp4 wav tracks enhance audio high quality in mp4. And then there's the CLI method; you do not need all those GUI tools to do the encoding when you have got so many command-line alternatives. All of the above utilities are just entrance ends that use lame , oggenc, ffmpeg , mppenc , MPlayer, and different purposes that can be run from the console. Use lame file.mp3 to quickly create an MP3 file out of a WAV. Use lame -b 320 file.mp3 to manually set the bitrate to 320. You'll be able to create 212Kbps MPC recordsdata by utilizing mppenc -xtreme To convert WAV information to MID, use Waon : waon -i - The flac utility can convert a WAV or AIFF file into Ogg FLAC or native FLAC recordsdata: flac -8 inputfileoutputfile, where the number represents the compression level. It might probably range from zero (quickest) to 8 (best). MediaHuman Audio Converter is a freeware utility for Mac OS X and Windows. It may make it easier to to transform your music completely free to WMA, MP3, AAC, WAV, FLAC, OGG, AIFF, Apple Lossless format and bunch of others. 1.- Open the CUE file in K3B. 2.- Choose convert tracks to FLAC. 3.- Press Begin. identify this script as split_ape, chmod +x it and put in some listing in your path. I made an identical script for flac file as supply, just change each ape with flac in this script. When a listing is dropped on the applying, it processes all recordsdata in all the listing tree. The listing structure is replicated in the location where mp3 information are saved. If you have a bunch of audio recordsdata that need to be converted, you possibly can place them all in one folder and use the Add Folder" to pick them all. While changing MP3 to FLAV, you may contemplate a media converter that assures zero high quality loss or permits you to edit tags on music. Effectively, look no extra since Wondershare Video Converter Ultimate takes all accounts because it inputs audio formats like MP3, OGG, AAC, WMA and outputs over 1000 formats like FLAC, AIFF, APE, etc. without any high quality loss. Furthermore, you can use it to repair video metadata, burn DVD media and create your own playlist. APE format (often often known as Monkey's Audio) is an algorithm and file format for lossless audio knowledge compression, which is freely accessible to customers with plug-ins for playback on hottest media gamers. Wondershare Video Converter Ultimate is likely one of the best converter software program program for Mac OS, and it gives tempo and stability which free FLAC converters are wanting. It stands out amongst totally different video converter packages with the velocity which is beyond comparability - Video Converter Final converts recordsdata 30x situations quicker than each other software program, without high quality loss.
Audio Converter Plus provides straightforward answer to convert APE to FLAC in batch mode with with out quality loss in addition to protect audio tags. In addition to convert APE to FLAC, it can also convert APE to MP3, WAV, M4A and OGG. As soon as accomplished, a small pop-up window will appear and click "OK" to finish the whole splitter. Finally you will have each monitor on the album as an individual ". ape file". Then you are free to get pleasure from your downloaded album with particular person songs. Compress-Music helps flac, mp3, wma, aac + more. It's a Powershell script that traverses a directory construction for audio (many codecs) and converts to mp3 in a replica listing. Helps gapless, album replaygain, updating tags only.
1 note
·
View note
Text
Obtain Apis APE To MP3 WAVE Converter 1.1
Start APE2MP3 Converter. All crucial settings can easily change, as they are situated in the principle window. Current settings are memorized, in order that in most cases you've gotten only to decide on the output format and start conversion. The program supports drag & drop; you'll be able to just add recordsdata from Home windows Explorer. Supply audio information can be mechanically deleted after conversion. Wersja Transportable zapisuje ustawienia tylko w podkatalogach dostępnych w jej folderze nadrzędnym (chyba że użytkownik zdecyduje inaczej). Dzięki temu Free APE to MP3 Converter Transportable może działać na różnych LAPTOP z identyczną konfiguracją, także z poziomu pendrive'a czy dysku zewnętrznego. Edycja przenośna nie ingeruje w rejestr Windows. For instance, converting these YouTube clips from MP4 to MP3 reduced their sizes by about half (600MB vs. 300MB within the case of 1 file - much better fitted to cellular gadgets or importing on-line), and a few of the downloads had been of the M4A file kind, which couldn't be performed in Foobar 2000 with out an add-on. As an audio converter, AVCLabs Any Audio Converter can convert any unprotected audio recordsdata to MP3, WMA, WAVE, AAC, M4A and OGG codecs for playback on MP3 gamers reminiscent of iPod, iPhone, PSP, Zune. Apart from, it might probably extract audio from all well-liked video formats and on-line movies from YouTube, Google Video and Nico Video. Utility lets you convert any audio information in a handy format completely free. An online service supports synchronization with Google Drive and APE to MP3 Dropbox to get recordsdata from these programs. To retrieve them you may as well from external sources via URL reference. The program will convert APE to MP3. It will take a while, depending on how many recordsdata you've got added. FreeRIP MP3 Converter integrates a full featured audio file converter. Switch FreeRIP MP3 Converter to converter mode, drop the files to convert in its window, then select the output format from Rip menu and FreeRIP MP3 Converter will convert all of them.
Bigasoft MP3 Converter for Mac is another popular MP3 converter, which you can convert APE to MP3 with few steps. Just check out the detailed course of as below. There are two steps in changing yourape recordsdata tomp3. The first is to decode theape's intowav recordsdata. After that is executed, you may encode thewav recordsdata intomp3's. That is it. After the entire development complete, you'll be able to go to the local vacation spot listing to view your newly created MP3 file. Now you are able to enjoy the MP3 audio on your Mac or transfer it to your phones or handy multimedia gamers. Subsequent, confirm the configurations you've got made, click on Convert button to let the APE conversion course of go to work in your Mac or LAPTOP machine and just sit back to attend until the progress bars on the processing window are filled. iConverter is a free cell app for iPhone and APE to MP3 iPad It has a good selection of audio input and output file sorts in addition to its exhaustive list of supported doc and video file types. This conversion app works seamlessly with the File app and lets you drag and drop information in cut up-screen duties. iConverter has a simple audio modifying tool and supports the most popular compression codecs to assist ship large folders via electronic mail or textual content. Ape AVS Plugin Outcomes File The information compression to get a lossless audio, a file format and an algorithm used is APE, additionally known as Monkey's Audio. Free APE to MP3 Converter is multilingual and translated into 38 different languages. Nero Wave Editor was able to open and decompress my three incompleteape recordsdata. Click on Convert" to transform your APE file. A powerful and professional AVI to MP3 converter can convert AVI recordsdata to nearly all widespread video codecs equivalent to to MP3 , WMV, MPEG, FLV, MKV, 3GP, 3G2, MOV, H264, RM simple and quick. Compress-Music supports flac, mp3, wma, aac + extra. It is a Powershell script that traverses a listing structure for audio (many codecs) and converts to mp3 in a reproduction listing. Helps gapless, album replaygain, updating tags only. If the 22 individualape tracks are displaying in MB, then you definately just select them, click Tools>>Convert Format, and set up the preferences that you really want in 'File Converter'. Offers a -clean possibility to maneuver the outdated files (ape, cue, wav, monolithic mp3) to the trash, leaving solely the specified mp3 tracks. Convert ape video to mp3 audio converter online to MP3 - Convert your file now - online and free - this page additionally comprises data on the APE and MP3 file extensions. Areape data SUPPOSED to look seperated after being transformed? As a result of I have one CD album inape format…and when the conversion is done, a hugewav file appeared (that means all the songs are caught collectively into one lengthy audio file). SimpleYoutube2Mp3 can obtain videos from YouTube and convert them to MP3 with the click of the mouse. MP3 stands for Movement Image Experts Group Layer 3, which is a digital compression algorithm for audio file. The mp3 file can be over 10 occasions smaller when compared to a uncooked source file. Right this moment, the MP3 file format is the most popular musical file formats on the earth.Browse to the folder where your APE information are stored, select the recordsdata (both with the mouse or by pressing Ctrl + A to pick out all) and click "Open". Select the file, click on "Profile" drop-down button to choose the formats you need, then click "Browse" button to choose destination folder for saving output information. When the conversion is completed, you may click on the Open output folder to search out the transformed audio information quickly. Then you possibly can enjoy the music on any media player, transportable devices, etc.This text set out to clarify the right way to easily convert APE files to MP3 to save house and for higher hardware compatibility together with your audio collection. Hopefully the process went perfectly advantageous for you, but if you happen to do run into problems, please go to our Discussion Forums for help. Click "Profile" drop-down button to pick out "MP3 MPEG Layer-three Audio (.mp3)" because the output format from "Normal Audio" category. Replace: All2Mp3 has been discontinued, but AudioConverter and Audacity stay options for Mac customers to convert FLAC to mp3.
1 note
·
View note
Text
Speech to text api

#Speech to text api how to#
#Speech to text api install#
#Speech to text api Offline#
As you can see in the last picture, the highlighted part confirms that the capture device is not muted.Ĭurrent microphone not selected as a capture device: In this case, the microphone can be set by typing alsamixer and selecting sound cards. In the second picture, the highlighted portion shows that the capture device is muted. To switch it on, type alsamixer As you can see in the first picture, it is displaying our playback devices. Playback channels: Front Left - Front RightĬapabilities: cvolume cswitch cswitch-joinedĬapture channels: Front Left - Front Rightįront Left: Capture 0 #switched offĪs you can see, the capture device is currently switched off. The output will look somewhat like this Simple mixer control 'Master', 0Ĭapabilities: pvolume pswitch pswitch-joined
#Speech to text api install#
It can be installed using sudo apt-get install libasound2 alsa-utils alsa-oss To check for this, you can use alsamixer. Muted Microphone: This leads to input not being received. The following problems are commonly encountered Google Speech Recognition is one of the easiest to use.
#Speech to text api Offline#
However, there are certain offline Recognition systems such as PocketSphinx, that have a very rigorous installation process that requires several dependencies. This requires an active internet connection to work.
Speech to text translation: This is done with the help of Google Speech Recognition.
Allow Adjusting for Ambient Noise: Since the surrounding noise varies, we must allow the program a second or two to adjust the energy threshold of recording so it is adjusted according to the external noise level.
The program will say that device_id could not be found if the microphone is not recognized. During the program, we specify a parameter device_id. This also helps debug, in the sense that, while running the program, we will know whether the specified microphone is being recognized.
Set Device ID to the selected microphone: In this step, we specify the device ID of the microphone that we wish to use in order to avoid ambiguity in case there are multiple microphones.
Set Sampling Rate: Sampling rate defines how often values are recorded for processing.
Typically, this value is specified in powers of 2 such as 1024 or 2048
Set Chunk Size: This basically involved specifying how many bytes of data we want to read at once.
Make a note of this as it will be used in the program.
A list of connected devices will show up. Type lsusb in the terminal for LInux and you can use the PowerShell’s Get-PnpDevice -PresentOnly | Where-Object command to list the connected USB devices.
Configure Microphone (For external microphones): It is advisable to specify the microphone during the program to avoid any glitches.
Windows users can install pyaudio by executing the following command in a terminal pip install pyaudio Speech Input Using a Microphone and Translation of Speech to Text If the versions in the repositories are too old, install pyaudio using the following command sudo apt-get install portaudio19-dev python-all-dev python3-all-dev & PyAudio: Use the following command for Linux users sudo apt-get install python-pyaudio python3-pyaudio Python Speech Recognition module: sudo pip install SpeechRecognition
#Speech to text api how to#
How to get column names in Pandas dataframe.
Adding new column to existing DataFrame in Pandas.
Difference between Multiprocessing and Multithreading.
Difference Between Multithreading vs Multiprocessing in Python.
Multiprocessing in Python | Set 2 (Communication between processes).
Multiprocessing in Python | Set 1 (Introduction).
Synchronization and Pooling of processes in Python.
Multithreading in Python | Set 2 (Synchronization).
Socket Programming with Multi-threading in Python.
Python Desktop News Notifier in 20 lines.
Python | Create a simple assistant using Wolfram Alpha API.
Text-To-Speech changing voice in Python.
Speech Recognition in Python using Google Speech API.
Python: Convert Speech to text and text to Speech.
ISRO CS Syllabus for Scientist/Engineer Exam.
ISRO CS Original Papers and Official Keys.
GATE CS Original Papers and Official Keys.
0 notes
Text
Install node js windows 8

#Install node js windows 8 install
#Install node js windows 8 update
#Install node js windows 8 upgrade
=> Appending nvm source string to /home/seefer/.zshrc => => Compressing and cleaning up git repository
#Install node js windows 8 update
=> nvm is already installed in /home/seefer/.nvm, trying to update using git I constantly get this when running that nvm curl script :( Installing Node.jsįirst We'll start by updating linux, for those of you that are not familiar with linux this require running the process as root by add the sudo command before the command we need to execute: Immediately terminates all running distributions and the WSL 2 lightweight utility virtual machine.ĭisplay usage information.
#Install node js windows 8 install
Show detailed information about all distributions.Ĭhanges the default install version for new distributions.Ĭhanges the version of the specified distribution. List only distributions that are currently running. List all distributions, including distributions that are currently Specifies the version to use for the new distribution. The filename can be - for standard input. Imports the specified tar file as a new distribution. The filename can be - for standard output. If no command line is provided, wsl.exe launches the default shell.Įxecute the specified command without using the default Linux shell.Īrguments for managing Windows Subsystem for Linux: The feature is not enabled by default and you need to activate it, you can do it via powershell (with admin rights):Ĭopyright (c) Microsoft Corporation.
Full system call compatibility - the long awaited docker support!Įnabling WSL - mandatory for installing WSL2.
Increased file IO performance - file operation like ``git clone, npm install`, etc' could be up to 20x faster compared to `WSL` 1.
There major changes between version 1 to 2, there is a nice comparison table on microsoft site, but if you the gist of it, those two would have the most impact for the day to day user: NOTE: WSL version 1 is not replace/deprecated, and there are some exceptions where you would want to use it over version 2.
#Install node js windows 8 upgrade
I'm not sure about existing WSL machines surviving the upgrade process, but as always backup and 🤞. Windows updated windows subsystem for linux to version 2, as the F.A.Q stated you can still use WSL version 1 side by side with version 2. UPDATE (Fall 2020): This gist is an updated version to the Windows 10 Fall Creators Update - Installing Node.js on Windows Subsystem for Linux (WSL) guide, I usually just keep here notes, configuration or short guides for personal use, it was nice to know it also helps other ppl, I hope this one too. Windows 10 version 2004 - Installing Node.js on Windows Subsystem for Linux (WSL/WSL2)
0 notes
Text
Upgrade node js windows

Upgrade node js windows how to#
Upgrade node js windows install#
Upgrade node js windows update#
Upgrade node js windows upgrade#
Upgrade node js windows full#
Upgrade node js windows how to#
How to create footer to stay at the bottom of a Web page?.
CSS to put icon inside an input element in a form.
How to insert spaces/tabs in text using HTML/CSS?.
Top 10 Projects For Beginners To Practice HTML and CSS Skills.
How to get random value out of an array in PHP?.
Convert comma separated string to array using JavaScript.
Create a comma separated list from an array in JavaScript.
How to create comma separated list from an array in PHP ?.
Split a comma delimited string into an array in PHP.
Upgrade node js windows update#
How to update Node.js and NPM to next version ?.
How do you run JavaScript script through the Terminal?.
Run Python Script using PythonShell from Node.js.
Run Python script from Node.js using child process spawn() method.
ISRO CS Syllabus for Scientist/Engineer Exam.
ISRO CS Original Papers and Official Keys.
GATE CS Original Papers and Official Keys.
$>./configure -prefix=/home/devel/.nvm/versions/node/v12.16.
Upgrade node js windows install#
Anybody did have too? And anybody know how to solve it? Thanks nvm install -ltsĭownloading and installing node v12.16.3. nvm directory exists on my system, typing nvm always results in command not found. The upshot is even though ~/.bashrc contains the lines to run nvm.sh and the. "$NVM_DIR/bash_completion" # This loads nvm bash_completion => Close and reopen your terminal to start using nvm or run the following to use it now: => Appending bash_completion source string to /home/seefer/.zshrcĮrror: EINVAL: invalid argument, uv_pipe_openĪt createWritableStdioStream (internal/process/stdio.js:191:18)Īt process.getStdout (internal/process/stdio.js:20:14)Īt pile (internal/bootstrap/loaders.js:364:7)Īt (internal/bootstrap/loaders.js:176:18)Īt setupGlobalConsole (internal/bootstrap/node.js:407:41)Īt startup (internal/bootstrap/node.js:142:7)Īt bootstrapNodeJSCore (internal/bootstrap/node.js:622:3) => Appending nvm source string to /home/seefer/.zshrc => => Compressing and cleaning up git repository => nvm is already installed in /home/seefer/.nvm, trying to update using git I constantly get this when running that nvm curl script :( Installing Node.jsįirst We'll start by updating linux, for those of you that are not familiar with linux this require running the process as root by add the sudo command before the command we need to execute: Immediately terminates all running distributions and the WSL 2 lightweight utility virtual machine.ĭisplay usage information. Show detailed information about all distributions.Ĭhanges the default install version for new distributions.Ĭhanges the version of the specified distribution. List only distributions that are currently running. List all distributions, including distributions that are currently Specifies the version to use for the new distribution. The filename can be - for standard input. Imports the specified tar file as a new distribution. The filename can be - for standard output. If no command line is provided, wsl.exe launches the default shell.Įxecute the specified command without using the default Linux shell.Īrguments for managing Windows Subsystem for Linux: The feature is not enabled by default and you need to activate it, you can do it via powershell (with admin rights):Ĭopyright (c) Microsoft Corporation.
Upgrade node js windows full#
Full system call compatibility - the long awaited docker support!Įnabling WSL - mandatory for installing WSL2.Increased file IO performance - file operation like ``git clone, npm install`, etc' could be up to 20x faster compared to `WSL` 1.There major changes between version 1 to 2, there is a nice comparison table on microsoft site, but if you the gist of it, those two would have the most impact for the day to day user: NOTE: WSL version 1 is not replace/deprecated, and there are some exceptions where you would want to use it over version 2.
Upgrade node js windows upgrade#
I'm not sure about existing WSL machines surviving the upgrade process, but as always backup and 🤞. Windows updated windows subsystem for linux to version 2, as the F.A.Q stated you can still use WSL version 1 side by side with version 2. UPDATE (Fall 2020): This gist is an updated version to the Windows 10 Fall Creators Update - Installing Node.js on Windows Subsystem for Linux (WSL) guide, I usually just keep here notes, configuration or short guides for personal use, it was nice to know it also helps other ppl, I hope this one too. Windows 10 version 2004 - Installing Node.js on Windows Subsystem for Linux (WSL/WSL2)
0 notes
Text
Windows 7 keyboard shortcuts settings 無料ダウンロード.Microsoft.com 世界中
Windows 7 keyboard shortcuts settings 無料ダウンロード.PowerToys のインストール

Quickly load and save different regions.Make the keyboard easier to use in Windows 7
Windows logo key + G Open Game bar when a game is open Windows logo key + I Open Settings Windows logo key + J Set focus to a Windows tip when one is available. When a Windows tip appears, bring focus to the Tip. Pressing the keyboard shortcuts again to bring focus to the element on the screen to which the Windows tip is anchored Shotcut is a free, open source, cross-platform video editor for Windows, Mac and Linux. Major features include support for a wide range of formats; no import required meaning native timeline editing; Blackmagic Design support for input and preview monitoring; and resolution support to 4k You can adjust these settings on the Make the keyboard easier to use page in the Ease of Access Center. Click the Start button, click Control Panel, click Ease of Access, click Ease of Access Center, and then click Make the keyboard easier to use. Select the options that you want to use: Turn on Mouse Keys. This option sets Mouse Keys to run
Windows 7 keyboard shortcuts settings 無料ダウンロード.Keyboard shortcuts in Windows
Windows logo key + G Open Game bar when a game is open Windows logo key + I Open Settings Windows logo key + J Set focus to a Windows tip when one is available. When a Windows tip appears, bring focus to the Tip. Pressing the keyboard shortcuts again to bring focus to the element on the screen to which the Windows tip is anchored Deutsch (Österreich) Deutsch (Schweiz) eesti (Eesti) English (Australia) English (Canada) English (Hong Kong SAR) English (India) English (Ireland) English (Malaysia) コード サンプル. Office. Microsoft Graph. MSDN. Azure. Windows. Visual Studio Code. PowerShell スクリプト
We pledge that our downloads are always free of malware, spyware, and adware. Furthermore, we refuse to bundle any software unrelated to Shotcut such as browser toolbars or download managers. However, we can only provide that guarantee if you come to this website to download. We think your OS is Well, we don't actually know. Either JavaScript is disabled, or I am not working quite right. So, I am showing you all the options.
ARM64 IS FOR THE NEW APPLE SILICON M1 CHIPS. An unsigned app bundle is available on GitHub so that you can modify the build per the Free Software license agreement. Linux portable tar users : No install required, simply extract the archive and run it. You can drag the Shotcut folder to copy and move it wherever you want.
If double-clicking the icon in your file manager does not launch Shotcut, open Shotcut. app, and try double-clicking the shotcut shell script. You may need to install JACK from your distribution. Here is a page that lists some required packages for specific distributions.
Snap Users : On snap-enabled systems , install from the store with snap install shotcut --classic Since this snap is using classic confinement based on the portable zip above, not all dependencies are bundled, and it has the same run-time requirements as the portable tar. File checksums for downloads are available in md5sum or shasum format. Older versions are available for download.
Shotcut is a free, open source, cross-platform video editor for Windows, Mac and Linux. Major features include support for a wide range of formats; no import required meaning native timeline editing; Blackmagic Design support for input and preview monitoring; and resolution support to 4k. Toggle navigation. NEWS DOWNLOAD FEATURES TUTORIALS RESOURCES FORUM MORE FAQ CREDITS HOW TOs REVIEWS ROAD MAP SITE MAP. Current Version: To avoid ads and get automatic updates:.
Social Links. Windows installer. Windows portable zip. Intel macOS. ARM64 macOS. Linux portable tar. Linux AppImage.
0 notes
Text
Windows 10 control panel shortcut start menu 無料ダウンロード.7 Ways to Open Control Panel in Windows 10
Windows 10 control panel shortcut start menu 無料ダウンロード.How To Add Control Panel To Start Menu In Windows 10

Why does Windows 10 have control panel and settings?.7 Ways to Open Control Panel in Windows 10
Mar 17, · 1. Select the Start menu button or hit the Windows Key and type: Control Panel. You’ll see the Control Panel app listed here. 2. Right-click The most prominent, probably, is the removal of the Control Panel link of the Windows-X menu. The Windows-X shortcut opens a menu in the area where the start menu is opened usually that links to various important tools or pages. The Control Panel was listed there before, but Microsoft removed the link in the Windows 10 Creators Update Remove the Shortcut Arrow Start Menu, Boot, Windows Shutdown ~ My Computer and Control Panel Items 「コンピュータ」「コントロール パネル」「デスクトップ」内に、任意のファイルやフォルダを追加することができます。
Windows 10 control panel shortcut start menu 無料ダウンロード.Naneedigital | How To Add Control Panel To Start Menu In Windows 10
Mar 28, · Links that would open the System page in Control Panel will now direct you to About in Settings. 1 Right click or press and hold on your desktop, click/tap on New, and click/tap on Shortcut. 2 Copy the command you want from the table below as the "location", and click/tap on Next. 3 Type a name you want for this shortcut, and click/tap on Estimated Reading Time: 1 min Mar 17, · 1. Select the Start menu button or hit the Windows Key and type: Control Panel. You’ll see the Control Panel app listed here. 2. Right-click Click or tap on the Start button or press the Windows key on your keyboard, and, in the Start Menu, scroll down to the Windows System folder. There you're going to find a Control Panel shortcut: click or tap on it, and the Control Panel is launched
Where is the Control Panel in Windows 10? And how to find Control Panel in Windows 10? How many methods have you mastered to open Control Panel in Windows 10 computer? In this text, seven methods are illustrated one by one for your reference. Tips: If you often use Control Panel, I recommend you Create Control Panel Shortcut on Windows 10 Desktop. Click the bottom-left Start button to open the Start Menu, type control panel in the search box and select Control Panel in the results.
Click the File Explorer icon on the taskbar, select Desktop and double-tap Control Panel. Step 1 : Tap the Start button to open the Start Menu, input cmd in the search box and click Command Prompt to open it.
Step 2 : Type control panel in the Command Prompt window and press Enter. Step 1 : Click the Start button and select Windows PowerShell to enter it. Step 2 : Input control panel in the Windows PowerShell window and hit Enter. iSunshare is dedicated to providing the best service for Windows, Mac, Android users who are in demand for password recovery and data recovery. For Windows. iPhone Passcode Genius iPhone Passcode Unlocker iOS Repair Genius iOS System Recovery iBypass Genius Bypass iCloud Activation Lock iSyncGenius Backup and Restore iPhone Data.
CloneGo Windows Cloning Software System Genius Windows System Cleanup File Deletion Genius File Deletion Software. Data Recovery. Resources Windows 10 7 Ways to Open Control Panel in Windows ABOUT US About Us Privacy. CONTACT Contact Us Support. MORE Resources Blog Sitemap. FOLLOW US.
0 notes
Text
How to turn on Memory Integrity and Core Isolation in Windows 10
According to the Microsoft Support website:
"Core isolation is a security feature of Microsoft Windows that protects important core processes of Windows from malicious software by isolating them in memory. It does this by running those core processes in a virtualized environment.
Memory integrity is one feature of core isolation which regularly verifies the integrity of the code running those core processes in an attempt to prevent any attacks from altering them.
We recommend that you leave this setting on, if your system supports it."
Cool. Turns out this was added way back in 2017 in Windows 10 build 17093. I ran the Windows Security app on my system and noticed a few things. First, at the bottom it says "Your device meets the requirements for standard hardware security" but this can read "...for enhanced hardware security."
In order to be considered enhanced, your system needs to support:
Memory Integrity
Core Isolation
TPM 2.0
Secure boot
DEP - Data Execution Prevention
UEFI MAT - Unified Extensible Firmware Interface Memory Memory Attributes Table
Some of these technologies are quite old and have been in Windows for a while. It's the collection of all them together, working as a team, that enhances your systems security. Virtualization-based Security (VBS) isolates a secure region of memory from the rest of the OS.
I started digging to understand what was interesting or unique about my system that was preventing me from turning these new features on. Additionally I wanted to make sure I was ready for Windows 11 whenever it arrives and adds more security features and requirements.
Go to the Windows Security app and click Device Security.
I clicked on Core Isolation to turn on VBS and noticed that the on/off switch was grayed out and I could scan for driver incompatibilities. I want to ensure that drivers I have loaded into the kernel are secure. Windows 10 has a feature called Device Guard and drivers need to be written in certain ways to ensure they have a clear separation between data and code, and can't load data files as executable, or use dynamic code in the kernel. Again, NONE of this is new and goes back as far as 2015 or earlier.
What do I have installed? Well, friends, a ton of crap, it turns out! LOL. All off these drivers are either super old or are using insecure coding techniques that are preventing my system from turning on the Core Isolation Memory Integrity feature.
I can start searching for each of these and I see a few interesting culprits. Remember, these are all either old or poorly written drivers that are loaded into the kernel on my desktop machine, chillin'.
That Western Digital one? Notice that it evens says "_prewin8.sys" so I hope someone from WDC reads this blog and feels just a little bit bad about it. This is from an external USB hard drive. I certainly don't need whatever extra feature that driver lights up. My USB Hard drive is just fine without it.
The STT*.sys and S3x*.sys drivers are all from various Arduino COM Port utilities and DFU-util firmware flashers. Remember those unsigned warnings you thought nothing of years ago? Well, those drivers are still with you...I mean, me.
It's easy to look for "Windows Driver Package" and line up some of these drivers with actual installers and remove from Add/Remove Programs.
However, since I do a lot of IoT stuff and install random INFs manually...many of these drivers won't show up in ARP (Add/Remove Programs).
I could use Autoruns.exe and click the Drivers tab, but not every one shows up there, and even if you uncheck a driver here it won't be removed from the Windows Security Scan. It needs to be uninstalled and deleted.
For visible drivers, I can open Device Manager and look at the Driver details for each one.
If the .sys file matches, I can right click uninstall and check the delete checkbox to remove the driver entirely.
This NDI Webcam Input (NDI Virtual Input) driver knowledge base literally tells you to turn off Secure Boot and turn off Memory Integrity to install their unsigned driver. No thanks.
From an admin command line you can get a list of drivers. This one gets a list in PowerShell and puts it in your clipboard.
get-windowsdriver -online | clip.exe
While this one works anywhere and gets a simple list:
wmic sysdriver get name
TL;DR - Find the oem.inf from the Incompatible Drivers list and remove it at the Command Line.
But when you have the list from the Incompatible Drivers scan as seen in the screenshot above, just click each driver and you'll see the "oemXX.inf" file that describes the driver. Note your numbers will vary.
pnputil /delete-driver <example.inf> /uninstall
Then you can use pnputil that comes with Windows to delete the driver package from your system's driver store. Here is me doing that:
Do be conscious of each driver and what it does and consider what functionality - if any - you'll be losing if you remove them. If this blog post or specifically, you following the directions of this blog post, renders your machine unusable or unbootable, I'm sorry but you gotta do your research and back up your system. You should be able to turn it off and reinstall, but still, be careful.
Now I'm all set:
And my system says "meets the requirements for enhanced hardware security." Sweet.
Hope this helps you and sets you up for future success. I did a LOT of searching to figure this out and spent many hours to break this down for y'all.
Sponsor: This week's sponsor is...me! This blog and my podcast has been a labor of love for over 18 years. Your sponsorship pays my hosting bills for both AND allows me to buy gadgets to review AND the occasional taco. Join me!
© 2021 Scott Hanselman. All rights reserved.


How to turn on Memory Integrity and Core Isolation in Windows 10 published first on https://deskbysnafu.tumblr.com/
0 notes
Text
How to turn on Memory Integrity and Core Isolation in Windows 10
According to the Microsoft Support website:
"Core isolation is a security feature of Microsoft Windows that protects important core processes of Windows from malicious software by isolating them in memory. It does this by running those core processes in a virtualized environment.
Memory integrity is one feature of core isolation which regularly verifies the integrity of the code running those core processes in an attempt to prevent any attacks from altering them.
We recommend that you leave this setting on, if your system supports it."
Cool. Turns out this was added way back in 2017 in Windows 10 build 17093. I ran the Windows Security app on my system and noticed a few things. First, at the bottom it says "Your device meets the requirements for standard hardware security" but this can read "...for enhanced hardware security."
In order to be considered enhanced, your system needs to support:
Memory Integrity
Core Isolation
TPM 2.0
Secure boot
DEP - Data Execution Prevention
UEFI MAT - Unified Extensible Firmware Interface Memory Memory Attributes Table
Some of these technologies are quite old and have been in Windows for a while. It's the collection of all them together, working as a team, that enhances your systems security. Virtualization-based Security (VBS) isolates a secure region of memory from the rest of the OS.
I started digging to understand what was interesting or unique about my system that was preventing me from turning these new features on. Additionally I wanted to make sure I was ready for Windows 11 whenever it arrives and adds more security features and requirements.
Go to the Windows Security app and click Device Security.
I clicked on Core Isolation to turn on VBS and noticed that the on/off switch was grayed out and I could scan for driver incompatibilities. I want to ensure that drivers I have loaded into the kernel are secure. Windows 10 has a feature called Device Guard and drivers need to be written in certain ways to ensure they have a clear separation between data and code, and can't load data files as executable, or use dynamic code in the kernel. Again, NONE of this is new and goes back as far as 2015 or earlier.
What do I have installed? Well, friends, a ton of crap, it turns out! LOL. All off these drivers are either super old or are using insecure coding techniques that are preventing my system from turning on the Core Isolation Memory Integrity feature.
I can start searching for each of these and I see a few interesting culprits. Remember, these are all either old or poorly written drivers that are loaded into the kernel on my desktop machine, chillin'.
That Western Digital one? Notice that it evens says "_prewin8.sys" so I hope someone from WDC reads this blog and feels just a little bit bad about it. This is from an external USB hard drive. I certainly don't need whatever extra feature that driver lights up. My USB Hard drive is just fine without it.
The STT*.sys and S3x*.sys drivers are all from various Arduino COM Port utilities and DFU-util firmware flashers. Remember those unsigned warnings you thought nothing of years ago? Well, those drivers are still with you...I mean, me.
It's easy to look for "Windows Driver Package" and line up some of these drivers with actual installers and remove from Add/Remove Programs.
However, since I do a lot of IoT stuff and install random INFs manually...many of these drivers won't show up in ARP (Add/Remove Programs).
I could use Autoruns.exe and click the Drivers tab, but not every one shows up there, and even if you uncheck a driver here it won't be removed from the Windows Security Scan. It needs to be uninstalled and deleted.
For visible drivers, I can open Device Manager and look at the Driver details for each one.
If the .sys file matches, I can right click uninstall and check the delete checkbox to remove the driver entirely.
This NDI Webcam Input (NDI Virtual Input) driver knowledge base literally tells you to turn off Secure Boot and turn off Memory Integrity to install their unsigned driver. No thanks.
From an admin command line you can get a list of drivers. This one gets a list in PowerShell and puts it in your clipboard.
get-windowsdriver -online | clip.exe
While this one works anywhere and gets a simple list:
wmic sysdriver get name
TL;DR - Find the oem.inf from the Incompatible Drivers list and remove it at the Command Line.
But when you have the list from the Incompatible Drivers scan as seen in the screenshot above, just click each driver and you'll see the "oemXX.inf" file that describes the driver. Note your numbers will vary.
pnputil /delete-driver <example.inf> /uninstall
Then you can use pnputil that comes with Windows to delete the driver package from your system's driver store. Here is me doing that:
Do be conscious of each driver and what it does and consider what functionality - if any - you'll be losing if you remove them. If this blog post or specifically, you following the directions of this blog post, renders your machine unusable or unbootable, I'm sorry but you gotta do your research and back up your system. You should be able to turn it off and reinstall, but still, be careful.
Now I'm all set:
And my system says "meets the requirements for enhanced hardware security." Sweet.
Hope this helps you and sets you up for future success. I did a LOT of searching to figure this out and spent many hours to break this down for y'all.
Sponsor: This week's sponsor is...me! This blog and my podcast has been a labor of love for over 18 years. Your sponsorship pays my hosting bills for both AND allows me to buy gadgets to review AND the occasional taco. Join me!
© 2021 Scott Hanselman. All rights reserved.


How to turn on Memory Integrity and Core Isolation in Windows 10 published first on http://7elementswd.tumblr.com/
0 notes
Text
MySQL Connect Dialog
About a month ago, I published how you can connect to MySQL with a small form. One suggestion, or lets promote it to a request, from that post was: “Nice, but how do you create a reusable library for the MySQL Connection Dialog box?” That was a good question but I couldn’t get back until now to write a new blog post. This reusable MySQL connection dialog lets you remove MySQL connection data from the command-line history. This post also shows you how to create and test a Powershell Module. The first step to create a module requires that you set the proper %PSModulePath% environment variable. If you fail to do that, you can put it into a default PowerShell module location but that’s not too effective for testing. You launch the System Properties dialog and click the Environment Variables button: Then, you edit the PSModulePath environment variable in the bottom list of environment variables and add a new path to the PSModulePath. My development path in this example is: C:Datacit225mysqlpsmod I named the file the same as the function Get-Credentials.psm1 consistent with the Microsoft instructions for creating a PowerShell module and their instructions for Pascal case name with an approved verb and singular noun. Below is the code for the Get-Credentials.psm1 file: function Get-Credentials { # Add libraries for form components. Add-Type -AssemblyName System.Windows.Forms Add-Type -AssemblyName System.Drawing # Define a user credential form. $form = New-Object System.Windows.Forms.Form $form.Text = 'User Credential Form' $form.Size = New-Object System.Drawing.Size(300,240) $form.StartPosition = 'CenterScreen' # Define a button and assign it and its controls to a form. $loginButton = New-Object System.Windows.Forms.Button $loginButton.Location = New-Object System.Drawing.Point(60,160) $loginButton.Size = New-Object System.Drawing.Size(75,23) $loginButton.Text = 'Login' $loginButton.DialogResult = [System.Windows.Forms.DialogResult]::OK $form.AcceptButton = $loginButton $form.Controls.Add($loginButton) # Define a button and assign it and its controls to a form. $cancelButton = New-Object System.Windows.Forms.Button $cancelButton.Location = New-Object System.Drawing.Point(155,160) $cancelButton.Size = New-Object System.Drawing.Size(75,23) $cancelButton.Text = 'Cancel' $cancelButton.DialogResult = [System.Windows.Forms.DialogResult]::Cancel $form.CancelButton = $cancelButton $form.Controls.Add($cancelButton) # Define a label and assign it and its controls to a form. $userLabel = New-Object System.Windows.Forms.Label $userLabel.Location = New-Object System.Drawing.Point(30,15) $userLabel.Size = New-Object System.Drawing.Size(100,20) $userLabel.Text = 'Enter User Name:' $form.Controls.Add($userLabel) # Define a TextBox and assign it and its controls to a form. $userTextBox = New-Object System.Windows.Forms.TextBox $userTextBox.Location = New-Object System.Drawing.Point(140,15) $userTextBox.Size = New-Object System.Drawing.Size(100,20) $form.Controls.Add($userTextBox) # Define a label and assign it and its controls to a form. $pwdLabel = New-Object System.Windows.Forms.Label $pwdLabel.Location = New-Object System.Drawing.Point(30,40) $pwdLabel.Size = New-Object System.Drawing.Size(100,20) $pwdLabel.Text = 'Enter Password:' $form.Controls.Add($pwdLabel) # Define a TextBox and assign it and its controls to a form. $pwdTextBox = New-Object System.Windows.Forms.TextBox $pwdTextBox.Location = New-Object System.Drawing.Point(140,40) $pwdTextBox.Size = New-Object System.Drawing.Size(100,20) $pwdTextBox.PasswordChar = "*" $form.Controls.Add($pwdTextBox) # Define a label and assign it and its controls to a form. $hostLabel = New-Object System.Windows.Forms.Label $hostLabel.Location = New-Object System.Drawing.Point(30,65) $hostLabel.Size = New-Object System.Drawing.Size(100,20) $hostLabel.Text = 'Enter Hostname:' $form.Controls.Add($hostLabel) # Define a TextBox and assign it and its controls to a form. $hostTextBox = New-Object System.Windows.Forms.TextBox $hostTextBox.Location = New-Object System.Drawing.Point(140,65) $hostTextBox.Size = New-Object System.Drawing.Size(100,20) $form.Controls.Add($hostTextBox) # Define a label and assign it and its controls to a form. $portLabel = New-Object System.Windows.Forms.Label $portLabel.Location = New-Object System.Drawing.Point(30,90) $portLabel.Size = New-Object System.Drawing.Size(100,20) $portLabel.Text = 'Enter Port #:' $form.Controls.Add($portLabel) # Define a TextBox and assign it and its controls to a form. $portTextBox = New-Object System.Windows.Forms.TextBox $portTextBox.Location = New-Object System.Drawing.Point(140,90) $portTextBox.Size = New-Object System.Drawing.Size(100,20) $form.Controls.Add($portTextBox) # Define a label and assign it and its controls to a form. $dbLabel = New-Object System.Windows.Forms.Label $dbLabel.Location = New-Object System.Drawing.Point(30,115) $dbLabel.Size = New-Object System.Drawing.Size(100,20) $dbLabel.Text = 'Enter DB Name:' $form.Controls.Add($dbLabel) # Define a TextBox and assign it and its controls to a form. $dbTextBox = New-Object System.Windows.Forms.TextBox $dbTextBox.Location = New-Object System.Drawing.Point(140,115) $dbTextBox.Size = New-Object System.Drawing.Size(100,20) $form.Controls.Add($dbTextBox) $form.Topmost = $true $form.Add_Shown({$userTextBox.Select()}) $result = $form.ShowDialog() if ($result -eq [System.Windows.Forms.DialogResult]::OK) { # Assign inputs to connection variables. $uid = $userTextBox.Text $pwd = $pwdTextBox.Text $server = $hostTextBox.Text $port= $portTextBox.Text $dbName = $dbTextBox.Text # Declare connection string. $credentials = 'server=' + $server + ';port=' + $port + ';uid=' + $uid + ';pwd=' + $pwd + ';database=' + $dbName } else { $credentials = $null } return $credentials } You must create a Get-Connection directory in your C:Datacit225mysqlpsmod directory that you added to the PSModulePath. Then, you must put your module code in the Get-Connection subdirectory as the Get-Connection.psm1 module file. The test.ps1 script imports the Get-Credentials.psm1 PowerShell module, launches the MySQL Connection Dialog form and returns the connection string. The test.ps1 code is: # Import your custom module. Import-Module Get-Credentials # Test the Get-Credentials function. if (($credentials = Get-Credentials) -ne $undefinedVariable) { Write-Host($credentials) } You can test it from the local any directory with the following command-line: powershell .test.ps1 It should print something like this to the console: server=localhost;port=3306;uid=student;pwd=student;database=studentdb If you got this far, that’s great! You’re ready to test a connection to the MySQL database. Before you do that, you should create the same avenger table I used in the initial post and insert the same or some additional data. Connect to the any of your test databases and rung the following code to create the avenger table and nine rows of data. -- Create the avenger table. CREATE TABLE db_connect ( db_connect_id INT UNSIGNED PRIMARY KEY AUTO_INCREMENT , version VARCHAR(10) , user VARCHAR(24) , db_name VARCHAR(10)); -- Seed the avenger table with data. INSERT INTO avenger ( first_name, last_name, avenger ) VALUES ('Anthony', 'Stark', 'Iron Man') ,('Thor', 'Odinson', 'God of Thunder') ,('Steven', 'Rogers', 'Captain America') ,('Bruce', 'Banner', 'Hulk') ,('Clinton', 'Barton', 'Hawkeye') ,('Natasha', 'Romanoff', 'Black Widow') ,('Peter', 'Parker', 'Spiderman') ,('Steven', 'Strange', 'Dr. Strange') ,('Scott', 'Lange', 'Ant-man'); Now, let’s promote our use-case test.ps1 script to a testQuery.ps1 script, like: # Import your custom module. Import-Module Get-Credentials # Test the Get-Credentials function. if (($credentials = Get-Credentials) -ne $undefinedVariable) { # Connect to the libaray MySQL.Data.dll Add-Type -Path 'C:Program Files (x86)MySQLConnector NET 8.0Assembliesv4.5.2MySql.Data.dll' # Create a MySQL Database connection variable that qualifies: # [Driver]@ConnectionString # ============================================================ # You can assign the connection string before using it or # while using it, which is what we do below by assigning # literal values for the following names: # - server= or 127.0.0.1 for localhost # - uid= # - pwd= # - port= or 3306 for default port # - database= # ============================================================ $Connection = [MySql.Data.MySqlClient.MySqlConnection]@{ConnectionString=$credentials} $Connection.Open() # Define a MySQL Command Object for a non-query. $sqlCommand = New-Object MySql.Data.MySqlClient.MySqlCommand $sqlDataAdapter = New-Object MySql.Data.MySqlClient.MySqlDataAdapter $sqlDataSet = New-Object System.Data.DataSet # Assign the connection and command text to the MySQL command object. $sqlCommand.Connection = $Connection $sqlCommand.CommandText = 'SELECT CONCAT(first_name," ",last_name) AS full_name ' + ', avenger ' + 'FROM avenger' # Assign the connection and command text to the query method of # the data adapter object. $sqlDataAdapter.SelectCommand=$sqlCommand # Assign the tuples of data to a data set and return the number of rows fetched. $rowsFetched=$sqlDataAdapter.Fill($sqlDataSet, "data") # Print to console the data returned from the query. foreach($row in $sqlDataSet.tables[0]) { write-host "Avenger:" $row.avenger "is" $row.full_name } # Close the MySQL connection. $Connection.Close() } It should give you the MySQL Connection Dialog and with the correct credentials print the following to your console: Avenger: Iron Man is Anthony Stark Avenger: God of Thunder is Thor Odinson Avenger: Captain America is Steven Rogers Avenger: Hulk is Bruce Banner Avenger: Hawkeye is Clinton Barton Avenger: Black Widow is Natasha Romanoff Avenger: Spiderman is Peter Parker Avenger: Dr. Strange is Steven Strange Avenger: Ant-man is Scott Lange As always, I hope this helps those looking to exploit technology. https://blog.mclaughlinsoftware.com/2021/05/21/mysql-connect-dialog/
0 notes