#proper knife care is essential for its longevity
Text
Damascus Chef Knife: Enhance Your Culinary Experience
In the realm of culinary arts, having the right tools can make all the difference. Among the essential tools in any chef's arsenal is the chef knife. Among the myriad of options available, the Damascus chef knife stands out for its exceptional craftsmanship, unparalleled performance, and timeless elegance.
What is a Damascus Chef Knife?
A Damascus chef knife derives its name from the distinctive Damascus steel used in its construction. This type of steel is renowned for its exceptional strength, durability, and unique aesthetic appeal. Originating from ancient sword-making techniques, Damascus steel is characterized by its distinctive swirling patterns, created through a process of forging and folding multiple layers of steel.
Benefits of Using a Damascus Chef Knife
Superior Durability and Strength
One of the key advantages of a Damascus chef knife is its superior durability and strength. Crafted from high-quality steel, Damascus knives are known for their resilience and ability to withstand the rigors of daily use in the kitchen.
Exceptional Sharpness and Edge Retention
Another notable benefit of a Damascus chef knife is its exceptional sharpness and edge retention. The intricate layering of steel results in a blade that holds its edge exceptionally well, ensuring precise and effortless cutting with each use.
Unique and Aesthetic Design
In addition to its exceptional performance, the Damascus chef knife is prized for its unique and aesthetic design. The distinctive patterns and textures of Damascus steel lend each knife a sense of individuality and craftsmanship, making it a coveted addition to any kitchen.
Choosing the Right Damascus Chef Knife
When selecting a Damascus chef knife, several factors should be taken into consideration. These include the type of steel used in the blade, the material and ergonomics of the handle, as well as the size and weight of the knife.
Maintenance and Care
To ensure the longevity of your Damascus chef knife, proper maintenance and care are essential. It is recommended to hand wash the knife with mild soap and water, promptly dry it with a soft cloth, and store it in a protective sheath or knife block when not in use.
Versatility in the Kitchen
The versatility of a Damascus chef knife makes it an indispensable tool for a wide range of culinary tasks. From slicing and dicing to chopping and mincing, a Damascus chef knife excels in all areas, allowing for effortless food preparation and professional-quality results.
Custom Handmade Chef Knives
For those seeking a truly bespoke culinary experience, custom handmade chef knives offer a personalized touch that is second to none. Crafted to the exact specifications of the individual, these artisanal creations combine superior craftsmanship with unparalleled quality, resulting in a knife that is as unique as the chef who wields it.
Investing in Quality Kitchen Tools
In the world of culinary arts, quality kitchen tools are an investment in both practicality and performance. By investing in a Damascus chef knife, you are not only acquiring a superior cutting instrument but also enhancing your overall culinary experience.
Conclusion
In conclusion, a Damascus chef knife is more than just a tool—it is a testament to craftsmanship, performance, and timeless elegance. With its superior durability, exceptional sharpness, and unique design, a Damascus chef knife is the ultimate companion for any culinary enthusiast or professional chef.
FAQs
What makes Damascus chef knives stand out from other types of knives?
Damascus chef knives are distinguished by their exceptional strength, durability, and unique aesthetic appeal, thanks to the intricate layering of Damascus steel.
Are Damascus chef knives suitable for professional chefs?
Yes, Damascus chef knives are highly prized by professional chefs for their superior performance and versatility in the kitchen.
How often should I sharpen my Damascus chef knife?
The frequency of sharpening depends on usage, but generally, it is recommended to sharpen your Damascus chef knife every few months to maintain its edge.
Can I use a Damascus chef knife to cut through bones?
While Damascus chef knives are exceptionally sharp, they are not designed for cutting through bones. It is advisable to use a specialized boning knife for such tasks.
Are custom handmade chef knives worth the investment?
Yes, custom handmade chef knives offer unparalleled quality and craftsmanship, making them a worthy investment for serious culinary enthusiasts.
2 notes
·
View notes
Text
Moreover, personalized cutting boards can enhance the aesthetics of any kitchen
Available in various materials such as bamboo, hardwood, or even glass, these boards can complement the overall design of a home. A beautifully crafted cutting board can serve as a decorative piece when not in use, adding a touch of elegance and warmth to kitchen counters.
Practical Uses Beyond Food Preparation
While the primary function of cutting boards is food preparation, personalized boards can also serve other purposes. They can be used as serving platters for cheese, charcuterie, or hors d'oeuvres, making them perfect for entertaining guests. Their unique designs often become conversation starters during gatherings, inviting guests to admire the craftsmanship and story behind the piece.
Additionally, personalized cutting boards can be used as decorative items. Many people choose to display their boards on kitchen walls or counters, allowing the unique designs to add character to the space. Some boards are even designed to be hung, featuring hooks or decorative elements that enhance their visual appeal.
The Perfect Gift for Every Occasion
Finding the right gift can be a daunting task, especially when you want to convey thoughtfulness and originality. Personalized cutting boards stand out as an excellent choice for various occasions. Weddings, anniversaries, housewarmings, or even birthdays are perfect moments to gift these unique items. A custom board can symbolize the joy of cooking together, making it a meaningful present for couples starting their culinary journey.
For those who enjoy cooking or hosting, a personalized cutting board can serve as a daily reminder of love and connection. Engraving a special message, a significant date, or even a family recipe can add a sentimental touch that transforms a functional item into a treasured keepsake.
Choosing the Right Material
When it comes to personalized cutting boards, material choice plays a crucial role. Each type of material has its pros and cons, influencing both functionality and aesthetics. Wooden boards are popular for their durability and personalized housewarming gifts natural beauty. They are gentle on knife edges and can be refinished over time. Bamboo is a sustainable alternative that is both lightweight and durable, making it an excellent choice for eco-conscious consumers.
Plastic cutting boards, while less traditional, offer easy maintenance and a variety of colors and designs. However, they may not provide the same warmth as wooden options. Glass boards, though sleek and modern, can be harsh on knives and are primarily used for serving rather than heavy food preparation.
Caring for Your Personalized Cutting Board
To ensure the longevity of a personalized cutting board, proper care is essential. Wooden boards should be hand-washed with mild soap and water, avoiding soaking to prevent warping. Regularly applying food-safe mineral oil can help maintain the wood’s natural finish and prevent cracking. Plastic boards can usually be placed in the dishwasher, but hand washing is recommended to preserve their color and design.
0 notes
Text
Caring for Your Knives: How to Maintain and Sharpen Your Knife Set
A well-maintained knife set is the cornerstone of any kitchen, whether you're a professional chef or a home cook. High-quality kitchen knives are essential tools that can significantly enhance your cooking experience, but they require proper care to remain sharp and effective. In this blog, we'll guide you through the best practices for maintaining and sharpening your knives, ensuring they stay in top condition for years to come. We'll also highlight some top-rated knife sets from Chua Koo, perfect for chefs and home cooks alike.

1. Why Proper Knife Care Is Essential
Investing in quality kitchen knives, such as the Luxury Ultra Sharp Kitchen Knife Sets, is a smart choice for anyone serious about cooking. However, even the best knives will dull over time if not properly cared for. Dull knives not only make your cooking tasks more difficult but can also be dangerous as they require more force to cut through food, increasing the risk of slipping and injury.
2. Everyday Knife Maintenance Tips
Regular Cleaning: After each use, wash your knives with warm, soapy water and dry them immediately with a soft cloth. Avoid putting them in the dishwasher, as the high heat and abrasive detergents can damage the blades.
Proper Storage: Store your knives in a knife block, magnetic strip, or knife roll to protect the blades from damage. Keeping them loose in a drawer can cause them to bump against other utensils, leading to nicks and dulling.
Using the Right Cutting Surface: Always use a cutting board made of wood or plastic. Hard surfaces like glass or stone can dull your knives quickly.
3. Sharpening Your Knives: The Key to Longevity
Even with the best care, kitchen knives will eventually lose their edge. Regular sharpening is crucial to maintaining the performance of your knives. Here’s how to do it effectively:
Sharpening Stones: Using a sharpening stone is one of the most effective ways to sharpen your knives. Wet the stone, then run the blade across it at a 20-degree angle, making sure to sharpen both sides evenly. This method is particularly effective for high-quality knives like the Japanese High Carbon Stainless Steel Vegetable Knife Sets.

Honing Rods: A honing rod doesn’t sharpen the knife but helps maintain the edge between sharpening sessions. Use it regularly to keep your knives performing at their best.
Professional Sharpening Services: If you’re unsure about sharpening your knives yourself, consider taking them to a professional. This ensures that your knives are sharpened to the correct angle and will prolong their lifespan.
4. Choosing the Right Knife Set for Your Kitchen
When it comes to selecting the right knives for the kitchen, it’s important to consider your cooking habits and preferences. A versatile knife set like the Luxury Ultra Sharp Kitchen Knife Sets is perfect for chefs who need reliable, razor-sharp tools for various tasks. For those focused on precise vegetable preparation, the Japanese High Carbon Stainless Steel Vegetable Knife Sets are an excellent choice, offering exceptional sharpness and durability.
For chefs who demand precision, the Precision Razor Sharp Chef Knife is a must-have. Its razor-sharp edge ensures clean, accurate cuts, making it a favorite among culinary professionals.

Call to Action: Invest in Quality and Care for Your Knives
Quality kitchen knives are an investment in your cooking experience. Ensure they last a lifetime by following these maintenance and sharpening tips. Ready to upgrade your knife set? Explore our top selections at Chuakoo and discover knives designed for chefs and home cooks alike. Keep your knives sharp, your food prep easy, and your kitchen safe.
0 notes
Text
Artificial Grass Installation: A Comprehensive Guide to Synthetic Turf
Artificial grass has rapidly gained popularity as a viable alternative to natural grass, particularly for those seeking a low-maintenance, aesthetically pleasing solution for their outdoor spaces. Its versatility extends to residential lawns, commercial landscapes, sports fields, and even indoor areas. The installation of synthetic turf, however, requires careful planning and execution to ensure optimal results. This guide delves into the nuances of artificial grass installation, from initial considerations to the final touches.
The first step in installing artificial grass installation is understanding the specific needs of your space. Synthetic turf comes in various types and qualities, designed to mimic the look and feel of natural grass. Factors such as the intended use, local climate, and budget will influence your choice of turf. For example, high-traffic areas, such as sports fields, require durable, high-density turf, while decorative residential lawns may benefit from softer, more aesthetically pleasing options.
Once you have selected the appropriate type of synthetic turf installation, the next stage is site preparation. Proper preparation is crucial for ensuring the longevity and performance of your artificial grass sydney. Begin by marking out the area where the turf will be installed. Remove any existing grass, weeds, or debris from the site. This process may involve digging up the old grass and using a weed killer to prevent regrowth. Ensure the area is level, as an uneven surface can lead to problems with drainage and the overall appearance of the turf.
After clearing and leveling the site, the next step is to lay a suitable base. A well-constructed base supports the turf, provides stability, and facilitates proper drainage. Typically, a base consists of a layer of crushed rock or gravel, which should be compacted to create a firm foundation. The thickness of the base layer can vary depending on the intended use and local soil conditions, but a common recommendation is to lay a 3 to 4-inch deep layer. Once compacted, the base should be leveled and smoothed to ensure an even surface for the turf.
Installing a weed barrier fabric over the base layer is another important step. This fabric prevents weeds from growing through the synthetic turf sydney and helps to maintain the cleanliness and appearance of the turf. Cut the fabric to size and secure it in place using landscape staples or similar fasteners. Overlapping the edges of the fabric slightly can help to ensure complete coverage and prevent any gaps.
With the base and weed barrier in place, you can now begin laying the synthetic turf. Roll out the turf over the prepared area, ensuring that it fits correctly and covers the entire space. It’s essential to allow the turf to acclimate to the outdoor temperature for a few hours before cutting and fitting, as this helps to reduce any expansion or contraction that might occur.
When cutting the turf to fit the area, use a sharp utility knife or a specialized turf cutter. Make precise cuts around edges and obstacles to ensure a clean, professional finish. If you are working with multiple rolls of turf, make sure to align the seams carefully to create a seamless appearance. Seaming tape and adhesive are often used to join pieces of turf together, and it’s important to follow the manufacturer’s instructions for these products to ensure a strong and durable bond.
Once the turf is in place and seams are secure, the next step is to infill the turf with a suitable material. Infill helps to support the blades of grass, provides stability, and contributes to the realistic feel of the turf. Common infill materials include silica sand and crumb rubber. The infill is spread evenly over the surface using a broom or a specialized infill spreader. After application, use a power broom or a stiff-bristled brush to work the infill into the turf, ensuring that the blades are properly supported and that the surface is evenly distributed.
After the infill has been applied and brushed in, it’s important to secure the edges of the turf to prevent shifting or lifting. This can be achieved by anchoring the turf with landscape spikes or nails, placed around the perimeter and at any seams or joints. Ensure that the spikes or nails are driven in flush with the surface of the turf to avoid any tripping hazards.
The final step in the installation process is to thoroughly clean the area. Remove any debris, excess infill, or construction materials to leave a clean and polished finish. For a pristine look, a final brushing of the turf can help to lift and separate the grass blades, enhancing the overall appearance and ensuring a natural, uniform look.
Maintaining artificial grass is relatively simple compared to natural grass. Regular brushing helps to keep the turf looking fresh and prevents the infill from compacting. Occasional rinsing with water can help to remove dust and debris, and spot cleaning is effective for removing any stains or spills. Ensuring proper drainage is also crucial to prevent water pooling and maintain the integrity of the turf.
In conclusion, the installation of artificial grass involves several key steps, from site preparation and base construction to turf placement and finishing touches. By carefully selecting the right type of turf and following a thorough installation process, you can achieve a beautiful, low-maintenance outdoor space that enhances the functionality and aesthetics of your environment. With proper care, synthetic turf can provide years of enjoyment and functionality, making it a worthwhile investment for a variety of applications.
0 notes
Text
How to Maintain and Care for Your Tactical Knife
A tactical knife is an essential tool for outdoor enthusiasts, military personnel, and law enforcement officers. Proper maintenance and care are crucial to ensure its longevity and optimal performance. In this article, we will explore the best practices for maintaining and caring for your tactical knife. Additionally, we will highlight the importance of sourcing your knives from a reputable apparel and accessories shop.
0 notes
Text
Epoxy It! The Superior Choice for Lasting Repairs: From Broken Dreams to Bonded Realities
The dreaded crack, the disheartening chip – these unwelcome blemishes can leave your favorite possessions looking worse for wear. But before you resign yourself to replacing them, consider the hero of the repair world: epoxy.glass epoxy
"Epoxy" might sound like a singular entity, but it's a diverse family of powerful adhesives. Today, we'll focus on a champion within this family – glass epoxy, a two-part resin system that reigns supreme for a multitude of repair projects.
Why Epoxy It? The Advantages of Glass Epoxy
Strength Unmatched: Unlike ordinary glues, glass epoxy offers exceptional strength and rigidity once cured. This makes it ideal for structural repairs that require significant load-bearing capacity. Cracked countertops, loose tiles, or wobbly furniture are no match for the power of a well-executed epoxy fix.
Waterproofing Prowess: Leaky pipes, overflowing sinks – these plumbing woes can be a disaster waiting to happen. Glass epoxy, with its excellent waterproofing properties, acts as a long-lasting seal when applied correctly. Say goodbye to water damage and hello to peace of mind.
Versatility is Key: Forget the limitations of single-purpose adhesives. Glass epoxy shines in its ability to bond a wide variety of materials. From glass and ceramics to wood and even some plastics, it empowers you to tackle a diverse range of repairs.
Beyond Repairs: While excelling at fixing broken treasures, glass epoxy's potential extends further. It can be used for artistic endeavors like creating mixed-media sculptures or reinforcing decorative elements.
Epoxy It Yourself: Essential Steps for Success
Transforming a broken dream into a bonded reality requires following a few crucial steps:
Preparation is Paramount:
Clean Sweep: The foundation for a successful repair lies in meticulous surface preparation. Clean the bonding areas thoroughly with rubbing alcohol, ensuring they are free of dust, grease, oil, and moisture for optimal adhesion.
Mixing Matters: Most glass epoxies involve mixing a resin and a hardener. Follow the manufacturer's instructions for the precise ratio and mix them thoroughly. Remember, a uniform consistency is key for a strong bond.
Pro Tip: Only mix the amount of epoxy you can use within its working time (the time it remains workable before curing).
Application with Precision:
Tool Time: Choose the right tool for your project. A putty knife works well for flat surfaces, while a syringe or applicator tip offers greater control for intricate repairs.
Precise Placement: Apply the epoxy to one of the clean, dry surfaces, ensuring good coverage, especially for structural repairs. Precision ensures a successful and long-lasting bond.
Clamping for Strength (Optional): For projects requiring extra support, use clamps to hold the pieces together during the curing process. Ensure the clamps are positioned on areas where they won't damage the repaired object.
Pro Tip: Clean any excess epoxy that spills onto the surface with rubbing alcohol before it cures.
Patience is a Virtue:
Respect the Cure Time: Resist the urge to rush! Allow the epoxy to cure completely as per the manufacturer's instructions. Curing times can vary depending on the brand, the amount of epoxy used, and the ambient temperature. Rushing this process can compromise the final strength and longevity of the bond.
Post-Curing Care: Once fully cured, remove any clamps and gently scrape away excess epoxy with a razor blade. For projects exposed to harsh sunlight or extreme temperatures, consider applying a UV protectant to the bonded area for additional long-term protection.
Beyond the Basics: Considerations for Long-Lasting Results
Moisture Matters: While glass epoxy offers good waterproofing, for areas with constant moisture exposure, ensure proper ventilation to prevent moisture build-up behind the bond, which can weaken it over time.
Temperature Extremes: Glass epoxy can withstand a wide range of temperatures. However, extreme heat or cold can potentially impact the bond's flexibility and longevity. Consider the environmental conditions where the repaired object will reside and choose an appropriate epoxy.
Epoxy It! Breathe New Life into Your Possessions
With its exceptional strength, versatility, and waterproofing capabilities, glass epoxy is a valuable addition to any DIYer's toolbox. From fixing broken countertops to creating artistic masterpieces, the possibilities are endless. So, the next time you encounter a crack or a chip, don't despair – Epoxy It! and transform your broken dreams into bonded realities.Glass Bond Epoxy
0 notes
Text
Understanding Kitchen Knives Types and the House of Knives
01. Kitchen Knives Types
Kitchen knives are essential tools for any culinary endeavor, with each type designed to perform specific tasks efficiently. Understanding the various types of kitchen knives can help enhance your cooking experience, making meal preparation quicker, safer, and more enjoyable. Here are some of the most common types:
Chef's Knife: Often considered the most versatile knife in the kitchen, the chef's knife has a broad, tapered blade that curves upwards to a pointed tip. It is ideal for chopping, slicing, and dicing vegetables, meats, and herbs.
Paring Knife: Small and precise, the paring knife is perfect for peeling fruits and vegetables, as well as intricate tasks like deveining shrimp or creating garnishes.
Bread Knife: Featuring a long, serrated blade, the bread knife is designed to slice through crusty bread without crushing the soft interior. It is also useful for cutting cakes and pastries.
Santoku Knife: Originating from Japan, the Santoku knife is known for its shorter, wider blade with a straight edge. It excels in slicing, dicing, and mincing, particularly with vegetables and fish.
Utility Knife: Smaller than a chef's knife but larger than a paring knife, the utility knife is a general-purpose knife useful for a variety of tasks, including slicing sandwiches and cutting mid-sized fruits and vegetables.
Boning Knife: This knife has a thin, flexible blade that tapers to a sharp point, making it ideal for removing bones from poultry, meat, and fish.
Carving Knife: With a long, thin blade, the carving knife is perfect for slicing through large cuts of meat, such as roasts and poultry, providing clean, uniform slices.
Cleaver: Known for its large, rectangular blade, the cleaver is a powerful tool used for chopping through bones and thick meat. It can also be used to crush garlic or ginger.
Fillet Knife: Similar to the boning knife but usually more flexible, the fillet knife is specifically designed for filleting fish, allowing for precise, clean cuts.
Nakiri Knife: Another Japanese knife, the Nakiri has a straight, rectangular blade that is perfect for chopping and slicing vegetables with ease.
02. House of Knives
House of Knives is a renowned retailer specializing in a wide range of knives and cutting tools. With a commitment to quality and customer satisfaction, they have become a trusted name for both professional chefs and home cooks. Here are some key points about House of Knives:
Product Range: House of Knives offers an extensive selection of knives, including kitchen knives, outdoor knives, and specialty tools. Their kitchen knife collection features products from leading brands known for their craftsmanship and durability.
Expertise and Service: The staff at House of Knives are knowledgeable and passionate about knives. They provide expert advice to help customers choose the right tools for their needs, ensuring an informed purchase.
Knife Sharpening Services: In addition to selling knives, House of Knives offers professional sharpening services. Proper maintenance is crucial for the longevity and performance of a knife, and their sharpening services help keep your blades in top condition.
Educational Resources: House of Knives often provides educational resources, such as guides and tutorials on knife care, usage, and safety. These resources are valuable for both novice and experienced cooks.
Customer Satisfaction: With a focus on customer satisfaction, House of Knives ensures that every purchase is backed by a strong return policy and excellent customer support. They aim to create a positive shopping experience for all customers.
Innovation and Trends: Staying updated with the latest trends and innovations in the knife industry, House of Knives continually expands their product offerings to include the newest and most advanced tools available.
In conclusion, understanding the different types of kitchen knives can greatly enhance your cooking skills, while a reputable retailer like House of Knives can provide the tools and support you need to excel in the kitchen. Whether you are a professional chef or a home cook, investing in quality knives and proper maintenance will make a significant difference in your culinary journey.
0 notes
Text
The Art of Blade Renewal: Restoring Sharpness by Fixing Chips and Knicks in Knife Blades
Whether you're into outdoor adventures, fishing, gardening, arts and crafts, or simply cooking at home, a sharp knife is an essential tool. However, over time, even the most carefully handled knives can develop chips or knicks on the blade. These imperfections can hinder efficiency and compromise safety. Fortunately, these issues don't necessarily mark the end of your knife's usefulness. With the right approach, you can repair and renew your blade, restoring it to its former glory.
The Importance of a Sharp Knife
A sharp knife is more than just a tool; it's a vital part of many activities. A dull or damaged blade can slow you down and increase the risk of accidents. Whether you're preparing food, maintaining your backyard, or crafting, a well-maintained knife makes all the difference. However, even with careful use, knives can incur chips or knicks over time.
Common Causes of Chips and Knicks
Chips and knicks in knife blades are usually caused by accidental misuse or exposure to hard objects. Here are some common causes:
Improper Cutting Surfaces: Cutting on hard surfaces like glass or ceramic can easily damage the blade.
Accidental Dropping: Dropping a knife can result in severe damage, especially to the edge.
Hard Ingredients or Objects: Cutting through hard or frozen foods, bones, or other tough materials without caution can cause chips or knicks.
Misuse: Using a knife for tasks it's not designed for, such as prying open cans or cutting through hard objects, can lead to damage.
Assessing the Damage
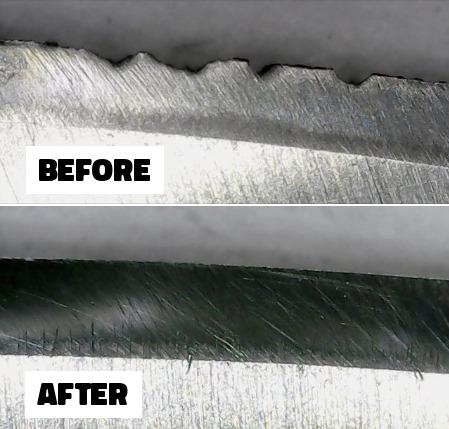
Before beginning any repairs, it's crucial to assess the extent of the damage. Minor knicks can often be smoothed out with regular honing or light sharpening. However, larger chips may require more extensive work to remove the damaged portion and reshape the edge.
The Art of Blade Renewal
1. Removing Metal to Renew the Cutting Edge
One effective way to repair significant chips or knicks is by removing enough metal from the blade to essentially "renew" the cutting edge. This process involves grinding down the blade, eliminating the damaged portion and creating a new, sharp edge. However, this method has a trade-off: removing metal reduces the overall size of the knife, potentially shortening its lifespan.
2. Balancing Metal Removal and Longevity
While removing metal is necessary for blade renewal, the key is to remove as little as possible to preserve the knife's longevity. This approach involves using coarser sharpening stones initially to grind away the damaged area and then transitioning to finer stones to refine the edge. The goal is to strike a balance between removing enough metal to fix the damage while conserving as much of the blade as possible.
3. Using a Coarse Stone
To start the repair process, use a coarse sharpening stone, typically with a grit between 200 and 400. This coarse stone helps remove material quickly and is ideal for reshaping the edge. Hold the knife at a consistent angle and use smooth, even strokes to grind away the damaged area.
4. Transitioning to a Finer Stone
After removing the damaged portion, transition to a medium grit stone, typically between 600 and 1000, to smooth out the edge. This step removes the roughness left by the coarse stone and prepares the edge for final honing.
5. Honing for Sharpness
Finally, use a fine grit stone or honing rod to refine the edge. This step polishes the blade and ensures a sharp cutting edge. Proper honing is essential for maintaining a keen edge and ensuring the knife slices through materials effortlessly.
Tips for Preventing Future Chips and Knicks
To prevent future damage, consider the following tips:
Use Proper Cutting Surfaces: Always use a wooden or plastic cutting board when preparing food. Avoid hard surfaces like glass or stone.
Handle with Care: Avoid dropping your knife or using it for tasks it's not designed for.
Avoid Hard Materials: Be cautious when cutting hard or frozen foods, bones, or other tough materials, and consider using a specialized knife if necessary.
Regular Maintenance: Regularly hone your knife and sharpen it as needed to keep the edge in good condition.
0 notes
Text
Slice and Dice with Precision: The Art of Cutting Knives
In the culinary world, the right tools can make all the difference between a mediocre meal and a culinary masterpiece. Enter cutting knives – the unsung heroes of the kitchen that play a crucial role in every chef's arsenal. From slicing and dicing to chopping and mincing, a good set of cutting knives can elevate your cooking game to new heights. Join us as we explore the world of cutting knives and uncover the secrets to selecting the perfect blade for your kitchen.
The Anatomy of a Cutting Knife
Before we delve into the various types of cutting knives available, let's take a moment to understand the anatomy of these essential tools. A typical cutting knife consists of a blade, handle, and sometimes a bolster or guard. The blade is the most critical component, typically made from high-quality stainless steel or carbon steel for durability and sharpness. The handle, often made from wood, plastic, or metal, provides a comfortable grip and control during use.
Types of Cutting Knives
There are countless types of cutting knives available, each designed for specific tasks and ingredients. Some of the most common types include:
Chef's Knife: This versatile knife is a kitchen workhorse, suitable for a wide range of tasks, including chopping, slicing, and dicing.
Paring Knife: With its small, maneuverable blade, the paring knife is perfect for intricate tasks such as peeling, trimming, and coring fruits and vegetables.
Santoku Knife: Originating from Japan, the santoku knife features a wide blade and granton edge, making it ideal for slicing, dicing, and mincing.
Bread Knife: Equipped with a serrated edge, the bread knife is designed to effortlessly slice through crusty bread without crushing or tearing.
Utility Knife: As the name suggests, the utility knife is a versatile tool suitable for a variety of kitchen tasks, from slicing sandwiches to trimming meat and poultry.
Choosing the Right Cutting Knife
When selecting cutting knives for your kitchen, there are several factors to consider, including blade material, handle design, and intended use. Look for blades made from high-quality steel for durability and sharpness, and ergonomic handles that provide a comfortable grip and control. Additionally, consider the weight and balance of the knife to ensure ease of use and precision during cutting tasks.
Caring for Your Cutting Knives
To ensure the longevity of your cutting knives, proper care and maintenance are essential. Always hand wash your knives with mild soap and warm water, and dry them thoroughly before storing. Avoid placing knives in the dishwasher, as exposure to harsh detergents and heat can damage the blade. Additionally, use a honing steel or sharpening stone regularly to maintain the sharpness of the blade and prevent dulling.
Conclusion: Slice with Confidence
With the right cutting knives in your kitchen arsenal, you'll be well-equipped to tackle any culinary challenge with confidence and precision. Whether you're a seasoned chef or a novice cook, investing in high-quality cutting knives is a worthwhile investment that will pay dividends in the kitchen for years to come. So sharpen those blades, roll up your sleeves, and let the culinary adventures begin!
0 notes
Text
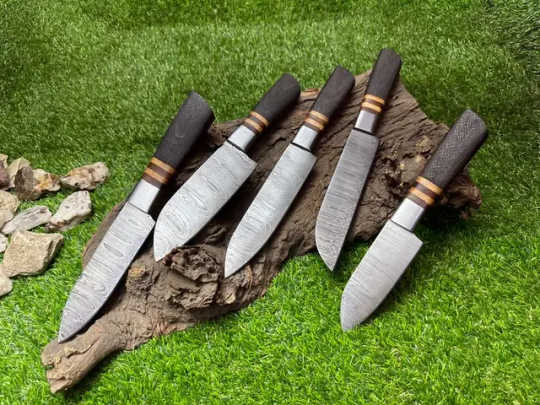
Damascus Chef Knife
Ever wondered what makes a Damascus chef knife so special? This article dives deep into the world of Damascus steel and its exquisite craftsmanship. Let's embark on this culinary journey together!
What Makes Damascus Steel Unique?
Damascus steel has a rich history and unique characteristics that set it apart from other types of steel.
History of Damascus Steel
Originating from the Middle East, Damascus steel has a history dating back over a thousand years. It was highly prized for its strength and sharpness, making it the preferred choice for warriors and craftsmen alike.
Characteristics of Damascus Steel
Damascus steel is known for its distinctive wavy pattern and exceptional durability. It's made by layering different types of steel and forging them together, creating a blade that's both beautiful and functional.
The Craftsmanship Behind Damascus Knives
Crafting a Damascus knife is an art form that requires skill, precision, and patience.
Traditional Methods vs. Modern Techniques
While traditional methods involve hand-forging the steel, modern techniques may incorporate machinery to speed up the process. However, both methods result in a high-quality blade that's a joy to use.
Art of Forging Damascus Steel
Forging Damascus steel is a meticulous process that involves heating, folding, and hammering the metal to create layers. This creates the unique pattern and ensures the blade's strength and sharpness.
Benefits of Using a Damascus Chef Knife
Using a Damascus chef knife offers several advantages that can enhance your cooking experience.
Sharpness and Edge Retention
Damascus knives are renowned for their razor-sharp edges and excellent edge retention. This means less time sharpening and more time cooking!
Durability and Longevity
Thanks to their high-quality construction, Damascus knives are incredibly durable and can last a lifetime with proper care.
How to Care for Your Damascus Chef Knife
Proper care is essential to maintain the beauty and functionality of your Damascus knife.
Cleaning and Maintenance Tips
Always hand wash your knife with mild soap and water, and dry it immediately to prevent rusting. Avoid putting it in the dishwasher or leaving it soaking in water.
Proper Storage
Store your Damascus knife in a knife block or sheath to protect the blade and prevent accidents.
Popular Damascus Chef Knives Brands
There are several brands known for their exceptional Damascus chef knives, such as Shun, Miyabi, and Dalstrong.
Choosing the Right Damascus Knife for You
When choosing a Damascus knife, consider factors like blade length, handle material, and your budget to find the perfect fit for your needs.
Price Range and Investment
Damascus chef knives can range from affordable to high-end, depending on the brand and craftsmanship. Investing in a quality knife is worth it for the years of enjoyment it will bring.
Customer Reviews and Testimonials
Many chefs and home cooks rave about their Damascus knives, praising their sharpness, balance, and beauty. Check out online reviews to see what others are saying!
Where to Buy Authentic Damascus Chef Knives
You can find authentic Damascus chef knives at specialty kitchen stores, online retailers, or directly from the manufacturer.
FAQs About Damascus Chef Knives
What is Damascus steel made of?
Damascus steel is made by layering different types of steel and forging them together.
Are Damascus knives worth the investment?
Yes, Damascus knives are worth the investment due to their durability and exceptional performance.
How do I sharpen my Damascus knife?
Use a whetstone or sharpening rod to maintain the sharpness of your Damascus knife.
Can I put my Damascus knife in the dishwasher?
No, it's best to hand wash your Damascus knife to preserve its beauty and functionality.
How long will a Damascus knife last?
With proper care, a Damascus knife can last a lifetime.
Conclusion
Damascus chef knives are more than just tools; they're a blend of art and craftsmanship that enhances your culinary skills. From their unique patterns to their exceptional performance, Damascus knives are a must-have for any kitchen. So why wait? Invest in a Damascus chef knife today and elevate your cooking experience to new heights.
1 note
·
View note
Text
Choosing the Best Scuba Knife: A Diver's Guide [year]

If you're gearing up for your next scuba diving adventure, one “nice-to-have” tool you won't want to forget is a reliable scuba knife. From cutting through stubborn fishing lines to freeing entangled marine life, a good scuba knife can be a diver's best friend in the deep blue.
But with so many options out there, how do you choose the best one for your needs? Fear not, because in this guide, we'll dive deep into the world of scuba knives, exploring key features, top picks, and expert tips to help you find the perfect blade for your underwater escapades in 2024.
1. 🗝️ Key Takeaways
- A dive knife is an essential safety tool for emergencies and practical uses such as untangling from ropes or nets and communication underwater.
- Look for top-rated dive knives with features like serrated edges or dual edges and choose from reputable brands to find the best fit for your diving needs.
- Proper maintenance, including rinsing, drying, and lubricating your dive knife, is crucial for its longevity and effectiveness during dives.
2. 🔍 Dive Knife Reviews: Top Picks from Seasoned Divers
The market is flooded with a wide range of dive knives, each with its unique features and specifications. So, which ones will come out on top in 2024? Here are some of our favorites, tried and tested on thousands of dives!
Promate Barracuda Sharp Tip Titanium Diving Knife
Our Rating★★★★★
This blade is made of titanium, which gives you superior corrosion resistance and stability than stainless steel. It’s equipped with a hammer on the handle bottom, making it versatile. The straps that come with it are easily adjustable and the blade has a quick-release system, which is perfect for emergencies.
To clean the blade, you can disassemble it and wash it thoroughly. The downside to this knife is typical of titanium blades, they’re harder to sharpen and are not as sharp as steel ones.
Key Features
Brand: Promate
Blade Length: 5 inches
Material: Titanium
Weight: 0.74 pounds
Best for: Beginners and experienced divers
Atomic Aquatics Ti6
Our Rating★★★★★
A durable knife that has an ergonomic design. It has a curved cutting edge that can easily cut through tough surfaces and a molded handle with finger grooves to improve grip. For safety, it has a lockable sheath that keeps your gear safe when not in use and a push-button release for emergencies.
The serrated edge and a large line-cutting notch are built for endurance, this knife will last you a lifetime of diving. This product includes adjustable straps that you can attach to your leg.
Key Features
Brand: Atomic
Blade Length: 4 inches
Material: Titanium
Weight: 0.6 pounds
Best for: Beginners and experienced divers
Cressi Skorpion
Our Rating★★★★★
One of the latest generation of Cressi’s knives, the Skorpion has a medium dimension that suits all divers. One upside to this product is you have two options - pointed and blunt tips. Having a blunt tip is great for those prone to accidental pricks underwater.
The straight-edged and serrated sides are separated by a small technopolymer thumb tab. Skorpion’s handle is anatomically shaped and made with a soft grip material for secure handling. The knife includes a sheath with a locking mechanism for one-hand release in case of emergencies. There’s also a standard issue strap for your leg.
Key Features
Brand: Cressi
Blade Length: 4 ⅜ inches
Material: Stainless Steel
Weight: 0.9 pounds
Best for: Budget-conscious
Scubapro Mako Stainless-Steel Diving Knife with 3.5-Inch Blade
Our Rating★★★★★
This knife has a stainless steel blade that’s tough, long-lasting, and resists surface oxidation. The multi-functional blade has a serrated edge, a smooth edge, a line-cutting notch, and a bottle opener on the bottom.
Some divers complain that the bottle opener can be a hindrance and give your skin a nick, but as long as you’re careful, there’s no real danger. The handle is relatively large with a gripping area and a thumb guard, making it beginner-friendly. It comes with a sheath that has a unique locking mechanism for easy release. The product also comes with a kit for mounting onto a BCD.
Key Features
Brand: Scubapro
Blade Length: 3.5 inches
Material: Stainless steel
Weight: 0.45 pounds
Best for: Beginners
Aqualung Squeeze Lock Stainless Steel Knife
Our Rating★★★★★
The Aqualung Squeeze Knife is a great practical knife with a patented squeeze-lock sheath that makes it easier to retract and use. The locking mechanism ensures your knife is securely in the sheath. The tip is blunt, which is perfect if you’re accident-prone.
There’s a variety of colors and mounting options you can choose from, and it can easily be mounted to the left pocket of most Aqualung BCs. It also comes in a titanium version, which you can choose if you want more of a low-maintenance, anti-rust knife.
Key Features
Brand: Aqualung
Blade Length: 3 inches
Material: Stainless steel
Weight: 0.4 pound
Best for: Beginners
XS Scuba FogCutter X Knife
Our Rating★★★★★
This knife is perfect for those who want a longer, sharper edge. The serrated pipe group integrated into the handle is great for twisting stubborn items. There’s also a butt cap with an attachment hole on the back of the knife that provides a hammering function.
You can turn the knife into scissors with just a couple of turns. The product comes with two 22-inch rubber leg straps that have a quick-release buckle for emergencies.
Key Features
Brand: XS Scuba
Blade Length: 6 inches
Material: Stainless steel
Weight: 0.95 pounds
Best for: Experienced divers
Cressi Vigo Diving Knife
Our Rating★★★★★
A handy, medium-sized knife, the Cressi Vigo is an inexpensive buy that will be perfect for recreational divers. The knife has an anatomical, non-slip polymer handle with molded finger grips for ease of use. It comes with two straps and a plastic sheath that firmly holds the knife with a traditional elastic band. Some divers complained of rust after several uses, so be aware and clean it properly after each use.
Key Features
Brand: Cressi
Blade Length: 4.3 inches
Material: Stainless steel
Weight: 0.46 pounds
Best for: Budget-conscious
Aqualung Squeeze Lock Stainless Steel Knife
Our Rating★★★★★
One of the go-to knives for savvy marines, rescue workers, EMTs, and ranchers, the Spyderco Atlantic Salt is reliable and sharp. The knife has a blunt-tipped sheep foot blade, a 50/50 index-finger choil, an integral shackle key, and ultra-corrosion-resistant material. If you are looking for a high-performance knife that can last you a lifetime, this is a must-have.
Key Features
Brand: Spyderco
Blade Length: 3.68 inches
Material: Alloy steel
Weight: 0.33 pounds
Best for: Professionals
3. 🔪 The Essential Role of Dive Knives in Scuba Diving
The underwater world is full of unexpected scenarios. From getting tangled in ropes or nets to needing to pry open shells or communicate with your dive buddy, a dive knife is an indispensable tool for scuba divers. Scuba diving knives, such as titanium dive knives, are your go-to lifesavers when it comes to cutting through materials that could potentially entrap you underwater.
Not to mention, the tapping sound made by a dive knife on a tank serves as an effective way to communicate underwater, getting the attention of your dive buddy or other members in your group.
What attributes make a dive knife so versatile? The secret lies in the blade. Serrated cutting blades are ideal for cutting lines, ropes, and nets, while a sharp edge is perfect for prying open shells, spearfishing, and even preparing fish.
So, whether you’re exploring a coral reef or venturing into the unknown, a dive knife is an essential piece of your scuba gear, ready to serve you when you need it most.
4. ⚔️ Selecting Your Ideal Dive Knife Blade
In the realm of dive knives, there isn’t a one-size-fits-all solution. The ideal dive knife blade for you depends on a variety of factors, including the blade material, edge design, and additional features. Whether you’re a pro diver or a beginner, here’s the skinny on how to pick a knife.
Blade Material: Titanium vs. Stainless Steel
The two most popular choices for blade material are undoubtedly titanium and stainless steel. A titanium blade is a favorite among divers for its rust-resistance, lightweight nature, and toughness. They remain sharp for longer periods and resist scratches impressively, making them ideal for heavy-duty underwater tasks. However, they do come with a higher price tag compared to their stainless steel counterparts.
On the other hand, stainless steel blades are a budget-friendly option that offers durability and sharpness. While they may require a bit more care to prevent rusting, they can hold their edge extremely well, making them a worthy companion for your underwater adventures. So, whether you choose a titanium or stainless steel blade, both materials promise longevity and rust resistance, crucial for any dive knife.
Edge Design: Serrated, Straight, or Both?
The performance of your dive knife is significantly affected by the type of edge it possesses. Serrated edges are not the most precise, but they excel at slice cuts and can cut through tough materials like ropes or thick vegetation like a champ. They’re perfect for those situations where you need to drag the blade across the material.
On the other hand, straight edge knives are ideal for delicate tasks like fileting a fish or cutting fishing line, offering precision and control. Dual edge dive knives feature both a straight edge and a serrated edge, offering the best of both worlds, along with a blunt or sharp tip to suit your needs.
5. 🤲 Dive Knife Handles and Grips: Security in Hand
Although the blade usually takes center stage, the handle’s role in a dive knife’s performance is just as crucial. The handle directly impacts your ability to control the blade and provide strength for tough cuts. And you certainly don’t want to drop your knife into the deep unknown!
Comfort and grip are key here. Handles that are comfortable to hold and provide a good grip ensure you can keep the blade under control, even in challenging underwater conditions.
When it comes to material, a smooth handle can become slippery when wet, compromising your grip. On the other hand, handles with textured finishes provide a better grip, ensuring your dive knife remains secure in your hand.
6. 🧳 Dive Knife Storage Solutions: Sheaths and Mounts
Storage matters as much as selection when dealing with dive knives. After all, a dive knife is only as good as its accessibility. Dive knife sheaths offer a secure storage solution that keeps your knife safe and within reach.
Mounting your dive knife strategically is crucial for easy accessibility. The inside of your leg or BC shoulder straps are popular mounting options that ensure your knife is within easy reach during your dive. Remember, the key is to attach the sheath securely to your diving gear, ensuring it stays put throughout your dive.
Regardless of where you choose to mount your dive knife, the goal is to have it readily accessible, ensuring you can retrieve it quickly and easily when needed.
7. 🛠️ Practical Tips for Dive Knife Care and Maintenance
Proper care and maintenance of your dive knife is key to its longevity and optimal performance. Here are some steps to follow:
- After each dive, rinse your knife and its sheath with fresh water.
- Soak any moving parts in fresh water to remove any salt or debris.
- Dry your knife thoroughly before storing it.
- Check for any signs of corrosion or damage and address them promptly.
- Regularly lubricate any moving parts to ensure smooth operation.
Beyond cleaning, lubrication is also essential to keep your dive knife functioning smoothly. Use a special knife lubricant or oil that’s made for underwater use to keep the knife safe. Regular oil won’t cut it. If your knife does end up with some rust, don’t panic. Just follow these steps:
- Boil the knife in white vinegar for 5-10 minutes.
- Rinse the knife.
- Dry the knife.
- Apply a little lubricant.
With these tips, you can keep your dive knife in top shape, ready to serve you on your underwater adventures.
8. ⚠️ Dive Knife Safety: Handling and Usage
When handling and using dive knives, safety should always be the top priority. As a diver, it’s important to remember that a dive knife is a tool, not a weapon. Its primary function is to help you out of tricky situations like getting tangled in fishing line or nets, not for self-defense against sea creatures. Mishandling a dive knife could lead to injuries or damage to your gear, so it’s vital to follow safety measures at all times.
To ensure safe handling, here are a few tips to keep in mind:
- Choose a knife with a blunt tip if you’re not planning to stab or pierce anything.
- Strap the knife just below your knee on your leg, inside the leg to avoid getting caught on kelp.
- Always be careful and prioritize your safety when using cutting tools underwater.
Last but not least, remember to keep your knife sheathed when not in use, securely attach the sheath to your diving gear, use the knife only for diving purposes, and clean and maintain it regularly.
9. 📜 The Legalities and Travel Considerations with Dive Knives
Certain considerations need to be made when traveling with your dive knife. Different countries have different regulations regarding dive knives, and it’s essential to familiarize yourself with these rules before you travel. While some places are lenient, others have strict regulations, and non-compliance can result in penalties. Always check the specific rules for the country or dive operator’s policies before packing your dive knife.
When flying, remember to pack your dive knife in your checked bags and ensure it’s sheathed or wrapped up to prevent any accidents. Dive knives are not allowed in carry-on bags, so make sure to pack it properly in your checked luggage.
10. 📝 Summary
From their essential role in ensuring safety and practicality to the considerations for selection, use, and maintenance, dive knives are a crucial part of any diver’s toolkit. Whether you’re a seasoned diver or just starting your underwater adventures, understanding the different aspects of a dive knife can help you make an informed choice.
Remember, the best dive knife is not the one with the most features or the highest price tag, but the one that fits your needs and enhances your diving experience.
11. ❓ Frequently Asked Questions
What is a scuba knife used for?
A scuba knife is used for various purposes while diving, such as cutting through ropes, nets, and other materials.
Is a titanium dive knife worth it?
A titanium dive knife is definitely worth it due to its lightweight, which makes it easier to use underwater. Additionally, titanium's strength-to-weight ratio, edge retention, and corrosion resistance make it the best metal for the blade.
What makes a good diver’s knife?
A good diver’s knife should have a blade and grip that are almost equal in length, providing balance and control. Look for blades made of stainless steel, titanium, or a durable alloy for strength and durability.
What is the difference between a dive tool and a dive knife?
The main difference between a dive tool and a dive knife is that a dive knife typically has a sharp cutting edge and a serrated edge, while a dive tool has a prying tool instead of a sharp tip.
How do I select the perfect dive knife for my needs?
For the perfect dive knife, go for a small (2-3 inches) or medium (4-5 inches) size for practicality and easy maneuvering. Avoid larger knives to minimize potential risks.
Read the full article
0 notes
Text
Slice with Precision: Exploring the Magic of the Boning Knife
In the realm of culinary craftsmanship, the boning knife is a true magician's wand, wielding precision, finesse, and versatility with every slice. Whether you're deboning poultry, filleting fish, or trimming meat, this essential tool is the go-to choice for chefs and home cooks alike when it comes to handling delicate cuts with expert precision. Let's unlock the secrets of the boning knife and uncover why it's a must-have in every kitchen arsenal.
The Anatomy of a Boning Knife
The boning knife is characterized by its narrow, flexible blade and sharp, pointed tip, designed specifically for the intricate task of removing bones from meat, poultry, and fish. Featuring a slender profile and a fine edge, the boning knife excels at maneuvering around joints, bones, and cartilage with ease, ensuring clean, precise cuts without damaging the surrounding meat.
Precision Cutting Power
What sets the boning knife apart is its unparalleled precision and control when working with delicate cuts of meat and fish. With its razor-sharp edge and flexible blade, the boning knife effortlessly glides through flesh, separating the meat from the bone with surgical precision. Whether you're deboning a chicken, filleting a fish, or trimming a tenderloin, the boning knife ensures clean, uniform cuts that elevate your culinary creations to new heights.
Versatility in the Kitchen
While its name may suggest a singular purpose, the boning knife is surprisingly versatile in the kitchen. Beyond boning, this indispensable tool is also well-suited for a variety of other culinary tasks, including filleting, trimming, and portioning. Its narrow, flexible blade makes it ideal for precision cutting and intricate work, allowing for seamless transitions between different cutting techniques.
Choosing the Right Boning Knife
When selecting a boning knife for your kitchen, it's essential to consider factors such as blade length, blade flexibility, and handle design to ensure optimal performance and comfort. Look for a boning knife with a narrow, flexible blade that offers both precision and maneuverability, allowing for clean, controlled cuts while maintaining stability and control. Additionally, choose a knife with an ergonomic handle that feels comfortable and secure in your hand, reducing the risk of fatigue during prolonged use.
Caring for Your Boning Knife
To maintain the longevity and performance of your boning knife, proper care and maintenance are crucial. After each use, wash the knife by hand with mild soap and warm water, then dry it thoroughly with a clean towel. Avoid soaking the knife or putting it in the dishwasher, as prolonged exposure to moisture can cause damage to the blade and handle. Additionally, regularly sharpening the blade and honing the edge will help maintain its sharpness and cutting precision over time.
Conclusion
The boning knife is a true magician's tool, wielding precision, finesse, and versatility with every slice. With its unmatched precision, control, and versatility, it's no wonder that the boning knife remains a staple in kitchens around the world. Whether you're deboning poultry, filleting fish, or trimming meat, adding a boning knife to your culinary arsenal is sure to elevate your cooking experience and inspire creativity in the kitchen. So sharpen your skills, hone your techniques, and let the boning knife be your trusted companion on your culinary journey. With its precision and finesse, you'll be slicing like a pro in no time.
0 notes
Text
Carve with Confidence: Unleashing the Power of the Meat Knife
In the realm of culinary mastery, the meat knife stands tall as a symbol of precision, power, and prowess. From carving roasts to slicing steaks, this essential tool is the go-to choice for chefs and home cooks alike when it comes to handling cuts of meat with finesse and efficiency. Let's explore the world of the meat knife and uncover the secrets to its unmatched performance and enduring appeal.
The Anatomy of a Meat Knife
The meat knife, also known as a carving knife, is distinguished by its long, slender blade and sharp, pointed tip, designed specifically for slicing and carving large cuts of meat. Featuring a narrow profile and a straight or slightly curved edge, the meat knife excels at making clean, precise cuts through meat and poultry, ensuring uniform slices with minimal effort.
Precision Carving Power
What sets the meat knife apart is its unparalleled precision and control when working with cuts of meat. With its razor-sharp edge and long, slender blade, the meat knife effortlessly glides through flesh, separating the meat from the bone with ease. Whether you're carving a holiday turkey, slicing a roasted chicken, or portioning a prime rib, the meat knife ensures clean, uniform cuts that showcase your culinary expertise.
Versatility in the Kitchen
While its name may suggest a singular purpose, the meat knife is surprisingly versatile in the kitchen. Beyond carving meat, this versatile tool is also well-suited for a variety of other culinary tasks, including slicing fruits, vegetables, and bread. Its long, slender blade and sharp edge make it ideal for precision cutting and slicing, allowing for seamless transitions between different cutting techniques.
Choosing the Right Meat Knife
When selecting a meat knife for your kitchen, it's essential to consider factors such as blade length, blade material, and handle design to ensure optimal performance and comfort. Look for a meat knife with a long, slender blade that offers both strength and flexibility, allowing for precise cuts while maintaining control and stability. Additionally, choose a knife with an ergonomic handle that feels comfortable and secure in your hand, reducing the risk of fatigue during prolonged use.
Caring for Your Meat Knife
To maintain the longevity and performance of your meat knife, proper care and maintenance are crucial. After each use, wash the knife by hand with mild soap and warm water, then dry it thoroughly with a clean towel. Avoid soaking the knife or putting it in the dishwasher, as prolonged exposure to moisture can cause damage to the blade and handle. Additionally, regularly sharpening the blade and honing the edge will help maintain its sharpness and cutting precision over time.
Conclusion
The meat knife is a testament to the precision and artistry of the culinary world. With its unmatched precision, versatility, and finesse, it's no wonder that the meat knife remains a staple in kitchens around the world. Whether you're carving roasts, slicing steaks, or preparing a holiday feast, adding a meat knife to your culinary arsenal is sure to elevate your cooking experience and inspire creativity in the kitchen. So sharpen your skills, hone your techniques, and let the meat knife be your trusted companion on your culinary journey. With its precision and power, you'll be carving with confidence in no time.
0 notes
Text
A Comprehensive Guide to EPDM Roofing Repair

EPDM roofing repair is a popular choice for flat and low-slope roofs due to its durability, flexibility, and resistance to weathering. However, like any roofing material, EPDM membranes may occasionally require repair to address issues such as leaks, punctures, or seam separation. In this comprehensive guide, we'll discuss the steps involved in repairing EPDM roofing to ensure the longevity and integrity of your roof.
Inspecting the Roof: Before initiating any repairs, it's essential to conduct a thorough inspection of the EPDM roof to assess the extent of the damage. Inspect the entire surface for signs of tears, punctures, blistering, or seam separation. Pay close attention to areas around penetrations such as vents, drains, and HVAC units, as these are common areas for leaks to occur.
Gathering Necessary Materials: Once you've identified areas in need of repair, gather the necessary materials and tools for the job. Typical materials for EPDM roof repair include:
EPDM patching material or repair tape
EPDM primer
Seam adhesive or seam tape
Scissors or utility knife
Roller or brush for applying primer
Cleaning solution and rags
Ensure that you select repair materials compatible with EPDM roofing to ensure proper adhesion and effectiveness.
Cleaning the Repair Area: Proper surface preparation is critical for ensuring the adhesion of repair materials and the success of the repair. Thoroughly clean the repair area using a mild cleaning solution and a rag to remove dirt, debris, and any existing sealants or adhesives. Allow the area to dry completely before proceeding with repairs.
Preparing the Surface: Once the repair area is clean and dry, apply EPDM primer to the surface surrounding the damaged area. The primer helps improve adhesion and ensures a strong bond between the repair materials and the existing EPDM membrane. Use a roller or brush to apply the primer evenly and allow it to dry according to the manufacturer's instructions.
Repairing Tears and Punctures: For tears or punctures in the EPDM membrane, cut a patch of EPDM material slightly larger than the damaged area. Round the corners of the patch to prevent peeling and improve adhesion. Apply a layer of seam adhesive or primer to both the patch and the repair area, then carefully place the patch over the damaged area, ensuring it overlaps the surrounding EPDM membrane. Use a roller to press the patch firmly into place and remove any air bubbles.
Repairing Seam Separation: If seams in the EPDM membrane have become separated, use seam adhesive or seam tape to reseal the seams. Apply a thin layer of adhesive to both sides of the seam, then press the seam together firmly. If using seam tape, apply it over the seam and use a roller to ensure proper adhesion. Allow the adhesive or tape to cure according to the manufacturer's instructions.
Inspecting and Testing Repairs: Once the repairs are complete, inspect the repaired areas to ensure they are properly sealed and free from defects. Conduct a water test by spraying the repaired areas with water and checking for any signs of leakage. Additionally, monitor the repaired areas during rainfall to verify their effectiveness in preventing leaks.
Maintenance and Preventive Measures: To prolong the life of your EPDM roof and prevent future damage, implement regular maintenance practices such as cleaning debris from the roof surface, inspecting for signs of damage or wear, and addressing any issues promptly. Additionally, consider applying a protective coating or sealant to the EPDM membrane to enhance durability and weather resistance.
In conclusion, repairing EPDM roofing requires careful preparation, proper materials, and attention to detail to ensure effective and long-lasting results. By following the steps outlined in this guide and adhering to best practices for EPDM roof repair, you can address common issues such as leaks, tears, and seam separation and preserve the integrity of your EPDM roof for years to come. If you're unsure about how to proceed with repairs or encounter significant damage, consider consulting a professional roofing contractor for assistance.
1 note
·
View note
Text
sydney artificial grass installation on concrete
Artificial grass installation on concrete in Sydney offers a practical solution for transforming outdoor spaces into lush, low-maintenance areas suitable for various activities and aesthetics. Whether you're enhancing a balcony, terrace, or courtyard, the process involves several critical steps to ensure a durable and visually appealing result that withstands Sydney's climate and environmental conditions.
Assessment and Preparation:
The first step in installing artificial grass on concrete is to assess the condition of the surface. Concrete should be clean, dry, and free of any debris, dirt, or loose particles that could affect the adhesion and appearance of the grass. Start by sweeping the area thoroughly to remove surface dirt and debris. For stubborn stains or ingrained dirt, consider using a pressure washer to achieve a deeper clean. Allow the concrete to dry completely before proceeding to the next steps.
Addressing Drainage:
Proper drainage is crucial for the longevity of your synthetic turf installation. Unlike natural turf, artificial grass doesn't absorb water, so ensuring efficient drainage is essential to prevent pooling and potential damage to the underlying concrete. Evaluate the existing drainage system or plan to incorporate drainage solutions such as perforated pipes or channels that direct water away from the installation area. This step is particularly important in Sydney's variable climate, where heavy rains can occur.
Applying Adhesive:
Once the concrete surface is clean and dry, apply a suitable adhesive to create a strong bond between the artificial grass backing and the concrete. Choose an adhesive recommended for outdoor use and follow the manufacturer's instructions regarding application methods, coverage rates, and drying times. Use a trowel or suitable tool to spread the adhesive evenly across the concrete surface, ensuring complete coverage.
Installing the Artificial Grass:
Carefully roll out the synthetic grass over the adhesive-covered concrete surface. Take care to position the grass correctly, ensuring any seams are neatly aligned and secured. Trim any excess grass using a sharp utility knife to achieve a precise fit around edges, corners, or obstacles such as posts or steps. If you encounter any seams where multiple pieces of grass are joined, ensure they are tightly bonded together to prevent separation over time.
Acclimation Period:
Allow the installed artificial grass sydney to acclimate to its new environment for at least 24 hours. This acclimation period allows the grass fibers to settle and adjust to any minor irregularities in the concrete surface. Avoid heavy foot traffic or placing heavy objects on the grass during this time to ensure optimal bonding and stability.
Applying Infill Material:
Infill material is essential for maintaining the structure and appearance of artificial grass. It helps support the grass fibers, keeps them upright, and enhances the overall resilience and longevity of the installation. Choose an appropriate infill material such as silica sand or a rubber granule mixture based on your specific needs and preferences. Use a drop spreader or shovel to evenly distribute the infill material across the grass surface.
Brushing and Finishing:
After applying the infill material, use a power brush or stiff-bristled broom to work the infill into the grass fibers. This brushing action helps distribute the infill evenly and encourages the grass blades to stand upright, enhancing the overall appearance and resilience of the installation. Pay attention to brushing in multiple directions to achieve a natural look and prevent matting of the grass fibers.
Final Inspection and Maintenance:
Inspect the completed artificial grass installation for any adjustments or finishing touches. Check seams for tightness and smoothness, ensure edges are properly secured, and remove any excess infill material from surrounding areas. Consider adding perimeter edging or trim for a polished look and to help maintain the shape and integrity of the grass installation over time.
Maintenance Tips:
Regular maintenance is essential to prolong the lifespan and appearance of your artificial grass installation on concrete in Sydney. This includes periodic brushing to remove debris, occasional rinsing with water to remove dust and refresh the fibers, and addressing any minor repairs promptly to prevent issues from escalating.
By following these comprehensive steps and guidelines, you can achieve a professional-quality artificial grass installation on concrete in Sydney that enhances your outdoor space with year-round greenery and minimal maintenance requirements. Whether for residential or commercial purposes, artificial grass offers a versatile solution that combines aesthetic appeal with practicality in urban environments like Sydney.
0 notes
Text
Watch Battery Replacement Guide
Watches are not only accessories but also precision instruments that rely on reliable power sources. In this guide, we will explore the key aspects of watch batteries, focusing on the types of batteries including silver oxide watch battery and providing insights into the best practices for watch battery replacement.
Types of Watch Batteries
Watch batteries come in various types, each designed for specific needs:
Silver Oxide Battery: Commonly found in quartz watches due to its stable voltage output and compact design. It is ideal for continuous use, offering a reliable power source.
Lithium batteries: Known for their extended lifespan, they are suitable for watches with infrequent use or additional features like digital displays. They are lightweight, compact, and perform well across various temperatures.
Alkaline batteries: Being economical, find popularity in less expensive watches, particularly those with low energy consumption. They are now obsolete due to environmental concerns.
Factors to Consider When Choosing the Best Watch Battery
Choosing the best watch battery and adopting proper maintenance practices will contribute to the longevity and accuracy of your timepiece:
Compatibility: Ensure the selected battery is compatible with your watch model. Refer to the watch manual or consult the manufacturer for recommended battery types.
Size and Thickness: Watch batteries come in various sizes and thicknesses. Choose a battery that fits snugly into the battery compartment without excessive pressure.
Voltage and Capacity: Match the voltage and capacity specifications of the original battery to maintain optimal watch performance.
Avoiding 5 Common Mistakes During Battery Replacement
When embarking on the task of replacing a watch battery, it's essential to proceed with care to avoid common mistakes that could impact the watch's functionality. Here are 5 crucial aspects to be mindful of during the battery replacement process:
Inappropriate Tools
Using the correct tools is paramount. Magnetic interference can harm delicate watch components, so opting for non-magnetic tweezers and screwdrivers designed for watch repairs is essential.
Forceful Opening
Opening the watch case demands finesse. Avoid using excessive force, as this can lead to damage. Instead, employ specialized tools like a case back opener or knife, ensuring a gentle and precise approach.
Losing Components
To prevent the loss of tiny components, work in a well-lit area and consider using a tray or container for organizing parts. This meticulous approach minimizes the risk of misplacing crucial elements.
Skipping Functionality Check
After replacing the watch battery, perform a functionality check to verify that all watch features are working correctly. Some watches may require recalibration, so follow the manufacturer's guidelines for any necessary adjustments.
Successfully replacing a watch battery requires a delicate touch and attention to detail. By steering clear of common mistakes during this process, you safeguard the intricate mechanisms of your timepiece and ensure its continued functionality.
0 notes
Last Seen Blogs

edgar-gheman
Edgar Ghenno

hokipro44-pigeon1
𝗛𝗢𝗞𝗜𝗣𝗥𝗢𝟰𝟰 LINK RESMI ORIGINAL TERBARU

hollow-pretense
ᴘᴜɴᴋ ʀᴀᴛ ᴀɴᴏɴʏᴍᴏᴜꜱ

rey-poe
JediPilot hideaway

brainwashingdetective
ぐるぐる翡翠ワールド