#pso2en
Text
Hi I’m NextTime

“what does this option do?” *click* -me taking my first screenshot
I’ve been playing Phantasy Star Online 2 for most of the last 5 years, since Closed Beta to be precise; It’s a pretty fun game! In that time I’ve watched it grow from it’s humble, content-starved beginnings to where it is today. Early on you were just beaming down to the latest and highest level Multi-Party Area to join in a train of other users roaming around from map space to the next, sometimes leaving for the boss if you wanted to do that. Sometimes an Emergency Quest notification will appear, then you would go do that instead; though most of the early EQs were also over-glorified MPA crawls. These days, well it’s still largely that to be honest; just that the quests themselves have shifted to have more controlled encounters instead of the semi-procedurally generated areas, and EQs have shifted more to grander boss fights.
Early on I kinda floundered about not really knowing totally what I was doing, or why I was doing it; but eventually important lessons about how to play and how to build up my character began to sink in. Eventually I would meet a lot of people who were still starting out, or returning from a long hiatus; I could help them get caught up without stumbling around like I did.
As of lately, SEGA has been implementing content that requires you to know a lot of this information to even clear it. Some of it is knowing how to loadout your equipment, having a skill tree that gets the job done is extremely important, but possibly more important that all of that is knowledge and skill to play your class to it’s fullest extent.

While it’s pretty easy to coast your way from starting a new character to level 50 without really doing too much more than jumping down to a quest and beating stuff up indiscriminately; you start to get a glimpse of what lies ahead when the Emergency Quest notifications go off, and now everybody around you is dead on the floor or all the mining base towers suddenly died.
Some of these people will go lookup a guide on how they should outfit themselves, but more often than not those guides simply tell you what items to put on and what your skill tree should look like. More often than not they do not explain why you are doing this, and how you properly utilize it; so they wind up maxing out Standing Snipe but never actually sit still long enough to get it to activate.
The mission of this blog is to help out players who have been playing PSO2 for a while discover more of the game’s nuances. In the coming weeks, the topics I will start to cover will include Individual class skill tree breakdowns, analysis of weapon types and the Photon Arts they use, and the basics of Special Ability affixing.
But for the next post, I’ll start with going over PSO2′s damage formula; which should provide a number of reasons why stuff like special abilities and weapon elemental values are pretty dang important!
1 note
·
View note
Text

Whos gonna tell them
1 note
·
View note
Photo


Urgent Quest with random party~
0 notes
Text
Ability Affixing Part 4: Putting it all together
Now that I have gone over why affixing is important, how to prep your item’s ability slots to fit everything you want on, and listed off how to go about transferring each type of ability, it’s time to put it all together and tweak out some equipment without breaking the bank or getting overwhelmed preparing fodder items! Even then, there are tools to help you out like this Web-Based Affixing Simulator. As we go through this article, I will periodically link to this simulator, so keep an eye out for those URLs.
Soul Strategy
To start, Soul abilities and the basic stat boosters have been staple abilities since the beginning; between an attack up and boss soul, it’s easy to reach +60-70 ATK with only 2 slots used! Example: http://pso2affix.seilent.net/#!/s=ZA01.ZB01&1=ZA01.AA03&2=ZA01.RA22&3=ZA01.RA22&4=ZA01.RA22&5=&r=RA22.AA03&o=A05
The only thing that complicates the matter is the fact that you need 3 of the same boss soul in order to transfer it at a rate you can take to 100% with a booster. You can try to get away with only using 2 of the same soul, but with only two souls, the base rate is 50%. Even if you throw down the 100 Excubes on a +40% booster, you are not going to reach 100% outside of an affix rate boost period.
The only exception here is Toh’oh Soul and Full Vegas Soul, which reach 60% when there is only 2; but you only really want to move those souls around in order to make a compound soul. Compound Souls make putting a soul on your items much easier, since you only need Toh’oh, Full Vegas, or Escared Soul; as well as one soul of a Free Field boss. It’s worth noting however, my previous example using Gwana Soul would not work; because Gwana is still a miniboss, but desert seems to lack a proper boss anyway. Example: http://pso2affix.seilent.net/#!/s=ZA01.ZB01&1=ZA01.AA03&2=ZA01.RH23&3=ZA01.SB03&4=&5=&r=SH10.AA03&o=A05
Here I use Ex Soul instead of Gwana soul. Both Gwana Soul and Ex Souls provide a +20% boost to transferring Power III, so this makes it possible to move Power III at an 80% success rate with only a single Power III present. For info on which boss souls boost which ATK stat transfer rate, and which Boss Souls are compatible for making Compound Souls, you can look at the “Boss Boosts” tab on this spreadsheet: https://docs.google.com/spreadsheets/d/1x8bN2DCYckX__Slcxpo7OKqUYMK0RqfPlna5qdz6bt4/edit?usp=sharing
Playing the Slots
Only 2 slots might get you started, but there is a lot more you can do with your equipment when you have more slots to work with. It is possible to reach 4-slots on equipment using Ability Affix Boost +30% items, and 5-slots with the +40% boosters. During a +10% Affixing boost period, you can even go up to 6-slots safely with a 40% booster! Here’s a simple example of using junk Stat I abilities to add a 5th slot to an item: http://pso2affix.seilent.net/#!/s=AA01.AC01.AD01.BB01&1=AA01.AB01.AD01.EB01&2=HA01.HJ01.HN01.AC01&3=&4=&5=&r=AA01.AB01.AC01.AD01.BB01&o=A06
When attempting to expand ability slots on an item, Reaching 100% transfer rate before boosters on as many abilities is extremely important. If one item doesn’t reach 100% and fails, it sets you back to try again; if more than one ability fails, then you are left in an even worse position!
Back on the Ability Spreadsheet, spaces marked green are where you can reach 100% transfer on an ability, allowing you to safely add an extra ability slot and preserve that ability.
http://pso2affix.seilent.net/#!/s=AA03.RH23&1=AA03.EB03&2=XA01.EB03&3=&4=&5=&r=RH23.AA03.EB03&o=A05 In this example, we take a unit with Power III and Ex Soul, Power III and Spirita III, and Soul Receptor with Spirita III, to reach 100% on all abilities and safely add a third slot to the item. Soul Receptors are only available in the mobile game, PSO2es, but they can be very useful for preserving a boss soul ability when expanding slots, or just working with Souls in general.
More often than not however, you will want to stick to combing through boss loot crystals for item drops that have a lot of abilities already on them, since more slots mean there is a better chance of the Soul ability being on the item, and you can use the item to start moving souls around at higher slots on your base item; instead of needing to carry a soul up from an item with few slots on it.
Low-Cost, Low-Effort Affixing
Now that you have your items with the number of slots you would like to work with, what do you do after Soul and Attack III? Stamina III and Spirita III are popular choices, Spirita allows you to use more Photon Arts before you run out of PP, and Stamina III is arguably the best stand-alone defensive ability, as the value of defense and resistances can vary wildly between content, or even the same quest! One may argue though, that these abilities do not directly give you any ATK than you had with just Soul+Attack at 2 slots, but they do offer good utility for taking up a slot on your item. Example: http://pso2affix.seilent.net/#!/s=AA03.RH23.ZA01.ZB01&1=SB02.ZA01.ZB01.ZC01&2=EA03.EB03.ZA01.ZB01&3=EA03.ZA01.ZB01.ZC01&4=&5=&r=SH10.AA03.EA03.EB03&o=A05
Laplace’s Demon was recently given the ability to drop Doom Break on the items it drops, and as of this writing, is appearing commonly inside With Wind and Rain 2017 dropping units with a high number of slots, with any combination of Toh’oh Soul, Full Vegas Soul, Stamina III, and Spirita III as well! This is pretty big, since this influx of high-slot doom break items means it is very easy to get it onto your own gear, like so: http://pso2affix.seilent.net/#!/s=AC03.EB03.ZA01.ZB01.ZC01&1=TH01.SB01.ZA01.ZB01.ZC01&2=TH01.EA03.ZA01.ZB01.ZC01&3=TH01.EB03.EA03.ZA01.ZB01&4=RJ22.ZA01.ZB01.ZC01.ZD01&5=&r=SH30.AC03.TH01.EA03.EB03&o=A05 EDIT: They don’t have Laplace's demon appearing in Beach Wars 2017, and doom break prices went up as soon as Wind and Rain 2017 ended, so I cannot recommend doom break for now.
However, it does not need to stop there. Seasonal EQ bosses can have Mutation II appear on the gear they drop, which is an additional +15 All-ATK, but with +15 HP instead of Doom Break’s PP. Not only that, but Mutation II also boosts ability to create Stat IV from Stat IIIs, so if you stock up on Doom Break and Mutation II drops, you could make an intermediary item like this: http://pso2affix.seilent.net/#!/s=TH01.SB02.ZA01.ZB01.ZC01&1=TH01.SB02.ZA01.ZB01.ZC01&2=TH01.SB02.ZA01.ZB01.ZC01&3=OA02.RB22.ZA01.ZB01.ZC01&4=OA02.RB22.ZA01.ZB01.ZC01&5=OA02.RB22.ZA01.ZB01.ZC01&r=TH01.OA02.SB02&o=A05 EDIT: like the previous paragraph, with doom break being expelled back to mostly only Tokyo and Vegas free fields that nobody really has a reason to otherwise farm, doom break might be better to just sell off for money.
In that example, you could add Fang soul or Full Vegas Soul; but ideally you would want to skim your items to only use doom breaks without earth souls, or mutation IIs without Fang Soul, and make two items that each have one of the souls on it. Make an additional Doom Break / Mutation II item, bring in a couple more Shoot IIIs, and use the Body+React+Mind method of creating Ability III, and here you go: http://pso2affix.seilent.net/#!/s=AB03.EB03.ZA01.ZB01.ZC01&1=TH01.OA02.RB22.ZA01.ZB01&2=TH01.OA02.SB02.ZA01.ZB01&3=TH01.OA02.ZA01.ZB01.ZC01&4=AB03.BB03.ZA01.ZB01.ZC01&5=AB03.BA03.BC03.ZA01.ZB01&r=AB04.TH01.OA02.FA03.SH20&o=A05
That’s a pretty powerful set of abilities considering over half of them were all found in a single quest! As for the extra Shoot IIIs and the Body/React/Mind IIIs, you could possibly make those items by fusing up Stat I abilities into Stat IIs, then the Stat IIs used with Mutation I to create the level 3 versions. Just keep an eye on the stuff you find and maybe something you thought was trash could still be useful in making something stronger! Though at this point we are starting to leave the “Low Effort” territory...
EDIT: With Doom Break becoming scarce again right after Wind and Rain 2017, and Beach Wars 2017 seeming to not have Laplace’s demon to drop it again, I gotta say that I cannot recommend it from a low-budget standpoint.
The Factor Factor and Vinculum
If you have been running a lot of an Episode 4 Emergency Quest boss lately, you may also have a stock of items with that bosses Factor ability. you could try to make Factor Catalyst for each full set of factors you collect, or you could use them as-is on your gear! They are plenty powerful abilities on their own.
In this example, we effectively replace Mutation II and make a Mother Factor / Doom Break / Full Vegas Soul item: http://pso2affix.seilent.net/#!/s=TG03.ZA01.ZB01.ZC01.ZD01&1=TG03.ZA01.ZB01.ZC01.ZD01&2=TG03.ZA01.ZB01.ZC01.ZD01&3=TH01.SB02.ZB01.ZC01.ZD01&4=TH01.SB02.ZB01.ZC01.ZD01&5=TH01.SB02.ZB01.ZC01.ZD01&r=SB02.TH01.TG03.ZA01.ZB01&o=A05
You could make 2 more Mother Factor/Doom Break items to make a Magi the Soul / Tech III / Mother Factor / Doom Break / Ability III item, or even take it one step farther and try to fit Mutation II in there as well! But that, again, is adding a level of complexity outside the scope of this guide.
Vinculum is often overlooked since it is just 2/3rds of a Modulator, and you cannot have both of them on the same item, but Vinculum is far more available than Modulator is, so it might be worth to consider using if you were looking for a little extra kick to your equipment. http://pso2affix.seilent.net/#!/s=TB01.ZA01.ZB01.ZC01.ZD01&1=TB01.ZA01.ZB01.ZC01.ZD01&2=RP25.TB01.ZB01.ZC01.ZD01&3=TH01.SB02.ZB01.ZC01.ZD01&4=TH01.SB02.ZB01.ZC01.ZD01&5=TH01.SB02.ZB01.ZC01.ZD01&r=TB01.SB02.TH01&o=A05 it can be a little hard to move between items without Anga Soul to boost it’s transfer rates, however.
EDIT: I thought the upgraded Yamato fight and the Yamato Rematch would help fix how rare Yamato Factor appears on dropped units, and possibly also have it drop with more slots on average like Mother Factor and Deus Factor do, but it seems I was wrong. so if you are working on R-atk units you might have to pass on the idea of using Yamato Factor.
Weapon Affixing and Special Ability Factors
Weapons can ignore a lot of this stuff since they added the Special Ability Factor system. As long as a New-Type weapon being used to transfer abilities is upgraded to +35, it has an ability independent of the abilities on the weapon that can be transferred with a 100% rate. A big example of this are the Ray and Union-series weapons, as they are able to create Astral Soul as long as they have been ground to +35. The NT Extreme Quest weapons can pull a Flict or Alter ability out of thin air, though which ability depends on the weapon itself. Be sure to check the “Special Ability Factor Confirmation” menu option on any New Type weapon to see what the stuff you find can do once you’ve upgraded them.
http://pso2affix.seilent.net/#!/s=*SA01.ZA01.ZB01.ZC01.ZD01.ZE01.ZF01&1=*TC01.ZA01.ZB01.ZC01.ZD01.ZE01.ZF01&2=*TH01.ZA01.ZB01.ZC01.ZD01.ZE01.ZF01&3=*UA01.ZA01.ZB01.ZC01.ZE01.ZF01.ZD01&4=*AA05.ZA01.ZB01.ZC01.ZE01.ZF01.ZD01&5=&r=*SA01.*TC01.*AA05.*TH01.*UA01&o=B07 like you can just causally do this with the only “prep” work is grinding up the weapons with those particular SAFs on them.
In Closing
Between Souls, Power/Shoot/Tech, Stamina, Spirita, Doom Break, Ability III, Mutation II, Raid Boss Factors, and maybe even Vinculum too, there are plenty of ways to get your gear outfitted with stuff that makes them do even more. If something gets introduced in Episode 5 that changes this up even more, I’ll be sure to update this guide to cover it.
0 notes
Text
Ability Affixing Part 3: Reference Guide
Each Special Ability has different rates for transferring to a different item, and many abilities have increased rates for multiples of the ability present across each item, and some of those cannot even be transferred at all if there is not at least 2 of the ability present! In this article, I’ll break down each group of Special Abilities and what it takes to transfer them across items. If you want to follow along, I am going to be posting screen captures from the spreadsheet I’ve made here: Special Ability Reference document
EDIT: wow you cannot see those images at all; I thought there was some kind of zoom function if you clicked on them haha. yeah just open that spreadsheet right now you are going to need that.
Basic Stat Boosters
This family of abilities are the bare-bones “boosts a single stat” abilities, while they are not too fancy, they do typically give a large amount of the stat they do give.
Power / Shoot / Tech / Arm / Body / React / Mind
I = +10, II = +20, III = +30, IV = +35, V = +40
Stamina I = +20 HP, II = +40, III = +50, IV = +60, V = +70
Spirita I = +2 PP, II = +3, III = +4, IV = +5, V = +6
[Damage Type] Resist I = +3 [Damage Type] Resistance, II = +4, III = +5, IV = +6, V = +7
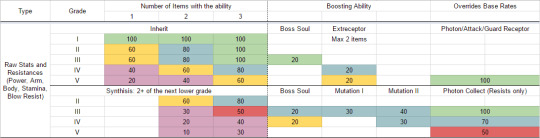
“Boss soul” varies as different boss souls will supply the 20% boost to different abilities. For specifics, please consult the “Boss Boost” sheet on the Special Ability Reference document. The “Extreceptor” ability’s boost for inheriting Stat IV and Vs appears to be ignored if there are three or more of of the ability present already. Photon (Stamina/Spirita), Attack (Power/Shoot/Tech), and Gaurd(Body/React/Mind) Receptors, Available from support items in the SG Scratch, will transfer their designated Stat V abilities with a 100% rate with only one Stat V ability available.
To upgrade a Stat Boost ability up one grade, you need 2 or 3 of the ability present. any more than that will not have any additional effect.
Mutation I and II are very useful for synthesizing Stat III and Stat IV abilities, Photon Collect only works for Resistances, and is only available on items in the Photon Drop Shop, and cannot be transferred itself, so it’s usefulness is limited at best.
Ability and All Resist
Ability and All Resist are interesting, in that they are often found on items dropped by bosses, and can be transferred; but they are much easier to Synthesize yourself
Ability I = +5 All ATK, DEF, and DEX, II = +10 All, III = +15 All
All Resist I = +1 All Resistances, II = +2, III = +3
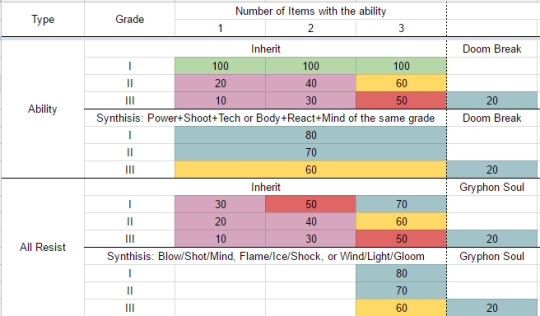
As shown here, Ability and All Resist can be hard to move between items once they exist; but if you combine the right abilities you can Synthesize them at a much more agreeable rate. Doom Break and Gryphon Soul can make moving pre-made Ability III and All Resist III reasonable as well.
Boss Souls
Boss Souls are special abilities dropped by bosses or other specific enemies like Rappies and Singo Betes. These abilities typically boost one or more Attack or Defense stats, or Dex, while also supplying a decent amount of HP, PP, or a little bit of both. There are still exceptions to even that much, so be sure to examine each soul you find to see what stats they give! You can only have one boss soul ability on any given item however.
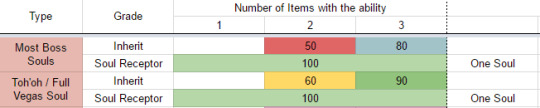
The ability “Soul Receptor” allows you to transfer a boss soul with 100% success, allowing you to safely upslot a boss soul to an item with more ability slots on it. Soul Receptor is only available on items obtained from PSO2es, the mobile companion game for iOS and Android.
Toh’oh and Full Vegas Soul added in Episode 4 have 10% higher transfer rates, but they also have another use: to synthesize a set of special soul abilities

By having an Earth soul and a soul ability of a Free Field Quest boss (forest uses Fang Soul, and Desert is unrepresented), you can create your choice of Act the Soul, Till the Soul, and Magi the soul. These souls have +35 to an ATK stat with +3 PP, making them easy to make and use. However, once made these souls can only be transferred at half the rates normal souls use, but it’s not too difficult to synthesize a new one if you need too.
Mutation
Mutation I appears on gear dropped by bosses that have a title on their name, such as “Tyrant Rockbear”. Meanwhile Mutation II can either be dropped by the special-titled bosses within Seasonal Emergency Quests, like “Tempest King: Fang Banther”. Mutation II can also be synthesized when 3 to 5 Mutation Is are present.

As noted earlier, Mutation I and II both help substantially with synthesizing a Stat III ability from combining Stat IIs however they do also give a respectable amount of All-ATK too!
Mutation I = +10 All-ATK and HP, II = +15 All-ATK and HP
Vinculum and Modulator
Vinculum = +20 All-ATK
Modulator = +30 All-ATK
Vinculum and Modulator are pretty simple yet powerful abilities, they give a large chunk of All-ATK, but you cannot have both of them on the same item. Therefore people tend to favor Modulator over Vinculum, despite Modulator exclusively dropping on items found from ARKS Clones.

Vinculum seems to drop mostly from boss-based Emergency Quests, and bosses encountered in Emergency Quests that have a two-part name; the original example of this is “Mad Machine: Big Vardha”. Though this type of way to point out what drops Vinc seems kinda sketchy since I think many of the translated enemy titles have 2 words to the name anyway. Vinculum is also hard to move around to new items without Anga Soul present.
Modulator is easier to move to a destination item, but ARKS Clones are extremely rare these days. Clones only appear in Single Party Areas of quests that do not have a set enemy spawn layout, or at the end of the Time Attack Abduction quest, where you must face-off against your own clone.
Stigma and Extreme Quest Abilities
Stigma = +20 DEX +5PP
Flict Arma = +20 S-ATK +3 PP
Flict Tiro = +20 R-ATK +3 PP
Flict Magia = +20 T-ATK +3 PP
Alter Arma/Tiro/Magia = +20 ATK, +30 HP

Stigma appears on items dropped by rare enemies, either rare versions of enemies as well as Rappies, Tagami and Izane Kazutchi. DEX is kind of a useless stat so the real thing here is the +5 PP. Incompatible with the Extreme Quest abilities for some reason.
Flict/Alter Arma/Tiro/Magia appear on items dropped in Extreme Quests, so they are hard to come across unless you are running those often. They require three of the same ability in order to transfer at all, so they are hard to move even when you do find a bunch of them. They can also be moved with Extreceptor and 1 of the desired abilities; while this makes it a whole lot easier, Extreceptor is only available from reward items in Extra Hard PSO2es Emergency Missions, so the supply of Extreceptor is very limited.
Raid Boss Factors

Yamato Factor = +20 R-ATK, +10 S/T-ATK, +20HP, +1PP
Mother Factor = +20 T-ATK, +10 S/R-ATK, +20HP, +1PP
Deus Factor = +20 S-ATK, +10 R/T-ATK, +20HP, +1PP
The Episode 4 Emergency Quest Bosses drop items with Factor abilities with their names, instead of Soul abilities. Statistically, they are similar to Flict/Alter abilities but with +10 of the other ATK stats. Each of the Episode 4 Souls, Toh’oh Soul, Full Vegas Soul, and Escared Soul, boost one of the factor’s transfer rates by 20%. While Yamato and Deus factors will drop with the soul that helps transfer them, Mother Factor needs you to bring in a Full Vegas Soul from another item to boost it.
Status Effects
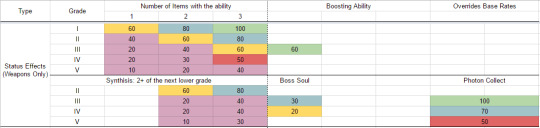
Status Effect abilities are only available for weapons. They can be a bit hard to move around, but in general people don’t go out of their way for them anyway. They can be nice for Fighter mains or subs, since you could use them to help activate Chase Advance on an enemy, or if a boss reacts to a particular status effect.
Doom Break and Miscellaneous Abilities
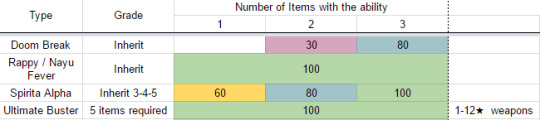
Doom Break = +15 All-ATK, +2PP
Seasonal Rappy and Nayu Fevers = various stats, never more than some combination of +10 ATK, +5 DEX, +5-10HP, +1-2PP
Spirita Alpha = +30 DEX, +3PP
Doom Break used to only appear on items dropped by Odin from the FFXIV collab event; you can still run into Odin randomly in ARKS Quests and Free Field Quests, or as a Parallel Area for his arena, but now they have added it to most of the items that Laplace’s Demon drops, and made the big guy show up in Wind and Rain, and hopefully every seasonal EQ from here on out he’s not going to be in Beach Wars 2017 so now I got no idea if that was a fluke or what. It also gives a +20% boost to Ability III’s transfer rates
Seasonal Rappy and Nayu fever abilities are basically “Junk” abilities that do a little more than the typical Junk abilities. Saint Fever, Love Fever, and Latan Fever are notable for being +10 ATK +2 PP, while Frog Fever, Lovey Fever, and Egg Fever give +10 ATK +10 HP. all six of these come one after another from Haloween through Rainy season Rappies.
Spirita Alpha shows up on item rewards from Code: Variant emergency trials when a person uses a Rare Enemy trigger item from the casino. that or you get Pink ARKS badges as a reward to trade-in for units with Spirita Alpha on them. Nobody really uses this because it’s not much PP and DEX doesn’t really do anything important.
Ultimate Buster only appears on weapons dropped on Extra Hard difficulty, requires 5 items with the ability to even transfer, and cannot be added to 13-star weapons at all. it boosts damage against Ultimate-area enemies by 10%; so it was meant more to help people fight through the Ultimate areas back when they were still new, and 13-star weapons were much harder to obtain. These days it just means weapons can have 1 more ability that can show up on them to boost the overall number of slots that appear on them.
Affixing Hell: Catalysts and Returner

Soul Catalyst, Factor Catalyst, and Ether Soul are very hard to make. I just sell any unit I get with a Falz soul on it these days. they make good cash since people still want to make Soul Catalysts for Astral Soul.
Factor Catalyst and Ether Soul on the other hand are a bit easier, since the Episode 4 Raid Bosses tend to drop their Factor abilities on most of the items they drop (Yamato’s going to get buffed to do that better soon), though since they are all schedule-only emergency quests, the supply lives and dies based on Sega’s Scheduling.

Astral Soul = +35 ALL, +35 HP, +5 PP
Ether Factor = +30 ALL, +10 HP, +6 PP
And here we see why people bother chasing after Soul and Factor Catalysts.
Astral Soul is far and away the strongest soul ability in the game, while the Earth Compound Souls do give +35 to one ATK, Astral just gives everything +35. so really it’s more of an end-goal for users seeking a generalist unit setup.
Ether Factor is the same way, though it trades away most of the HP for more PP. Ether Factor seems a little easier to make since Factor Catalyst only needs 3 ingredients to Soul Catalyst’s 5.
Since Astral and Ether require 4 catalysts, and you cannot have more than one catalyst on a single item, it is impossible to synthesize them both at the same time. Ignore that bit about Astral Soul having a 10% Inheritance Rate with Soul Receptor. Just... don’t look at it...
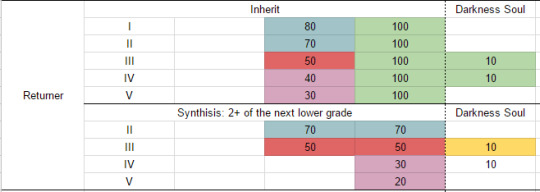
Returner
I = +3 ALL, +3 HP, +1PP
II = +5 ALL, +5 HP, +2 PP
III = +10 ALL, +10 HP, +3 PP
IV = +15 ALL, +15 HP, +4 PP
V = +30 ALL, +30 HP, +5 PP
Upon clearing the Time Trial Abduction Quest, you are rewarded with a 1 to 2 slot unit with Returner I (Super Hard) or Returner III (Extra Hard)
Returner is Upslot Hell.
There are people with one or more unit that has Astral Soul and Returner V on them, but these people have billions of meseta at their disposal.
Add Special Ability items
AC and SG Scratch have a set of items in their prize pool that attach a special ability to an item at the end of the affixing process. These abilities are great in general, but the ones from the AC Scratch generally cost a lot of money to buy from other players, and the ones from the SG scratch are a little hard to come across. They cannot be inherited, so you want to use them for when you want to lock-in your abilities on your units for a good while.
Special Ability Factors (SAFs)

New-Type weapons, when ground to +35, are able to transfer an ability with 100% transfer rate when they are used in Special Ability Affixing. Even the base weapon can provide an SAF, so more often than not you will want to try to stick some cheap abilities on your weapon after you have ground it up to +35 just so you can also obtain it’s SAF. This does -not- consume the ability if someday you decide to use the weapon to affix another weapon, so there is hardly any reason to not affix a base weapon’s SAF if it is available.
Since new weapons are being added every so often, Please consult the Special Ability Factor page of my spreadsheet for more info. (as of this writing I have not added an SAF page)
Swiki also has a good page listing Special Ability Factors, so check that out too.
Sentence and Phrase abilities are only available as SAFs, as well as some normally unobtainable grades of other abilities, like Ability IV (14-star weapons) and Power VI (Seikaiser weapons from upgraded Yamato)
Closing Statements
As PSO2 continues, I will try to update this post with new abilities as they are added, or at least keep the spreadsheet, updated.
There is still one more article left in me for ramble on about Special Abilities, and that is an article on how to get yourself setup with some decent unit abilities without spending a lot of meseta chasing after stuff like Flict/Alter or Modulator.
1 note
·
View note
Text
Ability Affixing Part 2: What’s Upslot?
When you get yourself a brand new weapon from a collection file, or get Deus to drop you some shiny new units; they will usually not have enough ability slots to for you to fit everything you want. In order to do this, you will need to expand the number of ability slots on your item one at a time.

The more slots you attempt to add, the higher penalty your abilities will be hit with. This penalty is applied to every ability individually, so even this chart is a bit misleading. Assuming all of your abilities would normally transfer with a 100% chance before using a boost item, going from 7 to 8 slots will bring them all down to 30% each. So let’s take another look at what your odds are for every ability succeeding their roll:

Yikes! Those are some pretty terrible odds! Luckily there are things you can do to improve these odds, and get your units large enough to accommodate everything you want to put on them.
Restrictions and Rules
one of the first rules of affixing is that the items being used have to have the same number of abilities or more than the base item, they can’t make it too easy on us and let us use a few 1-slot Modulator or Returner V items and stick them straight onto an 8-slot item; that would basically defeat the entire point of there being an extra slot penalty in my opinion.
The other important rule is that you cannot mix weapons and units when affixing; given the abundance of high-slot weapon drops, and a number of other edges they gave to affixing weapons, this really just serves to make affixing units harder. For the record; you can mix units of different types, and weapons of different types when affixing, so you can still use a Sub Unit to add abilities to a Rear Unit. I’ve seen people sometimes think they cannot use units of different types on each other, so I just wanted to get that cleared up too.
Finally, the other rule is that you need to utilize all slots on the base item. This means if you started with a 7 or 8 slot item, you need enough transferable abilities present in order to attempt to fill every slot. This usually only plays a role when you are trying to only use 2 fodder items on a 3 to 4 slot base item, but you have too many abilities around that are either incompatible with each other, or not enough of them present to even attempt to transfer them.
Why would you want to use as few items as you can? Because there is a modifier on how much meseta it costs to affix based on how many items you are using:

High grade items often have a base cost of 51k meseta or more, so trying to use use 5 items on those will cost you over 800,000 for the attempt! so you generally want to use your target equipment as few times as possible, with as few items as possible, in order to keep your final costs down.
Use the Boost
The way boosts, bonuses, and penalties are applied to an ability’s affix rate works like this:
Final Rate = (MIN(100, MAX(Inheritance Rate + MAX(Inheritance Rate Boosts), Synthesis Rate + MAX(Synthesis Rate Boosts) ) ) * Extra Slot Penalty * Same Item Bonus) + Sum of All External Boosters (Items, event boosts, Zeinesis weapon affix boosting potential)
Let’s break this down; first off, the game uses the largest raw transfer rate available given the abilities present on the items being used. Inheritance is simply keeping a pre-existing ability, while Synthesis creates a new ability based on what abilities are available on the equipment being used. Sometimes both methods are present, so the game just goes with the higher transfer rate of the two.
After that, if the Transfer Rate exceeds 100%, it is rounded off here. Sometimes it is possible to have enough of an ability around to reach a 100% transfer rate before any additional abilities can boost it beyond that. For example: Power III + Power III + Power III will allow Power III to be inherited with a 100% chance, but if Vol Soul is also present on the items, it would in theory be boosted to a 120% chance. However, the game does not allow for that, so it stays at 100%. This is important to remember in the next step.
At this point, the Extra Slot Penalty is applied. The penalty varies based on how many slots you are expanding to, should you make an attempt to add on the extra slot. Since base transfer rates cap at 100%, you cannot overcompensate in order to try to negate the Extra Slot Penalty. At the same time, an additional bonus is available if all of your fodder items have the same name as your base item. that bonus is x1.1 if you are only using 1 fodder item, and x1.15 for 2 or more identical fodder items. I didn’t mention this earlier because in practice, it is kind of impractical outside of making affixing fodder items. So here is how the tables from earlier look with this boost factored in:


The only thing this really changes is going from 5 to 6 slots does cross an important threshold when using identical items, but I’ll go into the details on that in the next section.
Finally, the whole thing I have been building this section up to is here. Affixing boosts from Items, Event periods, and if the base item has a potential ability that boosts ability transfer rates, are all Added in at this point. This is what makes adding extra slots a bearable process. You can get items that boost ability rates by 10% as you grind weapons, then 30% boosters are available for 20 Excubes at the Excube exchange, and as well as 40% boosters for 100 Excubes. There are other sources for these items but most of them are limited in the number you can get per week or so. Three or four times a year they also boost affixing rates by 5% or 10%; where 5% normally is during Golden Week, and 10% is a reward from a major in-game event. Finally, as of this writing, the Zeinesis weapons dropped by Deus ESC-A have a potenial that can provide an additional 10% boost, but only if the weapon is the base item; it cannot boost rates if it is being sacrificed as fodder.
Using these boosts, you can go up to +40% on the penalized rates normally, +50% during a boost week or on a Zeinesis weapon, or even +60% if you are affixing a Zeinesis weapon during a boost period. so here is how the upslotting odds look like with boost items factored in:


I didn’t include +55% and +60% on the identical items table because the idea of using multiple identical zeinesis weapons just to add extra slots seems kinda wasteful to me, and it still doesn't allow for a zeinesis weapon to reach 100% odds on all abilities going to 8 slots, so it’s not really reliable enough to be worth it to me.
100% or Nothing
The first thing you need to know about Ability Affixing in general, is that eliminating as much RNG from the equation you possibly can is key. When it comes to adding extra slots, you generally want to have everything reach 100% base transfer rate so the Extra Slot Penalty is applied evenly and consistently across all of your abilities.
The easiest solution for this is to use “Junk” abilities. The Affixing Simulator (found here) has a category called “Junk”, but really they are a stand-in for low-grade abilities like Power I, Blow Resist I, or Stamina I. These abilities can be transferred with 100% success with only one of them on one item; so they are pretty easy to move around and use for adding extra slots.
Many abilities can never reach 100%, so they are a gamble to try to take to a higher number of slots. If you do plan on attempting that; it is important to only use 1 or 2 abilities that do not reach 100%, otherwise you are risking too much; since if even 1 of those abilities fail, you would need to try again, much less if more than one of them fail, leaving you multiple steps backward from where you just were.
Some non-junk abilities can still reach 100%, but that will be covered in the next article; where I break down each type of ability, and how to transfer them around.
0 notes
Text
Introduction to Ability Affixing
Aside from your base stats, equipment stats, mag, and any additional class skills; your equipment can have bonus stats in the form of Special Abilities. These abilities run a range from boosting your attack, defense, resistances, hp, pp, and so on, but more often than not, they might not have everything you would want to have on them. In order to move them around and gather them together on the items you do want to have all these extra stats, we gotta take part in the strange and unnecessarily complex science we know as Special Ability Affixing.
Flat Values Falling Flat?
Now one thing I’ve heard from people over time, myself included, was “I got loads of ATK already, why should I go about the trouble of pushing an extra 30 of it into my gear when my weapon already has over 1400 ATK?”
Well, for an example, let’s take a look at what a level 80/80 Hunter/Fighter can do with a Zeinesis Caliber. First with no units equipped and the stock abilities on a collection file Zeinesis Caliber, then if they only had a +60 set bonus but no other ATK, and from there if they had +60, +120, and +180 S-ATK on all three units and their sword, on top of the set bonus of course, for totals of +300, +540, and +780 S-ATK. The Zeinesis sword is assumed to still be using it’s non-Quilphad potential because that starts to inflate things outside the scope of this article.

As it turns out, all of those flat stat boosts do add up. +60 S-ATK between all of equipment manages to boost their damage ~6%! Not only that, but going up to +120 increases damage by nearly the same 6% over just having +60 S-ATK! Heck, even going up to +180 S-ATK is still holding a strong 6% over +120; practically 20% more damage than the person without anything on their units at all!
One thing that does have an effect on this is if the player has various buffs on them too; here, we can see how this same setup would look if the Hunter/Fighter had Shifta Drink EX and Team Tree Attack Boost Lv8 on them.

While the gaps have been closed somewhat, +180atk still has roughly a 17.6% lead over the person without any S-ATK abilities. I chose Hunter/Fighter with a Sword since Swords have a higher base ATK among weapon types, so special abilities should have a lesser effect on their final damage. But what if we took a look at the opposite end of the spectrum; a Figher/Hunter using the Zeinesis Twin dagger?

Even with the the Attack boosting buffs and Fighter’s own conditional Raw-ATK boosting skills, the +180 S-ATK units are holding a 19.5% lead.
While 180 on everything is kind of hard to pull off without deep meseta pockets, I feel most players should be able to afford to make units in the range of +90 to +110 of their primary ATK stat with the tools they have given us.
But Why All The Effort?
The next concern I’ve seen from players over affixing, is about how much they should really concern themselves with cramming every possible ATK up onto their gear when everything tends to die fairly quickly already. My simplest answer is really just this:
Go as far as you are comfortable with.
While boosting your ATK helps you clear content at a brisker pace; should you feel like you are contributing well enough to the group, I would say you could then branch out to increasing your PP or even defensive abilities! Though as I mentioned earlier, I would strongly suggest you to aim for +90 or more of the ATK stat you plan on using the most.
For defensive abilities, the extra section in my previous article about the Damage Formula noted that enemies can vary wildly in their raw ATK to attack damage modifier relationships, so just sticking raw HP through Stamina III is the easiest way to boost your surviveability across the board.
You Have No Luck
Before I close out this first article and move onto explaining the mechanics behind moving Special Abilities around, the motto I swear by for affixing is simply this:
If the odds are not 100%, they might as well be 0%.
Useful Links
Swiki’s page on Special Ability affixing: my main source of info for these articles.
Swiki’s Special Ability comparison tables: a cool page telling you how much of each stat each ability gives.
A Google Spreadsheet I made based off of data from those Swiki pages. it might not be able to be sorted as easily as Swiki’s tables, but at least it’s in English.
English PSO2 Affixing Simulator: a web-based tool you can use to get a visual of how many of what abilities you need to get what you want.
0 notes
Text
Damage Control

So for my first actual article on this blog, I thought I would start at the core of it all by explaining how your stats and flashy moves get converted into numbers that make the enemies stop moving. So without any more overly wordy sentences, let’s dive right in!
The damage formula for players looks something like this:
Final Damage = ((((Player ATK * Buffs + Equipment ATK + Weapon ATK) - Enemy DEF) * hitbox modifier) + (Weapon ATK * Weapon Elemental Percentage * Enemy Elemental Resist/Weakness)) / 5 * (1.05 * Attack Modifier * Product of Class Skill Modifiers * Weapon Potential)
Yikes; that's a bit of eyeful, but I'll break it all down so we can make some sense of it all. Oh, it's also worth noting that Techniques and Pets use a slightly different formula, but I'll point out the differences as I go along.

Player ATK represents the sum of your base stats without anything equipped except your mag. Incidentally, this is the only part of your stats that buffs like Shifta, Shifta Drink, and the Team Tree Attack Boost buffs apply themselves to. After that, Conditional Class Skills such as Photon Flare, Halfline Slayer, and Never Give Up are added in; as well as any additional stats from your units, equipment sets, and affixed special abilities.
Then your weapon's ATK is added in; however, Weapon ATK is subjected to Damage Variance. If you are using a 7* or higher rarity weapon, at least 90% of your weapon's ATK is used in every attack; with the remaining 10% up to a roll of the dice. If you roll a Critical Hit, you automatically use 100% weapon stats in your attack regardless of damage variance. So this means that outside of class skills that directly boost damage for landing a critical hit like Fighter's Critical Strike and Gunner's TMG Mastery, Critical Hits do not make a huge difference in PSO2.
While Damage Variance uses at least 90% of your weapon's stats, that minimum value can go as low as 10% weapon stats when you are using sub-7* rarity weapons, the "Invade" series 13* weapons, Craft-Extended weapons, and Summoner's pets. It can go down this low based on your DEX stat and the enemy's DEX stat, but it's not really worth going out of your way to build up your dex for. Also as I mentioned earlier, Critical Hits ignores the dex calculation; so you could technically just build up some crit rate to compensate instead.
As a brief aside, Summoner's pets do things a little different. Pet damage factors Shifta at this point, instead of earlier. This means Shifta boosts the values of your conditional skills, set bonuses, special abilities, and your pet's ATK on top of everything else from before! ATK from Cookies and other Candy Box items are added after shifta however. I am unsure if Shifta Drink and the Team Tree Attack Boost go here too or not.
From here; Before any other modifiers are factored in, Enemy DEF is subtracted from your ATK. As of this writing, Level 80 enemies all have 315 base DEF, with varying modifiers per enemy DEF stat; ranging from as low as 90% (283) up to 120% (378). So what this means is the more Raw ATK you have past this amount, the more your damage modifiers have to multiply! This is where Special Abilities manage to retain their relevancy, since every ATK point you push past enemy DEF means more of it gets multiplied in the end; the same applies to Shifta and other buffs.
After that, this number gets multiplied by the enemy’s Weakpoint Modifier for that damage type. This is basically where it matters if you are hitting a weakpoint or not. While they generally keep enemy weakpoints uniform for all damage types, many enemies have an extra shooting damage weakpoint associated with their head. However, Techniques use the elemental weakness modifier here, instead of the Tech damage modifier of the weakpoint.

In the next section of the damage formula, your weapon's Elemental Percentage is factored in. Your weapon's ATK is multiplied by it's elemental value, then by the enemy's modifier for that particular element. What this means is that your weapon's Elemental value is adding up to an additional 60% of it's stats to your attacks! This is really important! Most elemental weakpoint modifiers on enemies are about 1.2x damage, so even if your weapon's element is not the weakness of the current target; you are still getting a large amount of extra stats from your weapon's elemental value! Techniques though, skip this part of the formula entirely, since they factored in elemental weakness earlier. Element values on Tech weapons are still extremely important; mainly from Force's Elemental Convert skill, but that isn't factored in here.
Once all of those calculations are said and done; the raw numbers are added together and divided by 5. Don't ask me where this 5 comes from, it's just sort of there.
Finally, all of the percentile modifiers from your Class Skills, the current attack you are using, your weapon's potential, and basically anything else, are all multiplied in. Class skills are multiplicative, even among similar or related skills such as Force and Techer's Elemental Mastery skills; which multiply together from 1.2 and 1.2 into a 1.44x boost! While sometimes a skill might seem like it does not offer too big of a boost on the surface, it could still wind up giving you a lot more damage than you think! There is also an extra 5% damage boost thrown in here too, like that "divide by 5" thing earlier I am not really sure what this is about.
Well I hope that clears up a bunch of things, but to sum it all up here's what I consider to be the most important things to take away from this:
A weapon's elemental percentage is equally as important as it's grind level, while the element itself is not as important to match to an enemy's weakness (with some exceptions)
Special Ability Affixing is still pretty important! I'll cover the basics in a future article.
Buffs like Shifta and Shifta drink can make a noticeable difference!
Use your skills! All of those 1.15x boosts could have a bigger impact on your damage than you think!
DEX does absolutely nothing for your attacks.
Useful Links:
Swiki's article on damage calculation: This is where I got most of the info for this article, I just ran it through google translate and pieced it together with prior knowledge.
These tables at this part of the article tell you in general what uses which ATK stat and is dealt as which damage type.
PSO2 Damage Calculator: A tool you can use to see how skills multiply together for comparing subclasses, or compare weapons without needing to manually test them against each other in-game.

As a bonus, I also looked into the formula for taking damage as well, it's not too different from how we deal damage:
Max damage taken = (enemy ATK - player DEF) / 5 * 1.05 * attack modifier * player skill modifiers * player's applicable resistance
the DEF stat used is dependent on what ATK stat the enemy's attack uses; and when you take damage there is an option that turns your health bar the color of the used DEF stat. orange for S-DEF, blue for R-DEF, yellow for T-DEF, and red for attacks they intentionally bypass your DEF stats, such as environmental hazards.
"player skill modifiers" mostly means things like Fury Stance increasing the damage you take, as well as skills that reduce overall damage like Massive Hunter.
"player's applicable resistance" means that every enemy attack only uses 1 out of the 9 resistance stats: striking, ranged, tech, and all six elemental resistances. The majority of enemy attacks use Striking resist, but there are some known cases of ranged and elemental resists being used. These have mostly been figured out manually by players using a set of weapons with one of each resist ability attached to them, but I don’t really have a usable listing of what enemy attacks use which resistances.
While all of this is well and good; an important thing to note is that Enemy ATK and their attack modifiers vary wildly between enemies. Many enemies have high modifiers on their ATK stats with lower power multipliers on the attacks they use, making your Resists play a bigger role than your DEF; but at the same time other enemies have low ATK mods but use attacks with high multipliers, causing DEF to play a bigger role. Neither set of stats seems more important than the other, but simply having high HP seems to be the best defensive option of them all.

Next week's article will cover the basics of Special Ability Affixing, something I often see players having a hard time with.
0 notes
Photo

Urgent Quest : Dark Falz Loser
0 notes
Photo

Urgent Quest : Dark Falz Elder
0 notes
Last Seen Blogs

anoudzzy
Anoudzy Alkuwari

anorexia-0
Celular Comunal 📱

oraw3n
Tonight We Hunt!

librospdfgratismundocom1
Librospdfgratismundo

munshund
Aujourd'hui