#psychonauts 2 modding tutorial
Explore tagged Tumblr posts
Visit Tumblr Blog
Explore Tumblr blogs with no restrictions, modern design and the best experience.
Last Seen Tumblr Blogs


Fun Fact
Mobile US users spent an average of 115.8 minutes on Tumblr app monthly.
Text
Psychonauts 2 - Texture Change and Model Replacement Tutorials
So, someone messaged me the other day asking how I changed the textures and changed the models in Psychonauts 2 and I thought I may as well write a guide to how I managed to achieve some of these changes.
I apologize in advance with how lengthy this will most likely be and if any of the wording might be a little confusing, feel free to ask me for any further explanation on areas where you might be confused.
Texture Changing Tutorial: Link
Model Replacement Tutorial: Link
Enjoy!
#psychonauts#psychonauts 2#psychonauts 2 modding#psychonauts 2 mod#model replacement#texture changing#psychonauts 2 mod tutorial#psychonauts 2 modding tutorial#unreal engine 4 mod tutorial#texture modding
28 notes
·
View notes
Text
Texture Changing (Psychonauts 2 Modding Tutorial)
So first, we'll start with the texture changes, since they're an easy thing to get the hang of.
First, the programs you'll need:
Epic Games Launcher [to download Unreal Engine 4.26.2]: Link
UModel [Psychonauts 2 version, this specific version makes it so you can export the models]: Link
Unrealpak [to repack everything into a pak file for the game to read]: Link
Paint.NET [just the tool I use to change the textures]: Link
Once you have all the programs needed, open up UModel and set the input to where your game pak is located. [Which is typically in 'C:\Program Files (x86)\Steam\steamapps\common\Psychonauts 2\Psychonauts2\Content\Paks'].
You don't need to worry too much about anything else in that menu, just click OK. Now, it'll open another window showing various files. For this tutorial, I'm going to change Raz's P1 Body texture, which is located in Game/Characters/Raz/Outfit_P1.
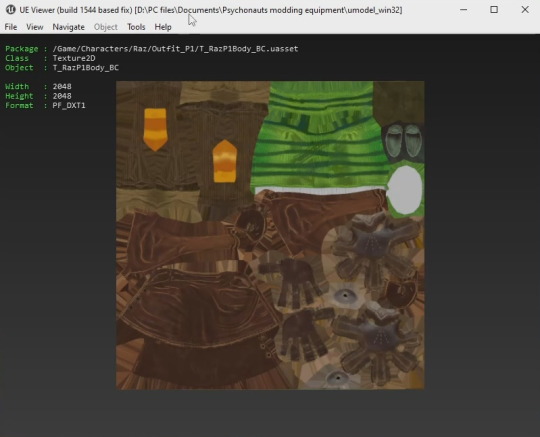
Note: The textures you're most likely wanting to change are the ones that end in BC. Don't worry about the other ones. Also, if you export the models, that'll also extract the textures as well.
Make sure to save the texture as TGA (which you can change in the Tools/Settings menu.
Once you have the texture extracted, use any photo editing program that can use TGA files [such as Paint.NET] and edit however you like.
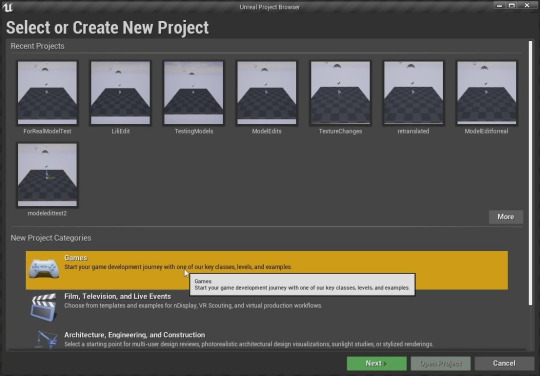
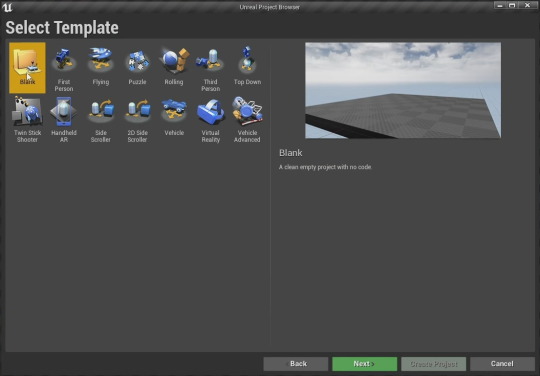
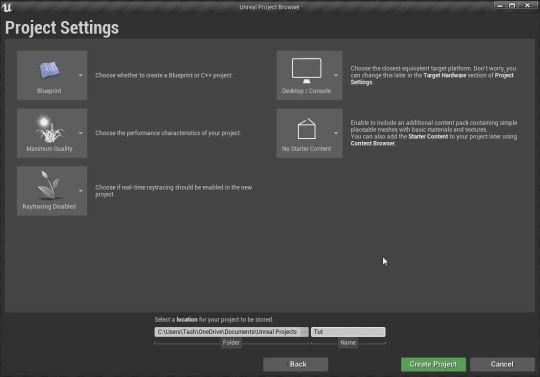
When you've done your changes, now open Unreal Engine 4.26.2. (Which you typically do by opening the Epic Games Launcher, but you can pin the Unreal Engine application to your toolbar to ease of access.)
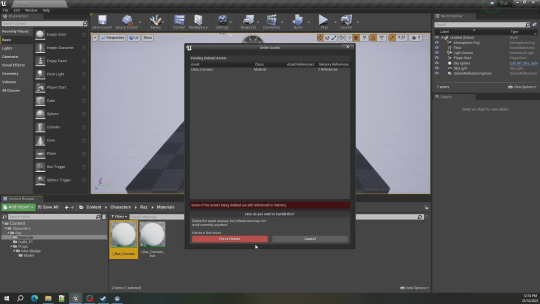
It'll open up to something like the images below, so just choose Game, Blank and name the project however you like and then Create Project.
Once it has opened, drag and drop your edited texture into the bottom grey area and click 'Save All' in the File menu. Now, to cook the texture by clicking 'Cook Content for Windows' in the File menu.
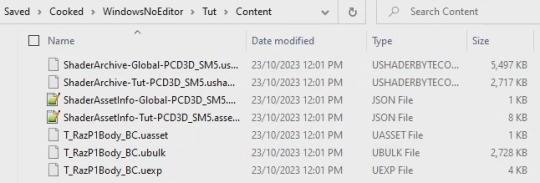
When it is done cooking, left click the texture and use 'Open Cooked File in Explorer', it'll open to the window that's shown in the image below, but DO NOT USE that asset. It is NOT what we want.

Instead, click on your project's name in the address bar (in my case, I would click on Tut that is before Content).
Then go into 'Saved', 'Cooked', 'WindowsNoEditor', 'Tut' and 'Content' and there are the assets we need until the Shadow info.
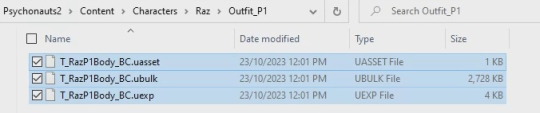
Make a new folder somewhere else and name it 'Psychonauts2', then another folder in it named 'Content', the next folders depend one where you got your texture from, since I got mine from Raz, I'd need to make a folder in Content called 'Characters', one in that called 'Raz' and then another in that called 'Outfit_P1'. [Such as the image below, showing the folder structure in the address bar.]
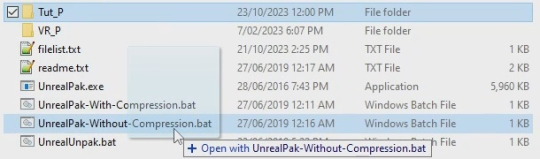
Now to pack this all up into a pak file. Go into the folder does has your UnrealPak bats and create a folder with whatever you want to name your mod. (For this one I named it Tut_P, I'm not entirely sure you need the '_P', but I do it just in-case, so I advise you do too.) Then put the Psychonauts2 folder you created with your cooked edited texture into it that folder. Once you've done that, drag and drop your 'modname_P' folder over any of the UnrealPak bats (that isn't the unpack one). It doesn't really matter if you use it with or without compression, I just usually use 'without' compression.
Once it's all paked and ready to go, just head on over to C:\Program Files (x86)\Steam\steamapps\common\Psychonauts 2\Psychonauts2\Content\Paks and create a folder (if it's not already there) called ~mods.
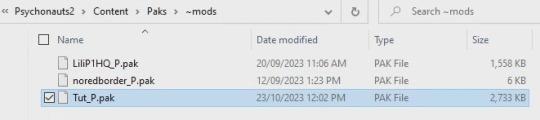
Drag and drop your cooked pak into the ~mods folder and viola. You're done. Open up and the game and you should see whatever you changed in the game.
11 notes
·
View notes
Text
Model Replacement (Psychonauts 2 Modding Tutorial)
In case you clicked this one over the Texture Changing tutorial, I'll include the programs you need, once again, as well as a specific one you'll need for models.
Epic Games Launcher [to download Unreal Engine 4.26.2]: Link
UModel [Psychonauts 2 version, this specific version makes it so you can export the models]: Link
Unrealpak [to repack everything into a pak file for the game to read]: Link
Paint.NET [just the tool I use to change the textures]: Link
Blender: Link
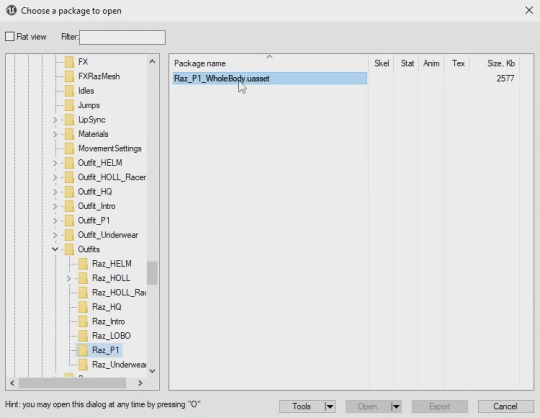
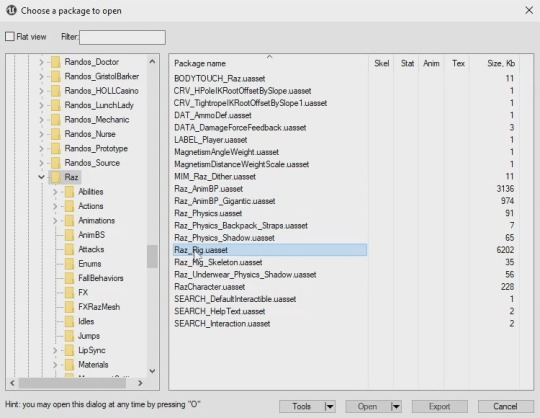
Now, use UModel to extract the model you want to replace and the one you wanna to replace with. In this tutorial, I'm going to replace Raz_Rig (Raz_HQ) with Raz_P1.
Note: Raz's main HQ model used in-game uses the 'Raz_Rig' model and not the Raz_HQ_WholeBody that is found in the Outfits folder, with the other outfits. The HQ_WholeBody model IS used, but for specific cutscenes. For this tutorial, I am only changing the Raz_Rig model.
Once you have your models extract, open up Blender. Now, you'll need a plugin in order to the use the psk files in Blender. You can get the plugin here. There are instructions on how to install it on the Github page.
When you have that installed, make sure to change the Unit Scale to 0.01 and the Length to 'Centimeters'. (I'm not an expert on model stuff, I don't know what this does, but the other tutorials I used would have varying options and this is just what I use.)

Make sure to the delete the cube by just clicking it and pressing DELETE.
With all that set up, import you models. (Press the Import button and the PSK file type, then just find where you extract your models to import them.)
I typically import the model that'll be replaced first, so in this case it'll be 'Raz_Rig' and then the model that'll be replacing that, so for this tutorial that's 'Raz_P1_WholeBody'.
The Collections (top right) should look like this (just press the triangles on the left of the Armature names to have what's seen here). [Make sure the models are call Armature.]
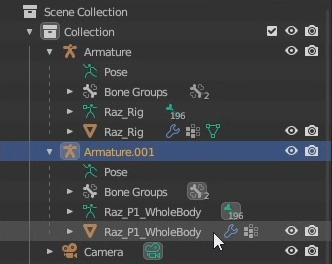
Now, delete the mesh that's the model that you want to replace, so here I'll delete Raz_Rig (With the Downwards Orange Triangle).
Then press the mesh of the other model (in this case, Raz_P1_WholeBody) and, holding ctrl, press the top Armature. Press ctrl + P and click 'Armature Deform'.
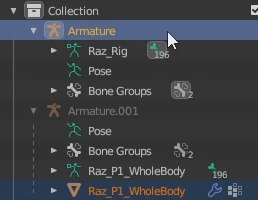

This will put the mesh you've selected into the top Armature, leaving he bottom Armature.001 without a mesh (you can delete Armature.001 at this point.)
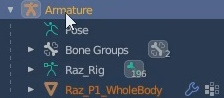
Press 'Armature', hold shift and press the mesh (Raz_Rig, orange downward triangle.) This will select everything between the Armature and the mesh.
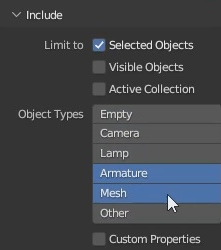
Now we can go ahead and export the model. Press Export and export the model as an fbx. Now, make sure to have these options as shown.
'Selected Objects' checked on and press 'Armature', hold shift and press 'Mesh'.
Press Geometry and make sure 'Smoothing' is set to 'Face'.
Press Armature and uncheck 'Add Leaf Bones'.
Then uncheck 'Bake Animation'.


Double check to make sure you have this all correct, name your model (I usually prefer to name it after the model I've replaced, so I named this one 'Raz_Rig') and export it.
Now, open up Unreal Engine. Instead of what we did in the Texture Changing Tutorial, we gotta put in the paths for where the materials, mesh, skeleton and physic assets go.
To start off, you'll already have a Content tab. (To see the rest of the hierarchy, click the three bars that have a left facing triangle next to the Search Paths button.)
Add a new folder and name it 'Characters'.
Since we're changing Raz in this tutorial, add another folder and name it 'Raz'.
Now, for the materials, add a folder named 'Materials', 'Outfit_P1' and 'Props'. Within the 'Props' folder, add another folder named 'InternBadge' and within that folder, name a new folder 'Model' (we'll be placing the Min_InternBadge in here).

You can used where your model was extracted as a good starting point to where the materials are places.
So, I_Raz_Corneas goes into the 'Materials' folder, 'I_RazP1Backpack', 'I_RazP1Body', 'I_RazP1Eyes', 'I_RazP1Hair', 'I_RazP1Head', 'I_RazP1Helmet' and 'MIN_P1_PsychonautsPin' into 'Outfit_P1' and [as stated above] 'Min_InternBadge' in the Model folder of the InternBadge from the Props folder.
Now, since the Raz_Rig is just placed in the Raz folder itself, you don't need to move it, or the Physics or Skeletons files. You will need to rename the Physics file to 'Raz_Physics', but that's all. (If you're replacing a different model, you'll also need to rename the Skeleton to 'Raz_Rig_Skeleton'.)

Now, back to the materials. We've gotta create a 'Material Instance' for all of them. Right click the material and press 'Create Material Instance'. This will create a dupe that has the same name, just ending with Inst.
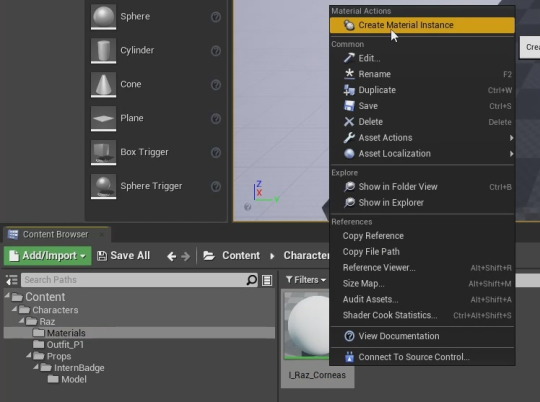
Delete the original material and then delete the 'Inst' part of the file name.

Once you've done that to all the materials, go back to the Raz_Rig mesh in the Raz folder, double click it and it'll show you the screen in the image below. Make sure to re-add all the materials onto the mesh.
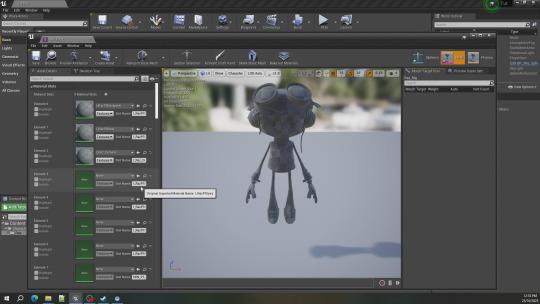
You can do what I do and hover over what the original material was to insert it. (You can also press the highlight button to show which part of the mesh is connect to that material.)
Once you've done that, make sure to click 'Save' on the top left, then close that window.
Now press 'File' and 'Save All' the project, then press 'Cook Content in Windows'. Wait for the assets to cook and when they're down, left click on any of the files and press 'Open Cooked File in Explorer'.
I'll repeat what I wrote in my Texture Changing tutorial, if you've only read this one.
It'll open a window to the cooked assets, but this is NOT what we want.
You need to click on your project's name in the address bar, then go to 'Save', 'Cooked', 'WindowsNoEditor', 'Tut [or whatever you named the project]' and 'Content'. Once in Content, go to 'Characters', then 'Raz'. You'll find the Raz_Rig assets you need 'uasset' and 'uexp'.

Make a new folder anywhere else (I usually do one within the folder of the UnrealPak, where the bats are and name it whatever you're going to name your mod, make sure to add a '_P' to it. (I named mine Tut_P)
Within that folder, create a new folder named 'Psychonauts2', in that folder create 'Content', in that folder create 'Characters', in that folder create 'Raz' and within the Raz folder, place your cooked assets.
Drag and drop your 'modname_P' folder over either the UnrealPak with or without compression bats and it'll create a new pak file using your folder name.
Head over to C:\Program Files (x86)\Steam\steamapps\common\Psychonauts 2\Psychonauts2\Content\Paks and create a folder (if it's not already there) named '~mods'.
Drag and drop your newly create pak file in there and you're all ready and set to go!
If you have any questions, feel free to ask. I can made a video version if any of you would prefer!.
8 notes
·
View notes
Note
Hey I've seen your texture and model changing tutorials, tried them out and they worked perfectly great but it also made me curious. Is there a way to customize the model (not the textures nor using already in game models) by using sculpting and such and make it work?
I've seen few mods that were completely replacing the models in game and was interested in trying to do this myself (still learning how to do such tricks) and since everything by your tutorials worked, I thought maybe you know how to do this too or at least has any knowledge where to find tutorials.
Even if no, it's fine, I'll try to do so myself till i succeed. Still thanks. Asking this on anon because anxious
Unfortunately, I'm not exactly sure how to do that myself.
There were a few guides I used to be able to change the meshes in Unreal Engine 4 games, of which I applied to Psychonauts 2 and I can share those here.
This guide talks about deleting some of the mesh and then extending the mesh to cover the hole, as well as re-assigning materials.
This YouTube playlist of modding Stray is, funnily enough, what helped me actually work out how to get my mods working in the game. This gives the basics of editing and sculpting a model in blender (namely Part 4).
I do want to try and add some meshes to models in the game, like Christmas hats and such. I'll share more details if I can get that working, but I hope the guides I've linked help somewhat.
Sorry I couldn't exactly help out, but once I get more experience with it, I'll make sure to add onto this post.
#psychonauts 2#psychonauts 2 modding#psychonauts 2 mod#model replacement#guides to modding unreal engine 4 games#ask answer
6 notes
·
View notes