#same measurements for both. i might have used a larger seam allowance for the charcoal maybe
Text
finally finished my satin poet shirt and it’s so prettyyy if any vampire wants to transform me... well im all neck
#went with gold buttons + buttonholes + no lace in the end#its actually pretty understated given its. a puffy satin shirt with gold buttons#v comfortable too even if the collar is pretty tight#funny that this collar fits just right but the charcoal cotton is too small to overlap (i just made braid ties for that one) when i used the#same measurements for both. i might have used a larger seam allowance for the charcoal maybe#anyway i recommend bernadette banner and marius lee's videos on 18th century shirts#in case you wanna feel like a vampire. you dont even need a machine at all these are 100% doable by hand if you can handsew#(in fact you can hand sew ANYTHING all those fancy 18th century clothes are pre-sewing machine)#they use linen bc theyre doing it period accurate but cotton is cheaper and easier to cut bc you can just tear the fabric#i make my body pieces 60cm long so i can use just 1m of fabric + i like short tops better anyway#my satin was a stained offcut from the offcut bin so it was stupid cheap so if youre afraid to mess up or w/e just get cheap fabric!#you just do more stuff bc you can just rationalize it as 'well if i mess up it was just 6 bucks' - same think for cheap sketchbooks etc#anyway i kinda wanna buy some cheetah print satin for a light jacket now. maybe a haori style maybe even a shirt-jacket look
2 notes
·
View notes
Text
Sourdough Bread: Sun-dried Tomatoes & Parmesan // Roasted Garlic & Rosemary
Test Recipe 01
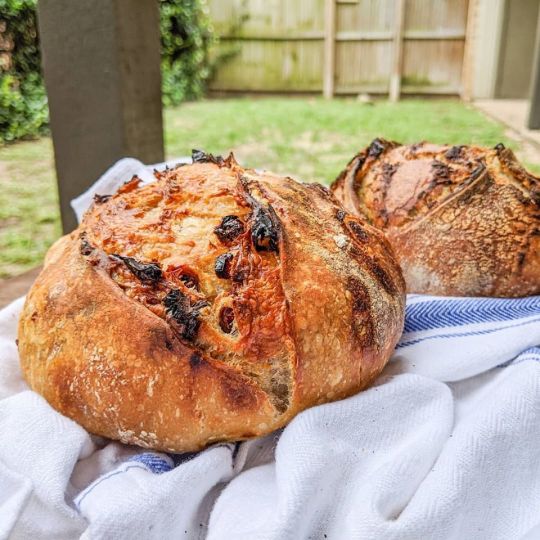
Sun-dried tomato, parmesan boule (front) // Roasted garlic & Rosemary boule (back)
Overall Outcomes
Bread Score: 7/10
Would have preferred larger, open crumbs. Bread was denser than I would like, but I was happy to see an even distribution in crumbs overall, a good sign of better shaping. Nice oven-spring and rise on the loafs. Beautiful coloring on crust. Much better compared to my first foray into breadmaking. See section on bread to see what I tried this time round that made it better.
Flavor Score: 2/10
The low score wasn’t because it tasted bad. Rather, it was simply the lack of flavor that was disappointing. It just tasted like plain sourdough. I ended up eating it with some whipped cream cheese. Whenever there were bites that contained the flavor bombs, it was great.
On the Roasted Garlic, Rosemary loaf:
Best enjoyed toasted. Cream cheese complemented the herbaceous flavors really well, kinda reminiscent of Boursin’s garlic chives cream cheese.
The Good
The sticky, mushy garlic helped the herbs clump together, which ensured those flavors always lived together, rather than separate.
The Bad
Mushy clumps of roasted garlic ruined the texture of bread. It was also unevenly and scarcely distributed throughout the loaf.
The Techniques
Roasted a head of garlic in the oven for 45 minutes till caramelized and mushy. Cut cloves into chunks, not tiny because I thought I wanted bites of flavor. This was a terrible experience. It was mushy, sticky and hard to handle. it caused all the rosemary to clump together and I could not get the incorporated into much of the dough because of the low volume.
Flavor bombs were introduced in final shaping stage as well, incorporated with every fold in the Tartine book’s packaging fold technique.
There must be a better way to infuse garlic flavors into the loaf.
Things to potentially try next time:
Definitely MORE VOLUME of garlic & rosemary. I used 1 head of garlic. There wasn’t much garlic from it after roasting. Might need 3-4 heads of garlic next time for a half-sized boule.
Incorporate smaller bits of roasted garlic instead of chunks
Mash into a butter with olive oil and chopped herbs and incorporate into a loaf through a lamination method, like a cinnamon roll/babka or croissant instead.
Try diced, raw garlic. Maybe it’ll roast and caramelized during the baking period to get the same effect and you won’t have to deal with messy, mushy garlic that stuck everywhere.
Would garlic oil work? How would fat incorporated into a dough affect proofing and rise? Would it still become bread?
Tips from the FB sourdough community:
I roast the garlic in foil in the oven just to the point where it is roasted and the cloves are still holding together so I can dice it. I don't roast it until I can just squeeze it into a paste.
Once it is minced I will put it in a little bowl with just 10-15grams of EVO just to keep the garlic from clumping and to help it distribute through the dough a bit.
I add it at my 2nd turn. I will autolyze and then start my turns and at the 2nd one I will add the garlic and EVO mix to the dough and squeeze through until the extra liquid is absorbed and the garlic is distributed through.
At most reduce your water amount by a few grams if you are worried about the hydration level.
~ Stephen Blanchard from https://stephensbreads.com/
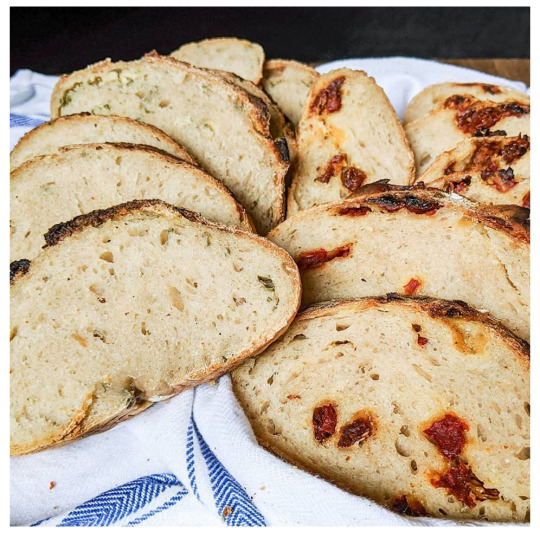
On the Sun-dried Tomato, Parmesan loaf:
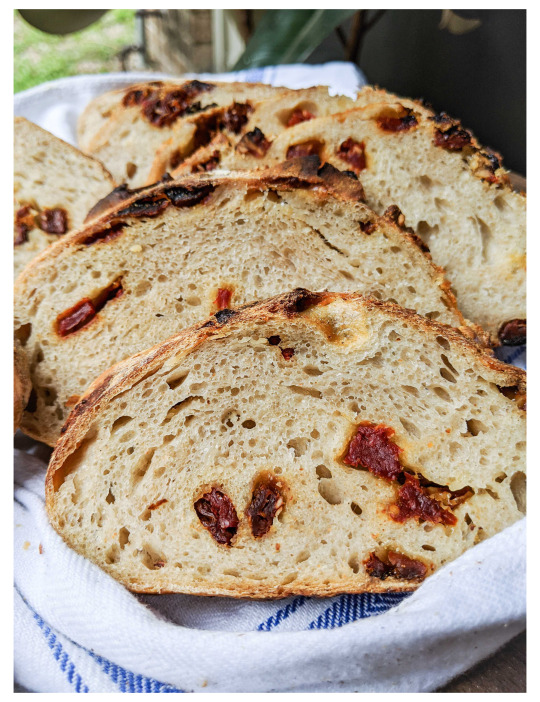
“oh what a beautiful crumb”
The Good
The loaf smelled AMAZING while in the oven. You could smell the gorgeous scent of Parmesan and sun-dried tomatoes. I was expecting it to be very rich in flavor.
The Bad
I was nervous any cheese on the surface was going to burn real badly during the bake, but I was wrong. Not only did it not burn, it gave the crust a glorious golden brown.
I wished there was more cheese on the surface, and in the interior of course.
Since I had used shredded cheese, the flavors were really mild, if not, undetectable.
The sun-dried tomatoes on the other hand, burned to a bitter, charcoal crisp on the exterior of the bread. Next time, make sure any sun-dried tomatoes are on the interior of the bread. Thankfully, those on the surface were easy to pick off without any visible damage to the boule.
The Technique
I used 1.5 oz shredded cheese and opted for 2 oz dry-packed sun-dried tomatoes instead of the oil-packed variation for fear of what the excess oil would do to my dough.

Flavor bombs were introduced in final shaping stage as well, incorporated with every fold in the Tartine book’s packaging fold technique. Even after chopping the sun-dried tomatoes, they were still bulky and made folding and shaping difficult. Building surface tension on the dough was a little trickier with this.
Things to potentially try next time:
Soak sun-dried tomatoes in water, then use that water for the doughChop sun-dried tomatoes smallerUse more cheese, both on interior and exterior of loaf.
On the bread making:
Base Recipe: I used the recipe for the Basic Country Loaf from the Tartine Bread book.

(img credit: Tartine Bakery)
I halved the recipe, so my boules are only half-sized boules, perfect for portion control for me.
For my Levain:
I made 120g of levain even though recipe only needed 100g, so that I would have 20g remaining to keep as the mother starter.
20g starter
50g flour (25g All Purpose flour, 25g Whole Wheat)
50g water
For the 2 half-sized boules (about 6in in diameter):
350g water
100g levain
450g AP flour (would prefer to use bread flour next time)
50g Whole Wheat flour
10g salt, dissolved with 25g water
Thoughts on Technique
Dissolving levain in water first then mixing in flour for autolyse, incorporating salt dissolved in water after dough has rested for 1 hr.
I really liked this technique. Joshua Weissman uses this as well. I felt that the levain and salt water were better, and more evenly, incorporated into the dough this way, versus the finger poking, stretch and fold method from Mike Greenfield from Pro Home Cooks.
Using a clear, transparent tupperware for bulk proofing/stretch & folds.
This allowed me to measure and track how much the dough was growing as a better indication of proofing stages, versus when it was in a stainless steel bowl. I did not see very much bubbles, like in a starter, but I could see the change in volume. Dough also felt lighter and aerated over time, become more fluid in the container, but not in a gloopy, sticky dough sense. It detached cleanly from the container. It still wasn’t clear to me whether or not dough was perfectly proofed though. Is this over? under? No idea. Note: I proofed for 4 hrs with 6 sets of stretch & folds ever 30 minutes in a ~78F environment.
Dip your hand in (unchlorinated/boiled and cooled) water before handling dough.
This creates a magical glove that prevents the dough from sticking to your hand. Did not realize dough was hydrophobic(?), but that was cool. Not entirely sure if using normal tap water was fine, but since chlorine could kill the bacteria and yeast in your starters, I didn’t want to risk killing it when I needed them to proof the dough.
Use a bench scraper. It is your friend.
This made shaping the dough so much easier, especially the turns & tucks. Make sure to wet your bench scraper prior to using to prevent the sticky undersides of your dough from sticking to it though.
Do the circumference pull and pinch dumpling method for first shaping to develop more dough surface tension first, before the turn and tuck.
I only did the turn and tuck, as instructed by the book, but it didn’t feel like enough surface tension was built. Use this technique that Jack the Baker recommends instead to prevent your dough from spreading. I used this to tighten up the dough later when it was in its proofing bowls.
It’s fine to shape, shape and shape again.
After a beautiful first shaping, the dough deflated and became a sticky mess in my second attempts of shaping after incorporating the flavor bombs. So defeated was I, that I had expected to get 2 flat, frisbee-like dense loafs the next morning. I had already placed the doughs in its final proofing bowls, dusted with rice flour, so I didn’t want to risk reshaping and incorporating rice flour into the doughs. After taking a break and leaving the doughs in the fridge for its overnight proof, I mustered up enough energy to try another Hail Mary pass to save it. I pulled the dough out of the fridge, pulling the edges of the dough and folding it into the center to create surface tension, then pinching the dough folds together until the seams were invisible. Not sure if it helped, but it created the (dis)illusion that I’ve incorporated more air into the boule for hopefully, a decent rise during the bake.
The next morning, I did the turn and tuck for one final time until it looked like a beautiful, round, and tall ball of dough before baking. This worked extremely well and the final boule came out looking very well shaped versus if I had just placed it into the oven as is, without shaping.
Proofing covered with a dish cloth instead of cling wrap/plastic
Now my bowl is deep enough for my tiny boules, so I don’t have to worry about dough spilling out during proofing. I didn’t use plastic wrap this time when resting my doughs overnight in the fridge. I covered it in my dish cloth loosely. I did not dust my doughs of excess dough prior to baking either. Having it uncovered by plastic allowed the dough to try out abit more, resulting in a nicer, crackled crust this time round and I liked it better.
Baking withOUT a dutch oven
Yes, it’s possible. The last time I did made bread, I baked it uncovered in my cast iron skillet with a tray of ice cubes in a tray underneath for steam, as suggested by Mike Greenfield from Pro Home Cooks. I didn’t think it was enough, and my bread came out with the ugliest crust (see pic below). Dissatisfied, I needed to find a better method.
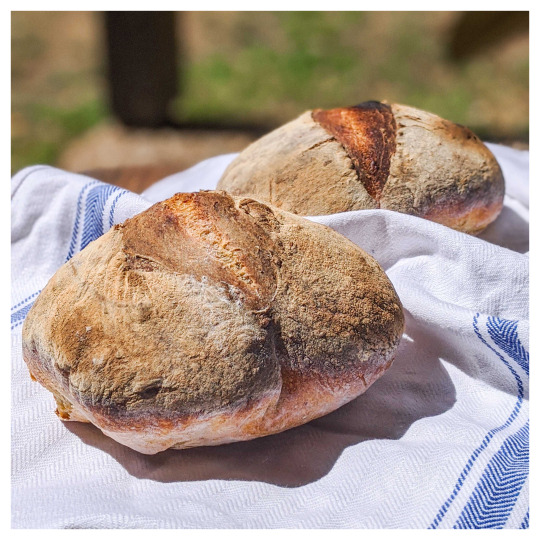
My first sourdough breads. SEE THAT UGLY OLD ASS CRUSTY TOP??? Looks like your grandma’s ashy butt. No. can. do.
Research with various videos and the FB group of sourdough experts revealed it was an issue with insufficient steam during the bake. So this time, I provided a heavier source of steam, and trapping any steam generated from the dough during the bake by covering the top with another skillet.
I had bought an official Easy Tiger sourdough loaf, placed it in my cast iron skillet to measure height. Turns out, having two cast iron skillets stacked on top of each other was tall enough, especially for a half boule. Here’s my setup:
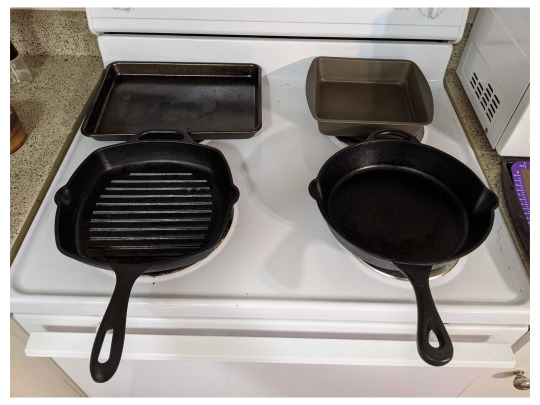
2 cast iron skillets, a baking sheet, and a small cake pan.

The tray under cast iron was set to prevent the base of my boules from burning. Is it necessary? I’m unsure at this point. Would have to test it out next time round, but no harm no foul to be extra safe on these early, vulnerable babies.
The spouts on the cast irons meant that steam could escape, unlike an enclosed dutch oven or combo cooker. So, I went overboard by providing an additional source of steam underneath in the form of boiling water poured into the cake pan...just in case.
Removing the top skillet during the bake revealed that it did provide some level of steaming with it’s paler, shiny crust, but there was still enough crust to indicate that it didn’t do a great job trapping steam inside the skillets, so having additional steam was beneficial after all. I can’t say this with confidence. Only changing things up and experimenting during my next bakes will confirm my hypothesis.
Next Iteration
I would definitely stick to this Tartine recipe for bread making. It was easy, seemed fool-proof, and the number of people using it as a guide meant you had lots of tips available on the youtube channels.
Would definitely use bread flour instead of normal white flour next time round for a stronger gluten structure though. That might give me a more open crumb this time.
Would also stick to majority of the techniques, with changes in:
incorporating flavor bombs during stretch & fold instead of final shaping stage
changing the shaping techniques to generate more surface tension and reduce spread of dough.
volume and treatment of flavor bombs as mentioned in the earlier sections.
0 notes
Last Seen Blogs

crownhale-blog
we are revolution

bsdstolemysanity
Liz

aphion
Aphion aka Radi

snorkiss
snårkis

lubeservice
Untitled