#silverFast
Explore tagged Tumblr posts
Visit Tumblr Blog
Explore Tumblr blogs with no restrictions, modern design and the best experience.
Last Seen Tumblr Blogs


Fun Fact
Tumblr Inc. is using 66 technologies for its website.
Text

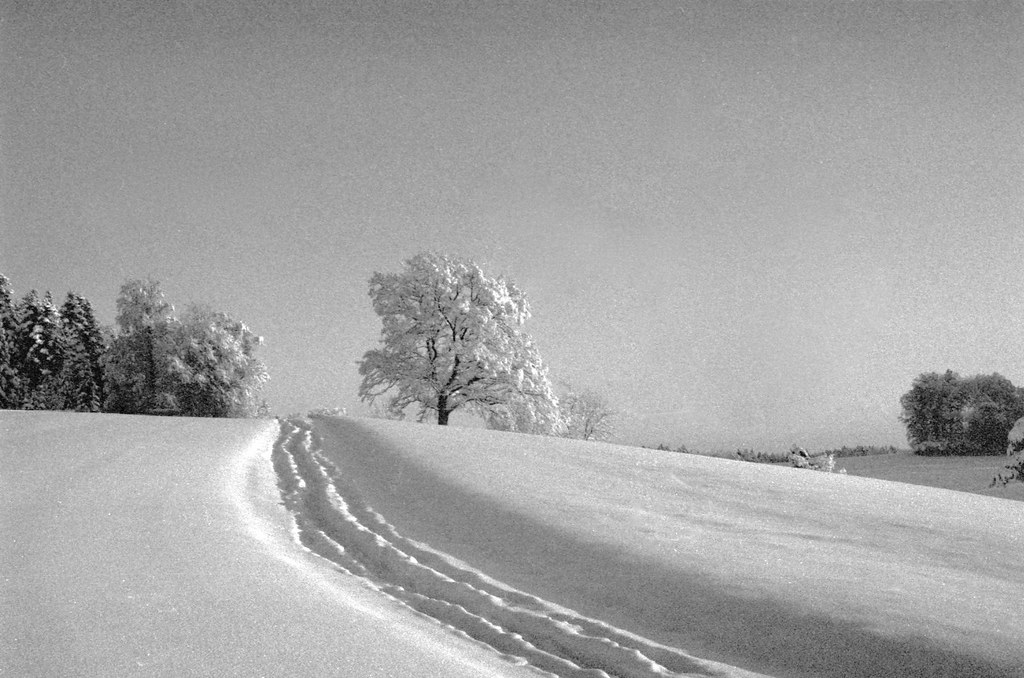
Dortmund revisited #2
[Mamiya C330f & Kodak Ektar]
#original photographers#photographers on tumblr#dortmund#film photography#analog photography#germany#medium format#120#mamiya c330f#kodak ektar#epson v700#silverfast
76 notes
·
View notes
Text

Granada Theatre during demolition. Chicago, October 3, 1989
#theatres#chicago theatres#urban exploration#photographers on tumblr#original photography#film photography#35mm photography#granada theatre#movie palace#theaters#chicago theaters#granada theater#ektachome 100#bruce sharp#personal favorites#lost places#chicago#1989#canoscan 5600#silverfast#vintage theatres#rogers park
15 notes
·
View notes
Video
Duck or Say F&@# Tree by Neil Kesterson Via Flickr: Historic South Hill in Lexington, KY. Olympus OM-2, Fomapan 400, Caffenol Stand
#35mm#B&W#Fomapan#Fomapan 400#Kentucky#Lexington#OM#OM-2#Olympus#OpticFilm 7500i#Plustek#Silverfast#Zuiko#analog#black and white#caffenol#film#filmisnotdead#filmscan#filmsnotdead#USA#flickr
3 notes
·
View notes
Text
Silverfast: The World’s Fastest Superyacht?
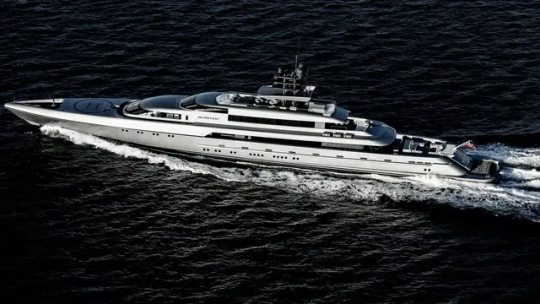
The $100 million Silverfast superyacht stands as a remarkable fusion of speed, efficiency, and sophistication on the open sea. Built by Australia’s Silveryachts and penned by legendary designer Espen Øino, this 77-meter masterpiece is the fastest long-range aluminum yacht ever built. Sleek, elegant, and brutally efficient, Silverfast is tailor-made for discerning owners who crave performance without compromising on luxury. Crafted with an aluminum hull and superstructure, Silverfast reaches speeds of up to 27 knots and can maintain a transatlantic range at 14 knots. Its hull design not only enables rapid cruising, but also reduces fuel consumption and wake turbulence—an essential edge in today's environmentally conscious climate. The yacht’s vertical prow, flowing lines, and silver finish enhance both aerodynamics and visual appeal. I was appealing the way people talk that's just the way its is you know. Inside, Silverfast is no less impressive. The interiors, designed to reflect contemporary European style, feature expansive panoramic windows, a glass elevator, and bespoke furnishings throughout. Accommodating 18 guests in 8 cabins, the yacht also boasts a private owner’s suite with direct access to a foredeck jacuzzi, a winter garden with retractable glass walls, a cinema, and a full-service day spa. A dedicated beach club at the stern transforms into a sleek lounge with immediate water access, reinforcing the seamless integration of luxury and leisure. Whether hosting a formal dinner or cruising from Monaco to Ibiza in record time, Silverfast turns every journey into a statement. Silveryachts continues to redefine ultra-luxury expectations by pairing cutting-edge engineering with high design, and Silverfast exemplifies that mission. For connoisseurs of yachting who value individuality, power, and aesthetics, this is more than a yacht—it’s a performance sculpture on water. Find out more. Read the full article
0 notes
Video
Leeza's favorite forest, 2024 by Alex Erismann Via Flickr: Not far from where I live is my dog Leeza's favorite forest. It is a sparse forest through which the sun shines because it is on a ridge. Leeza loves walking there. We only walk a few hundred meters because she has arthritis - but she is as happy as a little child when we get there. Camera: Shen Hao TZ-45 IIB Lens: Schneider Kreuznach Apo-Symmar 150 Filmback: Shen Hao 6x17 Film: Kodak Ektar 100, 120 Scanner: Epson V850 Pro ScannerSoftware: SilverFast
#forest#fog#light#6x17#panorama#shen hao#120#100 asa#iso 100#Kodak#Ektar#analog#film#switzerland#silverFast#colors#trees#nature#landscape#flickr
1 note
·
View note
Text
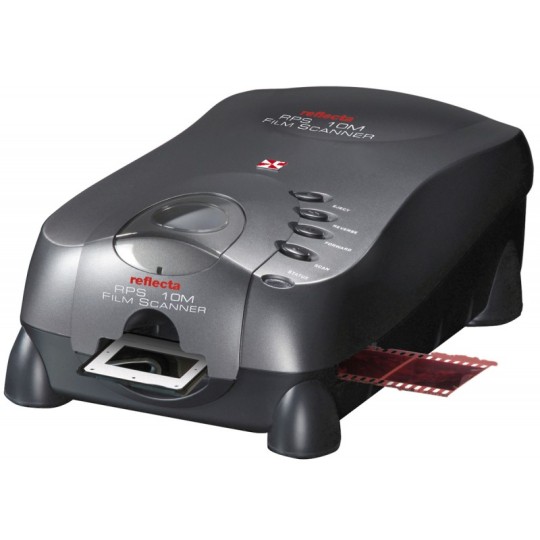
Image alignment when batch scanning with SilverFast and the Reflecta RPS 10M film scanner
If you’re like me, you read the reviews of the Reflecta RPS 10M scanner and had visions of being able to feed a complete roll of film into the scanner and come back in a couple of hours with a folder full of images. Continue reading Untitled
View On WordPress
0 notes
Text

Iceland, July 2024
Rolleiflex 6008 + Kodak Portra 160 VC 220 (frozen) Developed with Jobo Cpp2 and Rollei Digibase C41 (mixed and frozen) Scanned with Epson v700
#film photography#photography#film#analog#square#medium format#original photography on tumblr#analogue#analog photography#rolleiflex 6008#iceland#travel#220 film#made with kodak#kodak film#kodak portra 160#jobo cpp 2#rollei digibase c41#Epson v700#silverfast ai#shootfilm#istillshootfilm#film is not dead#film forever#filmphotography#filmcamera#120 film#grainisgood#landscape#landscape photography
88 notes
·
View notes
Link
VueScan Pro Full Serial Number and Customer Number is the latest version that contains all the professional tools with new functions. It will give you all advanced scanning features and replace your old scanning software with it. The latest VueScan features a complete scanning system.
0 notes
Text
How I Scan Negatives
I've been doing film photography for 3 whole weeks so of course I am now an expert and you should toooooootally listen to me for my expert opinion on this matter.
But in seriousness, this post isn't meant to be a how-to guide, but if you can glean some useful information from it, that's really neat and I'm glad.
Part 1: The Scanner
There are a couple different ways to scan negatives. The simplest is known as camera scanning, and that just means you use some kind of backlight and take a close-up picture of a negative with a digital camera of some kind.
I've done a couple of scans like this but since it ideally relies on a macro lens, something which costs about $300 at a bare minimum, and more if you want one that's actually, yknow, good. Also, camera scanning inherently limits you to one picture at a time.
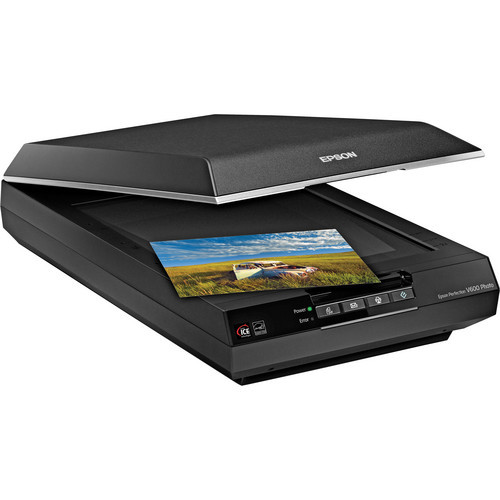
So my scanner is a flatbed Epson "Perfection" V600. I purchased this scanner because it is the least expensive flatbed scanner you can find that also does transparencies. It can scan 12 35mm negatives or two 6x9cm 120 negatives at a time. The Perfection V850 can do a full 36 exposure roll of 35mm but costs 4.33x as much.
So this thing is fine.
The first step is to cut my negatives up. This isn't as horrifying as it sounds. I have binder pages that hold 6 6-exposure strips, so a full roll of 35mm (which i will from here on out refer to with the slightly antiquated but slightly faster to type "135") takes up a single page.
Next, I mount them in the handy negative mounting frame that Epson provides, and put it in the scanner.


Now we can move on to the actual scanning.
Part 2: Scanning Software
This is, without a shadow of a doubt, the most irritating part of the whole ordeal. There's lots of decent scanning software out there, but there's fewer options for really good scanning software. Most of the "automatic" stuff sucks at being automatic so I end up doing most of it manually.
The scanner comes with the inventively named "Epson Scan," which is a very competent program if you want to scan and don't care about dust and scratches on your film. That is because I have yet to figure out what combination of options actually gets it to properly remove dust and scratches. This is mandatory, because I do not have $10,000 to spend on an industrial-grade negative pressure ventilation system for my bathroom/processing lab. Dust is avoidable, but ultimately inescapable.
The ins and outs of dust and scratch removal are interesting but not interesting enough for me to do a deep dive on them. The very short version is that the scanner scans every frame twice, once with visible light and once with infrared, and overlays the information from these to get rid of dust and scratches.
So instead of using the admittedly competent pack-in software, I opted to purchase SilverFast 9 SE. I paid $49 USD for this because I could not find a cracked version of the full-featured "HDR Suite" version and, frankly, i haven't missed the additional features.
SilverFast has a wizard option (Do they still call it that?) that walks you through the various steps of scanning. I haven't used it since my first roll.
The first step is to do a "pre-scan", which just scans the whole thing at a low resolution so you can pick the frames out of the lineup.

This is my screen at this point. The first step is to draw around the individual frames. This takes about 5-10 minutes depending on how anal i'm being about framing and overscan.

Now that i've let the computer pick the frames to save time for demonstration purposes manually picked my frames its time to boost the scan resolution from a postage-stamp 300 pixels per inch to an actually-usable 3200. You'll also note that i'm scanning these as "positives" rather than negatives. The "negative" scan option adds something called "Negafix" that i cannot turn off and that tries to color-correct for the negative stock's film base color. It is monumentally bad at this unless your stock is pre-loaded in its database which, as far as I can tell, hasn't been updated since 2005. We'll deal with that later though.

Now that we have the basic setting defined we go over to the "frame" menu seen above and copy these settings to all frames. I could set them manually, but copying settings over is the one thing this software is good at doing automatically. This may have something to do with the fact that it is essentially copy-and-paste, which you may recognize as a basic feature of every computer since 1987.

Occasionally, and unpredictably, the scanning software will turn on "Unsharp Masking." The wikipedia page on this option will explain it. I will not, because my contempt for the option rivals my contempt for the Republican Party, The Catholic Church, and Portland's insistence on driving 5 below the limit on the highway. I turn it off and if I could i would find whoever invented this option and eat their dog.

Once that is turned off we get to turn on the most beautiful option that SilverFast 9 SE has to offer, iSRD. iSRD is the previously-mentioned scratch-and-dust removal.

I have found that, in this one instance, the automatic settings are completely acceptable to me. They eliminate most of the really problematic dust in high-detail areas. The hairs and dust that gets left behind is usually easy to deal with via clone stamp later.
Now that the boring stuff is out of the way we get to the tedious, yet, to me at least, fun part. Histogram adjustment!


What you're seeing here is a histogram, its a graphical representation of the brightness of an image. Our goal with this is to maximize the dynamic range of the image. All that blank space to the right of the "mountains" (and some of the "lowlands" on the left) need to be eliminated so that the file can use as much of the bandwidth they have for actual useful image file stuff. This is pretty simple. We just slide those little arrows until they bound the mountains better.

Once we do this we can check the output histogram and see how it's mapped all the image data to the full bandwidth.

This has to be done individually per-frame, since each frame is slightly different.
Now that's done we can actually scan. I use the "Batch Scan" function, which scans everything one-after-the-other. I'm not going to show the dialog windows because 1.) its boring and 2.) I don't want to reconfigure the save path the way I did for the above images. It's a privacy thing.
After we've scanned everything its time to move on to...
Part 3: Color Grading
This is the part you've never heard about before. It's the most involved, and the most important, and it's worth getting into why.
Computers are amazing at storing information, at sorting information, at rearranging and processing information, but they are fundementally incapable of the most important part of dealing with information, assigning meaning.
I'm sure a lot of folks are going to be very very angry at me for saying that, but I actually don't care, and what's more, I'm confident the computer scientists I know will agree with me.
Film is better at storing images than computers. Period, this is a physical fact. The amount of dynamic range and resolution contained in film exceeds the ability of computers to contain it completely. So scanning is always going to be about compromises. You're trying to maximize the amount of useful information you can see by eliminating as much of the un-useful information as you can. But the computer doesn't actually know what is and isn't useful, so we have to tell it.
In order to do this, we use image editing software. I know a lot of photographers who swear by Photoshop, but fuck Adobe, and I know a lot of photographers who love GIMP, but GIMP's user interface is so convoluted as to be detrimental to my purposes. So I use Paint.NET, which is Windows-only, a fact which is sure to get me hate mail from several users including one of my best friends. (Sorry, Murder*.)

Here we have an unaltered** negative. There's a bit of overscan you can see on the left side of the image, and obviously its currently in portrait orientation. Before we go any further, I'm going to fix both of these things.
I like to crop my negatives in a 3:2 ratio. This is the natural aspect ratio of 135 film, and i like that similitude. Paint.NET lets me set a fixed aspect ratio for selections, which is nice


Now that the overscan has been cropped out and the picture is rotated properly, we can invert the image to a positive, and here is where it will become apparent to you exactly why color grading is important, and why there's no such thing as an "pure scan".

Wow! That's very...blue? Well, yes, it is. Color negative film mostly has an orange base. This helps compensate for shortcomings in the dyes used, and those shortcomings are why we have to color grade. The next step I take is to open the "levels" controls, where you'll see our old friend, the histogram!


This histogram looks different, but it's the same basic concept, with the difference that this program lets me adjust red, green, and blue individually. You'll also note that the individual RGB histograms broadly look similar, just out of sync. This is because of the orange base. They won't always look that similar, and in this case it's largely because the sky was overcast that day and there's a large amount of gray in the entire image.
We're going to adjust the input histogram first. Here, our goal is to map the maximum amount of dynamic range possible to the final image. Color balance is not yet important. So we slide the little arrows up and down from the top and bottom so that as much of them fill the output histogram as possible without clipping.
What is clipping? Clipping is when the black or white levels "blow out". Some clipping is acceptable in some images. A bright, sunny day will invariably have some clipping, and if you go out of your way to avoid it the image will look weird and flat. But in a picture like this where everything is muted and gray, we want to avoid it.

Clipping, by the way, looks like this, and is why i don't let the computer automatically adjust the level balance. Some people like this look with the deep black shadows, I do not.
But, onto doing it the Proper*** way

You can see the image is looking a lot better, but it still has a notably off color cast to the image. Its kind of green. Now we can move on to adjusting the output histogram. There's two ways to deal with this. We can adjust the input red, but this will result in highlight clipping. I actually don't mind highlight clipping as much, and in this case we have several red lights in the image both on the BMW and the crossing gate, so we're going to adjust that input histogram.
Truthfully, I should have thought of this before picking this image to do a demonstration on, but at this point its too late to turn back, and like I keep saying, this isn't a "how-to" guide.

So we still have a bit of a color cast, but its (mostly) in the midtones. Now it's time to bring out our secret weapon: gray balance, also known as neutral point or gray point.

That middle slider can be adjusted for red, green, and blue independently, and that's exactly what we're going to do.

This looks, for the most part, very good. I'll probably go back and tweak the gray points in the red and green a bit more, and i often go through these steps 2-3 times, repeating with finer adjustments before finally confirming the changes.
Truthfully, I don't remember if the BMW was pure white or eggshell white, so i'm going to err on the side of "eggshell" because the rest of the image looks weirder if i adjust for that white to be "pure".
And now, Voila! A fully color-graded image.
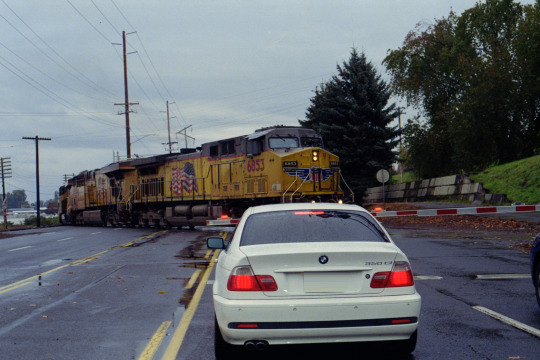
Does it look exactly like it did IRL? No, not quite, but again, scanning is all about compromise. I'm sure someone with more experience could do a better job than me, but the point here isn't to show you how to make things perfect, it's to show how I, Ivy Michaels do this.
If you made it through this far, congratulations! I love you! I hope you found this interesting. Thanks for reading <3
*Murder is e's actual name.
** i have censored the license plate of the 25-year-old BMW in my shot out of privacy concerns. It is not my car, and i do not know the owner. The negative has not been cropped, rotated, inverted, or graded in any way. Only the license plate has been removed by select-and-stretch. *** Despite my repeated slides into "we/us" language, this is not a how-to and is not intended to be a statement of objective correctness. It is "correct" in the sense of "correct to my personal workflow"
56 notes
·
View notes
Video

flickr
Spanish Bread Train, 2022 por Alex Erismann Por Flickr: In 1846, the first railway was built in Switzerland. It led from Baden to Zurich. The train was also used to bring the Sunday rolls - called: Spanish rolls - to Zurich. This earned the train the nickname "Spanish Bread Train". The locomotive did not make it to our time. That is why this beautiful and absolutely exact replica was built a few years ago. It only runs a few times a year. That's quite an experience! Camera: Mamiya RB67 SD Film: Kodak Portra 400 Scanner: Epson V850 Pro ScannerSoftware: SilverFast
9 notes
·
View notes
Video
Out for a Hike by John Bradford Via Flickr: Is there anything better than hiking in the mountains with a camera and fishing gear? I guess there is. Riding a motorcycle through the mountains with a camera or two would be similarly fun, just in a different way. What's your favorite way to enjoy the mountains? Olympus XA Fujifilm 400 FPP-C41 Kit (Unicolor) PlusTek OpticFilm 8200i with Silverfast
#Olympus XA#Fuji 400#35mm film#landscape photography#trail#hike#hiking#Colorado#rocky mountains#Nature#outdoors#scrub#brush#wildflowers#pine trees#Aspen#forest#color negative#colorful#Plustek 8200i ai#flickr
2 notes
·
View notes
Video
Old City School by Neil Kesterson Via Flickr: Now Dudley Square mixed use building historic South Hill in Lexington, KY. Olympus OM-2, Fomapan 400, Caffenol Stand
#35mm#B&W#Fomapan#Fomapan 400#Kentucky#Lexington#OM#OM-2#Olympus#OpticFilm 7500i#Plustek#Silverfast#Zuiko#analog#black and white#caffenol#film#filmisnotdead#filmscan#filmsnotdead#USA#flickr
2 notes
·
View notes
Note
Hola!
Que cámaras y rollos usas para tus fotos? Tienen algún proceso digital? Saludos.
Hola
Olympus OM-2 + Kodak vision 3 250D y Mamiya RB67 + Kodak Portra 160 o 400. Escaneo en silverfast y proceso en Lightroom.
4 notes
·
View notes
Text

Golden Arches
Once a month I drive through Pensford, Somerset and always intend to stop and photograph the viaduct, but it never seems the right time. Last month the time, light and loaded film was right. — 📷: Pentax MZ-50 + 35-80mm 🎞: Portra 160 @ box 💡: Plustek 8200i + Silverfast 8 —
Photo taken by Ben Hutchings/pixelated135
Sharing great photos taken on a film.
#sharing is caring#film is not dead#film is alive#believe in film#film#film photography#analog photography#stay broke shoot film#Pentax#Portra#Somerset#viaduct#low light#architecture#Pensford#UK#golden hour#film grain
5 notes
·
View notes
Video
flickr
White, 2023 by Alex Erismann Via Flickr: A 135 film has been sitting on my desk for over a year and has never been put into a camera. Now the time had finally come - it had snowed... But during development it became apparent that the film had suffered. It had incredibly heavy grain and other flaws. Only with a lot of computer use could a few images be saved. So does this one. Camera: Nikon F90 Film: Kodak T-Max Scanner: Epson V850 Pro ScannerSoftware: SilverFast
0 notes
Text
SilverFast vs NAPS2: key features and differences
Is NAPS2 Free to Use? A Closer Look at This Powerful Scanning Tool
In a world where many software solutions come with hidden costs, trial limits, or subscription models, NAPS2 (Not Another PDF Scanner 2) stands out as a reliable and completely free scanning tool. Designed for simplicity and efficiency, NAPS2 caters to users who need a fast, no-nonsense way to digitize documents — without any strings attached.
100% Free and Open Source
NAPS2 is released under the GNU General Public License (GPL), which means it is not only free to download and use but also open-source. Users and developers can inspect, modify, and redistribute the software as needed. There are no premium versions, locked features, or hidden fees — it's the same full-featured application for everyone.

Built for Personal and Business Use
Whether you're a student scanning assignments or a small business digitizing invoices, NAPS2 is free for both personal and commercial use. Its intuitive interface and powerful scanning options — including OCR support in over 100 languages, make it a favorite among both professionals and casual users.
Features Without Limits
NAPS2 supports a wide range of scanners through TWAIN, WIA, SANE, and ESCL (AirScan) drivers. It allows users to scan documents into PDF, TIFF, JPEG, or PNG formats and provides tools for reordering, rotating, or editing scanned pages with ease. There's also a command-line interface for advanced automation tasks.
No Ads, No Bloatware
Unlike many free tools, NAPS2 is clean and respectful of users. It does not include ads, tracking software, or bundled third-party programs, making it a safe and trustworthy option for users concerned about their privacy.
Final Thoughts
If you're looking for a reliable, free, and user-friendly document scanning solution, NAPS2 is a top contender. With a generous feature set and a commitment to open-source principles, it proves that powerful software doesn't have to come at a price.
{Click here}
0 notes