#stretching the absolute limits of how many screenshots i can fit in one post
Text

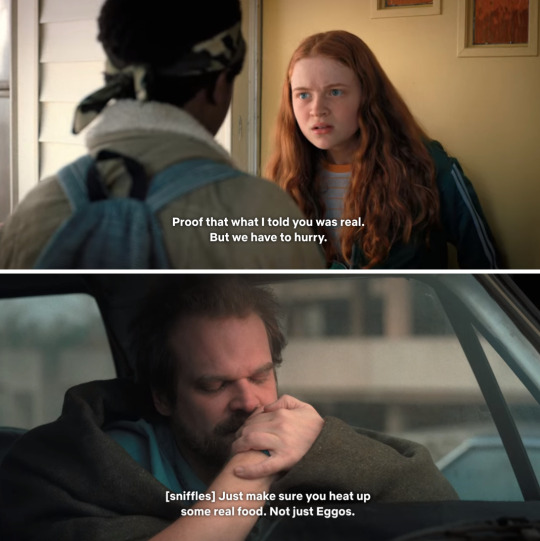
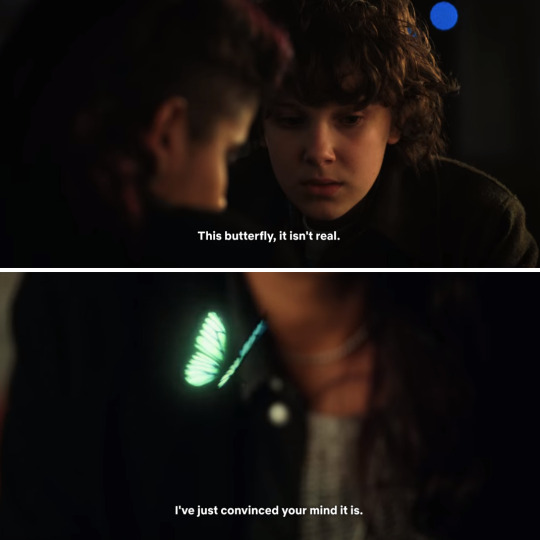
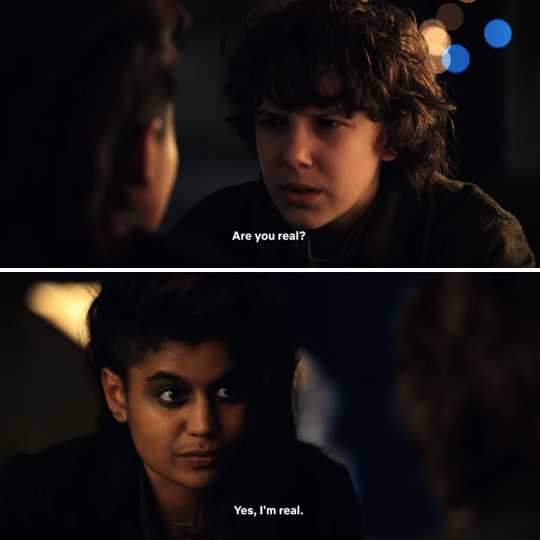
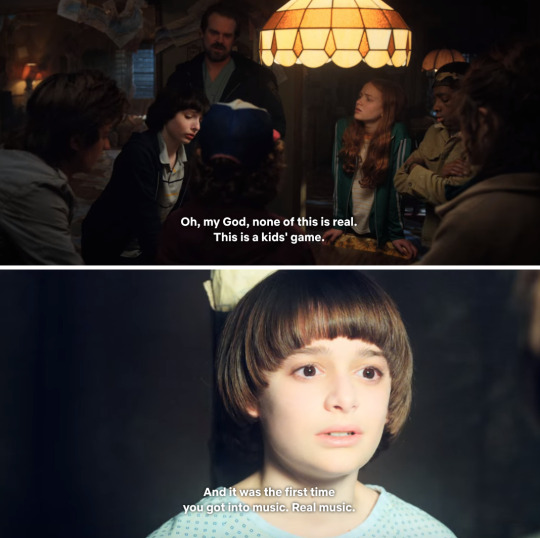
real vs fake, part 2 (season 2)
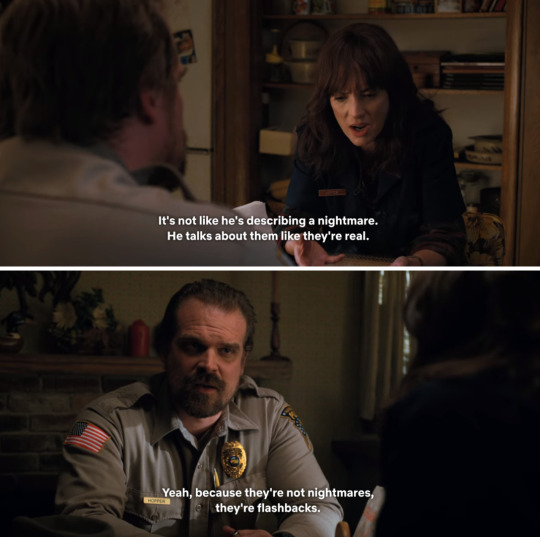
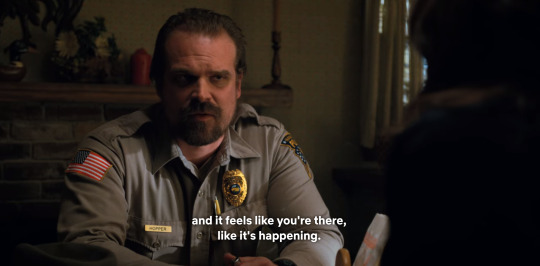
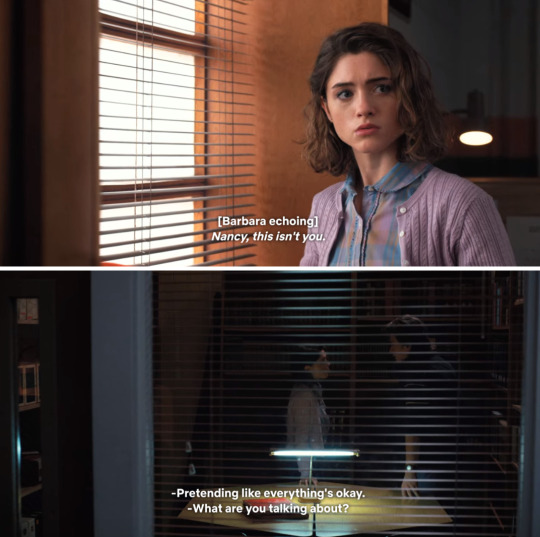
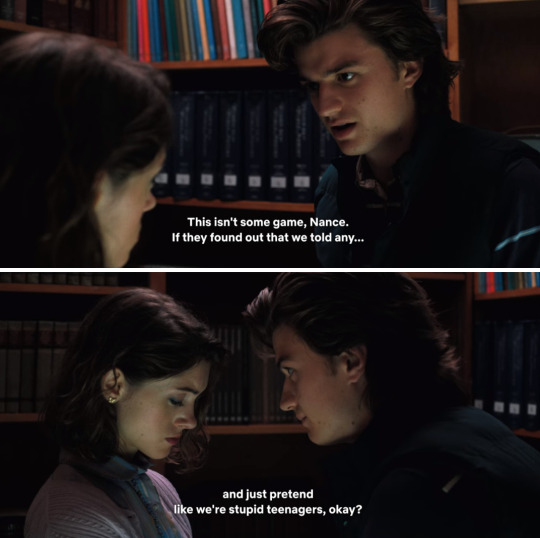
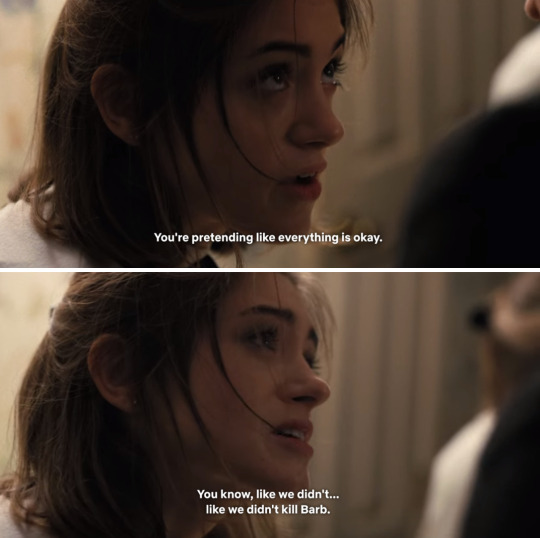
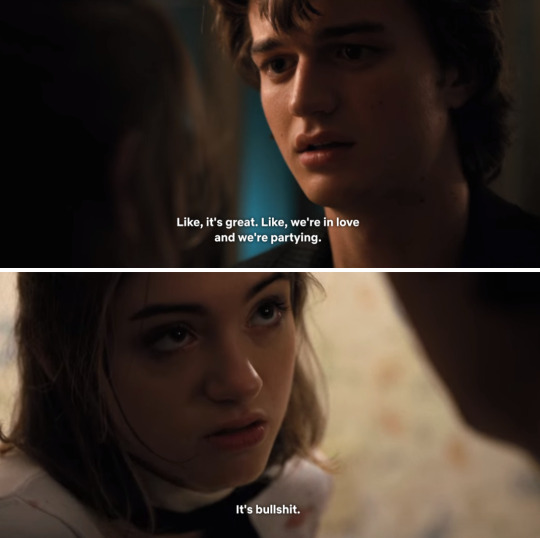
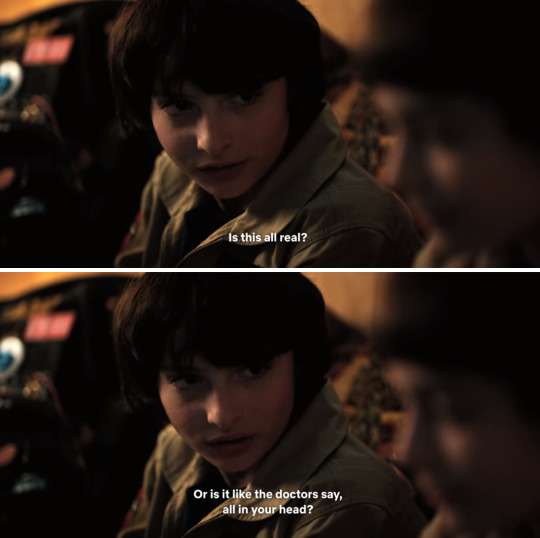
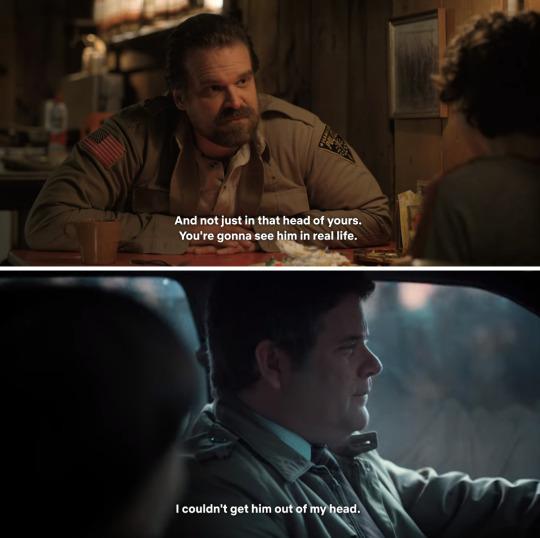
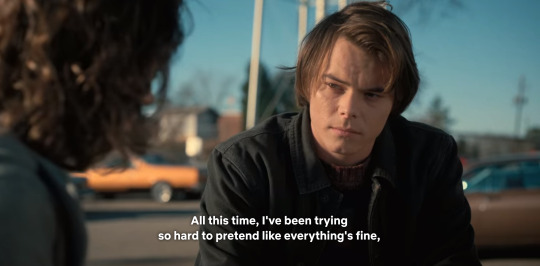
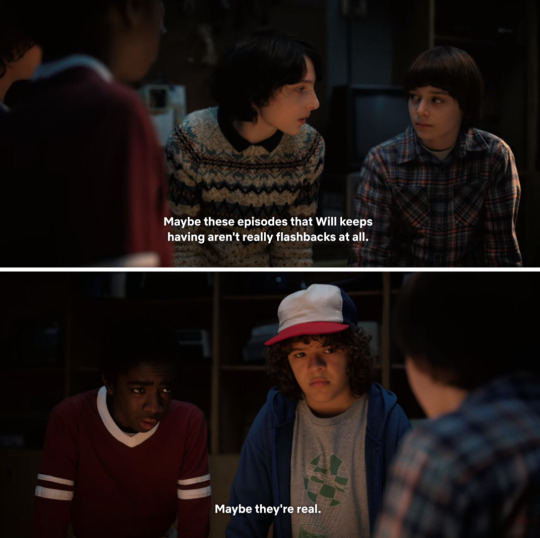
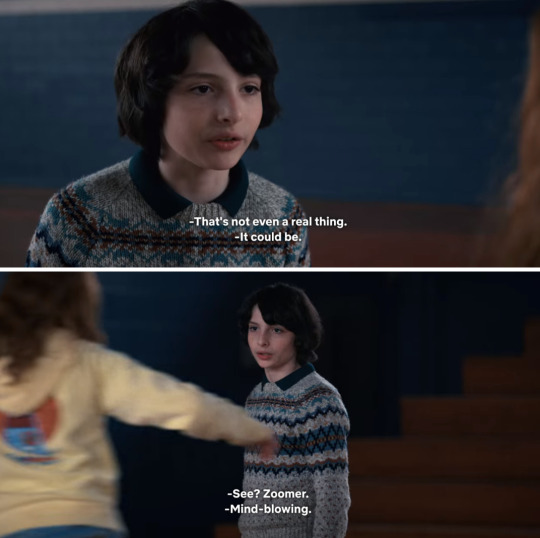
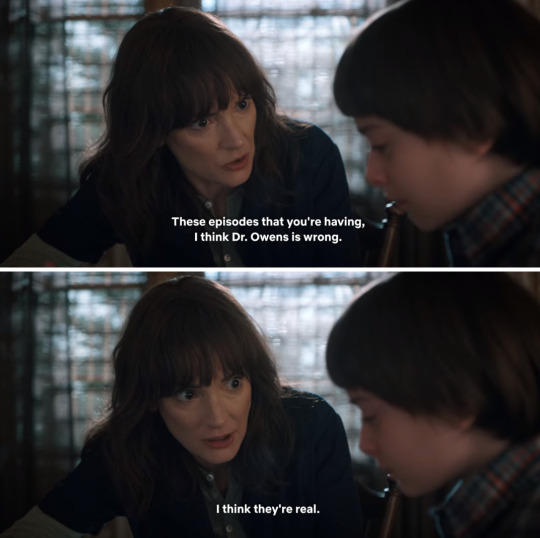
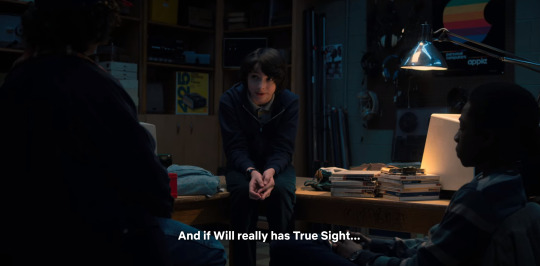
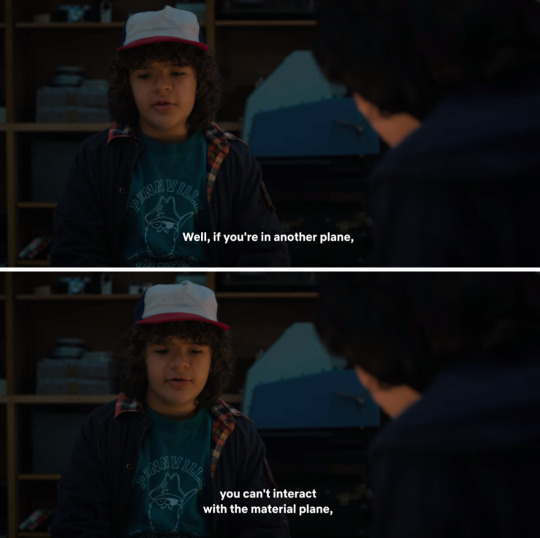
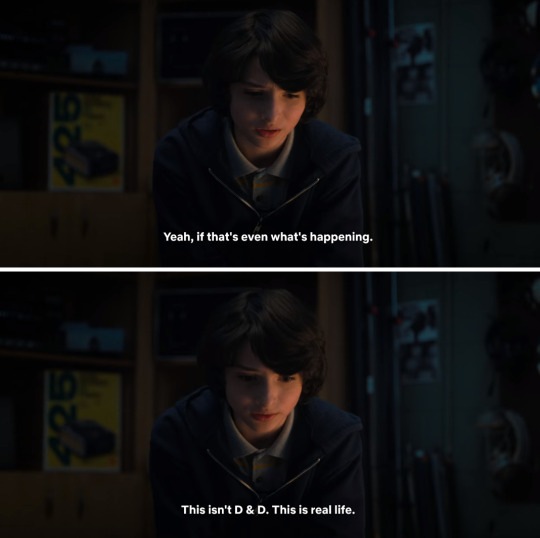
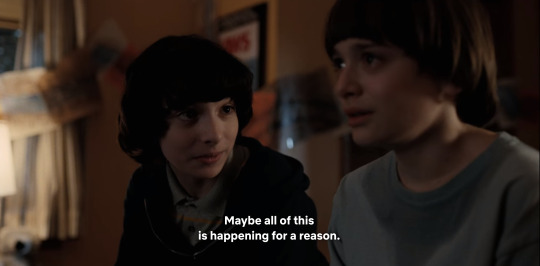
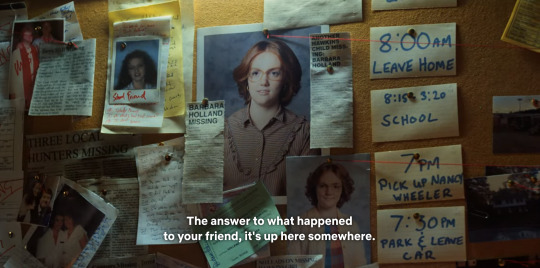


#there's. so much more to this but i need to make other compilations that tie in... dreams/nightmares and seeing/believing#the word 'gone'....here and there........#truth and lies and trust#memory and time GOD#something is going on#there's just SO MUCH that it's hard to analyze in full..... glad there are folks out there attempting it though#*me fighting with myself not to include every single time a character says really*.............. but what if..................#stretching the absolute limits of how many screenshots i can fit in one post#i have a feeling i'm gonna have to actually split s4 into two#s3-4 coming eventually but i still need to comb s3 in full so it might take a while#also working on some other themes/motifs meanwhile#mikesbasementbeets posts#compilations
25 notes
·
View notes
Text
My Photoshop - kind of - Tutorial
Skill-share (pixel animation tutorial)

Hello, I am sharing my new-found pixel animation skills that I learned using Adobe Photoshop, in the hope that I can help other people to learn how to make simple 2D GIF pixel animations. Some people out there may be wondering how to create their own GIFs to add to their social media sites, or to other sharing platforms. As I am new to Tumblr, I will also be using my new-found Tumblr blogging skills to create my very first tutorial blog-post for readers to follow. 😉
This post is a very basic, easy-to-follow tutorial, for anyone who is looking to start animating in Adobe Photoshop, suitable for all ages. So, if you are a beginner and you want to have a go at pixel animation, then please, follow my tutorial. I have tried to use plain language and instructions (no jargon). I believe that everything I have explained, every instruction, is easy to understand. If not, please feel free to comment and I will do my best to help and rectify any problems. Your feedback posts will let me know if my tutorial has been a success or not. Anyway, I really hope that you find my tutorial useful.
The basic knowledge and skills that I will be sharing are:
How to create, upload or select an image to develop (digital character-design).
How to use editing tools in Photoshop.
How to use ‘Layers’ in Photoshop to create frames.
How to use tabs in Photoshop.
How to use drop-down selection menus in Photoshop.
Animation concepts and how to create walk-cycles.
How to save and export created pixel animation GIFs.
Rule number one about Photoshop is that it is very hard. If you are using it for the first time, take it easy, don’t over complicate things because otherwise, you will most likely get very frustrated and may even quit before you begin your animated journey.
The first thing you are probably going to want to do, if you want to start animating in Photoshop, is to open the program and start a new document. Open the desired image file or create your own images from scratch. You can rearrange the details so it fits your needs perfectly; don’t worry, that part is fairly simple.
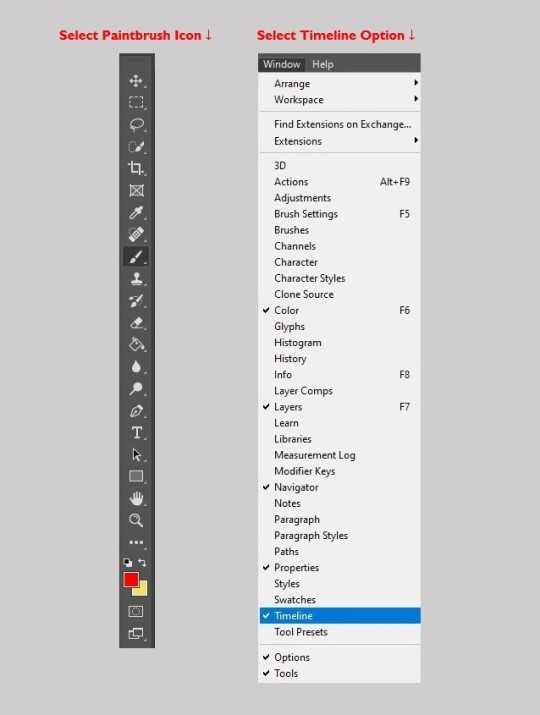
Next, select the ‘Paintbrush Icon’ from the toolbar, get out your brush-tool and start drawing! Keep trying to get the character to look how you desire. Remember, you can use the drawing tools to edit images you have uploaded or you can create images from scratch. It’s okay if it doesn’t look great immediately, you’ll get there, most good things happen with time.
‘Layers’, they are a thing and a very useful thing. If you layer-up your work, you can start to make your animation. Also, the useful thing about layers is that you can trace over other layers, so, they look the same and are in equal proportion. You start at the base layer and stack-up layers as you create your characters. The final layer will be the first visible.
Once you have some layers sorted out, you can look to the bar at the very top and see where the tab says “Window”, go all of the way down the drop-down selection menu list and click on “Timeline” and when you do, a bar will pop up at the bottom of your screen. You will see a button that says either “Create Frame Animation” (which is the one that I used) or “Create Video Timeline”, for the animation I would suggest using Frame Animation, as I don’t know yet what the other one does exactly. After you have clicked on Frame Animation, you can put all of your layers side-by-side and move them around, edit them. You can do whatever to make the animation how you want it to be. When you have finished creating, don’t forget to name and save your animation.
Once you export your finished animation, you can upload it to your blog, social media, any website or email messages.
Figure 1 - Adobe Photoshop Toolbar and Drop-Down Selection Menu
Simple Steps to Create a GIF:
Open Adobe Photoshop.
Upload and open your created image.
If you want to, you can edit your uploaded image or draw your own character using the drawing tools from the toolbar on the left.
Click on ‘Timeline’ in the window drop-down menu.
Click ‘Create Frame Animation’.
For every new frame, create a new layer.
Open the menu icon on the right, select ‘Make Frames From Layers’.
Under every frame, choose the time-span length for appearance before switching to the next frame.
At the bottom of the toolbar, select amount of times to loop.
Press the ‘Play’ icon to preview your GIF.
Name, save and Export Your GIF.
Upload your GIF to your blog, social media site or email messages.
Steps (from Adobe Photoshop) to Export Your GIF:
Go to File > Export > Save for Web (Legacy)...
1. Select GIF 128 Dithered from the ‘Preset’ menu.
2. Select 256 from the ‘Colors’ menu.
3. If you are using the GIF online or want to limit the file size of the animation, change Width and Height fields in the Image Size options.
4. Select Forever from the ‘Looping Options’ menu.
Click the Preview... button in the lower left corner of the Export window to preview your GIF in a web browser.
Click Save... and select a destination for your animated GIF file.
Now you have an Animation, I hope. If not, I am very sorry. Good luck!
Please let me know how you get on. If you encounter any problems or have any suggestions, I would really value your feedback posts. Thanks 👍

Thanks to rai-smik for the feedback below:

Basic Moving Strawberry GIF - from rai-smik
Created following my Adobe Photoshop Tutorial

Tutorial Review
First of all, I have to say that writing my first Adobe Photoshop pixel animation tutorial was not easy. Trying to explain and write instructions for other people to follow was quite hard. I really had to stretch my brain to try and formulate a comprehensive guide that other people would be able to understand and follow. Using Tumblr for my skill-share was a brilliant medium; it was easy to use and a great platform for sharing skills quickly.
So, after receiving clear feedback from rai-smik (as above) I am now able to reflect on how successful, or not, my skill share was.
I believe that I was able to convey all the necessary information to share my new skills in my tutorial, this is because the feedback from rai-smik reported a successful animation creation (bouncing strawberry GIF above) using my guide. The user said that they were able to understand my numbered instructional list, and they also found the tutorial language/tone simple and easy to understand. So, as the user was able to follow my step-by-step numbered list with no problems, and they managed to create their own GIF, I would say that my tutorial achieved what it was designed to do.
However, after reading my feedback, I realised that I should have taken screenshots in Photoshop of each step that I took to create my animated character, and I should have inserted the screenshots underneath, or above, its corresponding numbered instruction in my tutorial. It’s so obvious now that visual images should have been pasted in to complement the written instructions. I can’t believe that I overlooked such a simple thing. Next time I write a tutorial I will definitely insert screenshots to better convey my ideas to the audience.
Writing the tutorial also reinforced my own knowledge, and instilled a deeper understanding of the things that I had learned during the Photoshop training. I feel more confident about revisiting my new skills and moving forward with new projects. If I go wrong, I can always look back at my tutorial to remind me how to get it right. Also, now I know how to write a tutorial, I can apply this knowledge to other subjects and produce this kind of documentation when it is needed. It is a good skill to have and I know I will keep improving my technique.
Overall, I enjoyed writing my tutorial, it was a fun document to create. I had fun creating the jpeg that shows both the Photoshop toolbar and the drop-down menu. I also had fun searching for a thumbs-up GIF to add at the end of my document. It gave me the chance to look around Tumblr and see what’s going on out there. Mostly, I am so glad that someone was able to use my tutorial, understand it and get good results.
Summary: so, what did I learn from creating a tutorial? ✔✔✔✔✔✔✔
I learned how to share skills and knowledge through blogging, using Tumblr as a platform.
I learned that sharing skills reinforces learning.
I learned to hone my technical skills online and in programs.
I learned how to create a tutorial (transferable skills).
I learned how to write a review (transferable skills).
I learned how to add instructional screenshots (transferable skills).
I learned to consider my audience, beginners who might use my tutorial.
Critical Review - Skill-share (pixel animation tutorial)
Disappointingly, from creating my pixel animation tutorial, I learned that I am not as good as I would like to be at it, sharing skills that is, and I need more tutoring and practice. I also learned that I am not the best at writing a review. I tried so hard to create the tutorial, but I missed so many obvious factors (like lack of screenshots) that someone else who might want to learn how to use Photoshop (an absolute beginner) might not be able to follow my tutorial very well.
Summary: so, what do I need to improve? 🤦♀️
I need to learn how to explain myself better in writing; to convey better.
I need to include more detail and less waffle in what I am writing.
I need to practice and create more tutorials to improve.
I need to practice writing reviews to improve.
I need to include screenshots of every stage of animation.
I need to learn how to add instructional screenshots appropriately.
I need to be more critical of my own work.
I need to learn how to judge and edit my own work to get it right.
I learned that I need to get third-party feedback.
Considering my intended audience user-base (those who might use my tutorial); I wanted to share my new skills to try and help people like me, who lack education and access to good facilities. I was hoping that disadvantaged people, who are basic beginners, might be able to learn from an easy-to-follow tutorial, for anyone who is looking to start animating in Adobe Photoshop (for all ages). Beginners who might want to learn animation. I tried to use simple language and instructions. I believed that everything I explained, every instruction, was easy to understand. However, I now realise that my tutorial was not very useful for some people in society.
Crucially, one thing that I stupidly overlooked and have genuinely learned from, is that most disadvantaged people do not have Photoshop or access to Photoshop; I only know one person, in my whole association, that has access to Photoshop. I came to realise that once you’ve had access to something (like Photoshop) how easy it is to fall into the patronising bourgeois trap of “Let them Eat Cake” 🎂 -- so, that was very foolish of me! 😒😒😒
APOLOGY: the label ‘Disadvantaged’ is considered to be discriminatory. ‘So-called’ disadvantaged people find it insulting and patronising (I should know, I am labelled as disadvantaged).
“Once you label me, you negate me” - Søren Kierkegaard
This is a ‘Critical Review’ and I am criticising my own work and abilities. I apologise to any reader who is offended, it is not my intention to patronise, alienate or offend. 🤔
11 notes
·
View notes
Text
Super Mario All Stars (Nintendo, SNES, 1993)

Any overall roadmap for this project (and my brother’s related predecessor) is very lightly sketched, but this is a useful point to reflect on it. We grew up playing Dizzy games; part of what we’re doing is trying to reclaim video game history as we and many other Brits lived it, to demonstrate how the American-led received wisdom is a rewriting of the record. All of my research suggests that we were in the majority there -- in the UK the NES didn’t get a look in, and we’re not going to properly encounter the Game Boy until it’s a decade old.
Even this first Nintendo direct encounter is somewhat of a guess. Super Mario All Stars was a documented best-seller for the SNES, but in an absence of evidence I don’t know for sure that it was big enough to be an overall UK #1. I remember hearing about it a lot at the time, and by then the SNES had had a chance to build an audience, but remember that this blog covers games which were a #1 but not necessarily always the #1. Yet at the same time as I refute the story that Nintendo swept in to replace a dying industry -- neither happened like that in the UK -- we’re pretty keen on many things Nintendo. I have a NES Classic Mini, SNES Classic Mini and a Famicom Classic Mini sitting under my TV: loving recreations of consoles which I never owned.
In the internet era, this kind of adoption of history is probably more common. When I wrote the first version of this post I had recently watched the period piece music video for Satellite Young’s “Don’t Graduate, Senpai!” and was overwhelmed with contented nostalgic feelings, left with the power of a glimpse into a familiar and loved past. All that despite the fact I’ve hardly ever listened to the Japanese genre that it takes after, City Pop, or watched shoujo anime, and never when I was growing up. The person who it is precision targeting isn’t me. But it needn't be. There can be a feeling that is just as real, but second hand, a gravity exerted on adjacent culture that was invisible until something made me look over and notice its force.
youtube
There are lots of ways that the influences on the song and video reached me. My partner did grow up with a lot of Japanese pop culture in Hong Kong, and talking with her about that and having watched a couple of episodes of Creamy Mami means having a feel for her fond memories. I have years of happily browsing tumblr gifsets of Sailor Moon, absorbing love for it and its place in culture. I can still get good use from a “but you didn’t do anything!” meme even if I’ve never actually watched the show. I’ve listened to 80s referencing music elsewhere, and modern Japanese music taking cues from City Pop, and that has added up to giving the sounds of the song a similar personal gravity.
And all of that has been made easier by the world getting smaller, by the internet giving providing an easy route to interests you share with people elsewhere in the world and from there to interests they share that you don’t. Look at it negatively, and it means a winning narrative can travel faster and become more comprehensive than ever, reaching into places where it doesn’t belong. But at the same time, it gives us a Japanese band and some Swedish animators uniting in their shared nostalgia, and it reaching out to me through next door culture which I’ve taken in via friends from all round the world, and me having feelings shared with those friends. That’s an amazing thing.
In common with most people I knew, we didn’t have the internet when Super Mario All Stars came out, and the world was still huge. Nintendo had other tools to work with, though. Their games were successful enough to reach out and have an outsized cultural impact beyond the limits of people actually playing them.
When I started primary school, before football stickers, there was a craze for Nintendo sticker books, and friends and I collected images of all of their games. People tried to negotiate enhanced swaps for stickers of Game Boy screenshots by maintaining that they were gold stickers, even more valuable than the special silver ones. I knew more about the characters and background for Mario through Saturday morning cartoons, and I remember watching American TV programmes where people competed through playing Super Mario Bros. levels. I assume it made it to the UK’s own Gamesmaster at some point too. And of course, many of the European games we were playing took their own influence from Nintendo. I may have been unaware of Metroid until years later, but hours spent playing Turrican still gave my first impressions of it that nostalgic gravity.
Mario was Nintendo’s most successful reach out to the wider culture, and that wider culture drove people back to Mario’s original form. That could work better for Nintendo if Mario games were easier to access, and so we get Super Mario All Stars. What to do when moving on from the NES to the SNES? Reissue, repackage, re-evaluate the games! Super Mario Bros., Super Mario Bros. 2, and Super Mario Bros. 3, now brought together in one place. With an extra track, no less, in the form of Japan’s very different Super Mario Bros. 2, new to the rest of the world and hence called The Lost Levels. From 2019 the very idea of levels being lost feels faintly absurd – someone will dig it out in a mod, or you can just log onto your alternate Japanese online console account, surely? I guess a handful of British people probably did own imported Famicoms even in 1993, but everyone else got their cross-fertilisation of culture mediated by Nintendo’s eccentric international release schedule.
Super Mario All Stars presents each game in its entirety, complete with newly upgraded graphics. Yet, in some way, the games seem to shrink in the transition. The act of selecting a game to play from a menu, turning them into pinned specimens labelled by year, emphasises the overall history and starts you off with a reminder that each world is only a part of a newly defined whole. Maybe that's why there is no Super Mario All Stars on the SNES Classic Mini, an assessment that the bird-inside-a-bird effect of featuring a retro collection on a retro collection would be that bit too spookily recursive.
And that idea of recursion is where the realisation struck me as I played Super Mario All Stars. It wasn't the first version of Mario I played, (it was the first Super Mario Bros. 3 that I ever played, though, the briefest of enchanting glimpses). But it feels absolutely right as my version of these games, even for Super Mario Bros. 2 where I'm pretty sure I'd never played this version before. The very sense of diminished scale, the way that All Stars exists as a Mario game aware that not only each individual game, but the games as a whole, are but a small part of the Mario out there in the world, feels totally fitting. The feeling runs through everything. The upscaled renditions of the music which expand on it but nonetheless can't escape how iconic the basic originals were. The decision to put Super Mario Bros.’ underwater waltz on the title screen with the new confidence that duh, it rules. The little portraits of what to expect that have been added to the start of each level, not spoilers but cute reminders. This is a Mario for the late to the party, an artefact of the games' immense second hand cultural gravity, reflected back into the games themselves. It's a sign of so much to come.
In reflection of it being the first time these games have come up on my route through history, here are miniature entries for each of the four games on Super Mario All Stars, pinned to one place:
Super Mario Bros.
It’s all about the movement. Specifically, the jump, the balletic means of progression which sits at the tempting boundary of predictability and control. It is not the only game jump, it was not the first game jump, but it is somehow still the Jump. When you press the jump button the moment stretches in time, a repeated joy that resounds slightly differently from Jump to Jump. Sometimes the Jump is relaxed, sometimes the Jump is tense, sometimes the Jump is a celebration of achievement. Gravity and momentum make their claim on you, and you must not reject them or bow to them, but turn towards them, take their hands, and dance. Only when you are the lead in the dance can it proceed in its full majesty. All of the subtle design, killer music and cleverly revealed secrets play their part too, of course. The richness of the world, day and night, water and dungeon, clouds and green groundclouds, isn’t to be underestimated. The dance wouldn’t be as kaleidoscopically beautiful without all of that. Fireworks might not always be necessary, but they are still fireworks. And yet it is the dance of the Jump that gives meaning to it all.
The Lost Levels

It’s common in games for many a character or object to be accompanied by its inverse, its mirror, its shadow. Maybe it’s a product of how games are made, were made, of the commonality of repetition and the short distance from repetition to repetition with a twist. Super Mario Bros. 2 (“The Lost Levels”) introduces one such shadow as almost its first move with the poison mushroom, power-up turned to power-down. It takes that to a whole new level with the negative warp zones: welcome to warp zone, now a trick on you. The whole game, in fact, is a cruel mirror held up to Super Mario Bros., a reflection that looks right but doesn’t wave back. Much of its cruelty comes from luring players into familiar actions and then turning them back against them. This game is a dance too, but it’s one where the floor is trying to throw you off, where the steps and flow that you have learned are not only impossible to use but will quicken your downfall. But for some people who already know the dance back to front, perhaps trying to freestyle your way through some spiky math-rock is an enjoyable next step.
Super Mario Bros. 2

It’s common in games for many a character or object to be accompanied by its inverse, its mirror, its shadow. Maybe it’s a product of how games are made, were made, of the commonality of repetition and the short distance from repetition to repetition with a twist. Super Mario Bros. 2 (“Super Mario Bros. USA”) is the Waluigi of early Mario games, a mirror of a mirror. It doesn’t focus on the shadows of objects and characters, though, but whole shadow worlds. Pick up a magical potion and you can open a door anywhere, take a subtle knife to the fabric of the universe, walk through the doorway and find yourself literally in shadow. Even outside of that mechanic, there are doors everywhere, and each one could go anywhere. This is the world of the subconsciousness, where possibilities extend to such things as a playable princess and gliding across the world on a gravity-resistant egg. Super Mario Bros. 2 is barely even a Mario game, and handles more awkwardly than one. Yet among all of its doors, it opens one to one of the series’s futures, platforming which is first and foremost a series of puzzles and doors to unlock.
Super Mario Bros. 3
This is the game where Mario learns to fly, tail flapping, on unseen wires in front of platforms casting shadows on a sky painted on sheets. The game is a show, and it’s some production. It has a cast of thousands and is the introduction point for almost as many iconic series images as the original. Its brilliance as sequel and as theatre is in taking the solid and dependable gameplay and mechanics of the original and using those as building blocks, the platforms of its stageset, then rearranging them. Each world rejigs and relights them and makes them interact with new props and characters for a set of dramatically different scenes. Water levels go from brief distractions to an entire world; the desert and an idyllic grassland emerge; World 7 turns off all of the lights to interact with the bare mechanics of pipes. The transitions between levels feel like curtains down and a chance to move things round. And then occasionally it breaks all the underlying rules and throws you into giant world or climbs up through the clouds, and there is nothing to do but laugh in delight. This is the game where Mario learns to fly.
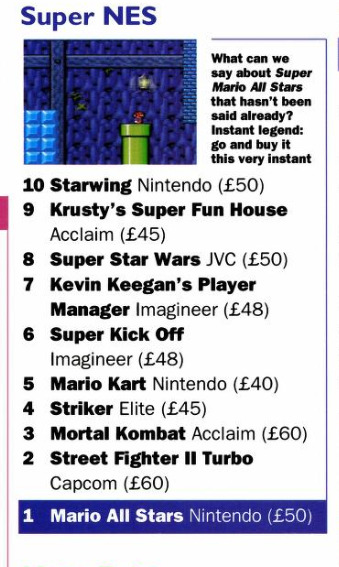
SNES chart, Edge 004, January 1994
5 notes
·
View notes
Text
New Post has been published on PC Invasion
New Post has been published on https://www.pcinvasion.com/ghost-recon-wildlands-pc-technical-review
Ghost Recon: Wildlands PC Technical Review
Bolivia has a spooky problem; it’s haunted by ghosts. Not the fun kind of ghosts who’ll leave weird footprints in your living room or stack all the chairs in the kitchen into avant-garde shapes. No, these ghosts are backed by shady US finances and all come with automatic weapons. Tom Clancy’s Ghost Presents … Ghost Recon: Wildlands is released worldwide on 7 March, and it has PC options galore to explore.
So many options and menus in fact that I think, in a slight break from the traditional PC Invasion order of Technical Review events, I’ll just go through them sequentially. You’re in for a whole world of menu screenshots, dear reader. Plus some commentary on what some of the options actually mean, and comments on my experiences with how the game performs.
Here’s the PC I’ve been using to take a look at this title: i5-6600 / 16GB RAM / 4GB 380X (at the time of writing I was using the latest 17.2.1 drivers, 17.3.1 have since come out). Not the top end testing ultra-machines you might see on other sites, but representative of, well, the PC I currently own. If you’re curious about mid-range Ghost Recon: Wildlands performance, you’re in the right place.
You’re also in the right place for Grey Wolf stickers.
To save some time for those who played the closed (or open) beta, options and performance appear to be largely identical. There are a few small differences and additions in the full release (I could never get the benchmark working properly in the beta, for one thing), but based on my experience with both versions you can be pretty sure of getting the same sort of frame-rates as the betas. That’ll be good or bad news, depending upon how you found performance there.
For those who aren’t familiar with the PC graphics (and more) options in the game, join me now for an extensive visit to MenuTown. Starting without our old miscellaneous friend, Gameplay. You can click on any of these images to make them larger, if you wish.
Nothing too fancy here. You can toggle the aiming mode to over the shoulder if you wish, and do things like tell Ghost Recon: Wildlands to cool it with the tutorial messages. The matchmaking filter can be set to ‘Language and mic’ if you wish to stick to players who are both using a mic and potentially speaking your language (handy if you’re serious about this tactical co-op business). In-keeping with that, you can allow people you play with to recommend you to others here too.
Next in line, it’s Keyboard and Mouse control options.
Here’s where you can forlornly mess around with sensitivity settings in the hope of making the helicopters control in slightly more coherent manner. Bad luck, they’re coded that way. Same goes for the now infamously robust vehicles, which can defy almost all laws of physics short of driving vertically up a cliff face.
Vehicular ‘feel’ is certainly strange in this game, but the fact that the control options provide separate sensitivity sliders for driving, drones, choppers, and aircraft (along with separate options to invert the Y axis and so on) shows a commendable flexibility. Same goes for the inclusion of a Left-Handed Mode option.
As well as the usual selection of Crouch and Run toggles, this is where you’ll find the Key Mapping section. Again, divided into separate branches. Want to change the button that launches your mobile scouting drone and absolutely nothing else? Go ahead. Want to extensively alter the entire control scheme to suit a very specific taste? I haven’t tested every possible button combination in the universe, but that sure seems possible.
Aside from things that are out of the control of incremental options (like weird car physics), the Ghost Recon: Wildlands keyboard and mouse controls seem like the optimal way to play. Aiming, obviously, is far superior with the mouse. But things like being able to order your squad around (or call in rebel support) via hotkeys are a boon too. You still have to have the radial menu open when you do this (in part because some of those keys are shared with switching weapons), but it’s still a helpful shortcut.
Switching between controller and keys/mouse on the fly is possible as well, so if you find that the ideal world is keyboard and mouse while on foot but gamepad for vehicles, you can take that approach. Button prompts switch on the fly as well (at least they did for my knock-off 360 pad).
The HUD toggles are similarly broad in scope, allowing you to pretty much turn off every aspect of the UI individually. Again, this allows the player a neat amount of flexibility in terms of what’s shown on screen. They’re all straightforward ‘on or off’ toggles. No ‘fade out over time’ options here, which is a slight shame.
Moving on to what many will feel is the main event, Video and Graphics options. Plus a smattering of Benchmarks.
General stuff first. Ghost Recon: Wildlands will support 4K resolution if your monitor will (or you can downsample if that seems like a wise move). 16:9 and 16:10 aspect ratios are supported, though I don’t know if areas get stretched or cut off with the latter. It’ll run in Fullscreen, Borderless Window or Windowed mode, as desired.
The frame-rate limit counter starts at 30, goes up in increments of ten up to 60, then offers 75, 90, 120, and 144. You have the option to leave it off completely too. Ubisoft really going the extra distance for customisation of the optional in-game frame cap, there.
Also of interest from a PC perspective (literally), is the Field of View slider. Here’s a comparison between the FOV at minimum and right up at 100%. Presently, I’ve settled closer to 50%, as the maximum was creating a bit of a fish-eyed effect when moving the camera around.
FOV at its lowest.
FOV to the max. Hey, I can almost see her legs now.
On then to the more in-depth graphics options. Many of which you will notice I have turned Off, either out of preference (motion blur, please die forever) or because Ghost Recon: Wildlands really makes my 380X earn its keep.
The presets are Low, Medium, High, Very High, and Ultra. A slightly tweaked ‘Medium’ is about all my GPU can cope with; at least without making the concession for better image quality at the cost of locking to 30fps. In what seems to be a trend for Ubisoft, each option provides an accompanying picture showing what effect, say, increasing the Level of Detail will have in a practical sense. Combined with the VRAM bar and the Benchmark tool, this is a pretty dependable way to figure out a decent quality-performance trade off.
Also useful if you want to know what the hell Nvidia’s special Turf Technology is all about. I suppose it’s fitting for a drugs game to have a special setting devoted to grass.
As mentioned at the start of the piece, the Benchmark tool utterly failed to function for me during the closed beta (giving averages of about 11fps even on all Low). Now, however, it works. So here’s what Ghost Recon: Wildlands manages on my machine at Low, Ultra (well, Ultra-ish, I had to turn down terrain quality a notch to get under the VRAM bar), and my slightly boosted Medium settings.
The ‘Low’ Preset.
The ‘Ultra’ Preset (mostly – Terrain detail turned down to get under the VRAM limit)
Effectively the ‘Medium’ preset with some AF and a few things like Motion Blur off.
As you can see, Wildlands will barely manage 60fps at the lowest possible settings on a 380X. Ultra is out of the question, but if you’re willing to go for 30fps and higher image quality then that’s a possibility on GPUs at the lower end of the game’s range. I’ve been happy enough with the 40-50 average afforded by Medium settings. While that’s not ideal, the game does seem consistent with that range (in other words, it’s not fluctuating all over the place from 20 to 60 or anything). That’s true of both the Benchmark and (for now, I’ve only seen the first area) the game itself.
Initial loading times are extremely long, however. That goes for both the Benchmark and the game. Especially so with the main game, which spends a few minutes loading up to what amounts to a friends lobby, and then a few more minutes getting you into the actual game. Quite tedious, but the major benefit here is an apparent lack of any loading beyond this first couple of blocks. This was also from an HDD in my case, so an SSD would undoubtedly help.
There’s quite a bit of texture pop-in too. Most gratuitously straight after loading up, but throughout play as well.
All of this is pretty consistent with the performance I saw in the beta version, so not a whole lot has changed on that front. While we’re at it, here are the Audio options.
I’ve scrolled down beneath the usual set of Voice, Music etc sliders. What you see here are largely Microphone options for co-op play; whether you want to have a permanently Open Mic, or disable voice chat completely, and so on.
PC Invasion will no doubt be recording some co-op once the game is fully released, so I’ll refrain from any conclusions about connectivity until Ghost Recon: Wildlands is at the mercy of launch day. I didn’t run into any major problems during the beta when messing about with fellow Soldier Specter Man Tim McDonald, but that’s not necessarily a true indicator of how the final version may (or may not) function with a full player-base.
Now to make my escape from this article.
Whatever else you want to say about Ubisoft PC versions these days, they’re exhaustive with their toggles, tweaks, and sliders. We’re a picky (‘discerning’, if you prefer) lot in PC land, so there will doubtless be factors affecting someone that I haven’t even considered, but pretty much all the customisation options that I consider important are here in some fashion. There’s full incremental control over the frame cap (which can also be removed entirely). An FOV slider should ease most troubles with the default third-person camera being too close up. Controls can be rebound. The HUD can be essentially eliminated if you desire. 4K is supported if you have the machine power for it.
Performance-wise, Ghost Recon: Wildlands clearly demands a much more powerful GPU than my usually dependable 380X for anything approaching 60fps (or above) at the High/Ultra end of the graphics spectrum. It is, though, pretty consistent about staying in the 40-50fps range at roughly Medium settings. That’s not ideal, but to me seems perfectly playable.
There are some things that can’t be fixed by PC customisation tweaks, like clunky animations and curious vehicle handling (the latter can be mitigated a little), and design choices like the command wheel mean the UI leans towards the console version. But it seems like the majority of desirable options are accounted for in this release.
Overall, it seems the purity of the Ubisoft Cartel’s PC releases is generally on the rise.
0 notes
Last Seen Blogs

unsee1ie
@witchwitchwitch

junnichiedesu
Junnichie.

rebelqueenblake
Brave Soldier Boy

lil-lemon-snails
Snailem's Snart (Snail Art)

webstoreestore
Webstore Estorefactory