#sxlvxrfxngxr
Explore tagged Tumblr posts
Visit Tumblr Blog
Explore Tumblr blogs with no restrictions, modern design and the best experience.
Last Seen Tumblr Blogs


Fun Fact
Tumblr was named as a finalist in Lead411’s New York City Hot 125 in Aug 2010.
Text
Some Useful Tips on Making Gifs (With Sony Vegas)

@sxlvxrfxngxr
Well hi there! :D Thanks for your nice comment~ And for taking the type to ask me something!
For me, making gifs is a bit different than the photoshop loading up and editing type thing, because I actually use Sony Vegas plus a third party website to convert my video files into gifs. c: It’s tedious to go from one thing to another, but I can describe my process of gif-making to you, if you like! It might give you an idea of how ideas form, and what things I do when editing it! If you’re not familar with Vegas, then it might seem like a bunch of mumbo jumbo, but it’ll get you a start on how to do it!
Keep reading below since this is gonna get long, and be wary! Imma be using Chapter 13, Verse 2 as my example!
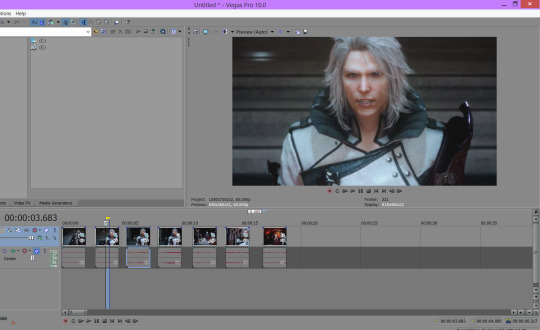
So like everything I make, I gotta start off with an idea, right? In this case, I’m starting with the idea that ‘Man, I really like Ravus. Imma make a self-indulgent gifs with, I dunno, the new cutscenes and stuff.’ So with an idea that simple, I fire up Vegas and drop the video file I want to take from, so I can cut it down!

When I make my gif sets, I'm very exact when it comes to the timing on them. So they all are 2 seconds long. Rarely are they longer than that. So I trim down the clips that I want to make gifs of, and I have them in my timeline for editing and trimming! (In this case, I’m trimming the subtitles until I can get the cutscenes in HD without the subs). So after that’s all trimmed down, I’m able to have individual clips to trim down if needed, pan to what angle I want them in, and have stuff I can add and eliminate accordingly! Good stuff! Be sure to disable the resampling by selecting the clips and going to switches. It’ll prevent ghost-framing and make your clips look so clean and smooth when in motion!
Now I can add my video effects to the clips, which basically act as my filter and coloring. Me personally, I like darker blacks and lighter lights, so I end up adding an effect known as ‘Levels’ to my clips, as well as the ‘HSL Adjust’ effect. Both of those will allow me to brighten my colors highlights while darkening the darks that I want. It’s a play with it, but I typically like the Preset ‘Studio to Computer RGB’ for levels and an HSL adjust with 1.21 points on saturation, and 1.05 on luminosity. I just drag and drop what I want onto the entire video track to apply it, and that gives me my base color. (I use these base settings on the ‘This Is...’ series. Basic color enhancement!) You can also use Levels and HSL adjust in Photoshop too in your adjustments panel as well!

So now, I play around with some coloring, usually with nothing in particular for a set color, but for this case, Imma go with something violet. This is where I usually play with ‘Color Curves’ and ‘Color Corrector’ to get the tones that I want. Color curves is nice because you can play with the specific RGB spectrums you want, making some colors more apparent or others less. Kinda like the color sliders, only with a graph instead. You can anchor certain points and shift the color and lighting to your favor, making it a fun tool to experiment with! You can first edit all three at once to play with lights and shadows, and then you can go to each one individually to play with how much reds, blues, and greens appear.
Some examples of playing with it...

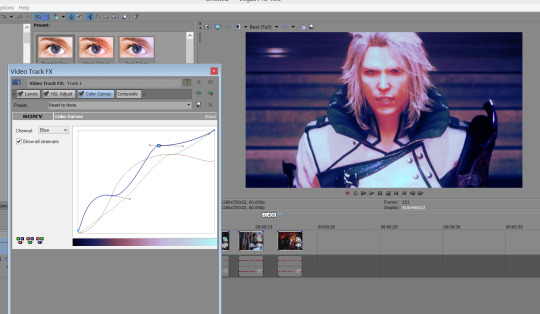

It’s all about playing with the color curves, but you can make some pretty cool combinations! After you apply color curves, you can also try using the Color Corrector tool. (There’s secondary color corrector too, but that one’s more good for a sin-city effect.) This tool allows play on the colors too, but it’s not as manipulative as the Curves tool, and it’s a Vegas feature. But with Color Corrector, you can apply midtones and highlights of certain colors to your edit, while also playing with the lighting, saturation, and contrast of it. This one’s customizable by its low-lights, mid-tones, and high-lights, so it can be used to make things softer or apply almost a color wash over your edit. It’s really nice when wanting to try muting your clip, but not have it straight-up black and white. Like many of Vegas’s effects, this one’s all about play too! If it’s too bright too, you can desaturate it from the color corrector, or even apply the Black and White effect in Vegas to desaturate it even more.


Once that’s done, you can add text with the Text Generator in Vegas! I use 10, so the text generator was pretty much the same since Vegas 7, but in versions like Vegas 13, you’d have to find the Legacy Text Generator for a more simple interface. Basically just type it in, add outlines, shadows, and the like there. It doesn’t have fancy text effects, but you can just add transitions and stuff with Vegas effects to do cool things with text in general! I’m simple with my text, so I enjoy using the ‘Times Sans Serif’ font with ‘Times New Roman’ to make more pretty looking edits. Don’t need fancy fonts, in my opinion, but they can look cool in some instances. Again, it’s experimentation in what you think looks cool! For quotes too, I usually come up with them from the top of my head. But in this case, I had a Dragon Age quote I wanted to use. c: So playing with some Graphic Design things, you can apply the text accordingly!

And that’s pretty much all I wanted to do with my gifset! I’ll then render out what I have and then I can run over to my gif converter site to convert everything into a GIF format for Tumblr. When rendering though, I render in an HD 30p format, with a project template of 60 frames per second, so my things are a little bit clear. Depending on the converter sight, you can keep all of the frames, but Tumblr HATES large files. So, I keep it in an MP4 30p render file and call it good. c:
From there, I can trim down and optimize my gifs for a proper Tumblr format. The website I use only has a cap of 25 FPS, but it lets me optimize, crop, resize, and more after I upload my video file. It’s easy to use once you get the hang of it too!
And that’s how I make my gifs. c: It’s really fun and simple once you get the hang of it! Photoshop is a different process for making gifs, but here’s how to do it with video editing software! I hope this helps you out a bit, despite my rambling and stuff, but it might help you if you figure out Photoshop gifing too, dear friend!
#stephic edits#tutorial#gifs#sony vegas#stephic writings#das a whole lot of ravus as an example#i ain't complaining though~#sxlvxrfxngxr
15 notes
·
View notes