#the gif is so crusty on mobile so click for better quality
Photo
Some people were asking about my process for this last piece so I did a little process gif of it which goes:
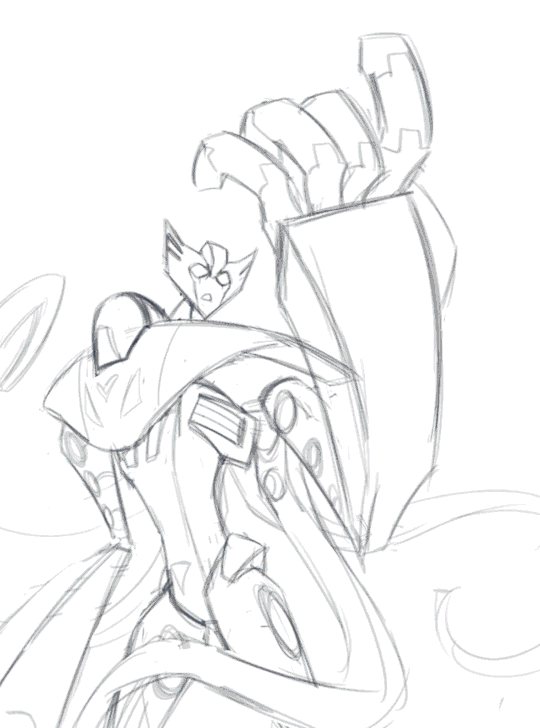
1. Sketch (flip canvas 100000 times now so you can get any weird jankiness out here and not later on when it’s harder to correct)
2. Lines/corrections. (also a lot of canvas flipping)
3. Flats, all set on a clipping mask to the base color.
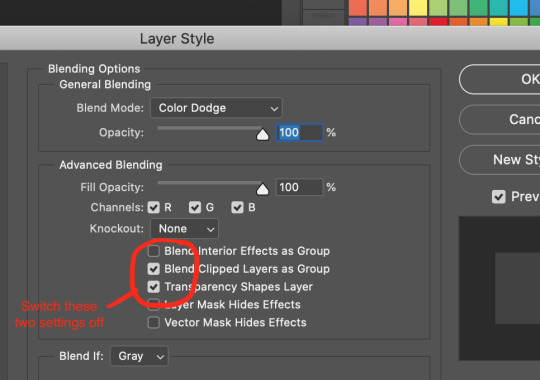
4. Shading, done separately on each flat layer color with the “lock” setting on. I mostly color picked by eye for this, but for the subtle reflected colors I used a mix of color dodge and color burn with a low opacity brush.
5. Added the light from the secondary light source, his biolights, using color dodge.
6. The background was worked on from here on with minor changes going up til the last step, but in this gif it’s completed. I blurred it slightly to keep the focus on the subject/add depth.
7. Painted over some of the lines (now set to multiply w a dark blue color), added the autobot brand, and rendered more reflections on his hands with color dodge again.
8. Painted the energon, with four separate layers: the bottom one (darkest color) being set to normal or multiply on a medium opacity, the second (base color) on normal mode at a medium opacity, the third (highlights) on normal mode at 100%, and the last being a bit of gradient for glow on a layer set to “lighten”.
9. More lighting effects on a few separate layers consisting of multiply, color burn, and color dodge. The multiply and color burn layers were there the entire time, but I kept switching them on and off periodically so I could shade better, and only towards the end did they stay on mostly. I had them there from the start and worked on the shading underneath them while taking into account how everything would look once those layers were permanent. I also had the main light source set right from the beginning and based the shading on that.
10. Some more finishing touches and rendering, again using a lot of color dodge for the highlights.
11. The finished piece, after some minimal tweaking in Camera Raw Filter (the image needs to be flattened). If you’ve been thinking hard about color you shouldn’t need to do much here, but I also like to add some grain using Camera Raw.
** When using a color dodge layer I LOVE to do this in the layer settings bc it makes everything pop so much more:
* Camera Raw Filter is specific to Photoshop, so idk if there is an equivalent for other programs, but it’s not necessary, just nice to have if you need to fix values and stuff.
* These layer modes may look different in other programs so fiddle with what works.
* Using a slightly textured brush makes any errors or shaky lines a lot less obvious, and adds nice effects when shading using color modes.
* Liquefy tool is your best friend if something looks off, even at the last stage you can mush things around a bit to look marginally better. Sometimes you don’t see errors till it’s almost done.
I am by no means a professional, this is just what I’ve learned myself over the years.
#my art#tutorial#i know i hate adobe throw stones at me#but i'm too tired to learn something else when i know this so well#i also did something similar to this w the last sg xenaut thing i drew#can u tell i like color dodge#the gif is so crusty on mobile so click for better quality
32 notes
·
View notes
Last Seen Blogs

godsmackdaily
Godsmack History And News

joeray33
Untitled

orristerioso
Orristerioso
seapups-cove
🌊•Seapup•🌊

deadbeat--godfather
Drag The Lake