#the way the changing camera angles make it impossible to maintain a consistent coloring has been driving me up the walls
Text
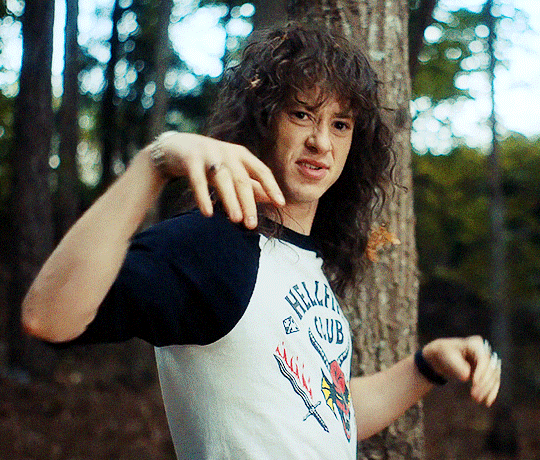
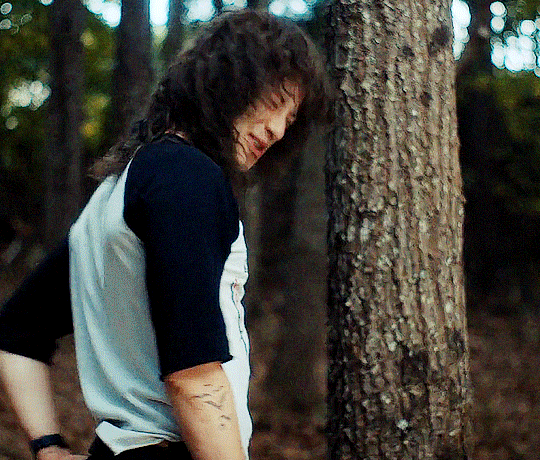
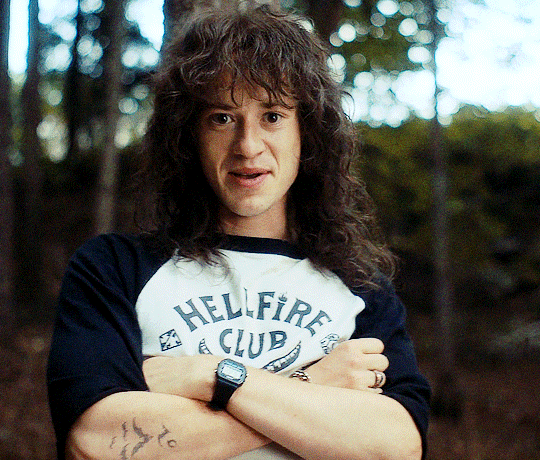
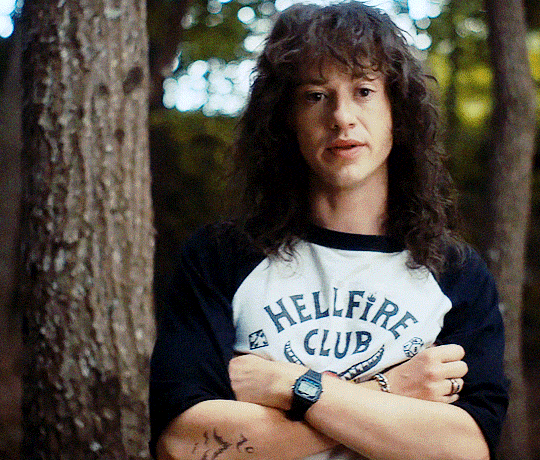


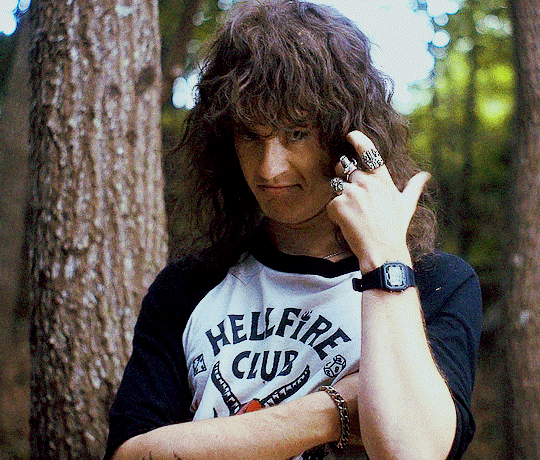
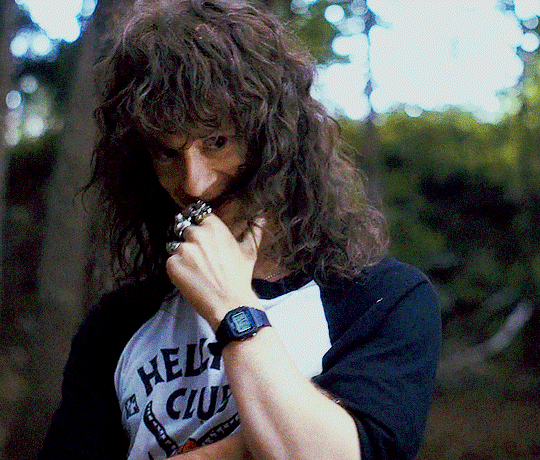
The most adorable metalhead
#eddie munson#joseph quinn#misha-bawlins gifs#was feeling very normal about him today. needed to gif#the way the changing camera angles make it impossible to maintain a consistent coloring has been driving me up the walls
536 notes
·
View notes
Text
10 Photography Tips for Bloggers

LEARN PHOTOGRAPHY BASICS
There are hundreds of thousands of blogs out there that offer the basics of photography but the reason this stands out is because there is a surprising lack of quality photography across travel blogs. Therefore, one way to shine among the crowd is by showcasing your photography.
First, explore the "Exposure Triangle," which is the relationship between aperture, shutter speed, and ISO. There's no shame in using automatic but sometimes a scene needs your assistance, such as a bright sky against architecture or a prop (wine bottles, ice cream, etc.).
Perfect Sky But...
This isn't a terrible mid-range exposure but if you point your lens to the sky (or "expose for the sky"), the sky will be prefect but your architecture might be too dark for us to recover in post.

Perfect Interior, But...
With an automatic camera, if you point your lens at the interior, this is what it will produce: perfect interior with a blown out sky that's impossible to recover.
An automatic camera automatically exposes for where your lens is pointing. For the advanced, if you move your exposure square, it will expose where that square is when you lightly press the shutter. By learning how to use your camera more effectively, you can produce better work that stands out.
If there's demand, I'm happy to write a quick and easily digested blog about photography basics. Leave a comment below or Tweet me if that would be helpful.

EXPLORE DIFFERENT GENRES
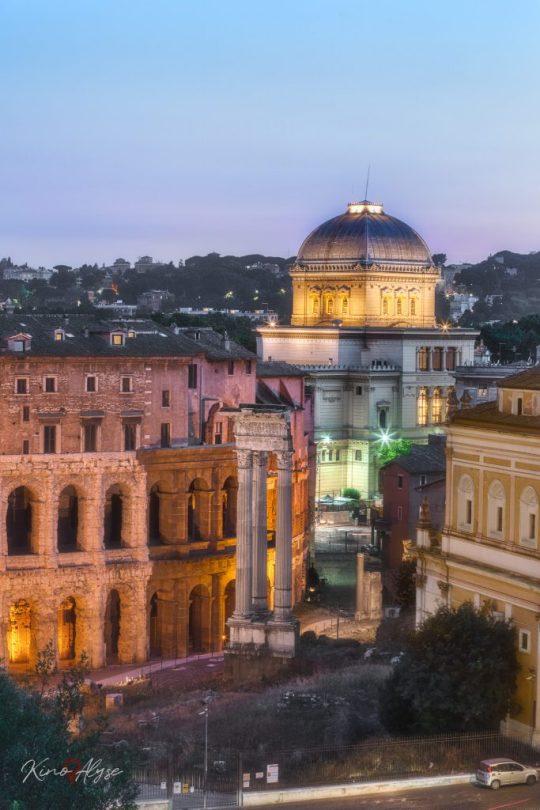
Second, what is the theme of your blog? If it's quite specific, such as food around the world, consider the different angles you can take to tell the story of that food. What of the chefs, the building, where the food comes from? To illustrate, a typical food blog features the food and wine placed on their table: food photography. However, if you want to tell a different story and, again, offer a fresh perspective, start exploring different genres of photography.
In order to photograph the chefs, one would want to dabble in portraiture or street photography. Furthermore, to tell the story of a restaurant with a history, consider architectural photography.

Night
Changing the time that you shoot can completely diversify your portfolio and is more visually interesting.

Portraiture
Portraiture helps blogger to pull readers into their story. See Using Human Elements for more information.

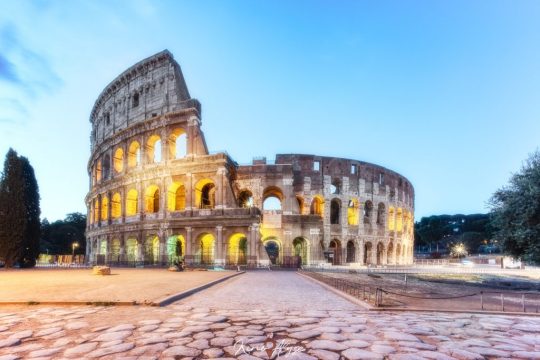
Architecture
Architecture connects readers to where you are and the people who inhabit the location. Always tell a story.
Take Notes
Travel takes a lot out of us. As you shoot, remember to take notes of your experiences, especially as you move: one city contains any number of photographic features in different sectors and you may not realize you've changed locations. Take notes of your surroundings to make sure you aren't misleading your readers and especially in case you decide to make money with stock photography in the future.
https://vimeo.com/286921266
Tell a Story
Telling a story requires creativity and a willingness to explore different shooting methods. For example, street photographers use a method called "shooting from the hip." Instead of shooting from a standing position, the camera is placed near their hip to not only give their photos a different angle, but the camera is less obvious.
In this photo, I had visited a city with a couple of famous landmarks and decided to skip them entirely in favor of exploration. I later realized that this town had been devastated by an earthquake years prior. At first glance, this is just an archway with a window reflecting the sunset. I wanted to invite the viewer to look closer for the story, the acorns littering the ground, unkept foliage, cracks in the stone. It becomes quite clear that this section of the city hasn't been maintained by citizens in years.
Leave White Space
White space is empty space within your photo, perfect for banner backgrounds because it lacks 'business' against your font.
Play attention to white space while you shoot.
skeleton plans, open schedules
plan flexibly

The rewards for patience is often worth the story itself. Be patient if your sunrise isn't incredible. Stay another half-hour in case the rain lets up. Flexibility in photography means using the unexpected to your advantage.
Planning a vacation and having an open mind is totally different from patience in photography. When you plan your locations, remember that the weather, people, situations are not always as expected. Use these 'problems' to tell a story.
Use A Human element
Thank you to CrossroadAdventure for the question! A human element adds relatability to your scene. First, let's observe an ice cream cone in front of a famous landmark.
keep to your tone

Photographer: WeNeal's Photography and Retouching
Alongside the right blog tone, this is a genuinely effective photo.
Additionally, there is consideration for the framing and elements: they've gone with pastel nails and vibrant ice cream colors along with framing the fountain behind them. Coupled with the correct tone of a blog, this photo can be especially effective: it communicates a story in front of a famous destination and two people enjoying their cloudless afternoon.
A human element also adds scale.
Without the photoshopped man in the background would you look twice at this photo?
A viewer has no concept of how large the driftwood and bushes are nor the rock in the background. Further, it was shot wide angle so scale is already an illusion.
Placing a human element psychologically brings the viewer in. Simultaneously, a human element invites them to look again, even search for more easter eggs (hidden elements).
This also means people stay on my website longer. My visitor retention skyrockets when I add something relatable.
I have a lot to say about props: for more depth, Using Human Elements discusses more on the stereotypes of photography and how you should plan your own photos.
Create Scale
Edit consistently
In addition to sticking to your tone, you should edit your photos within one blog post identically and within the blog itself, similarly. In the gallery below, two of the photos match styles. The other two were edited as I continued to learn and, as such, lack a cohesive style.
Look specifically at the blues. The first and second photos were edited with the same saturation and hue of blue in Lightroom. The third has intense, saturated cyan and more rusty yellows. Finally, the last photo has darker blues and far less vibrant than the others.
Much like the tone of your text, don't stray from a specific style in a single post.

get creative with props and people
perspective
Change the angle. Crouch, look up/down, creative placement that isn't from a standing position

light
Look for interesting light such as bokeh, light filtering through the trees, and soft reflections off glass.

composition
Find interesting foreground and background placement where your subjects can interact.
BEST CAMERAS FOR BLOGGERS
Until I am blue in the face: the camera does not contribute to the artistry of photography until the mind behind it understands how to use their camera as an intended tool. However, some cameras do make layman lives easier.
Here is what I recommend for different types of bloggers - thank you to Dancing Pandas for the question!
Cheap powerhouse:
Canon G7 X Mark II
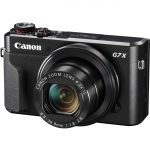
This is my vlogging camera, nearly four years old and is still kicking after moving around the US and overseas multiple times. Not only is the camera itself small and lightweight, the batteries and chargers are as well. It takes gorgeous photos, has stabilization for video, and a wide range of automatic features, such as timelapses and night photography. For the layman and especially for the price, this camera is a dream.
Compact DSLR: CANON REBEL T6

My first DSLR camera was the Canon Rebel T2i, my first truly daunting purchase. The T6 is a better camera and less expensive. It takes quality photos and has features like wifi connectivity, creative tools like HDR, and great autofocus. It has similar power to more expensive cameras without the weight and complexity, although the crop censor is something to consider. The Rebel line continues to impress.
ACtion Camera: GoPro Hero 7 BLack

The GoPro is a huge contender. For action without quality sacrifice, 4k video, voice commands, automatic HDR photography, timelapse and hyperlapse photography, wifi-enabled... I envy you if you've got this mounted. I can't wait to see what they do next: GoPro created one smart camera for any situation I could dream of finding myself in. The best part: it's relatively cheap compared to any other cameras on this list.
Best mirrorless: Sony A7 II

Although there is a newer Mark III model out, I think it has an overwhelming amount of bells and whistles. This version remains one of the best mirrorless, lightweight cameras on the market. It is able to automatically shoot simple, automatic photography but the moment you decide to really get into shooting, it also comes ready with professional features. It's the middle ground between professional and hobbyist.
Phone photography: Samsung Galaxy S10+

At the end of the day, the best camera is the one you have with you. Camera photography is no joke. Samsung's Galaxy S10+ features a wide angle lens (equivalent to 12mm) and crazy manual control you usually only get from a paid app otherwise. This also means control over your focus. Want dreamy backgrounds? You got it. Insane zoom? Comes standard. It also takes full 1080 60FPS video for that extra bang for your buck.
BEST DRONE: DJI Mavic Air

If you don't have a drone can you even come to the photographers' table these days? DJI has made droning more accessible than ever through their Spark and Mavic Air. I recommend the Air specifically for professional bloggers as it is lightweight and compact, contains a wealth of features (timelapse, tracking, full HDR, even filters!), and comes with everything you need to get started. Quality drone photography and video? Look no further. DJI Mavic Air.
If you want more of me or my work: Twitter | Instagram | Facebook | Art Industry
Read the full article
1 note
·
View note
Text
Surreal photography
https://www.designyourway.net/blog/inspiration/amazing-examples-of-surreal-photography-39-photos/
The purpose of surreal photography was to destroy the borders between reality and dream and to release the passion.
Various experienced photographers like Man Ray, Lee Miller, and Raoul Ubac were drawn to surrealist photography because of its commitment to achieving artistic freedom.
Surreal photos present pictures that are unlikely to be found in the real world and surrealist photographers produce photographs which have a special impact.
Surreal pictures usually represent overlapping photographs, abstract forms or blasts of light that trick the viewer’s senses.
The viewer’s brain perceives that the things they are observing are quite impossible in reality, yet at the same moment their eyes are viewing a remarkably realistic-looking photo. Surreal picture manipulation is really a challenge.
It demands a special sort of creativity to produce such an impact. It is not all about the fancy picture editing software programs or the camera, just many techniques taken by photographers that deliver the surreal images their charm.
Surreal Photography Starter Guide
In order to take surreal photographs, you will need to have an idea. So, when some idea comes to your mind, it will be good if you sketch it out.
This should be the case with everything that you do, not only for taking surrealist pictures.
So, firstly you need to get some pencils and sketch the surrealist ideas which begin to emerge.
Next, plan the photos you will need to take to shape your surrealism ideas. TTake the lighting into consideration. You should plan that well if you want your surrealist photos to turn out great.
Even if you will be working in Adobe Photoshop using a lot of manipulating, cutting and pasting, twisting and many other techniques on the surrealist picture, your surrealist photographs should be great to start with.
Make your Photoshop work much simpler by capturing a great image with your camera. This will save you time as you will have a lot to do in order to fine-tune your surreal image.
When you are creating a surreal photo it is always a good idea to start with the background first and then work on the final details later.
Attach your surrealist images one at a time in Photoshop as to see if the light flattens. Color temperature plays a huge role, so try to make it consistent so the photo looks more natural.
Also, shooting raw truly pays off here since you will have total control of the picture, you may manually adjust shadows and highlights, set the white balance and much more. You can use shadow to create a dark surreal landscape or add highlights for a lighter setting.
Methods of Surreal Digital PhotographyCliché Verre
This method is normally used in drawings, etchings, paintings and also photography.
Advertisement
Cliché verre was firstly practiced in the 19th century by French artists and includes transporting the resulting picture to a light delicate paper and drawing on a transparent surface.
This method is further known as glass negative in photo surrealism because it involves utilizing negatives that are glazed with a glass plate.
Photomontage
As one of the most usual methods utilized in surrealist photography, photomontages incorporates joining 2 or more images together and achieve to look like they are one single photo.
The photos a generally integrated by utilizing digital editing software. Generally, surreal photographers are capturing pictures of some interesting backgrounds and other picture of the main subject. After that, they join the 2 images easily and make them seem like one.
Multiple Exposures
This method can be made by using an analog camera and capturing a photo without moving the negative.
By doing this, you will place two separate photos onto each other, forming an undetermined mix of each. This will form a surreal effect. Since each photo is formed, you will be capable of picking out details from every photograph in the complete surrealist photograph.
Typography
This is a surrealism photography method where 3 distinctive images are taken from one roll of film. This triple-exposed photograph makes it impossible to simply pick out one subject from one photograph, creating a surrealist picture.
Long Shutter Speeds
Long shutters speeds are another modern surrealism photography method if you want to create surreal photos by playing with the speed of your camera.
Shutter speeds normally last shorter than a second. A remarkably quick shutter speed has the capacity to “freeze” a moving subject.
For instance, a running individual can be captured with both of the legs in the air. Slower shutter speeds may describe movement in a photo of a moving subject. It can also blur motion, which will result in a surreal picture.
Solarisation
Solarisation, also recognized as the Sabattier effect, is a method of photography surrealism in which the picture is somewhat or entirely changed in tone.
This is a Man Ray surrealism technique. A partially-developed film is visible to light whilst it is being formed. Normally, the partially-developed film is presented by switching on the light in the dark room for a short moment.
The surreal photos developed by the Sabattier effect results in the withdrawal of highlights and shadows, which creates a great level of contrast.
Capturing during the “magic hours”
The magic hours, also known as the golden hours, is the period shortly after sunrise or before sunset. This is the time when the sun has taken the lowest angle up in the sky.
During the magic hours, the rays of the sun are covering everything in warm and attractive colors.
Picutestaken at this time without flash usually turn out to be surreal pictures.
The twilight hours are also known as the blue hours and are a great chance to take surrealist photos. This is the time after sunset and before sunrise. A surrealist photographer can use this time to create overwhelming scenes.
Juxtaposition
The juxtaposition is utilized in surrealist photographs, painting, sculpture, and writing. One of the intentions of surrealism is to increase our mental limits by juxtaposing entirely distinct objects in surreal pics.
For example, in surrealist images, a portrait of a modern woman could be captured with a dead fish in her legs or a photograph could represent an arena with a baby in a plain white dress in the center. Here are some surrealistic photography examples.
Blurring
To produce a surreal environment for your videos and photos, the subject needs to be in focus, and then you can utilize blurring effects in your post production and camera.
Decreasing the opening of the camera will lessen the deepness of the field in the image, and it becomes simpler to blur objects that are moving through the time you take the photo by reducing the screen speed. You can edit the picture and copy the image layer in Photoshop to enhance your surrealism image.
Shutter speed
Shutter speeds can help you produce cool surreal art.
Quick shutter speed has the capacity to stop a moving subject and the slower shutter speeds can describe movement in a picture of a moving subject.
Shutter speeds are lasting shorter than a second. It can likewise blur movement, which can produce dream surrealism pictures.
Float your subject
This is an extraordinary way to produce images of surrealism. Utilize stool or chair so that it becomes simple to eliminate in Photoshop later to keep your subject up as if the subject is in the air. Nevertheless, to perform this effect, you need to keep your camera in a manual mode and also turn off the auto-focus.
You also need to use a tripod as to maintain the position of all in two pictures really close. One picture will possess the floating subject on a prop, and the other must be quite the same image, just without your subject or prop in the frame.
In Photoshop, open both the pictures, with the background picture as your bottom layer and the floating picture on top. Lastly, take the brush tool and zoom in. Eliminate the prop from the top layer to finish levitating the individual or object in the picture. The result will be some amazing photography ideas.
Tips and Tricks for Beginner Surrealist PhotographersImprove Your Idea
Look for a surreal pic on Flickr, DeviantArt, and Tumblr, and you will notice a huge number of surreal ideas available.
Many pictures are clearly created through, and are, storytellers. Do you have a story that you would like to tell? How can you attract diverse parts together or create surrealist pics to tell your story?
What sort of a picture can you presume that you haven’t noticed in a picture yet?
These are few questions that you can question yourself as you are creating original ideas for surrealism project concepts and stories.
Examine Photoshop
You need to have rather good skills in Photoshop or a related picture editing app to produce a realistic looking surrealist image.
A perfect surrealist photograph seems so real that it gives the viewer the chance to think if that moment captured really happened.
With all kinds of photography, practice makes excellent, so learning as you go along likewise an excellent way to learn surreal photography techniques.
You can always check out the Craftsy’s excellent Photoshop tutorials for newcomers. You can likewise enjoy our new post on the fundamentals of using Photoshop.
Use Inventive Commons
You can create some excellent landscape surrealism photography by utilizing simple imagery techniques and camera equipment.
Nevertheless, in case that you don’t have the means or time to bring out your idea with your own images, some experts believe in sharing their images for the greater good of photography and art. give up their images through an inventive commons license.
You can see some of those pictures on DeviantArt or Flickr. The original experts typically permit usage of their images and derivative works for non-commercial motives without a charge. Naturally, be certain that you have the approval of the principal photographer if you want to use pictures that are not yours.
Easy Techniques
If you are looking to start with easy surrealism, you may attach just a bit of the surreal to your pictures with easy techniques. For instance, utilizing the HDR mode on or HDR software can drive your pictures into a surreal empire. HDR function very well for building photography or landscapes.
Managing the color temperature of a raw picture can turn an ordinary picture into a surreal picture—if you go for abnormally warm or cool it can totally change the feel and the look of the image.
You can likewise selectively adjust the color of some parts of the image to make them more realistic. For instance, you can make the water turn red or the sky to look green. This improves the mood of the image and makes it seem otherworldly.
You can additionally increase one point of a picture very quickly to make it surreal. Beauty retouches do this with control: changing curves and eyes, proportions of legs, and changing texture and skin color. You can actually overdo this sort of improvement to create surrealist portrait photography.
0 notes
Text
How to Choose the Right Monitor for Photo Editing
Photographers rarely think twice when it comes to buying expensive camera bodies or high-end lenses, but often seem willing to skimp on a monitor. Why is that? In many cases, it’s because one monitor appears very much like another, especially when purchased over the internet, which is how many of us shop for such things.
This article will help you know what you should look for in a monitor, and show you how to interpret many of the tech specs you’ll see when shopping online. Not so long ago, buying a monitor for photography was an expensive business, but today there is more choice available at every price point.
By Senado Federal
Panel Technology
One of the things you must think about when choosing a monitor is panel technology. The “panel” is the main part of the monitor — the screen. It includes polarizing layers, glass substrates, a liquid crystal (LCD) layer, and a color filter. It’s a high-tech sandwich.
The main difference between monitor technologies lies in the way the liquid crystals are oriented, which fundamentally affects the way your monitor behaves. Here are the main three panel types:
TN (Twisted Nematic) Panels
These type of panels are often favored by gamers for their fast response times, which reduces unwanted ghosting and blurring effects in moving pictures. The biggest downside of TN panels is that their viewing angles are greatly inferior to other panel types. If you move in front of the screen, the color and contrast are liable to shift in appearance. This flaw varies in severity between monitors.
Be aware that, in monitor specs, viewing angle numbers are highly misleading. They’re based on a lenient contrast test, so you should ignore the common claim that a TN panel has 170/160° horizontal and vertical viewing angles. Those figures bear little relevance to what you’ll experience when editing a photo.
Laptops are almost always made with TN panels, which makes them sub-optimal for photo editing in a perfect world. They’re more usable if you can fix your position in front of the screen and maintain a consistent viewing angle.
Image from Maxpixel CC license.
IPS (In Plane Switching) Panels
Plane Switching panels are consistent in appearance from almost all probable viewing angles. In this respect, they are far superior to most TN panels and better than VA panels. IPS panels are also favored for their innately high-quality color reproduction. In most regards, a monitor with an IPS panel is better for photo-editing than one with a TN panel.
A drawback of IPS technology is a phenomenon known as “IPS glow”, which is a glowing effect that appears across much of the panel when viewing dark screens in subdued light. The more money you spend on an IPS monitor, the less likely you are to encounter this, but it’s probably fair to say that it’s more problematic for gamers. IPS glow is different to backlight bleeding, where light appears to seep out from the edges of the screen. That, too, is more likely in budget or mid-priced monitors.
There are various sub-categories of IPS panel, including S-IPS, e-IPS, H-IPS, and P-IPS. The basic benefits of an IPS panel apply to all of them, though the different types may vary in areas like color depth or response time. An e-IPS panel, for instance, is usually cheaper because it typically runs a lower color depth (i.e. 6-bit) than other IPS types. We’ll look at color depth anon.
Proprietary technologies that are similar in behaviour to IPS panels are Super PLS (Samsung) and AHVA (AUO).
VA (Vertical Alignment) Panels
These type are not considered as good as IPS in terms of their viewing angles or color reproduction, but better than TN panels in both respects. They are a kind of a happy medium. The technology is relatively rare, but still used by some of the leading manufacturers in a minority of displays (the proper word for monitors).
A VA panel typically has a bigger contrast ratio than an IPS panel, with an ability to display dark tones and blacks very effectively. Big contrast ratios are not always as desirable to photographers as they are to gamers, however, because they make it harder to imitate the dynamic range of a print when soft-proofing.
Standard or wide gamut?
Image courtesy Wiki-Media Commons.
There is no right or wrong answer when deciding whether you should buy a standard or wide-gamut monitor, but there are pros and cons attached to either choice. Let’s look at some of them:
Standard gamut monitor
Pros
Cheaper.
Wide variety of models available at all price points.
Doesn’t need immediate calibration and profiling (an OS monitor profile will truncate the color of a wide-gamut monitor).
Won’t display garish colors in non-color-managed programs.
Less prone to banding (usually offset by more color depth in wide-gamut).
Syncs okay with the output of most photo labs.
Smaller gamut might suit wedding or events photographers, for whom a large color gamut is less of a draw.
Cons
Not so good for color-managed inkjet printing, since the monitor gamut won’t encompass the color output of the printer
Less attractive, especially for landscape fans, who lose significant color particularly in cyans and greens
Wide gamut monitor
Pros
Just looks better, especially skies, sea, grass, foliage, etc. More colorful and more nuanced detail in cyans and greens – good choice for landscape shooters.
Much better for anyone wanting to soft-proof (preview) the color of an inkjet print, since the monitor gamut will cover the output of most inkjet printers.
Cons
More expensive.
Ideally requires immediate profiling, otherwise the OS monitor color will severely prune the monitor’s gamut.
Colors in non-color-managed environments will appear garish (e.g. Windows desktop).
More prone to banding, though this is usually countered by increased color depth.
Rather oddly, I run standard gamut and wide-gamut monitors side-by-side, and the difference in colors is marked. However, with monitors as with many other things, ignorance is bliss, you don’t miss what you never had.
Image from unsplash CC license.
Aspect ratio, resolution, and screen size
Aspect ratio
You’ll find the cheapest monitors typically have a 16:9 aspect ratio, which is fine for watching movies, but a 16:10 aspect ratio is worth aiming for if you can afford it. The latter allows a little more vertical working space and, as Wiki observes, is a closer fit for the classic 3:2 ratio used in many photos.
Resolution
For many years, a myth circulated that said your photos should have a 72ppi resolution for the web. In fact, as most of us now know, a monitor screen is oblivious to image resolution. This is proven, if proof is still needed, by the fact that Photoshop’s “Save for Web” feature does not attach resolution to images, even though they appear as 72ppi when reopened.
Image courtesy of Wiki-media Commons.
Although several factors may affect the sharpness of an image on your screen (e.g. contrast, anti-glare filters, viewer-to-screen distance), the central thing that dictates sharpness is the monitor’s pixel density, or dot pitch. A greater pixel density or a finer dot pitch is indicative of a sharper onscreen image, all other things being equal. If you google “dot pitch calculator” or “PPI calculator”, you’ll find an easy means of calculating the pixel density of any screen.
As an example, an average desktop monitor might have a pixel density of around 90-100 ppi, while the 27” 5K iMac with Retina display has a pixel density of 217 ppi. That’s impressive in a big screen.
An extremely dense pixel pitch tends to have a flattering effect on photos, just like every photo looks sharp on a smartphone, but isn’t a necessity for efficient photo editing.
Photo from Pixabay, CC0 public domain license.
Screen Size
These days, “bigger is better” seems to be the mantra when it comes to choosing a monitor. Of course, it is pleasant to view your photos on a big screen, but my advice is to buy what you can afford and don’t give precedence to screen size over other important attributes. Also remember that big screens need big resolutions to look as sharp as smaller screens from the same distance, so don’t be deceived by pixel dimensions alone. Scrutinize the pixel density, as outlined above.
Anti-glare Filters
Apart from Apple iMacs, nearly all desktop monitors are equipped with anti-glare filters for the obvious purpose of cutting out distracting reflections. This creates a matte finish to the surface of the screen. The degree to which this affects the sharpness of the screen image varies a lot, ranging from imperceptible to adding a noticeable grainy effect. You might make an analogy with glossy versus matte prints; the glossy print typically looks a little sharper.
An anti-glare filter is not something to be avoided in a monitor (almost impossible, anyway), but it is worth researching how much it affects the image in your desired screen before buying. Ideally, of course, it’s a good idea to get a look at a monitor before investing. Always check negative reviews when buying online.
Photo by Rawpixel CC license.
Color Depth
On to a slightly complicated subject, which we’ll attempt to keep simple. Color depth relates to how many distinct colors a monitor can display.
Theoretically, the more colors a monitor can display, the more smoothly it can reproduce gradual changes in tone and the less prone it is to frustrating “banding” or posterization effects (characterized by ugly pixelated blocks of color).
Most monitors on the market have one of the following two specs:
8-bit color (native)
6-bit color + FRC (2 bits)
The second of these uses dithering to create colors that aren’t there, which is theoretically inferior to a monitor that can natively display 8-bit color. A monitor with 6-bit color is more prone to banding problems, as previously described.
Note that calibrating a monitor increases the likelihood of banding, so more color depth offsets this and effectively makes a monitor more adjustable. Laptop screens nearly always use 6-bit color, so should ideally be calibrated conservatively.
You may see 10-bit color in more expensive monitors. This, again, could be genuine 10-bit color depth or 8-bit + FRC. Bear in mind that a 10-bit monitor can only display its 1.07 billion colors if 10-bit is supported by your graphics processor, software and video connection.
Hardware LUT calibration
Hardware LUT calibration is a fancy feature you’ll find in some high-end monitors from Eizo and NEC as well as a few consumer brands.
Image courtesy of Wiki-media Commons.
What is an LUT?
An LUT is a lookup table, which maps the input signals from your PC into, typically, 8-bit RGB color output from your LCD monitor.
In a monitor, greater color depth allows for smoother, more nuanced tonal transitions without banding. Like a monitor, an LUT may also vary in its color depth; the more colors it can process, the better the monitor will be at displaying smooth tones and precise color.
The above is true even if the final output is an 8-bit monitor, so a 10, 12, 14, or 16-bit LUT produces better color in an 8-bit monitor than an 8-bit LUT. The difference between a 10-bit and 16-bit LUT may be less appreciable.
Hardware Calibration
The type of hardware calibration under discussion here doesn’t refer to use of a hardware device like a Spyder. Instead of storing an 8-bit LUT in your video card, like most monitors do, expensive graphics monitors usually have a high-bit LUT built-in to their own hardware for more refined calibration. You’ll still use a calibration device to measure your monitor’s color, but the final color reproduction should be superior.
Expensive graphics monitors often allow you to store and switch between calibration profiles, so you can alter calibration settings with the click of a mouse using proprietary software. This is impossible in normal monitors, where calibration data is loaded into the video card LUT on startup and not changeable without recalibrating your monitor.
A Final Word
When choosing a monitor for photography, panel type is king. If you buy the best IPS (or equivalent) monitor you can afford, the other features are frosting on the cake. Good luck!
The post How to Choose the Right Monitor for Photo Editing by Glenn Harper appeared first on Digital Photography School.
from Digital Photography School https://digital-photography-school.com/choose-right-monitor-photo-editing/
0 notes
Text
Tokyo 42 and the unkillable charm of isometric gaming
New Post has been published on https://soulcrazy.org/1161-2/
Tokyo 42 and the unkillable charm of isometric gaming
Hardware video gaming generations come and pass; pics processing strategies tumble into Tokyo and out of fashion. However the allure of so-called “isometric visuals” refuses to wane. The remaining year saw the discharge of Gareth Noyce’s Lumo, a tidy little 450-room throwback puzzler starring a chubby wizard, which harkens lower back to the fixed vantage factors and tile-based totally environments of eight-bit classics like Head over Heels. This spring has already given us Torment: Tides of Numenera, InXile’s tribute to the select of Infinity Engine RPGs. And later this yr you’ll get to play Tokyo 42, an open international assassination recreation which unfolds in an airborne, plastic town of exhilaratingly jammed-collectively architectural styles, rendered in 3-D however with a zoomed-out, semi-manual digicam that calls to mind the authentic Syndicate.
Gaming
Created using two-man developer SMAC, it is a bouncy arcade affair that wears the trappings of a tactical sim lightly but convincingly, as you scuttle around the busy yet idyllic city claiming skulls, evading rival assassins or police and getting to the lowest of a conspiracy. Infiltrations oblige you to either avoid patrolling guards or become them – anybody in the games international has an artificial body, which (apart from robbing dying of its sting) approach you may spend “juice” to modify your appearance and blend in. The stealth is otherwise redolent of Steel Equipment Strong, as you duck underneath AI view cones and look ahead to alertness states to reset. Firefights have extra in commonplace with Radiant Silvergun – sluggish-transferring bullets, rockets, and grenades crowd the screen, touch you to preserve tune of your tiddly, trench-coated killer amid the carnage.
4
One of the earliest dimetric pc gaming is Head over Heels, lovingly recalled by Graeme Mason some place else on this site.
The PvP area multiplayer, in the meantime, takes intention squarely at Assassin’s Creed’s lapsed multiplayer – each participant begins off incognito in a throng of NPCs, and also you need to discover warring parties with the aid of maintaining your eyes peeled for suspicious behaviour and dispatching your trusty pet cat to sniff out nearby players. All in all, Tokyo 42 has the makings of a delightfully open-ended throwback blaster, refreshingly unencumbered through meant current stipulations like individual or weapon improvements – but what truly grips me approximately the sport is the way it reveals inside the opportunities of an isometric game standpoint.
I am the usage of “isometric design” extraordinarily loosely in this piece, of course (fair warning, photographs programmers – the following might also strike you as painfully noobish, assuming you have not clicked away already in disgust). Typically taken to intend a recreation with a digicam located diagonally above the surroundings, “isometric art” absolutely refers to the orthographic projection of cubic volumes onto a second plane to create the illusion of intensity, such that all the visible angles on every cube identical one hundred twenty levels. “Authentic” isometric is, but, hard to attain with older presentations and CPUs, as it’s difficult to draw angles which are multiples of 30 degrees while you’re working with square pixels. In reality, some of the video games often labeled “isometric” truly use “dimetric” projection, wherein most effective of the cube’s seen angles are identical, or “trimetric” projection, in which all the angles are one-of-a-kind.
Isometric or near-isometric projection, in the beginning, came into use in a manner of faking 3D at a fragment of the computational rate. But over a long time, isometric gaming has flourished right into an awesome style with its very own aesthetic and creative possibilities, while the ones computational overheads have evaporated. One advantage of isometric projection or strategies that mimic it is that artists are capable of honestly nice-device or stylize each object’s internal geometry, color and lights contrasts, capitalizing on the constant attitude – you might forget one face of the object in robust shadow, the opposite in daylight. Another effect is to impose a discreet diamond motif at the visuals, fashioned using the arrangements of cubes – a motif that can be adhered to and broken from to softly interesting impact, as inside the fabulous iOS name Monument Valley.
Tokyo 42 permits you to rotate the view around the protagonist by way of forty-five diploma increments, exposing pathways around buildings, dug-in enemies and beguiling info along with waterfalls or apartment owners smoking on balconies. However its cuboid international is also clearly designed to be appreciated in isometric view, made up as it is of striking contrasts that are much less substantive when regarded from ninety ranges on – terracotta red plazas slicing across walls daubed pistachio-green, shiny yellow stairways slicing via matt black monoliths, and lively advert forums that are discreetly organized to play up that underlying diamond pattern. You can even make out the diamond motif in the flight paths of hovercraft – each a lovingly faceted bit of cyberpunk, like a WipEout racer repurposed for civilian use.
Tokyo
The sport’s global changed into, in fact, at first designed to be a flat pixel-artwork example, but SMAC opted for polygonal 3-D and a spinning digicam after noting that players were struggling to navigate. “while we commenced, we had the sport running in natural isometric orthographic. However, it was clearly too difficult to differentiate foreground and background,” observes studio director Maciek Strychalski through e-mail. “This is important for our sport because we’ve vertical traversal and fight and gamers want so as to study intensity. This would not have been trouble if we had been a pure dual-stick shooter or flat aircraft sport.
“To get around this, we moved the digital camera waylay back, like a kilometer, and tightened the sphere Of View down. This did matter, it allowed for a tiny quantity of parallax, and it allowed us to put in force a Depth Of Field effect (that’s not possible without intensity facts – i.E. impossible when using an orthographic digital camera which has no intensity data). This offers the participant that greater statistics had to parse depth.”
So why go to all that effort to retain the arrival of a fake-3-D game, while you’re in reality operating in “Real” 3-d? “Nicely, it’s simply neat, is not it? Especially while viewed from a 45 diploma angle, the lines are so photo and consistent to the attention. I discover it lovely.”
Pokemon has had a totally vital cultural impact in many nations wherein it’s been imported. In Japan, Pokemon became famous, selling more than one million copies of Pocket Monsters in 1996. On the Tokyo sports Show in 1997, gamers should get the Mew Pokemon by way of downloading their video games. The result changed into a queue that was four km, with some humans tenting overnight earlier than the Display. Arriving in the U.S., the Purple and Blue versions sold more than 200 000 devices in weeks, then persevered to promote at a mean of 800 000 units in step with the month. Both versions had been the pleasant video games offered by way of Nintendo. At that factor in time, they had been the exceptional-promoting video games in the history of video games. Pokemon Pinball becomes the sport released on recreation Boy, and it sold even greater fast, with extra than 262 000 devices sold in 20 days. The collection that was allotted with the aid of Hasbro toys were also industrial successes. Because the tv collection grew in recognition, so did Hasbro which surpassed its main competitor, Mattel, in 2000. The games have been so famous that Hasbro was not able to collect sufficient toys to fulfill demand. Wizards of the Coast had the same problem with the card game collectibles and had offered over 50 million playing cards among January and March 1999. As of July 1999, Pokemon had generated extra than $ 5 billion.
The phenomenon also affected Ecu nations, like France, where the Crimson and Blue versions were the quality selling video games of 1999, and a million copies of every were bought as of June 2000, less than a 12 months after its launch in France. The lively collection was broadcast in numerous international locations, which include America, Australia, Japan, and Canada.
Who hasn’t been interested in this superhero that is so one of a kind from other superheroes, no longer having any unique powers in any respect save his cunning? Beginning as a DC Comics character, the darkish knight now invades not simply the tv and movie monitors however additionally video games.
Batman video games are created to permit the Caped Crusader’s fans to live the existence of a superhero, saving lives and a defensive the residents of Gotham town from the evils lurking while the streets get dark.
First, of the Batman game franchise is Batman launched in 1986 released through Ocean Software program and became designed as an isometric motion/adventure game.
isometric
Batman: The Caped Crusader, became released in 1988 by using Ocean Software program. This paid homage to Batman’s original comedian appears and with comic e-book panels as sports backgrounds.
Batman (also referred to as Batman the movie). Launched in November 1989 by using Ocean Software and turned into obviously based on the 1989 Batman film. This game spearheaded a new fashion in gaming design and become Well acquired using the gaming public. It has a higher reminiscence than the previous Batman video game and the pictures improved to present off a 3-d effect.
Batman. Released on NES in December 1989 and changed into additionally inspired by way of the 1989 Batman film. Every other Batman recreation inspired with the aid of this movie become launched via Mega Force in July 1990. In reality, there can be greater Batman games created basing on this movie. What do they discover so unique on this specific movie they preserve turning it into numerous games with similar sports plays?
Pc Engine launched a Batman online game in October 1990 which has gameplay capabilities similar to that of Percent-guy.
Batman: Go back of the Joker. Launched by using game Boy, Mega Force, and NES in December 1991 capabilities specialized boss combating At the Last Degree.
Batman Starts of evolved. Released in June 2005 and inspired via the film with the identical title features new forms of play regarding stealth, driving, and platforming.
The latest launched Batman online game is Batman: Arkham Asylum launched in August 2009 and only a few months ago in Japan. The PS3 model has specific downloadable Joker venture levels.
Two Batman video games are nevertheless pending launch. One (Batman: The Courageous and the Ambitious the Videogame) might be launched in September 2010 and the alternative (Batman: Arkham Asylum 2) in 2011.
0 notes
Last Seen Blogs

leilok-blog1
Holist Health Coach

et12317
我愛肌肉

racesupercars
𝕿𝖔𝖕 𝕾𝖚𝖕𝖊𝖗𝖈𝖆𝖗𝖘

raika-yu
Raika yu Storage place

antonius
portfolio