#this lost some when i adjusted the values in photoshop (which i never do but this time i counted it as part of the painting gbskdfshf)
Text
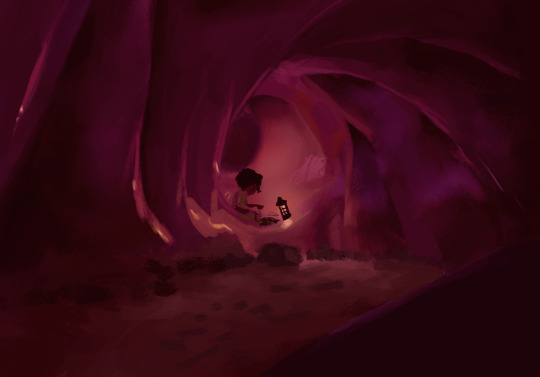

second study of a shot from the sea beast! i didn't realize how tough this one would be 😪 i was gonna give up 75% through! but i told myself to just get the rough of everything in and this is what i managed 🥹
#it's all the colour and hue variation i think#this lost some when i adjusted the values in photoshop (which i never do but this time i counted it as part of the painting gbskdfshf)#but that's ok lol it's all so subtle anyway it was just driving me up the wall aaaaa#listened to the entire soundtrack of six :') gosh bless#~1hr time weirdly but it felt soooo long lol i was suffering from beginning to end#painting practice#art stuff#the sea beast
21 notes
·
View notes
Text
the speed of change
I think about change a lot. I tend to register when it happens, but sometimes big changes happen and I don’t arrive at a place of recognition until way past, while looking back. That probably happens a lot more than I think, seeing as we all are changing every second of every day, on imperceptible levels. These thoughts I’m happening are radically changing tiny parts of me right now.
But anyhow, I was reflecting on the way in which my photography has changed as I geared up to submit photos to an on campus publication. Up to this point, I was aware of certain ways that college changed my approach. I took and black and white film photography course and switched to primarily shooting film. That was my first semester of my first year. I slowly built up familiarity with the light meter and manual exposure and framing for the lens that my dad had for his camera (a Nikon FG with a prime lens, very zoomed in). Last year, probably during my second semester, my friend gave me their Kodak K500, and I started doing typical college party and life photos; people at parties, on the lawn, etc. I was shy so I did very few, and mostly candids of my friends, rarely posed. I took the camera with me to the beach that summer and took a bunch of my family, feeling sentimental and having an urge to capture those experiences. Everything was taking on the form of documentation, attention given to adjusting the exposure and hoping it would turn out a good capture, curiously awaiting the quasi-magic of film. This year, I started taking more photos on the casual camera, trying to pay more attention when I took party photos, or asking people if they would pose for my photos (though I still never take the time to get creative, I usually just stand a few feet away and snap like a 2000s mom). I continued to take still photos of places on campus and my style slid away from properly balanced, measured, and edited to “I guess I’ll take whatever I get and let the novelty of film and college life speak about the capture.” I even stopped retouching my photos and my recently shared shots have been exactly as captured by camera and scanner. I was okay with doing the typical college photos type thing. Mine are more or less better or worse than many people on my campus who do the same thing, and are stylistically similar and absolutely uninspired and derivative. I guess maybe I had let that phase of the imperfections are what give it character to wanting more creative control again, more guarantee of what was going to come out, and something more characteristic to be a result of my experiments. With film, since my captures are often poor and amateur (amateur is definitely the word I’ve been searching for this whole time), I thought it might be fun to “experiment” with expired film. This resulted in my shooting many rolls -- at parties, with friends on the way to parties, for my friend’s haircut (this last one was important and specific) and to my chagrin, my reticence to use flash resulted in rolls of blown up grain and not much image to show for the captures I attempted to make.
Somewhere in here there was a reflection of what I want from my photography and why I do it. I do it casually, as an amateur, but there’s no reason to waste time and money and not make good captures. There’s also no reason to resign to college style photography just because I am at college and have a mediocre camera. There is definitely a thread of creativity missing from my recent work. I of course don’t regret the changes that have happened in my voice -- it’s only natural to go somewhere where the pace of life is faster and different from what life was before with less time for hobbies that my style would conform and reflect the speed of change. It’s a good thing that I left my style behind and tried out the feeling of taking photos that may seem lo fi, amateur or even just bad captures (many of them are) for the sake of art and experience. Realizing this, I was thinking that maybe I should work up from here, start slowly getting better captures, photoshopping them, having more discretion on what’s a good capture and what is worthy of the eyes of my blog, or my archive. This was up until today when I was looking through old folders trying to summon a photo for a publication. I opened a folder from 2015 and was actually quite shocked at my discovery. I had folders upon folders of photos -- digital photos -- that had been edited into bright and blurred scenes with surreal saturated colors. But what interested me was how distinct the creative voice was, and how prolific. I had multiple edits of the same shot, with different edit names, and many of these edits had titles. There were folders of things I was throwing away, and in these folders were actually some pretty great/interesting pieces that I have no recollection of making, but actually hold their own in a way that feels unlike the type of work I do now. I felt like I was entering someone’s creative world, looking at finished pieces of art that I had no familiarity with, and it was astonishing. There were specific pieces that I knew I did, remembering them as creative anomalies that I did to experiment or “be weird.” Having departed from that voice it’s only now in rediscovering it that I realize that was my voice, and it was strong, and I was just afraid to showcase it, thinking it was ridiculous and didn’t have a place in photography because at that point, I didn’t know the art world.
Now, with my eyes having absorbed much art of the NYC world, I see a different kind of value in the art that I thought was “silly” and “weird.” There’s an naïveté that seems to have disappeared as I joined the collegiate world, an honesty of intent, for my final piece of work to be a work rather than just a documentation where the content speaks for the whole work. It’s interesting ; in these old photos I can really see this young, imaginative, expressive voice that was on the brink of developing into a full blown style that was all but erased by the nature of age and experience and not having the time and space to wander through nature and take photos that could be edited into rainbow oblivion. All this to say, I’ve changed a lot in four years, and so has my perspective. This little portal to the past showed me another self that I had lost track of in the change, some details of my shifting being that I had lost sight of in the journey. As someone who’s trying to practice radical openness and embrace experimentation, this exercise in self awareness has driven further home the idea that I should keep pushing the boundaries of my changing self, as well as recall and honor previous iterations, and call upon them where I see fit. My PA self was a different person with a different mindset, and while I felt trapped by my location at the time, my self that has been liberated from that particular place now understands some nuance and beauty that existed in that self, that may have gotten lost in my current self. Thus is the nature of change and the changing speeds of life, and all part of what keeps the process interesting. I’m looking forward to making the time to share new and old experiments.

0 notes
Text
My BEST piece of PS advice
How’s that for a title? Absolute hooker, right? Well, here I am again? It’s Dave Williams here on Scott Kelby’s Photoshop Insider for the weekly dose of wisdom on #TravelTuesday – let’s get this show on the road!
First up, lets have a little introduction for anyone who hasn’t landed on this site before. I’m Dave, I’m a travel photographer. My job is to make you want to go somewhere, which means I have to use a range of skills and techniques on location and in post, and it’s one of those post-processing skills I want to share with you right here today.
The success of your image can be pretty much determined from the moment you open the file.
It all boils down to the first things you do, really. When you open up your RAW file in Adobe Lightroom or Adobe Camera Raw and make those first few adjustments you’re either setting yourself up for an awesome success or for an epic fail. Here’s why: –
There’s a saying common in everyday life…
Less is more.
This little saying is used to express that fact that, in artistic and aesthetic matters, a minimalistic approach is more effective. There is value in simplicity, and often more can be accomplished with less. Synonymously, the term ‘don’t overdo it’ is thrown about a lot, but the thing with us photographers is that there’s never usually an end.
When we’re out shooting there’s always that one last shot, and then another last shot, and then just one more. Before we know it it’s been an hour since that last shot and we’re still going. When it comes to the post process it’s not dissimilar; we all too often will retouch and retouch, and retouch some more. It’s hard to draw that line in creativity. It’s hard to say when it’s done.
So on that note, now aware that my little spiel is drifting away and making this look like click bait, here’s the BEST advice that I promised you.
So, back to that first point. Back to when you open up that RAW file. That’s what I said up top, and that’s what I’ll explain right now.
We all have our own methodology when it comes to those sliders, ranging from those who just hit ‘auto’ through to the minuscule adjustments made using a Loupedeck, and everything in between. But once we make some adjustments, it’s hard sometimes to know when to stop. Whilst stumbling over my thoughts trying to come up with a similie, this sprang to mind: –
You know how if you lose weight you don’t really notice because to you it’s been gradual, but then someone you haven’t seen for a while says, ‘hey, you’ve lost weight!’ Yeah, that. You’ve seen the gradual changes to the image, not just the before and after. The changes you’re making when you push those sliders around look one way to you as you’re doing it, but potentially quite another relative to the initial image.
That’s where the best piece of advice falls in. Right there in between the initial image and the ‘where I am right now’ version there is probably something better. Nine times out of ten it’s better, in fact. There’s a place where the adjustments are more realistic, more minimalistic, more ‘less is more’ and thereby more pleasing. That place is about half way, so here’s what you do.
Whatever slider adjustments you’ve made, make them half. If you’ve pushed clarity to +20, move it to +10. Take a look at the difference it makes. Take a look at whether the image you now have achieves what you want it to in a more realistic way, rather than running the risk of being over-processes by our creative desire to please which results in our photos never quite being done.
Have a go, and let me know what you think – you can find me on Twitter, Instagram, and on Facebook.
Much love
Dave
The post My BEST piece of PS advice appeared first on Scott Kelby's Photoshop Insider.
from Photography News https://scottkelby.com/my-best-piece-of-ps-advice/
0 notes
Link
Get the original full length PDF containing images HERE provided at no cost. Reddit is not allowing me to insert pics in this post and I am only allowed to post less than half of the original text. So if this information looks useful to you, I highly encourage you to download the full PDF.PreambleNote: This was originally a Quora.com answer but the modbots deleted it. Guess AI and interpreting policies don’t go hand-in-hand after all? So bear in mind that I refer to other answers on this thread which can be found here: https://www.quora.com/How-can-I-start-my-own-T-shirt-business/answer/Albie-Kross I have made updates to my original answer so that it makes more sense when I post it on other platforms. Where I remembered to, I formatted the updates in red.I am going to be rather blunt here - the information given on this thread ranges from general | vague | theoretical to false to outright dangerous financial suicide. Yes, there is some links and references that will definitely help but I have yet to see an answer that explains step-by-step on how to do this. After all, who would you rather want to listen to - someone who Googled their info, someone who is marketing their printing services or someone who has his own online shop and social presence?Before I get to the technical info, let me first dispel some incorrect and/or misleading information and then I will get to a brief theoretical introduction. The bulk of this post, however, will be technical information to show you exactly what you need to do to set a business like this up.Disclaimer 1: There is no way that I can fit all the information necessary in this answer. It is enough to fill an entire book. Perhaps I should do a video on it though? Let me know in the comments if there is a need for this. I am definitely not going to spend hours and hours on producing a video tutorial if people don’t indicate beforehand that they would like to see something like that.Disclaimer 2: I will be using my own business as an example. So there will be links and screenshots to my own stuff. Do I hope that this article will drive some traffic? Of course I do. But I believe that the value I will be providing will be so awesome that this is not seen as spam, as per Quora’s spam policy.Dispelling the MythsMyth 1: Setting up an online tshirt shop is quick and easy.Excuse me while I try to recover from laughing. To put this in perspective, I am a web developer and graphic designer. And I can tell you that to set up a PROPER online presence is neither easy nor quick. You are either lucky or really, REALLY good of you start seeing sales within the first two months. I would wager that most online businesses of this nature never see any income.Myth 2: You need to borrow money from friends and family and buy stock and printing equipment.Yes, do this if you are completely off your rocker and you want to make life-long enemies of your friends and family. You need to start off by spending as little as possible. Remember, the odds are against you and you likely to fail for quite some time before you hopefully get it right. You can’t afford to have debt during the start-up stage!These are your costs:Computer with broadband Internet access.This is kinda non-negotiable. Yes, you can get away with a cheapie laptop but definitely upgrade your PC as soon as you can afford it. This is the tool that you are going to be using for up to 30 hours per day especially during the startup phase so you can’t afford to be frustrated and hindered in your production. At least if the business fails you will still be able to use the PC, it won’t be a very expensive doorstop like useless printing equipment.This is my hardware setup:Core i5 processor - really the bare minimum in processing power as graphic design and especially video production takes up lots and lots of processing juice.GTX 660 graphics card (a bit old in the tooth but gets the job done)16GB RAM - As with the processor, you really need plenty of RAM for high-quality design work.10TB Hard drive storage - you can get away with less but I am admittedly a bit of a hoarder.CMStorm mechanical keyboard - go as clicky as you can get. You can thank me later. You will be spending lots and lots of time typing,Razor Naga mouse - this one was a bit of a disappointment. Get a mouse that is ergonomically superior. Carpal tunnel syndrome is real and is a bitch.49″ + 27″ dual monitors - You need screen real estate and plenty of it for proper design work. The cool thing is that 4k TV’s have now become much cheaper and can be effectively used as PC monitors. Dual monitor setup is HIGHLY recommended.Marantz 4140 hifi with Dyna speakers — ok you are not likely to be fortunate enough to get your paws on a system like this but good sound is a must. You will want to do audio stuff like video and you need to be able to hear properly. And it helps to keep you putting in 30 hour days if you listen to good music. I recommend EBM like Funker Vogt to keep you going. Get a good headset at the very least.Sound recording setup - I have a variety of mics, mixers etc. Getting your voice to sound right in recordings is VERY difficult.Canon DSLR & Gitup Git2 actioncam - Your cellphone camera is probably not going to cut it for video productions. The Gitup is pretty cool quality at half the price of the comparable GoPro model.Software:Start off by using Gimp for image editing, it is free. It can be downloaded here: GIMP You can also download Adobe CS2 for free here: Get a Free Photoshop Download Legally from Adobe (Not a Torrent) | PCsteps.comLater on you will want to purchase a more recent version of Adobe’s products. You will primarily use Photoshop, Illustrator, Premiere Pro and Audition. You will need to watch YouTube tutorials on how to use these applications, I am not going to teach you that in this answer.Nuance Dragon dictation software is a nice-to-have that you might want to check out. You can probably churn out words faster with your mouth than with your fingers. And you are going to be churning out lots and lots of words.Website hostingMy hosting is around $15 per year at Host4Africa.com GET MORE FOR LESS!, main page, low cost Web Hosting for South Africa and the world. but they do have some stuff that you need to be able to work around e.g. if you are developing your website locally on DesktopServer and then you try to migrate to the live host you will run into server timeouts. You need to contact them with specific instructions on how to temporarily adjust their server-side settings in order for this to work. If you need details on these instructions you can send me a query at https://krossbait.com/contact/ and I will send you the instructions. I don’t think it is a good idea to post it publicly here.BTW - I highly recommend this approach where you first develop locally and then migrate. You could be stuck for months on development and then you are paying for hosting that you don’t need. I lost 10 months on my one site due to getting busy with other projects. What a waste!Get Desktopserver here : DesktopServer - Create locally installed WordPress Websites • ServerPress, LLC. and install it on your PC, it is free. Use this plugin to migrate the website to the live server: All-in-One WP MigrationSo now it is settled, you need three things to start - PC, Internet access, Web hosting.Myth 3: Once your store is set up the money start rolling inThe truth is that the Interwebs doesn’t even know that you exist. You won’t be found in the search engines. Nobody will find you online, even if they searched for your store name.Myth 4: Shopify is your best option (as recommended by many answers on this thread)I don’t have anything per se against Shopify. For all I know it is a wonderful platform. But it has a monthly subscription fee. That means it is not a viable option in my opinion. If Shopify’s business model was similar to MailChip’s model where they only start charging you when your business has reached a certain level my opinion would have been different.Fixed expense with an uncertain income? No way baby. I bumped my head hard enough previously with Aweber.Myth 5: Step 1 - Research your market / know your market / find the right opportunityNonsense. I might know that the robotics market is a vastly untapped market that screams for more engineers. Can I action any ideas there? Highly unlikely if not impossible.The first step is to make a shortlist of things that YOU are interested in. You are going to be spending an awful lot of time and energy on this business, it better be about something that you are passionate about and that you have lots of affinity for. If the topic isn’t your passionate heartbeat, there is no way that you are going to stick with it.Only after you have identified your topic, do you seek to match it with market opportunities. How do you do that? Let’s move on to the next section so that I can explain the technical stuff:The Technical StuffFinding a Market OpportunityTopicLet’s have a looksie at the process that I went through in order to identify my main business topic:Orgasm Art MemesGenre:BDSMI wondered to myself what I really like. I have worked in a number of industries before and most of them bored the living hell out of me.I have an exceptional imagination (I know because I had myself professionally tested), I have a dark sense of humour and I like sex (Duh).So my thoughts started wandering towards our deep and dark sexual desires and I thought of ways to make fun of it. Very subtle fun - sensual before funny.I have some experience in the life-style which I think is crucial. If you embark on something with theoretical knowledge only you will soon be seen as a fake or a wannabee.I then quickly evaluated the idea in my head:Will I have a target market?Yes, almost all people are interested in sexCan I find a viable niche market?Sure, BDSM is a recognized niche. 50 Shades proved that the niche is large enough to be viable.So far so good, now it was time to look at real numbers.Google AdwordsKeyword research is a field of study in its own so I am really just going to show you a few basics.Short tailA vague keyword/phrase with lots of traffic and also lots of competition.Long tailA detailed keyword/phrase with low traffic and hopefully also low competition.Why is this important? Let’s have a looksie at Google Adwords. You will need to register a free account here: Google PPC Online AdvertisingWe will be using the keyword tool that is accessible on the top right-hand side of the screen.First, we will get keyword ideas and then we will match them against specific key phrase search volumes and competition.Here we have used the keyword “BDSM” and sorted according to competition. We are only interested in phrases with low competition. We are looking for two categories of volume 1k - 10k and 10k - 100k.More than 100k and you are trying to compete in the field where all the big boys are and you are not likely to appear in search results. 1k - 10k is less competitive and you are more likely to be able to compete here. Less than 1k and the volume is not high enough to make it worth your while.Make a spreadsheet listing all the key phrases that matches these criteria AND that are related to the central topic that you are starting to formulate in your head.In my case I wanted it to be a sexy and funny spanking themed idea producing art, clothing and stories. I was definitely not going to hire actors and start making BDSM films. Also, I know very little of the Japanese BDSM culture so for these reasons phrases like “bondage video” and “japanese bondage” did not make my list, even though they fit the volume and competition parameters.Then an idea struck - memes is a very popular method of making fun of things and lends itself very well to the medium of printed tshirts.Checking actual search volumes for specific phrases to following helped guide me to come up with “orgasm art memes” as my site’s central theme.📷“Art”, “memes” & “orgasm” are all short tail. The competition might be low but good luck trying to compete using those three by themselves.“Orgasm art”, “orgasm meme” & “orgasm art meme” are all long tail with the latter being the most specific.Now we can also see something interesting here - why did I used “orgasm meme” as a keyword. Well the easy answer is that at the time when I did this research it fit my criteria. Google Trends is a useful tool to see how keyword popularity goes up and down over time: Google TrendsBut in any case, I will rank if someone searches for “orgasm art” or for “orgasm meme”.Of course I will be very competitive if someone searches for “orgasm art meme” but very few people search for that specific term.Now, as I did this check now for the article, my website has magically disappeared from the search rankings so I am rather alarmed. But fortunately I have a backup plan - my web presence extends beyond my website only. I wanted to discuss it later but this might as well be a good place to just show you the value of being present on as many places as possible:📷And on Quora📷Quick investigationSo my website has all but disappeared from Google. Yesterday I still ranked quite prominently. The Google Search Console might provide a clue, seems like the host server is giving errors when Google tries to crawl it. I will have to investigate further once I have completed this article.📷I know I jumped a bit ahead but I feel that it’s good that you get to have a look over my shoulder in realtime as I do these things.Don’t worry, we’ll come back to the Search Console.Update: Hey it is back today, thank God. Who knows what had happened yesterday when I typed this article? I rank on the first two spots for my primary key phrase on krossbait.com and I take the 6th spot for my Redbubble shop. Yay for me!📷Topic Research ConclusionWe now have the three necessary elements in place:Something that I know fairly well and that I am passionate about. Something that I will want to keep researching and that I am willing to spend most of my waking hours with.A general idea that the topic and its specific niche is viable.A specific, refined keyword analysis that proves that there are enough search volumes and the competition is low enough for me to be able to compete.Hosting and Domain NameYour domain name is crucial. I slipped up here because I decided on https://krossbait.com before I did proper keyword research. I can kinda kick myself but I compensate by branding “krossbait.com” as prominently as possible. But it would have been better if my keywords appeared in my URL.The https:// part is very important. You want to buy a SSL certificate right off the bat. It certifies your website as secure and accomplishes two things:Helps search rankings.Makes customers trust you more and therefore more likely to buy.Use a domain checker such as the one at Domain Registration to check for name availability.Some of the decisions you will have to make are:Length of nameKeyword inclusionLikelihood of typing errorsExtension e.g. .com or .org. If you want whoisguard (keeping your details private) .com is the way to go.Similar names of the competitionContent Management PlatformI use Wordpress and therefore I will only use it in my discussion. You will need to install Wordpress on your hosting, typically using something like Softalicious.***Important**\*Your hosting plan needs to include at least one database or Wordpress will not be able to run.Website BuildingThis is really not as simple as people make it out to be. Fortunately, there are quite a number of good tutorials on YouTube on Wordpress development. I am not going to explain it here, I am just going to show you a couple of important points.I use the Storefront theme as its Woocommerce’s native theme.Plugins I useAdd From Server - to bypass the 4mb upload limit of media files. I FTP large files directly and then use the plugin to associate them in the media library.Advanced Woo Search - A cool search bar that is much more user-friendly than the default search bar.Akismet Anti-Spam - Keeps the leeches from spamming your website.Contact Form 7 - This is how your audience communicates with you.Custom Twitter Feeds - I am very active on Twitter. This displays my twitter feed on my site in the footer. Always good to link platforms.Dashboard Directory Size - Helps me keep an eye on how much disk space I am using on the server.Easy FancyBox - Necessary for lightbox, a nice way to display images.Flamingo - Stores all contact form queries in the database. Absolutely critical!Google Analytics for WordPress by MonsterInsights - Helps me to analyze web stats.MailChimp for WordPress - Used for email marketing.Max Mega Menu - A real nice menuMax Mega Menu - StoreFront Integration - makes Max Mega Menu work with the Storefront theme.MetaSlider - Method to display images.Orbisius Child Theme Creator - Always create a child theme. Quite a lengthy topic, please have a look on YouTube for discussions on child themes.Printful Integration for WooCommerce - I use Printful as a partner for printing and shipping. This plugin automates the process.Redux Framework - Necessary for lightbox support.Sassy Social Share - Critical, gives me as well as visitors a way to share my products and posts on various social media platforms.Social Count Plus - Social credibility, tells people how many followers I have. Unfortunately, the plugin is no longer being developed and supported and does seem to be buggy when it comes to updating your stats. I will keep looking for a replacement.Storefront Footer Text - Gives you the ability to edit the default footer text of the theme.Storefront Top Bar - Gives me two additional widget areas at the top of the screen, I use one for my search bar.Woo Product Slider and Carousel with category - Way to display products.WooCommerce - The heart of the website, the ecommerce platform.WooCommerce PayPal Express Checkout Gateway - Gateway that enables me to receive moolah from people when they buy my stuff.WooCommerce shop to Facebook - My shop is on Facebook as well. Cross-linking platforms, remember?WP Add Custom CSS - I can enter CSS code here to alter the appearance of website elements e.g. hide the default search bar.WP Super Cache - Makes my site fasterWP User Avatars - Put my pic next to my posts. Good for branding purposes.WP-DBManager - Optimize and backup the database. If things go wrong with the database, you are in a world of hurt.WP-Optimize - Makes my site run efficiently.Yoast SEO - Highly critical, help me to let my site be discovered by the search engines.Select YouTube - Way for me to embed YouTube videos in my site.Absolute Privacy (not active) - Locks my website down when I am busy developing.All in one wp migration (not active) — Migrates my website from Desktopserver to the live environment. Also used to make backups.wp all import (not active) - make bulk changes to product data by importing and exportingwp all export (not active) - make bulk changes to product data by importing and exportingSite IdentityYour branding needs to be consistent yet everything must not just be an exact copy of a copy. Your keyword list is of crucial importance here.📷Update: The site Icon can be a real bitch to get right. I have decided on the lady with the cane as my primary branding image. But translating that to a teensy weensy site icon didn’t produce good results at all. The icon was simply too small and just looked like an “I”. I first considered changing the icon back to the skull that I had previously used but I felt that it really didn’t connect to my brand.📷I mean, when you look at the Google or Twitter site icons on your browser tabs you have no trouble recognizing them, right? I never thought that these were particularly good branding images but an exercise like this makes you realize their true value.And it makes you realize that the Whatsapp logo is better than the FireFox logo even though the FireFox logo is cleverder and beautifuller (see how awesomely I rock at the written word?).I kid you not, I only accidentally realized after years of looking at the FireFox logo that it was actually a fox that morphs into a flame that engulfs the earth. It is a really clever concept but I just never paid attention to the damn thing.My solution was to combine three things in my icon to make it recognizable:A cross for KrossbaitCross + Caning Lady forms a capital letter “K”. Well sorta …Colours to make it stand out. Purple is associated with BDSM and there is a National Fetish Day with the slogan “Perverts wear purple”. So there.Now let’s have a look at one that I consider to be really bad – the Redbubble site icon. If you look at the screenshot of my browser tabs below, we can see some pretty interesting things:Twitter: Easy to recognize.Quora: Also easy to navigate to.Krossbait a t positions 3 & 4, hopefully over time this will become a widely recognized icon. To my eye it looks pretty unique and it does stand out.Wordpress sitemaps: Also the icon when your site just fell over and you got something like a NGINX error. Mini heart attacks erupt in my chest whenever I see this icon.Amazon: Pretty recognizable.DeviantArt: Recognizable shape but I struggle to link it to DeviantArt.RedBubble: HOLY CRAP!!! IT IS A NGINX ERROR!!! PANICK ATTACK!!! Oh wait, it’s just RedBubble and my eye involuntarily inverted the colours because the shapes are similar. Thanks a lot for that, RedBubble.Pinterest: Yeah, very easy to spot and recognize.Twitter Nonfollwers: Nah, too much detail that one can’t make out at such a small size. Not effective at all.Building SEO PagesYoast is your friend here. You really, really need to have it installed.First things first, we are going to build the home page. Don’t just call it “Home”, rather use this opportunity to stuff you main key phrase in there like so:Now add your content. Be sure to add some attractive and relevant pics that are not copyright protected. And easy way of finding images is with Google Images and selecting “Labelled for reuse”And seeing that you will be creating your own designs you should have images to put on your pages.You will need to refer back to your keyword spreadsheet and make sure that you use your keywords but in normal, natural language. In the old days people just stuffed keywords but Google has gotten clever and will penalize you for that.Use the Yoast control panel at the bottom of the screen to make your SEO as good as possible. You goal is to convert red and orange lights to green lights.You SEO status is also displayed on the right hand of the screen;So you build page for page and then you set up product categories. For each of these you follow the same meticulous process.(Are you convinced yet that people are talking nonsense when they say that it is quick and easy to build a website?)Your final outcome of all this is that you want to build a menu that reflects the hierarchy of pages and categories like this:You will need to activate Product Categories in the Screen Options to be able to add them to the menu.I know it has been quite an information overload so far but the good news is that there is still plenty to come. If you have gotten stuck up to this point, you are welcome to drop me a line at https://krossbait.com/contact/Product CreationI have products that exist on five platforms. All of the platforms have their own tools with its own positives and negatives. I like the detail and control that is built into the Prinful mockup interface. Redbubble is good for putting the same design on multiple types of products all at once.Printful: The primary source of products that appears on my website. They have a pretty cool affiliate program that I incorporate on my website. If you register you will get a link like this that will enable you to receive profits from the sales of people who sign up through you:https://www.printful.com/a/654207:667a00219ee4cfbfd631314c86f9b2feIn case you were wondering, the above link is a shameless attempt from me to get you to sign up to Printful as my affiliate so that I can make additional money from Printful. I don’t believe in incorporating misleading marketing tactics, when I am trying to market to you I will tell you that I am doing it.Interestprint: I only use them because Printful doesn’t do underwear. For my specific market this is very important. People are more likely to wear something naughty if only they and their intimate partners know about it.This:is an easier sale than this:Redbubble: A separate set of products exist here: krossbait: Top Selling T-Shirts, Posters, Greeting Cards, Stickers, Wall Art and More. The benefit, as shown earlier is that this goes on no matter what happens to my website. Plus, Redbubble is much bigger and receives more traffic than I do. Rather than to compete, I joined forces.A link to the Redbubble store is in the sidebar that appears on every page. Crosslinking, remember?DeviantArt: Prints of the original artwork can be bought here: krossbait on DeviantArtNot only is it a potential source of income, but like everything, it is crosslinked and I am hoping that DeviantArt visitors might visit my site as well.Here you can see that another user has added my works to his watchlist. That is the beauty of joining forces and working collaboratively. The idea is to pass on as much love as possible and then people will do the same for you. Internet marketing is like jail … you can’t make it on your own.Amazon: I make use of Kindle Direct Printing and it is linked to my website:Remember that all products must be tagged properly. Your keyword research comes into play here and it might be more efficient for you to export your products to Excel, do the tagging and the import back to Wordpress. Be careful with the WP All Import process, don’t wipe out all of the products that you have so painstakingly created.Submitting SitemapsUp to this point Google and Bing has virtually no idea that you even exist. You need to kindly inform them that they need to tell people about you. You accomplish this by submitting sitemaps.Step 1 is to create the sitemaps in Yoast. Open the configuration wizard and follow the prompts:The next part is quite tricky - to find the damn sitemaps. Click on the “Features” tab in Yoast and then on the question mark next to “XML Sitemaps”. Then the “See the Sitemaps” link.A new tab should open with the sitemaps. You want to copy and paste them one by one in the sitemaps dialogue box in the Google Search Console: Search Console - Home.You will have to sign up and create a property. This can be really confusing. Remember you can drop me a line on https://krossbait.com/contact/ if you need help.Just copy and paste the part directly after .com/ as illustrated below.Wait a couple of days until the sitemaps are indexed. Follow the same process for Bing: Bing - Webmaster ToolsBacklinksBacklinks are one of the ways in which Google determines how relevant your site is. If a high authority site links to yours then you get some delicious link juice. But how the hell are you supposed to get that, right?Asking prominent bloggers whether you can be a guest blogger and make sure that your blogpost contains backlinks. Ugh … personally I am way too shy to ever consider doing this.100% Free SEO Tools - SmallSEOTools.com - use the backlink maker. The have some other nifty tools on their site as well and it is free.Backlinks in social media - when you create a Pinterest profile, for example, you get the opportunity to put your website link in your bio. Unfortunately, many social media platforms mark links as “nofollow” which means that it won’t really count as backlinks.Social Media MarketingAnd you thought that it was hard up to here. Fear not, now the real work starts.You can’t just be on one place. You need to be as everywhere as possible. You need to get the maximum followers everywhere and accomplish that without triggering ant-spam policies that could get you suspended or banned. You also need to understand the difference in post persistence between the different platforms.I will discuss the posting strategy to the different platforms after all the platforms have been introduced.What is important to keep in mind regarding followers and likes is that it not only determines your potential audience but it also demonstrates credibility. So we might run campaigns simply to collect Facebook likes or we might jump on a SDV train in Twitter to collect followers but none of those will be potential customers for us. Those are just social credibility numbers and should be seen as only that.The last thing before we get to the individual platforms is stats and measurability. All the platforms have some way of analyzing who sees your posts, tweets etc. Use the analytics to get a better understanding of your potential. I can guarantee that some of your most brilliant posts will receive little attention while the post that you wrote half asleep suddenly goes viral. Social media is a temperamental beast.FacebookI will admit, I have no love for Facebook. I am there just because I have to be. It is the only platform where I get random video calls throughout the day and night from virtual strangers. It creeps the hell out of me.And Facebook probably has the harshest anti-spam triggers. Screw with that and they will lock you out of your account for days.Don’t try to send too many friend requests at a time. Don’t try to post too many posts in direct succession.You will need an account with a business page. Fill in all the relevant details. You will need to come back to this page to update it with links to your other social accounts - everything needs to crosslink, remember? Note how my branding is aligned to my website as well as to my other platforms and how my other platforms are linked - Albie KrossOn the business page you will need to have a store. In order to do this you need to open a Please Login again - StoreYa.com account and the WooCommerce shop to Facebook plugin installed on your website. Follow the instructions and port your Woocommerce products to the Facebook store. Can be a bit tricky, make sure you read the StoreYa instructions carefully.To get Facebook friends you can basically do things to start off:Search for topics on Facebook relevant to your business and invite people who show up in these searches.Search for groups relevant to your business and join. Some of the groups will first ask some screening questions.As mentioned before … be very, very careful on how you send friend requests. Facebook WILL get its panties in a bunch and lock you out of your account if irregular activity is detected.Posts on Facebook timelines are moderately persistent. People generally get a couple of moments to view before it moves down out of sight on the screen. This means that you will need to repost stuff, but certainly not as frequently as with Twitter.If you would like to know how to get 10 000 likes on Facebook within three to four days, you can contact me on https://krossbait.com/contact/.Facebook’s paid advertising is probably the most powerful out there due to the power of demographics that you get to harness. But for now I am going to skip over it. First start making sales before you start spending money on paid advertising, right?TwitterTweets are the least persistent of all. If you login to Tweetdeck you will be amazed how quickly your timeline moves when you have a sizable amount of followers. This means that you really have to stand out in order to catch the audience’s attention.When you fill out your bio, include some hashtags to make it easier to be discovered. There is plenty of info on the interwebs about hashtags so I am not going to repeat it. What I will mention is to include #SDV and #IFB. You are telling people that you will follow them back if they follow you. (You must actually do it as well, don’t be a prick) This is how mine looks, notice the branding and the use of hashtags: KrossBait (@albie_kross) | TwitterI recommend using Unfollower Stats :: Track and unfollow your unfollowers! to manage your followers. Follow back all the little darling angels who followed you and unfollow all the ratbastard psychotics who don’t follow you back.Be very careful here, although Twitter doesn’t really care about spam when you post, it does get all PMSsy when you start mass unfollowing people.How do you get Twitter followers:Post some really funny and original tweets.Follow people, bearing in mind that Twitter has a ratio lock meaning that you will need at some point to get more followers before you can follow again. If memory serves me correctly it is 1000 follows.Like and retweet good tweets.Engage with people either by comments or by retweeting and including a comment. Most twits don’t really bother to interact so you can really stand out if you interact regularly.Jump on an SDV train every now and then when it comes along. It is basically a pact between a bunch of people that everybody will retweet a tweet and follow everybody that retweeted. You can pick up quite a few followers like this.I have used a service like Get More Twitter Followers at BestFollowers with varying levels of success.And remember, if you want me to help you with your online presence, do drop me a line at https://krossbait.com/contact/
0 notes
Photo


Lightroom Workshop
We had a Lightroom workshop with Scott which taught us how to edit our photos in Adobe Lightroom after we have taken our raw photos for our portfolio. The benefits of using Lightroom are that you are able to keep all of your photos together in one place and it is a convenient way to store all of your images. Scott described Lightroom as being a cross between Bridge and Finder.
To start using Lightroom you need to create a new catalog and import your photos from your computer or hard drive. The ideal way to import your photos is to copy them from the destination. This way, if you take the memory card out, they’ll still be available on the computer and wont be lost. You then have to choose the destination and can create sub folders for your photos to sit in. Lightroom has different modules but the most relevant are your Library (where you store your photos) and Develop (where you edit your photos). By adding key words to your photos or to a series of photos, it means that you can search for these and find them instantly which is useful when you are looking for a specific project or series. The types of files that you can edit in Lightroom are JPEGs, TIFFs, PNGs, PSDs and Raw files, however you can’t edit Illustrator or InDesign files. Lightroom is unlike the other Adobe programmes in the sense that it doesn’t work with layers, however, you can still turn on and off different effects that you have added.
Snapshots are a feature where you can save a version of an edited photo. This is useful as you can then save multiple versions and decided between them without loosing some versions that you had previously created. You can crop images using the crop overlay on the right hand panel. If you press O whilst doing this you can scroll through different cropping templates. If you click the transform options, you can select “constrain crop” which eliminates the white space around the photo if you’re rotating it.
Depending on which lens you use when taking your photographs, it may distort the image slightly. To rectify this you can enable profile corrections which reduces these distortions. You can also select “remove chromatic aberration” which fixes the colour distortions. There is also an option to change the white balance, however, Scott suggested that it was best to leave this option as “as shot” since you can then edit the exposure and contrast more easily.
Scott told us not to use the sliders when making changes since this could cause you to make drastic changes to the photograph which wouldn’t look realistic. Instead, he suggested to use the up and down arrows once you have selected the value on the right hand side of the slider to change each value notch by notch. If you hold shift whilst you’re using the arrows, you can change each value by an increment of 10.
The next thing Scott talked to us about was curves and told us that the most commonly used curve is an “S” shaped curve. He explained that above the line represents the darks and below the line represents the lights. If you press backslash, you will be taken to your original photo and if you press “Y”, the before and after versions will be displayed next to each other which is useful as you often forget what your original image looked like.
We also learnt about HSL (hue, saturation, luminence) and the fact that there is a joystick feature which lets you click on each section and move up and down to increase or reduce an effect. Scott explained that luminence is the brightness of individual pixels.
Lightroom has a feature where you can select a certain section of the photo and then alter the sharpening of that section. With this feature you can make certain areas seem more detailed than others which is useful if you want to show one particular area more clearly. We then learnt about the Effects section of the right hand side panel which offers effects such as “post crop vignette”, “grain” and “dehaze”. Another feature of Lightroom is the ability to sync effects to more than one photo which is useful if you have shot a series of photos in the same environment and with the same light and background.
There is also the option of applying a graduated or radial filter which can be used to remove vignettes from photos that you didn’t want. This can be done by changing the exposure and creating a mask over the photo. The graduated filter is linear where as the radial filter is radial.
The adjustment brush can be used to brush on effects. The size of the brush can be changed by using the “[” and “]” keys. There is also the option to show the selected mask overlay which makes it clear to see where you have applied the effect to. Finally, we looked at the clone tool which can be used to remove or replace sections of the photo - similarly to Photoshop.
To export a series of photos, you have to select the ones you want to export and then click File -> Export. There are then three options: export, export with previous and export with presets. Scott mentioned that setting up a present is really handy for our portfolio as ideally we want the photos to look similar in their style. You would then export to hard drive and choose “burn full sized JPEGs”. You can then choose a specific folder that you want to export to or you can export to the same folder as the original photo. You can also rename the photo to a custom name and apply a sequence so that the photos are numbered. When exporting, you can also limit the file size which is useful if you are using the photos in emails or on the web as you don’t want it to take ages to load the images. If you are exporting for print, you should keep the original file size as there won’t be any issue with having to load the image. The colour space that you should choose is sRGB. You can also choose the output sharpening for either paper or screen which is vital.
A very useful workshop as I had never used Lightroom before. I learnt a lot from this and feel confident that I could use Lightroom to edit my photos for my portfolio.
0 notes
Last Seen Blogs

mumbaionlinefuntoys
The Future of Intimacy in Mumbai

toshiro83
Toshiro83


yankit-seo
Untitled

diy-my-design
DIY My Design Editable Templates