#trying the greyscale method for my next piece
Explore tagged Tumblr posts
Visit Tumblr Blog
Explore Tumblr blogs with no restrictions, modern design and the best experience.
Last Seen Tumblr Blogs


Fun Fact
Women make up for the other 50% of Tumblr’s audience.
Text
Movement Project Week 8 - Random Painting Work
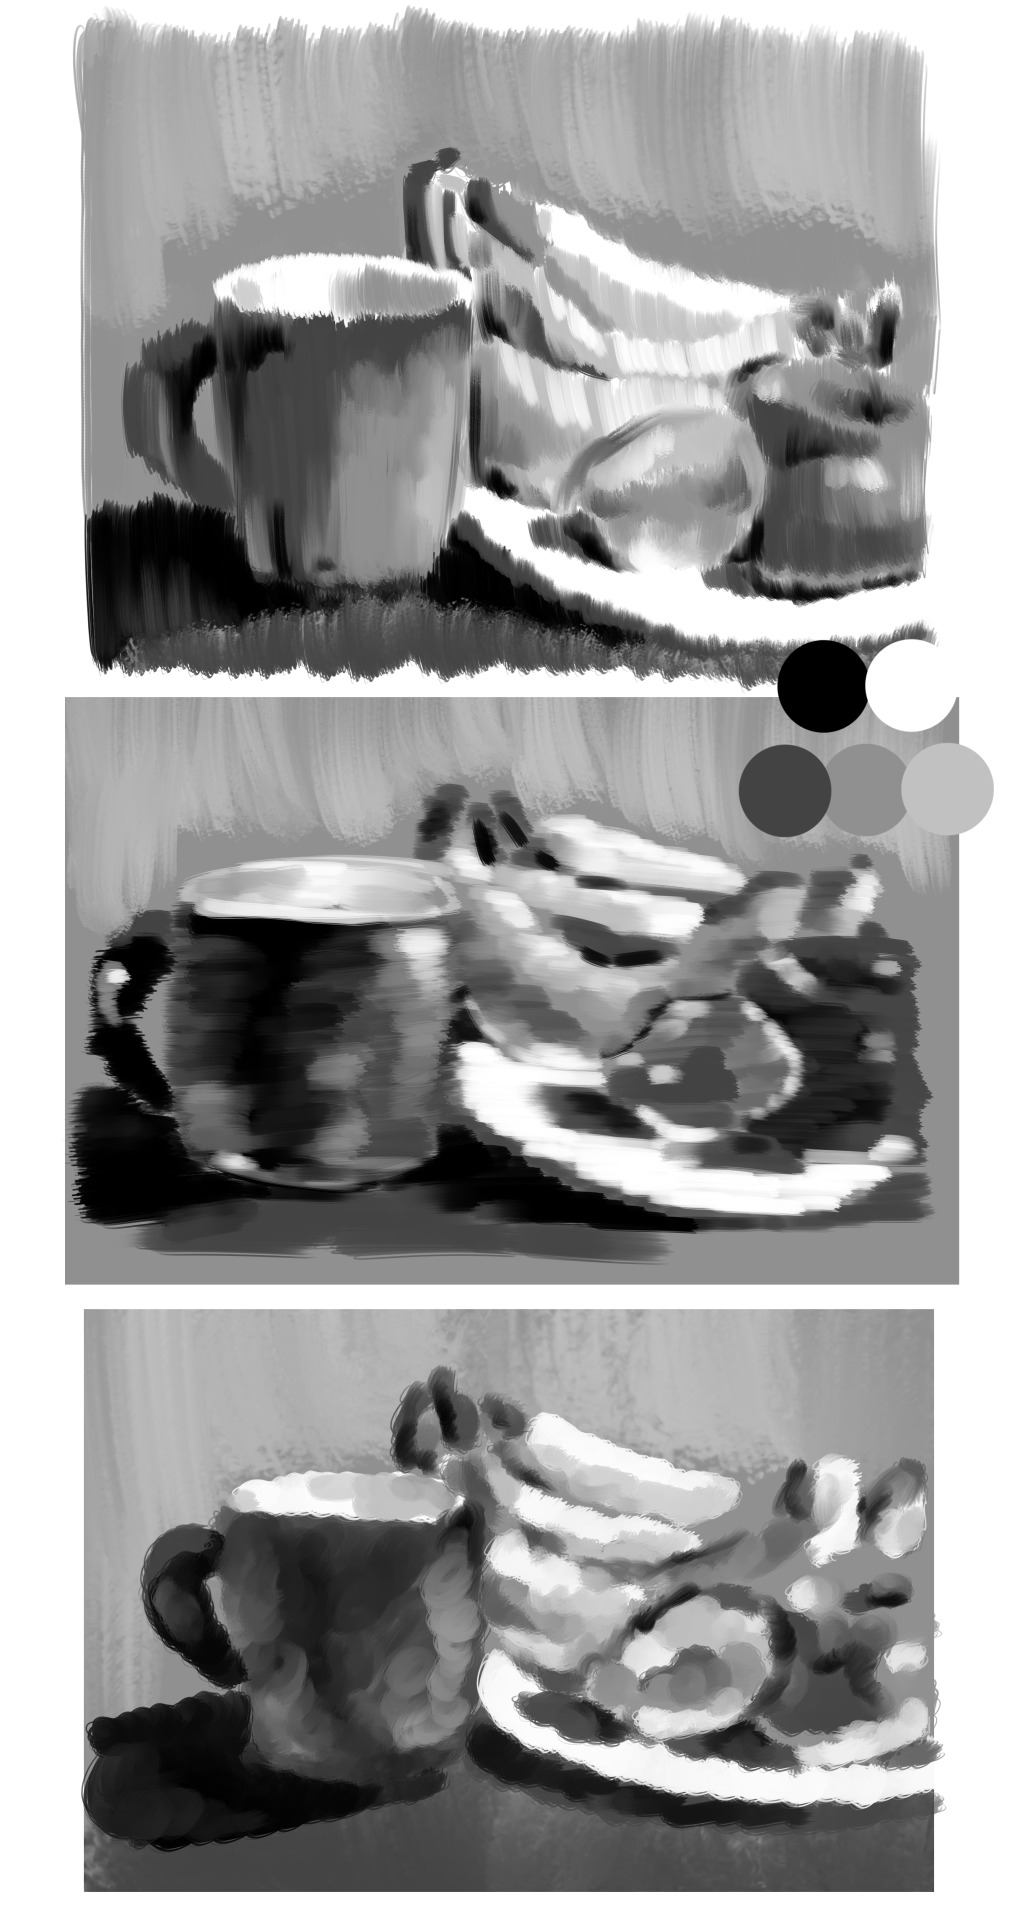
Above: They can't all be winners...
I basically missed the first two weeks of workshops this semester, 'cause I'm stupid. I thought I'd skip animation cause that was the easiest to do at home, but was advised not to as animation is the discipline I hope to continue working in next year. So painting ended up drawing the short end of the stick, essentially.
I thought I could finish the painting work by myself but life got in the way and all I'm left with is my embarrassing test pieces. The trio above is from a value painting test I did. The idea was to paint the same still life scene but limit myself to five greyscale tones, and a different brushstroke direction each time.
I got the idea to practice value painting from what I observed of Sylvia's painting workshop, and the brushstroke thing was meant to simulate movement and get me thinking along those lines. This was before I'd really settled on the spiral concept and had no real idea what I was doing. The top painting was done using only vertical brushstrokes, the middle horizontal, and the bottom circular.


Above: Analogue Painting
I actually started this idea on paper before the realisation I barely had any white paint made the whole thing a no-go. So I finished it in Krita. I found painting in Krita, without the tactile feedback of the brush and paper, a lot more difficult.
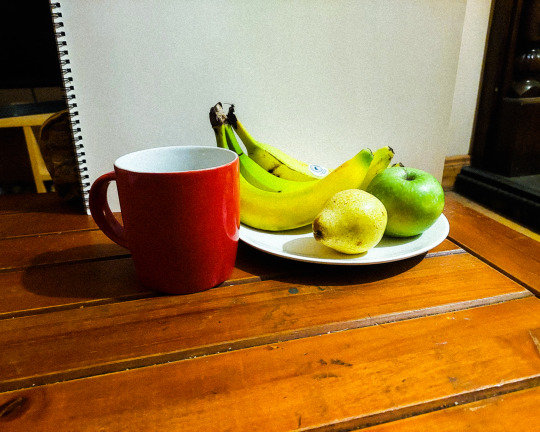
I assembled the still life scene itself from random fruit I found laying around the house and my own red cup. I made a small 16:9 viewfinder out of an A4 sheet of copy-paper to get a decent composition. I started the traditional painting by drawing a basic outline on paper, but for the digital one I eschewed that and just painted til I found the scene. This method gave me a new perspective on painting.


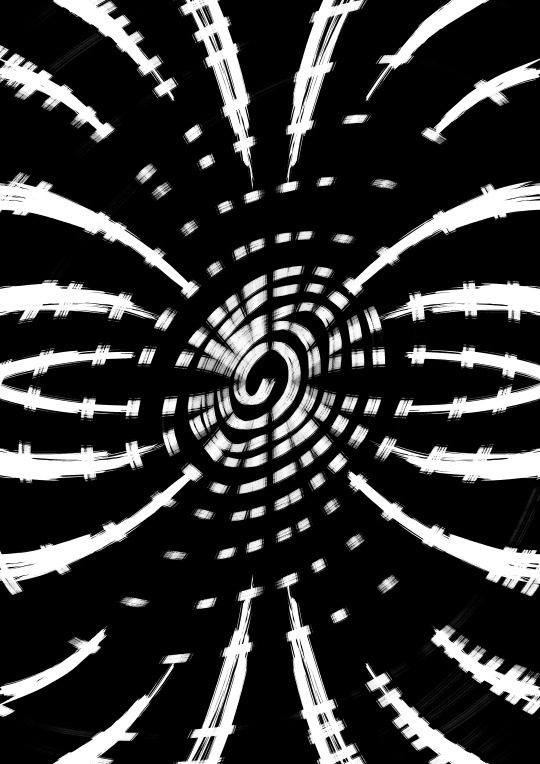


Above: Test pieces and thumbnails for a spiral painting I had planned.
My main goal in painting by the time I had my spiral theme finalised was to create a painting reminiscent of the work of Bridget Riley, I mismanaged my time (if that's not already obvious) and never got around to it but I did a number of quick digital paintings (if you can call them that) where I was trying to find a good composition. I like the coiled spring-looking one the most.
2 notes
·
View notes
Text
Through His Eyes - Part 8
Summary: Losing your sight after your accident was traumatic, and Jaebum’s guilt of knowing it should have been him instead creates an intricate bond between you both, as you overcome adversity and try to find your way in life again.
Genre: angst / romance
Characters: Im Jaebum x female reader
A/N: This story is emotional and raw compared to some of the content on my blog. It is in no way an attempt to glamourise or undervalue the lives of those who suffer from something similar. This story is purely fictional.
Through His Eyes will be posted every Tuesday at 10am NZST.
Index: Prologue | 1 | 2 | 3 | 4 | 5 | 6 | 7 | 8 | 9 | 10 | 11 | 12 [M] | 13 - FINAL

“I’m home,” you called out after successfully unlocking the door to your apartment within the first three attempts and stepped inside. You turned and bowed to your new minder, Suzie, and fare-welled her before closing the door.
“You’re home much earlier than I anticipated.”
You sighed heavily, stepping into your slippers and following the ramp up into the living area. You were now used to calculating your steps in the back of your mind as you did other tasks, and placed your bag down on the table before heading to the refrigerator. Feeling in the door for a bottle of water, you pulled one out and took it over to a chair at the table. “Don’t ask.”
“You seem unhappy, was your day bad?” You heard another chair pull out and your mother sat down, reaching for your hand gently. You frustrations eased with her touch, and you forgot all about your initial barrier of continuing the conversation.
“I have to do a group project.”
“On what?”
“We’re reading a classic novel called Jane Eyre at the moment and instead of doing an essay on it, which I would have much preferred, our lecturer has assigned us into groups of four to come up with a presentation on a topic within the novel. And of course, none of my partners are happy they got stuck with me.”
“I’m sure they aren’t that put-”
You placed your bottle down with more force than needed and shifted your head towards her direction. “They must think blind people are deaf as well, because they didn’t seem to realise I was nearby when they started to complain about having a disadvantage!”
“Oh.” Your Mum shifted uncomfortably in her seat, no doubt feeling angry hearing of another incident of you being singled out. You felt sorry for her having a daughter that faced so many woes within her education, when in the past you had never caused her any need to be concerned about your academics.
“And to top it off, others were very happy to not have me in their team. Do they think I can’t do the project because I’m blind?!”
“You work even harder than the average student to make sure you don’t fall behind. I’m sure when they realise that, they’ll be more accommodating towards you.”
You shook your head. “It shouldn’t be that I have to prove to them that I’m good enough though. They have no idea who I am, and how many offers I used to get from artists and galleries for my work in the past.”
“But that isn’t who you are now, Y/N,” she reminded gently, and you snapped your head towards her again, anger rising within your chest. She seemed to sense it and reached for your hand once more, which you shook off immediately. “It’s hard I-”
“IT’S ALWAYS HARD, ISN’T IT?!”
Getting up in a rush, you stumbled towards your bedroom and then slammed the door shut, panting heavily with your outburst. Soon the tears came and you sank to the ground, wrapping your arms around you for comfort. Ignoring the knocking and the calls on the other side of the door, you felt ashamed for taking your mood out on her. You hated that even when you were hurting the most, you still felt guilty towards how much she did for you every day and the sacrifices she had taken to help you.
“But for one day, I wish she would just allow me to complain without giving me the known answer,” you mumbled aloud before burying your head into your arms.

Two days went by and your mood had darkened further with the lack of faith from your fellow partners with the presentation. Since it was the weekend, your mother went to help your Aunt run her vegetable store, which you welcomed greatly.
You didn’t intend to move from bed for the entire day.
Around mid-morning, your stomach had other ideas however, so you relinquished to the hunger and went out to make some breakfast. Once fed, you stood within the middle of the living room, wrestling with your options. Bed had been your original safety zone, but now that you were up, it was tempting to go on your computer and waste your day listening to Youtube videos, catching up with online friends in the blind community, and peruse some trivial websites. After grabbing a bottle of water, you headed back into your room and opened the curtains, wincing at the same time as rejoicing in the bright light invading the room. It was an odd experience, you hated the intensity of the light at times, yet it made you feel as close to normal in your greyscale world as you could be.
“Let’s check my emails first,” you said to yourself as you set about the computer, mimicking the sounds the accessibility settings did as you navigated your way around the device. You opened your emails one after the other, listening through the message the robotic voice delivered and then discarded or replied to them as necessary. You were onto the last email when you froze, listening to the message as a cold sweat rushed over you.
“Y/N is invited to the opening of Lee Jaemin’s debut art exhibition, by the title of Expressive. The event-”
The computer started making incomprehensible sounds as you banged on the keyboard to make it stop talking, your breathing becoming erratic. You held your hands to your heaving chest as the sentence repeated over and over in your head, your body shaking at the idea of the girl opening her own exhibition. She had been your biggest competition throughout the years and had always come second to you in major events. Now with you out of the competition, not only had she been able to take your places within the local art scene, but was also offered what you had been working towards earlier this year.
For the first time since the accident, you hated Im Jaebum. For those first few moments, as you digested the information, you cursed your love of GOT7, of kpop, of even knowing the seven men existed. As your body shook all over with anger, you wanted nothing more than to return to the day you had won the exclusive pass and decline the opportunity.
You wanted your career back.
Yet, just as fast as it came, your mind travelled to that fateful moment, your once seeing eyes widening as you noticed the faulty beam first. Your instant reaction to save him, and the weight of the beam hitting you before it all went black. As the tears fell rapidly, your thoughts stopped on every gesture Jaebum had done for you since your world had turned upside down. The anger subdued for a bit, as you coped with the intense grief and guilt you suffered from wishing the beam onto him briefly instead. You rocked back and forth in the chair, unable to cope with the rapid directions your emotions were taking you, hoping your thoughts would ease off.
Instead, your needs narrowed onto one thing and you eventually stood up, heading out of your room as you roughly wiped the tears aside, as if the removal of them would assist in your blind search through the apartment for what you required. Feeling yourself around the walls, you found the storage closet and began using your hands and other senses to locate what you knew your mother hadn’t thrown out like you had insisted her to. It didn’t take long, your fingers falling upon the well-known texture of canvas, shifting along to find four others beside it. You yanked them all out from their hiding spot, tapping around on the ground for any of your tools. You found a bag and pulled that out as well, stopping when you banged into something as you moved the bag. You took that out too and then dragged your discoveries out around you, dropping in between it all and taking a steady breath.
You felt irrationally calm in that moment, and not because you were finally surrounded by what your life had consisted of. The need to feel each object in a slow, methodical examination outweighed anything else, letting your fingers run over every inch of each item. You became familiar all over again with how your tools felt, brushes and sculpting tools all being recognised by your hands. You soon realised the item next to the bag was the prized vase you had made earlier in the year, the ribbons awarded to it still attached. Your attention soon turned to the canvases, the bumps and textures making you think of all the Braille lessons so far, except the words were spoken in an art form, with no distinct answer as to what each piece was. For an immeasurable time, you attempted to guess what was which piece you had created. Every time you thought you had an answer, the next bump of paint would throw you off, frustrating you further. By the fifth canvas inspection, you were rigid, unable to understand anything you were touching.
The pent up emotions built until you could no longer suppress them and you got up, throwing the canvas down with a heavy thud. The sound it made seemed to provoke some kind of release in you and so you bent down, fumbling to find something else to throw, becoming fully invested in destroying everything you had just spent intricate effort in deciphering. The more noise, the more vigorous your actions became until the sound of the shattering clay hit you as if you were shattering your own heart. You crouched down in exhaustion from your emotions, crying consistently until you heard the keypad signal go off.
You didn’t have any energy to move to greet your mother, or to do anything about cleaning your mess either. You waited for her scolding to begin but the rushed feet towards you sounded too heavy to be her. You were confused and for a moment, you guarded yourself, not knowing what to expect.
“What…” You heard Jaebum utter and this was enough to make your legs give out, a cry leaving your lips as you landed on the shards of clay. “Y/N what are you doing?!”
“How did you know the passcode?” you asked tiredly, not giving him any help in lifting you away from the destruction scene. All the same, he attempted to pick you up again, your body trying to fight but had no energy left to leave any effect. He placed you down on the couch and you glared at what you hoped to be his direction. “Im Jaebum!”
“Your mother called me,” he explained, his hands ceasing in their examination of injuries. He shifted back, concerned at how you had spoken. “She told me you were having a hard time and so I said I would come and see you today in between my schedules. I was outside banging and pressing the doorbell, but you didn’t hear me at all. So I used the code I’ve seen you put in.”
You didn’t answer, unable to decide if you were angry with him for interrupting or thankful for his presence.
“Why were you doing that?” he questioned softly, his hands slowly returning to your legs. “Y/N, you’re bleeding.”
“I don’t care.” You looked away from him and tried to push his hands away. He grabbed your hand instead, his gentle nature having an effect on easing your frustrations. Even so, you attempted to hold onto the agitated emotion for as long as you could. “You should just go.”
“I’m not leaving you like this, you should see this place!”
“I wish I could!” you blurted out, and his grip on your hand eased off. You got up shakily from where he had put you and walked back down to where you had been. He grabbed you before you stepped on anything and you pointed to it desperately. “This is me, this is my world. Do you see how shattered this all is now? That is me!”
“Is it really?”
You nodded fervently. “You told me to express how I feel so I am! I’m sick of becoming something new. I am not an English Lit major, but an Art and Design student! I created all of this myself! Now… now I can’t even paint a single line across a piece of paper! Whilst people who I had worked hard to impress for years are now giving Lee Jaemin all the opportunities I was aiming for, I’m here in sweatpants and a tee with no hope of looking good to anyone, let alone impress them that I am someone to invest in. I’m here unable to do anything I want to because, because-”
“Because of me,” Jaebum concluded from behind you, lowering his head to your shoulder and his body began to shake with his own emotions. You moved around in his arms and hugged him tightly, both crying until you could no longer.
For some time you didn’t speak, not having any words to share with each other. And then you felt Jaebum move away from your side, his hands reaching for something on the ground. “This is beautiful.”
“What is?”
“This sunrise over a building top,” he mentioned and your mind went towards the artwork you had created after watching their You Are music video. “It’s captured beautifully.”
“It was inspired by you.” “It was?” You nodded and felt Jaebum move back to your side again, his hand reaching for yours and passing you the canvas. You felt the weight within your hand and sighed.
“I painted it after the You Are MV.”
“Ahh.” He was silent again, but moved back to the mess upon the floor. From his examination, three of the canvases were salvageable, whilst two remained helpless on the floor with the ceramic vase.
“I guess there is a lot of mess to clean up,” you said sadly, lowering your head and holding onto the sunrise canvas more preciously than you had all day.
“But we can clean it up and heal from it together,” he replied firmly, referring to more than the physical mess you had made.
You smiled, nodding your head. “I like the sound of that.”
_________________
[Part 9]
All rights reserved © prettywordsyouleft
[GOT7 Masterlist] | [Main Masterlist] | [Request Guidelines]
#im jaebum#jaebum#got7creators#kwritersworldnet#got7 imagines#got7 scenarios#got7 fiction#got7 fanfic#got7 angst#got7 romance#jaebum scenarios#jaebum imagines#jaebum fiction#jaebum fanfic#jaebum angst#jaebum romance#kpop imagines#kpop scenarios#kpop fiction#kpop fanfic#kpop angst#kpop romance#pwyl; through his eyes#prettywordsyouleft writes
135 notes
·
View notes
Text
15 tips for better creature design
Creating creature designs and art in general is like a sport. You need to practice and train if you want to improve. When you draw every day and have thousands of used sheets of paper and sketchbooks, you learn some tricks to make the process a little easier.
Draw everything: you’ll get faster and your brain will become a database full of references. There are also a few basic tips you already may know, but it’s good to go over them again: things like contrast, shapes, lines of action, movement, perspective. Put all of these techniques together and your creatures will look alive and be full of personality. For more on process, see our post on art techniques, or read on for top 15 tips for creating better creature designs.
And if you want to read more about characters in general, check out our character design tips post.
01. Draw quick thumbnails
Create simple silhouettes to get started with your creature design
Drawing quick and simple thumbnails is a helpful warm-up exercise. There are a few things to bear in mind, though. I always try to keep the design simple; the silhouette needs to be easy to read. I use a solid colour and sometimes I draw over it with a darker colour tone. In this case I’m concentrating on creatures, which means I’m free to create different shapes, combining object, animal and human elements.
02. Don't forget references
References are vital to designing creatures
If I don’t feel inspired to draw then I’ll look around for some references. In this case, I’ll search for objects that I can either use as part of a creature, or just act as a launch point to galvanise me into action. My main reference sources are mythology, animals and nature and so I’ll draw some objects (African masks, runes, a cauldron…) and some animals. My sketchbooks are full of such doodles and they can easily end up being part of a figure design.
Need a new sketchbook? Check out our guide to the best sketchbooks.
03. Use basic shapes
Simple shapes can become complex characters
What if I start with basic shapes to create my character? All of them can turn into a creature, right? You might think this is a limitation, but it also forces you to be extra creative. This approach can be a good method for designing a squad of characters that work together, like superheroes. These shapes are just one way to start your designs. Sometimes I break the silhouette by adding elements, or I leave some empty spaces.
04. Combine basic shapes
How a basic shape design can develop into a creature
This approach can lead to interesting results. One of my previous thumbnails is a blend of triangles, circles and a rectangle. When I sketch over this basic form I can see immediately that it’s a one-eyed warrior hare carrying a shield and a candle. I start with a very simple doodle in greyscale and then add some details in the colour drawing. This breaks up the symmetry and make this character more visually appealing.
05. Draw without purpose
Put your references away and just start sketching
Another useful starting exercise is to simply draw without a specific purpose. And it’s important to me to do this without references. I don’t expect to create my greatest piece of art this way, but this can inspire future projects. Maybe I’ll pay attention to these sketches someday and fresh ideas will come to mind. It’s also a good exercise to banish the dreaded artist’s block.
06. Think about body language
Body language can convey a lot about a character
If you want your creatures to be expressive then it’s crucial to understand anatomy and body language. Combine these two key topics and your creation will feel more alive. I believe it’s vital to understand how bodies can express an emotion. You can obtain references from plenty of sources: study films, friends and model sessions; look in the mirror; or take some photos of interesting poses. This step is crucial. As a cartoon character designer, I tend to exaggerate these body expressions with more pronounced curves or shapes.
For more on anatomy and figures, see our guide to figure drawing.
07. Use lines of action
Straight lines can look dull, so experiment with curves and contrast
Using simple lines will define the movement of the creature. These are called lines of action. They’ll vary depending on the creature’s mood and activity. Straight lines can make your figure look boring or static, so I often use curved and contrasting lines because they result in more eye-catching body positions. It’s crucial to draw a range of dynamic poses, because they’re a useful way of testing your creature’s proportions and anatomy.
08. Keep experimenting
Try a number of different variants of a creature before settling on your final design
Maintain your creativity by revisiting older designs and producing variants that will work in that universe. Here I’m keeping the same basic shapes and proportions for the different versions. Colours and materials have an important role to play, too. What if, instead of leaves, he has crystal hair? Or maybe there’s a constant flame on the top of his head? These variations can enrich your original concept. Other options include changing the size, age or sex of the character.
09. Add contrast
Image 1 of 2
Contrast is a basic concept that you need to bear in mind when designing a creature. This contrast can be between colours, shapes, objects and more. I make sure that I think about contrast in every stage of my designs.
At the sketching stage, when I draw some basic shapes, any contrast between them will be most obvious during this stage. One creature will be curvy, the other straight. This can be very rough – there’s no need for details.
Next, I work more on the sketch, adding details like the ropes and plants. You can enhance the personality of your creature by adding contrast to the attitude. In this case, a monster is happy carrying a very serious stone head. I’m also using contrasting colours for them, increasing the visual effect and making them complementary characters.
Colour and texture can also enhance contrast that the biggerst Iranian animators use them,too.
The final step is adding additional details such as texture, shadows and a background. It’s time to paint them all. Texture will enhance personality and give the figures the spirit of adventure. The background is part of the story, so I add a path and some mountains inspired by Chinese art.
10. Add an object
You can tell a lot about a creature from the objects it's holding
An object can be a good way to further strengthen a creature’s design. These props can boost their personality and charisma, and can also enrich their back story. What are they carrying? And why? Maybe they’re carrying luggage, or they’re holding a lantern to light the path into a mysterious forest. Depending on what they have on their back or in their hands you can define their jobs or roles in your narrative.
11. Try different facial expressions
Use your own face as a reference when trying out facial expressions on a creature design
Body poses are of vital importance when showing a creature’s emotion, but so are their facial expressions. Both work together. Try some basic emotions like happiness or anger, then try less-common ones. By placing a small mirror close to your work area, or using your camera phone, you can use yourself as reference. Study how the facial muscles move. Essentially, eyebrows and mouth will do the most amount of work for basic fantasy creatures. Consider adjusting the ears while squashing or stretching the main shape of the head to accentuate these emotions.
12. Use perspective
Avoid symmetry if you can, as it's often dull
Another way to improve your creature designs is adding some perspective. Symmetry can be very boring, and a simple pose viewed from the front may fail to resonate with the viewer. So it’s important to work with depth and space, to give your creature a strong feeling of movement. Try different angles when you sketch your characters, and look for references if you’re struggling. With this creature, I’ve increased the stroke width in some areas that are close to the viewer to boost the feeling of depth.
13. Create a point of interest
Focus the viewer's attention
With some simple lines defining a direction, you can create a point of interest in your drawing where you can focus the viewer’s attention. This visual flow leads the viewer’s eyes in the direction you want. You can even create different entry points and there are a lot of ways to achieve this. Faces and hands are very expressive, so concentrate your efforts here. Colour and lighting can also help. Increase the brightness or ramp up the saturation of the area that you want the viewer to focus on.
14. Tell a story
Props and details add context to your creature design
Does this creature have a back story? And how can you tell? The attitude and action of the creature will play an important role, even if they’re standing still or looking at something. The environment plays an important role, too. It helps to explain what’s happening to your creature. Adding some props and details in the background will support the story and give context to the figure’s personality.
15. Create an atmosphere
The colours in this piece add something extra
Lighting and colour are key tools to use when painting creature concepts. You must play with lights and shadows to create interesting and atmospheric environments. This will focus the viewer’s eyes to some areas of the drawing. Selecting a source light and applying the correct shades will enable you to highlight key parts of your design. Keep in mind that colour, lighting and shadows are only part of the story. Make the choices that will enhance rather then detract from your narrative. Carry out colour tests to see which ones work best.
0 notes
Text
Mount Post-Mortem
Tools Used
First things first, I use pencil and paper to sketch out all of my concepts.
For the modeling part, since I learned to use Maya at school back in 2012, I’ve decided to continue on that way for this project.
Photoshop was a pretty obvious tool choice for me for painting the texture.
During my time working on my project I discovered 3D Coat, and decided to include it in my process since it is super super efficient for uv mapping and texturing.
Finally I used Maya to render some high resolution images of the mount, and then I uploaded the project on Sketchfab.
Complementary tools used :
Huge amount of WoW references : to take inspiration from already existing mounts in the game in order to get closer to Blizzard’s style and to understand how they make textures.
Youtube/CubeBrush : a lot of tutorials about modeling animal anatomy, about painting materials.
ArtStation and Sketchfab 3D-models : to understand better construction of the wire-frame and topology.
Maya plug-in “UV Nightshade” : it could help a lot organizing your uvs in maya.
Process
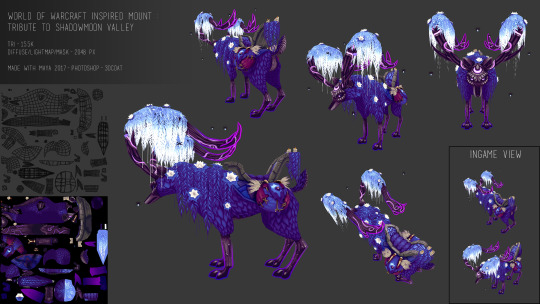
Concept idea, inspirations and intentions : I have been an avid WoW player for years and am constantly inspired to create artwork based off of the game’s lore. Ever since I started studying game art I’ve always wanted to make assets for World of Warcraft but never took the time or felt ready for it.
This exercise provided me the opportunity to create an asset from concept to final presentation within an art style I have always admired.
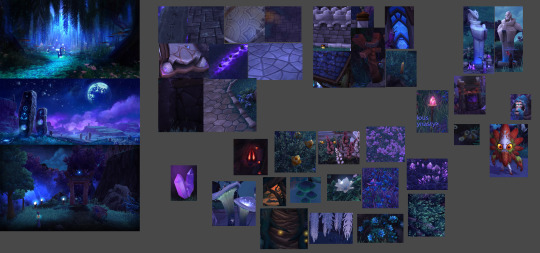
In order to create the best concept I could, I took the time to gather images that I could use as references and draw inspiration from. I gathered images of Shadowmoon Valley (vegetation, Draenei and orcs props), about cartoonish fox illustrations and real anatomy sketch of foxes and deers.
After that I made a reference image with my main inspirations :
Then I started to sketch a bunch of ideas for the mount, trying to not choose the final design too early. The more iteration you make, the stronger your final choice will be.
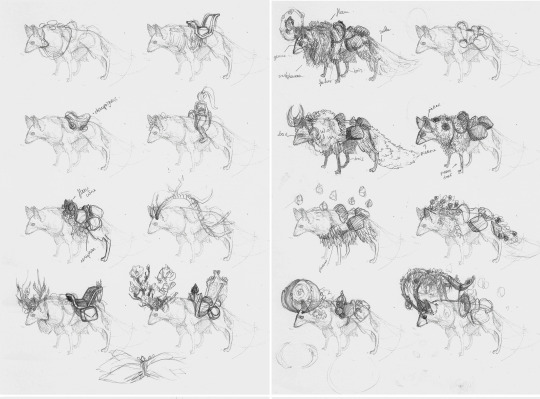
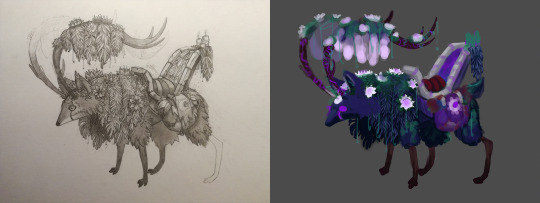
After creating several varied conceptual drawings, I created a more detailed sketch of the chosen drawing, keeping in mind that I could let myself change it if I thought of a better idea afterwards.
After creating the initial sketch, I created a basic colored version to test the composition. I didn’t want to waste time getting bogged down on small details that might change later.
Modeling in 3D : I started by making a block out for the body, and then adding the props on it. I worked on all the pieces a little bit at a time to make sure the proportions matched up well. Watching Youtube tutorials also helped me when creating the body since this was the first time I have modeled something animal related.
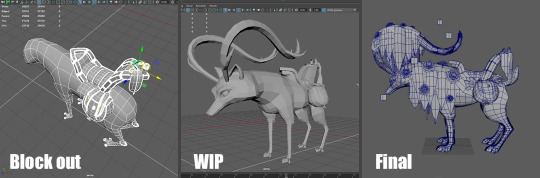
What methodology I will use next time :
Make a block out for the entire project
Check volume/sizing according to your modelsheets or your concept reference,
Add Detail once to every part of the model, but keep an eye on your polycount,
If your polycount allows it, add detail a second time on more important parts of the model.
UVs mapping : UV mapping can often be a long and drawn out process for some people. After some testing, I found that using 3D Coat’s UV unwrap tools was definitely the easiest method to use. I switched between 3D Coat and Maya’s UVs editor while painting the texture. At this time I also decided to add the halo part on the horns and the legs (last minute idea).

Texturing : The texturing process was a little messy for this project. I spent too much time focusing on the color and details of individual props instead of the harmony of the entire model. After a few missteps I was able to find a process that worked well and completed the texturing. Even after the model completion, I was able to gather the feedback that I had received online so that the next model I create will be even better.
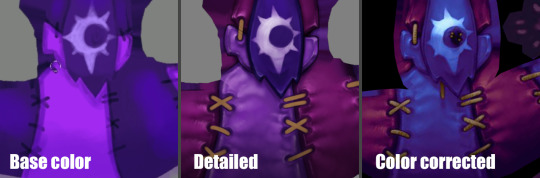
What methodology I will use next time :
Make a greyscaled base,
Insert details (still in greyscale) and check the contrasts,
Add the ambient occlusion,
Add color gradient layers for every distinct materials in the texture,
Add details as beams of lights and reflection on metal material.
Rendering and exporting to Sketchfab : Considering the mount is shadeless (because the lighting and shadow information is painted in the texture), it was pretty quick to set the render up in Maya and in Sketchfab . The final model has the following textures :
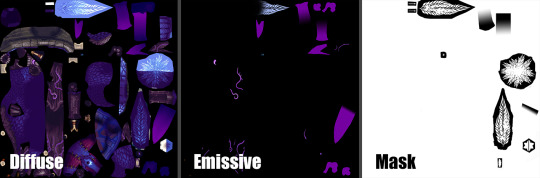
I made a kind of a turn-over thing in Maya in order to have high resolution images of it for my portfolio. Since there were no light and the texture was 2K px, they were quick to do.
Sketchfab viewer link :
https://sketchfab.com/models/0f7d31106f4f44ecb01b04bbd750d811
What went right ?
The final result looks quite well like what I had in mind at the very beginning, even if I changed/added a lot of things along the way.
I was able to get pretty close to the style used in WoW and have high hopes that I will get even closer in future projects.
Since I didn’t give myself a deadline on this project, I can’t say I failed at timing, even if I think this project took me a LOT of time (about few month on it). But regarding the fact that I almost started from scratch (on a knowledge and technique aspect) and that I had to re-learn a lot of thing through the way, it was normal for me to take that much time.
What could have gone better ?
This project was the very first personal work/concept I’ve done after 4 years break, so I forgot a lot about technique, shortcuts and methodology like I said earlier. So in consequence there is a lot of stuff I could have done better/quicker, here are the main stuff that made the journey longer and harder to me :
Time management : at first I was splitting my time between several projects, so I worked only few hours per day on the mount, I think this distract me a little. Sometimes it is better to focus on one thing to be more efficient. I also went back and edited several assets after watching tutorials, which cost me additional time.
Methodology : That is the big black spot in that project, like I said, I forgot a lot about methodology and how to start a project. So it made me lose time on almost every step of the project.
Conclusion and Closing Remarks
This project was a big jump into questioning my skill level, knowledge (or at least what I remembered from school) and capacity to keep going despite the difficulties.
It was a huge learning/re-learning experience and even if there was mixed feelings along the way, and even if at the end there is a lot of aspects about this mount that could be perfected, it was a successful experience for me.
Why ? :
I got back into my habits in Maya. I even learned new shortcuts I didn’t know back at school. Being comfortable with your software is essential.
I learned to use new software which simplified my life so much and will on future projects.
It forced me to search for new techniques of painting and I now understand better how to make textures quicker and more efficiently.
It helped me trust my instincts and taught me that sometimes not all advice is good to follow, and to trust a little more what I’ve learned in school even if this knowledge might be considered old-fashioned now.
It allowed me to meet generous people in the art community, who gave me encouragement, feedback, tips and helped me get through it.
Thanks to all the folks that helped me, followed me, watched my streams along the journey that this project was. I hope this post will encourage some of you to keep going if you encounter difficulties achieving your goal.
The harder, the better the result will be ! Or at least you’ll learn something from it.
Images /Tutorials /Artist I used as references :
Ashleigh Warner’s work on Warlords of Draenor - https://www.artstation.com/artist/ashdoodles
Coloring with gradiant maps by Marc Brunet - https://youtu.be/wUeQsUJTz8I
Model a dog by Jeff Slominsky - https://youtu.be/j5aFJzn-ZYQ
My Pinterest board : https://fr.pinterest.com/mhagnusgame/p-vall%C3%A9e-dombrelune/
You can follow me on and see more of my work on :
Twitter : https://twitter.com/MhagnusGame
Instagram : https://www.instagram.com/mhagnus_pauline/
ArtStation : https://www.artstation.com/artist/paulinep
DeviantArt : http://thegreenchick.deviantart.com/
Sketchfab : https://sketchfab.com/PaulinePouchtajevitch#
2 notes
·
View notes