#vueaxios
Explore tagged Tumblr posts
Visit Tumblr Blog
Explore Tumblr blogs with no restrictions, modern design and the best experience.
Last Seen Tumblr Blogs


Fun Fact
Tumblr has a 66 index score for customer satisfaction in the US.
Photo
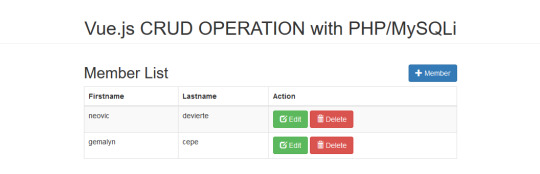
Tutorial: How to Fetch Data using Vue.js from MySQL Database in PHP with Source Code Getting Started on How to Fetch Data using Vue.js from MySQL Database in PHP This tutorial will show you How to Fetch Data using Vue.js from MySQL Database in PHP. In this tutorial, I've used Bootstrap CDN, so you need an internet connection for it to work. Creating a Database 1. Open phpMyAdmin. 2. Click d... https://bit.ly/3cIoBpL
#axiosapp#axioscdnunpkg#axiostutorial#axiosvue#axiosvueexample#axiosvueplugin#datavue.js#fetchdatausingvue.jsphp#FetchDataVue.jsfromMySQLDatabaseinPHP#mysqlvue.js#php#phptutorials#viewdatafromvue.js#vueaxios#vueaxiosdownloadfile#vueaxiosexample#vueaxiospost#vueaxiospostformdata#vueaxiostutorial#vueconnecttomysqldatabase#vuejsapi#vuemysql#vue.js#vue.jsmysqlexample
0 notes
Text
vue安装vue-axios和使用方法
进项目根目录,然后cmd运行
npm install --save axios vue-axios
安装完成后,在main.js中添加
import axios from 'axios'
import VueAxios from 'vue-axios'
Vue.use(VueAxios, axios)
注: vue-axios的源码是按照Vue的插件文档来写的,直接绑在原型链上不是不可以,如果像下面这样注册一个$http,和项目其他成员协作的时候就必须注明你注册的变量名称用来区别不同,而使用vue-axios大家就没有歧义了。说白了,使用vue-axios更多是为了符合规范,并且方便协作吧。
不加载 vue-axios写法如下:
import axios from 'axios'
Vue.prototype.$http = axios
需要使用vue 的prototype注册$http才能用$http
用法:
Vue.axios.get(api)
this.axios.get(api)
this.$http.get(api)
基本使用方法
GET请求
// Make a request for a user with a given ID axios.get('/user?ID=12345') .then(function (response) { console.log(response); }) .catch(function (error) { console.log(error); }); // Optionally the request above could also be done as axios.get('/user', { params: { ID: 12345 } }) .then(function (response) { console.log(response); }) .catch(function (error) { console.log(error); });
POST请求
axios.post('/user', { firstName: 'Fred', lastName: 'Flintstone' }) .then(function (response) { console.log(response); }) .catch(function (error) { console.log(error); });
同时执行多个请求
function getUserAccount() { return axios.get('/user/12345'); } function getUserPermissions() { return axios.get('/user/12345/permissions'); } axios.all([getUserAccount(), getUserPermissions()]) .then(axios.spread(function (acct, perms) { // Both requests are now complete }));
其实和其他的ajax库一样,基本用法都是差不多的。大家一看就知道怎么用。
axios API
可以直接通过config来完成请求 axios(config)
axios({ method: 'post', url: '/user/12345', data: { firstName: 'Fred', lastName: 'Flintstone' } });
axios(url, [config])
// Send a GET request (default method) axios('/user/12345');
请求方法别名
下面是axios支持的所有请求方法别名,便于各种请求。 注:[...]中的数据表示可以为空。url是ajax请求地址;data是提交的数据对象;config是配置对象,所有ajax配置都可以在config中实现。
axios.request(config)
axios.get(url[, config])
axios.delete(url[, config])
axios.head(url[, config])
axios.post(url[, data[, config]])
axios.put(url[, data[, config]])
axios.patch(url[, data[, config]])
并发性
下列接口用于处理并发请求(同时处理多个多个request)
axios.all(iterable)
axios.spread(callback)
axios实例
可以用自定义的config创建一个axios实例 axios.create([config])
var instance = axios.create({ baseURL: 'https://some-domain.com/api/', timeout: 1000, headers: {'X-Custom-Header': 'foobar'} });
实例方法
下面是实例的所有可用方法,方法中的config会与axios实例中的config合并。(实例可以将一些通用的config先配置好)
axios#request(config)
axios#get(url, [config])
axios#delete(url, [config])
axios#head(url, [config])
axios#post(url[, data[, config]])
axios#put(url[, data[, config]])
axios#patch(url[, data[, config]])
Config
重点来了,来看看Config。 下面列出了config的所有配置项,其中之后url是必填的。当method没有指定方法,默认为GET。
{ // `url` is the server URL that will be used for the request // 用来向服务器发送请求的url url: '/user', // `method` is the request method to be used when making the request // 请求方法 method: 'get', // default // `baseURL` will be prepended to `url` unless `url` is absolute. // It can be convenient to set `baseURL` for an instance of axios to pass relative URLs // to methods of that instance. // 假如`url`不是绝对路径,那么向服务器发送请求的URL将是`baseURL + url` baseURL: 'https://some-domain.com/api/', // `transformRequest` allows changes to the request data before it is sent to the server // This is only applicable for request methods 'PUT', 'POST', and 'PATCH' // The last function in the array must return a string, an ArrayBuffer, or a Stream transformRequest: [function (data) { // Do whatever you want to transform the data return data; }], // `transformResponse` allows changes to the response data to be made before // it is passed to then/catch transformResponse: [function (data) { // Do whatever you want to transform the data return data; }], // `headers` are custom headers to be sent headers: {'X-Requested-With': 'XMLHttpRequest'}, // `params` are the URL parameters to be sent with the request // Must be a plain object or a URLSearchParams object params: { ID: 12345 }, // `paramsSerializer` is an optional function in charge of serializing `params` // (e.g. https://www.npmjs.com/package/qs, http://api.jquery.com/jquery.param/) paramsSerializer: function(params) { return Qs.stringify(params, {arrayFormat: 'brackets'}) }, // `data` is the data to be sent as the request body // Only applicable for request methods 'PUT', 'POST', and 'PATCH' // When no `transformRequest` is set, must be of one of the following types: // - string, plain object, ArrayBuffer, ArrayBufferView, URLSearchParams // - Browser only: FormData, File, Blob // - Node only: Stream data: { firstName: 'Fred' }, // `timeout` specifies the number of milliseconds before the request times out. // If the request takes longer than `timeout`, the request will be aborted. timeout: 1000, // `withCredentials` indicates whether or not cross-site Access-Control requests // should be made using credentials withCredentials: false, // default // `adapter` allows custom handling of requests which makes testing easier. // Return a promise and supply a valid response (see [response docs](#response-api)). adapter: function (config) { /* ... */ }, // `auth` indicates that HTTP Basic auth should be used, and supplies credentials. // This will set an `Authorization` header, overwriting any existing // `Authorization` custom headers you have set using `headers`. auth: { username: 'janedoe', password: 's00pers3cret' }, // `responseType` indicates the type of data that the server will respond with // options are 'arraybuffer', 'blob', 'document', 'json', 'text', 'stream' responseType: 'json', // default // `xsrfCookieName` is the name of the cookie to use as a value for xsrf token xsrfCookieName: 'XSRF-TOKEN', // default // `xsrfHeaderName` is the name of the http header that carries the xsrf token value xsrfHeaderName: 'X-XSRF-TOKEN', // default // `onUploadProgress` allows handling of progress events for uploads onUploadProgress: function (progressEvent) { // Do whatever you want with the native progress event }, // `onDownloadProgress` allows handling of progress events for downloads onDownloadProgress: function (progressEvent) { // Do whatever you want with the native progress event }, // `maxContentLength` defines the max size of the http response content allowed maxContentLength: 2000, // `validateStatus` defines whether to resolve or reject the promise for a given // HTTP response status code. If `validateStatus` returns `true` (or is set to `null` // or `undefined`), the promise will be resolved; otherwise, the promise will be // rejected. validateStatus: function (status) { return status >= 200 && status < 300; // default }, // `maxRedirects` defines the maximum number of redirects to follow in node.js. // If set to 0, no redirects will be followed. maxRedirects: 5, // default // `httpAgent` and `httpsAgent` define a custom agent to be used when performing http // and https requests, respectively, in node.js. This allows to configure options like // `keepAlive` that are not enabled by default. httpAgent: new http.Agent({ keepAlive: true }), httpsAgent: new https.Agent({ keepAlive: true }), // 'proxy' defines the hostname and port of the proxy server // `auth` indicates that HTTP Basic auth should be used to connect to the proxy, and supplies credentials. // This will set an `Proxy-Authorization` header, overwriting any existing `Proxy-Authorization` custom headers you have set using `headers`. proxy: { host: '127.0.0.1', port: 9000, auth: : { username: 'mikeymike', password: 'rapunz3l' } }, // `cancelToken` specifies a cancel token that can be used to cancel the request // (see Cancellation section below for details) cancelToken: new CancelToken(function (cancel) { }) }
分析Config
配置参数很多,我们一个一个来了解它们
url —— 用来向服务器发送请求的url
method —— 请求方法,默认是GET方法
baseURL —— 基础URL路径,假如url不是绝对路径,如https://some-domain.com/api/v1/login?name=jack,那么向服务器发送请求的URL将会是baseURL + url。
transformRequest —— transformRequest方法允许在请求发送到服务器之前修改该请求,此方法只适用于PUT、POST和PATCH方法中。而且,此方法最后必须返回一个string、ArrayBuffer或者Stream。
transformResponse —— transformResponse方法允许在数据传递到then/catch之前修改response数据。此方法最后也要返回数据。
headers —— 发送自定义Headers头文件,头文件中包含了http请求的各种信息。
params —— params是发送请求的查询参数对象,对象中的数据会被拼接成url?param1=value1¶m2=value2。
paramsSerializer —— params参数序列化器。
data —— data是在发送POST、PUT或者PATCH请求的数据对象。
timeout —— 请求超时设置,单位为毫秒
withCredentials —— 表明是否有跨域请求需要用到证书
adapter —— adapter允许用户处理更易于测试的请求。返回一个Promise和一个有效的response
auth —— auth表明提供凭证用于完成http的身份验证。这将会在headers中设置一个Authorization授权信息。自定义Authorization授权要设置在headers中。
responseType —— 表示服务器将返回响应的数据类型,有arraybuffer、blob、document、json、text、stream这6个类型,默认是json类似数据。
xsrfCookieName —— 用作 xsrf token 值的 cookie 名称
xsrfHeaderName —— 带有 xsrf token 值 http head 名称
onUploadProgress —— 允许在上传过程中的做一些操作
onDownloadProgress —— 允许在下载过程中的做一些操作
maxContentLength —— 定义了接收到的response响应数据的最大长度。
validateStatus —— validateStatus定义了根据HTTP响应状态码决定是否接收或拒绝获取到的promise。如果 validateStatus 返回 true (或设置为 null 或 undefined ),promise将被接收;否则,promise将被拒绝。
maxRedirects —— maxRedirects定义了在node.js中redirect的最大值,如果设置为0,则没有redirect。
httpAgent —— 定义在使用http请求时的代理
httpsAgent —— 定义在使用https请求时的代理
proxy —— proxy定义代理服务器的主机名和端口,auth
cancelToken —— cancelToken定义一个 cancel token 用于取消请求
Response
当我们ajax获取数据成功后会返回一个response对象,它包含了以下内容:
{ // `data` is the response that was provided by the server data: {}, // `status` is the HTTP status code from the server response status: 200, // `statusText` is the HTTP status message from the server response statusText: 'OK', // `headers` the headers that the server responded with headers: {}, // `config` is the config that was provided to `axios` for the request config: {} }
response是通过promise的then方法来获取,具体使用方法如下:
axios.get('/user/12345') .then(function(response) { console.log(response.data); console.log(response.status); console.log(response.statusText); console.log(response.headers); console.log(response.config); });
相对的,我们有时也会出现ajax报错,此时就会到我们的catch中去捕获异常error对象。
0 notes