#waterproofing bathroom floor after tiling
Text
Effective Bathroom Leakage Waterproofing Solutions
Bathrooms are essential spaces in any home, but they can also be challenging to maintain due to the high humidity and moisture levels. Bathroom leakage can cause damage to your floor, walls, and the foundation of your house, leading to structural problems and health hazards. That’s why investing in bathroom leakage waterproofing services is vital, such as waterproofing bathroom floors after tiling.
Save And Seal provides high-quality waterproofing solutions that protect your bathroom floor against water damage and mould growth. Our team of expert technicians uses proven techniques, like grouting and caulking, to create a watertight barrier that inhibits water penetration, extending the lifespan of your bathroom floors. We also recommend epoxy grout, which is known for its durability and long-lasting waterproofing performance.
Leaking showers are one of the common problems in bathrooms, causing dampness, mould growth, and structural damage. Our comprehensive leaking shower waterproofing solutions solve the root cause of the leakage and prevent future infiltration of water. We meticulously assess the shower area and implement effective measures that address your specific needs, ensuring that you have a safe and leak-free shower experience.
We understand that every bathroom has unique waterproofing needs. That's why we offer customised solutions tailored to your specific concerns. Our skilled technicians use only premium quality materials that meet the industry’s latest trends and techniques, ensuring that we provide the best solutions for your waterproofing needs.

1 note
·
View note
Text
The weird fisheye thing my phone always does makes taking these kinds of photos difficult because there are very few straight lines.
Anyway.

Before moving stuff around again.

After.
It doesn’t look very different, but it feels different. There’s another half a floor tile of walking space, now.
I have to admit I’ve hated being in there at all so far. It’s crowded and I despise the color on the walls. When we moved in, this bathroom was very sloppily sponge painted which I got tired of eventually so I mixed what was left of the colors that were used together (they left the paint), and then painted the walls with the resulting goldenrod. I don’t like it, but it’s better.
I can’t let myself focus on the walls too much or I will be tearing out the whole bathroom to redo it. They need puttied, sanded, smoothed, and leveled (and likely waterproofing added considering how poorly Roland did everything else down there) then repainted.
Disclaimer for anyone that missed it: I clean that toilet and flush it now and then to keep the water in the bowl fresh, but it’s never used. There’s no worry of waste particles getting on dolls or ponies.
11 notes
·
View notes
Text
So! I bought a house last year (sliiiiding into that disappearing middle class like Indiana Jones under a closing temple trap door). Decided that the bathroom needed to be remodeled because it had committed the dual sins of being unaesthetic and not up to code.
After the initial stages of demolition (fun!) and installing new floor and toilet (2 months of portable toilet in the driveway - less fun!), it was time for the shower. Because I wanted to save money and gain DIY cred, I decided to tile the shower myself. (A professional did the plumbing and shower pan installation, though - I know my limits.) Today I share with you the fruits of my labor!
First, the classic pre- and post-glow-up shots:

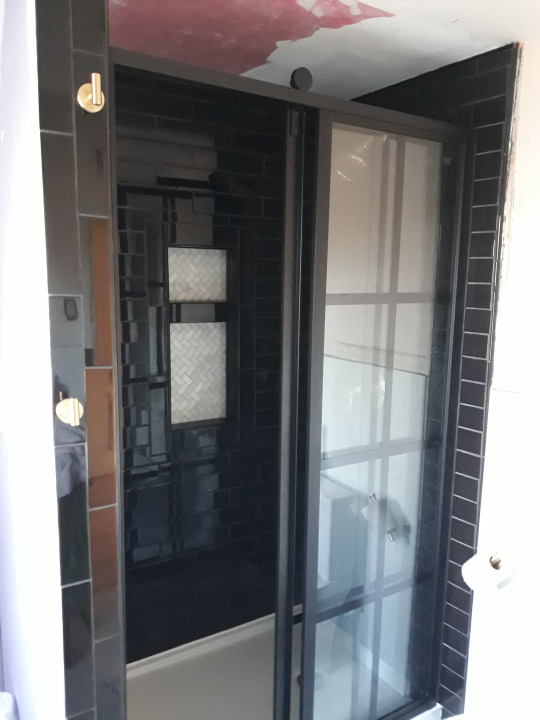
Aaand let's take a look without the door so we can see all of that lovely tilework. (seriously, it was a fair bit of time getting that right) An unintended side effect of all this glossy black is that you get a sort of funhouse reflection in the tiles. I like it.

You may have noticed the weird triangle piece in the corner. That's framing following the steeply-pitched roof line. The wood framing was actually missing in the bottom quarter of the triangle, opening up to a gaping hole in the wall. It looked like someone had hacked away chunks of it with a chisel, it was really odd. We covered it up with some wood and waterproof membrane. Anyway, tiling this part turned out to be not as big of a pain as I originally feared, and I think it makes the shower look a little cathedral-like. (It looks better in person, tbh.)

Behold the shower niche! The colors of this bathroom are/will be white, black, brass, and emerald green. The house was built in 1930, so I wanted to make something that would match the rest of the house as well as my own aesthetic tastes.
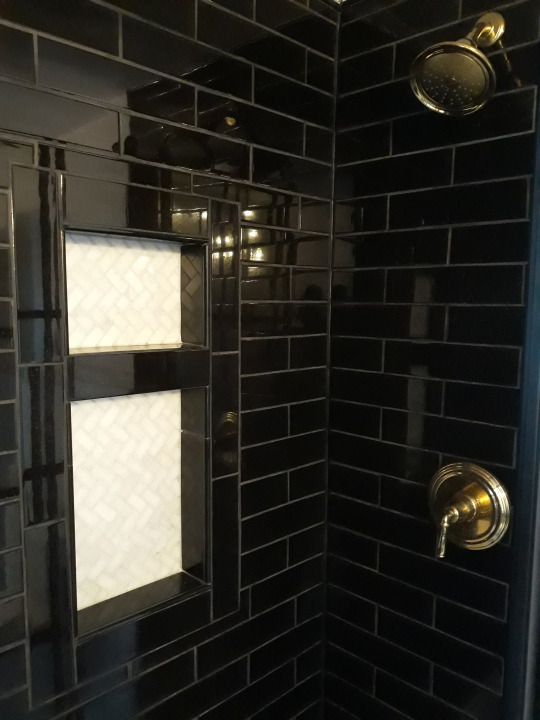
I laid the mosaic herringbone tile vertically and I love the way it turned out, with the zigzags echoing the shape of falling water. My partner wanted to align it perpendicularly so that everything was right angles, smh.

And the final glamour shot.

It's so nice to have proper showers on demand again! Now on to finishing the rest of the room...
Happy to answer any questions about the process. Thanks for stopping by!
#scsc posts#home improvement#diy#any mistakes are now easter eggs for guests to find#wish the lighting was more conducive to photos but what can ya do#very satisfied with the end result!
2 notes
·
View notes
Text
Local Santa Ana Bathroom Remo
Santa Ana Bathroom Renovations: Transform Your way of being in the same way as Style and Functionality
Renovating your Santa Ana bathroom can breathe new spirit into one of the most important rooms in your home. Whether youre looking to update antiquated fixtures, growth storage, or make a luxurious retreat, a bathroom renovation offers endless possibilities. in the same way as the right approach, you can not lonely increase the beauty of your way of being but after that growth the value of your home.
Planning Your Santa Ana Bathroom Renovation
The first step in any bathroom renovation is careful planning. begin by assessing your needs and wants. attain you craving more storage, or are you dreaming of a spa-like experience? in the same way as you have a vision, establish a budget and timeline. This ensures your project stays on track and within financial limits.
Consider the layout. A well-designed layout can make even a little bathroom setting spacious and functional. Think approximately how you use the way of being daily this can support you decide on the placement of essential features in the same way as the shower, toilet, and vanity.
Choosing the Right Materials
When selecting materials, prioritize both durability and aesthetics. Tiles are a popular marginal for flooring and walls due to their waterproof nature and easy maintenance. Opt for slip-resistant tiles for the floor to ensure safety, especially in damp areas.
For a more luxurious feel, decide using natural rock or high-quality porcelain. These materials are steadfast and go to a innovative touch. Dont forget approximately cabinetry and countertops moisture-resistant materials in the same way as quartz or laminate are ideal for bathroom use.
Fixtures and Finishes
The right fixtures can lionize your bathrooms look. Opt for modern, smooth faucets, and showerheads that not lonely see good but after that support conserve water. You can after that go to a upholding fragment in the same way as a freestanding tub for a be next to of elegance.
Lighting is key in any bathroom. Layered lighting, including task lighting a propos the vanity and ambient lighting throughout the room, ensures functionality though creating a warm and inviting atmosphere.
Santa Ana Bathroom Renovation
Santa Ana Professional Bathroom Makeover
Expert Santa Ana Bathroom Redesign Contractor
Santa Ana California ADU Contractors
Local Santa Ana Kitchen Renovation Experts
Local Santa Ana Bathroom Renovation Contractors
Local Santa Ana Custom Bathroom Remodel Professionals
Santa Ana Modern Bathroom Remodel Experts
Excellent Santa Ana Bathroom Upgrade Contractors
Santa Ana Highly Rated Bathroom Remodel Contractors
Santa Ana Highly Skilled Luxury Bathroom Renovation Contractors
https://localsantaanabathroomremodeli613.blogspot.com/2024/09/local-santa-ana-bathroom-remodeling.html
Santa Ana Bathroom Remodel Services
https://chiropractorcostshreveportla835.blogspot.com/
https://sportschiropractic77.blogspot.com/2024/09/chiropractor-cost-shreveport-la.html
https://www.tumblr.com/juliannacastroverde/762115547053850624
https://www.tumblr.com/seal-beach-carpet-clean-dt29/761208683479826432
https://cypresspersianrugrestoration112.blogspot.com/2024/09/periodontitis-treatment-encinitas.html
0 notes
Text
Epoxy Grouting Material

Epoxy grouting is a popular choice for tile work in wet areas like bathrooms, kitchens, swimming pools, and commercial spaces due to its water-proof properties, durability, and resistance to chemicals, making it a preferred choice for long-lasting tile installation.
Why Choose Epoxy Grout Over Cement-Based Grout?
Epoxy grout has several advantages over the cement-based conventional grout. Specifically, it finds its applications in places exposed to water, chemical environment, and also high traffic floors.
1. Waterproof Properties
Epoxy grout, a non-absorbing mixture of epoxy resins and filler powder, provides a watertight seal, making it ideal for wet and damp areas like bathrooms and swimming pools, preventing mold and mildew growth.
2. Hardiness and Strength
Epoxy grout is much stronger compared to cement grout. It resists cracking and shrinking much more, thus has a longer working life, even in high-traffic or moisture-rich locations. The material also resists cleaning chemicals and acids, hence versatile and commercially viable for application in commercial kitchens and other industrial uses.
3. Mold and Mildew Resisting
Since epoxy grout is sealed and non-porous, it could never become a haven for mold and mildew growth, which often occurs when most places are wet and moist very frequently. This makes it even more sanitary while at the same time minimizing recurrent cleaning and upkeep by the homeowner and contractor.
How to Apply Epoxy Grouting Material?
Although epoxy grout offers the best possible benefits, applying it is very meticulous. It is much more unlike the traditional grout applied on a surface that requires good skills and responsibility in its application.
1. Preparing the Area
Before applying epoxy grout, the installing correct tiles, clean the inter-tile gaps of debris. Water, dust, and dirt may reduce adhesion, alongside reducing the effect of epoxy grout.
2. Preparation of Epoxy Grout
Epoxy grout is supplied with epoxy resin and a hardener. These have to be mixed in good condition only before these are applied. Mix the material with a slow speed drill attached with the paddle till the mixture becomes smooth. Be cautious with the working time of epoxy grout as it cures quite fast.
3. Application Procedure
For filling the joint: mix the grout, then spread it at a 45-degree angle with a rubber float in the joints. Once all the gaps are full, then use a damp sponge to wipe off any excess grout off the tile's surface. Something to note about epoxy grout: they tend to haze on tiles if not cleaned soon after placing. Cleaning must be done within the first 15-30 minutes before it hardens.
4. Final Cleaning and Curing
Post the first clean rinse, the final rinse will be done using clean water to flush out all the grout, if left behind. Epoxy grout usually cures in 24 to 48 hours, depending on temperature and humidity. Once cured, it becomes waterproof, extremely strong, and chemical resistant.
Applications of Epoxy Grout in Wet Rooms
1. Bathroom and Showers
One of the best places to apply epoxy grout is in the bathroom. That is because it does not allow water penetration, and the effects of seepage into the wall or sub-flooring, thus preventing mold and structural damages.
This can also hold up very well in bathing areas with various exposures to soaps, shampoos, and cleaning agents.
2. Swimming pools and Spas
Epoxy grout is very suitable for pools and spas because it exhibits moderate resistance to water, chlorine, and other chemical agents. Its surface will not encourage the presence of bacteria and other microorganisms that could infect such a structure yet keep its appearance constant in the long run.
3. Kitchen and Food Preparation Areas
It resists heat, grease, and most chemical cleaners present in the kitchen. Its strength also means that it is not easily going to allow grout lines to break away in commercial kitchens, which have far stricter hygiene and safety standards.
Frequently Asked Questions
1. Is epoxy grout suitable for exterior application?
Epoxy grout is highly resistant to adverse weather conditions as well as UV rays. For these reasons, it is an excellent choice for outdoor patios, pool decks, or any other type of exterior application.
2. How long does epoxy grout last?
Grout epoxy has been marketed to be one of the most durable and long-lasting products with about 50 years of lifespan given proper care and maintenance, hence is an investment for a long while.
3. Can I apply epoxy grout with all types of tiles?
Epoxy grouts are suitable for most tile material types, such as ceramic, porcelain, and natural stone. However, make sure to refer to the manufacturer's recommendations with respect to compatibility with certain tile types.
4. How do I care for epoxy grout?
There isn't much maintenance required to keep epoxy grout looking fresh. General cleaning using mild detergents and water usually suffice. Avoid using abrasive cleaners though. They may destroy the tile surface, but the grout will be safe.
5. Is epoxy grout more expensive than cement grout?
Yes, the epoxy grout is much costlier than the cement-based grout, however for better properties, in the long run, durability and low maintenance makes it payable.
Conclusion
Epoxy grouting material is a top choice for wet areas due to its waterproofing, service life, and resistance to chemical and mold. It is ideal for bathroom re-design, pool installation, and commercial kitchen design. Although more expertise is needed for installation, the ability to overcome difficulties makes it a wise investment for areas with high moisture content.
0 notes
Text
7 Tips to Use When Shopping at a Tiles Shop in Toronto

When it comes to renovating your Toronto home, choosing the right tiles can make all the difference. Tiles offer durability, style, and functionality whether you’re sprucing up your kitchen, bathroom, or floors.
But before you make that trip to a tiles shop in Toronto, there are a few things you ought to consider to ensure you make the right choices for your home.
In this guide, we'll explore the key factors to keep in mind so you can confidently navigate the selection process at any tiles shop in Toronto.
Let’s get started.
Consider These Things When Shopping at a Tiles Shop in Toronto
Are you shopping for floor tiles for the bathroom or kitchen in your Toronto home? Here are a few things you may want to consider when making your rounds at tile shops in Toronto or elsewhere.
1. Understanding Your Space
Before shopping for tiles, knowing where they will be used is important. The type of tile you choose will depend largely on the room you plan to renovate. For instance, tiles for bathroom floors may need to be slip-resistant, while tiles for a kitchen backsplash can focus more on aesthetic appeal. Ask yourself, what is the primary function of the space? Is it high-traffic, moisture-prone, or a focal point in the home? Understanding this can help narrow down your choices from the start.
2. Selecting the Right Tile Material
At a tile shop in Toronto, you’ll encounter various materials, including ceramic, porcelain, marble, and even glass. Each has its pros and cons. Ceramic tiles are a cost-effective option that works well in many spaces but may not be ideal for floors that take a lot of wear. Porcelain tiles are more durable and moisture-resistant, making them perfect for bathroom floors. If you’re after a luxury look, marble tiles are gorgeous but require more maintenance. It's all about finding a balance between style and functionality.
3. Tile Sizes and Shapes
Tile size can dramatically change the look of a space. Larger tiles make a room feel more spacious, while smaller ones can add intricate detail. Some of the trendiest shapes available in a tile shop in Toronto include hexagonal, rectangular, and even fish scale designs.
When considering size, also think about the layout. Do you want to make a room appear larger or cozier? Your choice of tile size can help achieve that effect.
4. Tile Finishes: Glossy vs. Matte
The finish of the tile you choose plays a big role in both its appearance and practicality. Glossy tiles reflect more light, making them great for small spaces where you want to create the illusion of more space. However, glossy surfaces can show smudges and water spots more easily. Matte tiles, on the other hand, offer a more subtle look and are ideal for areas like floors where you need better traction.
5. Considering Tile Durability
Durability is an essential factor to consider, especially if you're installing tiles in high-traffic areas like hallways or kitchens. When you’re at a tile shop in Toronto, ask about PEI ratings (Porcelain Enamel Institute), which indicate the hardness and wear resistance of tiles. A higher PEI rating means the tile is more durable and suitable for floors, while lower-rated ones are better for walls and backsplashes.
When choosing tiles for bathroom floors and walls, specific features must be considered. The tiles need to be waterproof and easy to clean. In addition, slip resistance is crucial for bathroom floors to prevent accidents. Porcelain tiles are often recommended due to their water resistance, durability, and wide range of design options.
6. Colour and Design Choices
Tiles come in a rainbow of colours and a wide array of designs, from minimalist whites to vibrant patterns. But remember that trends come and go. Consider choosing classic colours or designs that won't feel outdated in a few years. Neutral tones like beige, grey, or soft pastels are versatile and timeless. If you want a bold statement, consider adding a splash of colour or a feature wall with patterned tiles. Your choice will set the tone for the entire room.
7. Budget and Pricing
Tiles vary greatly in price depending on the material, design, and brand. Before you head out to a tile shop in Toronto near you, it’s a good idea to set a budget. Remember, it's not just about the cost of the tiles themselves but also the cost of installation and any additional materials, such as grout or underlayment. High-end tiles like marble can be pricey, but you can also find beautiful, budget-friendly options in ceramic or porcelain.
Shopping for tiles can be an exciting part of the renovation process. Whether you're looking for floor tiles in Toronto or unique tiles for bathroom spaces, keeping these key considerations in mind will help you make a choice you'll love for years. Remember to balance style, function, and budget to create a beautiful and practical space.
0 notes
Text
Mastering Bathroom Renovations with Top Waterproofing Techniques
Home renovations, especially of the bathroom, give the interiors of one of the most important rooms in the house a new look. However, as one of the most moist areas in a house, waterproofing plays a crucial role in any North Shore bathroom remodelling. Adhering to the best practices in waterproofing this building will come in handy in preventing water penetration and mold in your investment and this will be a long-lasting one. Regarding this concern, major strategies on how to practice effective bathroom remodeling with correct waterproofing shall be enumerated in this particular article.
Selecting Water-Resistant Materials
The kind of material used in the bathroom during the renovation process will determine the extent of waterproofing needed. The first step involves selecting materials that are particularly suitable for withstanding moisture. For flooring, porcelain or ceramic tile is good in this aspect since they don’t let water through easily. Other types of LVP are just as effective and water-resistant as well. When it comes to the shower walls, it would be most desirable to use tile or any other material with solidity like used in cultured marble. When installing dry walls, there is a need to ensure that moisture-resistant drywall panels are used. Other choices that one has to make while selecting bath fixtures and hardware include the use of metals like brass, nickel or even stainless steel that do not corrode or are not affected by moisture after some time.
Installing the Correct Underlayments
Installing underlayments ensures that the rest of your bathroom has no water issues and that it is properly installed. Regarding the flooring, cement backerboard is used to minimize the actual absorption of water and eventual mold formation. Another advantage is that when used with thinset mortar and proper waterproofing membranes, which are discussed in the next section, floors remain safe from water leakage. On walls, use moisture-resistant wall panels, cement board, or waterproof drywall rather than using common drywall because mold thrives in it. Spend time to properly install these important underlayments as per manufacturer guidelines for effective moisture management.
Utilizing Waterproofing Membranes
There are specific waterproofing membranes that form a barrier through which water cannot penetrate to harm surfaces beneath your finish materials. RedGard® Waterproofing and Crack Prevention Membrane is an ultra-slim and continuous waterproofing layer suitable for use in bathrooms. Pour it on your flooring underlayment and continue upwards through the shower pan liner over bathtub surrounds. For the final touch, add tile, stone or vinyl flooring to your bathroom restoration, ensuring that moisture cannot seep through floors or walls. Other quality liquid-applied membranes that can provide the same whole-bathroom waterproofing include the Laticrete® Hydro Barrier.

Caulking Effectively
Many people tend to ignore the process of caulking as the final stage of an effective waterproofing process when renovating. Once you are done with the installation of all the last and final materials in the bathroom, like floor tile, sinks, toilets, and tubs, take time to apply a thin bead of flexible, mold-resistant bathroom caulk along every joint or seam present. Particular emphasis should be paid to the shower floor perimeters and corners, tub surround edges, toilet and sink bases, as well as vertical corners since sealing these places will eliminate the chance of moisture penetration. Sealing or as commonly referred to as caulk work, ties the new bath finishes to complete the job of shielding your beautiful remodel.
Conclusion
When designing or constructing bathrooms during renovation, there are essential factors and measures that need to be taken into consideration regarding waterproofing in order to produce desirable, efficient, and long-lasting waterproofing in North Shore. Selecting the right moisture-resistant materials, applying the underlayments in the correct sequence, using waterproofing membranes on all surfaces, and thoroughly caulking every joint and seam will give a bathroom renovation protection from leaks, humidity, and moisture damage even in the heavily utilized facilities. Combine these essential waterproofing procedures with the best design choices to successfully complete your next bathroom designing job and protect your investment from water perils for many years to come by being careful about waterproofing and moisture control.
1 note
·
View note
Text
Transform Your Bathroom with a Sliced Pebble Tile Shower Floor: A Complete Guide
When it comes to designing a shower that is both functional and visually stunning, the sliced pebble tile shower floor stands out as a popular choice. Its unique blend of natural beauty and slip-resistant properties makes it perfect for creating a spa-like atmosphere in your bathroom. In this guide, we'll explore everything you need to know about installing, maintaining, and designing with sliced pebble tile for your shower floor.

What is a Sliced Pebble Tile Shower Floor?
A sliced pebble tile shower floor is made from natural stones that are sliced to create a flat surface, then mounted on mesh sheets for easy installation. Unlike traditional pebble tiles, where the stones retain their rounded shape, sliced pebbles have a flat surface, providing a smoother feel underfoot while still maintaining the organic look of natural stone. This makes sliced pebble tile an excellent choice for shower floors, offering both style and practicality.
Benefits of Using Sliced Pebble Tile for Shower Floors
Slip-Resistant Surface: One of the most significant benefits of using sliced pebble tile for a shower floor is its slip-resistant texture. The natural grip of the pebbles makes the surface less slippery when wet, enhancing safety for all family members, including children and the elderly.
Natural Aesthetic: Sliced pebble tiles bring the soothing feel of nature into your bathroom. The natural variations in color, size, and texture of each stone create a unique and visually appealing shower floor that adds character and elegance to any bathroom design.
Comfort Underfoot: While traditional pebble tiles can feel uneven or uncomfortable, sliced pebble tiles provide a smoother surface that is still textured enough for grip. This balance between comfort and safety makes them ideal for shower floors.
Durability: Made from natural stones such as river rocks, marble, or granite, sliced pebble tiles are incredibly durable and can withstand the rigors of daily use. They are resistant to cracking, chipping, and general wear and tear, making them a long-lasting option for your shower floor.
Versatility in Design: Sliced pebble tiles come in a variety of colors and finishes, allowing you to choose the perfect style to match your bathroom decor. Whether you prefer neutral tones for a spa-like feel or darker shades for a modern look, there is a sliced pebble tile option for every taste.

How to Install a Sliced Pebble Tile Shower Floor
Installing a sliced pebble tile shower floor can be a DIY project if you have some experience with tiling. However, due to the nature of working with natural stones and the need for a waterproof installation, many homeowners opt to hire a professional. Here are the basic steps for installing sliced pebble tile in your shower:
Prepare the Subfloor: Ensure that your shower subfloor is clean, level, and waterproof. Any cracks or uneven surfaces should be repaired before beginning the installation. A waterproof membrane or backer board is often necessary to prevent moisture from seeping through.
Choose the Right Thin-Set Mortar: Use a high-quality thin-set mortar that is suitable for natural stone tiles. Spread the mortar evenly with a notched trowel to ensure a solid bond between the sliced pebble tiles and the subfloor.
Lay the Pebble Tiles: Start placing the mesh-backed pebble tile sheets in the center of the shower floor and work outward. Ensure that the sheets are aligned properly to create a seamless look. You may need to trim the mesh backing with scissors to fit around edges and corners.
Grout the Tiles: After the mortar has set, apply grout to the tiles using a rubber float. Choose a grout color that complements the stones. For a more natural look, opt for a neutral or earth-toned grout. Be sure to fill all gaps and spaces between the pebbles.
Seal the Shower Floor: Sealing is crucial for protecting sliced pebble tiles from water damage, staining, and mold growth. Use a high-quality stone sealer and follow the manufacturer’s instructions for application. Resealing may be required every 1-2 years, depending on usage and exposure to moisture.
Caring for Your Sliced Pebble Tile Shower Floor
Maintaining a sliced pebble tile shower floor is relatively simple, but regular care is essential to keep it looking its best:
Regular Cleaning: Use a mild, pH-neutral cleaner and a soft brush or cloth to clean the pebble tiles regularly. Avoid using harsh chemicals or acidic cleaners that can damage the stones or grout.
Prevent Mold and Mildew: Ensure proper ventilation in your bathroom to reduce moisture buildup. Wiping down the shower floor after each use can also help prevent mold and mildew growth.
Reseal as Needed: Over time, the sealer may wear down, especially in high-moisture environments like a shower. Inspect the sealer periodically and reapply as needed to keep the stones and grout protected.
Design Ideas for Sliced Pebble Tile Shower Floors
Sliced pebble tile offers endless design possibilities, allowing you to create a shower floor that is both functional and beautiful. Here are some design ideas to inspire your next bathroom remodel:
Natural Zen Retreat: Pair a sliced pebble tile shower floor with natural wood vanities, neutral walls, and a rainfall showerhead to create a calming, spa-like atmosphere.
Monochrome Elegance: For a more modern look, choose dark gray or black sliced pebble tiles and pair them with sleek, black fixtures and white subway tiles for contrast. This creates a contemporary and stylish shower space.
Coastal Vibes: Incorporate sliced pebble tiles in shades of blue, gray, and beige to mimic the colors of the ocean. Add white or light blue walls, wicker baskets, and sea-inspired decor for a beachy, coastal bathroom design.
Accentuated Niches: Use sliced pebble tiles to accentuate built-in shower niches or benches. This creates a cohesive look while adding texture and visual interest to your shower space.
Indoor-Outdoor Fusion: If you have a bathroom that opens to an outdoor space or a garden, a sliced pebble tile shower floor can help blend the indoors with the outdoors, creating a seamless transition that emphasizes natural elements.

Conclusion
A sliced pebble tile shower floor offers a unique combination of natural beauty, durability, and slip resistance, making it an ideal choice for any bathroom renovation. Whether you're aiming for a spa-like retreat, a modern look, or a coastal theme, sliced pebble tiles can complement a variety of design styles while providing a safe and comfortable shower experience.
By choosing sliced pebble tile for your shower floor, you’re not just opting for a stylish upgrade—you’re also investing in a long-lasting, practical, and eco-friendly solution that will enhance the overall appeal and value of your home. Start planning your bathroom transformation today and enjoy the beauty and benefits of sliced pebble tiles!
0 notes
Text
Transform Your Space with JM Tiles and Stones: Premier Bathroom Tilers in Melbourne

Bathrooms are no longer just utilitarian spaces in a home—they've evolved into personal sanctuaries where aesthetics and functionality merge. Whether you're renovating an old bathroom or building a new one, the quality of tiling can make or break the space. In Melbourne, one name stands out when it comes to expert Bathroom Tilers Melbourne: JM Tiles and Stones. Renowned for their craftsmanship, attention to detail, and commitment to excellence, JM Tiles and Stones is your go-to partner for transforming your bathroom into a luxurious retreat.
Why Bathroom Tiling Matters
The importance of tiling in a bathroom cannot be overstated. Tiles serve both a practical and aesthetic purpose, providing a water-resistant surface that protects walls and floors from moisture while also contributing to the room’s overall design. However, poorly installed tiles can lead to water damage, mold growth, and a host of other problems, making it essential to choose a tiling service that you can trust.
This is where JM Tiles and Stones excels. With years of experience in the industry, they understand the complexities of bathroom tiling, from selecting the right materials to executing flawless installations. Their expertise ensures that your bathroom not only looks stunning but is also built to last.
The JM Tiles and Stones Difference
1. Expertise in Bathroom Tiling
JM Tiles and Stones has built a reputation as one of Melbourne’s leading bathroom tiling specialists. Their team of highly skilled tilers brings a wealth of experience to every project, ensuring that each job is completed to the highest standard. Whether you’re looking for a simple, modern design or something more intricate and detailed, JM Tiles and Stones can bring your vision to life.
Their expertise extends to all aspects of bathroom tiling, including:
Wall and Floor Tiling: JM Tiles and Stones specializes in both wall and floor tiling, ensuring that every surface in your bathroom is covered with precision and care. They are adept at working with a wide range of tile materials, including ceramic, porcelain, and natural stone, allowing them to create custom designs that suit your taste and lifestyle.
Mosaic Tiling: For those looking to add a touch of artistry to their bathroom, JM Tiles and Stones offers expert mosaic tiling services. Whether it’s a feature wall, a decorative border, or a full mosaic floor, their team can create intricate patterns and designs that add a unique flair to your space.
Shower and Wet Area Tiling: Proper tiling in showers and other wet areas is crucial to prevent water damage. JM Tiles and Stones ensures that these areas are not only beautifully tiled but also fully waterproofed, providing long-lasting protection against leaks and mold.
2. Comprehensive Tiling Services
From concept to completion, JM Tiles and Stones offers a full range of tiling services designed to make your bathroom renovation as seamless as possible. Their process begins with a detailed consultation to understand your needs, preferences, and budget. They then assist you in selecting the perfect tiles for your space, taking into account factors such as durability, style, and ease of maintenance.
Once the design is finalized, their team gets to work preparing the surfaces, which is a critical step in ensuring a flawless installation. This includes leveling floors, applying waterproofing membranes, and priming walls, all of which are essential to the longevity and appearance of the finished product.
The installation process itself is where JM Tiles and Stones truly shines. Their tilers are meticulous, ensuring that each tile is placed with precision and care. They take the time to measure, cut, and lay tiles with exacting accuracy, resulting in a finish that is both visually stunning and structurally sound.
After the tiles are installed, they complete the project with expert grouting and sealing, which not only enhances the appearance of the tiles but also adds an additional layer of protection against water and stains. Their commitment to quality ensures that your bathroom will look great and function perfectly for years to come.
3. High-Quality Materials
At JM Tiles and Stones, quality is paramount. They source only the finest materials for their tiling projects, ensuring that your bathroom is fitted with tiles that are both beautiful and durable. Their extensive selection includes:
Ceramic and Porcelain Tiles: Ideal for both walls and floors, ceramic and porcelain tiles are known for their durability, water resistance, and versatility in design. JM Tiles and Stones offers a wide range of colors, sizes, and finishes, allowing you to create a custom look that suits your style.
Natural Stone Tiles: For those seeking a luxurious, timeless look, natural stone tiles such as marble, travertine, and slate are excellent choices. JM Tiles and Stones expertly installs these materials, ensuring that their natural beauty is showcased to its fullest.
Mosaic Tiles: Perfect for adding decorative elements or creating focal points, mosaic tiles are available in a variety of materials, including glass, ceramic, and stone. JM Tiles and Stones can create intricate patterns and designs that make your bathroom truly unique.
4. Custom Designs Tailored to Your Needs
No two bathrooms are alike, and JM Tiles and Stones understands the importance of creating a space that reflects your individual style. Whether you prefer a sleek, modern aesthetic or something more traditional and ornate, their team works closely with you to design a bathroom that meets your specific needs and desires.
They offer personalized design consultations where you can explore different tile options, layouts, and patterns. Their expert advice ensures that the final design is not only beautiful but also practical, taking into consideration factors such as lighting, space, and functionality.
5. Exceptional Customer Service
At JM Tiles and Stones, customer satisfaction is their top priority. From the initial consultation to the final inspection, they are dedicated to providing a smooth, hassle-free experience. Their team is professional, courteous, and always willing to go the extra mile to ensure that you are completely satisfied with the results.
They understand that a bathroom renovation can be a significant investment, both in terms of time and money, which is why they strive to deliver the best value for your investment. Their transparent pricing and detailed quotes ensure that there are no surprises along the way, allowing you to plan your project with confidence.
6. Post-Installation Care
JM Tiles and Stones’ commitment to their clients doesn’t end once the tiles are installed. They offer ongoing support and maintenance advice to help you keep your bathroom looking its best. Whether you need tips on cleaning and care or assistance with any issues that may arise, their team is always available to help.
7. Client Testimonials
The true measure of a company’s success is the satisfaction of its clients, and JM Tiles and Stones has garnered glowing reviews from homeowners across Melbourne. Here’s what some of their clients have to say:
Sarah from St. Kilda: “JM Tiles and Stones did an incredible job on our bathroom renovation. The tiling is absolutely flawless, and the team was a pleasure to work with. We couldn’t be happier with the results!”
Michael from Brighton: “We hired JM Tiles and Stones for our bathroom makeover, and they exceeded our expectations. Their attention to detail and commitment to quality are unmatched. Highly recommend them for anyone looking for top-notch bathroom tiling.”
Olivia from Fitzroy: “JM Tiles and Stones transformed our bathroom into a luxurious retreat. The tiling is stunning, and the whole process was smooth and stress-free. We’re thrilled with the outcome and will definitely be using them again for future projects.”
Why Choose JM Tiles and Stones?
Choosing the right tiler for your bathroom renovation is crucial to ensuring a successful project. With JM Tiles and Stones, you’re not just hiring a contractor—you’re partnering with a team of experts who are passionate about delivering exceptional results. Their combination of technical expertise, high-quality materials, and personalized service makes them the ideal choice for anyone looking to elevate their bathroom space.
When you choose JM Tiles and Stones, you can rest assured that your bathroom will be transformed into a space that is not only beautiful but also built to last. Their attention to detail, commitment to quality, and dedication to customer satisfaction set them apart as the premier bathroom tilers in Melbourne.
Final Thoughts
Your bathroom deserves the best, and JM Tiles and Stones delivers nothing less. With their expert tiling services, you can create a bathroom that reflects your style, meets your needs, and adds value to your home. Whether you’re renovating an existing bathroom or building a new one, trust JM Tiles and Stones to provide the expertise and craftsmanship needed to achieve stunning results.
Contact JM Tiles and Stones today to discuss your bathroom tiling project and discover how they can help you transform your space into a true masterpiece.
0 notes
Text
Extending the Lifespan of Your Renovated Kitchen and Bathroom: A Guide for Homeowners in the Inner West
Renovating your kitchen and bathroom can significantly enhance the functionality, aesthetic appeal, and value of your home. However, after investing considerable time, effort, and resources into these spaces, it’s crucial to ensure their longevity. This guide focuses on homeowners in the Inner West of Sydney, providing practical tips and strategies to extend the lifespan of your renovated kitchen and bathroom.
Understanding the Importance of Durability in Home Renovation Inner West
The Inner West of Sydney is known for its diverse architecture, from charming heritage homes to modern apartments. Whether you’re renovating a classic terrace house or a contemporary unit, durability should be at the forefront of your renovation plans. A well-executed renovation not only improves your daily living experience but also boosts your property’s value. However, without proper maintenance and planning, even the most meticulously renovated spaces can deteriorate over time.
Choosing the Right Materials for Longevity
One of the most critical factors in extending the lifespan of your renovated kitchen and bathroom is the selection of materials. The materials you choose must withstand the test of time, particularly in areas exposed to moisture, heat, and heavy usage.
1. Cabinetry and Countertops
Materials: Opt for high-quality, water-resistant materials for cabinetry, such as marine-grade plywood or medium-density fiberboard (MDF) with a durable laminate finish. For countertops, materials like quartz, granite, or engineered stone are excellent choices due to their durability and resistance to scratches and stains.
Maintenance: Regularly wipe down surfaces to prevent the buildup of dirt and grime. Avoid using harsh chemicals that could damage the finish.
2. Flooring
Materials: Porcelain or ceramic tiles are ideal for both kitchens and bathrooms due to their water resistance and ease of cleaning. If you prefer a warmer feel underfoot, consider luxury vinyl tiles or waterproof engineered hardwood.
Maintenance: Keep floors clean by sweeping and mopping regularly. Immediately clean up spills to prevent staining and damage.
3. Plumbing Fixtures
Materials: Invest in high-quality, corrosion-resistant fixtures made of stainless steel or brass. These materials not only look elegant but also resist tarnishing and wear over time.
Maintenance: Regularly clean fixtures to prevent limescale buildup. Check for leaks and address any issues promptly to avoid water damage.
4. Tiles and Grouting
Materials: Choose tiles with a glazed finish for easier cleaning and greater resistance to moisture. For grouting, epoxy-based options offer superior durability compared to traditional cement-based grout.
Maintenance: Clean tiles and grout lines regularly with a mild detergent. Re-seal grout annually to prevent water infiltration and staining.
Smart Design Choices for Longevity
In addition to materials, the design of your kitchen and bathroom plays a crucial role in their longevity. Thoughtful design choices can reduce wear and tear and make maintenance easier.
1. Ventilation
Importance: Proper ventilation is essential in both kitchens and bathrooms to prevent moisture buildup, which can lead to mold growth and deterioration of materials.
Solution: Install high-quality exhaust fans in both spaces. In the kitchen, consider a range hood that effectively vents outside the home. In the bathroom, ensure that the exhaust fan is appropriately sized for the space and runs for at least 20 minutes after a shower.
2. Storage Solutions
Importance: Adequate storage reduces clutter and keeps your spaces organized, which can minimize damage to surfaces and fixtures.
Solution: Incorporate custom cabinetry that maximizes storage without compromising on style. Consider pull-out shelves, lazy Susans, and deep drawers in the kitchen. In the bathroom, opt for mirrored cabinets, vanity units with drawers, and recessed shelving.
3. Lighting
Importance: Good lighting not only enhances the aesthetics of your renovated spaces but also ensures that they are functional and safe.
Solution: Use a combination of task, ambient, and accent lighting. In the kitchen, under-cabinet lighting can illuminate countertops, while in the bathroom, backlit mirrors can provide adequate lighting for grooming tasks. Use LED bulbs for energy efficiency and longevity.
4. Ergonomic Design
Importance: An ergonomic design minimizes strain on your body, making daily tasks more comfortable and reducing the likelihood of accidents that could damage your renovated spaces.
Solution: Ensure countertops are at a comfortable height, and install pull-out shelves or drawers to reduce the need for bending and stretching. In the bathroom, consider walk-in showers and grab bars for added safety and convenience.
Regular Maintenance: The Key to Longevity
No matter how well you renovate your kitchen and bathroom, regular maintenance is essential to extend their lifespan. By establishing a routine, you can prevent minor issues from becoming major problems.
1. Routine Cleaning
Kitchens: Clean countertops, sinks, and stovetops daily to prevent stains and buildup. Deep clean appliances like the oven, refrigerator, and dishwasher every few months to ensure they function efficiently.
Bathrooms: Wipe down shower screens, tiles, and fixtures regularly to prevent soap scum and limescale buildup. Clean drains to prevent blockages and keep the exhaust fan free of dust.
2. Inspect for Wear and Tear
Kitchens: Regularly check for signs of wear and tear, such as loose cabinet hinges, damaged countertops, or malfunctioning appliances. Address these issues promptly to prevent further damage.
Bathrooms: Inspect seals around bathtubs, showers, and sinks for cracks or wear. Reapply sealant as needed to prevent water infiltration.
3. Pest Control
Kitchens: Food particles and crumbs can attract pests like ants, cockroaches, and rodents. Keep your kitchen clean and store food in airtight containers. Consider periodic pest control treatments to keep infestations at bay.
Bathrooms: Moisture can attract pests like silverfish and mold. Ensure your bathroom is well-ventilated and promptly repair any leaks.
4. Seasonal Maintenance
Kitchens and Bathrooms: Change HVAC filters regularly to ensure proper airflow and reduce dust. In colder months, check for drafts and seal any gaps around windows and doors to prevent heat loss and moisture buildup.
Renovation Tips for the Inner West Climate
The climate in the Inner West of Sydney can influence the longevity of your renovated spaces. Hot summers and humid conditions can affect materials and finishes if not properly managed.
1. Humidity Control
Importance: High humidity can cause wood to warp, paint to peel, and mold to grow.
Solution: Invest in a dehumidifier for your home, particularly in areas like the bathroom. Ensure your kitchen and bathroom have adequate ventilation to reduce humidity levels.
2. Sunlight Exposure
Importance: Direct sunlight can cause materials to fade and deteriorate over time.
Solution: Use UV-protective films on windows or install blinds and curtains to limit sunlight exposure. In the kitchen, consider positioning appliances and countertops away from direct sunlight to prevent fading and heat damage.
3. Water Conservation
Importance: Efficient water usage can reduce wear on plumbing fixtures and lower your utility bills.
Solution: Install water-saving fixtures like low-flow taps, showerheads, and dual-flush toilets. Consider incorporating a rainwater harvesting system to reduce your reliance on mains water.
The Role of Professional Maintenance Services
While regular DIY maintenance is crucial, professional services can also play a significant role in extending the lifespan of your renovated kitchen and bathroom.
1. Professional Cleaning Services
Importance: Deep cleaning by professionals can reach areas you might overlook and ensure your kitchen and bathroom stay in top condition.
Services: Consider hiring professional cleaners for a thorough clean of your kitchen and bathroom at least once a year. This can include deep cleaning of tiles, grout, and hard-to-reach areas.
2. Plumbing and Electrical Inspections
Importance: Regular inspections can identify potential issues before they become major problems.
Services: Schedule annual plumbing and electrical inspections to ensure everything is functioning correctly. This can prevent leaks, electrical faults, and other issues that could damage your renovated spaces.
3. Pest Control Services
Importance: Professional pest control can help keep your home free of pests that could damage your renovated kitchen and bathroom.
Services: Consider regular pest control treatments, especially if you live in an area prone to infestations. This is particularly important in the warmer months when pests are more active.
FAQs About Extending the Lifespan of Renovated Kitchens and Bathrooms
Q1: How often should I re-seal the grout in my bathroom?
A1: It’s recommended to re-seal grout in your bathroom every year to maintain its water-resistant properties and prevent staining.
Q2: What’s the best way to prevent mold growth in my bathroom?
A2: Ensure your bathroom is well-ventilated by using exhaust fans and keeping windows open when possible. Regularly clean surfaces with a mold-preventing cleaner and address any leaks promptly.
Q3: How can I protect my kitchen countertops from damage?
A3: Use cutting boards, trivets, and coasters to protect your countertops from scratches, heat, and stains. Wipe up spills immediately to prevent staining.
Home Renovation Sydney
Home Renovation Hills District Sydney
0 notes
Text
5 Essential Tips for Preventing Mold on Hard Surfaces

Mold isn't just an unpleasant sight; it's a serious concern that can affect your health and damage your home. It thrives in damp, dim, and warm places, silently growing where there's excess moisture in the air or on surfaces that aren't properly dried.
In this blog, we will explore some of the causes of mold growth and how to prevent and remove it.
1. Keep Surfaces Clean and Dry
Mold spores are everywhere, waiting for the right conditions to grow. Regularly cleaning surfaces removes the dust, dirt, and organic matter mold spores need to thrive.
Use non-acidic cleaners to clean tiles and other solid surfaces for effective cleaning. Acids can damage and remove stain-protective seals from grout and porous tiles such as marble, travertine, limestone, slate, and granite. Acid can also etch dull surfaces like marble, travertine, and limestone. There is no need to create a new problem while seeking to address mold and mildew staining. Focus mainly on moisture-rich zones like kitchens and bathrooms.
Equally important is ensuring that these surfaces are kept dry between uses. Mold loves moisture, and even a small amount of water can create an ideal mold environment. Be vigilant in drying any spills or splashes immediately.
After bathing or showering, it’s advisable to dry walls and floors to eradicate surplus water, or at least to squeeze them down if your shower is not drawing out between uses or a change in the family use prevents it from drying out between uses. Something as simple as your teenager now showering after an afternoon practice could alter whether the shower has enough time to dry out between the next family member's use fully. Vigilantly monitor for condensation, notably on windows and in cellars, and swiftly dry these spots to avert mold establishment.
2. Improve Ventilation and Air Circulation
Good ventilation is a powerful tool in preventing mold growth. Ensuring proper airflow can significantly reduce between-use dry time and overall moisture levels, which are critical for mold proliferation.
Bathrooms, kitchens, and laundry rooms are susceptible to mold due to their high humidity levels. Installing or upgrading the CFM (cubic foot per minute) of existing exhaust fans in these areas can help remove moist air, replacing it with drier air from outside or other parts of the building.
In addition to mechanical ventilation, natural methods can also be effective. Open windows and doors when the weather permits fresh air to circulate and disperse moisture. For rooms without windows, consider using a dehumidifier to reduce humidity levels.
Ceiling fans and portable fans can also enhance air circulation, helping to distribute heat evenly and prevent the formation of damp spots where mold can grow.
3. Use Mold-Resistant Products
Incorporating mold-resistant products into your home space is a proactive way to prevent mold growth. These products are specially formulated to resist moisture and inhibit mold development, providing an additional layer of protection in areas prone to mold.
For areas that are frequently exposed to water, such as showers and sinks, consider using mold-resistant sealants. These sealants create a waterproof barrier, preventing water from seeping into cracks and crevices where mold can grow.
In addition to sealants, mold-stain-removing cleaning products are also available. Regularly using these products in high-moisture areas can help keep mold at bay.
4. Monitor Humidity Levels
When the air is saturated with moisture, it creates the perfect breeding ground for mold to proliferate on various surfaces.
One effective way to manage humidity is by using dehumidifiers. These devices remove excess moisture from the air, helping to maintain a balanced indoor climate. Place dehumidifiers in areas that are prone to high humidity, such as basements, laundry rooms, and bathrooms.
In addition to cooling the air, air conditioners help remove moisture, further reducing the likelihood of mold growth. Ensure that your air conditioning system is properly maintained and that the filters are clean to maximize its efficiency in humidity control.
5. Address Water Leaks and Moisture Problems Promptly
Water leaks and unresolved moisture issues are like open invitations for mold to enter and flourish in your home or commercial space. Even a small, slow leak can create a persistently damp environment, providing the perfect conditions for mold to grow and spread.
Regularly inspect your property for signs of leaks, such as water stains on ceilings or walls, musty odors, or visible drips. Pay close attention to areas around pipes, faucets, and appliances like washing machines and dishwashers.
If you find a leak, act quickly to repair it. You may be able to fix minor leaks yourself with the appropriate tools and materials. However, it's advisable to seek professional help for more significant issues.
In addition to fixing leaks, addressing the root causes of moisture problems is essential. For example, if you have condensation on windows, improve ventilation in the room. If your basement is prone to flooding, consider installing a sump pump or improving drainage around your property.
It's a good idea to examine the grout in your shower for cracks periodically. Once moisture enters the grout, it becomes more challenging for it to evaporate. This can lead to problems, especially if water has penetrated behind a tile. If you notice cracks in the grout, especially between walls and floors, this typically indicates there is more movement than the grout can handle. In such cases, you should consider caulking these areas since caulk is better equipped to handle movement. Once you have sealed the crack, the area can dry out naturally.
Professional Help
There are situations when DIY mold prevention and removal efforts might not be sufficient.
RESTORATION PROFESSIONAL
Prevention is always preferred to Mitigation. If in doubt, have a professional review your shower or bathroom with an eye to minor changes that could be made to fix leaks, address cracks, and improve airflow and dry out times.
TILE INSTALLER
If you are more adventurous and open to a remodel, changes in layout can result in enormous improvements in mold reduction. Re-tiling with a tile pattern that runs grout lines directly to the drain can reduce hold-up by grout lines parallel to the drain. Shifting to a bar drain at the end of the shower versus a central circular drain makes this even more effective. Consider a walk-in shower versus a shower with a door if space permits, as this increases airflow and eliminates another soap scum buildup surface on the door. Increase the angle of tilt on the floor to accelerate runoff; a small increase in angle can have a big effect.
MOLD MITIGATION
In cases of extensive mold infestation, health concerns, or if the mold is located in hard-to-reach areas, seeking professional mold removal services is advisable.
Professionals in mold remediation possess the necessary expertise, equipment, and protective gear to safely and effectively remove mold from your property. They can also identify the source of the mold and provide solutions to prevent its recurrence.
When choosing a mold remediation service, look for one with a solid reputation, proper certifications, and positive reviews from previous clients. It's important to get quotes from multiple services and inquire about their process, the chemicals they use, and any guarantees they offer.
Once you've selected a service, you can expect them to conduct a thorough inspection of your property, identify all areas affected by mold, and develop a plan for removal and prevention. The remediation process typically involves containment of the affected area, removal of mold-infested materials, cleaning and disinfecting, and measures to prevent future mold growth.
By enlisting the help of a reputable professional mold remediation service, you can ensure that the mold is removed safely and effectively, protecting the health of your family or employees and the integrity of your property.
#home improvement#home#maintainance tips#cleaning tips#mold and mildew#professional products#mold and mildew remover
0 notes
Text
Choosing the Right Tile Adhesive & Tile Grout: A Comprehensive Guide
When it comes to tiling projects, selecting the right materials is crucial for a durable and aesthetically pleasing finish. Among the most important choices are tile adhesive and tile grout. Understanding their roles and how to choose the best options for your project can make a significant difference in the overall outcome. This guide will explore the essentials of tile adhesive and tile grout, offering tips and insights to help you make informed decisions.

What is Tile Adhesive?
Tile adhesive is a specialized bonding agent used to attach tiles to various surfaces. It acts as a glue that ensures tiles stay in place once they are applied. There are different types of tile adhesives, including thin-set mortar, modified thin-set mortar, and mastic. Each type has its specific use cases, so it’s important to choose the right one based on the tile type and the surface it will be applied to.
Thin-Set Mortar: This is the most common tile adhesive, ideal for most types of ceramic and porcelain tiles. It is mixed with water to create a paste that is spread over the surface where the tiles will be placed.
Modified Thin-Set Mortar: This type includes additional polymers that enhance adhesion, flexibility, and resistance to moisture. It’s suitable for areas with high moisture or where tiles are subjected to movement.
Mastic: This adhesive is pre-mixed and easy to apply. It’s best suited for indoor wall tiles and not recommended for wet areas or floors.
What is Tile Grout?
Tile grout is the material used to fill the gaps between tiles after they have been set. It not only improves the appearance of the tiled surface but also prevents dirt and moisture from penetrating the gaps, which can cause damage over time. There are two main types of tile grout: cement-based and epoxy-based.
Cement-Based Grout: This is the most commonly used grout, available in both sanded and unsanded varieties. Sanded grout is used for larger joints, while unsanded grout is ideal for smaller joints and delicate tiles.
Epoxy-Based Grout: This type is more durable and resistant to stains and moisture. It’s ideal for high-traffic areas and wet environments like bathrooms and kitchens.
Choosing the Right Tile Adhesive & Tile Grout
Consider the Tile Type and Location: The type of tile (ceramic, porcelain, glass, etc.) and its location (floor, wall, wet area) will determine the best adhesive and grout. For example, a flexible adhesive might be necessary for glass tiles, while a waterproof grout is essential for wet areas.
Assess Surface Conditions: The surface where tiles will be applied should be clean, dry, and properly prepared. Certain adhesives and grouts are formulated for specific surfaces, so check the manufacturer’s recommendations.
Think About Application and Maintenance: Some adhesives and grouts are easier to apply and maintain than others. If you’re a DIY enthusiast, you might prefer products that are straightforward and less messy.
Check for Compatibility: Ensure that the adhesive and grout you choose are compatible with each other and with the type of tile you’re using. Compatibility issues can lead to problems like poor adhesion or grout cracking.
Consider Color and Aesthetics: Tile grout comes in a variety of colors, which can complement or contrast with your tiles. Choosing the right color can enhance the overall look of your tiled surface.
Common Questions About Tile Adhesive & Tile Grout
Q1: What is the difference between thin-set mortar and modified thin-set mortar?
A1: Thin-set mortar is a standard adhesive suitable for most tiles, while modified thin-set mortar includes additional polymers that enhance its performance, especially in moist or high-traffic areas.
Q2: Can I use mastic for floor tiles?
A2: Mastic is not recommended for floor tiles or wet areas due to its lower resistance to moisture and movement. Thin-set mortar or modified thin-set mortar is a better choice for these applications.
Q3: How do I choose the right grout color?
A3: Choose a grout color that complements or contrasts with your tiles based on your design preferences. Lighter grout colors can highlight the tile pattern, while darker colors can blend with the tiles.
Q4: Is epoxy grout better than cement-based grout?
A4: Epoxy grout offers superior stain and moisture resistance compared to cement-based grout, making it ideal for high-traffic and wet areas. However, it can be more challenging to apply and more expensive.
Q5: How long should I wait before grouting after applying tile adhesive?
A5: The waiting time can vary based on the adhesive and environmental conditions. Generally, it’s advisable to wait 24 to 48 hours after setting the tiles before grouting to ensure the adhesive is fully cured.
Conclusion
Choosing the right tile adhesive & tile grout is essential for achieving a successful tiling project. By understanding the different types available and considering factors such as tile type, location, and application, you can make informed decisions that will ensure a durable and visually appealing finish. Whether you’re undertaking a DIY project or working with a professional, the right adhesive and grout will make all the difference in your tiled space.
0 notes
Text
Waterproof Vinyl Flooring: The Ideal Choice for Port St. Lucie Homes
When you’re designing or renovating your dream home, the last thing you want to worry about is your flooring. And if you’re looking for durable and low-maintenance options, vinyl flooring can be a great choice. Homeowners appreciate having vinyl flooringin Port St Lucie because it’s waterproof, so it stays in great condition for a long time. Moreover, it can mimic the aesthetics of traditional flooring like wood and natural stone.
Vinyl plank flooring, in particular, is a trendy option if you want to replace old and tired floors to refresh your home’s aesthetic. Just be sure to work with reputable installers to be confident in the longevity and quality of the installation and enjoy high-quality flooring for many years to come.
Versatility
Waterproof vinyl flooringin Port St Lucie is a versatile option for different areas in your home, including:
Your kitchen
Are you remodeling or building a new kitchen? Vinyl flooring is a great choice because it can keep up with the bustling environment and temperatures in that room. Plus, it makes cleaning up after spills easier.
Your bathroom
Waterproof vinyl flooring can enhance your bathroom’s look. A seasoned installer can provide the right finish to ensure safety and comfort.
Your living room and entryways
Flooring is one of the first things guests notice when they enter your house.High-quality vinyl flooring can create a beautiful and inviting space that will impress everyone who walks in, especially when installed by qualified professionals.And if you have kids or pets, you won’t have to worry about accidents staining your flooring as long as you clean up immediately.
The best floor for modern homes
Vinyl flooringsuits many Port St Luciehomes because it’s highly durable and resistant to water damage, stains, and scratches. With proper installation, maintenance, and care, vinyl floors will last many years and guarantee long-lasting functionality and beauty.
Additionally, vinyl flooring comes in many colors, patterns, and styles, meaning you can achieve a custom look that perfectly suits your space. You won’t have to worry about going barefoot because these floors offer a cushioned and comfortable surface underfoot.
Interested in vinyl flooring?
Get a quote for vinyl flooring for your Port St Lucie home from All Star Carpet and Tiles. Explore their selection and let their friendly team take care of the installation with their expert services. Call (772) 323-0188.
0 notes
Text
Luxury vinyl flooring has surged in popularity over recent years, thanks to its durability, affordability, and aesthetic versatility. Among the various types of vinyl flooring, Stone Plastic Composite (SPC) flooring stands out due to its remarkable resilience and stability.
What is SPC Flooring?
SPC flooring, or Stone Plastic Composite flooring, is a type of rigid core luxury vinyl flooring. It consists of several layers. The topmost layer is the wear layer, which provides resistance to scratches and stains. Below this is the vinyl layer, which adds the design element, with various patterns and colors that mimic natural materials like wood or stone.
The SPC core, made from a blend of limestone and stabilizers, is incredibly durable and stable, resistant to dents and expansion or contraction. Some SPC flooring also comes with a pre-attached underlayment, enhancing sound absorption and providing additional comfort underfoot.
Benefits of SPC Flooring
SPC flooring offers numerous benefits, making it a preferred choice for many homeowners and businesses. One of its standout features is its waterproof nature, making it ideal for areas prone to moisture, such as kitchens, bathrooms, and basements. Additionally, SPC flooring is highly durable, resisting impact, scratches, and wear, which makes it suitable for high-traffic areas.
Maintenance is straightforward, requiring only regular sweeping and occasional mopping. Furthermore, SPC flooring comes in a wide variety of designs, mimicking wood, stone, and tile, thus offering aesthetic versatility. Lastly, it provides a comfortable underfoot feel, especially with the attached underlayment.
Preparation for Installation
Proper preparation is crucial for a successful SPC flooring installation. Start by gathering the necessary tools and materials, including SPC flooring planks, spacers, measuring tape, a utility knife or laminate cutter, a straight edge or ruler, a rubber mallet, a pull bar, a tapping block, underlayment (if not pre-attached), and cleaning supplies. Allow the flooring to acclimate to the room's temperature and humidity by laying the unopened boxes flat in the room where they will be installed for at least 48 hours. This helps prevent expansion or contraction after installation.
Read more
0 notes
Text
Enhance Your Home's Protection with Professional House Caulking Services
Sealing the gaps between different building materials in a house is known as house caulking services in Melbourne, and it may enhance the living environment in a number of ways. Being able to relax and de-stress in a more natural environment is made possible by having a house free of mould growth, dampness, and other related issues. Caulking has several uses, such as keeping the house looking tidy, stopping water from leaking out of bathrooms, and reducing the loss of conditioned air.

Providers of Caulking Services Are Adaptable and Provide Many Services
Tile re grouting services is very important as it keeps the tiles neat and clean and also keep the bathroom of the house neat and clean.Sealing the grout after regrouting is very important part of the process as it makes the bathroom watertight.
Similar to caulking, waterproofing the house is essential to maintaining the structure, especially in moist areas. Professionals with a Certificate III in construction waterproofing are qualified to provide re grouting services in Melbourne and can complete the job appropriately. Because the grout absorbs a lot of water and dirt, it becomes discoloured with filth more quickly, giving the house an awful appearance.
The durability of a tiled floor depends on the grout between the tiles;thus it must be refilled often. Only experts possess the equipment and know-how necessary to remove stains from grout and reapply it. Because it retains the tiles in place and completes the process with the application of sealant, regrouting is the ideal choice when the flooring is damaged or the stain cannot be removed. Sealing the grout is the best course of action since it prevents germs and fungus from growing there and prevents mould.
Pressure washing services may be used to remove dust and dirt from surfaces such as patios, decks, driveways, and other exterior hardscapes. The best thing about utilising a pressure washer to remove filth and debris is that it eliminates the need for scrape and strain methods.
Whether it's gutter installation, basement waterproofing, or caulking repair, the work should be done carefully. Time is of the essence when it comes to waterproofing and related work, so pick trustworthy contractors, look for references, and engage the finest right away to safeguard the home!
Source: https://waterproofingmelb.blogspot.com/2024/07/enhance-your-homes-protection-with.html
0 notes
Text
Learn the Pros and Cons of Cork Flooring
Cork flooring has gained popularity in recent years as a sustainable and versatile flooring option. It is made from the bark of the cork oak tree, which regenerates after harvesting, making it an environmentally friendly choice. However, like any flooring material, cork has its pros and cons. Let us explore these in detail.
Pros of Cork Flooring.
1. Sustainability
- Eco-Friendly: Cork for cork tiles is a renewable resource. The bark of the cork oak tree is harvested without harming the tree, which then regenerates its bark. This process can be repeated every 9-12 years, making cork a sustainable choice.
2. Comfort and Softness
- Comfort Underfoot: Cork flooring is soft and cushiony, providing a comfortable surface to stand and walk on. Timbermate Teak 2kgs will make it ideal for areas where you spend a lot of time on your feet, such as kitchens.
- Shock Absorbent: Its natural springiness makes it gentle on your joints and reduces fatigue.
3. Thermal Insulation
- Warmth: Cork has excellent thermal properties, helping to maintain a comfortable floor temperature. It provides natural insulation, keeping floors warmer in winter and cooler in summer.
4. Sound Insulation
- Noise Reduction: Cork's cellular structure acts as a natural sound barrier, reducing noise transmission between rooms and floors.
5. Hypoallergenic
- Resistant to Mould and Mildew: Cork is naturally resistant to mould, mildew, and pests, making it a great choice for allergy sufferers.
- Antistatic: It does not attract dust, which helps maintain a cleaner environment.
6. Durability
- Resilience: Cork can recover well from minor impacts and dents due to its elasticity.
- Longevity: With proper care and maintenance, cork flooring can last for decades.
7. Aesthetic Variety
- Design Options: Available in a wide range of colours, patterns, and styles, cork flooring can complement various interior designs, from traditional to contemporary.
Cons of Cork Flooring.
1. Susceptibility to Damage
- Scratches and Dents: Cork can be easily scratched or dented by heavy furniture or sharp objects. High heels and pet claws can cause noticeable damage.
- UV Sensitivity: Prolonged exposure to sunlight can cause cork flooring to fade or discolor over time.
2. Moisture Sensitivity
- Water Damage: While cork is naturally water-resistant, it is not waterproof. Excessive moisture can lead to swelling, warping, or mold growth. Therefore, it is not ideal for areas prone to high moisture, such as bathrooms or basements, unless properly sealed.
3. Maintenance
- Regular Maintenance: Cork floors require regular maintenance, including sweeping or vacuuming to remove dirt and grit that can cause scratches. They also need periodic sealing to protect against moisture and wear.
- Special Cleaning Products: Using the wrong cleaning products can damage the floor. It's important to use pH-neutral, non-abrasive cleaners specifically designed for cork flooring.
4. Installation Challenges
- Professional Installation Recommended: While some cork flooring products are available as DIY options, professional installation is often recommended to ensure proper fitting and sealing, which can add to the overall cost.
- Subfloor Preparation: The subfloor needs to be smooth and dry, as imperfections can telegraph through the cork tiles or planks.
5. Cost
- Higher Initial Cost: Cork flooring can be more expensive than other flooring options like vinyl or laminate. However, its durability and longevity can offset the initial investment over time.
6. Expansion and Contraction
- Temperature Sensitivity: Cork can expand and contract with changes in temperature and humidity, which can lead to gaps or buckling if not properly acclimated before installation.
Cork flooring offers a unique combination of sustainability, comfort, and aesthetic appeal, making it an attractive option for many homeowners. Its eco-friendly nature and insulating properties make it a popular choice for those seeking both comfort and environmental responsibility. However, it also comes with certain drawbacks, including susceptibility to damage, moisture sensitivity, and the need for regular maintenance.
Before deciding on cork flooring, it is important to weigh these pros and cons in the context of your specific needs and environment. If you prioritize sustainability, comfort, and noise reduction, and are willing to invest in proper care and maintenance, cork flooring could be an excellent choice for your home. However, if you need a flooring option that can withstand heavy wear and moisture without frequent upkeep, you might want to consider other alternatives.
0 notes