
Don't wanna be here? Send us removal request.
Statistics
We looked inside some of the posts by tanmaygamesartdesign and here's what we found interesting.
Average Info
Notes Per Post
0
Likes Per Post
0
Reblog Per Post
0
Reply Per Post
0
Time Between Posts
19 hours
Number of Posts By Type
Text
17
Last Seen Tumblr Blogs


Fun Fact
Tumblr has 16.74 million mobile monthly users in the US.
Text
Tanmay - Interdisciplinary Project Research
Idea:
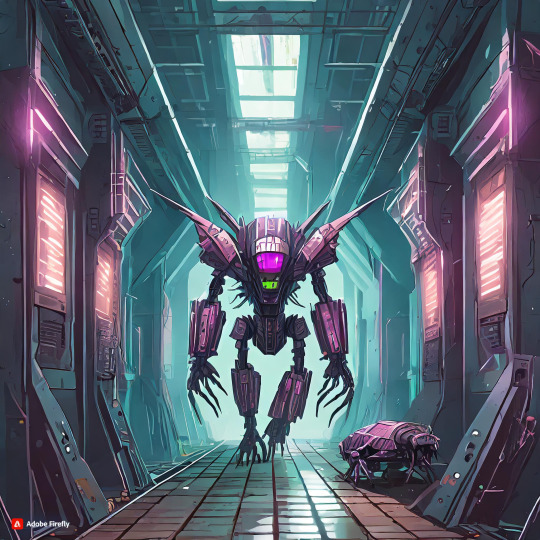
Title: Overview of CyberRain VR: The Rollercoaster Portal Experience
CyberRain VR is an exhilarating rollercoaster portal experience that seamlessly combines the cyberpunk atmosphere of high technology and neon lighting with the rainforest's natural beauty. The journey starts in a corridor with a cyberpunk theme and ends in the middle of a lush rainforest. There are unexpected twists and turns and a jump scare to keep players on their toes.
youtube
Key Scenes:
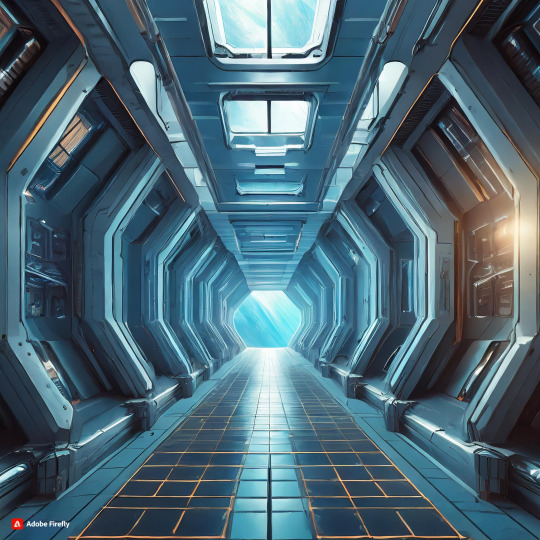
Corridor of Cyberpunk:
The ride begins in a sleek cyberpunk corridor with a futuristic cityscape, holographic billboards, and neon lights. To create a striking visual environment, incorporate dynamic lighting effects like reflections and blinking neon signs.
Change at the Portal:
The rollercoaster approaches a portal resembling a wooden door as it accelerates. The change between the cyberpunk passage and the rainforest is consistent, accentuating the differentiation between the fake and regular universes.

Waterfall in the forest:
The rollercoaster arises in a lively rainforest, complete with thick foliage, fascinating untamed life, and the mitigating hints of nature. The rollercoaster expertly navigates the twists and turns alongside the majestic waterfall, which becomes the main attraction.
youtube
Abyss Underwater:
Following the stream, the rollercoaster ventures out into the water, drenching the crowd in murkiness. Progressively strengthen the haziness to make tension as the liner adventures further into a submerged void.
youtube
Cyberpunk Bounce Scare:
A sudden flash of neon lights reveals a cyberpunk-style shark emerging from the shadows in the darkness. For a well-executed jump scare, accompany the appearance with a jarring audio cue and a surge of adrenaline.

Utilization of Jump Scares in the Cyberpunk Setting:
Utilize unforeseen holographic errors or abrupt framework breakdowns in the cyberpunk passageway to make an uncomfortable climate. Before the jump scare, build tension by introducing shadowy figures or fleeting glimpses of cyberpunk entities that vanish upon closer inspection. Use vivid 3D sound to improve the leap alarm, causing it to feel as though the cyberpunk shark is genuinely present in the virtual space.
Method of the Portal:
The wooden door-inspired portal creates a compelling visual transition and serves as a thematic link between the two distinct environments.
CyberRain VR means to convey a heartbeat-beating experience via flawlessly consolidating cyberpunk style with the quietness of rainforest, making a rollercoaster ride loaded up with shocks, tension, and extraordinary minutes.
References
www.youtube.com. (n.d.). Minecraft, but it’s a Portal Parkour Music Sync. [online] Available at: https://youtu.be/Isjp7pN67V4?si=gHGgknCqcKG2jiKq&t=23 [Accessed 27Jan. 2024].
www.youtube.com. (n.d.). We explored KUMBHE WATERFALL like NO ONE BEFORE | Kumbhe waterfall Information |. [online] Available at: https://youtu.be/nyA3teAJkK0?si=8bzoJDI-xZk86tHk&t=27 [Accessed 28 Jan. 2024].
www.youtube.com. (n.d.). Fascinating 3D Journey to the Ocean Depths. [online] Available at: https://youtu.be/-j4eTCk5XJU?si=uN8qaBYQfP-qBFFi&t=127 [Accessed 31 Jan. 2024].
0 notes
Text
Practice 1_ Weekly Projects
Places of Mind
Blog 2
Blockout and Beginning Demonstrating: With careful blockout in Blender, the arch in the "Spots of Psyche" scene got its start. During this underlying stage, the arch's essential extents and outline were laid out to guarantee that it matched the arranged advanced scene consistently. The blockout stage went probably as the focal graph, clearing a path for coming about layers of complex organizing.
Refinement and Listing: Developing the blockout, the accompanying stage incorporated the cautious course of refining and organizing the curve. From expels to slopes, Blender's adaptable toolset considered the chiseling of intricate primary parts. Each piece of the curve was meticulously made, giving legitimate regard to the numerical class saw in authentic accomplices. Special attention loosened up to the place of bolts, the curve of connections, and the specific plan of basic parts, ensuring a reasonable depiction inside the electronic space.
Substance Painter: Revitalizing the Curve: Changing from Blender to Substance Painter meant a weighty stage in the creative trip. The opened up model of the curve immaculately found its heading into Substance Painter's association point. The completing framework incorporated a symphony of layers, each adding to the visual abundance of the curve. Splendid materials reenacted getting through influences, procedural surfaces added significance, and hand-painted nuances updated the realness of the high level form. Substance Painter's constant info considered second changes, ensuring that the curve's surface resonated with the envisioned significant tone of "Spots of Mind. " Delivering the Substance Painter: Substance Painter stepped in as the finishing material and set the stage for delivering the final results. Using the in-built conveying engine, I changed lighting limits, investigated various roads in regards to camera focuses, and changed biological settings to redesign the special visualization. The conveyed pictures became sneak peaks of the curve's encapsulation, frozen in time inside the electronic depiction of "Spots of Cerebrum."

0 notes
Text
Practice 1_ weekly Project
Places of Mind
Blog 1
Pylon as a Network Image: The craving to convey a feeling of greatness and network drove the choice to remember an pylon for the scene. Curves, with their rising above presence and bewildering association of connections, have a significant resonation that connects past their utilitarian explanation. As a similitude for the interconnectedness of thoughts inside the tremendous region of the brain, they stand as quiet sentinels, interfacing scattered areas and working with the progression of energy.
Inspiration from Metropolitan and Present day Scenes: The classy appeal of curves is deeply grounded in the metropolitan and current scenes that regularly sneak past everybody's notification in our everyday schedules. The unmistakable greatness of pylon against the material of a nightfall or the complex numerical models made by their connections against an obscure sky began an interest with their visual potential. Drawing inspiration from certifiable scenes, the curve emerged as a persuading part that could infuse "Spots of Mind" with a sensation of both shared characteristic and reflection. Moving Up close and personal Resonation: Arches summon different feelings notwithstanding their pragmatic reason. A sense of greatness and consideration is evoked by the transcendent structures against the changing sky. In "Spots of Cerebrum," the curve ends up being some different option from a part in the scene; It transforms into a conduit for emotions, a hushed character in the narrative, and a stimulus for contemplation. The trading of light and shadow on the curve's metallic surface adds a strong layer to the significant resonation inside the electronic space.


0 notes
Text
Practice 1_ Weekly projects
Nostalgia and memory
Blog2
Step 1: Reference Get-together The excursion started with an inundation into the universe of PlayStation 1 wistfulness. Scouring through different pictures, diagrams, and online assets, I carefully accumulated references to catch the unmistakable elements, extents, and subtleties of the notorious gaming console. The foundation for a faithful recreation that sought to honor the classic design was laid in this initial phase.
Step 2: Blender - Demonstrating the Copy Furnished with a thorough arrangement of references, the following stage included reviving the computerized domain inside Blender. Beginning with essential mathematical shapes, I fastidiously molded and expelled vertices, edges, and faces to make the particular forms of the PS1. Meticulousness was central, as I pointed for a shallow copy as well as a model that typified the embodiment of the first plan.
From the precision of the Boolean modifier to the extrusion and beveling of edges, Blender's versatile toolset made it possible to recreate intricate details like the CD drive, controller ports, and memory card slots. Iterative changes and steady reference correlations guaranteed an elevated degree of exactness all through the displaying system.
Step 3: Opening up and Sending out With the hard surface model total, the center moved to opening up the UVs, a critical stage prior to finishing. Blender's UV planning devices worked with the production of a coordinated and effective UV design. I exported the model after it was unwrapped to ensure a smooth transition into Substance Painter's texturing process.
Step 4: Substance Painter - Adding Life to the Model Progressing into Substance Painter denoted a groundbreaking stage in the venture. Outfitted with the opened up model, I brought it into Substance Painter and started the course of fastidiously applying surfaces. The objective was not only to recreate the PS1's visual aesthetics but also to give it life online.
The layer-based workflow of Substance Painter made it possible to create intricate textures, such as the distinct grain of the plastic casing or the subtle wear and tear on buttons and ports. Using a mix of brilliant materials, procedural surfaces, and hand-painted subtleties, I meant to catch the material and visual subtleties of the exemplary PlayStation 1.
Step 5: Cycle and Refinement As the finishing system unfurled, steady emphasis and refinement became fundamental. Substance Painter's ongoing delivering capacities gave moment criticism, permitting me to calibrate subtleties, change material properties, and improve the by and large visual loyalty. This iterative process ensured that the final textured model reflected the original PlayStation 1's nostalgic spirit.

0 notes
Text
Practice 1_Weekly Projects
Nostalgia and memory
Blog 1
The Charm of PS1 Sentimentality: Experiencing childhood in the period of the PlayStation 1, the particular stylish of pixelated designs, restricted surfaces, and the natural appeal of low-poly models made a permanent imprint on my gaming sensibilities. The possibility of reproducing this one of a kind allure in a contemporary setting enamored me, igniting the beginning of my PS1 hard surface displaying project.
ArtStation as a Well of Motivation: ArtStation arose as an important asset as I continued looking for motivation. Perusing the stage, I coincidentally found an abundance of works of art that epitomized the quintessence of PS1-period plan. "Retro Gaming Console," a work by an artist whose creativity echoed the spirit of classic gaming consoles, was one that deeply resonated.
ArtStation's citations: The reference piece on ArtStation filled in as a directing light, offering bits of knowledge into the nuanced components that characterized the PS1 stylish. The purposeful utilization of rakish math, restricted variety ranges, and the careful amusement of exemplary gaming peripherals powered my inventive vision. This reference turned into a standard for understanding how to offset wistfulness with current hard surface displaying procedures.
Embracing Low-Poly Difficulties: I embraced the technical limitations of the PS1 era as challenges rather than obstacles because of their allure. ArtStation references gave a guide to successfully using low-poly builds up to catch the embodiment of a past time. The conscious rearrangements of subtleties and the essential utilization of surfaces became key components in my way to deal with hard surface demonstrating.
Converting Inspiration into Work: Outfitted with motivation from ArtStation, I set out on the functional part of my undertaking. Utilizing PS1-enlivened references, I started creating low-poly models that repeated the effortlessness of that period. The plan of the control center, regulators, and, surprisingly, fringe components like memory cards were carefully etched to reverberate with the pixelated sentimentality I looked to reproduce.


0 notes
Text
Practice 1_weekly Projects
80.lv Assignment
blog 2
Setting out on a 3D arrangement project, particularly one spun around the utilization of stickers in Substance Painter, requires a wellspring of inspiration to fuel the imaginative stream. In this academic blog, we unravel the captivating journey of inspiration drawn from references tracked down on ArtStation, unequivocally researching the successful work displayed in a piece named "Present day Zone" (https://www.artstation.com/craftsmanship/b5Kx9m).
The Secret of the ArtStation The thriving online community for designers and artists known as ArtStation is a virtual treasure trove of concepts. My investigation into the capabilities of stickers in Substance Painter converged on the "Modern Zone" project, which was created by a skilled stage craftsman.
Researching Elegant Choices The allure of "Present day Zone" lies in its demanding conscientiousness and the skilled blend of various parts. The craftsman brilliantly investigates the balance between creative expression and authenticity by spray painting loaded structures and endured surfaces. The play of light and shadow, the outer layer of materials, and the fundamental circumstance of decals and stickers make an apparently persuading story.
The Impact on the Imaginative stream Drawing inspiration from "modern Zone," I wound up obliged to copy the nuanced approach found in the reference piece. The cutting edge elegant, put aside by a grimy and lived-in environment, transformed into a basic belief for my own endeavor. The reference piece laid the basis for where I needed to head down, as did the determination of varieties, the range of stickers, and the general state of mind it conveyed.
Embracing Development The reference piece laid the basis for the task, however it likewise ignited novel thoughts. As a powerful tool, Substance Painter encouraged me to reconsider and rethink components from the reference within the context of my own project. The goal was not replication but rather a talk with the inspiration, taking into account the implantation of individual creative mind into the inventive cycle.
Conquering any issues Among Reference and Creation As I investigated the Substance Painter interface, the reference piece went probably as a coordinating aide, controlling me through the nuanced decisions drew in with material application, sticker position, and the overall completing cycle. As a consistent reference, it guaranteed that my task held the embodiment of the first work's reverberation with me.

0 notes
Text
Practice 1_Weekly Projects
80.lv assignment
Blog 1
Adding stickers to textures in Substance Painter is a powerful way to enhance the realism and detail of your 3D models. In this comprehensive guide, we'll walk through the process of seamlessly incorporating stickers onto textures using Substance Painter and subsequently exporting the textured model to Unreal Engine. Whether you're a seasoned artist or a beginner, this step-by-step tutorial will empower you to elevate your creations to new heights.
Step 1: Importing Your 3D Model into Substance Painter Open Substance Painter and create a new project. Import your 3D model into Substance Painter. Ensure that your model is UV-mapped to facilitate proper sticker placement. Step 2: Applying Base Materials Select the desired materials for your model's base layers. Apply them to the respective channels (Base Color, Roughness, Normal, etc.) in Substance Painter. Step 3: Creating a New Fill Layer for Stickers Add a new fill layer for your stickers by clicking on the "Add Fill Layer" button. In the Layers menu, rename the fill layer to "Stickers" for organization. Step 4: Importing Sticker Resources In Substance Painter, navigate to the "Layers" shelf. Click on the "Add a New Resource" button and choose "Import Resources." Select the sticker images or textures you want to use and import them into your project. Step 5: Placing Stickers on the Model In the "Stickers" fill layer, click on the "Add a Mask" button. Choose "Bitmap Mask" and select the sticker texture you imported. Adjust the mask settings to control the placement, rotation, and scale of the stickers on your model. Step 6: Customizing Sticker Appearance Fine-tune the appearance of your stickers using the various adjustment options in the "Stickers" fill layer. Utilize parameters like color adjustment, wear, and roughness to integrate the stickers realistically into the base material. Step 7: Exporting Textures for Unreal Engine Once satisfied with the sticker placement, go to "File" and select "Export Textures." Choose the desired configuration for Unreal Engine, such as Metallic/Roughness or Specular/Gloss. Click "Export" to generate the texture maps. Step 8: Importing Textures into Unreal Engine Open Unreal Engine and create a new project or use an existing one. Import your model and the exported texture maps. Apply the materials to your model, ensuring the sticker details are visible. Step 9: Fine-Tuning in Unreal Engine In the Unreal Engine Material Editor, adjust material settings like roughness, metallic, and normal maps to achieve the desired look. Utilize the UV mapping to control sticker placement and orientation on your model. Step 10: Preview and Refine Place your model in the scene and preview the stickers in different lighting conditions. Make any necessary adjustments in Substance Painter or Unreal Engine to achieve the desired visual result.

0 notes
Text
Practice 1_Weekly Projects
Lights and shadows
blog 2
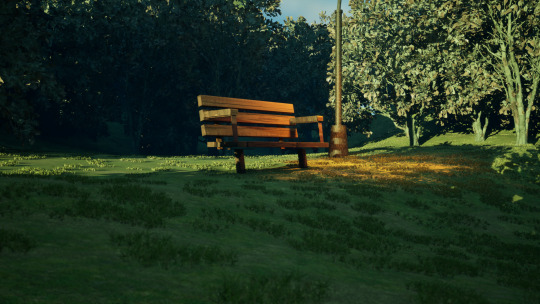
The excursion to succeed at lighting and shadows in virtual circumstances happen as we investigate the versatile way from Blender to Unreal engine. This blog delves into the creative process of creating a wooden seat and light in Blender, setting up the lighting, trading resources, and finally the magic of scene creation in unreal engine 5.
Showing in Blender: The preparation of our cycle lies in the cautious showing of the wooden seat and light in Blender. Drawing inspiration from the ideal environment, the wooden seat happened as expected with organized mindfulness in regards to construction, surface, and scale. A critical part of our lighting story, the light arisen as an effortless design, prepared to enlighten the computerized world.
Extraordinary Engine Lighting Course of action: Our examination arrived at a significant defining moment when we changed from Blender to Unreal engine. With assets illustrated, the Unreal engine lighting game plan transformed into the material for laying out cools. The engine's robust devices considered where the moving lights were, highlighting the movement of light and shadow to produce the best profound response.
Directional Lighting: The directional light source was meticulously arranged to reproduce sunlight, making long concealed regions and describing the general perspective of the scene.
Point Lights for State of mind: Definitively situated point lights overhauled express areas, adding warmth to the wooden seat and making pockets of lighting up around the light.
Spotlights for Focus: The bright lights turned into the craftsman's brush, carrying concentration to significant subtleties. For this present circumstance, the light turned into the mind-boggling center, projecting a sensitive sparkle that supplemented its presence.
Conveying to FBX and Wrapping up with Substance 3D Painter: The excursion proceeded when the painstakingly created resources were sent out from Blender to the FBX design, prepared for the resulting upgrade stage. Substance 3D Painter transformed into the reach for adding puzzling surfaces to our wooden seat and light.
Wooden Seat Surface: The wooden seat sought a surface treatment that got the nuances of grain, persevering, and blemishes. This layer of detail intended to raise the credibility of the environment.
Light Edification Arranging: The light's brightening maps were made simpler by Substance 3D Painter. Arranging the districts that communicate light ensured that our virtual light would project a convincing sparkle in Dazzling Engine.
Mind boggling Engine Scene Creation and Quixel Megascans Compromise: The stage was set for the creation of scenes as soon as one entered the realm of unreal engine 5. The wooden seat and light found their places, yet the scene required more. The resources of Quixel Megascans became an integral factor, bringing certifiable components into our created climate that functioned admirably together.
Megascans for Legitimacy: Adding Megascans assets like foliage and ground surfaces raised the scene's realness, conveying a sprinkle of nature to our electronic environment.
Lighting Refinement: The Megascans assets affected the lighting components, with the materials answering really to unreal engine lighting conditions. This iterative communication ensured a friendly blend of virtual and genuine parts.
Conveying the Scene: The brilliant finale spread out as the scene was edified, got done, and populated with assets. unreal Engine's conveying limits got the essence of our painstakingly established environment, showing the exchange of shadows and light in a dynamic, obviously stunning association.


0 notes
Text
Practice 1_ Development Project
Lighting and Shadow
Blog 1
In the domain of virtual conditions, the transaction of lighting and shadows assumes a crucial part in forming the environment, state of mind, and narrating capability of a scene. The inspiration behind the investigation of lighting and shadows within the dynamic canvas of Unreal Engine is the subject of this academic blog. The choice to unwind the complexities of this pivotal part of computerized creativity was energized by a longing to lift visual stories, bring out feelings, and at last, make vivid encounters for the crowd.
Cinematic Ambitions: The motivation for diving into lighting and shadows inside Unreal engine rose up out of a realistic vision - a longing to change static scenes into dynamic stories that unfurl under the nuanced impact of light. The spark to replicate the enchantment of real-world lighting in the virtual world was provided by cinematography, which had a significant impact on storytelling in both film and animation. The possibility of utilizing Unreal engine high level lighting devices to create scenes that impersonate the true to life experience energized the excursion.
Close to home Reverberation through Lighting: Understanding the profound reverberation that lighting bestows to a scene turned into a main impetus. Different lighting arrangements, from the warm shine of a nightfall to the cool obviousness of twilight, have the ability to bring out unambiguous feelings and submerge the crowd in a story. The motivation was drawn from the acknowledgment that, likened to a cinematographer's brushstrokes, painstakingly positioned lights and shadows in Unreal engine could be tackled to make close to home scenes that reverberate with the watcher.
Realistic and Ambient Architecture: The world-building capacities of Stunning Motor, particularly in compositional perception, added one more layer of motivation. The engine's ability to simulate realistic lighting, such as the interaction of sunlight filtering through windows or the ambient glow of artificial lights in a cityscape, sparked an interest in figuring out how these elements could be used to improve architectural scenes' visual appeal and realism. The objective was to reproduce conditions as well as airs that felt genuine and lived-in.
Dynamic Narrating through Shadows: The narrating capability of shadows turned into a point of convergence of motivation. Shadows, dynamic and consistently changing, can cover and uncover, adding layers of secret and interest to a story. The choice to investigate the creating and control of shaded areas inside Unbelievable Motor emerged from the craving to wind around powerful stories where shadows become quiet storytellers, directing the crowd through visual accounts loaded up with tension, show, and disclosure.
0 notes
Text
Practice 1_ weekly Projects
3d printing
blog 2
The excursion of reestablishing Anubis in the modernized space started with the drawing structure in ZBrush, a strong significant level scratching device known for its convoluted getting sorted out limits. ZBrush turned into the device I used to carefully make the canine headed god, regarding customary portrayals while consolidating some contemporary energy. The nuanced depiction of Anubis, which got both the brilliant and powerful pieces of this old Egyptian god, was made possible by each ZBrush stroke and shape.
Conveying to FBX and Base Displaying in Blender: Following the satisfaction of the carving system in ZBrush, the resulting stage included conveying the model as a FBX record for additional refinement in Blender. Blender, a flexible 3D animation software, provided the foundation for Anubis, ensuring stability and support for the model's staggering details. Making the stage on which Anubis would stand was a perceptive decision, adding an additional layer of imagery to the general creation.
Troubles and Decisive reasoning: While the inventive excursion was fulfilling, it was not without its difficulties. There was a learning curve when incorporating new software into the workflow, particularly ZBrush. Exploring through the scope of instruments and functionalities guessed that assurance and a confirmation ought to making sense of the thing's complexities. Carving, trading, and progressing among ZBrush and Blender referenced a hold of the captivating work patterns of every single application.
During the item cycle, comparability issues also arose. Guaranteeing that the cut subtleties dependably different over into Blender without episode or reshaping tended to a test. To accomplish critical advancement between the two programming stages, iterative changes were made to the scaling factors, UV guides, and item settings.
Texturing and Counting: Consolidating surface helpers and refining the better subtleties in both ZBrush and Blender passed Anubis on to a more huge level. The test here lay in changing the realness of the jackal head with the mind boggling decisions that would improve the general creation. Continuous refinement and a variety of cycles were necessary to achieve the neighborly combination of actual precision and creative understanding.

0 notes
Text
Practice 1_ Weekly Projects
3d Printing
Blog 1
Leaving on a 3D printing project is a journey that beginnings with inspiration, a principal stimulus that shapes the story and classy of the creation. My decision to create a 3D-printed model of the ancient Egyptian god Anubis and the reasons behind the creation of a character scene that is steeped in mythology and cultural diversity are the subjects of this academic blog.
Folklore and Social Importance: The old woven artwork of Egyptian folklore fills in as the motivation for this undertaking. In ancient Egyptian belief systems, Anubis, the divine force of death and life after death, played a significant role. His canine head, which is habitually portrayed with a jackal or canine like head, passes a feeling of secret and protectorship on over eternity. My creative mind was captivated by the rich imagery associated with Anubis as a guide for the great beyond, which inspired a desire to bring this legendary element into the present day through 3D printing.
Imaginative Articulation and Enumerating: Anubis, as an innovative subject, acquainted a fascinating test with explore muddled determining and actual precision. The clever jungle gym of perplexing chiseling and computerized itemizing was created by juxtaposing the canine head with a human-like physical appearance. The endeavor presented a potential opportunity to convey the combination of animal and human characteristics, capturing the essence of Anubis as a celestial being with remarkable visual characteristics.
Mix of Innovation and Custom: The choice of Anubis for the 3D printing project was an insightful work to defeat any hindrance between old custom and present day development. I needed to give this notorious divinity new life through computerized model and 3D printing, protecting its social importance in a cutting edge structure. This mix of custom and development is a celebration of the enduring through congruity of old stories in our painstakingly resolved world.
Investigation of Stylish Potential outcomes: The canine-headed figure of Anubis presented a persuading sleek test that controlled my imaginative examination. The venture's stylish profundity was improved by the jackal's head's shadows and features, magnificent stance, and imagery in regards to the god's part in directing spirits through existence in the wake of death. To make a visual story that gives proper respect to the iconography of old Egypt, each etched detail turned into a brushstroke.

0 notes
Text
Practice 1_ Weekly projects
Red vs blue
blog 3
The activity interaction itself brought its own set of challenges, particularly keyframing and timing. Ensuring smooth changes and accurate keying required tirelessness and a concentrated cognizance of the vivacity schedule. This time of the endeavor featured the meaning of cautious readiness and trustworthiness in the energy work process.
Flickering Lights for Atmosphere Consolidating gleaming lights to upgrade the unpleasant climate of the scene ended up being an illuminating test. Adjusting the power, recurrence, and variety temperature of these lights required iterative changes. Defeating this challenge contributed fundamentally to the by and large climatic effect of the spooky parking area
0 notes
Text
Practice 1_ Weekly Project
Red vs Blue
Blog 2
The fundamental development toward restoring the dreadful stopping structure was the mindful making of resources in Blender. Drawing motivation from the startling feel I imagined, I made help centers, a lift, cooling vents, doorways, pipes, and a dreadful figure. Each asset was displayed with careful consideration to ensure legitimacy and the moderate elegance I wanted.
The assistance centers, with their traversed surface, remained as quiet sentinels in the stopping structure. With the addition of bright lights, the lift became a major focus point. The climate's visual complexity was effectively enhanced by entryways and lines, and strategically placed cooling vents added a hint of metropolitan authenticity. The ghost, a shadowy substance of the mysterious, was plainly noticeable, bringing out an ethereal presence.
Getting done and Lighting: After the materials were molded, the subsequent stage was to apply moderate surfaces to keep an ideal and firm style. To convey the spooky climate without overwhelming the scene, I decided to use got through surfaces and simple assortment assortments. The cautious participation of red and blue tones besides supported the successful partition.
The lighting configuration was essential in fanning out the unpleasant perspective. A remarkable environment was made by decisively positioned spotlights, gleaming lights over the lift, support focuses that were just faintly enlightened, and the lights. The presence of cloudiness added a layer of secret, projecting a ridiculous shroud over the scene.
Camera Plan and Consistent with life Conveying: After the resources were finished and lit, I carefully set up a camera to catch the spooky parking garage according to a powerful viewpoint. The camera's headway was painstakingly coordinated to reliably zoom towards the lift, hoisting the strain as the unpleasant figure climbed out of the shadows.
Blender's strong improvement limits permitted me to convey a predictable with life movement that spread out dependably. A visual story was made by the camera's turn of events, air lighting, and tormented surfaces, all of which invited watchers into the ethereal stopping region.
The Artistic Video's Delivering:
Conveying the creative video was the last step. Blender's conveying engine guaranteed that each edge got the nuanced association of light and shadow, while the carefully picked camera centers conveyed a vibe of strain and revelation. The outcome was a creepy video that sent watchers through the moderate at this point fascinating tormented stopping structure.

0 notes
Text
Practice 1_ Weekly Projects
Red vs blue
Blog 1
The challenge at the beginning of the course, to capture the essence of the age-old rivalry between red and blue within a hauntingly atmospheric art scene, sparked creativity in me as an art and design enthusiast. The outcome? A spooky parking area that complicatedly winds around the topical polarity of red and blue into an outwardly suggestive story. In this scholarly blog, I dive into the motivations that energized the making of this confounding scene.
Psychological Effect: The mental effect of varieties assumed a urgent part in my choice. The instinctive idea of red gets compelling close to home reactions, going from fervor to misgiving, while blue oozes a quieting and strange emanation. I aimed to intensify the immersive experience of the haunted parking lot by strategically incorporating these colors to elicit a range of emotions in the viewer.
Film and Workmanship References: My choice of a haunted parking lot was influenced by numerous artistic and filmic references. Exemplary film noir style, with their juxtaposition of profound shadows and serious tones, impacted the general state of mind. My exploration of the eerie atmosphere in the parking lot was influenced by the well-known use of red and blue lighting in movies like "Blade Runner" and "Suspiria." These films served as visual references for my investigation.
Contrasts in Metropolitan Spaces: The polarity of red and blue likewise finds reverberation in metropolitan scenes, particularly in parking garages. The unforgiving, frequently red, lighting that pervades these spaces around evening time makes a frightful environment. The differentiation between the warm gleam of red security lights and the cool, barren blue of evening glow filled in as a certifiable motivation, educating the visual language regarding the spooky scene.

0 notes
Text
Practice 1_ Development project 2
Places of mind
Rendering and Cinematic Presentation:
As the desert spring lolled in the shine of Unreal Engine 5's delivering abilities, the following period of my imaginative excursion unfurled. I set out on catching the quintessence of the climate according to assorted points of view, delivering pictures that displayed its magnificence from each point.
Using Unreal Engine 5's hearty camera frameworks, I situated virtual cameras decisively to catch clearing vistas of the passage, many-sided subtleties of the pathway, and the loftiness of the pyramid. A testament to the depth and richness of my digital oasis, each rendered image was a carefully selected snapshot.
The true to life capability of the scene called, inciting me to mesh these delivered pictures into a convincing story. Directed by the developing lighting conditions and the vivid subtleties of the climate, I organized a realistic video grouping that welcomed watchers to navigate the desert scene. The Unreal Engine 5's realistic instruments took into consideration smooth changes between various perspectives, making an enthralling visual excursion through the computerized desert garden.
Adobe Premiere Pro Editing: Changing from Unreal Engine 5 to Adobe Premier pro, I started the most common way of altering the artistic arrangement. The narrative's seamless flow was made possible by each frame, transition, and carefully selected angle.
Adobe Premiere Pro's instinctive point of interaction engaged me to shape a realistic encounter that rose above the simple grandstand of 3D resources. It turned into a narrating medium, permitting me to direct the crowd through the hypnotizing embroidery of the desert climate, catching its subtleties in a dynamic and connecting with design.


0 notes
Text
Practice 1_ Development Project
Places of mind
blog 3
Scaling and Degree Challenges: One of the hidden deterrents emerged in Blender, where definitively scaling and proportioning the colossal doorway, bewildering pathway, and staggering pyramid turned out to be a nuanced task. Discovering some sort of congruity among validness and inventive distortion required cautious changes and a sharp eye for detail. Predictable changes and gatherings with individual experts expected a fundamental part in overcoming this test.
Surface Arranging Multifaceted design: The advancement from 3D showing in Blender to completing in Substance 3D Painter presented its own game plan of troubles. The intricacies of arranging surfaces onto unusual surfaces, especially on the persevered through stones of the pyramid, mentioned a mindful concordance among consistency and legitimacy. To achieve a lasting and publicly engaging result, trial and error with various planning procedures and constant cycles was essential.
Compromise of Quixel Megascans Assets: While Quixel Megascans massively progressed the scene, organizing these brilliant assets into Scaling and Extent Difficulties: One of the underlying obstacles arose in Blender, where precisely scaling and proportioning the monstrous entryway, perplexing pathway, and terrific pyramid ended up being a nuanced task. Finding some kind of harmony among authenticity and creative misrepresentation required careful changes and a sharp eye for detail. Consistent modifications and conferences with individual specialists assumed a vital part in conquering this test.
Surface Planning Intricacy: The progress from 3D displaying in Blender to finishing in Substance 3D Painter introduced its own arrangement of difficulties. The complexities of planning surfaces onto unpredictable surfaces, particularly on the endured stones of the pyramid, requested a cautious harmony among consistency and authenticity. Trial and error with various planning procedures and constant cycles were fundamental to accomplish a durable and outwardly engaging outcome.
Reconciliation of Quixel Megascans Resources: While Quixel Megascans enormously advanced the scene, coordinating these excellent resources into Unbelievable Motor 5 presented difficulties connected with improvement and consistent mixing with the exclusively made resources. Finding some kind of harmony between the itemized Megascans components and the adapted designs requested cautious changes in lighting, variety evaluating, and careful position. The digital oasis had to be refined iteratively throughout this process until it appeared cohesive.
Delivering and Execution Advancement: As the scene filled in intricacy, delivering times turned into a worry. Adjusting the craving for excellent visuals with ideal execution in Unreal Engine 5 required exhaustive investigation of different delivering settings. Exploring different avenues regarding level of detail (LOD) settings, changing lattice intricacies, and utilizing proficient lighting arrangements were fundamental to guarantee a smooth encounter for watchers without forfeiting visual loyalty introduced troubles associated with progress and reliable blending in with the only made assets. Finding some kind of harmony between the itemized Megascans components and the adapted designs requested cautious changes in lighting, variety evaluating, and careful position. The digital oasis had to be refined iteratively throughout this process until it appeared cohesive.


0 notes
Text
Practice 1_Development Project 2
Places of Mind
blog 2
The excursion started in Blender, a flexible 3D demonstrating programming. Outfitted with a dream of a fantastic entry, I fastidiously created a tremendous passage that would act as the point of convergence of the desert scene. Accuracy was key as I formed the curves and perplexing subtleties, guaranteeing the design radiated a forcing yet welcoming air.
Following the entryway, I produced winding pathways that wound through the huge desert territory. These pathways filled in as the connective tissue, directing the watcher through the vivid climate. To elicit a sense of realism and engagement, careful consideration was given to scale, texture, and curvature.
The scene's focal point, a pyramid, arose straightaway. Every feature of this antiquated design was fastidiously formed to mirror the secrets of the desert. It remained as a demonstration of the union of verifiable charm and contemporary plan.
Sending out to FBX and Substance 3D Painter for Finishing:
With the resources etched in Blender, the following stage included trading them to the FBX design for consistent combination into Substance 3D Painter. This strong finishing device turned into my material, permitting me to reinvigorate the infertile designs of the desert.
Substance 3D Painter worked with the use of mind boggling surfaces, from endured sandstone on the pyramid to the rough earth underneath the pathways. In order to ensure that the desert environment's texture told a story, I tried to capture the subtle play of light and shadow on each surface.
Unreal engine 5: Putting things in place: Moving the finished resources into Stunning Unreal Engine 5 denoted a crucial second in the undertaking. The motor's state of the art capacities permitted me to rejuvenate the desert climate with dynamic lighting, reasonable shadows, and vivid subtleties.
Utilizing Quixel Megascans resources, I advanced the scene with similar vegetation, rocks, and extra subtleties, upgrading the visual constancy of the climate. The Megascans library infused legitimacy into the advanced desert spring, making each grain of sand and each leaf influence with authenticity.
Lighting and Delivering: The last strokes included careful lighting plan. The sun plunged low, creating long shaded areas across the desert scene, as I tweaked the scene to accomplish the ideal feeling. Unbelievable Unreal engine 5 ongoing delivering capacities guaranteed that each change was in a split second noticeable, considering a nuanced and vivid lighting experience.
With the scene washed in the warm shades of a desert nightfall, I hit the render button, catching the summit of endless long periods of innovativeness and specialized artfulness.

0 notes