
Statistics
We looked inside some of the posts by taraknowls and here's what we found interesting.
Average Info
Notes Per Post
3K
Likes Per Post
2K
Reblog Per Post
730
Reply Per Post
0
Time Between Posts
5 days
Number of Posts By Type
Text
15
Note
1
Photo
1
Last Seen Tumblr Blogs


Fun Fact
Tumblr was acquired by Yahoo for $1.1B in 2013.
Text
[GIF Pack] Lázaro Ramos
Following this link you’ll find 230 gifs (245x150) of Lázaro Ramos as Pêpe in O Primeiro Natal do Mundo (World's First Christmas) from 2023. Lázaro Ramos is a Brazilian actor and was 44 at the time of filming.
Please reblog and/or like if you plan on using these. Do not claim as your own. Do not include in gif hunts. Thank you. Please check out my other roleplay gifs here.
Trigger-warnings: -
38 notes
·
View notes
Text


&&. TEMPLATE 003 ― * TOYPACK
customizable png template inspired by the recent starter pack trend but versatile enough for whatever!
various shapes + blister assortments!
lots of decor elements (shapes, two-tone, banner)
all text is editable, & add your own!
add a logo, collection info, your own patterns & shapes... go wild! :D
great for: ootd, what's in my bag, starter packs, anything!! ♡

&&. DOWNLOAD (free +) credit required & appreciated. please like + reblog if using! DO NOT REUPLOAD OR CLAIM AS YOURS [ TOU ] FONTS USED: *make sure you have them b4 editing! helveti hand | positive forward | circular std | tropiland

35 notes
·
View notes
Text


✶⋆.˚ CHARACTER TEMPLATE 001 : F4 by KAISERSCOMMS.
price: $0 (pay at your wil)
INTERCONNECTED CHARACTER TEMPLATE. size:1295x720. MEANT TO BE USED FOR CHARACTER’S RELATIONS SUCH AS NPCS - MAINS - EXCLUSIVES. FONT USED: PNA Solarithm. changeable smart objects.
DO NOT CLAIM AS YOUR OWN / REDISTRIBUTE IT. CREDIT TO KAISERSCOMMS. COMMISSION OPEN IN tumblr.com/KAISERSCOMMS
DOWNLOAD IN KO-FI / PAYHIP.
29 notes
·
View notes
Text


SERPENTINE — an icon border template by lightlysources
the bigger icon is 100x100px, the smaller 80x50. edit as much as you like! if you don't know how to edit the colours, you can send me an ask to request the borders in different colour schemes. please reblog/like if you download.
colouring psd on the first preview image (not included) is maddie by @travi3sapsd.
23 notes
·
View notes
Text

BASIC NEWSPAPER CLIPPING TEMPLATE.
do not repost without permission. these are FREE templates, but you are free to pay me or tip! click HERE or the source link to grab the items. credit is mandatory. made by kyrie.
77 notes
·
View notes
Text


HERA is a visually rich quote and aesthetic template, featuring deep blues and warm, inviting tones. It includes all the graphics and design elements you see displayed. Originally released in 2019, this template has been carefully refined over time with subtle updates to enhance its overall look and feel. The text featured in this template is from Relationship of Mélodrame! a piece that perfectly complements its romantic and dramatic vibe. This is part of my greek mythology series. Hope you enjoy.
price: 0$ / pay what you want
KO-FI DOWNLOAD
364 notes
·
View notes
Text


PROMO TEMPLATE 010: ARCHANGEL, by KAISERSCOMMS.
price : $0+ (pay what you want)
ARCHANGEL, DUAL PROMO (FREE). SIZE 1200X800. FONTS USED: Stretch Pro, Swis721 BT, Florisa script. basic knowledge on smart objects. COLOUR PSD ISN’T INCLUDED
DO NOT CLAIM AS YOUR OWN / REDISTRIBUTE IT. CREDIT TO KAISERSCOMMS. COMMISSION OPEN IN tumblr.com/KAISERSCOMMS
DOWNLOAD IN KO-FI / PAYHIP
127 notes
·
View notes
Text
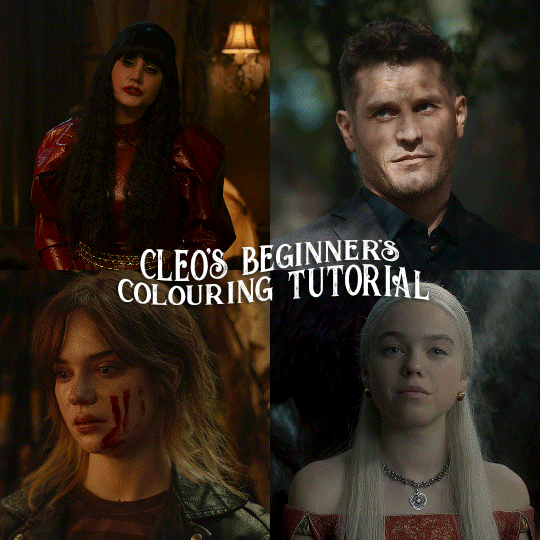
here is the colouring tutorial i promised to go with my beginner's gifmaking tutorial.
to save image space, i've written up a simple explanation of how each adjustment layer works here, so i'm just going to over my colouring for these 4 different gifs.
as always, very image heavy underneath
there are many ways to get the same results and i'll use various methods usually just based on what i'm feeling at the moment. some of it is a little convoluted, but hopefully this will give you a rounded idea of how it all works so you feel more comfortable playing around with your own colouring
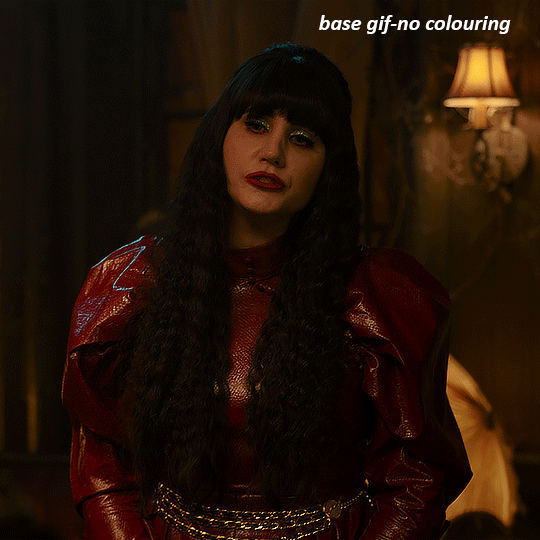
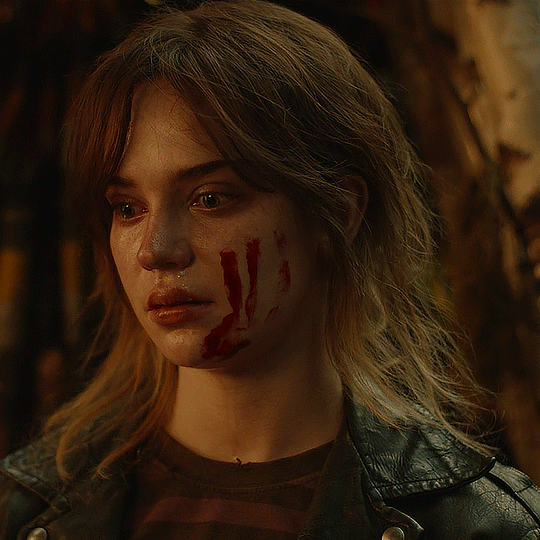
NADJA
this is the base gif with zero colouring adjustments, just resized and sharpened.
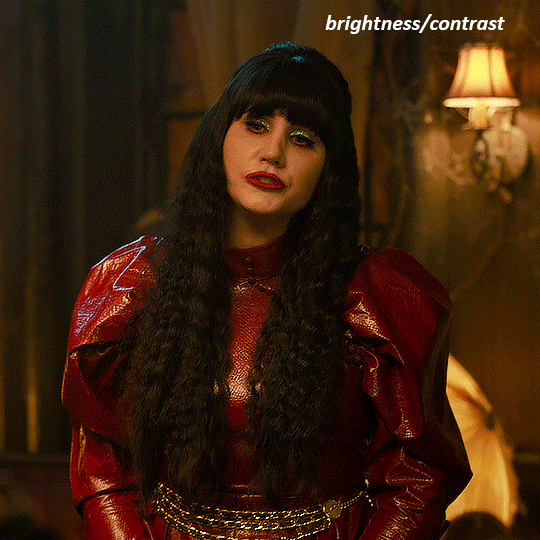
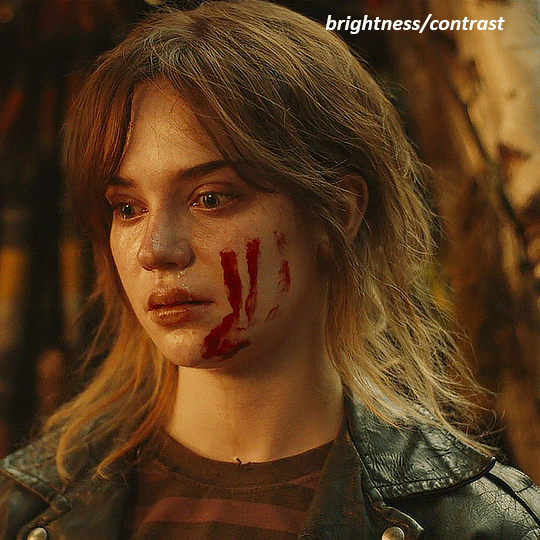
unless the base gif is already very bright, which doesn't often happen because directors nowadays are allergic to light, the first layer i add is always a brightness/contrast layer. i don't adjust any of the sliders, i just change the blending mode to "screen", and then adjust the opacity if needed. this gif was pretty dark, so i left it at 100%,
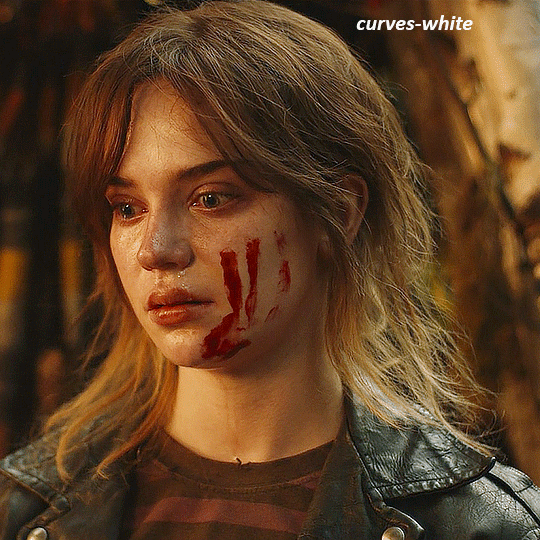
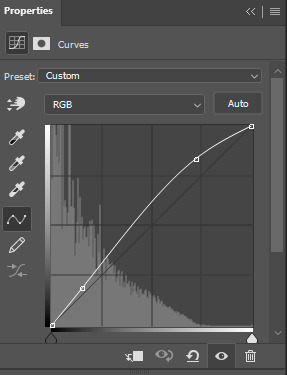
my next layers are always curves to even out the white and blacks. i use two curves layers, one for white and one for black. i used the white drop-picker and selected just below the lightshade on the lamp behind her, and for the black drop-picker i selected her hair near her neck which gives us this
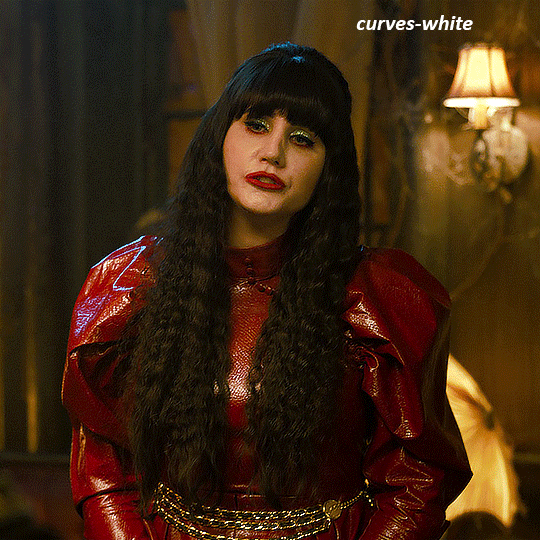
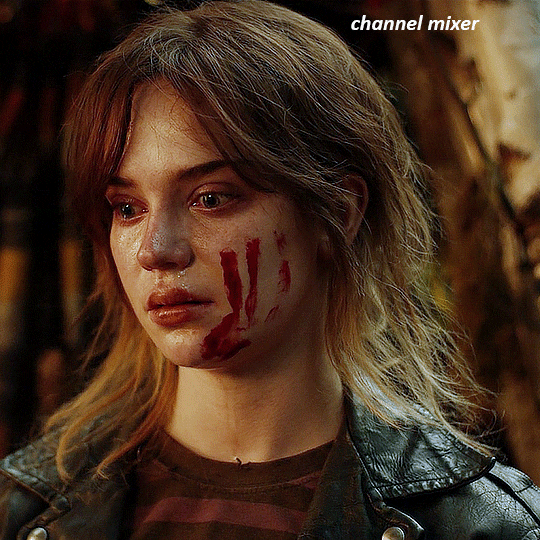
it's already looking much better, it's not as green tinted, but i want to make the red of her dress pop a bit more. in order to do that without making her face too red, i'm gonna remove some of the yellow. so next i'm gonna add a selective colour layer, and under the yellow channel i moved the yellow slider to -5 and the black slider to -52. now
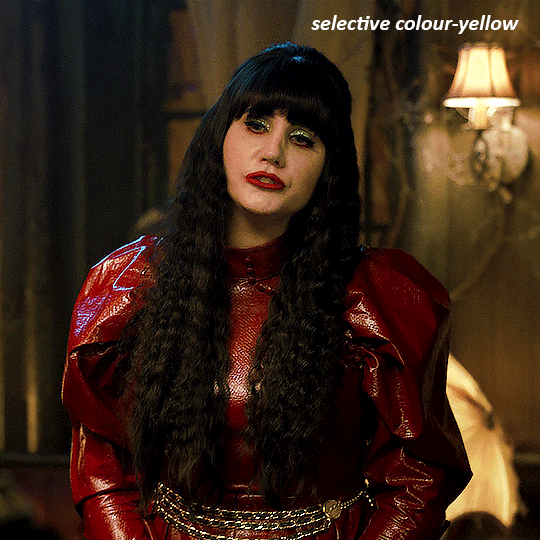
now that the yellow is reduced, i add another selective layer, and under the red i move the cyan slider to -66 and the black slider to +29. now the red of her dress pops and her face is still a realistic tone. when i first made the gif, i added the red selective layer first, then added another selective layer under it and adjusted the yellows to offset it. you can always shift layers around or add a new layer underneath as you go.
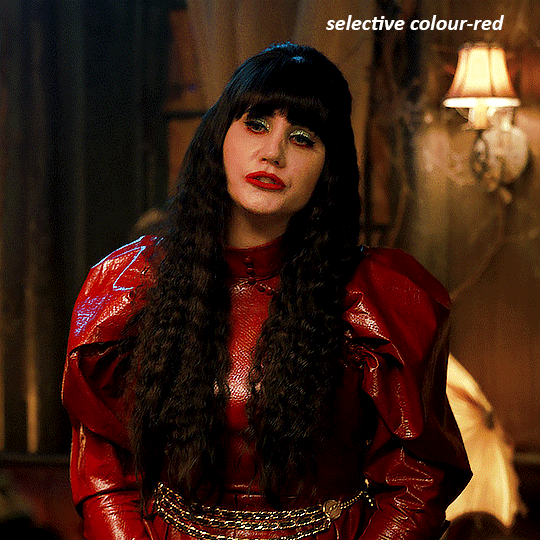
voila
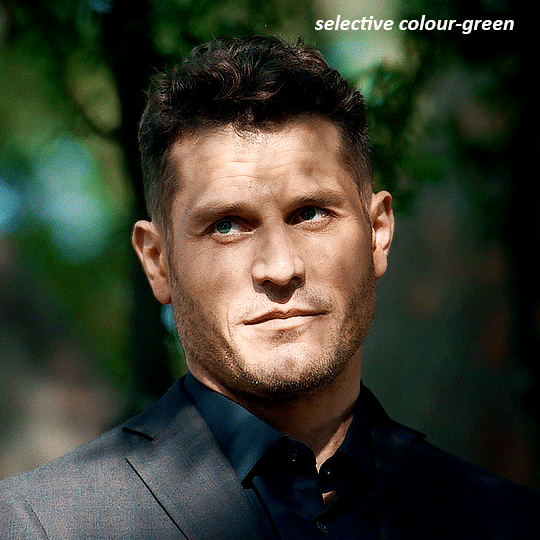
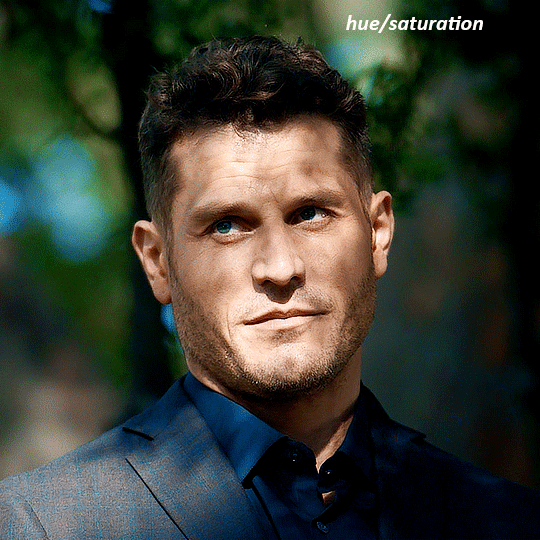
TOMMY
here is our base gif

this scene is better lit than the nadja one, but i prefer bright and colourful gifs, so i'm gonna once again add a brightness/contrast level and keep it at 100%
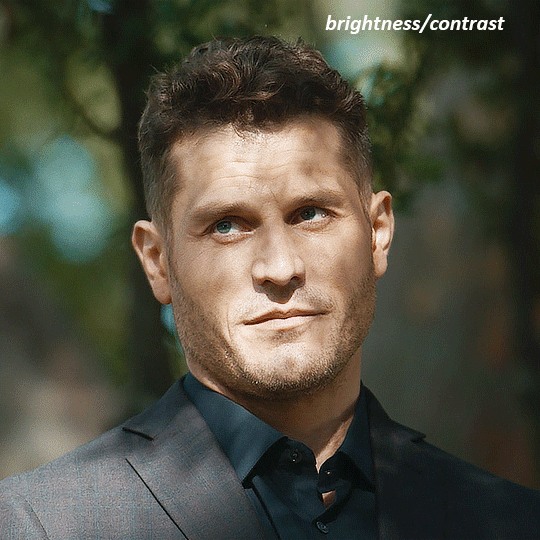
and then the curves layers to even it all out. since there isn't a spot that is immediately noticeable as white, you can hold the alt button with the white dropper selected and it will highlight all the white/very near white pixels. you can also zoom real close in to select specific pixels. i selected a from the white area around his chin/mouth. the same process works for finding a black spot with the black dropper, and for that i selected from a dark spot in his hair
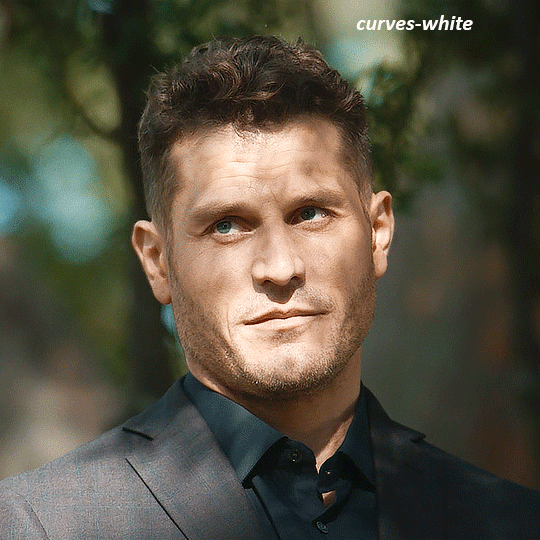
the curves layers evened it out but also made the gif a bit more red and warm toned, and since i've decided i want the end result to be more blue/green, so i'm gonna add a colour balance layer. in the shadows channel i moved the cyan/red slider to -16, and the yellow/blue slider to +11

now the gif already looks great, it's bright, skin tone is accurate, he's not washed out, but like i said i like my gifs colourful, so i'm gonna add two more selective colour layers. in the first i'm gonna adjust the greens, bringing the magenta slider to -87, and the black slider to +81. in the second layer i'm gonna adjust both the blues and cyans, because when you see blue in a gif it's rarely ever straight blue or straight cyan, so always adjust both. (you could adjust the blue and green in the same layer, but i prefer to do them separately in case i need to move the layers around)
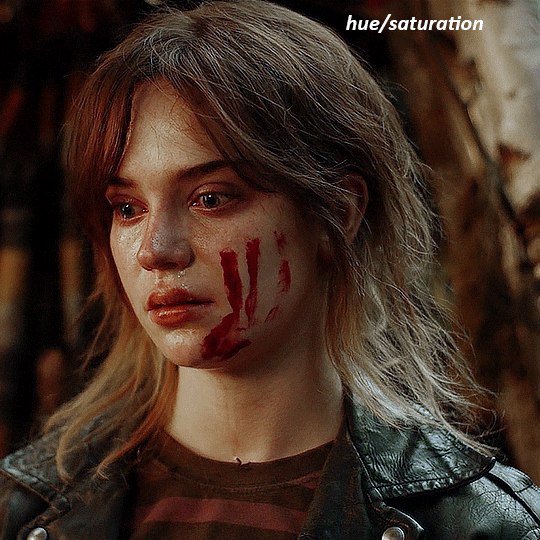
now finally i'm gonna add a hue/saturation layer because i think the blue of his suit is too blue when the sky behind him is more cyan. (also, since you only have 256 different colours to work with, you don't want too many different colours otherwise it will distort the colouring.) in the blue channel i move the hue slider to -12 to make the blue a bit more cyan, and i also move the saturation to +38 to make it pop more
and voila
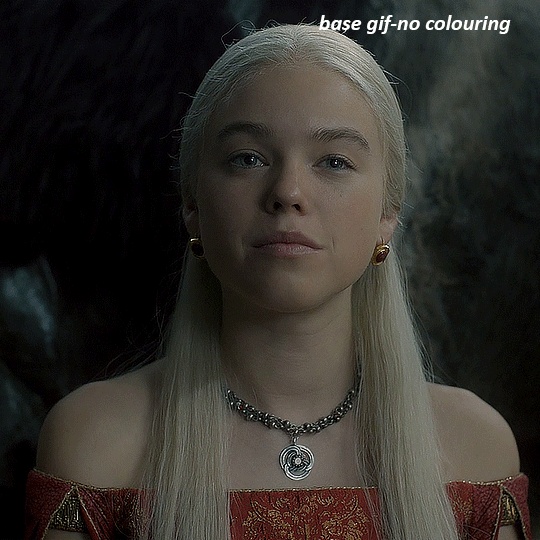
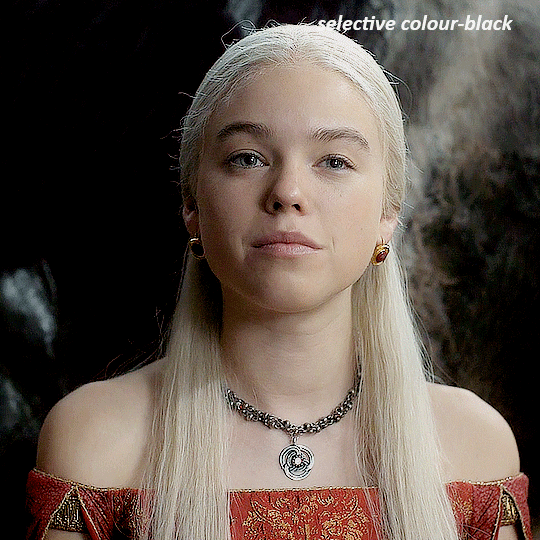
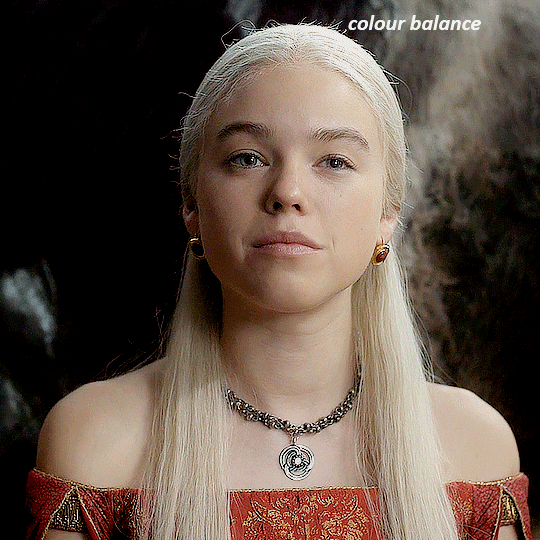
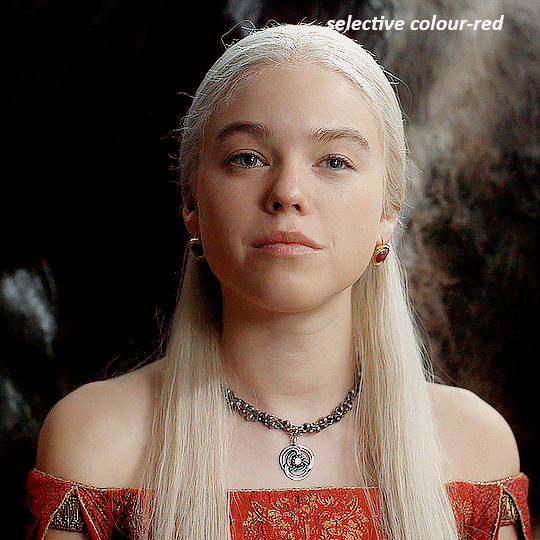
RHAENYRA
here is the base gif (this one is going to get very convoluted and imo best exemplifies what colouring gifs is like most of the time)
as always, a brightening layer set to screen
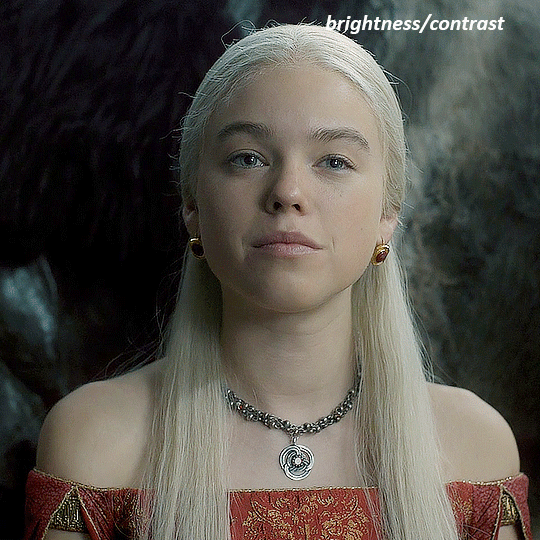
now the curves layers. for the white i clicked on her hair at the top of her head, and for the black i i clicked in the shadows to the left of her.
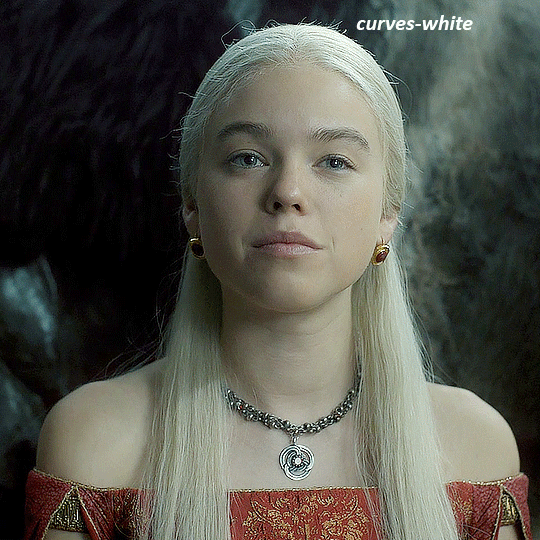
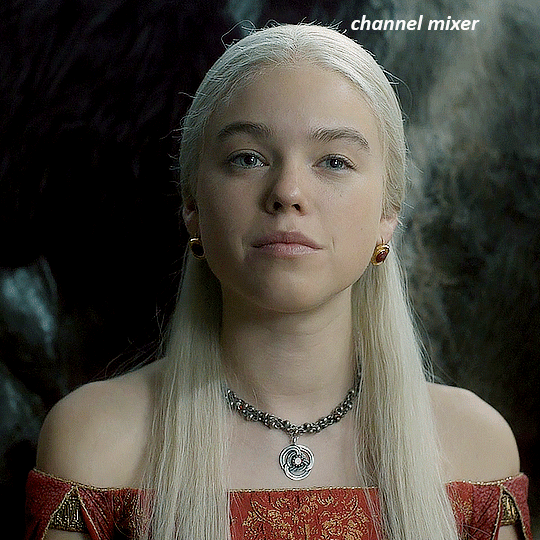
but as you can see, while it added contrast, it also made the gif more green tinted than it was. you could click around more, or manually adjust the red, green, and blue lines on the curves until it looks better but i decided to add a channel mixer layer instead. in the green channel i set the greens to -95, and in the blue channel i set the blue to -97
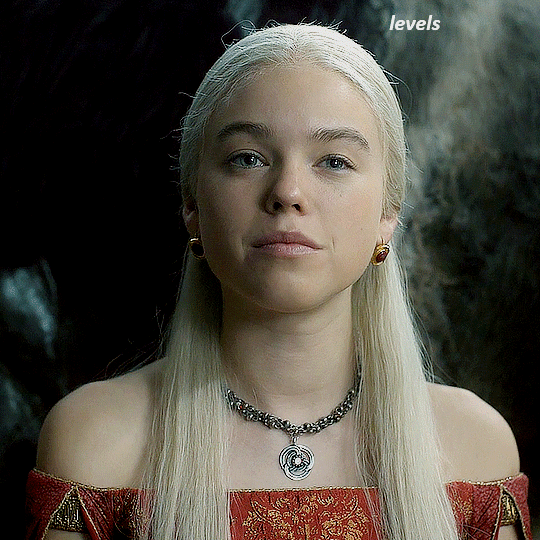
next i wanted to add a little contrast, but i find that using the contrast in brightness/contrast can saturate it too much, so instead i added a levels layer. first i adjusted the bottom bar, moving the right slider to 230 which reduces the overall brightness of the gif, so when i adjust the top bar it doesn't brighten the gif too much. on the top bar, i moved the right slider to 212, and the left slider to 9
now, i'd like it to be not exactly warm toned, but less cool, and while i could use colour balance or a photo filter, i'm instead going to add a gradient map, using the default gradient pink 08, and setting it to blend mode soft light at 50% opacity

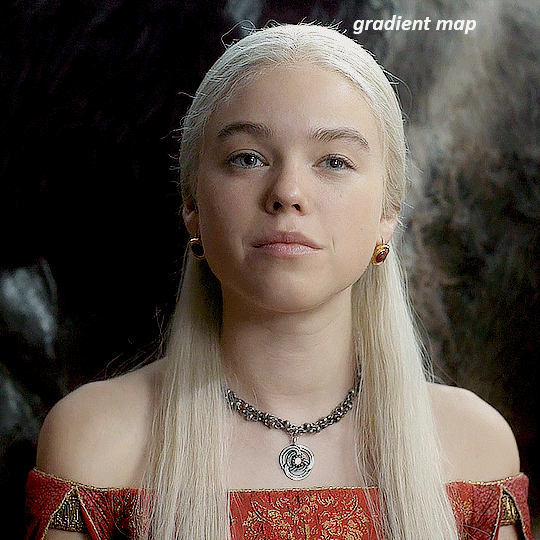
next i just want to increase the blacks a little, so i'm gonna add a selective colour layer and under black i'm gonna set the black slider to +10
it's still not as warm as i'd like, so i'm gonna add a colour balance layer, in the midtones setting the cyan/red to +10 and the yellow/blue to -5
we're almost done, but i want to make her dress pop a bit more, so first i'm gonna add another selective colour to bring the yellows down a bit, setting the black slider to -15

and finally one more selective colour layer, in the reds, setting the cyan slider to -50, the yellow slider to +10, and the black slider to +15
voila
NATALIE
here's the base gif
as always the brightness/contrast layer set the screen
now the curves layer. for the white, i zoomed in and selected a pixel on her cheek under her right eye. for the black i the dark spot just above her head
now she's very yellow, so i added a channel mixer layer. in the red channel i set the reds to +88. in the blue channel i set the reds to +10
she's still a little too yellow for my liking, so i'm gonna add a hue/saturation layer, and under the yellows i'm gonna adjust the saturation to -60
finally, i want her to be a it brighter, so i'm gonna add another curves layer, but instead of using the drop, i'm going to manually adjust it. the two points along the line are where i selected it and then i dragged until it looked how i wanted. i start with the upper dot, which made it brighter and moved the line into an arch, and then selected at the lower end of the line and dragged in back closer to centre to add some darkness and contrast
voila
and that's how i do my colouring. it's generally all trial and error, using a layer to fix one thing and then needing another layer to fix something the previous layer did.
play around, have fun, see what works for you and what doesn't. it will take a while for you to develop your own method and style, and even then you'll come across scenes that make you question if you have any sills at all. you do, directors just hate us
have fun and feel free to ask any questions
331 notes
·
View notes
Note
this a gorgeous gifset for wicked 💗
https://www.tumblr.com/tidescaller/781106467228073984/glinda-in-wicked-part-i-happy-birthday?source=share
I would appreciate a tutorial for the first gif blending and colouring

Hi anon! thank youuu, i'll leave the tutorial under the cut ૮(˶˃ᆺ˂˶)
As always, basic knowledge on making gifs is required to do this type of edits. I linked some useful guides on my previous tutorial here.
PART I: BLENDING
STEP 1, BASE GIF
I recommend getting ready the gifs you're going to use before any try on blending them. And which ones are right to blend? That's just depends on the scenes you're working on. On this gifset, I made two previous blends that didn't make it to the final version cause I didn't like how it turned out. It's all about trial and error.
For this specific blending, as I'm working with only 2 gifs, I'll start editing first the base and then the one "blended". Adjust your BASE GIF in your canvas as you want.

I sized mine like this cause I imagined the second scene of Glinda behind this one.
STEP 2: BACKGROUND
i followed becca's coloring tutorial for this part, except I didn't add any adjustments yet. only coloring the background for a later gradient blending.

STEP 3: BLENDING
Duplicate your other gif into the canvas and change its blending to screen

Now add a layer mask (the button marked with red in the picture) and, with a soft brush at 200px/300px, start erasing whatever you don't want. Remember black is 0% opacity and white is 100%.


STEP 4: THE BLENDED GIF
The problem I noticed by this point is that my background coloring on the BASE GIF was kinda irrelevant cause now the BLENDED GIF completely covered it (。•́︿•̀。) and I also wanted this one to be pink. In order to do this, I created a gradient map layer and made it as a clipping mask so it wouldn't affect my main gif.


PART II: COLORING
STEP 5: BASE
For the base coloring, I always follow this tutorial cause it's literally how I learned how to do it. Honestly, check all maziekeen's tutorials (she made A TON) cause they are so good and your learn a lot. However, I tend to give my personal touches like adding another vibrance layer if i feel like it, cause I like the colors to pop; or skipping steps if I don't think they fit my gif/style. Anyways, this is the result for now:

and these are my settings


i tried to translate as much as possible (,,>﹏<,,)
STEP 6: SMALL TOUCHES
Could leave the gif as it is, but when I was working on it, I felt like something was missing. So the last step is to apply/paint some small touches of pink (or whichever color you're working on). This trick I learned it from this beautiful and very detailed tutorial from dani (she is awesome!! and her tutorials and gifs are flawless!!)
Create a new layer, use the soft brush tool at 1000px, zoom out your gif and start painting out of the canvas (you can totally paint inside if you feel like it) Play with different opacities and blending modes of the layer, this is literally how I created all these gifs. I know it sounds stupid ajskjas but it's true!! Try what best fits the structure of the gif. The first one I made is with multiply at 60% and you can see how much the gif changed already.

The second being color at 100% and the third one hard light at 30%
STEP 7: THE CHERRY ON TOP
Finally I added an animated overlay from this post. Changed the blend mode to screen and erased a bit of it on glinda's face creating a layer mask and with a soft brush. Added my texts... and that's a wrap! :D

I used the same process on gifs 3 and 5 ⸜(。˃ ᵕ ˂ )⸝♡
102 notes
·
View notes
Text

CHB CHARACTER SHEET FOR CARRD 001. 𑁋 LIVE PREVIEW. GET TEMPLATE. LINK TO GREEK KEY PATTERN BORDER.
please LIKE or REBLOG. this post if using. this template is FREE but anything is appreciated as it helps support my family during this difficult time. please do NOT remove credit nor use this template to spread hate. this template requires PRO-LITE or higher in order to use due to the amount of features within it. colors are completely customizable, as are the photos. GREEK MYTHOLOGY and rick riordan's CAMP HALF-BLOOD were the inspiration for this template and it's color palette.
here are the image dimensions. home page is: 500xauto height.
12 notes
·
View notes
Text


. ִ ་ ˖ ʿ ִֶָ ׄ BREAKAWAY ﹌﹌﹌﹌﹌ a character template by @fyeahpoc !
༝ difficulty — medium . ༝ fonts used — poppins ; medium & extrabold . ༝ how to download — click the source link to be redirected to mediafire . ༝ restrictions — do not claim as your own or duplicate .༝ credit is not necessary , but please like or reblog if you intend on using ♡
422 notes
·
View notes
Text

♡.⠀⠀⠀dial⠀tragedy⠀⠀──⠀⠀header⠀template.⠀⠀⠀⠀𐫇
click the link to find dial tragedy, a header template. you’ll need to know how to work with layer styles, smart objects and clipping masks. if you need help, i’m just an ask away. please don’t edit in any way, add parts to another creator's templates, nor repost or take credit for it.
free or pay what you want⠀⠀──⠀⠀payhip,⠀ko-fi.
fonts used: lucida bright, annabellejf.
233 notes
·
View notes
Text

⠀▍ㅤ 𝚅𝙾𝙸𝙳 𝙷𝙾𝚄𝚂𝙴 ⠀𓍯𓂃 ⠀𝙿𝚂𝙳 𝙲𝙾𝙻𝙾𝚁𝙸𝙽𝙶
𖤐. ⠀𝗳𝗿𝗲𝗲⠀ .ᐟ ⠀ ⠀ 𖤐. ⠀credit is 𝙖𝙥𝙥𝙧𝙚𝙞𝙘𝙖𝙩𝙚𝙙 but not necessary.
CLICK TO DOWNLOAD OR 𝙙𝙤𝙬𝙣𝙡𝙤𝙖𝙙 𝙬 𝙥𝙖𝙮𝙝𝙞𝙥.ᐟ
66 notes
·
View notes
Text

⠀▍ㅤ 𝙱𝙸𝙾𝙷𝙰𝚉𝙰𝚁𝙳 ⠀𓍯𓂃 ⠀𝙿𝚂𝙳 𝙲𝙾𝙻𝙾𝚁𝙸𝙽𝙶
𖤐. ⠀𝗳𝗿𝗲𝗲⠀ .ᐟ ⠀ ⠀ 𖤐. ⠀credit is 𝙖𝙥𝙥𝙧𝙚𝙞𝙘𝙖𝙩𝙚𝙙 but not necessary.
CLICK TO DOWNLOAD OR 𝙙𝙤𝙬𝙣𝙡𝙤𝙖𝙙 𝙬 𝙥𝙖𝙮𝙝𝙞𝙥.ᐟ
141 notes
·
View notes
Photo
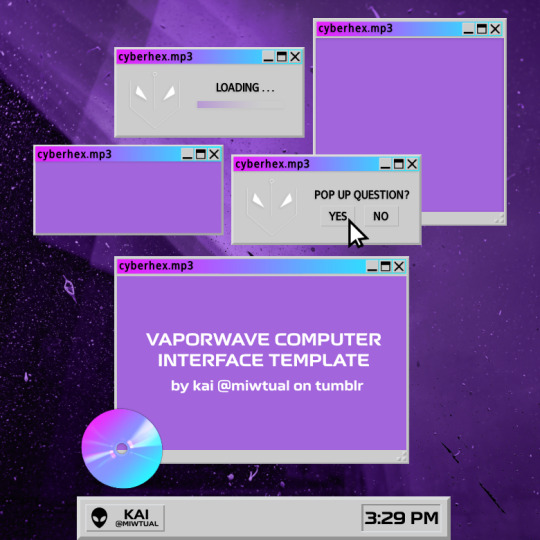
VAPORWAVE COMPUTER INTERFACE TEMPLATE by kai @miwtual
initially featured in this gifset, i wanted to share this template with all of you! this template features a set of 2 psds with multiple parts meant to be mixed and matched, all with an old school desktop computer interface aesthetic.
what you need: ♡ basic giffing knowledge (in particular, layering) ♡ fonts: neusharp and francophil sans
download this template FREE via kofi! donations are appreciated but in no way required :) <3
if you have any questions, comments, or concerns concerning this template, feel free to send anything to my askbox and i will be sure to try and help you!! please note that i am a photopea gifmaker, so i may not be able to help with your photoshop needs.
195 notes
·
View notes
Text

* DREAMS.PSD a character template by yeonjvnz.
to use this template you must have basic knowledge of photoshop: clipping mask, color overlay, strokes, shapes. for a better result i suggest sharpen the images.
free download / pay what you want.
please like, reblog if using it.
don’t extract parts of this psd and use them in your own.
psd coloring: messy.
check out my payhip and ko-fi store.
if you have any doubts regarding this PSD, please contact me via DM.
462 notes
·
View notes
Text
✦ heroism, < download >. a simple dash icon template. sized 200x200px; using the font arial.
27 notes
·
View notes