
Don't wanna be here? Send us removal request.
Statistics
We looked inside some of the posts by term2itmedia and here's what we found interesting.
Average Info
Notes Per Post
1
Likes Per Post
1
Reblog Per Post
0
Reply Per Post
0
Time Between Posts
3 days
Number of Posts By Type
Text
16
Last Seen Tumblr Blogs


Fun Fact
Average visit duration of Tumblr.com is 10 mins and 25 secs.
Text
Cinema 4D and Unity - What are they capable of? + My Storyline Link to 1969/Apollo 11
OK, maybe I lied about that “final post” in the previous post. In this post, I’m going to explain what the software I used to make my digital outcome (the game) is capable of and what they are.
Cinema 4D
Cinema 4D is a 3D workstation software that is capable of creating realistic environments with a number of different shapes, such as discs, cylinders, cubes and even figure rigs.
Structures made in Cinema 4D can be edited in a huge number of ways, such as by extruding surfaces or sub-dividing them to make each end editable to make it more sloped or join them together to make a fake street with buildings, which is actually a cube edited in a way to make it look like many buildings, which is where another feature of Cinema 4D, material, comes into play.

An image of what looks like a giant reactor which many different components of machinery. Every object is made in such a way that it appears rusty or is metallic.

(image credits - www.c4dcafe.com and 3D Artist)
An image of a floating house with a jet engine, which appears to be flying at sunset or above a very cloudy wasteland.
These images was made in Cinema 4D using the different shapes and modifiers to make certain parts to stick on a large shape (i.e. bolts on the cylindrical top of the floating house or the rails/supports of the walkways).
“But what about the shade and the weird lighting?”
This is done by adding a Light object, which has different outcomes, such as Sun light, Infinite light and Spot light, which can be altered via rotation to get the appropriate scenery ambience, which is also how you make a sunset scene, or something like this:

(image credit - Maxon)
An image of a bed with light shining upon it with very detailed walls and... circles. Lots of circles.
Everything in Cinema 4D has started out as a singular 3D object and has been expanded with additional shapes and modifiers to make it appear more realistic, making these images look like they weren’t even made in Cinema 4D at all! They are so surreal, it is unbelievable that someone had made something like this in Cinema 4D. Must’ve taken them so many hours over a few months due to all of the details, plus the trial and error with the material textures.
My opinions on these images is that they look so real it looks like it was taken by a photographer in a very remote place, except the second one, which appears very obvious to be fake. I also think they are so good, the artists have no room for improvement.
But Cinema 4D is not all about making scenery, it is also for making characters.

Whether it’d be a character for a game or a 3D movie, you can make it in Cinema 4D. All you need is either a lot of patience in creating the right character rig, or you could just cheat and download a character rig for a base to go off of (trust me, MANY character creators do cheat like that at some point).
This character... I couldn’t find what he is from. He looks like an enemy from one of them Dragon Quest games, but I could be wrong.
Speaking of games...
Unity?
Unity is a cross-platform games engine that is used to create movies, games and environment designs. Like Cinema 4D, it is a 3D software, but it does have a 2D option to those who aren’t really fond of 3D design.


Unity is free, but it does have a paid option where you can get a fancy black theme... and that’s it. The default theme is white, and cannot be changed unless the black theme is paid for (or if you are a crazy hacker, which I’m not).
From the looks of these images, they look like some sort of dungeon-based role-playing game. I like the look of them based around my assumptions since the fire, darkness and lack of light gives it that really dark feeling that you’re in a dungeon.
But Unity isn’t just about making games, if you were reading carefully:
youtube
A picture of this isn’t enough so I thought I’d share the video itself.
The video starts out as what looks like an thin figure crossing a swampland, before cutting to a cyborg’s cell, where it falls and wires become detached from it’s back. It then escapes, to which it sees hundreds of other cyborgs, which are getting shot down by a nearby security group if they slow down behind their ancestors. They then walk away into the distance, and the film ends with the Unity logo showing up.
As the film tells you, it is made within the Unity engine, which is done with many different assets, cameras and keyframes.
Episode 1 is uploaded on the official Unity channel, while future episodes are uploaded on OATS Studios (see my first blog, term1itmedia for more about them), as they’re the ones who have made it.
It requires a lot of time, effort, trial and error to make something like this in Unity and this is why I like it. It has so much potential in becoming a feature length movie someday.
Unity and Cinema 4D are brilliant 3D software, however there may be a better software soon...
Link to 1969 Moon Landing/Apollo 11
In my game, M.A.R.Kour, I included lore at the beginning of it. If you don’t know what lore is, it is another word for a backstory, which gives a story behind something. It read:
It was the year 1969. Humans have set foot on the moon for the first time.
On the way back to Earth, they discovered a distant object covered in a layer of thick fog.
In an attempt to find out about this mysterious object, they have accidentally sent you instead as you went to space anyway. You are now trapped on this planet, known as Mars II.
Luckily, there is no life on the planet besides you. The only threats are lava and long falls.
This lore links to the 1969 moon landing since it states within the story itself that “it was the year 1969. Humans have set foot on the moon for the first time”, meaning this took place after the first humans have walked on the moon. The creative part comes in when it says “they discovered a distant object covered in a layer of thick fog”, which is why there is fog in the game.
The reason why you're on this planet is because it states “they have accidentally sent you instead as you went to space anyway”, meaning you have went to the Moon as well.
So, in the game, it is still 1969... at least until escape the planet and get back to Earth. Because it was such a short time-span, I didn’t have the time to implement a rocket using Cinema 4D to make a cutscene.
If you’re wondering, the inspiration behind the game was just the event itself. Nothing else. The design is just what I decided to go ham on. The land was originally grey, but I chose to make it purple because I like the colour.
0 notes
Text
Last Day Research - Goldilocks Region + How It’s Made - Live-action Animation

The Goldilocks region is the habitable zone which is a certain distance from the Sun (around 92 million miles). The Goldilocks region edges out further away over time, but at a ridiculously slow pace, meaning Mars will be uninhabitable for millions of years.
Anything outside the Goldilocks region is frozen, while the inside of the Goldilocks region is too hot to support any human life, which is why we cannot survive on Mercury or Venus. The Earth is in the middle of the Goldilocks region, meaning it is neither too hot nor too cold. This is controlled by the Sun’s temperatures - meaning if the Sun gets hotter, the Goldilocks region will move outwards. If the Sun gets colder, the Goldilocks region will move inwards towards the Sun.
Because the Sun is so hot, currently sitting at nearly 10,000 degrees Fahrenheit, we will be safe from calamitous temperatures for a billion years, after which the oceans of Earth will evaporate due to the high temperature. Luckily, since none of us will live a billion years (unless we somehow become immortal), we don’t have to worry about dying to our power source.
The reason why our Goldilocks region moves is because the Sun is getting hotter and more luminous, albeit very slowly.
How It’s Made - Who Framed Roger Rabbit?
youtube
Who Framed Roger Rabbit is a 1980s animated film with the majority of it being live-action. It looks like a complicated film to make, and to be perfectly honest, it is.
Because this contains animation, every animated frame had to be done with a green background for green-screening to then be edited into the live-action video in post-production.
All live-action scenes are done normally, but done in such a way that the animated characters are interacting with them one way or another. For example, if the character is pulling on a sleeve, then it has to be done with wires (which can then be masked out later on in post-production) or machinery.
If the character is hiding in someone’s jacket, then... well, a large object has to be held in the location they’re hiding in.
Because of the animation and the other complications behind it, the film took well over 4 years to make. Another fun fact is that this is based off of a novel called “Who Censored Roger Rabbit?”.
So, this is my final post in term2itmedia. You can now catch me at term3itmedia.tumblr.com, which will house all of the blogs for the Final Major Project, which will be a 12-week long period of pure happiness and fun.
0 notes
Text
Progression of M.A.R.S - Weeks 15-20 + Extra Research
M.A.R.S was a very interesting term. There might be another post after this, but for now I’ll give you the full process of what I did so far this term (using screenshots from previous posts).
Note, this may contain extracts from my previous posts because I either forgot the process or couldn’t word it any differently.
Cinema 4D - Captain’s Chair
For our first project, we were taught how to make a Captain’s Chair similar to the one in Star Trek, which if you don’t know, looks like this:

Because of the immense effort I have to take in order to re-create every detail on this chair, I chose to go simple by using basic shapes and sizes.

For this, I started out with a flat cylindrical base. Then, I added a cone in the middle of it to give it that base-y feel. A few more shapes are used within the cone to give the chair a spinning mechanic, which involved me making cubes, cylinders and spheres (I have no screenshots of the underside so imagine it for now). Finally, to give it a seat, I just used cubes and resized them accordingly. Now THAT is a lot of cubes in one model. If I did it practically with clay or super-sculpie instead of digitally, I would have done the same, only with a tougher base.

Then I had to transform the shapes into polygons to have a bigger base, tilted walls and sloped surfaces. This was done by making the object editable, selecting the Polygons selection tool and dragging the faces accordingly. This was tough to figure out at first, but now I think I’ve got the hang of it.
Mudbox - Alien-like Creature
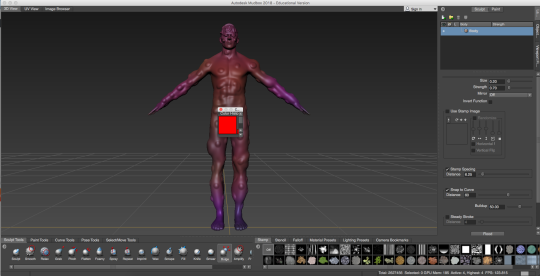
Then we took to Autodesk Mudbox to make an alien. This required us to download a full human figure and adjust it with tools to level out spots, lumps and deformed body parts.
We then had to take THAT to Cinema 4D and make a little animation with the character rig (which also had to be downloaded and applied).
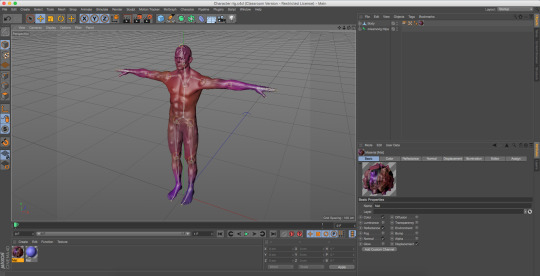
In the animation I made, the figure puts it’s arms into an “L” shape, shakes it’s head, and then kicks the viewer. Afterward, it thinks about what it did and then puts it’s hand on it’s head in shock that it hurt someone.
Nobody was actually hurt in the process, don’t worry.
This was VERY hard to do as the export process was absolutely horrendous and I can’t even begin to tell you how to do it properly because of how problematic it can be.
What I did first was selecting UVs and maps. Then I had to select the options I needed for my character to look good. I enabled paint map saving as well as two other essentials, and added filenames to the bottom of all but the paint map save.
After a lot of trial and error, that was done.
Unity - Gaming Time!
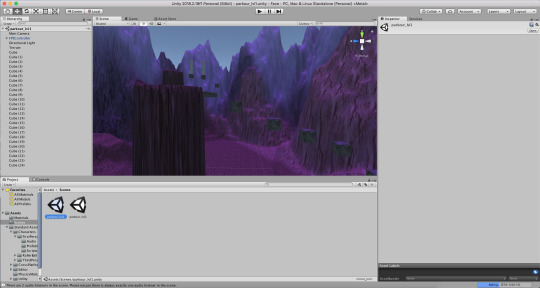
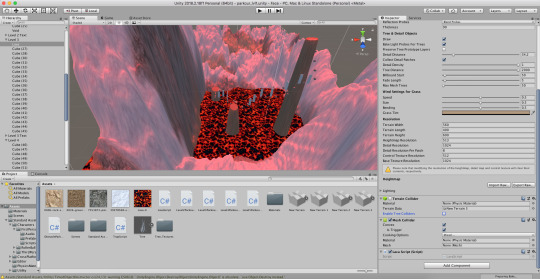
After all that stuff was done, it was time to move into Unity, a games engine! Personally, this was my favourite part of the entire project as I like to game/make games.
First I had to make Terrain by using GameObject > Terrain, and then scale up certain parts of it using Brush tools to lift it up. The textures on it come from Google Images, which have then been imported into Unity to be used there. The cubes, however, are stone cubes (also stock images). They are added by simply clicking on GameObject > 3D Object > Cube. After that, we had to import a Unity package that comes WITH Unity when you install it, which creates a character. A move-able character that you can control.

Then I chose to add a lot of floating cubes and make a parkour-like game as it was very basic and the gravity in-game can be altered to make it look like they’re on another planet. Some of those cubes move up and down continuously by code, which is what you see in the image above.
For the code, we originally used Adobe Dreamweaver as that was what we had in our selection of coding programs. We then switched to Visual Studio 2018 as that is apparently easier to handle your code with (sometimes it gets on your nerve with the auto-completion mechanic).
If you want to know, the game is written in C#. If you know Java, you can use that too. I currently know most of C#, so I chose to use that. If you’re curious, I know a little bit of C++ and Java. Anyway, moving on.

There were a lot of changes I chose to make with the game to both make it work properly and be good. This included having a lot of problems with code, movement and placement, and since this was a game that I played a lot, it was very easy to get distracted.
RESEARCH TIME
Kerbal Space Program
youtube
Kerbal Space Program is a game made in the Unity engine that appears to be a game where you have to stock up resources and upgrade your vehicle to fly it into space. While in space, you can visit other planets (and even land on them to explore!). Personally, I have never played this game. It does look interesting though because it requires strategy and good thinking in order to complete it, so I might consider getting it.
Escape From Tarkov
youtube
Escape From Tarkov is another game made in the Unity engine that appears to be a game similar to Half-Life 2 (which is a game I have played), which requires you to run around with weapons and kill off people who try and capture you or leave you for dead. Just like Kerbal Space Program, you can modify your accessories/weapons to make them look better or insanely overpowered.
Hearthstone
youtube
Hearthstone is yet another game made in the Unity engine that appears to be a trading card game similar to Yu-Gi-Oh (which is another game that I have played). The objective of the game appears to be to wipe out your opponent’s main card to win (which has a set amount of hitpoints, which is the amount of hits it can take before it gets wiped out).
BACK TO UNITY

The final part of this project involved me having to make a timer, a menu and give the planet a sense of darkness. The first thing I added was a timer, and a fail counter.
During the development of levels 3 and 4, I came across a cheat, where you can just jump up the very end of the landscape and skip levels 1 and 2, going straight to level 3. However, that is now impossible to do without hacking the game.
I have written a check in the game’s code to check if the player is far enough to the side, near the edge of the terrain. If they are, and they haven’t completed level 2 yet, they will be stopped in their tracks, and “YOU! SHALL NOT!! CHEAT!!!” will pop up in the interface.
I put the text there for humorous purposes, as it calls out the cheater directly. I might change this text however, or just remove it entirely, seeing as it isn’t really needed. The text is also, you guessed it, a reference to “You shall not pass” from Lord of the Rings (I haven’t seen the movie but I know of the memes associated with it).
Another feature I have added in is Fog. Fog is directly implemented into Unity, so I just have to check a box within the “skybox” that says “Fog”, and this is the result. I’ve added it because it adds a dark feeling to the world and also makes invisible objects visible again (cubes that blend with terrain behind them, making them very difficult to see).

I have built the menu outside of the map, VERY far away, so that even if fog wasn’t enabled, nobody would be able to see it from the planet map.
The menu was made with triggers, or invisible objects that make the game do things when the player interacts with them. Say for example, if you want to walk into a cube and get teleported to another map, you can set it to do that via triggers and… ahem, code.

If you cannot understand this, don’t worry. First of all, the game checks to see if the player is colliding with a mesh (which is what the trigger is made of, mainly). It will then check the TAG of that object, whether it’d be Mode 1, Mode 2, Void or whatever.
If one of the tags matches it’s respective tag in the list of statements, then it will either teleport the player or make the game do things, such as increasing the fall counter by 1 or setting the level count to 3.
Now the game is fully built and is ready to play on Windows, Mac and Linux.
What was your initial plan with this? What did you focus on and WHY?
I chose to focus on game design as that is my main comfort zone within the three, plus it is the easiest for me to get the hang of. Plus, I have about 8 years experience in game design (although 7 of them were spent in the Scratch engine, then I moved to Game Maker and Unity).
I chose to do it because I couldn’t see myself making a standout sculpt or very wacky spaceship with interior design. Maybe I could’ve done one of the other two I had more time.
What is your story?
The story is that the first people who went to the moon for the first time in 1969 found a mysterious object on the way back to Earth. This was thought to be a planet, so they sent somebody else there (who is you, the player). They are now trapped on the planet with no way out but to get to the top of the cliffs and hope.
Inspiration?
Apart from the moon landing and my game design experience, none.
Review?
I... have just explained that in the rest of the post beforehand. I went over all three aspects.
Final Evaluation?
Personally, I think my game turned out very good. The only thing I would do to improve it is learn more of Unity to add more fonts and even a glitch-like effect with night vision, along with maybe a few more levels or even some enemies that try and stop you from progressing. However, I couldn’t do so due to the fact I had to test it over and over again for about four hours, which didn’t really allow me to stick to my original plan, which was to have a boss-like level in the game where the platforms get destroyed as soon as you step on them, making it a very difficult Level 5. In all seriousness, this was a very fun project for me as I enjoyed every single step of it. I have learned a lot about the digital industry and 3D game design. The only hard steps I had was near the end when I compiled the game and found out my interface had to be re-aligned, along with a menu issue, which instead of using a proper buttoned menu I used hotkeys instead (cheating). Again, if I had more time, I would’ve made a proper menu, made the boss level and even more elements. But now we’re here at the end, with a game that is good enough... and difficult as well, for everyone else. Because I have experience in C# coding, that part wasn’t hard at all. All I had to learn was the proper elements of Unity as there are a LOT of code tidbits that Unity adds to make things easier.
Final Research about Cinema 4D - 5 Examples of what was made in it
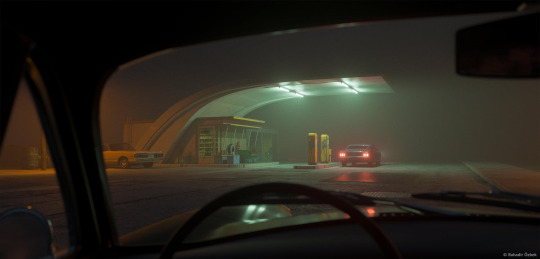
1 - This picture was made in Cinema4D using lighting, shapes and fog. From the looks of it, it looks like the car in front of the driver is going to pull out of the fuel station, or is just going to sit there forever. I like it because it looks so realistic, which is very tedious in 3D software.

2 - Another realistic picture, but this time with a building in the middle of a forest. This looks like it wasn’t even made in Cinema4D at all, and that is why I like it.
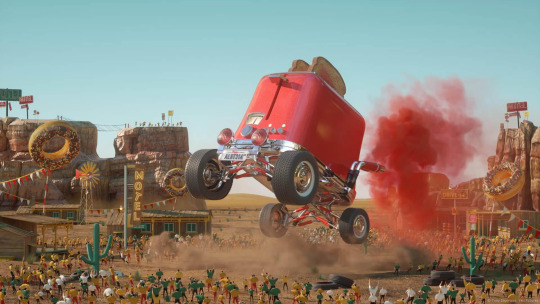
3 - A semi-realistic picture of a giant vehicle puffing out red smoke before (what looks like it will be) driving off, crushing about 400 people. This reminds me of Cars 2 for some reason. Deserted village, car-... oh wait, the car is a TOASTER? Well then... Anyway, I like this picture without reason. I just like it.

4 - A realistic picture of a sink with some utilities beside it. This was done with transparent shapes to give the water it’s reflective effect, hence the mirror (which is probably just a plain copy of the scenery from this side). Again, I like it because it is a realistic picture, plus the detail.

5 - Another realistic picture that doesn’t look like it was made with Cinema4D at all. It looks like an abandoned fuel station with what looks like a giant ball near it. Do I have to say I like it? Well yes, because of the detail it has to make it realistic.
These five images are directly pulled from the Cinema4D website, the gallery: https://www.maxon.net/en-gb/gallery/
Phew, that was a lot of research and reflection. Again, there may be another post after this, but if not, then I’ll see you in my FINAL MAJOR PROJECT!
0 notes
Text
Kit-bashing Part 2 - Concept Art
You have seen my kit-bashing, but did you know there was another task after that? Didn’t think you did, because neither did I until it was announced.

This concept art was a long process that lasted about 2 days over 2 weeks. This concept art was to be done on our spaceship, which had only just been finished.

This is the near-finished result. It contains lore (very top left), top down view of the engines (near-top left), square design overlayed on top of another top down view of engines (top right), inside the spaceship plan (very left), engine side view (middle), spaceship crashing on a planet (left), spaceship travelling to the planet (bottom left), spaceship crashing on a planet from high altitude (bottom right) and comic strips (very bottom right).
This was all done with felt tips, B pencils and fine liners. There was also a lot of scrap paper when it was done, which shows that these were originally drawn on larger pieces of paper, but were then cut to stick down (they’re not stuck down yet, they’re loose).
Because circles are hard enough to draw without a compass, I used a stencil which had 36 different sized circles. This was to help me with the engine design as it is spherical. Oh, and the planet design.
That is what I did for the concept art. This post was pretty short, but there really isn’t anything else to mention.
To be continued...?
0 notes
Text
Progression of Animation - Weeks 15-19

This post will cover the entire process of making an animation, from start to finish. Specifically, what I did to make the animation, and what problems I ran into during the process.
In the picture above, you can see some drawings of Earth, a pointed finger, an explosion shape and two storyboards, because there were some scenes on the storyboard that I decided to add in between said frames to give it more ‘reason’.

After all of the planning and storyboarding, it was time to make the individual parts.
Because I was doing a stop-motion animation, I chose to do it in the same way as many stop-motion animations, but with layered paper cutouts instead of drawing 200+ frames (my hand cannot cope with that), but is perfectly fine to do 1,000+ frames of stop-motion (I didn’t do that many, it was an exaggeration!).

After cutting out the individual parts, it was time to shoot!

The main focus of the animation was in space, so I had to get a black piece of paper. A LARGE one. Large because of the limited zoom cameras have.

The cameras I used were Canon and Nikon. I cannot remember the model name exactly, but you can probably guess by the picture if you’re skilled enough.
Unfortunately, the penny dropped as soon as I finished shooting the photos. Here’s why:
At the end of the first session, when I was done with the camera I plugged the SD card from it into a computer, dragged the files off of that and onto my USB memory stick. Little did I know however, that my memory stick was old and extremely prone to corruption.
The day before the second session, my memory stick was working just fine with no issues. I put files on it and ejected it before taking it out, just like you’re supposed to. There has never been a time where I just yanked it out like a baby pulling on a plug.
When I went to tie every frame together digitally after the second shooting sessions, getting all of the photos off my memory stick... was a fight. When I plugged it in, it wasn’t readable. I have tried using 12 different computers, but the result was the same for every one.
So there was only one thing for it. I had to take my USB memory stick to Tech Support, or I.T. if you prefer. Because there was a lot of stuff on there, I couldn’t just wait as it was nearing the end of the day. So I left it there overnight, leaving the experts to figure out what was wrong.
Sadly however, when I went to retrieve it, it was lifeless. It died to corruption and there was nothing that tech support could do, not even retrieve a single file.
This is the only project so far this year I'm unable to complete, unless I somehow manage to pull off 32 hours with no sleep trying to do everything all over again. Considering the fact that the longest time I’ve ever gone without sleep was 20 hours, finishing this task proved to be impossible.
At least you have the process of how I made the animation, as well as the stop-motion post associated with it (see my post about Wallace and Gromit for more details). It’s such a sad shame you’ll never get to see how it will look when finished... DAMN YOU CORRUPTION.
0 notes
Text
Project 11 (Continued, Part 3)
We’re almost there! The Unity games project is nearing completion. There are a few things I have to correct in the game and add to this blog, and this is the majority of that so far.
Without further ado, let’s look at the third series of changes!

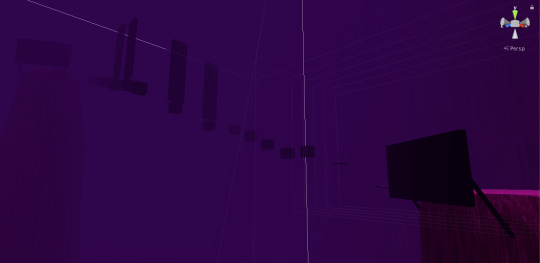
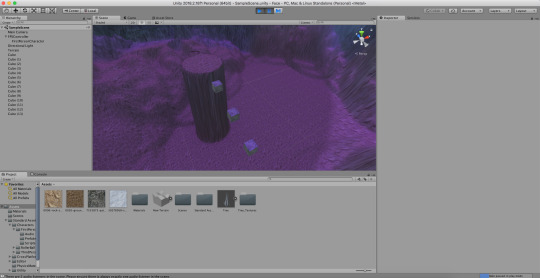
First of all... the floating text. It wouldn’t make sense to have floating text on another planet, so I chose to make signs instead. Aligning the text and the sign together was very tricky, but eventually it was set.

The sign here is connected to the terrain using cylinders, which have been stretched out and aligned properly to make it look like it is holding the sign up.
These signs have collision detection, so you don’t just walk through them like they’re not even there. The text, however, is not interactive.

During the development of levels 3 and 4, I came across a cheat, where you can just jump up the very end of the landscape and skip levels 1 and 2. However, that is now impossible to do without hacking the game.
I have written a check in the game’s code to check if the player is far enough to the side, near the edge of the terrain. If they are, and they haven’t completed level 2 yet, they will stopped in their tracks, and “YOU! SHALL NOT!! CHEAT!!!” will pop up in the interface.
I put the text there for humorous purposes, as it calls out the cheater directly. I might change this text however, or just remove it entirely, seeing as it isn’t really needed.

Another feature I have added in is Fog. Fog is directly implemented into Unity, so I just have to check a box within the “skybox” that says “Fog”, and this is the result. I’ve added it because it adds a dark feeling to the world and also makes invisible objects visible again (cubes that blend with terrain behind them, making them very difficult to see).

My next personal objective was to add a menu. Because I have no experience in making a 2D menu in a 3D games engine, I had to cheat a little bit.

I have built the menu outside of the map, VERY far away, so that even if fog wasn’t enabled, nobody would be able to see it from the planet map.
Anyway, the menu was made with triggers, or invisible objects that make the game do things when the player interacts with them. Say for example, if you want to walk into a cube and get teleported to another map, you can set it to do that via triggers and... ahem, code.

If you cannot understand this, don’t worry. First of all, the game checks to see if the player is colliding with a mesh (which is what the trigger is made of, mainly). It will then check the TAG of that object, whether it’d be Mode 1, Mode 2, Void or whatever.
If one of the tags matches it’s respective tag in the list of statements, then it will either teleport the player or make the game do things, such as increasing the fall counter by 1 or setting the level count to 3.
To be concluded...
0 notes
Text
Project 11 (Continued, Part 2)

So, we’re back in Unity! So far, the game is still not complete. But it will be by the time you see the next post.
My primary focus of this was to not only add a new part of the level, but to add a timer so players can see how long it took them to reach the end.

I had to use code to get it to work. All you really need to know about it is that for every single game frame, the amount of time gets tracked since the previous frame and adds up to the total time count based on how long it has been between frames. Each time increment is kept track of separately, with seconds being the primary and minutes being the secondary.
IF the seconds variable hits 60 or above, the minutes variable will increment by 1, decreases seconds by 60, and repeats. There is no limit to the timer, and I don’t plan on adding a hard limit as the max value for the variables (double values) is ridiculously high (about 2^1024). I have thought about adding an HOURS variable, but who is really going to play the game for over an hour?

There were times where I needed some help, so I kept taking to the Unity documentation website for it. It took a while for me to understand, but now I’ve got the hang of it.

And I ran into many different problems while getting triggers to work. One of which was that no matter what the trigger was, I’d always get teleported back to the same spot.
Luckily though, the fix was very simple. All I had to do was add tags and get the code to check if the trigger is right. This required a lot of “if” statements and some heavy thinking, but eventually it was fixed.

Another scenario of this is when I wanted an object to move upon collision. I gave up on that since the process of doing so was too complicated for my standards, and went with a timer-based movement instead.

After many new additions, alterations and a lot of trial and error...


We have a game that is one tricky problem... will I solve this?
To be continued...
0 notes
Text
How It’s Made - CGI Animation + Michal Socha Research
So, we looked at stop-motion animation and hand-drawn animation. Now for the most complicated of all... CGI (computer-generated imagery).
youtube
The movie we have watched this week was Big Hero 6 (which is absolutely fire, I recommend it), which is a computer animated film. This means that everything you see in the movie (at least outside of text sequences) is made of 3D assets and environments in a 3D workstation, like Maya or Cinema 4D.
The process of starting to make a film like this is pretty much the same as making a live-action film or animation - Plan > Storyboard > Go wild!
...except everything production-based is made digitally. It is all done with textures, keyframes, camera movement and timing. Timing is VERY crucial to an animation like this, regardless of voice acting. Not only that, but the movie has to be somewhat realistic, hence why sometimes you see animated figures running so fast it cannot be replicated in real life. Then again, what animation DOESN’T defy the laws of reality? None that I know of.
Some scenes within animation use a heavy amount of light, like this one from Monsters University:
youtube
Because this scene takes place in a house at night, the only light seen in the scenes with Mike and Sulley is coming from the torches... but how? Because of fixed lights. A light is assigned to a certain object, and it will always point in a certain direction that the object is facing based on parameters.
The door explosion, however, is a plethora of lights and assets of a broken nature, except the lights always stay in one place and dim out entirely over a short period of time.
Light flicker is all keyframe based, like in the scene where all of the Scream Canisters fill up and the power is so strong the energy becomes overpowered. For example, if you have 1000 frames of light flickering, then you would set the light’s brightness level at frame 1, add a keyframe, go to frame 28, change the brightness level, add a keyframe and repeat until the scene is complete.
However, you should take caution in doing very fast light flickering if you or someone watching the film has epilepsy. I, however, am not epileptic, so I’m fine, but I am aware of my surroundings and targets.
So that, in whole, is how a CGI film is made. You thought it was real life? I didn’t think so either.
Michal Socha
Michal Socha is a Polish animator. Here is one of his animations called Chick:
youtube
In this animation, you can see a chain of events happen in very weird ways. A woman gets ready for a man to arrive. Once he does, they sit down, drink some wine, have a smoke and then dance together.
Personally, this animation is too weird for my liking, not only because of the colour scheme, but because everything just goes by too fast and you cannot really tell what is happening until something is revealed (you think a walking woman with pointy hair has no eyes until her eyes open up). Very... very weird.
If you want to see more of Michal’s animations, check out his portfolio: http://michalsocha.com/
0 notes
Text
How It’s Made - Stop Motion Animation
Stop motion animation is the practice of taking a picture of objects in certain positions, moving them, taking pictures and repeat until the object reaches it’s final location. An example of this is Wallace and Gromit:
youtube
Wallace and Gromit was made using Plasticine, background images (which are hand-drawn/painted) and camera rigs. In this scene, you can see Wallace and Gromit getting out of the rocket, kicking a ball very high into the air (so high that it never returns because of the gravity on the Moon), walking off-screen and sitting down having a picnic.
At around 26 seconds and 35 seconds in, you can see the background suddenly move. This due to a problem that all stop-motion animators will face one in a while where they accidentally move the camera, which you’re not supposed to do unless you are at the end of a scene, willing to take on the next one.
At around 54 seconds in, Wallace’s cheese and cracker jitter about slightly. This is because of how the frames themselves are made, with the animators having to reach over things painstakingly to set up and take the next frame. This is very common throughout the animation, as next to no shots are absolutely perfect as if they were real.
At 1 minute and 13 seconds in, a red spot appears on Wallace’s plate, which very likely came from his tie or his tongue.
At 1 minute and 17 seconds in, it is gone again.
At 1 minute and 27 seconds in, the cheese ROLLS slightly!
At 2 minutes and 7 seconds, Wallace’s sleeve has a few dents in it!
And again, at 2 minutes and 11 seconds! With very much observation and close watching, I was able to find out all of the unintentional mistakes that A Grand Day Out has in this particular scene alone. Either way, the animation received great reception and that is how we got Wallace and Gromit.
But what we saw on Tuesday was not Wallace and Gromit. Instead, we watched Isle of Dogs, which is a 100 minute stop-motion film. I couldn’t see any mistakes in the film as every frame was passing by so quickly (about 25 frames a second, where as Wallace and Gromit is about 10 FPS (at least A Grand Day Out is anyway, the most recent ones are up to about 30 FPS)).
Isle of Dogs is made in the same manner as every other stop-motion animations:
Take picture > Move objects for next frame > Rinse and repeat
However, it is not always about Plasticine models and added scenery. Some stop-motion animations used paper cutouts overlay-ed on a background. I don’t know of any examples, but I know that some animations are made that way.
Back to stop motion. You may see some objects fly, which is next to impossible to do without some complicated editing. This is done by Masking.
youtube
An example of this is the scene in Wallace and Gromit - A Close Shave where Gromit’s plane falls off a cliff and gets it flying to save his life. Particularly at 1 minute and 22 seconds in, this is all done by masking. All you need is two pictures, one with the full scenery, and one with JUST the background.
You would layer the full scenery picture on top of the background image and cut out the rig of the full scenery image to give the illusion that the object is flying. It is a very ingenious way of making scenes like that.
So... you will probably never look at Wallace and Gromit the same way again. I have spoiled you. Sorry.
0 notes
Text
Project 11 - Making a Game

For this project, we were taught how to use Unity to make a 3D game. I know the setup looks empty, but don’t worry about that. It will eventually look like this:
Now, how was this done? Well, first I had to make Terrain by using GameObject > Terrain, and then scale up certain parts of it using Brush tools to lift it up. The textures on it come from Google Images, which have then been imported into Unity to be used there. The cubes, however, are stone cubes. They are added by simply clicking on GameObject > 3D Object > Cube. After that, we had to import a Unity package that comes WITH Unity when you install it, which creates a character. A move-able character that you can control.

I was having so much fun up to this point. Very much so that I decided to add a lot more cubes and build a parkour type game. Some of the cubes move, but how? By code:
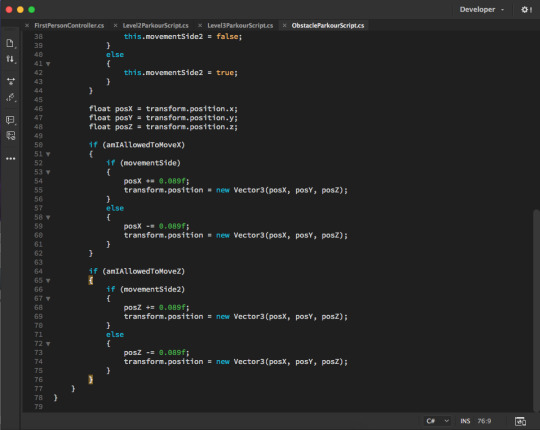
This piece of code isn’t all that complicated so I can break it down for you. First, the cube checks to see what their position is. Afterwards, it will run a check if it is allowed to move. If so, it will change the position “posZ -= 0.089f subtracts the position”, and then loops around over and over again. This is because the code used contain a method called “Update”, which is run once per frame.

This code is all the code that the Unity package generates, and it would take me forever to tell you how it works. Either way, the code is written in C#, which is a programming language.

After a load of additions, alterations and some nifty code, we have a game that is starting to get somewhere. There will be a lot more added to this, but that is another story for another day...
To be continued...
0 notes
Text
Progression of Kit-bashing - Weeks 14-17

I’ve done different projects involved with M.A.R.S during these weeks, but they’re not quite finished yet. In the meantime, have this post where I show you the progression of kit-bashing to make a spaceship look entirely surreal!
This project involved bringing in some old recycled plastic that we had kicking around our house. I brought in a selection of plastic soda bottles (which have been washed out thoroughly), including the lids. I didn’t end up using my own lids as I had lost them after the first day.. sigh.
But nevertheless, we had a LOT of other stuff to work with. This involved breaking up some old computer motherboards, keyboards and even mice (not real mice). I did this by using screwdrivers, pilers and a glue gun. What you see in the picture above is my earliest draft of my spaceship.
What I did to get to this point was to saw off the tops of the plastic bottles. Doing this without a saw was extremely difficult as the plastic is VERY tough in that area, so I had to use a special saw that could cut through plastic. I cannot remember the name of it exactly.
After that, I wanted to find a way to make the three bottles stick together. If I had used glue at this point, it would look really strange and nothing like a spaceship. Plus, the bond would be so weak (because of the indents around the outside), they would keep falling off. So I chose to drill some holes in the bottles in specific locations and stick plastic rods in them. This is somewhat effective, but I could’ve made the holes smaller by using a smaller drill piece.

After the sawing and drilling and smacking it in anger, I had to add a top to it. Instead of making a cone for the top, I chose to use bottle caps to save time and resources. However, this proved difficult as it involved looking in rubbish bins (yes, I actually had to do that to get the results I wanted) to find a duplicate of a particular lid (the dark blue ones you see in this picture). This was a dirty job, and it is kind of naughty, but I got it in the end.

For extra research, I’m going to criticise some of the other spaceship builds that have been made by other students. I’m not going to say their names in respect of their privacy. This one in particular is a build made of wood with some added plastic, metal and other wooden parts crafted individually. This student in particular had an earlier draft which looked like this:

...but because they weren’t happy with the results, they chose to make what you saw in the previous picture. I’m glad that they made this decision as it takes it to a higher level (not using plastic bottles), and that is why I like it so much.

This one, at first glance, doesn’t look like it was made with a bottle to begin with. That is because there were a load of added flat parts, curved parts and individually made wooden parts which have all been painted over. I like this model a lot because of not only the detail, but the accuracy in comparison to a real rocket. Hop aboard, we’re going to M.A.R.S!
Anyway, back to mine. After all of the additions and subtractions that have been made to this model, I had to spray paint it. Because of how hazardous the Surface Primer is to do so, I had to take it outside. I wasn’t very good with it as I didn’t know what I was doing, so I had another student do it for me (this student in particular has good experience with stuff like this).

So after all of the strong cuts, clip offs, gluing and spraying, we have this:

Isn’t it grand? Well, not quite. While it may look like a spaceship, it still has that bottle-y look. To counter that, I had to paint it. I used a combination of yellow, orange, black and white.

I gave it a coat of brown first of all (by mixing yellow and orange), and then added some light shaving of black to it to give some age to it, as well as some white on some parts to give it a rust effect.

Finally, we had to make it look like it is actually flying in space. To do this, we either had to rig the model up or hold it against a projected image of a space event. This image was taken from my phone. The quality isn’t the best, but another image has been taken with a good camera which I will post here whenever I get it:
(image pending)

As an extra task, I had to make a stand for it out of wood. And here we are now. Personally, I think this would have looked better with some heavy additions, such as flat parts and a cone top. But never mind, what is done is done.
So, that is the end of the Kit-bashing M.A.R.S project right? Well... not quite. I have concept art to do, which will be the final post before the Final Major Project.
0 notes
Text
Research - Character rigging, Redline process, space and spaceships
This research post will cover how character rigging is done from start to finish, plus the animation process of the anime Redline, alongside what I know about space. This will include research about Autodesk Mudbox, my first thoughts on the software, and the tedious export process.
Autodesk Mudbox
Autodesk Mudbox is a 3D sculpt and paint software. It is used to build 3D models digitally that can then be exported and used in either live-action movies, 3D games, or just for show. Mudbox is a tricky software from my point of view, but once you learn all of the controls and tools, it is easy to use.
The export process, however, is another story. Depending on what you want to do with the model, you have to choose certain options within the process to make it work with whatever you’re putting it into (Cinema4D, for instance).
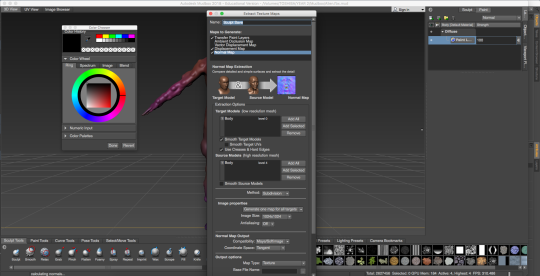
First, you must go to UVs and Maps > Extract Texture Maps > New Operation. Then you have to choose the appropriate settings in Maps To Generate: Transfer Paint Layers, Ambient Occlusion Map, Vector Displacement Map, Displacement Map and Normal Map. You CAN choose more than one and less than five, but I don’t recommend trying it unless you know what you’re doing.
The next step is to choose the part to export, such as your full model under the name of “Basic” or even “mr wishy washy”. And at the bottom of the menu is a filename field. Click that and choose where to export it. If you don’t, it may export in the Mudbox directory or somewhere else you don’t want something like that to be.
Do that for all of the parts you have and you are done. Just locate it and pray to God that it works perfectly with whatever you do next. I have had a lot of trial and error with this complicated process, so... get a Mudbox pro if you need help, as I cannot help you with your issues.
My first thoughts on Mudbox - The only part I don’t like is the export process. It is too difficult for me to understand or even get started on without following a very long tutorial, which I’m not capable of doing in all honesty. Everything else is alright.
What do I do with this model texture I have?
What I did next was move to Cinema4D. Unless you know how to make a full human skeleton in Cinema4D by yourself (it is tedious and complicated, not something you can learn in a day), go to Mixamo, which is a modelling site that even allows you to animate your character in just the click of one button.

You can find different models of different characters on here, so the possibilities with your model are endless.
Once you find the animation/model you want, you can download it and use it in Cinema4D. I’m not sure if it works within any other 3D software such as Blender. Prove me otherwise.
Redline Animation Process + Review
Redline is a feature-length manga animation (1 hour and 42 minutes) that involves the plot of a racer willing to win the final, but is being stopped by a cyborg. The reason why I’m explaining the process of this animation instead of a full-on review of the film (which I will get into after this process) is because of the amount of time it took to make the film - seven years! If you remember my post about Cuphead, you’re probably familiar with that long length of time. The reason why it took so long is because of all of the detail required to make such an animation with a length like that (average of 25 frames per second, multiplied by 6,120 seconds = 153,000 drawn frames!):
youtube
Some scenes re-use some frames (like when the character talks or if the car is passing multiple objects of the same kind) in one particular shot or many shots of the same frame). An example of this is very frequent throughout Yu-Gi-Oh (which is also a manga).
Just watch their mouths:
youtube
In my opinion, this is rather lazy, but it saves a lot of time, resources and money. Imagine if every frame in Redline had to be completely unique (no two frames would be the same), it would take well over seven years and 3 billion yen to make if that were the case.
Because Redline is a Japanese film, it may not seem very expensive as 3 billion yen is around £23.3 million, but think about that for a second. Would you spend 3 billion of whatever currency you have, to make a 104-minute manga? Personally, I wouldn’t unless I know it will be a film that everyone would like.
Onto the Redline film review (even though we weren’t told to do one but hey, who is going to stop me?):
This was the best animation I have ever seen in my life. However, there were some traits in the film that kind of weirded me out a bit. It may be weird, but what animation isn’t? How it’s weird is the fact that this animation contains a fair bit of blood, nudity and swearing, but I honestly don’t care for that. But some of my favourite scenes are the crash scene (how the racer crashes his car at 200+ MPH and is still alive somehow to drag on the movie) and the final race scene, especially the part where they’re neck and neck and it is a death wish to reach the finish. All of the time and effort that went into this film is what makes it worth the wait for. The plot and storyline really gives you enough tension to keep you on the edge of your seat during the climax of the film. All of the detail, the filters and how everything clashes together makes it a film worth watching. If you're not a fan of nudity, blood, super cars, or tragedy in general I do not recommend this film. Nonetheless, I really enjoyed watching it. It somehow reminds me of Wacky Races, which is an old-time cartoon based around these very comedic and edgy races. Would I recommend this to a friend? I probably would tell them about the film first before I did so, but if they are into the genre of racing, I would do.
Finally, Space!

Not just space in the room, OUTER space. Outer space is what lies outside the Earth, around 62 miles up from ground level. The observable universe that we can see is 93 billion light-years wide, while outer space goes on forever.
So far, humans have only managed to reach the Moon and no further. The Moon itself is around 250,000 miles away from Earth, and only 12 people have ever made it there and back. While other spacecraft had tried to land on other planets in the Solar System such as Jupiter, nobody has ever been out further than the Moon.
Outer space, or in the very least, our observable universe contains two trillion galaxies, which altogether contain more stars than there are grains of sand all over Earth.

Each individual star has a life, just like us humans. Stars are born from dust and gas, which then evolve into their main form for about 3-7 billion years while it burns all of it’s gases to it’s own core, after which it will collapse on itself, turning into either a white dwarf star or a black hole in the process. Our Sun, is one such star. It is around 5 billion years old, and in about 7 billion years time, it will die too, which will destroy Mercury, Venus and most likely Earth with it. Long before then, it’s habitable zone (or Goldilocks region) will move further outwards into the Solar System, potentially allowing life on Mars, so life on Earth could flee to Mars to escape the cataclysmic event.

So far, we have not found another life-form that lives off of water or anything us humans need to survive. Those there are theories and speculations that there may be “aliens” outside of our Solar System. One of such system is the Proxima Centauri star system, which is just over 4 light-years away from us. Since it is too far away for us to humanly reach in spacecraft, even if it could go at the speed of light (it would take 4 years in this case), there is only one plan to get to the area, which is to send 1,000 sail-spacecraft called StarChip at 15-20% the speed of light towards the system using a laser to get them going.

The reason why 1,000 are going at once is because of the extreme speed they’ll be going at, which is so fast that if it even comes into contact with a spec of dust, it will INSTANTLY get destroyed. So if multiple get destroyed, at least a couple hundred will make it. When they do, the craft will take photographs of the star system and it will take a few years to get back to Earth.

Speaking of spaceships, there is unique spacecraft in both the game and movie industry. This example is Liset from Warframe. It is the military home ship of the player, who goes to different planets to either extract data from the enemy base, capture an enemy, or to straight up kill the leader of an enemy gang.
It is a military spaceship because it is home to a being who is willing to wipe out life on another planet and claim whatever treasures lay on said planet. Another example is the spaceship of the bad guys in Elysium:

It may not look intimidating, but the entities inside the ship certainly are.
What do I like about everything shown in this post? Well, see my Redline review for my thoughts on Redline. As for everything else, it really fascinates me as I like science-fiction based stuff, because it raises a lot of speculation for scientists, and even me, about what lies outside of our planet and even this universe. Do we live in a multiverse? Is the universe much bigger than we thought? For now, it looks like we may never know unless we have trillions of years to spare...
1 note
·
View note
Text
Project 10 - Digital sculpting and character rigging
This project was based in Autodesk Mudbox, which is a digital sculpting software. When we loaded up the software, we created a Basic Head, which is a template.

And from there, we worked with it until we were happy with our results.

For mine, I only went simple and gave mine eyes and sculpted ears.

This was only a test to get us used to the software, as later on we moved on to full-body sculpting.

For this, we used either a male or female character rig. Because the character is naked, I had to censor some parts of these photos in case this post gets false-flagged by the bot.


First, we applied coats of paint, along with some sculpted extensions or modifications. This went up until lunch-time.
After that, we had to export. This was a HUGE pain in the neck to remember. First, we had to go to UVs and maps. Then we had to select the options we needed for our character to look good. I enabled paint map saving as well as two other essentials, and added filenames to the bottom of all but the paint map save (I called them “jelly” and “jelly 2″, don’t even ask).
After that, we put them into Cinema4D.

Because of how much trial and error Mudbox likes to throw in, this took a lot of time and effort. Eventually, we had the exact colours that our model did in Mudbox.

Now it was time to go ham with animation! Keyframes, adjustment and repeat. For real though, there are a LOT of parts in this ‘skeleton’. Finding the right one was super easy as they were all named accordingly.
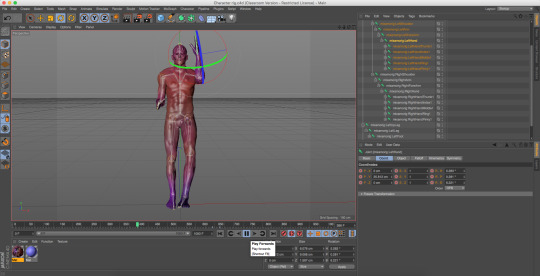
In the animation I made, the figure puts it’s arms into an “L” shape, shakes it’s head, and then kicks the viewer. Afterward, it thinks about what it did and then puts it’s hand on it’s head in shock that it hurt someone.
Nobody was actually hurt in the process, don’t worry.
In short, this was a VERY hard project compared to the other ones we did, due to all the trial and error. Learning to sculpt in Mudbox was easy, though. Hopefully Project 11 will be easier...
0 notes
Text
Research - Kit-bashing, Star Wars and the 1969 Moon Landing
In this post I’ll look at multiple artists who do kit-bashing (Adam Savage, Colin Cantwell, Joe Johnston), including Star Wars and the 1969 moon landing (this doesn’t involve kit-bashing but a summary). All of these, except for the ‘69 moon landing involve Star Wars in some way. Given I’ve never seen Star Wars, I’ll do the best I can to relate to it as much as possible.
First, let’s look at Kit-bashing...
Kit-bashing is the practice of taking multiple scrap metal parts, such as from broken motherboards out of computers or old tin cans, and turning them into another model. This is useful for the movie industry as some of these models can be transformed to give a teaser look at a scene (i.e. a broken down building or a mangled machine).
Kit-bashers use kit-bashing to make small/large scale models for films, realistic-looking pictures, or just for the sake of it.
Adam Savage

Adam Savage is one of the three kit-bashers I'm looking at in this post. He is the official model maker for Star Wars Episodes 1 and 2, as well as a helper in the special effects in that same film. In this picture you can see him making a large-scale model of what looks like an enemy ship (again, I’ve never seen Star Wars so I don’t know what it officially is, best I could get out of a search was Tipoca City). I like the detail he puts into his models, another one of which is this one:

...a small-scale robot. Not sure if this is from Star Wars or another sci-fi film like Transformers.
Colin Cantwell

Colin Cantwell is the second artist I’m looking at. Unlike Adam Savage, he doesn’t go large. To compensate for that, he makes very detailed miniature models to then put up close to a camera and create a picture like this...
Oh, and he is also a concept artist.

Following this concept artist, he then goes on to produce models based off of them (without the fancy effects (like the jet engine fire) of course).
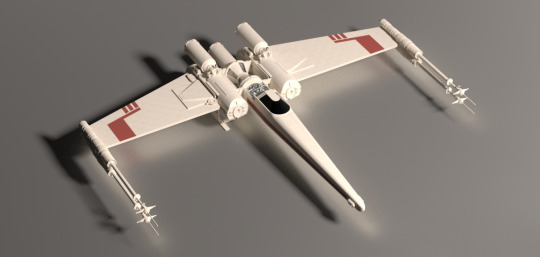
The official model that was used for the... X-wing?
When put up close to a camera, a small-scale model can turn into a giant spaceship (not in front of your eyes, but in front of the camera). So you get stuff like Lori Nix’s pictures (see term1itmedia for more about her).
Another concept artist that I was going to look at in this post but I’ve ALSO done on term1itmedia is Ralph McQuarrie. In short, they’re all concept artists.
Joe Johnston
Joe Johnston is the third and final artist I’m looking at in this post. However, unlike Adam and Colin, he does NOT make models.


In the first concept art, you can see a giant robot being drawn to scale next to a human (the robot is about five humans tall!), and also what the scene would look like. In the second concept art, you can see what looks like a spaceship’s engine with all the pipes, buttons, rivets and everything else.
Joe’s concept art has SO much detail, and that is why I like it.
Now onto the man and his creation themselves...
George Lucas and Star Wars

George Lucas is the one who created Star Wars, alongside another film series known as Indiana Jones. He even had his own company, Lucasfilm, which he then sold in 2012.
Star Wars, if you don’t know, is an American space opera franchise that became known after the first film’s release.
Star Wars was a huge success at first release in 1977, becoming the fifth highest-grossing film of all-time at $775 million in the box office.
In total over the entire franchise, they have $65 billion as of 2018. In the leading franchise (the Skywalker saga) there are eight films with an upcoming ninth coming out in late December 2019 (which looks like it will be the last one).
Unlike the other eight films, George will not be directing the final as he is a retired man (74 years old as of this post), so J. J. Abrams is directing it instead.
Phew, I can finally get this load off of my chest.
1969 Moon Landing?
Oops, I forgot about this.

The 1969 moon landing is one of history’s greatest events in exploration and is now approaching it’s 50th anniversary on the 21st of July this year (as of the time of this post). This event involved the first two people to ever walk on the Moon, Neil Armstrong and Buzz Aldrin.
Armstrong was the first person to set foot out of the spacecraft and set foot on the Moon, during which he said one of the most iconic lines in history;
“That’s one small step for man, one giant leap for mankind.”
However, ever since then, people have been convinced that the entire landing was staged (as it was filmed too). This led people to ask questions such as “Why is the flag waving when there is no wind on the Moon?” or “Where are the stars? The sky should be full of them!”. Well, I can answer both of these questions.

The flag is waving due to how it was planted into the Moon. Because there is less gravity on the Moon, the flag did not flop down upon being planted, as of which it continued to wave in the direction the flag was planted in.
The reason why the stars are not seen is because they’re too faint for the camera to see them. If you look closely you can see a few stars in the sky, but there are not many to be seen. They are there, but you can’t see them.
Anyway, after spending 135 minutes on the Moon, the crew had to return home. They launched off of the Moon and then waited three days to get back into Earth’s gravitational pull, after which they splashed down into the Pacific Ocean.

The spacecraft is still on display today at the National Air and Space Museum.
That is certainly one giant leap for mankind.
Did you know, that more people have been to the Moon than to the bottom of the Mariana Trench?
0 notes
Text
Research - Animation (Max Fleischer, Cuphead and the Moldenhauer Brothers)
Animation is the process of using many illustrated or pictured frames to create a real-time video so it looks like the models or characters used to make it are actually alive. Examples of which are the old Disney movies such as Snow White (1937), The Jungle Book (1967) and Cinderella (1950), or other iconic animations such as Popeye and Betty Boop (pre-1940s).
Another type of animation is stop-motion animation. This is done by setting up a scene using models and using a main model to move (for example, a ball rolling down a street). It goes like this: Take picture, move object and repeat until the object reaches it’s final location. An example of this is, you guessed it, Wallace and Gromit.
These are long and tedious processes, as it will take more than 86,000 frames ((60 minutes * 60 seconds) * 24 frames per second) to make an hour-long movie using this method (at least if you stick to 24FPS).
Max Fleischer

Max Fleischer is known for creation of the Betty Boop animations and the invention of the rotoscope. The rotoscope was used to make the animations come to life instead of appearing as 300 frames (this isn’t how many there are in an animation but let’s use this as a base for now) in a line, one by one.
Rotoscoping nowadays is used to make visual effects and not full animations, as the rotoscope has been made obsolete ever since the invention of computers, but some studios still use rotoscopes.
A good example of rotoscoping is the Take On Me music video (1985). The scenes that take place in the paper is all done with rotoscoping.
youtube
It is an excellent process that was way ahead of it’s time, and that is why it interests me. To see something being done that was previously thought to have needed a very steady camera and 10,000+ sheets of paper (probably not but again, base) is a huge jump into the next generation.
Cuphead and the Moldenhauer Brothers
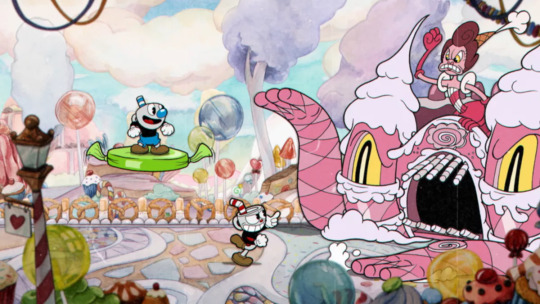
Cuphead is a 2017 indie game that was developed by the Moldenhauer Brothers using the Unity engine. The reason why this game is on this blog post is because the majority was made using traditional animation techniques (since the minority are other assets such as code and audio (which is a jazz orchestra that has also made music in the same way old cartoon music was)).
This technique required them and their team to draw every single frame for the characters within the game to then put onto a sprite sheet and then configure properly to make it work. Just imagine how big the sheet would be for just the main character! However, the game is not just made using hand-drawn animations as there are some models involved. For an example of every one of these factors seen in action, see gameplay (the background is a model and not animation):
youtube
I have actually played this game all the way to the very end and I love it because not only is it like nothing I’ve ever played before, it is one heck of a challenge, and I do love me a challenge every now and again. If you’re thinking of playing this game yourself, I’m just going to warn you: This game is VERY difficult. Prepare for rage-inducing action, and to die a lot.

As for the Moldenhauer Brothers (the guys behind the development of the game), they have never made a game before (as mentioned above). They chose to make the game because they wanted to, despite their lack of knowledge. What really mattered to them is that they made a game they liked themselves, but they also had high expectations on positive reception from the audience.
The game originally started out as a boss rush (a whole sequence of bosses a player would fight one after another with nothing else in between), but after an E3 exhibition, they decided to “fully commit to it’s initial “dream-scope””, making the game what it is today.
They did not make the game by themselves as they had family and friends do some of the major work, such as drawing the characters or composing the music. I’m just saying though, there are some popular games that were made by one person, and one person ONLY, such as Stardew Valley and Papers, Please (one of which I have played).
The Moldenhauer Brothers are currently building a DLC (downloadable content) for Cuphead, and I really don’t blame them. The game sold over three million copies and has won so many awards.
Conclusion
Plan to be an animator? You need some great artistic skills and a lot of time if you want to make something as great as an animation made today. These animations don’t create themselves.
0 notes
Text
Project 9 - Welcome to M.A.R.S!
So, the Christmas holidays were a blast. Now back to college for term number 2 out of 3 for the entire year (plus the three in Year 2 should we pass the first year) to focus on new projects and challenges.
The first challenge was making a ‘captain’s chair’ for our sci-fi project known as M.A.R.S. If you don’t know what M.A.R.S is, it is an amalgamation of Maths, Art, Religion and Science (which abbreviates to MARS) into one outcome or more that is made based around science-fiction.
Maths requires us to use geometry and the ability to count to determine how many pieces we need for the project. Art is the element that brings this project to life. Religion is based around what original species we come up with and the lore associated with that. And Science... is the key factor in this project.
Everything we have learned up to this point is crucial in this 6-week long project, and also our “one small step” to the Final Major Project.
Anyway, enough about explaining M.A.R.S, time for the project!
Aye aye, captain!
Our first task within this project was to make a captain’s chair similar to Captain Kirk’s one from Star Trek, which if you don’t know, looks like this:

While it would take us longer than 6 weeks to completely replicate this chair (unless we have previous experience and lots of knowledge about the software), we had to make our own original chair, but similar to this one.
The process was done in Cinema4D, which required us to learn some new options and controls to get the results we wanted.

I didn’t capture the beginning processes (I forgot, sorry), but I can explain it word-by-word here. First, I made a Cylinder and then made it extremely thin on the Y-axis (not too thin otherwise it will be barely visible and will look weird at a distance) and stretched it out on the X/Z-axis (doesn’t matter either way as it auto-scales).
Next, I made a cone, which was also shrunk down in the middle of the flat cylinder.
Third, I made a cube to put INTO the top of the cone (so the cube blends in with the tip), accompanied by another cylinder.
Lastly, I made another cube and transformed it into a cuboid (the base of the seat). The same thing was done for the arms of the chair and the very back of the seat.

But having a flat chair wasn’t going to cut it as Captain Kirk’s chair is not flat unlike most home chairs (which Kirk’s isn’t, it’s a spaceship captain chair). I then had to transform the shapes into polygons to have a bigger base, tilted walls and sloped surfaces. This was done by making the object editable, selecting the Polygons selection tool and dragging the faces accordingly. This was tough to figure out at first, but now I think I’ve got the hang of it.

After a lot of alterations and anger...

We have a chair that is suited for the future Captain Kirk (fit with buttons, but no cushioning yet).
Let’s land!
After that, we were given the task of creating a landscape, also done with Cinema4D.

Again, I didn’t capture the beginning process. I forgot again, OK?
Anyway, how this was done: First, I had to create a Plane. Not like an AIRplane, but a Plane. Flat ground.
Then I had to expand that Plane from 400cm to 2,000cm and from 1 segment per side to 400 segments per side. That allowed us to edit individual tiles on the stretched out land we had.
Then I had to select the Brush tool by right-clicking on the Plane, which allowed me to drag a certain tile upwards. Whenever I drag a tile, about 30 or more will move up with it, giving us a slope that levels up exponentially to the very top. It took some effort to get it working (CMD+A or CTRL+A), but eventually I did.
Then I had to drag a material into the layer to give it some texture (that is a snow texture in the picture by the way). I’ve tried out rock and snow. I went with snow as the rock texture looked very weird on the extremely steep slopes. I even added ice into the pit I made in front of the mountains to give it a northern look.
And that was it. Now we know how to make a captain’s chair model (and pretty much any model in general) in Cinema4D and a landscape. This will be very helpful for ourselves as we’re going to put these into Unity as some point.
Speaking of Unity, we are going to create a game based on these assets in about 2 weeks time. I have prepared for this greatly over Christmas by learning the C# coding language, which is what Unity uses, alongside Java which is also used in it. I have also taught myself how to make stuff work with code by making a mod to an already-existing game (if you’re curious, I modded Terraria, which is written in C#).
This is going to be an exciting time...
0 notes