
Don't wanna be here? Send us removal request.
Statistics
We looked inside some of the posts by theberknologistspeaks-blog and here's what we found interesting.
Average Info
Notes Per Post
0
Likes Per Post
0
Reblog Per Post
0
Reply Per Post
0
Time Between Posts
2 months
Number of Posts By Type
Text
13
Photo
1
Link
3
Last Seen Tumblr Blogs


Fun Fact
Tumblr was created by web developers David Karp and Marco Arment.
Text
ISTE Certification - 2019
ISTE Certification – 2019
Photo: Mine 🙂
Last weekend, I participated in a 2-day training towards becoming an ISTE Certified Educator. I wanted to do this because I was reaching a point in my professional practice where I needed to rethink how I approached my work with teachers, reflect on my teaching practices and strategize how our entire school could engage with and reflect on best teaching practices which include…
View On WordPress
0 notes

Text
Student Use of Images and Copyright
Student Use of Images and Copyright
https://www.educatorstechnology.com/2017/03/important-google-image-search-tips-for.html
When working with students on a project including digital media in the form of images, I like to emphasize that students need and should include attribution for any of the work they use. Students should also be encouraged to create their own images and/or drawings, to which they reserve the rights to. …
View On WordPress
0 notes
Text
Podcasts as Learning Tools
Podcasts as Learning Tools
Increasing in popularity and scope, podcasts not only make a useful medium for a wide range of topics to be explored but can also serve as a dynamic teaching and learning tool, as well.
A podcast is an audio recording with spoken word delivered in an audio file format. Podcasts can be played or downloaded to any phone or streamed to a computer or other mobile device. Varying in…
View On WordPress
0 notes
Text
Ten Google Apps & Extensions for Teaching and Learning
Ten Google Apps & Extensions for Teaching and Learning
Image source: giphy
Happy Media Literacy Week! Check out the Newseum’s site for additional resources.
Before jumping into a few of what I have found to be useful extensions for teaching and learning, it might be helpful to briefly explain what an “extension” is. Extensions are lines of code that run within a browser that “extend” the functionality of the browser. Here are just a few…
View On WordPress
0 notes
Text
Spatial Thinking with Google Maps and Beyond...
Spatial Thinking with Google Maps and Beyond…
18 Ways to Use Google Maps in the Classroom
In this last newsletter exploring the intersection between mapping and geography, I wanted to share one final resource in the form of Google Maps.
What is Google Maps? Of course, many of us have likely used Google Maps to quickly locate a destination or to pull up driving directions. But with Google Maps, you and your students can become arm-chair…
View On WordPress
0 notes
Text
Storytelling with Google Lit Trips
Storytelling with Google Lit Trips
What is a Google Lit Trip?
“Lit Trips are downloadable files that mark the journeys of characters from famous literature on the surface of Google Earth. Along the way, placemarks with pop-up windows contain “just in time” resources including relevant media, thought-provoking discussion starters, and links to supplementary information about “real world” references in that portion of the story.” …
View On WordPress
0 notes
Text
Digital Citizenship Week 2018
Digital Citizenship Week 2018
Every year, the third week of October is dedicated to teaching good digital citizenship in hopes that all students will become safe and smart when using technology. Every day this week during lunch, a few of the boys in Form II have been sharing a tip that serves as a reminder of what it means to be a connected, conscientious digital citizen.
The tips covered this week will range from…
View On WordPress
0 notes
Text
Storytelling and Creating Interactive Maps with Google Tour Builder
Storytelling and Creating Interactive Maps with Google Tour Builder

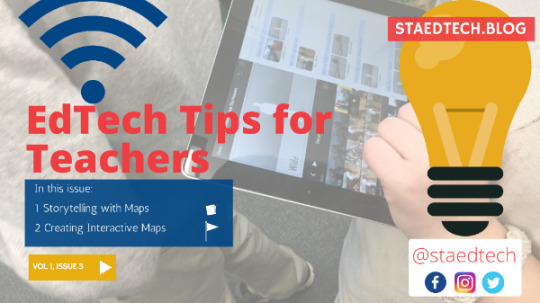
What is Google Tour Builder? Google Tour Builder is a Google tool, which leverages Google Earth technology to allow users to create a story using geographic locations. With Tour Builder, students use location and place to tell a story or to better convey the details of a literary work.
Here are a few examples of Google Tour Builder from across the curriculum: The American Revolution A…
View On WordPress
0 notes
Text
Last week I had the wonderful opportunity of attending the #picademy, sponsored by the Raspberry Pi Foundation, held in Ann Arbor, Michigan. During this two-day workshop, 40 educators from all over came together to learn more about physical computing and just a few of the ways the Raspberry Pi 3 (RPi 3) could be used to foster creativity, problem-solving ability, and the maker mindset. In groups, teachers collaborated on a variety of projects to include selfie photo-booths, sensing projects, and more.
The Raspberry Pi is an accessible and affordable computer, not to mention one in which can fit in the palm of your hand. At a price point of $35/unit, it provides a neat way to put a programmable computer in the hands of your students. Similar to a Windows or Mac OS, it runs the Raspbian OS, its own operating system.
Out of the box, I was able to quickly assemble and connect the Pi’s components. Once connected, our rock star facilitators walked us through a few projects to get started with the Pi. What I appreciated about this workshop was that there was no “sit and get”, within the first 20 – 30 minutes of Day 1, we were drafting, testing, and exploring new ideas on the Pi. Though I learned much more than I had already known about the Pi, that wasn’t what made the workshop awesome… it was the confidence I gained in failing and trying new things beyond my reach and learning to leverage the wealth of resources around me, by way of the RPi Community and beyond.
Another thing I appreciated about the workshop is that I was able to walk away with something I had created. During the workshop, we were tasked with coming up with a project idea that solves a problem we have and then organize ourselves in teams centered around that mission.
While brainstorming a few project ideas, I wanted to come up with something that would give students and teachers a way to quickly reflect, document and share their learning experiences. One easily overlooked, but so very important practice in education is that of reflection and sharing. A selfie/video-reflection photobox thingy (smile) is what my group and I came up with. Inspiration from the @thenerdyteacher. Recently, Instructables posted a nice write up for a Raspberry Pi Photo Booth Case… Check out that link here.
This slideshow requires JavaScript.
Of course, during the project development phase, we experienced some challenges, but that was to be expected. Needless to say, the payoff was huge. Not only were we able to develop an initial concept, but we now have some ideas of what to improve upon in our next iteration. My team was fire (that means terrific, great, hot, etc.) and consisted of @ckillmer, @ra_stratton, @mkplyler , @afmcdnl and our Tweet Bot: @RPCE_PhotoBomb. Consider following them on twitter when you get a moment.
@theberknologist & @ckillmer in the zone
What the bleep am I doing?!
@ra_stratton & @mkplyler working it out
@RPCE_Photobomb working on the Twitter plug-in
Team @RPCE_Photobomb
It did take us a while to get going, as we spent a great deal of time in the concept development and project management phases. Our group-assigned team leader quickly assigned us roles and from there, we all just jumped in. Two of us worked on a physical prototype of the photo booth, followed by my work in Python on the code for the Dropbox plug-in to automate the image delivery to a private Dropbox for vetting. This is particularly important if you are concerned about the content your students may record. Our group also had the work of drafting (borrowing) the code for the physical components and connections, i.e. the button wiring and designation in Python (wasn’t my part – LOL). While that was going on, we also had another team member working on the Twitter API plug-in, which would provide users the opportunity to submit their image or video (after a preview), along with 140-character tweet on their subject. One of the initial thoughts here was to use this in a science class, where during labs, students could quickly record their reflections and 140-character tweets, all from their lab bench. Of course, this can and should be adopted in other disciplines and content areas. What about a similar booth for a writing/ELA course where teachers allowed students to record their story endings, or in a language class, where teachers allow students to practice their dictation.
In short, I found this to be a low-cost and accessible way to outfit a class with portable recording stations/studios. Many thanks to @thenerdyteacher for the inspiration and the entire RPi Team @ascollins, @mllevalsunshine, @mattrichardson, @olsonk408, and @cortlentz1 for all the knowledge and support they offered to move the idea forward…


Til next time,
The Berknologist has spoken,.. Good night.
Pi Anyone? Raspberry Pi, that is… Last week I had the wonderful opportunity of attending the #picademy, sponsored by the Raspberry Pi Foundation…
0 notes
Text
As I’ve shared in a previous post, I recently signed up for an online workshop hosted by Digital Harbor Foundation. In this series of workshops, you learn how to build 10 different DIY projects. The course helps you with step-by-step instructions on how to complete the build. Along with the printed step-by-step instructions, you also get the live walkthrough of the build. Each project comes complete with a list of materials you will need for each build, along with support when you bump into troubles along the way. In this first build, using an Arduino, I learned how to program a Neo-Pixel LED light, which can be used as part of a maker space sign. Now, for anyone who knows truly knows me, knows that I love big bright lights, especially colorful lights, and this project appealed to my peculiar sensory needs.
While I am unable to outline the directions for the build here, you’ll have to sign up for the workshop for that! I will share my experience during the process, with a few snaps here and there… First of all, I will have you know that she (me) had no clue as to what she was doing, but that’s okay, both @jonathanprozzi and @shawngrimes were there to field my questions…
Arduino uno
The NeoPixel Light was “LIT!” haha!
Close up of Arduino
Micrograbbers connected to wire jumpers
NeoPixel
During the build, I learned to install a program from the Arduino Library, which caused the lights to “light up”. You’ll notice below in the strandtest below that you have the ability to customize the pattern and timing of the lights, which is pretty neat. I am thinking of using the lights to make a Neopixel basketball hoop. It’s gonna be LIT!!! Like, literally… Haha! During the build, of course she ran into a little snafu (just learned how to spell that word) during the build when I attempted to connect the Arduino via USB. I received the error message below and of course, called in @jonathanprozzi for damage control. Of course, he directed me to unplug everything, reboot and reinstall the program to my computer and, yes it worked! See pics above.
Hurrah!
Til next time,
Peace!
Make Your Makerspace As I've shared in a previous post, I recently signed up for an online workshop hosted by Digital Harbor Foundation.
0 notes
Text
Some weeks ago, our students completed a two-week long project on the Middle Ages, wherein they were given a variety of topics to choose from including, the Black Plague, feudalism, the Byzantine Empire and the Crusades. In groups of 3, the students approached the task by conducting background research on their selected topics, using advanced search strategies for their images. Collaboratively, they crafted and revised their shared storyboard, finally filming trailers using some green screen effects and iMovie.
This slideshow requires JavaScript.
The project cycle involved the teacher and I sitting down to discuss the learning goals for the unit, as well as what she was hoping to accomplish through the activity. Next, we planned a project timeline, which included a few deliverables along the way. I used Tony Vincent’s iMovie Trailer Planners to help the students plan and organize their stories. (Consider following Tony on social media) Scaffolding the project in this way not only ensured the students understood the project, but also helped with time management.
Before students set about to complete their story boards, I spent time discussing the importance of attribution and photography etiquette. I did this, as it is routine and tempting for students (and adults) to quickly google an image, copy and paste it, without citing where the image was taken from or knowing whether the image could be remixed or used in other ways. Since we were on the subject of images and photography, I also felt it was important to talk with the students about etiquette. Jenni Swanson Voorhees, my tech bud and former colleague at Sidwell Friends School, shared with me a lesson she and her students had completed centered around the theme of “Creating a Culture of Consent“, wherein students crafted a community agreement, laying out their rules for taking photos in the class. The agreement is simple but fosters the consideration and respect we want our students to display. I shared with the boys the importance of asking a person’s permission before taking a photo and sharing with them how that image will be used. In addition to asking permission, it is also important students share those images with the subject, and allow them to view the final product, as well as have knowledge about how that image/media will be shared. As the students were all working in groups, they were able to easily shared those images with their group members, in addition to viewing and editing the final products.
Discussing advanced image search
After our chat, students independently brainstormed their story ideas, followed by a collaborative planning session, where they merged their various visions into a singular story. After the storyboard was completed, the classroom teacher gave the students time to explore the various trailers to gain a sense of the tone and theme they were hoping to achieve. Finally, it was time to shoot.
The next 2 days or involved filming and editing, where students used the picturesque grounds of the National Cathedral in Washington DC, in addition to some green screen techniques to finalize their movie. I used Impact’s green screen and the DoInk iOS app ($2.99) to complete the project. Their vision and hard work culminated in a Film Festival, where students voted for their favorite trailer…
For me, one of the most important pieces of a project is that of reflection. Upon completion of the project and film viewing, both students and teacher were asked to reflect on the process and the product. The responses included those that were technical in nature, to simply having more class time to film and edit. From a technical perspective, a few students mentioned their desire to use tripods and professional lighting during their filming, in addition to having access to a wider green screen. While others expressed a desire to explore a different trailer/movie making app as well as more sophisticated editing software (Adobe Premiere) for enhanced quality (by the way, even I don’t yet know how to use Adobe Premiere) ha!
Another essential piece in refining a class project is that of teacher reflection and feedback. The classroom teacher thought this project gave her students an opportunity to explore their creative talents but also felt the trailer was a little light on content. If we were to do it again, we would explore a different video making format, so as to allow the students more flexibility to include their own voice. The teacher also felt it would have been helpful if students were able to record their own audible storyline in the trailer. For next time, the idea of a short movie might be a viable alternative. Having the boys use iMovie trailers for the first project was a scaffolded way of introducing them to the ideas of storyboarding, capturing images and editing. While she would like to do the project again, she and I both agree on coming up with ways to encourage the students to include more content.
Rest assured, this isn’t the end… We’ll be back!
Here is the write up, along with the trailers, located on the school website.
Til next time,
Middle Ages Film Festival Some weeks ago, our students completed a two-week long project on the Middle Ages, wherein they were given a variety of topics to choose from including, the Black Plague, feudalism, the Byzantine Empire and the Crusades.
0 notes
Text
In my previous post, I discussed my plans to launch a maker club at my school. In this post, I plan to provide a bit more context. Each club meets once a week for 45 minutes for seven (7) weeks. Because this was my first time ever doing this, I wanted to come up with a few project ideas in advance. Further, I wanted to select projects that would provide a low barrier to entry, as well as one that would incorporate scaffolded skills sets the students could build upon and leverage as they move towards more challenging projects.
As usual, I planned way more than I needed for the first day, as I was not yet familiar with the ability and skill level of the students. So, I decided on two (2) mini projects, Paper Flashlights, and Artbots. I “borrowed” the Paper Flashlights project idea from the Digital Harbor Foundation (DHF) and Instructables. During the Maker Workshop at DHF, one thing we discussed is the simple, but all important act of sharing one’s work. Had DHF and others chose not to share their work, I, as well as my students, wouldn’t be able to benefit and grow from their wonderful resources, so I was reminded by @jonathanprozzi to “pay it forward” through sharing (hence, my post).
Within the first 10 – 15 minutes of the club, I realized we would not complete both projects. My ambition was tempered with a reminder that planning adequate time for project execution is also key. The students set about the task of making Paper Flashlights using a template. Here are a few pics from that experience.
Maker Space in a Bin!
My stash of supplies – some of which was donated by teachers
Paper Flashlight Template
Student connecting the LED Light to the coin cell.
Googly Eye Paper Flashlight
Students assembling paper flashlights
Finished (not finished) product – remember, it’s a process!
During our second session, the students and I crafted Art Bots. This was done to engage the students in the idea of using technology as a means of self-expression. For this project, we used recycled yogurt cups, googly eyes, and markers to create the bot. After securing the battery and wires, we then set about connecting the battery pack to the cup. Next time, I might just go with the suggestion of DHF and use electric toothbrushes from the Dollar Store. This would have made the motor assembly much easier. If you’re looking for additional inspiration along these lines, The Tinkering Studio has a similar project posted titled, “Scribbling Machines“.
In short, the boys seemed to enjoy the project. I’m interested in where this will go next…
Art bot spin
Student stripping motor wires
Tada! My funky art bot… Isn’t she cute?
Students assembling their art bots
Art Bot Dance
More stripping…
til next time, – theberknologist

The Berknologist Speaks by Dawn Berkeley is licensed under a Creative Commons Attribution-NonCommercial-ShareAlike 4.0 International License. Permissions beyond the scope of this license may be available at www.theberknologistspeaks.wordpress.com.
Reflections of a Maker In my previous post, I discussed my plans to launch a maker club at my school. In this post, I plan to provide a bit more context.
0 notes
Text
Each year our school offers electives to students in Grades 4 – 8. These electives, better known as “clubs” include activities ranging from lacrosse, handball, and photography to Zumba. There’s even a crew of Star Wars enthusiasts. Learning this, I thought I would jump at the chance to launch a club for makers in Grades 4 – 6. You might recall from some of my earlier posts my previous attempts at starting a maker space. Learning from that experience, I decided to try again. With that said, the next few posts are a reflection of my attempts to get the ball going. Again. In this post, I wanted to document some of those processes. I might add I didn’t quite have time to develop the mission statement nor a collection of materials to furnish this space, and I was comfortable with that. I simply wanted to get started.
To better my own understanding during the process, I wanted to comb through some reputable resources, as well as connect with some folks who knew what they were doing (smile). That’s where Shawn Grimes and the folks over at Digital Harbor Foundation (DHF) came in. Consider following them on Social Media at @dhfoundation. From their site, Digital Harbor “is dedicated to fostering learning, creativity, productivity, and community through education.” What seems to be so cool about what they’re doing is that they seem to value the idea of reimagining and reclaiming used things. In particular, their current home is housed in a former recreation facility in the Federal Hill area of Baltimore City. What they’ve done is transformed this space into a vibrant community hub for kids, maker enthusiasts, and educators. After their first year, DHF launched the Center of Excellence to provide training and support to others, like me, on how to incorporate making into their own learning environments.
During the workshop, we explored the “why’s” of making and learning to see making as a means of developing productive habits of mind like adaptability, creativity and much more you’re likely aware of. One thing that stood out to me, however, is that making also equips students with skills and understandings for jobs that do not yet exist!
Over the two days of the workshop, Jonathan Prozzi and Andy O’Neill walked us through various projects we could easily take back to our schools and replicate, one thing I liked about this workshop – definitely not a passive experience.
During the workshop, we made LED name tags, Galaxy Bots, Paper Circuits and more. In addition to the cool projects, we talked a lot about the types of maker spaces, how to get started, how to fund your maker space, how to teach making, building a maker culture, prompt development and how to deal with frustration during a project. We even received a box of supplies, valued at $300 to help us get started.
My Makerspace in a Box – ~$300 of Merchandise
To date, I’ve been able to complete a few of the projects with my students. My next post will cover our first day of making in the Maker Club and the projects our students tackled along the way. Don’t forget to check out the footage from my Funky Wind Tube Challenge. The challenge required us to create an object that overs in the blue zone for at least 10 seconds and guess what? She did that…
Til next time.
Sources:
Digital harbor foundation. (2017). Retrieved January 22, 2017, from https://blueprint.digitalharbor.org/

The Berknologist Speaks by Dawn Berkeley is licensed under a Creative Commons Attribution-NonCommercial-ShareAlike 4.0 International License. Permissions beyond the scope of this license may be available at www.theberknologistspeaks.wordpress.com.
My Maker Space Journey Each year our school offers electives to students in Grades 4 - 8. These electives, better known as "clubs" include activities ranging from lacrosse, handball, and photography to Zumba.
0 notes
Link
0 notes
Link
0 notes
Link
0 notes