
Statistics
We looked inside some of the posts by thefoxburyinstitute and here's what we found interesting.
Average Info
Notes Per Post
8K
Likes Per Post
5K
Reblog Per Post
2K
Reply Per Post
137
Time Between Posts
5 days
Number of Posts By Type
Note
9
Text
8
Last Seen Tumblr Blogs


Fun Fact
Tumblr’s website traffic is steadily declining.
Note
hey there!! how are you doing? ^_^ so i wanted to know if you had a tutorial on how to make an override for the phone case but at some point if I can have kinda "multiple overrides" so that i can change it for all of my sims (so they dont have the same one T-T) i hope its understandable.. have a nice day!! :)
hello! if i recall correctly, you'd have to export out the phone asset and swap it with yours. there's unfortunately not a way to change swatches in cas, so for each case it'd be case 1, case 2, case 3 and the end user would have to pick one case.
so unfort each person would have the same case in game (ie everyone has a blingie case)
3 notes
·
View notes
Text
lmao a $42 tutorial to make CC...
ANYHOO:
Requirements You will need: Sims 4 Studio Photoshop (however you choose to acquire it), or an alternative DDS Plugin (unless you choose to save files as PNGs) Blender (any version between 2.76 and 4.3 - I use 3.3) The Basics
Recolours and Textures
The easiest thing to start with is a recolour. If you have some knowledge of photo editing software, this should be fairly straightforward, but if you’re new to it, the following tutorial covers it well: Recolouring Tutorial - Softpine
If you’re feeling confident with your recolours, but want to add a little extra to your textures, it’s worth checking out specular and normal files.
Speculars are my favourite thing for elevating CC (by that I mean covering it in glitter and sequins). This tutorial covers the basics:
Speculars - Teanmoon
Normal maps (bumpmaps) are a little different. They can give a 3d texture to an item without altering the mesh (within reason). Teanmoon also has a tutorial on that:
The Bump Map - Teanmoon
If you’re feeling extra (I know I often do), you can use emission maps to make your item glow and/or flash/twinkle.
Get to know emission the map - S4S
Meshing
Meshing is a little more complicated (or perhaps not, depending on what your strengths are. I recommend starting with the Blender Donut Tutorial (pick the one that matches your Blender version) to familiarise yourself with Blender. I didn’t do this. I went in raw from using Milkshape for over a decade (don’t start me on Milkshape lol) I would have learned faster if I did…
Once you’ve navigated the majestic plate of donuts, you might be ready for a touch of frankenmeshing! This tutorial covers the basics really well, as well as a touch of texturing:
How to Make CC Clothing for The Sims 4 - Powluna
@joliebean also has some great tutorials covering some of the more technical details.
Going forward:
So you’re feeling confident and want to mesh from scratch! There are 3980193890381 CC creators and a limited pool of meshes to frankenmesh, so you may want to create something new. Trust me, start with earrings and work your way down from there.
For the alpha girlies:
Start to Finish Marvelous Designer Tutorial by owlplumbob
I'm also happy to answer any questions people might have as they're starting out. I don't know everything, nor am I one of the top-tier CC creating girlies by a long shot, but I'll do what I can and try to sign post if I don't know.
633 notes
·
View notes
Note
When following the 'deco sims tut, I keep running into issues of when importing the obj mesh, it is a solid color (pink) and I have tried everything to fix it, any idea on how to fix that? My sims didn't have glasses so there was only "mesh" and I have clicked apply and even made sure to select that mesh and the rig when exporting as a obj
ah if it's pink it's "missing" a texture. you can normally go around it if you're importing stuff into game but i can show you how to get rid of it
when you're in blender, look at the outliner menu up top, here

you're going to click that and select "blender file"

click that and you're going to see a list of items that are in your blender file. if you're familiar with the adobe framework, think of them as "links". what we're going to do is delete the link that blender is searching for, and relink it (ie replacing one path to the file with another...even though it's the same file).
now you'll see some items but we're only concerned with the images

from here, delete everything in this drop down and then relink your textures as you normally would.
2 notes
·
View notes
Note
hello and happy new year! ceci, do you happen to have or could you please make a tutorial on creating teeth if it's not a big hassle? i wanted to make a very particulat teeth shape for my sim, but apparently i do something wrong because the result morphs the whole face in a weird way
gurl the "happy new year" is beating my ass rn, not this exposing the state of my inbox...... 😭😭😭
but ok more seriously, I'll get on with the tutorial 😳
Step 1
first, we're going to use s4studio to create our package. we're going to clone the EA teeth to use as our base.

open s4studio and select "create 3D mesh" under "CAS"
click the blue "CAS" button
Step 2

select "Face" from the Part Type dropdown menu. this will make only the teeth files show up.
we're interested in both "yuTeeth" and "yuTeeth_Snaggle", but select yuTeeth first! (you can hover over each picture to see the names too)
click next, and save your package file as whatever you want.
Step 3

zoom in close to the model with mouse wheel until you can see the teeth, to make sure everything is correct, then go to the "meshes" tab on the right side
export your mesh and save it where you can find it.
note: if you've never used s4s or blender before, make sure your blender location is set up correctly in the s4s settings. otherwise, the sims4studio tools won't show up in blender & we won't be able to edit our cut numbers later.
Step 4
now that we have our mesh, we need to edit it in blender. I'm currently using version 4.2. the controls are different in different versions, so feel free to ask me about it if you're using another version and something isn't working right.

open your mesh in blender. press the N key to get rid of the side panel and Numpad 5 to make the view better/less disorienting. you can zoom in and out with the mouse wheel, and move around by holding the mouse wheel and moving the mouse.
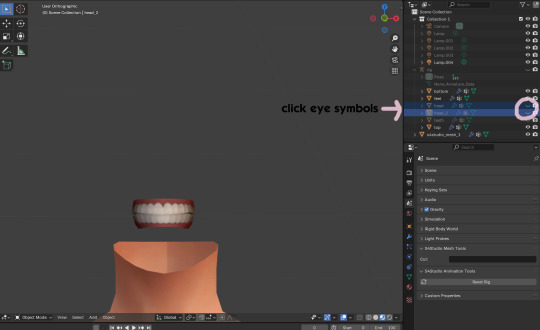
look to the right panel where "rig" is listed. click the arrow to expand the list so you can see all parts of the rig.
click the eye symbols next to "head" and "head_2" to make them invisible so you can easily see the teeth!
Step 5
there are many ways of editing teeth, of course, but what i'm going to show you is basically how to frankenmesh them. this is a good way of creating subtle variety in MM style, without it being overly difficult! we're going to combine the regular and snaggle teeth as an example.
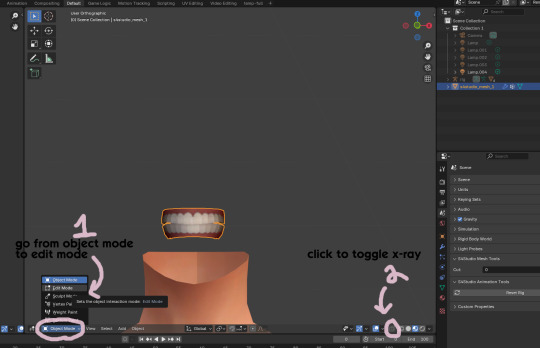
go from object mode to edit mode by clicking the menu at the bottom and selecting "edit mode"
afterwards, click the symbol on the bottom right to toggle "x-ray" so you can see all your vertices when editing.
Step 6

left click in the gray space to deselect all. there will be no orange left anywhere on the mesh.
then, hover over the top teeth and press the "L" key over a vertice (the small black dots) to start selecting the top half only. you should only have to select a couple vertices until everything on the top half is highlighted orange. you can change your view by holding down the mouse wheel and moving the mouse.
Step 7

now, press "X" key to bring up the delete menu.
click "vertices" to delete the parts of the mesh we've highlighted. only the bottom half of the teeth will be left behind. if there's any floating parts left over, highlight those with L and delete them the same way.
Now, repeat Steps 1-3 with "yuTeeth_Snaggle". when you have that mesh exported and saved where you can find it, continue to the next step.
Step 8

go back into object mode. you must be in object mode to append meshes.
go to file -> append to bring up another window

double click your snaggle mesh you just exported
double click "object"
double click "s4studio_mesh_1"
click "append" (if the window didn't close already) and the snaggle mesh will be added to your current mesh!
Step 9
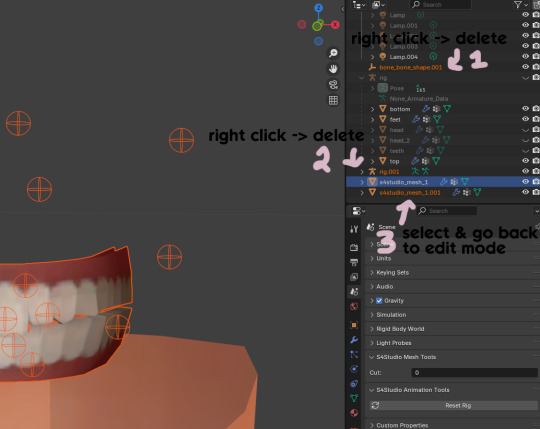
you will see several new mesh parts in the list on the right. right click over "bone_bone_shape.001" and click delete to remove it, since it's just a duplicate.
do the same thing with "rig.001" to delete it as well
select the mesh part you just appended- which is "s4studio_mesh_1.001" to select it and go back to object mode (you can also rename it now by double clicking it if you want)
Step 10

repeat what we did in Steps 6-7 to remove the bottom teeth of the snaggle mesh. you may need to be more careful since these teeth are less straight & overlap more. take your time, and if you make a mistake, you can press CTRL+ Z to undo. you can also click the eye icon next to our first mesh part to hide it so you can see better.
when you're done deleting, unhide the first mesh part to see how it looks together. you now have the top teeth from yuTeethSnaggle and the bottom teeth from yuTeeth on the same mesh! you can mix and match many teeth parts this way.

I decided to rename my mesh parts to top & bottom to keep them organized. you can click the eye symbols to hide either one and see how each part looks. when you're ready, select the top teeth mesh part and return to edit mode.
Step 11
some of EA's meshes have very few polys, so they can be hard to edit, especially if you want to move individual teeth. but, teeth are so small that they don't need/shouldn't have too high of a poly count. having every single tooth be super detailed is overkill, so it's a good idea to only increase polys in the specific areas you want to edit. for this example, i'm going to mainly focus on the front teeth.

select the front teeth by right clicking + dragging over the area you want to select, and it will highlight orange.
go to "edge -> subdivide" to increase the polys in the selected area only, which will give you more to work with. DO NOT SUBDIVIDE TOO MUCH! once should be plenty for this.
Step 12
now for the fun part- actually editing the teeth to be unique! you don't have to do this if you only want to mix & match EA parts, but it's neat to toy around with, even if you just do tiny edits. there's a variety of ways to do this, and I like to do a mixture, but for this example I'm going to use proportional editing.
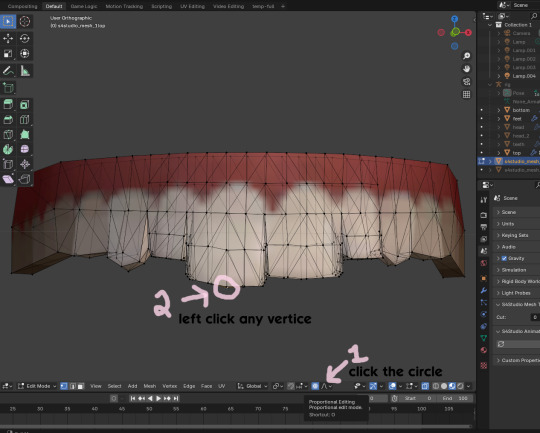
click the circle button to turn on proportional editing
left click any vertice you'd like to edit
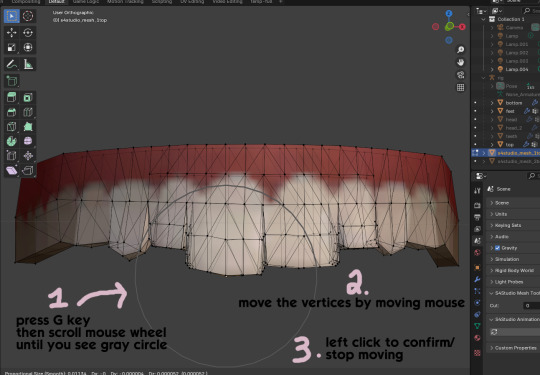
press the G key (move tool) and scroll the mouse wheel forward until the gray circle appears on your screen. this circle represents the influence of editing- the bigger the circle, the wider range of vertices will be moved around that point. the smaller the circle, the smaller/more detailed the change.
move the vertices around by moving your mouse. you'll see right away how it moves. play around with it by using a combination of scrolling the wheel back and forth and moving the mouse.
left click to confirm/stop moving the vertices. you can undo using CTRL + Z if you need to. keep repeating this step by selecting vertices, pressing G, and moving them around how you want. you can also use proportional editing with the S key (scale tool) to make areas bigger or smaller. in blender 4.2, you can also click the tools on the top left side of the window if you want to mostly use your mouse, but I usually use the keyboard.
when you're done editing your mesh and you're ready to test it out, save your file before moving to the next step. keep a copy to the side so you have something to come back to later if you want to change anything!
Step 13
now we're going to prepare our mesh to be game-ready. some of the most important aspects of that is ensuring a) the mesh part is correctly named and b) the "cut" number is correct. if these things are off, the game won't know how to read it, and we'll get odd bugs like missing heads or our mesh just not showing up at all. we currently have two mesh parts and teeth only need one, so we'll fix that first.
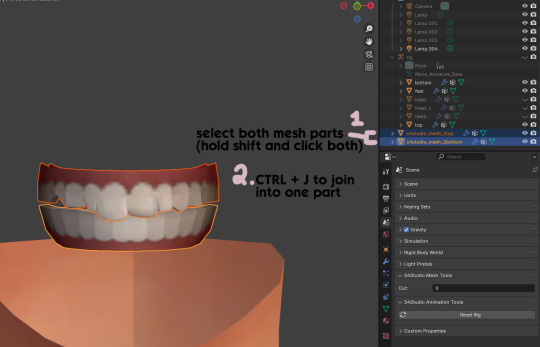
first, go to object mode and select both mesh parts by holding shift and clicking each one.
press CTRL + J to join them together into one part.
Step 14
another thing we need to do is remove doubles so our mesh doesn't look weird or have any odd shadows in-game. in blender 4, it's "merge by distance", but in earlier versions it's just "remove doubles". you should do this when you're done editing, because it'll be difficult to edit after this step. I always do it after I merge all my mesh parts & am about to import for testing. I also double check the cut numbers after this to be sure they're right.
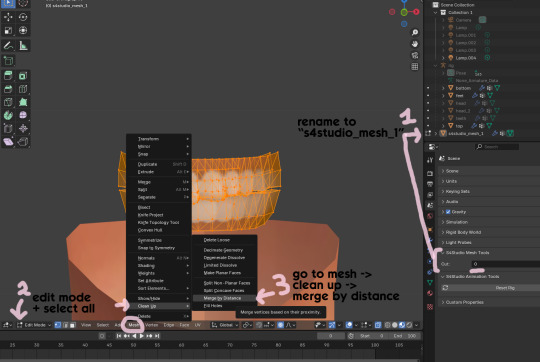
rename your combined mesh part to "s4studio_mesh_1" and ensure the cut number is 0.
go to edit mode and select all by pressing the A key
go to mesh -> clean up -> merge by distance
unhide the "head" and "head_2" parts of the rig you hid in Step 4
save your mesh as a new file name so you don't overwrite your working mesh, in case you want to go back and change something
Step 15
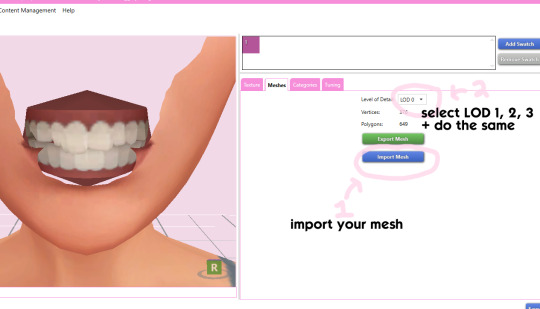
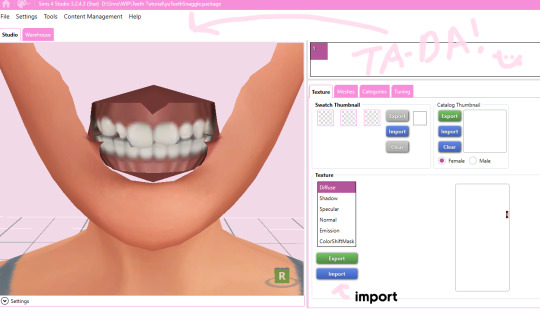
go back into your package in s4studio and import your new mesh
if you like how it looks & are done editing, select LODs 1, 2, and 3 in the dropdown menu and import your mesh there too. these are normally different meshes, but since EA based teeth are so insanely low poly, there isn't much point making individual LODs for them. but it's not that difficult to make them if you want to- if anyone wants a quick tutorial for that, let me know!
Step 16
you can stop here if you want- the teeth will take on the texture of your defaults if you used the yuTeeth package as a base. however, since we've used the Snaggle teeth on top, I think an adjusted texture might look better. I always use the textures by @ice-creamforbreakfast for my teeth, so head over there and grab their defaults if you haven't already! then grab the "uneven teeth" package file and open it in s4s.
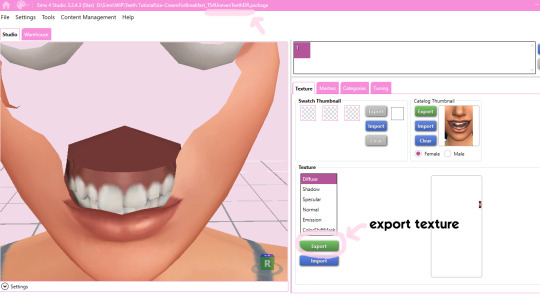
export the texture from the uneven teeth package file as dds
go back to your package file and import it! (and don't forget to credit ice-cream if you post your teeth publicly ;3)
Step 17
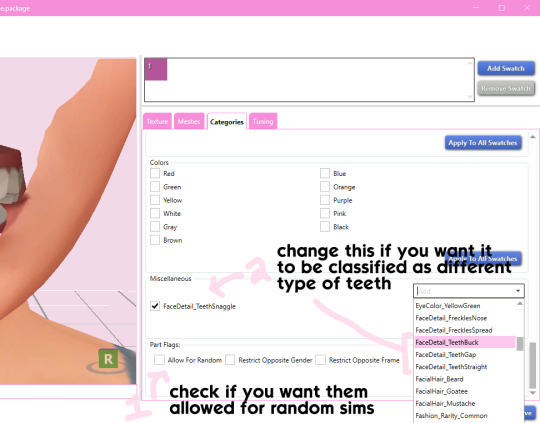
lastly, go to categories tab and scroll to the bottom. if you want your teeth to be enabled for random sims, check the box
if you want the teeth to be considered a certain type (like buck teeth), change the miscellaneous to that type. if it doesn't matter or you're not sure, just keep it as TeethStraight.
Finally, save your package and you're done! :)
69 notes
·
View notes
Note
Hi! This is a little weird so feel free to ignore.
But I’ve been trying to figure out how to fix the no texture pp issue with my occult skintones and wicked whims. I saw you commented on one of lamatisse’s asks a few years ago saying it was an easy fix. I was just wondering if you had a tutorial you could share?
If not, no worries and have a great weekend! 🌷
Hello nonny! :) It has been a while since I worked on skintones, I edited a few for personal use & then promptly forgot to finish them (story of my life lol!). Lamatisse's are updated for WW now, but I'll use the old version as an example. I'll share what I know/can remember to help you out! (Also, you may know much of what I talk about here already, but I'm going to speak as if a beginner is reading, so bear with me! :3)
From what I can understand, this issue occurs because custom skintones need to have their texture extended to be compatible with wicked whims. This isn't a difficult fix, mostly just time consuming depending on the amount of skintones you are fixing. Turbodriver has a tutorial about custom skintones here, which I'll be referencing.
As turbo explains in his post, the WW pp texture space is located in the green box circled below:
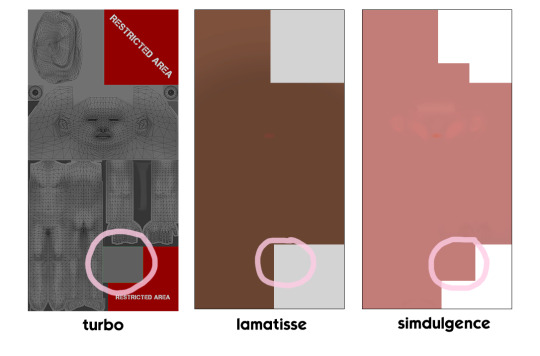
In lamatisse's old skintone texture, there's no color in that spot, making it incompatible- there's just a void texture since the game isn't told any to display on the mesh. Simdulgence's skintones, meanwhile, are compatible because they added that spot. So how do we fix a skintone that's missing it?
Step 1
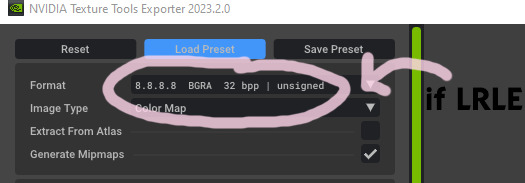
If you're trying to edit someone else's skintones, there's a couple different ways to get the textures in order to edit them. You can use sims4studio, ts4 skininator, or both. s4studio is handy for seeing the image type quickly (DDS, RLE2, LRLE, etc), but ts4 skininator will automatically update the package when you open it & is generally best for editing skintones. I'll show how to export & import from S4S, but it's a good idea to run the package through skininator and get familiar with how it works, since s4studio can sometimes be wonky/show things differently. I recommend using S4S to take note of the image type & how the package is set up and then working through skininator. From my limited knowledge, skintones are supposed to be LRLE, but I've seen different formats whilst poking around various files, so I'll mention all I've seen. An important detail is that you will have different save settings in Step 5 depending on your image type, so pay careful attention when you're about to save!
Exporting in Sims4Studio:
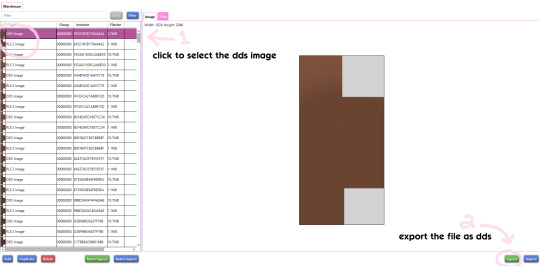
open your skintone package in s4studio, and under the warehouse tab, select the DDS image of your first skintone
export the file as dds & save it where you can find it
Exporting in TS4 Skininator:


open skininator and click the "Cloned Package Editor" tab
click select to choose the package file you want and open it
once the package loads (and updates if needed), click the skintone in the left window
click "skin image" to make another window pop up
in the new window, click "export image" and save the dds file
IMPORTANT: next, download this psd file I made. it has some examples of edited and unedited textures, as well as a couple guides (including turbo's) to help you edit the texture in the right spot. i'll be using the "small guide" in this tutorial.
Step 2

open your dds file you just saved as well as the psd file in photoshop, and select the "small guide" layer in the psd (small blue square)
select all (CTRL + A) and copy (CTRL + C) before going to your dds file and pasting in place (shift + CTRL + V). it'll make a new layer, so rename it to "small guide" by double clicking it so you don't get confused!
note: if your skintone file isn't the same size, the square may go in the wrong place. lamatisse's skintones are 1024 x 2048. you can check image size in photoshop by clicking "image" in the top toolbar and then "image size".
Step 3
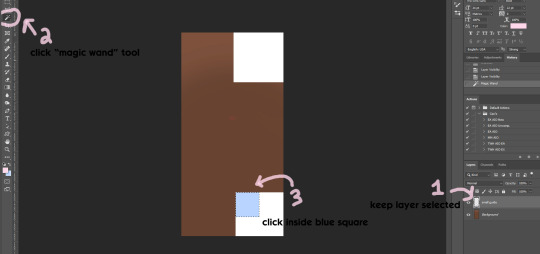
make sure the "small guide" layer is selected
click the "magic wand" tool in the sidebar
click inside the blue square to select those pixels
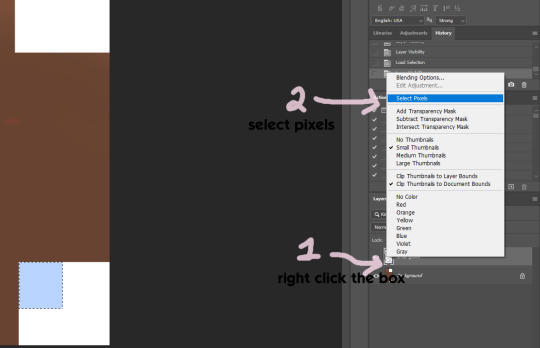
note: if you're fancy, you can also right-click the little white box next to the layer name, then click "select pixels" to do this quicker.
Step 4
If you've never worked with dds textures before, you may not know about the alpha channel. what you see when you first open your dds is the color part of the image, aka what you probably expect when you think about a texture. in lamatisse's texture, it is brown- the color of the skintone. and yet, even if you fill in brown where the square turbo described is, it still doesn't show up on the pp in game. that's because of the alpha channel, which manages transparency. if you don't edit this channel, your edits may not show up at all in s4s or in game, which can be very confusing and frustrating!
in the alpha, black = no transparency and white = full transparency. you can use shades of gray for see-through items, but we don't need that right now. we basically just need to change the pp square to white so that our skintone will show up. right now, it is black, which is why the pp just looks like a void in-game. when making a texture, always check the alpha to make sure it lines up with your main texture!

click the "channels" tab next to "layers". you'll see all channels except Alpha 1 (RGB, Red, Green, & Blue) are currently selected.
select the "Alpha 1" layer
make sure your foreground color is pure white (#ffffff)
go to edit -> "fill..."
click "ok" when the window pops up- the square will fill with white!
select "RGB" channel again now that you're done editing the alpha layer and go back to the "layers" tab, so we can fix the color layer next.
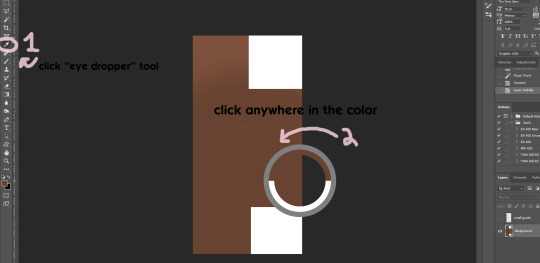

select the "eye dropper" tool
click anywhere in your color to select it/make it your foreground color
repeat Step 3 if your "small guide" square isn't selected anymore
make sure the "background" layer is selected
edit -> "fill" to fill the square with color
IMPORTANT: make sure to hide your "small guide" layer by clicking the eye symbol next to the layer name before saving! otherwise the pp will be blue lol
Step 5

save as (shift + CTRL + s) and make sure the file type is dds (if it doesn't appear, you need a plugin for photoshop- i have the one from nvidia here).
if you have nvidia dds plugin, a window will pop up with a lot of settings. if the image you exported in Step 1 is DDS or RLE2, make sure the format is BC3/DXT5 file compression! (select it from the dropdown window if it isn't) If it was LRLE, it needs to be saved as "8.8.8.8 BGRA" instead.
click save! (I also recommend saving your file as a PSD too for easiness sake later!!!!)
Step 6
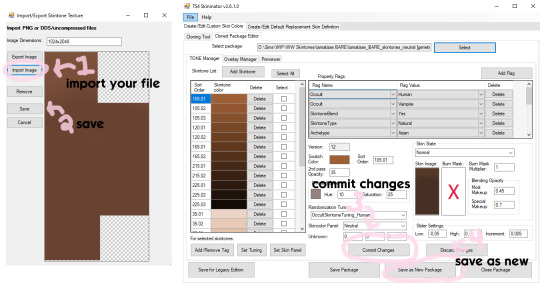
go back into skininator, click "skin image" like you did in Step 1, and import your file in the window that pops up
click save to close the window
click "commit changes" to confirm your changes in that swatch
click "save as new package" to save your progress as a new package file, so you can always go back to the original one if you mess up somehow
and with that, you've finished the first swatch! :) now you just have to go back and do the same thing for the rest of the swatches. however, it should be a bit easier now. if you saved your file as a psd, you just have to keep copying & pasting each exported texture into that same psd file as you go along. you'll need to edit the color layer for each one, but the alpha layer will stay the same each time, so you don't have to keep editing it over and over. continue doing this until all of the skintones are updated, and you're done!
26 notes
·
View notes
Text
Broken CC? No problem!
CAS and BB custom content gets a second chance here. Submit your problem file and I'll take a look at it.
Why am I doing this? Because I'm tired of creators not caring. The community deserves better and I have the skills to help out.
Fixed files can be found HERE🔗 in my Google Drive.
Feel free to @ me when you see broken CC in the wild too.
I also offer help to creators who ran into problems. My DMs are always open for you.
963 notes
·
View notes
Text
How to use Tray Importer to Answer WCIFs instantly
Did you know Tray Importer has a built-in tool to help you answer WCIF questions?
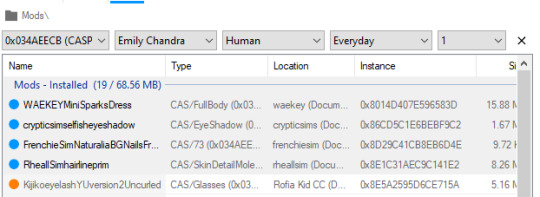
Make sure you have the household, lot, or room with the desired item saved to your library.
2. Open up tray importer and find the desired household, lot, or room.
3. Navigate to the CC tab.

4. If it's a big household or a large build, use the drop downs to narrow down the list of files. I got a recent WCIF about a character's dress, so I narrowed my list down to CASParts, the Sim who wore the dress, occult type, and outfit.
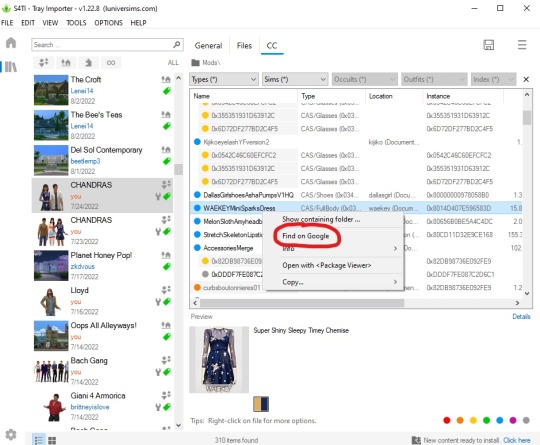
5. Find the desired object in the list of files, and then right-click the name. This will bring up a drop-down menu with a few options. Click 'Find on Google,' which will open up a google search for the item in your default browser.

6. Answer the WCIF with a link to the DL page!
No more rummaging through your mods folder and cross-referencing CAS items with screenshots! I used to be super intimidated by WCIFs and I'd ignore or delete them if I couldn't remember/recognize the object, but now the hardest part of the process is remembering where I saved the pics that prompted the WCIF!
235 notes
·
View notes
Text
Actually im not gonna shut up about this simmerkate charging 25 pounds for a tutorial on how to make arguably the easiest piece of cc one could make (clutter, decor, non functional decorative shit) is making me shake from anger
Its literally 1-import mesh into blender 2- import Blender fileand Textures into package 3- save and add to game
There that line i just wrote appearantly is worth 25 dollars in her opinion
Sigh
This is a call to anyone that has done a sims 4 cc tutorial for free in the past, the only way to nip this in the bud is for sll of us to refurbish/ rewrite/update those tutorials and put them out for free again please do this of you have an old tutorial sitting there collecting dust.
Also free cc creators this is the time to put what you know into tutorial form snd publish it. Please dont gatekeep as that mskes it possible for people like simmerkate to scam people for the simplest things.
Im so tierd of this im so sick of it if i could finish writing the tutorials im writing in 5 mins and publish them i would cause wtf is this...
1K notes
·
View notes
Text
Actually im not gonna shut up about this simmerkate charging 25 dollars for a tutorial on how to make arguably the easiest piece of cc one could make (clutter, decor, non functional decorative shit) is making me shake from anger
Its literally 1-import mesh into blender 2- import Blender fileand Textures into package 3- save and add to game
There that line i just wrote appearantly is worth 25 dollars in her opinion
Sigh
This is a call to anyone that has done a sims 4 cc tutorial for free in the past, the only way to nip this in the bud is for sll of us to refurbish/ rewrite/update those tutorials and put them out for free again please do this of you have an old tutorial sitting there collecting dust.
Also free cc creators this is the time to put what you know into tutorial form snd publish it. Please dont gatekeep as that mskes it possible for people like simmerkate to scam people for the simplest things.
Im so tierd of this im so sick of it if i could finish writing the tutorials im writing in 5 mins and publish them i would cause wtf is this...
1K notes
·
View notes
Note
How come your site isn't accessible for those who require more accessibility? Your search bar is not working. The only way I could get it to work was to disable certain things in the developer tools. I shouldn't have to do that to be able to use certain functions. Also certain fonts are all smushed together for some reason. Can you look into this?
i didn't code this theme. take it up with them
5 notes
·
View notes
Text
How to take screenshots edit (when it's just not your thing)

Alright-y!
So, I have over the years learned how to use reshade and to edit my pictures. I am really not a natural on these things, so this is very much to help others who are as aesthetically challenged as I am. I have to have certain "rules" to follow, because I can rarely just see if a picture will turn out well or not.
We all need to realize where I started. We're talking using FRAPS to take screenshots and then running holy colours batman! to get some sort of effect.
Now, I'm not one to buy fancy stuff and to pirate certain programs isn't really my thing either. So we mend and make do!
Also, I am by far very good at taking screenshots and edit, but I have learned things and hope that it might be useful for someone!
A word on light
One thing I've learned is to work with is light. Where the light is is where the focus will go. This doesn't mean that a person has to be in the spotlight, but if they aren't - try to make that a more conscious choice. I am no pro at this, but I have to say that some of my favorite screenshots are where the light is just good. It focuses the eye or it just give a vibe.


(and yes, for some reason all of my faves are of Agnes, which is a bit annoying since Amanda is my fav-character, lol)
This is also where reLight comes in handy. Yes, it's behind a paywall but there are ways that you will have to figure out yourself.
Great tutorial here on reLight by @pictureamoebae! (if you want to really understand reshade, do check out their tumblr. So many helpful tips and tricks!)


Posing
Posing is fun! I don't fully story-tell with my sims, most of it is gameplay. But I do like to pose for family pictures or to enhance something that is going on.
What you need is Andrew's Pose Player and Teleport Any Sim or Wicked Whims.
Now, I haven't figured out how to use WW for children and younger to pose, so I use both. And I like @ts4-poses to find poses. Eventually, you'll find your favorite creators and can follow them directly.


Angles and vibes
Here's a trick. Work with angles. I am a master of pictures with zero vibe, just a face. Those can be ok, and sometimes that's what you have - but try to angle your shot a little.
Or add clutter, focus on that and let something out of focus happen in the background.
Or just go higher, take the screenshot from above.
Or don't focus on your sim at all, focus on something else that adds to the story/post.


Take the screenshot
The light is good, the angle great, the poses are in place and now, we need to take the actual screenshots.
I am a huge fan of reshade, I use version 4.9.1 because that works for me and the presets I use. No need to update reshade unless it becomes too old.
It can be really difficult to to find a preset that you like. I mostly use birdie by @monasims, tawhay by @windslar and paperbacks by @literalite. But I have tried many.
I like this youtube-tutorial on how to make your own preset, which also helps if you wish to modify one that you've downloaded. I do always recommend learning how to use ADOF and CinematicDOF to help focus the image on what you want to capture. I also strongly recommend @pictureamoebae's Foundation.
To take pictures, use the tab-key to leave the UI behind and use Q and E to go down/up in your game and then the mouse to angle. I use print-screen to take my screenshot, but that's something you set up when installing reshade so that's different for everyone.
And now you have your screenshot and it's time to open an editing program. Cheap as I am, I open GIMP.
Let's edit!
I don't use many steps. Since I can't use fancy photoshop actions I have to make all the steps by myself and well - I am human and therefor lazy.
Resize and start to think of a post
First things first. I cut my pictures to work for the tumblr ratio. I actually don't resize them smaller anymore - because when I change layout on my tumblr I just feel as if it messes it up. Now, I don't have a huge screen and my screenshots aren't massive, so it's not necessary either.
My images will be 1017x1017, 1525 x 1017 or 678 x 1017.
Once this is done, I also try to look at how they will go together. If I want a post of just squares I need to have an even number of images. Sometimes I want a landscape image as a sort of heading, or one in the middle with squares around it. It depends on what I want to convey.
This is by no means something that comes natural to me - I am aesthetically challenged after all. Sometimes, I just have 5 images and have to make do.

Resized
Topaz Clean
Yup, it's awesome. No, it doesn't come with GIMP. Yes, there are ways to work around this. You will have to find those ways on your own.
But I have to say, it does makes wonder for the images. I have completely stolen @sojutrait 's settings because I really like her style and therefor - I copy. I have added a bit more sharpening, but otherwise it's completely hers.

Topaz Clean:ed
Curves
Curves my beloved! I use curves for two things! Take out the yellow (aka increase the blue) and to brighten/darken the image!
I do sometimes matte the image too and here's a good tutorial for GIMP users on how to use curves in GIMP (for a matte look)

Less yellow/more blue

Brighten the brights (but I did not brighten the darker parts)
Layers, curves and increase the light where needed
Now, remember that we need light? Sometimes, a screenshot just doesn't have the right light. So I duplicate the layer, use the free marking tool around what I wish was brighter and put that on a new layer.
Then I use curves to lighten the layer with what I want to brighten and to make darker the layer with what I want to put less focus on (here's an ok youtube video on the subject).
Below, you can see the effect on my images.


Sharpen
Pretty basic. I subtly sharpen the image again. Even if I use the sharpening in topaz clean I do like to add an extra touch before it's time to save and move on.

So sharp!
PSD and UI
I do like to use psd's now and then. I mainly use @windslar's psd-collections and @deathbypufferfish's Build-a-Sim Icon Pack.
It's mostly to help give some info about the post or when my sims age up and I want to show their traits.
I do use the UI-info sometimes. If I do, I go into Game Options in the game > Accessibility > UI-scale and just drag that up a bit. Then I copy/paste that part onto the image I'm using.


Done!
That's pretty much it. Thing is, to post good edits you have to actually take good screenshots. As annoying as it is, it's like cooking: it all comes down to the ingredients. I hate cooking Yes, editing does help but I think my main journey has been to learn to take better screenshots from the start.
The picture below is from resized to done.
Hope this might help someone! I will probably learn more and more as I continue to post, but this is where I am so far in my journey!
153 notes
·
View notes
Note
omg howwww did you get that skin texture to look that way…i’m in love
hiiiiiiii!! thank you!!! <3 you're so kind! I made my own shader! (tutorial & shader dl down below)

pics above are what the skin shader looks like w/o editing. just straight outta blender.
honestly, it's all thanks to using normal maps! you can make pretty much any texture appear by making one. There's a generator you can use here. I looked up skin texture/leather texture and was able to scale it to my liking with the mapping and texture coordinate node.
Here's my set up for my main sim, Jane:

the most important part for making the texture appear is not only using bump, but increasing specular and metallic (in tiny amounts) + decreasing roughness. I also don't like to use a lot of lighting because I feel like it blows out my sim too much and removes all the work I did. So I mainly just use 1 to 2 point lights at 1-5 power. Lately, I've been into increasing the radius cause it adds light lighting, but helps makes the specular bounce in an appealing way that's not just right in your face. The specular is the star of the show here! I also love using subsurface for my sims because it makes their skin more dimensional. You'll notice it a lot more when it comes to shadows. You can also adjust all these nodes for the image you want. So for some renders (even in the same scene), I change the values a little bit to get the vibe I'm going for.
So to sum it up: Normal Map, Specular, Metallic, Roughness, Subsurface and Bump Node.
You can also find the shader here if you're not up to setting up the nodes <33 it works for both eevee and cycles.
Anyways, I hope this helps!
163 notes
·
View notes
Text
a speedrun of teddy render
not rlly a 'how to render' or anything special just the process of a basic sim portrait for peeps that were wondering of lighting/etc!
157 notes
·
View notes
Text
Hey everyone it seems there a malicious individual trying to hack the sims cc community again and fill it with malware you need to stay vigilant as a creator and a downloader so
i have some tips for both to stay safe while downloading:
1- sims cc file extension is always .Package never download anything that is .exe
2- do not auto unpack zip files and rar files into your mods folder directly, open each zip or rar individually check the file extensions and drag them to your mods folder one by one
3- the only mods that have a .ts4script extension are ones that affect gameplay or how the game works, understand that if you are downloading cas or bb items you shouldn't have a .ts4script file
4- if you are downloading gameplay mods that do have .ts4script make sure that A) the creator hasn't announced on their pages that its infected B) you are downloading from a link provided by the creator of the mods themselves not something off of google or a link you got sent and make sure dates of upload match dated of announcements
5- if the mod or cc creator has retired and hasn't posted for a while LOOK AT THE DATES OF THE UPLOAD if it has been "updated recently" after the creator has left the community its most likely re-uploaded by a hacker and infected
6- download mod gaurd by Twisted mexi and keep it updated and keep your windows defender or malware detector Program up to date and always running do not disable it
7- make sure everything you download comes from a direct link from the cc creator, in this day and age do not trust link shortners, adfly, linkverse, etc get the universal bypass extension and ublock extension to stay safe but genuinely NEVER CLICK ON THOSE no matter how much the creator reassures you its safe it. is. NOT.
8- this is more of a general saftey precaution but, create a system restore point weekly before you run the game with new mods that way if anything happens you could have a chance to restore your windows to an earlier date before you downloaded anything.
9- BACK UP YOUR SHIT im serious right now either weekly or monthly put your files somewhere safe like a usb a storage card a hard drive even an online cloud if you dont have any of the previous.
10- files you should back up are your media from games and media everything else, any mods, games saves, work files, passwords, saved bookmarks, any documents txt files word files pdfs, links you saved, brushes or actions for Photoshop if you have any, any digital bills or certificates if you have any, and keep a physical list of all programs you have installed and where you installed them from
11- turn on any 2 factor authentication and security measures for any account you have
12- google and firefox have the option to check your paswords and emails against any data leaks USE THIS FEATURE and change any leaked passwords
13- regularly check your logged in sessions to make sure all the logged in devices or computers are yours and log out any that aren't and any old devices or unused sessions do this for every website and app you have an account on if available
14- change your passwords often. I know this is a hassle i know its hard to come up with new passwords but changing your passwords every few months will help you against anything mention previously that wasn't detected.
15- and as a cc creator check your cc and the accounts you host cc on and its uplaod and update dates make sure nothing has been changed without your permission :(
16- generally try not to get swept up in the "i must get it" fever you do not need to "shop" for mods weekly or monthly you do not need to download everything by that one creator you do not need to download new cc everytime you want to make a sim, im guilty of this so i know how hard it is to resist but take a breath and think "do i want this or do i need it" before downloading.
These are prevention methods i cant claim they are 100% will prevent any hacking but its better to be safe than sorry and these do keep you safe so
Brought to you by someone who has had their laptop ruined and data leaked from downloading cc once upon a time
3K notes
·
View notes
Note
Hii
I have a question about sliders. I've read somewhere that sliders that use the same hotspot controls conflict with each other. How can I find out which hotspot controls a slider uses? Then I should be able to find any conflicting slider immediately, I think?
you'd unfortunately have to open it up in morphmaker (i don't know if it's been updated) and check what "slot" it occupies.
i think you can do this too in s4s but it's in the warehouse tab.
8 notes
·
View notes
Note
hii, i didn't see anyone ask this yet—do you know why a skin overlay (in the forehead section) would hide tattoos? and what can i do to stop that from happening? please and thank you
ah it's the sort layer. you might have to go change it to a diff number so it's above everything but doesn't crash with tattoo. you can do it with sims 4 studio but i think it's easier to do with CAS tools
3 notes
·
View notes
Note
hiii, having all packs and kits installed just bc i want two or three items from the cas or buildbuy is really heavy on my pc. i know there is a way to take them out and use them as if they were cc but i don't know to do it? if u know and could explain to me, please and ty!
hello! basically you can use s4s to make it bgc. pretty straight forward tutorial! good luck!
15 notes
·
View notes