
Last Seen Blogs

operahouseloser
Fortnite Balls

thedancing-devil
Lance

allsimsyt
AllSims

cosmic-targaryen
cosmic fire witch

treasuretrucker
Untitled
Text
Don't Throw Your Treasures Out With the Trash: Check for These Valuables in Your Garage

When confronted with a cluttered, overstuffed garage, you may feel tempted to save time by just tossing it all into dumpsters and having it hauled away, rather than painstakingly going through each item.

0 notes
Text
The Benefits of Maintaining a Clean, Tidy Home During Winter

Maintain a tidy home this winter with help from Misty Clean!
As the old saying goes, “a clean home is a happy home,” and there is plenty of truth behind that. Creating a happy home environment is just one of the many benefits you can achieve by keeping a tidy and clean home. There are many physical, health, mental, and emotional benefits you can expect to see as a result of having a clean house. Here are a few examples of benefits you will notice by living in a beautiful, clean home.
Prevents Spreading of Germs
One of the biggest reasons you should keep a clean home is because it helps prevent germs from spreading. There are many areas in your home that are big, germ-ridden spots that you need to keep clean and sanitized. Your kitchen, in particular, is one area that is especially germ-ridden and should be thoroughly cleaned every time you use it. Additionally, you should frequently be washing your sheets, especially the pillow sheets. To maintain a clean home from germs, you should also be sanitizing your remote controls and other electronics frequently since those are other spots that bacteria tend to concentrate at.
Relieve Stress and Fatigue
When you do not have a clean home, it places a great toll on you. A messy home can easily stress you out because the mess is a constant reminder of work that you have to do, which can tire you out simply by looking at it. An unclean home can also make it more difficult to locate items quickly, which will only add to your stress. Having a clean home can easily solve these issues, but when you have limited time, it can be hard to find time to clean which only further stresses you out. This is why you should consider hiring a professional cleaning service to give you a clean home, freeing up your time and relieving you of a great deal of stress and fatigue.
Create Lasting Impressions
You will also want to make sure you have a clean home so that you will be able to make a good and lasting impression on people who visit you. By having a clean home, you are making a more relaxed environment that people will be able to enjoy when they come over. By creating a clean home, people will find it appealing and inviting and will want to come back over whenever you extend an invitation.
Call Misty Clean Today for a Professional Cleaning!
Every home is unique, and every homeowner requires different cleaning services than the next. It's important to hire a professional cleaning company that can customize their services to your needs, rather than paying for services you don't need. Whether you need to the master bath deep cleaned or you're looking for the entire home to be sanitized, Misty Clean can help.
If you're ready to get your home Misty Clean, give us a call at (410) 255-4111 or visit us online. For more cleaning tips and tricks, follow us on Facebook, Google+, and Pinterest.
The post The Benefits of Maintaining a Clean, Tidy Home During Winter appeared first on Misty Clean.
0 notes
Text
TOO FACED: SIX DEGREES OF SEPARATION!!!
This was going to be a quickie, no big deal post. Sure, sure, sure – I can hear you saying!!Go get that coffee…I'll wait.Last week, the new season of Bravo's Million Dollar Listing - Los Angeles started and as usual, it's a blast to watch these young realtors – making millions selling high priced houses all the while acting like little ill-behaved children, dressed to the nines and driving the


0 notes
Text
Where Should You Keep An Emergency Account?
Like it or not, emergency accounts are kind of boring.
And they need to be.
The main purpose of an emergency account is to sit around and wait for an emergency.
That certainly limits your options as to where to hold the money.
Because you may need the money on very short notice, the safety of principal needs to be the primary concern.
But that doesn't mean you can't try to earn some income on your emergency account in the meantime.
6 Best Places to Put Your Emergency Account:
Local Banks
Online Bank Accounts
US Treasury Bills
Laddered CDs
Betterment
Roth IRA
You don't want to take risks in doing it, but you should attempt to earn at least a little bit of income while you're keeping your money safe.
Here are six emergency account options to consider…
1. Your Local Bank
Your local bank is always a solid option.
Unfortunately, most don't pay much in the way of interest. And it usually doesn't matter whether that's interest-bearing checking, savings, money markets, or certificates of deposit (CDs).
Because they have a network of local branches, they don't need to pay high-interest rates to attract customers.
For example, according to the Federal Deposit Insurance Corporation's Weekly National Rates and Rate Caps, average rates on bank savings vehicles look something like this:
Savings, 0.09%
Interest Checking, 0.06%
Money Markets, 0.16%
3-month CDs, 0.19%
6-month CDs, 0.31%
Those interest rates are downright microscopic. But the one advantage to local banks is that they can provide immediate physical access to your money in the event of an emergency.
And even though the interest they pay amounts to little more than dust, it's better than nothing.
2. Online Bank Accounts
If you want to keep your money absolutely safe but earn higher interest than you can at a local bank, seriously consider online bank accounts.
In today's world of electronic money, you can often get access to your funds from an online account just as quickly as you can from a local bank branch.
In fact, most provide various options for you to get your money, including transferring it into a checking account at a local bank.
But the interest they pay on your savings are a welcome relief from the fractional rates being paid at local banks.
For example:
Ally Bank currently pays 2.00% APY on all balance tiers on its Online Savings account.
CIT Bank currently pays 1.85% APY on its Online Money Market account.
Barclays Bank is currently offering 2.55% APY on it' 12-month CDs.
Online banks may not have local branches, but they're the next closest thing in terms of liquidity. And when you consider that the interest rates they pay on savings instruments run between 10 and 20 times higher than what local banks are paying, it's well worth keeping most of your emergency account with at least one of them.
You can open an account with Ally, CIT, or Barclays today.
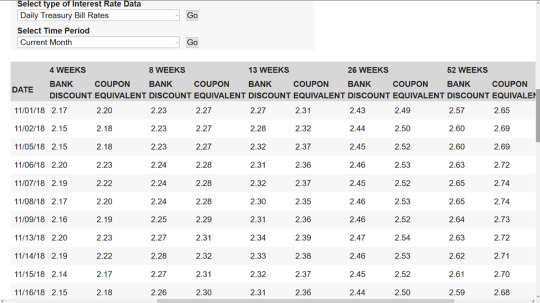
3. US Treasury Bills
US Treasury Bills are short-term debts issued by the US government. And because they are issued by the US government, they are considered the safest of all investments, backed by the full faith, credit, and taxing power of the US government.
They can be purchased in denominations of as little as $100 through do US Treasury's portal,
Treasury Direct, and with terms of 4 weeks, 8 weeks, 13 weeks, 26 weeks, and 52 weeks. You can both purchase and redeem them through Treasury Direct.
Current yields on these securities are all in excess of 2% APY, with specific rates as of November 16, 2018, as follows:
4. Laddered Certificates of Deposit
CDs generally pay higher rates of interest than what you will get on savings accounts or money markets.
But the best rates go to the CDs that have longer terms. Typically, the better paying rates start with 12-month CDs.
That creates a bit of a problem if you're looking to build an emergency fund. After all, emergencies don't wait 12 months for your CD to mature. You'll need an ability to access funds before a CD matures.
Now you can usually liquidate a CD early.
But if you do, you'll be subject to an early withdrawal penalty. That can cost you several month's worth of interest.
An alternative might be to have some money in a savings account or money market account, with most of your money in 12 months CDs earning higher interest.
But an even better strategy will be to create a “CD ladder”. The laddering part has to do with staggering the maturities.
For example, under Online Bank Accounts we noted that Barclays Bank offers a 12-month CD paying 2.55% APY.
You can divide up your emergency account into 12 equal parts and invest the funds in 12 different 12-month CDs.
If you have $12,000 in your emergency account, instead of investing it all in a single CD, you can instead invest $1,000 in one CD each month.
You'll get the benefit of the 2.55% APY, but each month you'll have one CD maturing, while investing in a new one.
Because one CD is maturing each month, you would have at least $1,000 available for that month, and for every month.
That's how you can use a CD ladder to earn higher interest on your money, but also add a measure of liquidity for emergency purposes.
5. Betterment
If you want to add even higher returns to your emergency account, and you're willing to take on some risk to do it, you can consider putting at least some of your money into a robo-advisor.
The most popular, and perhaps the best robo-adviser overall, is Betterment.
For a low annual fee of just 0.25%, Betterment will provide you with a fully managed investment portfolio, that will be diversified across stocks and bonds.
Stocks are the more risky asset allocation, so if you plan to use a Betterment account as an emergency account, you should favor a higher bond position.
That will make it easier for you to liquidate funds at more predictable valuations than you can with stocks.
But maybe the best use of a Betterment account is to put the bulk of your emergency account into it, to earn higher returns on your money. But you should also hold a portion in more liquid assets, such as those listed above.
You would then be able to tap your liquid savings for immediate emergencies, and access funds from Betterment only when either a larger amount of money is needed, or the emergency lasts longer than expected, such as in the case of a job loss.
Either way, you probably won't want to put all of your emergency account into Betterment. There is the risk of loss in the event of a general stock market decline.
The best way to protect against that risk is to make sure you always have at least some funds sitting in a completely liquid account, using the Betterment account as a secondary emergency account.
Start earning with Betterment today >>
6. Roth IRA
This one's a bit controversial as an emergency account, but it can actually make perfect sense.
If you put money into a traditional IRA – or virtually any other retirement account – and you need to withdraw funds before you turn 59 ½, you'll have to pay ordinary income tax on the amount withdrawn, plus a 10% early withdrawal penalty.
But the Roth IRA is the exception to that rule.
Under what is known as IRS Roth IRA Ordering Rules, you can withdraw your contributions to a Roth IRA at anytime, free of both ordinary income tax and the 10% early withdrawal penalty.
That's because under the ordering rules, the first funds withdrawn from a Roth IRA are considered to be your contributions. And since contributions to a Roth IRA are not tax deductible, they are not taxable on withdrawal.
Apart from the fact that you can take tax-free early withdrawals from a Roth IRA, using one as an emergency account has several advantages:
They can be used to earn higher rates of return, such as by holding the Roth IRA with Betterment.
Investment earnings on a Roth IRA are tax-deferred, so they'll build up more quickly than in a taxable account.
Since a Roth IRA is first and foremost a retirement account, any funds not withdrawn for an emergency will continue to help you save for retirement.
Once your Roth IRA account gets big enough, you may be able to keep a small portion in liquid assets, like bonds, to use as an emergency account.
But the rest of the account, the majority, can be invested for growth as part of your retirement strategy.
Where You Should Put YOUR Emergency Fund?
As you can see, there are more options as to where to put an emergency account than just the local bank. Best of all, you don't have to pick just one type of account.
You can use several, effectively turning your emergency savings into something of a diversified portfolio.
For example, you can hold a small amount, say enough to cover 30 days of living expenses, in a high yield savings account or money market.
You can put a larger amount into higher yielding (but safe) investments, like CDs and Treasury Bills.
Then you can put the largest amount into a growth account, like Betterment and/or a Roth IRA, to earn even higher returns for the long-term.
That will enable you to have the liquid funds you need for an emergency account, while earning a lot better than 0.09% in a local bank savings account.
The post Where Should You Keep An Emergency Account? appeared first on Good Financial Cents.
0 notes
Text
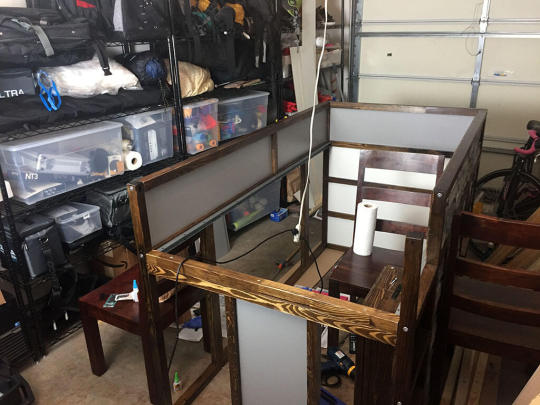
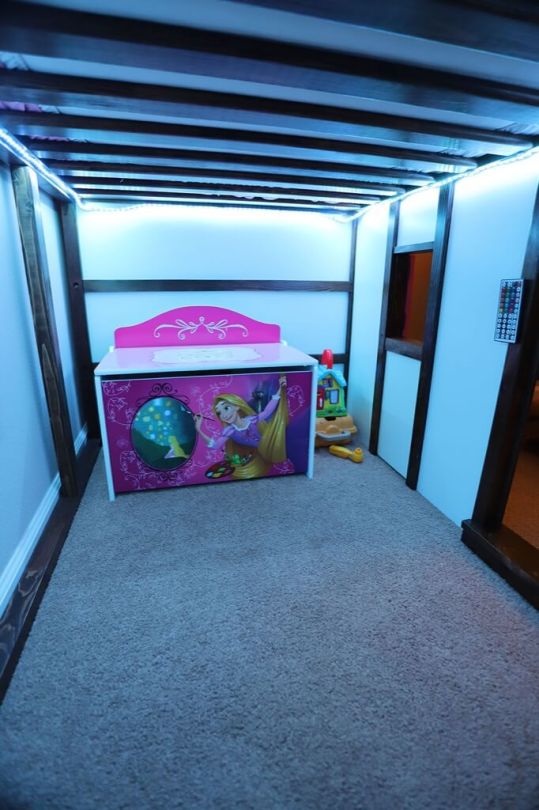
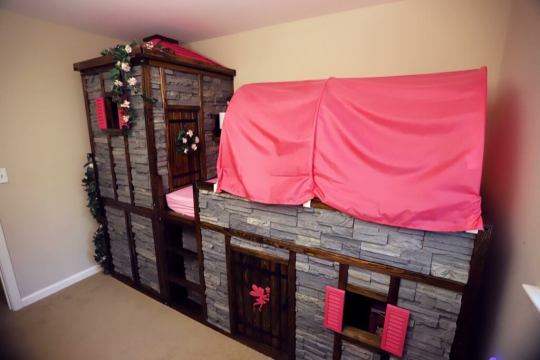
Dad does it! Hacks the most amazing princess castle bed
When my son was 4 years old, my wife and I needed to move him out of his convertible toddler bed to a “big kid bed” so that our daughter could begin to use the former.
He wasn't excited about it, so I offered to build him a new bed that was “the most awesome bed ever”, and the result was a success that made him very happy.
Our daughter is no dummy though … as she approached her fourth birthday, she began asking for her own special “big girl bed”.
And while our son had given us complete “creative control”, our daughter was a little more specific: “a fairy princess castle bed … preferably pink,” she said.
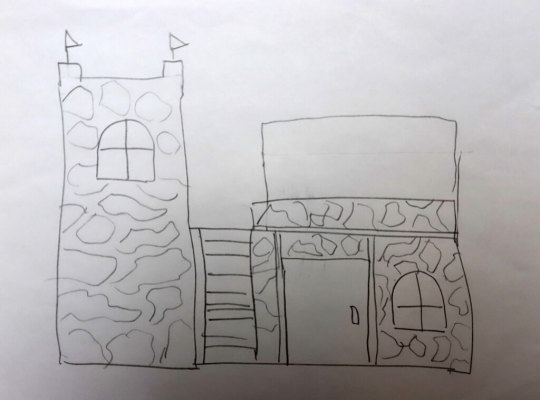
My daughter's first draft of the hack
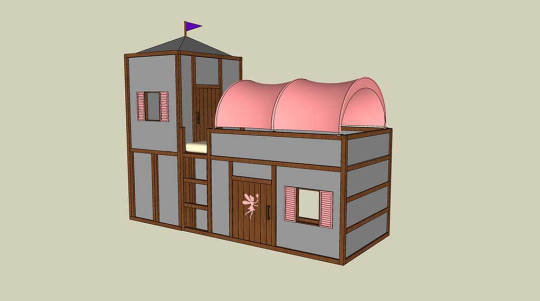
3D model before construction began
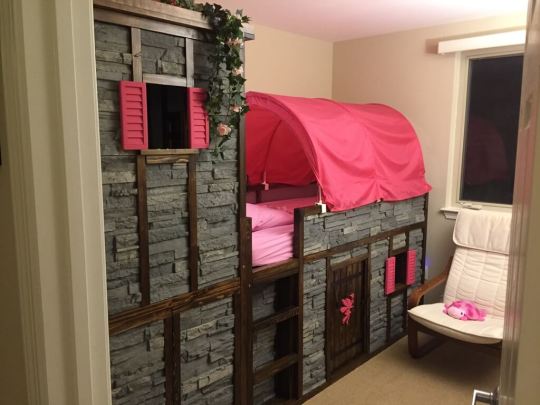
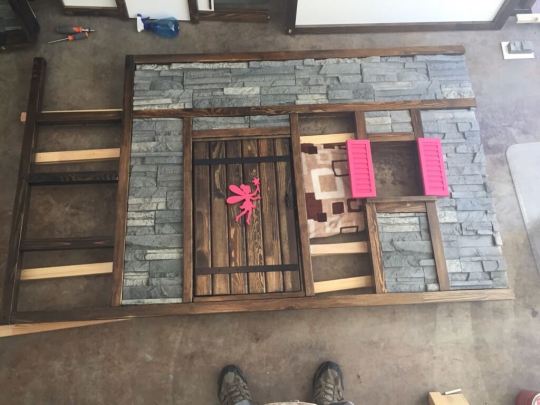
This is the Fairy Princess Castle Bed we built for her:
Watch my YouTube video, including 3D model, time lapse of the assembly, and my daughter's reaction to her Fairy Princess Castle Bed:
youtube
IKEA items used for castle bed:
2 Kura children's beds
1 Kura bed tent
Other materials:
~30' of 2x4s
~80' of 2x2s
~16' of 1x4s
~15' of 1x10s
3' of 1×12
18 2' x 4' white mdf panels
6 2'x4' faux stone panels
~30 ft2 of laminate flooring
~30 ft2 of plywood
~25' of nature-themed moulding
~50' of plain moulding
Strips of hobby wood
4 flat metal bars
22 button magnets
Square dowels of varying thickness
Bundle of cedar siding
Various pieces of hardware
Roll of grey contact paper
Quart of pink paint
Several quarts dark brown (Jacobean) stain
Several quarts of clear lacquer
Quart of black paint
Various fake plants
2 sets of remote-controlled LED strip lights
1 Aukey table light
2 sets of drawer slides
Tools:
Belt sander
Sandpaper (60-220 grit) and sanding block
Rip cut saw
Hack saw
Back cut saw
Miter box
Power drill and various drill bits
Hammer
Various screw drivers
Level
Various paint brushes
Super glue
Construction adhesive (i.e. “Liquid Nails”)
Caulk gun
Hot glue gun
Staple gun
How we put together the Fairy Princess Castle Bed
This hack was so extensive that giving detailed step-by-step instructions would be a book in itself, so here's a concise summary:
The hack consists of 2 major sections (each of which is comprised of a separate Kura bed):
I. “The bed”
1. Use belt sander to strip preexisting lacquer off all Kura parts
2. Stain all wooden Kura parts
3. Cover mdf panels provided with the Kura with grey contact paper on one side.
4. Assemble Kura roughly according to IKEA's conventional directions, but keep each of the 4 walls separate from one another. Only notable exception is to not include the upper rail to the side wall adjacent to the ladder – as this will be where “the bed” joins “the tower”. This will also require 2 2x4s (or alternatively 2 2x2s) to help support the back wall, which otherwise can't be assembled independently of the others.
5. Create frames for the door and window using 2x4s and 2×2 respectively.
Finishing the bed half
Front wall almost finished
6. Construct the door from bed slats taken from the second Kura: Cut off the ends to create the proper height. Attach them together using rectangular dowels nailed to their back sides.
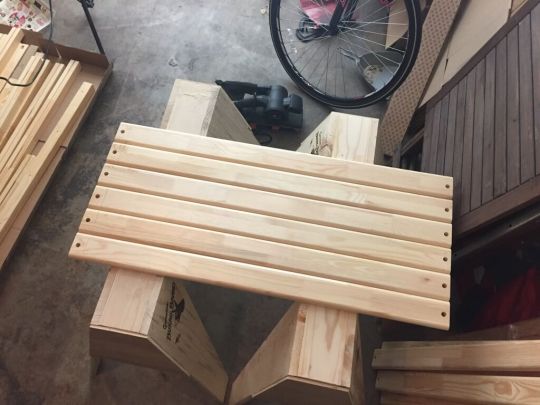
Future door from bed slats
Use hacksaw to cut metal bars to the width of the door, superglue metal button magnets on the front to look like rivets, and paint the bar/magnet pieces black. Once dry, attach to the bed slats.
(Super gluing them didn't hold well – I had better luck with drilling shallow holes into the slats, filling with construction adhesive, and then clamping the bars over them for 24 hours. Be sure to roughen the back side of the bars for maximum adhesion).
Once door finished, attach to the frame via hinges.
Optional: Attached pink wooden fairy to the door using the same drill hole-filled with adhesive approach.
7. Construct window shutters using square dowels and strips of “hobby wood”. Paint pink. Attach to window frame.

Window shutters in various stages of completion
8. Use white mdf panels for the walls. (The ones I used were actually intended for whiteboards, so were smooth white on one side, and rough/unfinished on the other. The smooth white side replicated dry wall relatively well). Attached walls to the inside of each of the now-assembled Kura wall frames.
9. Cut faux stone panels to fit into the preexisting spaces in the front frame. (I used Wellington light grey panels from fauxpanels.com. Attach to the backside of the mdf panels using construction adhesive.
10. Create an inset for behind the ladder using the same general principles used in steps 8 and 9.
11. Cut, sand, and stain plain moulding to use inside the first floor of “the bed” to cover over seems
II. “The Tower”
This is the more difficult half to hack/construct.
First, the tower consists of part of the second Kura bed tipped on its side (It doesn't include the top rail – which can be used as 2×2's anywhere else in the project).
Also, the tipped Kura may not be structurally sound; I create a platform for the second floor of the tower using 2×4's, 2×2's, and plywood, which stood completely independently of the visible tower.
12. As with “the bed”, strip and stain all wooden Kura parts.
13. Also as with “the bed”, assemble the 4 walls using the 12 main edge pieces to the bed/tower.
14. Create a lower platform using plywood placed on top of spare bed slats. (This will go directly on the actual room's floor when finished)
15. Create the upper platform using 2x4s for the vertical supports, 2x2s for the “beams”, and plywood for the floor. The plywood can be covered on one side with the white mdf panels to make a nice ceiling for the first floor.
16. Use a combination of 2×2's and mdf panels to create a wall that will divide the first floor into 2 halves. The left half will become an alcove for the hide-away bookcase, and the right will become a “secret passage”.

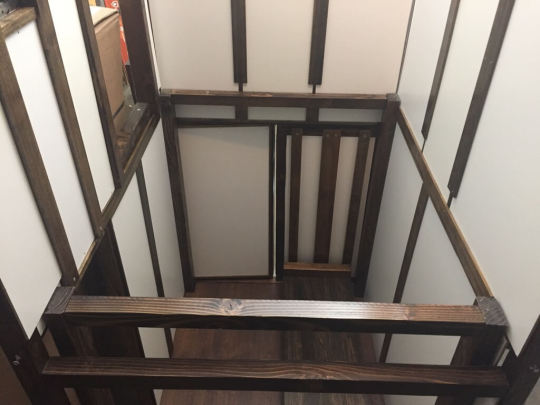
Inside castle bed – secret passage closed
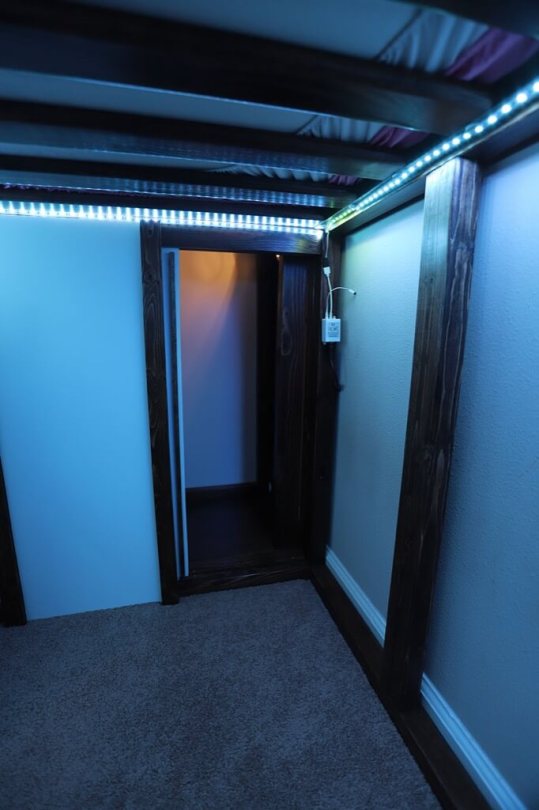
Inside castle bed – secret passage open
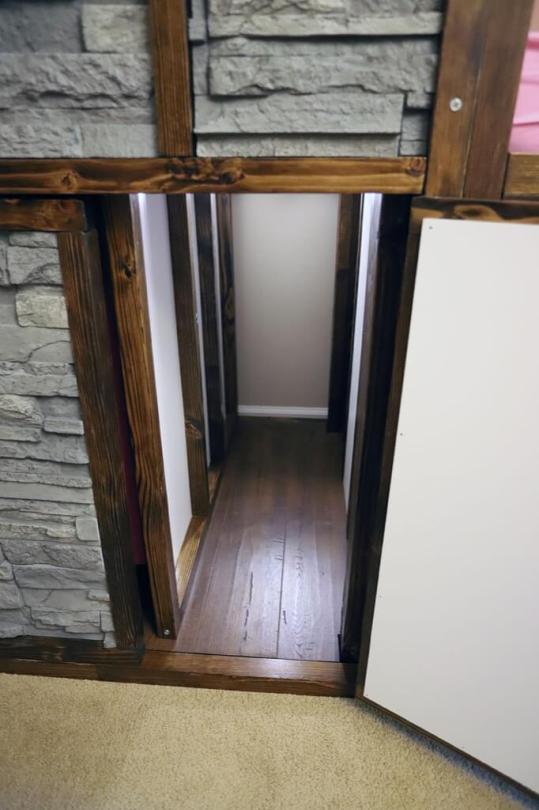
Secret passage exit to outside
17. Create the sliding platform for the bookcase. I used 2 2x4s attached to the lower platform, 2 2x4s attached to a horizontal 1×12 that acted as a shelf, linked together by industrial-strength, full extension drawer slides. (I used 32” drawer slides made by Hettich)
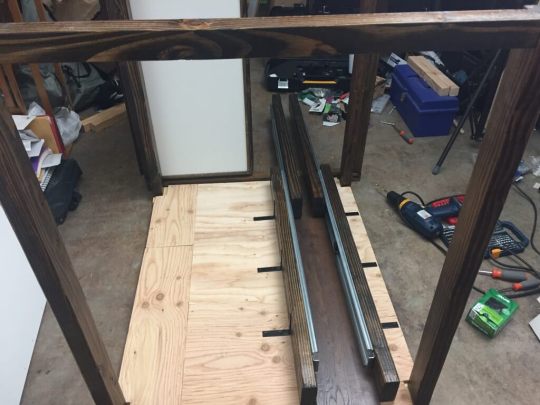
Sliding platform for bookcase
18. Use a combination of 2×4's, 2×2's, mdf panels, and faux stone panels to create the front and side walls in similar fashion to what was done for “the bed”.
This should include swinging doors covered with stone panel that will act like hidden compartments for the bookcase and secret passage.
The back wall of the tower will rest against the wall of the actual room and thus, can be left open as it was for “the bed”.
Backside of tower, almost finished
19. Build door and window shutters as done with “the bed”.
20. Use plain moulding to cover vertical seams inside the tower, and additional moulding around the top (I used nature-themed moulding).
21. Cut wooden laminate flooring to cover both the lower and upper platforms. (You do not need to worry about underlayment for this kind of usage)
Inside of tower without the upper platform
Inside the first floor (i.e. under the mattress)
22. Build a bookcase that will fit in the alcove and on top of the sliding platform built during step 17. (I would have preferred to use an IKEA bookcase – for example, a Bestå or Billy bookcase – but there wasn't one that was the appropriate size).
Paint (or finish) bookcase. I also glued some thin strips of nature-themed moulding to the front to add some character.
III. “The tower roof”
23. The tower roof was the most elaborate and challenging step.
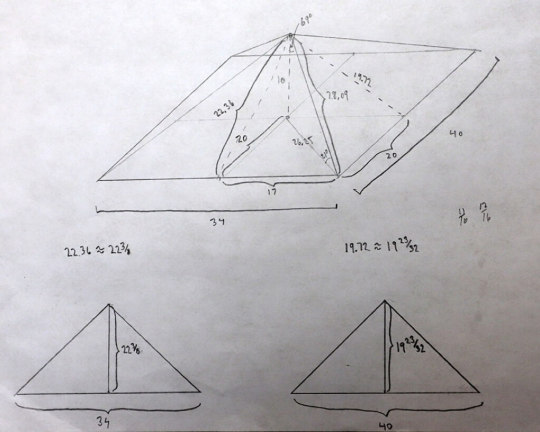
Calculating measurements for the tower roof

Angled wood used as a radial beam for the tower's vaulted ceiling
To begin, create a frame that will firmly attach to the top of the tower and also provide a lip for the roof to sit in.
(This way, the roof will stay on by virtue of its weight alone, and you won't need to worry about separately securing the roof.)

Vaulted ceiling inside tower
The roof is built from 4 triangular shaped mdf panels, joined together by pairs of angled wooden dowels that act as radial beams for a vaulted, pyramid shaped ceiling.
(I lacked the tools to do create those “beams”, so this involved a lot of sanding and revisions.) For the roof, I used cedar siding (which I needed to recut and sand prior to painting pink).
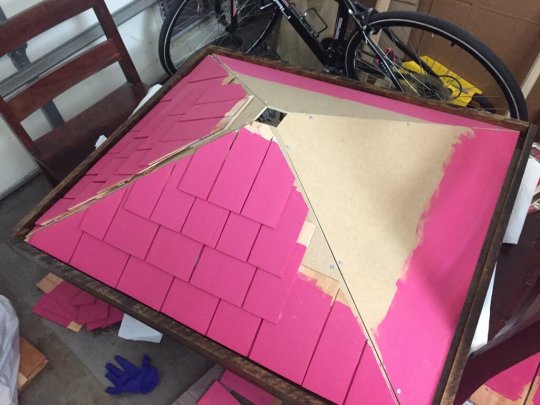
Tower roof, about halfway finished
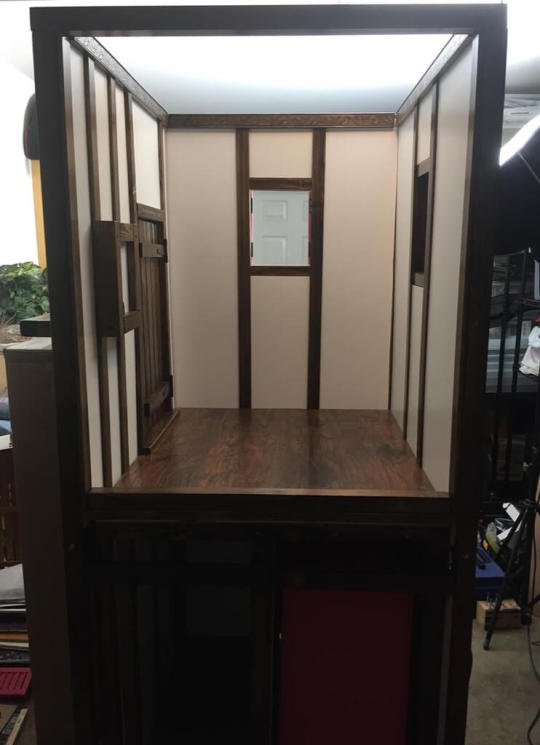
IV. Assembly of the Castle Bed
By this point, you should have 4-5 different pieces for “the bed” (4 walls +/- separate inset behind the ladder), slats for “the bed”, and ~12 different pieces for “the tower” (4 walls, 2 platforms, 2-4 vertical posts for upper platform, 1 inner vertical wall on first floor, bookcase, roof frame, roof). Time to put them all together. (The main assembly took me ~10 hours, separated across 2 days).
Now install the lights, any miniature furniture (e.g. pillows, kids chair, toy box), and attach fake plants (I literally stapled them to the wood frame).
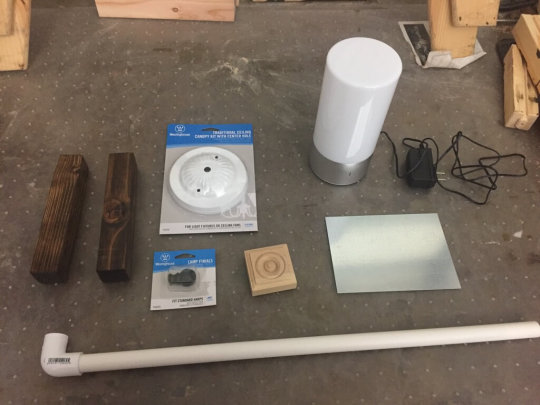
Parts that will eventually become the exterior light fixture

Finished exterior light
Add mattress and bed tent.
Woohoo – you're finally done!
Our daughter loves her Fairy Princess Castle bed.
How long and how much did the castle bed cost?
Took 10 months and ~400 hours. Total cost was about $2000-2500 US (I didn't keep receipts).
What do you like most about the castle bed?
How much my daughter likes it.
What was the hardest part about the hack?
Getting the hidden bookcase to slide in and out of its alcove with enough ease that my daughter could easily do it herself.
What to pay special attention to?
A Kura bed is not necessarily structurally stable if used on its side. Also, be 100% sure this monstrosity will fit into its destination room before you start!
Looking back, would you have done the castle bed differently?
I would have spent less time on the shingled roof, which is literally not visible without a step stool.
~ by Eric Strong
The post Dad does it! Hacks the most amazing princess castle bed appeared first on IKEA Hackers.
0 notes
Text
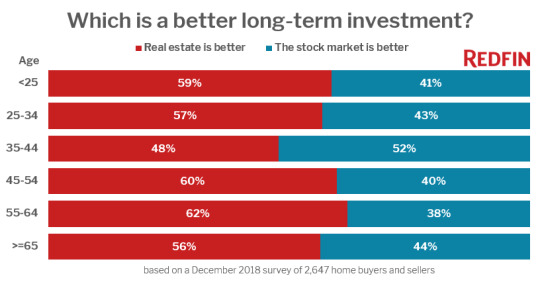
Survey: Gen-Xers & Older Millennials Believe Stocks are a Better Investment than Real Estate
35-44 year olds were hit hardest by the housing bust just as they reached prime first-time homebuying age
Less than half of homebuyers and sellers between the ages of 35 and 44 believe that real estate is a better long-term investment than the stock market, according to a survey Redfin commissioned in December of more than 2,600 people nationwide who bought or sold a home in the last year, attempted to do so, or have plans to buy or sell soon.
Buyers who reached the median first-time homebuyer age of 31 years old between 2008 and 2012 during the Great Recession and housing market collapse are now 38 to 42 years old. Redfin's survey results show that this was the only age group that has less confidence in real estate as an investment than the stock market. Just 48 percent of homebuyers and sellers in this age group believe that real estate is a better long-term investment than the stock market.
“The oldest Millennials and youngest Gen-Xers entered their late twenties or early thirties during the housing crash, which explains why they are more skeptical about investing in real-estate,” said Redfin chief economist Daryl Fairweather. “This generation experienced a major setback during the housing bust, which hit just as they were most likely to be getting married, starting a family, and becoming a first time homeowner. Looking into the future, we expect to see homeownership increase as Millennials enter prime home-buying age. This is because Millennials have a more favorable opinion of real estate as an investment than Gen-Xers, and Millennials are a larger group than Gen-Xers.”
In every other age group, buyers and sellers who believe that real estate is a better long-term investment outnumbered those who believe the stock market is better.
This finding is surprising given that it comes from a survey of people specifically buying or selling homes, which is a group that presumably would be biased toward real estate to begin with. Younger Baby Boomers, respondents aged 55 to 64, were the most optimistic about real estate as an investment. Previous Redfin surveys of homebuyers and sellers have not asked this specific question, so we do not yet have any data on whether this has changed over time.
Methodology
Redfin contracted Qualtrics to field a study between November 2 and December 10, 2018 of 2,647 people from the general population who indicated they had bought or sold a home in the past year, tried to buy or sell a home in the past year or plan to do so this year.
This report focused included data from the 1,784 people who answered the question: “Which do you believe is the better investment for those who do not plan to move their money in the long term, the stock market or real estate?” People who answered either “Real estate is the slightly better investment” or “Real estate is the better investment by far” were grouped together, and those who answered “The stock market is the slightly better investment” or “The stock market is the better investment by far” were grouped together.
The survey had respondents from all 50 states and Washington, D.C.
For more information about the survey and its findings, contact Redfin Journalist Services at [email protected].
The post Survey: Gen-Xers & Older Millennials Believe Stocks are a Better Investment than Real Estate appeared first on Redfin Real-Time.
0 notes
Text
Advantages of Owning a Franchise
Advantages of Owning a Franchise
On the previous feature, we have discussed the advantages of buying a franchise. In this article, we will further discuss why it is a better idea to own a franchise.
Organized training and support is provided by the franchiser. You can expect that whatever good practices there is in the brand, this will be carried out to your franchise as well.
Franchisees use various measures to ensure your success. It is in the franchiser's best interest to make sure you grow and sell.
Franchisers often have good track record, a sure prerequisite to become a successful franchise as well. You as an owner carry out the same reputation as well.
Franchisers provide you with location assistance, making sure that wherever you decide to put up your franchise will have the maximum possible profitability.
A good franchise can take advantage of the entire economic system, and negotiate the best prices for everything you need at significantly lower rate than you would as an independent business owner.
To know more about franchise opportunities at Life Maid Easy, click the link: http://www.lifemaideasyfranchise.com/
The post Advantages of Owning a Franchise appeared first on Life Maid Easy - House Cleaning Services for Vancouver.
0 notes
Text
Organizing Thoughts and Tips for the New Year!

Hello friends! I hope you've all had a great start to 2019! My kids are going back to school tomorrow (today when you are reading this!) and we had such a nice break. I'm really sad to see it end this year! We spent Christmas at home, then went to Utah to visit family, came […]
0 notes
Text
2019 New Year Goals and Resolutions

Hey Everyone! The first week of 2019 is already over, did you make some New Year Resolutions? I love the New Year because we can start off with a clean slate and forget about last year. Actually, I did pretty well in 2018 and accomplished most of my goals. I only missed a few and I'm okay with that.
This year, I'm going to keep it simple and have fewer goals. I'll keep them under 10. Read on to see what an early retiree's New Year goals look like.
Setting goals
In previous years, I had moderate expectations and set goals accordingly. This worked well because I was able to accomplish most of the things on my list. I find that setting high expectations doesn't work for me because I can't achieve them and then I become discouraged. My style is to go at a slow and steady pace. Shooting for the moon is probably better for younger folks, though.
Here is my approach to setting New Year Goals.
Set achievable goals – Don't shoot for the moon unless you have a sterling record of high achievement. Most of us will just become discouraged and give up.
Make the goals specific and measurable – New Year goals need to be very specific. Don't make vague goals like losing weight or saving more. You can't keep track of it and you'll forget about them by March. A better goal would be to lose 10 pounds or maxing out your 401(k)this year. You also need to figure out a way to get there. How will you lose 10 lbs? Will you increase your 401(k) contribution right away? You need a plan.
Write them down and track your progress– Write down your goals and put them where you will see them. The refrigerator door is a good spot for many people. Personally, I put my goals here on Retire by 40 and update the status every month. This has been working very well over the last 8 years. I have a public audience and you give me the motivation to improve. I made tremendous progress with our finances and personal life since I started blogging. It's been terrific. I recommend starting a blog if you don't already have one. It really helped me and it might help you, too.
Academic scale – On some goals, I'm grading myself on the academic scale. For example, I plan to save and invest $100,000 in 2019. Even if we fall short and saved $90,000, I'll get an A-. That's not bad.
Ok, let's get on to the goal sheet.
2019 Goals
Check out my goal sheet below. It's simple and helpful. I can see my progress at a glance and it's easy to update every month.
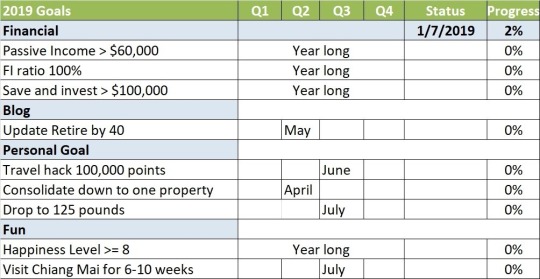
I try to schedule most goals in the first half of the year because I usually don't get much done in the 2nd half. Summer is always tough because RB40Jr will be out of school. I'll try to get 3-4 things done by June. I plan to visit Chiang Mai in July and it'll be tough to accomplish much then.
Financial Goals
Increase our Passive Income > $60,000
We spent about $60,000 in 2018. That's a bit higher than I'd like, but it's still a pretty good level. In 2019, I'll try to increase our Passive Income above $60,000. This is going to be somewhat tricky because there are a lot of changes in 2019.
We'll sell our rental properties so our rental income will disappear in early 2019. I'll use the money to invest in dividend stock and real estate crowdfunding. I'm not sure if the income from these two will be able to replace the rental income. We'll have to wait and see.
Here is our Passive Income spreadsheet.
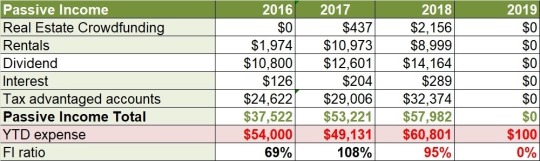
I'll grade this on an academic scale because there are too many changes in 2019. I think everything will settle down in 2020 and it'll be easier to predict what our passive income will look like. It might take a couple of years to push our passive income above $60,000.
FI Ratio > 100%
Unfortunately, we took a step back in 2019. Our expense was higher than normal and our FI Ratio* dropped to 95%. That's not bad, but I need to get this to 100% before Mrs. RB40 retires. There are many changes in 2019 so I'm not sure if we'll achieve this goal. I think our expense will drop after we move, but I'm not sure. Hopefully, we can increase our Passive Income to $60,000 and reduce our annual expense at the same time. That's a tall order, though. You can see how I'm doing with passive income so far here.
*FI Ratio = passive income / expense
Save and Invest > $100,000
In 2019, we saved and invested $102,817! That was fantastic! However, the primary reason why we could save that much was due to a banner year with my blog income. I saved a ton in my solo 401k account last year, over $40,000. I seriously doubt I we could replicate it this year.
The starting points for saving and investing have always been our tax-advantaged accounts. The contribution limits have all increased for 2019. Here is what we plan to save.
$38,000 in our 401k accounts. That's $19,000 each.
$12,000 in our Roth IRAs. That's $6,000 each.
$4,000 in RB40Jr's 529 college savings account.
$11,000 as employer contributions in my solo 401k. This one depends on how much money the blog makes in 2019.
Add these up and it's already $65,000. That's a good starting point. We'll have to figure out how to save more as we go. Oh, I almost forgot. We should receive some money from selling our rentals. We could invest that and it will help push us over $100,000. Is that cheating?
Blog Goal
Update Retire by 40
Retire by 40 still needs a facelift. In 2018, I changed to https, got a new logo, and made a few minor updates. This year, I'll hire someone to install a new theme. Hopefully, it will work out. I'm always scared of hiring people because I rarely get the result I want.
Personal Goals
Travel Hack 100,000 points
This is the same goal I had last year. I paid less than $700 for 3 tickets to Thailand in December. The credit card points helped a lot. Accumulating credit card points is not too difficult for me because I have to pay estimated tax. Those tax payments were enough to push me over most credit card signup requirements. We'll travel to Thailand again in 2019 so the credit card points will come in handy again.
***I just signed up for the Capital One Savor and got $500 cash bonus. Sign up before the bonus expires if you want the same deal. Click through the banner below to find the right card for you.

Consolidate down to 1 property
We're planning to sell our 2 condos then move into our rental home. This will simplify our lives a lot. Our tenants are moving out in February so everything is lining up. I hope we can sell our condos quickly and then move. We lived at our condo for 11 years and we really enjoyed it. However, the HOA fee and property tax had increased considerably. It's time to move on. I'm pretty sure our housing cost will be lower after we move into a house. Mrs. RB40 also doesn't want to be a landlord. She was very disgruntled when I left her to handle the tenants on this 5 weeks trip to Thailand.
Drop weight to 125 pounds
I rarely make this kind of goal because it never worked before. However, I think I can do it this year. Last year, I got my weight down to 128 pounds. That's really good! The key was intermittent fasting* and regular exercise. However, I'm probably up to 13x pounds now. I'm eating a ton of food in Thailand. My relatives keep pressuring us to eat more. It's a way to show affection here. Also, Thai food is so cheap and delicious. Who can resist? We don't get this kind of Thai food in the US. I'll weigh myself when I get home and then work on getting down to 125 pounds before summer.
*Here is how I do intermittent fasting. I eat only from noon until 8 pm on the weekdays. This cut down on the calories and I don't miss breakfast much. I'm busy getting RB40Jr off to school on the weekdays anyway. Try intermittent fasting if you want to lose weight. It really works. If you can't do it by yourself, I recommend Martin's Fasting Course. He calls it – What's for dinner? How you can get jacked by fasting. He's pretty helpful for a wrestler/blogger.
Fun Goals
Keep my happiness level at 8 or above
This one is a tricky one. The 2nd half of 2018 was tough for our family because my mom was diagnosed with dementia. She had hallucinations and she was having a really hard time in Portland. The situation was stressful and it dropped my happiness level from 9 to 8. We decided to move my mom back to Thailand and it's been very successful so far. She is much happier here and her symptoms are greatly reduced. She rarely gets hallucinations anymore and that makes a huge difference. Life in Portland should be less stressful once we get back. Hopefully, I can raise my happiness level back to 9 this year. It should be okay as long as there are no new problems. (Why are there so many problems in our 40s? Lots of my friends are having all sort of issues. It's a tough decade.)
Visit Chiang Mai for 6-10 weeks
I'm typing this post in a nice little coffee shop in Chiang Mai. It's pretty nice here for digital nomads. Chiang Mai changed a lot over the last 10 years. Now, there are nice gyms, coffee shops, restaurants, movie theaters, and all sort of nice places for everyone to enjoy. I wouldn't mind living here for a few years. However, Mrs. RB40 and Junior aren't ready to move yet so I'll have to put it off until later.
I'll come back in the summer to check on my mom and see how she's doing. Hopefully, she will be stable for a few years so we don't need to move her again. On the next trip, I plan to have a more structured routine. I'll get a gym membership so I can continue my exercise program. We'll also rent a place instead of staying with my dad. I can't get anything done with my parent around. It'll be a good opportunity to enroll RB40Jr in a Thai language program. He can only say “sawad dee krub” and “kob khun krub” right now. (Hello and thank you.) We'll also try to take a week off to visit Vietnam. It should be a fun trip.
So those are my goals in 2019. I'll give a status update every month so keep checking back to see my progress.
What about you? Do you have any New Year resolutions for 2019? Remember, the key is to track your progress. If you don't, then you'll forget about your goals and won't accomplish them. Also, get them done early if you can. Let's do it!
The post 2019 New Year Goals and Resolutions appeared first on Retire by 40.
0 notes
Text
Staying Sharp: 9 Knives Every Man Should Own
A few months ago, in the midst of a day full of projects, I had a bit of an a-ha moment. I was in my workshop, using the table saw to slice up some Baltic birch plywood, when a timer on my phone went off, reminding me to take a break and go chop a bunch of vegetables to add to the slow cooked stock I was simmering in the kitchen. … Continue reading on ManMadeDIY.com
0 notes
Text
Goodbye 2018 and Looking Ahead to New Projects
And so it begins. Back to routines, back to work. Did you enjoy wonderful holidays? I hope the last few weeks have been restful and restorative. I was able to spend lots of time with my family and just enjoy being at home and mostly stayed off of social media. It was wonderful.
I didn't get to write this post before the year's end but I thought it would be nice to reshare some of the things we did in 2018 - and fill you in on what we have planned for the year ahead! Truth be told, 2018 wasn't a great year but I am exceptionally excited for 2019!
SPRING
We started the year working on #ProjectCraftsDept. It was an empty shell of a room, and we started with vintage-coastal inspiration and installed the flooring. And finally, we finished off this room:
Modern Coastal Craft Room
Later on in the spring, I shared a room I rarely showed on the blog, our kitchen
Soon after, we started tackling another unsightly room, the master bedroom, as one of the featured designers of the One Room Challenge. We figured out the layout, added in furnishings and took the room from blue and awkward...
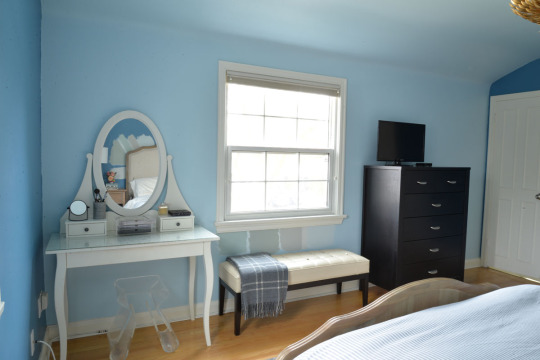
to cream and calming:

SUMMER
Summer was all about adding final touches to some of our favourite spaces. The prettiest fabrics
brought charm to our country cottage...

and stylish and functional lighting finished off my feminine home office.

I gave our cottage bedroom a refresh

and we finally got rid of the eyesore in front of our house and rebuilt our fence!
FALL
Crisp fall days brought exercises in decorating

A Moody Fall Mantel

Making the Living Room Cozier
and the debut of my first product collection, the Rambling Renovators x Tonic Living collaboration!

WINTER
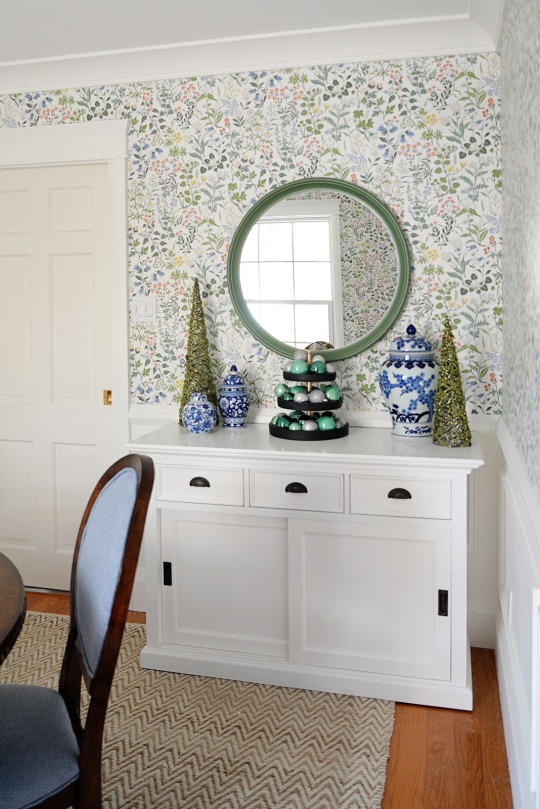
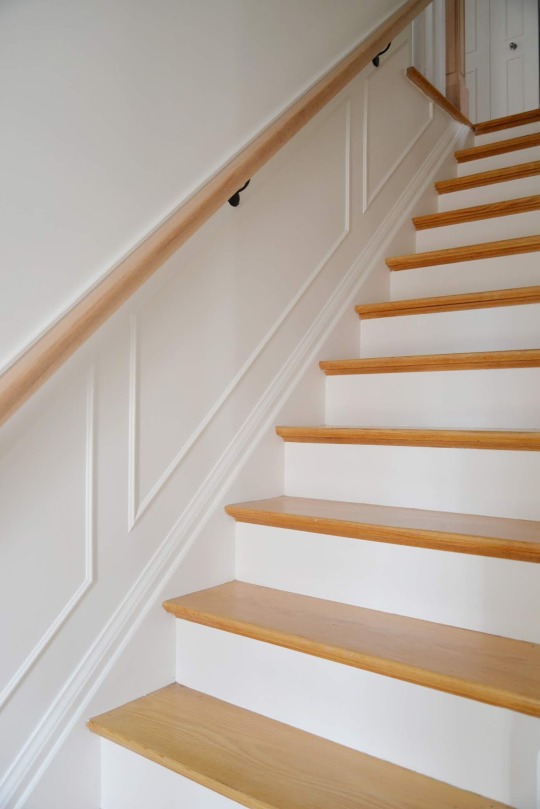
We ended the year with a reveal of a new floral dining room, a new stair railing, and a bright white one-day paint transformation.
It was a wonderful second year in this house and we made great strides in making this home more our own. So what's planned for 2019?? We'll be tackling at least these three spaces:
The powder room
Chloe's bedroom
The basement
and likely more. If you follow me on Instagram, you'll know that we've finished one of these rooms already! I'll share it here on the blog soon. I hope you'll continue to join me over the next year as we take on more renovating and DIY adventures.
Wishing you a wonderful 2019!

0 notes
Text
how we are ditching baseboard heaters
We ripped off the construction band-aid and have been demo-ing our little hearts out over at our #samuelfamilyfixer and sharing loads of progress as we go via Instagram stories. I've put a bunch in my highlights if you've missed anything and I'll be sharing more updates here now that things are really rolling. Along the way I've gotten a ton of questions over what we are doing with the baseboard heaters, if anything, and I tried to answer as best I could in a few short frames but really this is a full blog post kind of answer so here we go!
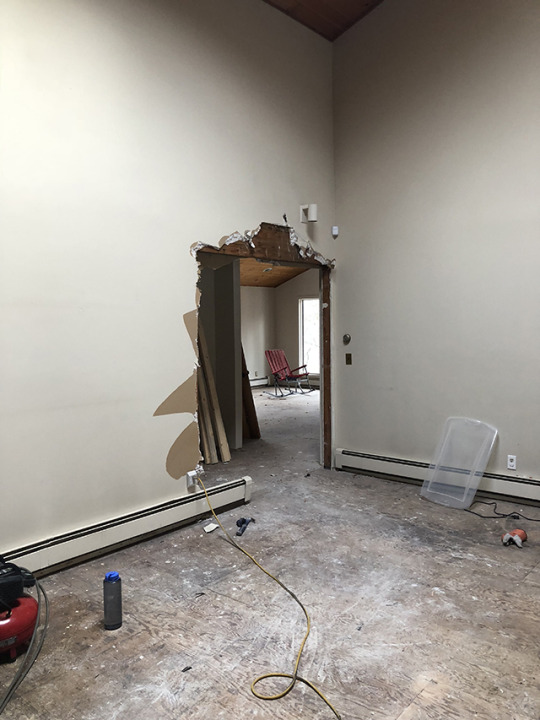
We love all the modern lines and unique features in the house but what we didn't love was the look of the radiant baseboard heaters. They do the job ok, but boy are they a big bummer to have to design around. No matter how you slice it, they make a space feel dated. So I did a deep dive into researching alternative heating systems and the good news is we got to rip those babies out of there, and will be replacing them with radiant heated floors which will be nicely tucked away under the finished flooring.

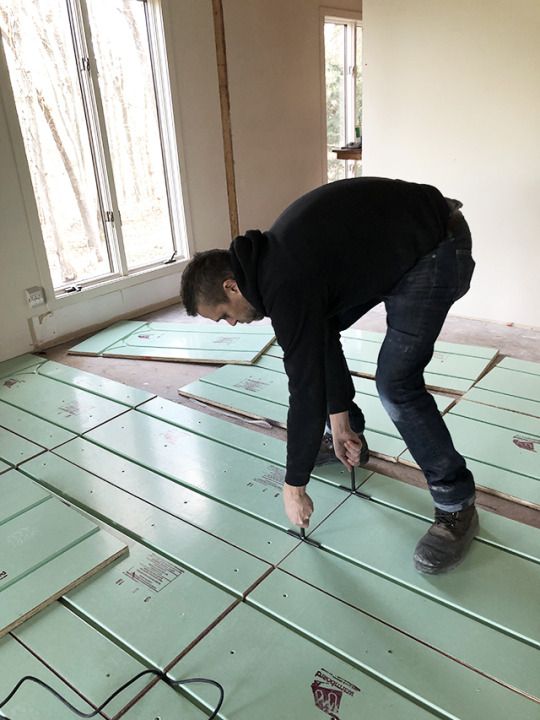
Through all my digging I found a company called Warmboard, and their pretty green panels are the answer to our prayers. According to their site… As a whole-home heating system Warmboard is the premier radiant heating solution in the US. Their panels outperform all the competitive systems with faster response times, easier installations, AND lower energy use.
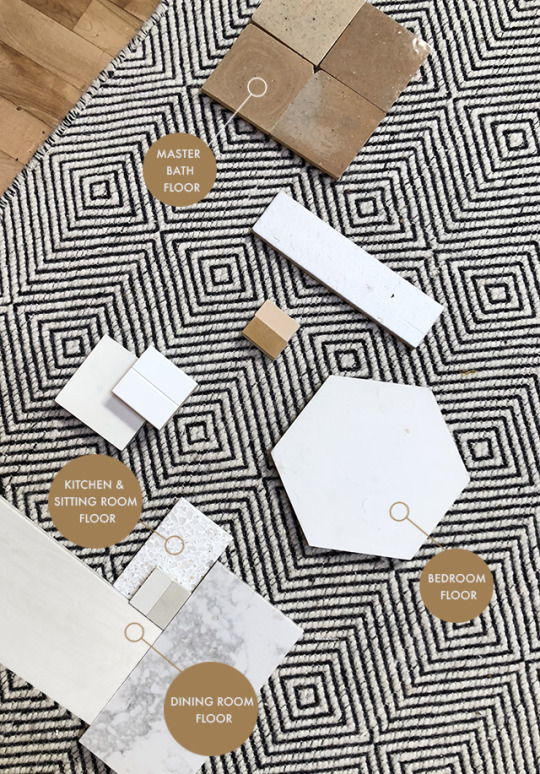
Tubing, that will eventually carry hot water, runs through those grooves in the panels and their patented design spreads the heat from the tubing throughout the surface of the entire floor, so there are no hot/cold spots and the water can run at a lower temperature which means its more efficient. What is really exciting from my point of view is that since these panels have a more even surface temperature than a lot of other radiant systems, the flooring possibilities are wide open. From what I gathered some radiant systems aren't compatible with carpet or hardwood because the heat doesn't make it thought the carpet efficiently and hardwood isn't good with the temperature fluctuation, but with Warmboard you can use thick carpets, laminate, tile, hardwood… all fair game and I am using a mix of almost all of the above. WOOT!
Once I locked in on the Warmboard system it opened up my design choices for the flooring. Tile in the sitting room, tile in the kitchen, bathrooms and even tile in the bedroom! I'm doing it. Without the radiant heated floors there would be no way I would install tile in the bedroom in this cold climate, but I was set on keeping the wood ceilings as is and I didn't want wood on both the ceilings and the floors, so with the Warmboard to keep the tile from feeling too cold and giving me the look I wanted, it was a win, win. We are doing carpet in the kids bedrooms and the large fireplace living room to keep those spaces extra cozy, laminate in the dining room, pantries and closets (I was originally planning on tiling those rooms too but when we got the labor estimates back for tile install we had to make some cut backs), and tile everywhere else. A peek at some of the finishes we've narrowed in on above!
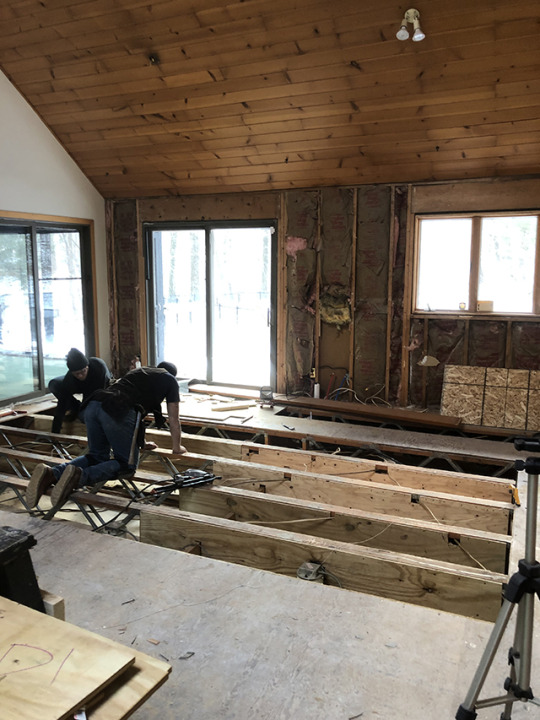
Another way we are saving some pennies (like $5000 worth of pennies, because we are covering A LOT of square footage) is by installing all the panels ourselves. This whole renovation is a mix of DIY and hired out work through our contractor, to get the most out of our budget (and so I can splurge on certain things like terrazzo floors in the main living space) and the Warmboard installation is a perfect illustration of that. We install the panels and then licensed heating & cooling professionals come in to run all the tubing, install a new boiler (ours is on its last leg) and does all the plumbing and mechanical portion of the install.
We just started installation and Rupe got a new power tool… so he's happy. It's an auto-feed drill that allows you to stay standing while screwing in all 16 screws per panel. We did the math based on how many panels we have to install and needed 5,000 screws! Rupe's knees are very thankful for the screw-loading stand up drill. Pop Pop and Rupe are on panels, me mostly on the sidelines this time, with the kids but jumping in and throwing my 2 cents in whether or not it is appreciated, and Mimi is sweeping up the floors as they go to make sure there's no princess and the pea situation under the panels. Warmboard supplies an install kit and a detailed custom design plan to follow which makes it a little like a putting together a giant scale, but fairly simple, puzzle. There was a bit of a learning curve at the beginning but once we got into a groove (pun intended) things started to move. I'll let you know how we do on the rest of the house! Wish us luck. x
Oh and p.s. I got the question a lot on IG if this will be our only heat source and the answer is yes! I've heard that some radiant systems may require supplemental heating, but not Warmboard! It is supposed to heat better than forced air, especially when it comes to heating rooms like ours, that are very large and have tall ceilings (ours are 20 feet tall at the peak!). But don't worry, this girl has been in California for way too long… so it better do the job, I will be the true test and report back.
The post how we are ditching baseboard heaters appeared first on Sarah Sherman Samuel.
0 notes
Text
Insurance Coverage and Falling Objects

Falling Objects
What if a meteorite or airplane parts fall from the sky and land on my vehicle?!?
What should I do if a sheet of ice and snow comes off of another vehicle on the highway and hits my car causing damage?!?
Our Massachusetts Auto policy tells us that there IS coverage under Comprehensive Coverage (Part 9), for losses caused by falling objects. What this means…
Comprehensive Coverage is coverage for events other than collision. Events that are out of your control…
Natural disasters: Earthquakes, Tornadoes, Hurricanes
Fire
Explosions
Vandalism
Theft
Run-ins with animals, such as deer
Broken Windshields (make sure you don't have a separate glass deductible)
And last, but certainly not least in our case, here in New England:
FALLING OBJECTS

Falling Objects
If you carry Comprehensive Coverage (Part 9) on your policy, then you DO HAVE COVERAGE if your vehicle is ever struck by a falling object (After your Comprehensive deductible is applied).
If your car is struck by an object that came off of another automobile, do your best to get their information. If subrogation and recovery of your deductible is possible, it is vital to have the plate number of the other car! Otherwise, there is no way for the insurance company to recover your deductible and you will end up responsible for the entire cost $$ of the repair!
Do you have additional questions? Shoot us an email at info@insurewithrichardson or click the lightning bolt to send us a direct message!
The post Insurance Coverage and Falling Objects appeared first on Richardson Insurance.
0 notes
Text
Reflecting on the Past – Looking forward to the Future

Whenever a year starts nearing its end, I reflect on the effectiveness of my past efforts, and focus on my goals for the future. As my business evolves, naturally, so do my goals. When I started this blog, I never intended it to be or dreamed it would become –a business. But my blog (and Youtube […]
The post Reflecting on the Past – Looking forward to the Future appeared first on Sawdust Girl®.
0 notes
Text
Healthy Recipe Ideas
This month the Cooking Housewives are sharing Healthy Recipe Ideas.
Whether it's a New Year's resolution for weight loss or you're looking to add a few healthier choices to meal planning, we have you covered. Be sure to check out all the recipes at the end of the post.
I'm a quick and easy Lettuce Chicken Wrap, we love it for lunch or dinner:


An InLinkz Link-up
Pin these healthy recipe ideas for later:

More recipes:
Favorite Italian Recipes
Soup Recipe Favorites
Easy Summer Picnic Recipes
The post Healthy Recipe Ideas appeared first on Refresh Restyle.
0 notes
Text
A nighttime Christmas tour
Hello all! I hope you've had a great week and are ready for the festivities ahead! I'm back with something I've wanted to do for years -- a quick nighttime tour. The magic of the decor and lights isn't completely captured in photos, but it's still pretty lovely. :) Night is definitely our favorite time of day during the holidays!
If you'd like to see the room tours I've shared this month, you can see our cozy master tour (with tons of updates!) here, the kitchen and morning room tour here, our great room and then the basement decor here. I didn't change up much on our porch this year, so you can see all the details about that here.
I'll just be sharing the photos, so if you have questions about anything please ask in the comments! I hope you enjoy! :)


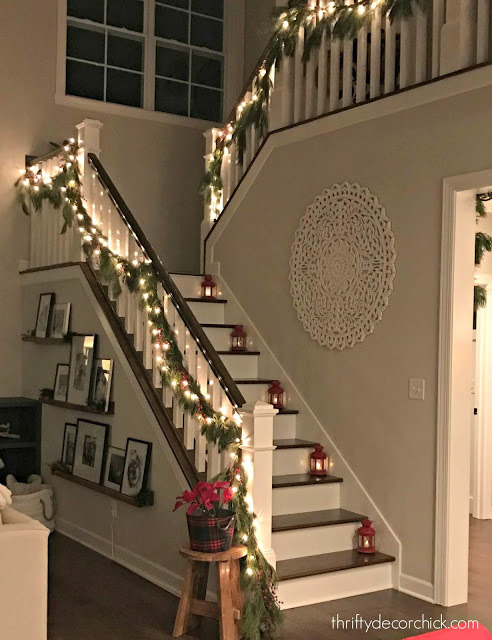


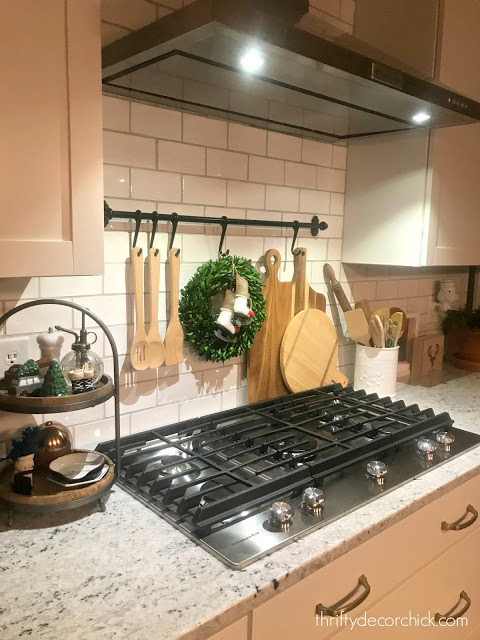
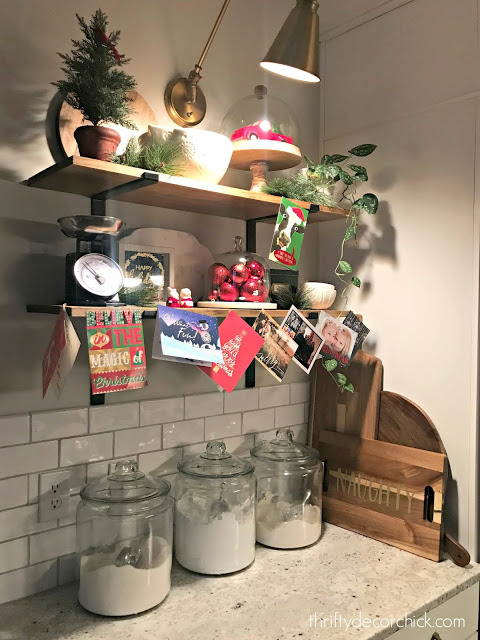
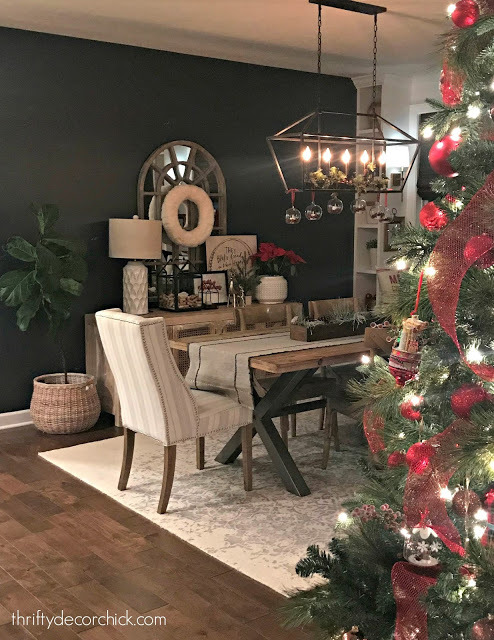
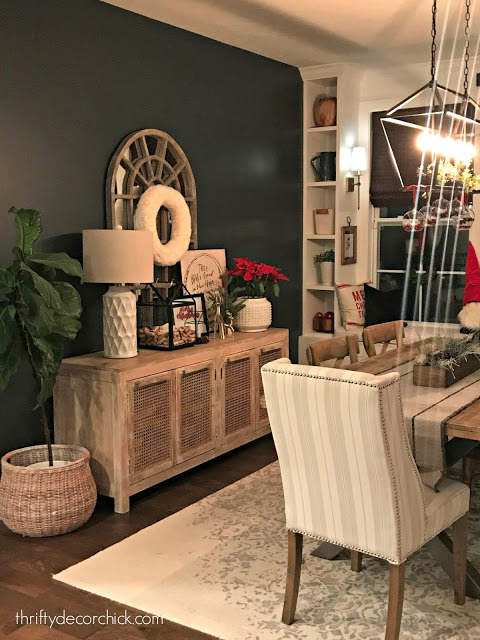
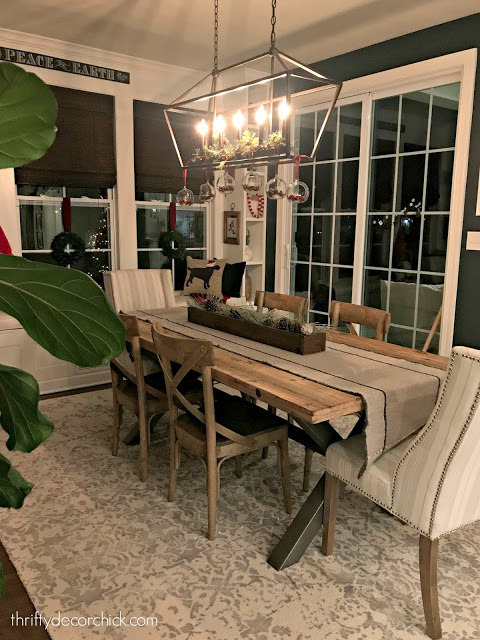

I hope your holidays are wonderful!! I'm so thankful for you all and your support again this year! Merry Christmas and happy holidays to you and yours. :)
This content is property of Thrifty Decor Chick LLC. If you are reading this on any other site other than www.thriftydecorchick.com or one of her social media platforms, please contact her immediately (thriftydecorchick at gmail dot com). Any other use of this content is strictly forbidden.
0 notes
Text
Will the El Nino Winter Snow Effect in NJ Mean More Spring Pests?

Will the El Nino Effect Impact NJ Spring Pests?
El Nino is coming. What effect will this have on NJ pest control issues? The U.S. Climate Prediction Center is expecting a weak El Nino weather pattern this year. However, this doesn't mean winter will be trouble-free.
What a Weak El Nino Means for the Garden State
During an El Nino pattern, surface temperatures in the tropical Pacific Ocean are warmer than normal, affecting global weather patterns. This year's weak El Nino is expected to lead to winter weather that's warmer and wetter. However, this doesn't mean no snow. Areas that commonly experience snowfall should expect more as part of the winter weather milieu.
How this Season's El Nino Pattern will Affect Pests
Insects are affected by temperature and moisture. Most hide away for the winter, taking shelter in warm spots beneath your home, in its cracks and crevices, or underground, beneath leaves, and tree trunks. Equipped with a built-in 'antifreeze' that allows them to remain dormant, they spring back to life in warmer temperatures, easily surviving the winter. The warmer, wetter weather predicted this winter season, however, could lead to:
– The premature emergence of pests from hibernation on warmer than normal sunny winter days.
– The invasion of your home by pests in rainy weather as insects flee flooded nesting sites.
Freeze pests out for the winter with the help of the NJ pest control experts at Stern Environmental today.
The post Will the El Nino Winter Snow Effect in NJ Mean More Spring Pests? appeared first on Sterns Chatter.
0 notes