
Don't wanna be here? Send us removal request.
Statistics
We looked inside some of the posts by theodorobreja3d and here's what we found interesting.
Average Info
Notes Per Post
0
Likes Per Post
0
Reblog Per Post
0
Reply Per Post
0
Time Between Posts
4 hours
Number of Posts By Type
Text
17
Last Seen Tumblr Blogs


Fun Fact
There were a total of 171.5 billion posts on Tumblr in 2019.
Text
80lv - Blog Draft - Ancient Traveller Character Creation Workflow
Introduction:
Hello everyone, I am Theodor, currently doing my masters in Game Art and Design. Throughout my masters I want to focus on character art. Looking forward to making connections and developing my skills.
Character background:
This character is a nomad, a travelling merchant. In his time it was said that he travelled through all the empires, been to every town and walked on every road. However, his intentions were not pure at heart. He wasn’t an evil man, but he was greedy, a sly merchant that would sell anything for coins. Thus, one day, a trickster spirit made a deal with him: to satisfy his hunger for gold, in exchange for his soul.
Little did the traveller know that the spirit would use his body for his own greed, to collect other souls. They are now sharing one body, the merchant looking for his gold, and the spirit collecting the souls of the lost wanderers.
In Game Function:
The purpose of the traveler is now to guide you through the map. In the beginning, he will show you the ways to navigate and present to you the different nations. Later, through a quest line, you will get friendly with the spirit and he will be willing to use his magic and teleport you to specific checkpoints and major cities.
Reference:
For this project I took inspiration from surrealism. While studying some representative artists of the artistic current such as Salvador Dali and Rene Magritte, I was inspired to give my character the distinctive features such as the long limbs (just like Dali portraits them in "The Temptation of St. Anthony" or "The Elephants") and the double faced coin in his head (as Rene depicts it in his paintings). In addition I took reference from other areas where surrealism was an inspiration, such as fashion (Heidi Lee). I used PureRef to put all the images together.

Sculpting an ancient, boney character was fun. Using reference from other artists, as well as anatomy and poses from real life, helped me study the bones of the body and how the deteriorated muscles would interact with them in different positions. I also gathered references for the old man's face in order to make all the realistic wrinkles.

Sketches:
In the beginning, I tried different approaches to how to incorporate two heads/personalities in one body. I tried experimenting with silhouettes and different positions of the head. In the end I decided to stick with the double sided "coin" face, which flips between personalities, one is the ancient traveler, the other is the trickster spirit.
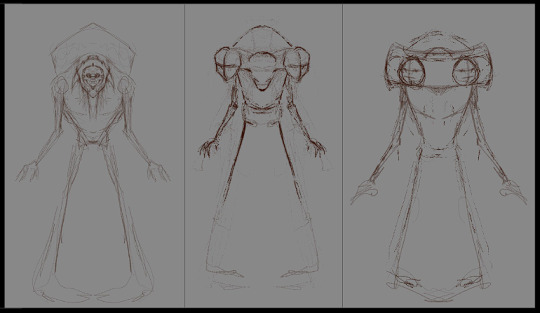
Afterwards, I wanted to make some rough sketches of the body, in order to see how the proportions work together and have a better concept of what I was going to model. At this stage I also decided what kind of props and clothing he would have.

For me, having some kind of sketching, no matter how rough, helps making sure that the image from my mind actually makes sense when made real. You would be surprised how many ideas seem amazing in our imagination, but when you put them on paper, problems start to appear.
Modelling the body:
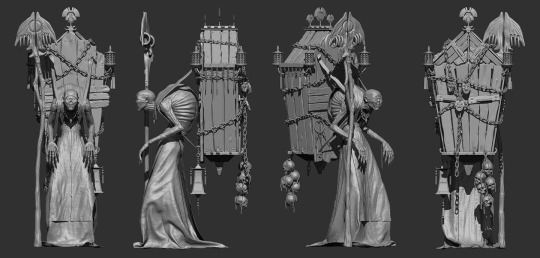
I started to sculpt the base shape of the model using ZSpheares in Zbrush. Once I had the silhouette that I liked, I roughly sculpted the ribs, some muscles and the head. For the first blockout I used big shapes with low poly count, to see if everything works together before starting to add details.

For sculpting I used the base ZBrush brushes such Move, ClayTubes and DamStandard brush, no custom brushes. As a final layer, I also used alpha brushes to create noise on the surface of the model. This later helped with the texture maps. Anatomy is very important, it can make or break the whole character. As such, I made sure to always go back to the anatomy reference and check if the bones and muscles are positioned correctly.
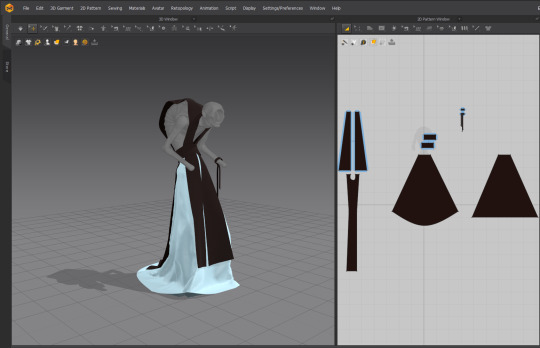
Using Marvellous Designer:
Right now, I am just a beginner when it comes to Marvelous Designer and clothing in general, however this is a subject I really want to develop, as it brings life and identity to the character.
Creating the props:
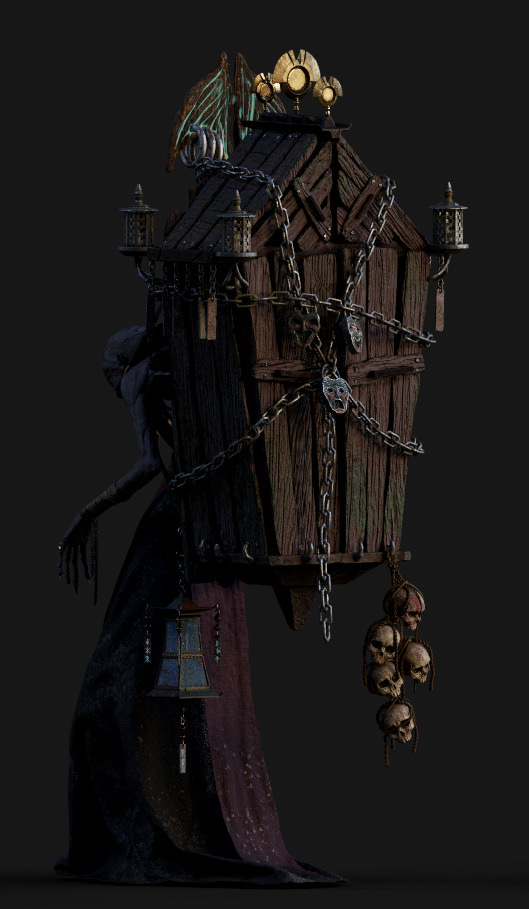
For the style of the props, I took some inspiration from the Asian culture, but I tried to reinterpret it and give it a personal touch.
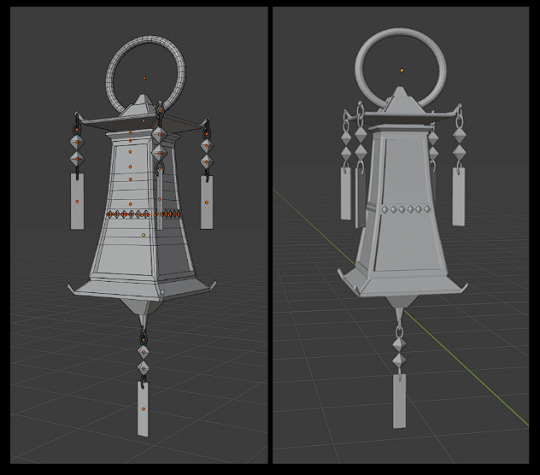
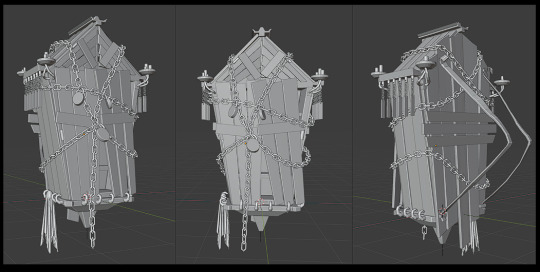
Adding small details to the props makes the whole character look more realistic. Each small object is part of the history of the character. The melted candles, rusty wood planks, the locks, each adds believability to the character.
To make it visually intriguing I also wanted to add chains around the cupboard. To learn how to do that, I looked on tutorials on how to make chains in Blender. After trying some different variation, I found a tutorial that would make the chain be procedural, which helped me tremendously when modeling it around the cupboard.
youtube

Final Sculpt Detailing:
I used the same techniques to sculpt and add more details to my character. To add the final touch, I used a simple brush with a rough alpha in ZBrush, in order to add those scratches, and deteriorated look.
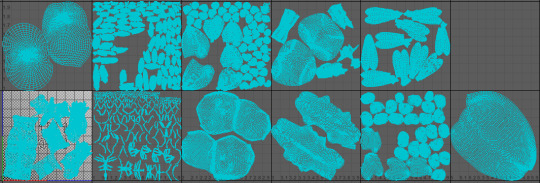
Retopology and UV mapping:
Having all the sculpted model done in high resolution, I then moved on to the next stage and did the retopology (the low resolution) of the character. For the body, I manually made the retopology in Maya, using its retopology tools. For the rest of the props, in order to save time, I used ZRemesher in ZBrush. With the high poly and low poly meshes done, I made sure to give each object their corresponding suffix, "high" and "low", so I can use the ID baking system in Substance Painter.

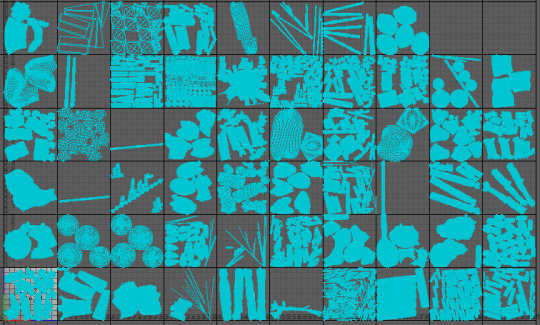
To prepare for Substance Painter, I also separated the UV maps on different tiles, allowing me to texture them individually.
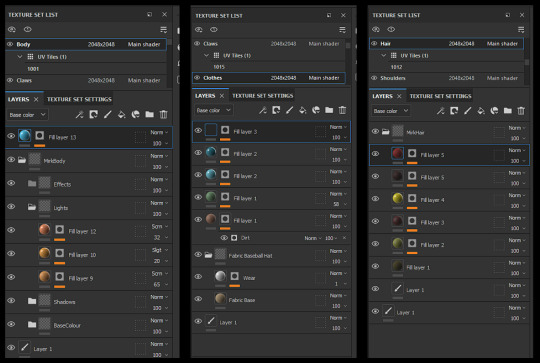
Texturing in Substance Painter:
After importing my low resolution mesh in Substance Painter, I baked the high resolution mesh on top, using the ID matching system that I mentioned before.

To make the textures, depending on the object I am texturing, I start with a smart material from Substance Painter, on top of which I start adding my own layers of colours and different types of effects to tell the history of the character.


It is good to use the baked maps to your advantage when texturing. Using curvature and ambient occlusion maps to add depth to the character and emphasise some of the sculpted detail.
I used the Unreal Engine 4 packed setting to export my texture maps. However, I made some small changes to the channels in order to be able to export the emissive and opacity channels.

Rendering and Compositing in Unreal5:
After importing the objects in Unreal Engine 5, I made one master material to which I added a small blueprint system that enables me to adjust the intensity of the emissive and opacity.

For the final renders, I used a free HDRI from Poly Haven to make the lights in my scene. I then put HDRI through the Sky Light in order to lose the background of the HDRI, but keep the lighting.
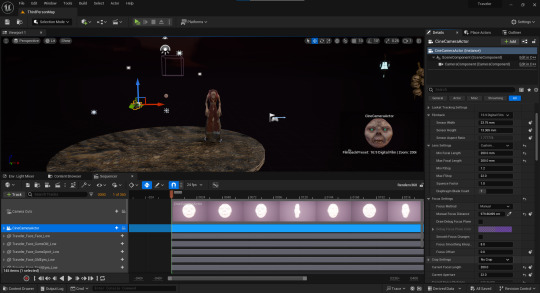
The last stage in rendering is to adjust the camera and make the cinematic sequence. Make sure the character is in focus and that the camera has the most optimal settings for your desired results.
Final thoughts and advice:
Overall it was a very exciting project to work on. I got to learn so many sculpting and texturing techniques, while also having fun and experimenting with the design.
My advice for anyone that is at the beginning of their 3D journey is to enjoy the learning process. As all of the arts, 3D modeling takes years to master and there are constantly appearing new techniques and functions to discover. Start with something small, make sure you learn the fundamental workflow, and the best part, have fun bringing to life the most interesting and unique characters you can think of. Being consistent helps you improve and achieve your goals.
0 notes
Text
The Mirk & Ancient Traveller - Details and Comparisons
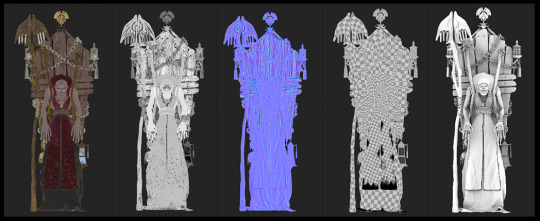
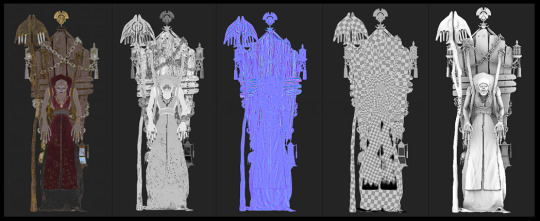
Ancient Traveller Before and After Development:

With the final render done, I wanted to show exactly where I used the reference and see how close I got to it, while also incorporating it in the style of the character.

360 Props Details:


The Mirk Before and After Development:

Just like with the Traveller, I wanted to show how I used the references I gathered and how they reflect in the final model.

Close Up Details:
0 notes
Text
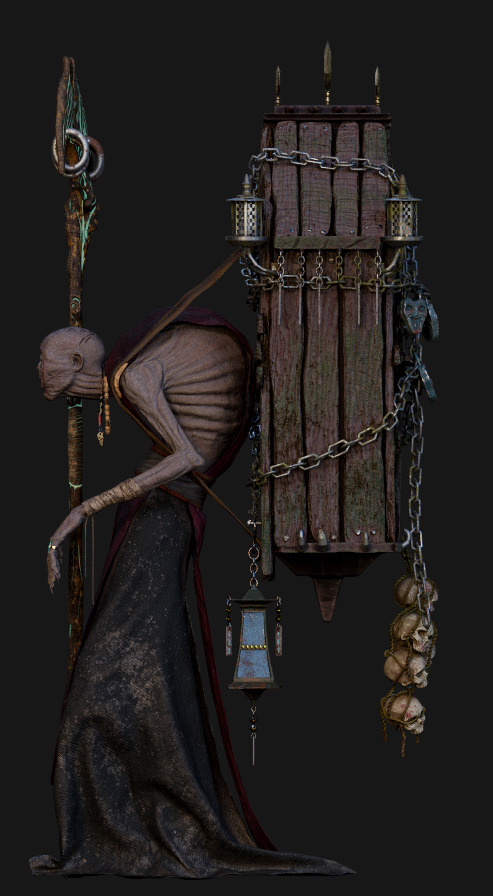
Ancient Traveller - Final Renders
To render the Traveller I tired to use four points of light because the model was occupying more space. However, for the final render, I ended up using an HDMI from Poly Haven to have an uniform lighting.

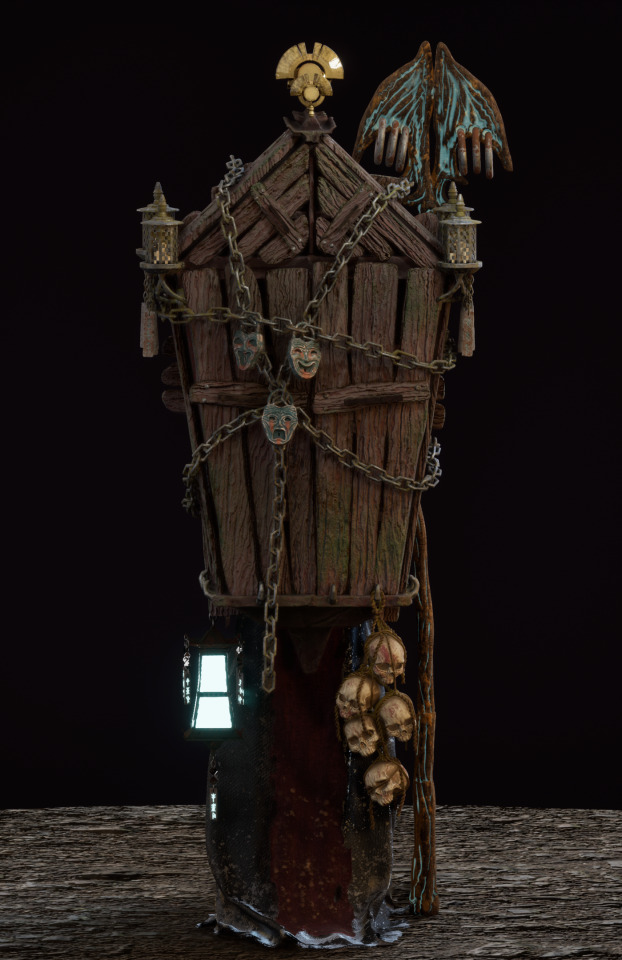
360 Unreal Engine 5 Render:
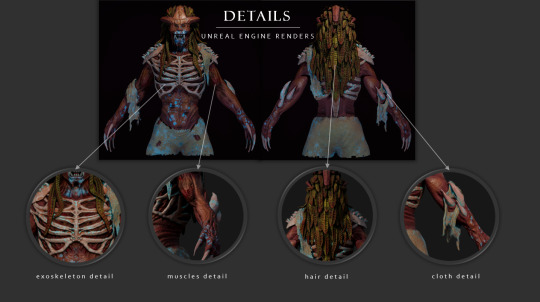
Front and Back Unreal Engine 5 Renders:

Close-up Details Unreal Engine 5 Renders:


0 notes
Text
Mirk - Final Renders
To make the final renders I made a three point lighting setup. The main light being neutral, second light with a cold tone and the third rim light with a warm tone.

I also looked at some tutorials and played with the camera settings to find the best combination for a good result.
360 Unreal Engine 5 Render:
Front and Back Unreal Engine 5 Renders:


Close-up Detail Renders:


0 notes
Text
Mirk - Development Project Update 6
Following the same workflow as with the Traveller, I imported the FBX of the Mirk into Unreal Engine and started making the master material.

However, I made some differences. In this case, I didn't made the emissive system, as I had no emissive channels exported. Additionally, because this character had less elements which I knew I would not need to move, I imported all the objects as a single element, making the process of adding the textures easier.

0 notes
Text
Traveller - Development Project Update 7
For the final renders, I imported the models into Unreal Engine 5. I've always had uncertainties when it comes to importing the textures, as there are some differences between Substance Painter and Unreal Engine.

Following the tutorial from the previous blog post, I learned how to organize and structure my imported texture maps, in order tot have realistic results. It was very useful as I also learned how to use the emissive and opacity channels, and how to adjust them in Unreal. Moreover, I learned how to make material instances, in order to easily duplicate the material and just add the textures of the other objects in their corresponding place. This saved a lot of time and I had to make the blueprint structure only once for the master material.


Being able to adjust the emissive and opacity channel in Unreal Engine was very useful, as it allowed me to adjust them in correspondence with what I needed for the renders and lights from the environment.
0 notes
Text
Mirk - Development Project Update 5
Following the same workflow as with the Traveller, I imported the high resolution and low resolution FBX files in Substance Painter and using the ID matching system, I baked the model.

The only textures that I kept from the initial Mirk model from the first week, were the skin and hair textures. In order to move them to the new project, I had to transform them in smart materials. This allows me to use them in any future projects and customize them however I want.
When I was done with the textures, I exported the baked maps using the same channel workflow as I used with the Traveller.

Final Render F.S.B:


0 notes
Text
Traveller - Development Project Update 6
For the baking, I made sure to have the same name with "low" and "high" suffixes, in both the high resolution file and the low resolution one. I then imported both in Substance Painter and made the baking in here using the ID system.

After the baking I moved on to build the textures for each object. For some of them, such as the metal, wood and leather, I used Substance Painter materials, on top of which I started to build my own textures and make them unique and add story to the character. I added effects such as dirt and dripping masks, but I also used curvature and ambient occlusion maps to underline the crevices and details of skin and props.

At the end, I exported the baked maps following a tutorial that talks about all the different channels and how to have a good workflow from Substance Painter to Unreal Engine.
youtube
Fig.1: Substance Painter to Unreal Engine workflow
Following the tutorial, I managed to export all the right textures and maps and prepare them for Unreal Engine.
F.S.B Character Textured and Rendered in Substance Painter:


Reference:
Fig.1: Games, T. F. (2020) UE4 Rendering Props. Youtube. Available at: https://www.youtube.com/watch?v=K_OC9Zs91Jc&list=PLmNLrfKMXuOwWtUVn-w4_IUUgeHQFwLaL&index=17
0 notes
Text
Mirk - Development Project Update 4
Because of the time pressure, for the Mirk, I made the retopology of the character using ZRemeseher in ZBrush.

I also used masks in ZBrush in order to create different poly groups. I then unwrapped the model using those poly groups in ZBrush.
After I was done with the retopology, I imported everything in Maya and arranged the UV maps following the same process as I did with the Traveller.
0 notes
Text
Traveller - Development Project Update 5
With the sculpting part done, I moved on to the retopology and baking process. Another challenge I wanted to take with this project was making a manual retopology. Having a clean retopology is very important for the workflow process, especially in a studio. It is an essential skill that every 3D artist needs to know. Thus, I wanted for the first time to start learning and practicing.

To start with the basics of the retopology, I looked at multiple YouTube tutorials, through which some of the best were from Flipped Normals:
youtube
Fig.1: Maya Retopology Tutorial by Flipped Normals
Having everything done with retopology of the body, I then moved on and used ZRemesh tool to do the retopology of all the other props and elements of the character.

Before moving to baking, I separated each UV map unwrapped in a different UV tile, in order to separately preserve the UV in Substance Painter.
Future Improvements:
As this was my first time doing a manual retopology, the final result need to be improved in order to become professional level. For the future, I will focus on improving my technical skill. Have cleaner and lower topology, learn new techniques, and how to optimize my characters, from the technical point of view.
Reference:
Fig.1: FlippedNormals (2018) Retopology for Beginners in Maya. Youtube. Available at: https://www.youtube.com/watch?v=xpDWta5O3n8
0 notes
Text
Mirk - Development Project Update 3
After feedback, I was advised to focus on a smaller portion of the character in order to make it look better, rather than waste time with the design of the legs, given the fact that my other character is also complex.
Finalised High Rez Sculpt F.S.B:


Sculpting Details:
Using the same technique I used on the Traveller, I added skin texture to the body of the Mirk as well. It was also very interesting to work and detail the muscles as well, trying to create the muscle fibers.


As final details, I sculpted creases and fold on the clothing and made sure any other areas of the body like the hair, face and the exoskeleton, look good and have a coherent style and level of detail.

360 View Final Sculpt:
0 notes
Text
Traveller - Development Project Update 4
I managed to finish the sculpting process. I focused on sculpting skin details and finalizing the props. I wanted each prop to add story to the character, all the deteriorated wood planks, candle supports, locks, etc.
360 view:
Finalised High Rez Sculpt F.S.B:

What I wanted to push myself to do with this project is reach the high level of detail that I saw in my favorite artists' work such as Samuel Alicea who has done amazing projects for Blizzard and Luke Starkie, who has done creatures for God of War.

Fig.1: Lindwyrm - God of War Ragnarök by Luke Starkie

Fig.2: Felguard Demon - Diablo by Samuel Alicea
Looking at skin reference from reality and artworks, I sculpted using brush strokes technique to add texture which will also help in the texturing process when I bake the curvature and occlusion maps.
Sculpt Details:


Cloth Details:
I also sculpted texture in the fabric of the clothing. Inspired by the high detail of clothing I saw in the artwork of Julie Beliveau (fig.1), one of the artists who worked on the costumes and cosmetics in Diablo IV. I managed to sculpt deteriorate fabric using a strong square alpha and a simple brush.


Fig.3: Barren Lord Costume from Diablo IV by Julie Beliveau
I also added ripped threads to emphasize the deteriorated clothing. I made those making cuts in the mesh and then adding clay tubes to make the threads.

After presenting my work, in the feedback I received, I was told to make the ripped parts of the clothing using alpha masks when texturing, as the way I did it wouldn't have been viable for retopology.
Reference:
Fig.1: Artstation.com. Available at: https://www.artstation.com/artwork/g8YYa8
Fig.2: Artstation.com. Available at: https://www.artstation.com/artwork/KOz90x
Fig.3: Artstation.com. Available at: https://www.artstation.com/artwork/lDK2qa
0 notes
Text
Traveller - Development Project Update 3
Following the feedback from my teachers and colleagues, I decided to adjust the design of the cupboard. Previously the doors were broken and deteriorated. After the feedback, I fixed the doors as I was told that it would keep the overall style uniform, deteriorated by time but not neglected.

In addition, I decided to use mega scans for the planks, in order to get more realistic shapes. This are the mega scans that I downloaded from Quixel:

Fig.1: Planks Mega Scans
However, I only used the irregular mesh of the scans. Because I had to remodel them to fit my cupboard model, the texture maps were no longer working. Aa a result, I had to do my own textures and retopology of the planks.

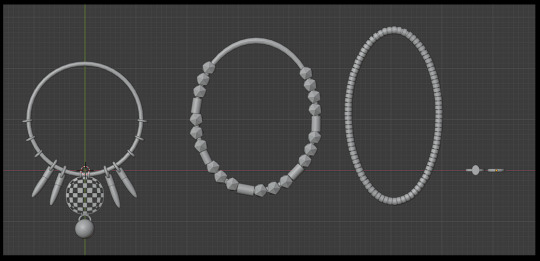
At this stage, I am also building the main shapes of the jewellery which the traveler will have around his neck and fingers. For the design, I took inspiration from real life necklaces with a shamanic style:

Fig.2 Fig.3 Fig.4
Base shapes of the necklaces and rings made in Blender:
Reference:
Fig.1: Quixel wooden pallet plank (no date) Quixel Megascans. Available at: https://quixel.com/megascans/home?category=3D%20asset&search=planks&assetId=tezvbcuda
Fig.2: Pin by Max Chandler-Pease on barbarian/savage costuming (no date) Pinterest. Available at: https://ro.pinterest.com/pin/408068416308970560/
Fig.3: Pin by Lovisa on Wicca (no date) Pinterest. Available at: https://ro.pinterest.com/pin/408068416308869756/
Fig.4: Stunning vintage shaman amulet necklace (no date) Pinterest. Available at: https://ro.pinterest.com/pin/408068416308860662/
0 notes
Text
Mirk - Development Project Update 2
At this stage, I steaked with a design for the legs and added the boney spikes to make the character look more corrupted and out of control.
I got the inspiration looking at one other artist's work that I follow, Luke Starkie. He designed the Suicide Minion from Diablo II: Resurrected.

Fig1. Suicide Minion by Luke Starkie
I also added cloth such as trousers and ripped strips to reflect the idea of transformation, how from a previous normal character, now it transformed in a corrupted monster. I also got a chance to work more on my Marvelous Designer skills and experiment with new shapes and create classic clothes like trousers which will also help me in the future.
Marvelous Designer Cloth:


After designing the clothes in Marvelous Designer, I imported them in ZBrush. I made the necessary adjustments and also sculpted some more creases where needed.
F.S.B High-Rez Full Body Sculpt:


Reference:
Fig.1: Artstation.com. Available at: https://www.artstation.com/artwork/bK253g
0 notes
Text
Traveller - Development Project Update 2
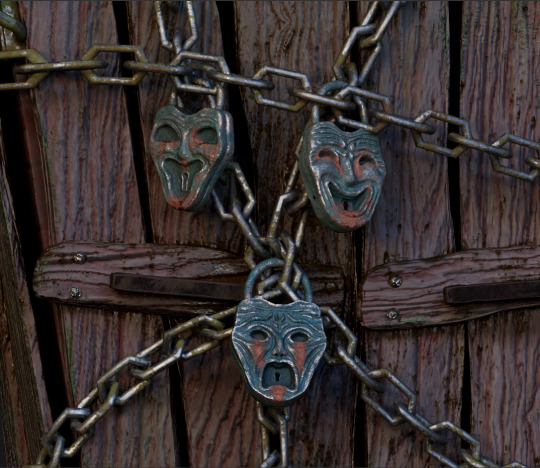
I kept on designing props such as the locks that hold the chain and the rope of skulls that hang at the base of the cupboard.

For the design of the locks I wanted to use the classic theatre masks, having the key hole in the mouth. As such, I started to gather reference with different theatre masks. I accentuated the creases of the face, in order to get a more forged look when adding textures.

It was also a good opportunity for me to study skull anatomy and see how to make them look realistic.
I decided to record my timestamps while sculpting the skulls in order to get used to recording my work and analyse how can I improve my process . It was also interesting to see where I started and how it looked in the end.
Skulls speed sculpt video:
To make the rope I looked for tutorials and I found a really good one which was very useful.
youtube
Fig.1 Ropes Tutorial

For the placement of the skulls, I looked at a concept art from a freelance 3D artist Yang Yang. I really liked it and I used it as a reference. His ArtStation: https://yangyang_10.artstation.com/

Fig.2 Skulls Concept Art
Referencing:
Fig.1: Abe_Leal3D (2023) How to create ropes and chains in ZBrush. Youtube. Available at: https://www.youtube.com/watch?v=j0gViuAjQWA (Accessed: January 9, 2024).
Fig.2: Artstation.com. Available at: https://yangyang_10.artstation.com/projects/6JLkW (Accessed: January 9, 2024).
0 notes
Text
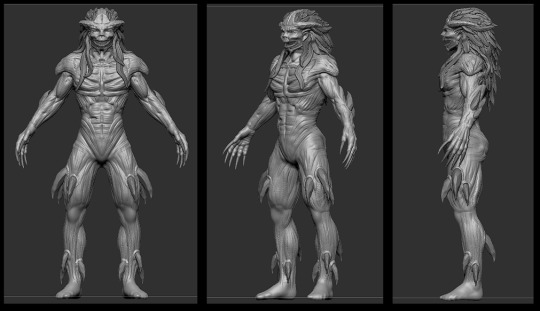
Mirk - Development Project Update 1
In parallel, I started working on my second project to develop the Mirk. I had to go back to an intermediate state of the project feom the first week in order to sculpt the body in harmony and have the same level of resolution.
Mirk Full Body F.S.B:


For the legs, I wanted to create an interesting silhouette to give the character a more unique look. I gathered multiple references with styles and lef anatomy in order to decide how to make them.

0 notes
Text
Traveller - Development Project Update 1
To start developing my Ancient Traveler project, I started to gather more references regarding specific details, such as the top decorations of the cupboard. For de design, I took inspiration from the Asian style of the Mikoshi, a sacred religious palanquin in the Shino religion.

In addition, I started adding more props to the character in order to make it more realistic. I envisioned him as a complex character with a lot of mystery. As a result, I wanted to add enough props, reveal hints about his story, and journeys.

I also kept on refining the body and clothes of the character. Using simple brushes with square alpha, I added muscle textures and fibers making small strokes along the main shapes.
Updated character F.S.B:


0 notes