
Don't wanna be here? Send us removal request.
Statistics
We looked inside some of the posts by thirdoasttraining and here's what we found interesting.
Average Info
Notes Per Post
0
Likes Per Post
0
Reblog Per Post
0
Reply Per Post
0
Time Between Posts
2 days
Number of Posts By Type
Link
5
Text
12
Last Seen Tumblr Blogs


Fun Fact
Kazakhstan’s Minister of Communications and Informatics has blocked the Tumblr site because it contained 60 sites of terrorism, extremism, and pornography in 2015.
Link
#CardiovascularFitnessMaintenance#Equipment-FreeTrainingSolutions#InjuryPreventionProtocols#MentalFitnessStrategies#MetabolicAdaptations#PreservingMuscleStrength#ReturntoTrainingGuidelines#UnderstandingDetrainingScience
0 notes
Text

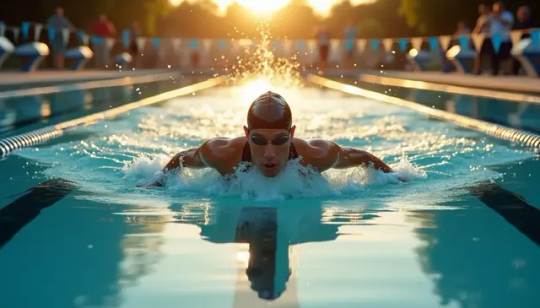
César Cielo blazed through 50 meters of water in just 20.9 seconds back in 2009, setting a world record that still stands today. Think that's impressive? Olympic champion Alexander Popov could kick a 50-meter long course pool in 27 seconds – using only his legs. Here's what separates elite swimmers from everyone else: they've mastered the four pillars of freestyle technique. Body position keeps them slicing through water like a torpedo. Leg mechanics provide the foundation for speed. Arm mechanics generate the power. Breathing timing keeps everything working together. Don't worry – you don't need Olympic genes to dramatically improve your swimming speed. The Tabata protocol proves this point perfectly. Just 20 seconds of all-out effort followed by 10 seconds of rest can boost your VO2 max by 15% in two months. That's a game-changing improvement from a simple training method anyone can use. Every fast swimmer develops what coaches call "feel for the water" – that ability to grab and pull water instead of just slicing through it. Regular practice with the right drills builds this crucial skill. You're about to discover the exact pro-level drills that create real speed improvements. Whether you're chasing personal records or simply want to glide through the water more efficiently, these techniques will get you there. Mastering the Basics Before Speed Have you ever wondered why some swimmers seem to glide effortlessly while others struggle to stay afloat despite working twice as hard? The difference isn't talent or strength – it's mastering the fundamentals first. Most swimmers make the same mistake. They chase advanced techniques before nailing the basics. Swimming speed isn't built on fancy drills – it's built on a rock-solid foundation. Why body position matters Your body position determines everything in the water. Think of it this way: water is 800 times denser than air. Even tiny positioning errors create massive resistance that kills your speed. Elite swimmers create a torpedo-like alignment from head to toe. Head, hips, and heels stay aligned at the surface. Coaches call this "swimming downhill" – that balanced, sliding sensation where you're working with the water instead of fighting it. Remember that moment when swimming felt easy? You were probably in perfect position without realizing it. When your body alignment is right, your legs won't sink. No sinking legs means no drag anchor slowing you down. A high, horizontal body position transforms your swimming by letting you: - Glide through water with minimal effort - Maintain momentum between strokes - Convert every bit of power into forward movement Here's the reality: small improvements in body position create dramatic speed gains. Position yourself correctly and you'll stop wasting energy fighting unnecessary resistance. The role of balance and core control Your core isn't just about looking good on the pool deck. Core strength acts as your power transmission system in the water. Every muscle around your abdomen, lower back, hips, and pelvis works to stabilize your spine while swimming. Without this stability, power "leaks" from your stroke. You end up with weak kicks and decreased overall power. Think of your core as the foundation that keeps everything connected. When engaged, it prevents your hips from dropping and maintains that crucial streamlined position. Better alignment equals less resistance and cleaner hydrodynamics with every stroke. Elite swimmers maintain what coaches describe as a "taut line" through their entire body. This engaged core keeps them elevated in the water, minimizing resistance even during powerful kick phases. Don't worry if core engagement feels challenging at first – most swimmers struggle with this initially. How breathing technique affects speed Most swimmers sabotage their speed the moment they take a breath. Breathing technique impacts everything from muscle development to stroke mechanics. Bilateral breathing – breathing to both sides during freestyle – prevents the muscle imbalances that plague many swimmers. Breathing to only one side creates a dominant side and a weak side, making you vulnerable to injury while reducing overall power. Here's something that might surprise you: the most efficient freestyle technique involves no breathing at all. Obviously, that only works for very short distances. For longer swims, bilateral breathing offers these advantages: - Balanced stroke development on both sides - Improved body rotation for maximum thrust - Straighter swimming lines instead of veering sideways - Better oxygen control during races The critical mistake happens when swimmers lift their heads too high for air. This drops your hips and destroys your streamlined position. Focus on rotating just enough to breathe with one goggle still underwater. Master these fundamentals and you'll have the foundation needed for real speed development. 5 Pro-Level Drills to Swim Faster Have you ever watched an elite swimmer glide effortlessly through the water while you feel like you're fighting every stroke? The difference isn't just talent – it's technique built through specific drills that most swimmers never learn properly. These five drills target the exact movement patterns that separate fast swimmers from everyone else. Each one addresses a specific weakness that holds back your speed. 1. Catch-Up Drill Most swimmers rush their strokes, creating choppy, inefficient movements that waste energy. The Catch-Up drill forces you to slow down and perfect each stroke component. Start with both hands extended in front of you. Pull with one arm while the other stays extended. Wait for the recovering arm to "catch up" and touch the extended hand before starting the next stroke. Focus on these key points: - Keep your head down with steady kick throughout - Maintain high elbows with fingertips pointing down during the pull - Pull directly under your shoulder and finish past your hip - Be patient between strokes – add extra kicks if needed This drill fixes timing issues and builds the coordination needed for powerful, efficient strokes. You'll immediately notice improved stroke length and better body position. 2. Zipper Drill Poor recovery mechanics plague most swimmers, creating unnecessary drag and shoulder strain. The Zipper drill teaches proper high-elbow recovery while maintaining body alignment. As your hand exits the water, drag your thumb up along your torso from hip to armpit – like zipping up a jacket. Master these technique elements: - Lead with your elbow during recovery, keeping it higher than your hand - Maintain a stable body line throughout the movement - Rotate fully from one side to the other between strokes Use this drill sparingly. While valuable for developing recovery mechanics, overuse can potentially cause shoulder impingement. Quality trumps quantity every time. 3. One-Arm Freestyle Drill This isolation drill reveals exactly what each arm contributes to your stroke. Swim with one arm performing complete strokes while the other arm remains extended forward. Here's how to execute it properly: - Focus intensely on the catch phase, underwater pull, and recovery - Breathe to the side of the working arm - Reach and rotate to the opposite side before pulling - Coordinate your catch with the downward kick Olympic champion Nathan Adrian emphasizes that this drill should engage your core and lats more than your forearms and triceps. Wear fins for better balance and use a snorkel if available to maintain consistent breathing patterns. 4. 3-Second Glide Drill Many swimmers struggle with flat, unrotated strokes that kill their speed. The 3-Second Glide drill (also called "6-Kick Switch") builds the rotation and balance that elite swimmers rely on. Begin in streamlined position, then rotate to one side with one arm extended forward and the other at your side. Follow these steps: - Hold this side position while kicking for six counts (about 3 seconds) - Complete the stroke and rotate to the opposite side - Repeat the glide and kick sequence This drill addresses three common problems: flat stroke technique, improper rotation, and weak core engagement. Focus on maintaining strong body position throughout each glide phase. 5. Shark Fin Drill The high-elbow recovery position separates good swimmers from great ones. The Shark Fin drill develops this critical skill without straining your shoulders. Swimming on your side with one arm extended forward: - Lift your elbow toward the sky as fingers move toward your armpit - Pause with fingers at your armpit for 1-2 seconds - Keep your elbow high and armpit open above water surface - Return your arm to your side This drill teaches you to rely on your hips and core for balance rather than your arms, creating a more efficient stroke pattern. Remember – these drills work only when performed with precision. Focus on quality over quantity, and you'll develop the muscle memory that transforms your swimming speed. How These Swim Drills Improve Technique and Speed Ever wonder why elite swimmers make difficult movements look effortless? The secret lies in what happens inside your nervous system during drill practice. Your brain doesn't just learn movements—it rewires itself to make those movements automatic. Building muscle memory Your nervous system craves repetition. Every time you practice the catch-up drill, neural pathways strengthen between your brain and spinal cord. Soon, proper stroke mechanics become as natural as walking. Here's the fascinating part: your muscles actually grow extra nuclei during training. These cellular additions stick around even after you take time off from swimming. That's why returning to the pool after a break feels easier than starting from scratch. Smart drill practice creates three game-changing advantages: - Flawless technique when you're exhausted during races - Consistent form under high-intensity pressure - Faster skill recovery after training breaks The one-arm freestyle drill excels at building this muscle memory. When you isolate each arm's movement, your nervous system learns precise motor patterns without the distraction of coordinating both sides simultaneously. Improving stroke efficiency Most swimmers chase speed by trying to stroke faster. Elite athletes know better—they focus on moving more water with each stroke. The zipper and shark fin drills teach your hands to grip water instead of slipping through it. This "feel for the water" develops slowly through deliberate practice. You're literally training your nervous system to detect subtle pressure changes that indicate effective propulsion. Research proves that resistance-based training forces swimmers to engage larger muscle groups. When you practice with closed fists or drag equipment, your body compensates by using more surface area to generate power. This adaptation carries over to normal swimming, making every stroke more effective. Nathan Adrian emphasizes taking adequate rest between drill sets. Fatigue destroys technique, and practicing sloppy movements reinforces bad habits. Quality trumps quantity every time. Enhancing body rotation and alignment Your shoulders need rotation to access their full range of motion. Without proper body roll, you're swimming with one arm tied behind your back. The 3-second glide drill targets this critical skill by forcing you to hold balanced positions. You learn to engage your core muscles to prevent hip sinking while maintaining that torpedo-like alignment through the water. Water's density means small improvements yield big results. When you rotate toward your pulling arm during the catch phase, you increase your reach and power simultaneously. This improved body position converts more energy into forward movement instead of wasting it fighting drag. Think of rotation as your secret weapon for effortless speed. Master it, and swimming transforms from a struggle against resistance into a smooth glide through liquid. Integrating Drills into Your Swim Routine Knowing the right drills is only half the battle. Most swimmers practice inconsistently, jumping between different techniques without a clear plan. Sound familiar? Here's the truth: random drill practice won't make you faster. You need a system that turns occasional technique work into consistent improvement. Creating a weekly drill schedule Start with 2–4 swimming sessions per week. Each session should blend technique work with endurance training. Remember this: consistency beats intensity every time when you're building proper technique. New to swimming? Begin with twice-weekly sessions. This builds your water feel while giving your body adequate recovery time. Ready for more structure? Try this proven weekly approach: - Monday: Technique-focused session with 2-3 drills - Wednesday: Endurance with integrated technique reminders - Friday: Speed work with drill reinforcement - Weekend: Optional recovery swim with drill focus Quality always trumps quantity. Perfect your form before you worry about adding distance. Many swimmers make the mistake of chasing yardage while their technique falls apart. Balancing drills with endurance sets Every effective swim session follows a basic structure. You can adjust the percentages, but the framework remains the same: - Warm-up (10-20% of workout): Build in basic technique drills - Drill/technique focus (5-20%): Work on specific skills before fatigue hits - Main set (40-70%): Your primary training focus - Cool-down (10-20%): Bring your heart rate down gradually Think of drills as bookends for your main training. Start with technique reinforcement during warm-up. End with technique refinement during cool-down. This keeps your form sharp even when you're pushing hard. Tracking progress over time Are you measuring what matters? Document your workouts in a swim log. Note distance, time, and which specific drills you practiced. Set milestone checkpoints every few weeks. Test your ability to swim certain distances or complete specific sets. Before making major changes to your routine, establish a baseline of your current capabilities. Here's what many swimmers don't realize: the movement patterns you're trying to fix took months or years to develop. They won't disappear overnight. Build your focus drills into weekly recovery workouts to steadily reinforce new movement patterns. Patience pays off in the pool. Trust the process. Common Mistakes and How to Avoid Them Have you ever felt frustrated watching your times plateau despite hours of pool work? You're not alone. Even experienced swimmers sabotage their progress by falling into predictable training traps. Recognizing these pitfalls is your first step toward real improvement in the water. Overtraining one drill Here's a mistake I see constantly: swimmers become obsessed with a single drill, thinking more repetition automatically equals better results. Wrong. Going through the motions without purpose reinforces poor technique rather than fixing it. Your nervous system learns whatever pattern you repeat most - whether it's correct or not. The fix: Quality trumps quantity every single time. Swimming mindfully during each session creates technique that sticks. Try light resistance tools like DragSox or a swim parachute at 50-60% effort. These force better body position and help you feel every part of your stroke. Ignoring breathing rhythm Your breathing pattern affects everything - stroke alignment, body position, even your kick timing. Yet swimmers consistently make these breathing errors: - Lifting their head too high when breathing - Taking shallow breaths or holding their breath - Over-rotating during breaths ("sky breathing") - Breathing irregularly during races When you pick your head up to breathe, your alignment falls apart. Your head moves out of line with your spine and core, your kick suffers, and drag increases. The fix: Pick a breathing pattern - every 2, 3, or 4 strokes - and stick with it throughout your workouts. Want to check your technique? Look at the lane line while breathing. If you can see the ceiling, you're rotating too much. Skipping warm-ups and cooldowns "I'll just jump in and start swimming hard." Sound familiar? Proper warm-ups and cooldowns might seem like extra work, but skipping them undermines your training effectiveness and increases injury risk. The fix: Dedicate 5-15 minutes to cooling down after intense sessions. This clears lactic acid buildup, speeds recovery, and prevents muscle soreness. The best time to stretch? Right after swimming when your muscles are warm and pliable. Cool down at lower intensity, focusing on the muscle groups you worked hardest. Conclusion Your swimming speed comes down to one thing: building the right habits and sticking with them. The fundamentals matter more than fancy techniques or expensive gear. Body position, core control, and breathing rhythm create the foundation every fast swimmer needs. Those five drills – Catch-Up, Zipper, One-Arm Freestyle, 3-Second Glide, and Shark Fin – aren't just exercises. They're your pathway to developing muscle memory that kicks in automatically during races when fatigue tries to break down your form. Quality beats quantity every time you hit the pool. Two focused sessions per week with perfect technique will outperform five sloppy workouts. Track what works, adjust what doesn't, and stay patient with the process. Don't let the common mistakes trip you up. Overtraining one drill wastes time. Poor breathing rhythm kills your alignment. Skipping warm-ups and cool-downs invites injury. These seem small, but they add up to big problems. The choice is yours now. Keep swimming the same way and get the same results, or start applying these proven techniques. Whether you want to shave seconds off your personal best or simply feel more confident in the water, these drills work. Your improvement starts with your next swim session. Pick one drill, focus on perfect execution, and build from there. Soon you'll be gliding through the water with the efficiency and speed you've been chasing. FAQs Q1. What are the most effective ways to increase swimming speed? Focus on perfecting your technique, particularly body position and breathing. Incorporate interval training and specific drills like the Catch-Up and One-Arm Freestyle to improve stroke efficiency. Additionally, work on core strength and streamlining to reduce water resistance. Q2. How important is breathing technique in swimming faster? Proper breathing technique is crucial for speed. It affects your body position, stroke mechanics, and oxygen intake. Practice bilateral breathing to balance your stroke and maintain a streamlined position. Avoid lifting your head too high when breathing to prevent your hips from sinking and creating drag. Q3. What role does core strength play in swimming speed? A strong core is fundamental to swimming speed. It acts as a transmission system for power, helps maintain proper body alignment, and reduces drag in the water. Incorporate core-strengthening exercises into your dry land training routine to improve your overall swimming efficiency. Q4. How should I integrate swimming drills into my training routine? Create a weekly schedule that balances technique-focused sessions with endurance training. Aim for 2-4 swimming sessions per week, incorporating drills during warm-ups and cool-downs. Focus on quality over quantity, and track your progress over time to identify areas for improvement. Q5. What are common mistakes that can hinder swimming speed improvement? Overtraining one drill, ignoring breathing rhythm, and skipping warm-ups and cool-downs are common mistakes. Read the full article
0 notes
Link
#triclothing#trikit#trisuit#triathlonclothing#triathlonclothingprosandcons#TriathlonSuitGuideandReviews|ThirdCoastTraining#wetsuit#zoot
0 notes
Text

Shaving just 20 seconds off your 100-meter swim time demands a staggering 44% increase in fitness – if you rely on brute force alone. Here's the reality most triathletes miss: technique trumps power every single time. Swimming feels like your weakest link? Don't worry – you're not alone. Most triathletes struggle in the water, burning precious energy that should fuel their bike and run segments. The solution isn't grinding out endless laps until your shoulders scream. Coach Glenn Smith breaks down effective swim endurance building into three phases: master your technique first (1-2 months), build your aerobic base at 70% max heart rate (six months), then add race-specific intensity. Smart triathletes follow this progression religiously. Consistency beats heroic efforts every time. Novice to intermediate swimmers need 4-5 weekly sessions to develop proper water feel. Consider this: proficient swimmers glide through 1.5 to 2.4 kilometers per hour while struggling swimmers barely cover half that distance. Ready to transform your swimming from survival mode to competitive advantage? This guide reveals the exact strategies that separate smooth, efficient swimmers from those who thrash their way through every workout. You'll discover how to build genuine endurance without wasting months on ineffective training methods. Refine Your Technique First Most swimmers think building more strength and endurance will make them faster. The reality? Even a small improvement in technique can yield significant speed gains without the exhaustion. Efficient swimmers glide through the water like they're born for it. They cover twice the distance using half the energy. Technique refinement becomes your secret weapon – not another painful training session. Get feedback from a coach or video Have you ever wondered what your stroke actually looks like underwater? Most swimmers swim blind, feeling smooth while creating chaos beneath the surface. Above-water and underwater HD video analysis reveals exactly what happens during your stroke. That "normal" feeling might be your biggest performance killer. Professional coaches spot the flaws you can't feel – improper arm strokes, inefficient breathing patterns, poor body alignment. Video feedback hits different than verbal coaching. You see the truth immediately. Professional coaches don't just point out problems – they provide structured guidance for fixing them. Regular video analysis sessions throughout your training ensure your technique improves alongside your endurance. Use targeted drills with purpose Smart drill work achieves three outcomes: isolates specific stroke elements, builds good muscle memory while eliminating bad habits, and develops strength with less fatigue. Random drill collections won't cut it. Follow the drill/swim/drill/swim pattern. Work on specific elements, then immediately integrate them into your complete stroke. The catch-up drill fixes stroke timing and breathing patterns for windmill swimmers. The zipper drill enhances high elbow recovery while maintaining a stable body line. One perfectly executed drill, performed consistently at the right moment, beats ten flashy drills done poorly. Avoid over-reliance on pull buoys Pull buoys feel like magic – suddenly you're gliding like an elite swimmer. They allow upper body technique focus, mimic wetsuit body position, and save your legs after brutal bike or run sessions. The trap? Becoming dependent on artificial assistance. Constant buoy use prevents learning proper body positioning in the water. That immediate satisfaction through better glide creates a false stroke rate that won't survive race day without proper technique. Count your strokes without equipment, then maintain that same count when using a buoy. Alternate between sets with and without the pull buoy to ensure skills transfer effectively. This balanced approach develops genuine technique while capturing the benefits pull buoys offer. Build Consistency Through Smart Frequency and Volume Technique mastery means nothing without consistent practice. Your swim frequency determines whether you maintain current fitness or actually improve race-day performance. How often should triathletes swim? Your triathlon distance dictates your pool commitment: - Beginners/Sprint distance: 2-3 sessions weekly to maintain swim memory and technique - Olympic distance: 3-4 weekly sessions for steady improvement in ability and fitness - Half Ironman: 3-5 weekly swims to build necessary endurance - Ironman: 4-6 weekly sessions for complete race preparation Three weekly swim sessions represent the minimum threshold for genuine improvement. Swimming once per week? You're treading water – literally maintaining muscle memory without progress. Twice weekly keeps you where you are, nothing more. Smart volume progression strategies Cramming too much distance too quickly destroys shoulders and motivation. Smart athletes follow proven approaches. Build schedule consistency first. This foundation allows accurate assessment of your current capacity before adding volume. Then increase training load by just 5-10% each week. Most triathletes benefit from 45-60 minute pool sessions, even long-course athletes. Adding more sessions beats extending individual workouts beyond this sweet spot. Recovery and taper protocols Progressive overload fails without strategic recovery. Schedule a recovery week after every 3 weeks of volume increases. During recovery weeks, cut both intensity and volume while maintaining technique work. Race week demands smart tapering. Complete rest kills your water feel. Instead, reduce volume while keeping some intensity alive. This approach allows your body to absorb training adaptations while preserving stroke efficiency and confidence. Add Strength and Dryland Training Pool work alone won't get you there. The swimmers gliding past you during races? They've discovered what most triathletes ignore – strength work outside the water builds the endurance that matters on race day. Smart triathletes who add structured dryland training see remarkable improvements: better body composition, reduced fatigue during long sets, improved exercise economy, and fewer frustrating injuries that derail training cycles. Key muscle groups for swimming endurance Swimming demands nearly every muscle in your body, but certain areas make or break your endurance: Shoulder complex: Your deltoids and rotator cuff fire with every single stroke. These muscles experience the most punishment and create the essential pivot point for powerful swimming. Weak shoulders collapse under fatigue. Core muscles: Think your abs, obliques, and glutes just keep you stable? They're actually the bridge connecting your powerful upper body to your kick. A weak core creates that dreaded body sag – the drag monster that forces every other muscle to work overtime. Lats and triceps: These powerhouse muscles generate the propulsion that moves you forward. Your lats initiate each pull while your triceps finish the job with that crucial push toward your hips. Strong lats and triceps separate efficient swimmers from those who struggle. Quadriceps: Sure, quads power your bike and run, but they also drive those explosive wall turns and push-offs that maintain momentum through every lap. Sample dryland exercises for triathletes Focus on movements that build stability and endurance rather than just raw power: - Medicine Ball Russian Twists: Sit in crunch position, hold a medicine ball with extended arms, rotate side to side without moving your hips. - Plank Row: Hold plank position with dumbbells, pull one arm up while maintaining perfect stability – builds the rotational control and core strength swimming demands. - Flutter Kicks: Lie on your back with hands under hips, lift legs 5-7 inches off the ground, perform freestyle-style kicks for 30-60 seconds. - Pull-ups/Lat Pulldowns: Essential for developing the back strength that powers every stroke. Preventing shoulder injuries Here's a sobering reality: swimmers perform 8,000-25,000 shoulder rotations weekly in water that's 773 times denser than air. Your shoulders face incredible stress. Balance becomes everything. Strengthen all parts of the shoulder girdle – not just the mirror muscles that look impressive. Include exercises like three-way banded pull-aparts and reverse flies. These unsexy movements prevent the injuries that sideline dedicated athletes. Mobility work can't be optional. Tight muscles around your shoulder create impingement and pain during those repetitive freestyle motions. Stretch consistently. Recovery time matters. Allow 24-48 hours between strength sessions and swimming workouts. Your tissues need time to adapt and strengthen properly – rushing this process invites injury. Push Limits with Quality Swim Sets Endless laps won't build race-day endurance. Most triathletes think more distance equals better performance – they're wrong. Quality beats quantity every single time when developing swimming stamina that translates to faster race splits. Smart swimmers know the secret: structured intensity creates adaptations that mindless yardage never will. Once your technique holds up and you're swimming consistently, strategic interval training becomes your pathway to breakthrough performance. Use intervals to build endurance Interval training delivers what continuous swimming can't – the ability to accumulate high-quality work while managing fatigue. Effective interval patterns follow these principles: - Gradually tighten rest periods as fitness improves - Mix distances (25s, 50s, 100s, 200s) to target different energy systems - Hold technique standards throughout every repeat Consider this progression: 33 x 100 using three interval drops (1:50/1:45/1:40), beginning with aerobic-based efforts and finishing with just 5-7 seconds recovery on the final interval. This method builds the resilience that carries you through entire race seasons. Incorporate pacing and time trials Time trials serve dual purposes – they simulate race pressure while revealing your current fitness level. Schedule these every 2-4 weeks when you're fresh and recovered to track genuine progress. Start with 800-meter distances, then build toward race-specific lengths. These sessions provide crucial feedback about your training focus. Fading badly at the end? Extend your longest training swims. Struggling early with pace? Add more race-intensity endurance work. The 10×100 time trial with 10-second rest intervals specifically determines your sustainable pace threshold. This benchmark guides your entire training progression. Train technique under fatigue Here's what happens when exhaustion hits during races: stroke rate jumps 10% while stroke length drops by the same amount. Research shows the glide and catch phases shrink by 18% as swimmers fight to maintain propulsion. Practice holding form when your body screams for relief through: - Stroke count challenges that match early and late lap totals - Tempo training to catch when rhythm starts breaking down - "Feel focal points" that redirect attention from discomfort to technique elements Focus on specific technique cues – water grab, shoulder rotation, head position – rather than the burning in your lungs. This mental training develops the toughness that separates good swimmers from great ones. Your Path to Swimming Endurance Success Building real swimming endurance demands strategy, not just more pool time. Perfect your technique first through professional feedback and targeted drills. This foundation cuts energy waste and prevents the injuries that derail training plans. Consistency wins races. Three to five weekly swim sessions develop the muscle memory and cardiovascular fitness you need on race day. Smart triathletes complement their water work with dryland training to strengthen key muscle groups and boost overall endurance. Quality beats quantity every time. Structured intervals, time trials, and technique-under-fatigue sets simulate race conditions better than endless easy laps. These focused workouts deliver results that matter when the gun goes off. Your swim performance shapes your entire race. A strong swim saves energy for the bike and run while building confidence for everything that follows. Follow this progression – technique refinement, consistent frequency, strength development, and quality sets – and watch your swimming transform from survival mode to competitive advantage. The path to swimming endurance requires patience and discipline. The payoff extends beyond faster splits to include fewer injuries, more enjoyment in the water, and better overall race results. Time to get started. FAQs Q1. How can I improve my swimming endurance for triathlons? To improve swimming endurance, focus on refining your technique first, then gradually increase swim frequency to 3-5 times per week. Incorporate strength training, use interval workouts, and practice maintaining proper form when fatigued. Consistency and quality training sessions are key to building endurance over time. Q2. What's the ideal swimming frequency for triathlon training? The ideal swimming frequency depends on your triathlon distance and goals. Beginners should aim for 2-3 sessions weekly, while more advanced athletes training for longer distances may swim 4-6 times per week. Most coaches recommend a minimum of three swim sessions per week for noticeable improvement. Q3. How can I prevent shoulder injuries while building swimming endurance? To prevent shoulder injuries, balance your training by strengthening all parts of the shoulder girdle, not just the major muscles. Include exercises like banded pull-aparts and reverse flies. Prioritize mobility work alongside strength training, and ensure adequate recovery time between swim sessions and strength workouts. Q4. What role does dryland training play in improving swim endurance? Dryland training is crucial for building swimming endurance. It helps develop key muscle groups like the shoulder complex, core, lats, and triceps. Incorporate exercises such as medicine ball Russian twists, plank rows, and pull-ups to enhance stability and endurance. This training complements pool work and can reduce fatigue and injury risk. Q5. How can I maintain proper technique when I'm tired during long swims? To maintain technique when fatigued, practice stroke count sets that match counts between first and final laps. Use regular tempo training to detect when your stroke rhythm begins to slide. Focus on specific technique elements like water grab or shoulder roll rather than discomfort. This approach helps develop mental toughness alongside physical endurance. Read the full article
0 notes
Text
Did you know that triathlon swim distances range from a manageable 500 yards to a staggering 2.4 miles? These numbers often strike fear into the hearts of adult swimmers taking on their first triathlon challenge. The swim segment terrifies more adult triathletes than both cycling and running combined. Water isn't our natural environment, and learning to swim efficiently as an adult comes with unique hurdles that children simply don't face. Don't worry – you're not alone in this struggle. Consistency trumps intensity when developing swim skills for triathlon. Swimming 2-3 times weekly creates the foundation for both technical improvement and endurance building. Experts recommend a minimum of 20-minute sessions, 3-5 times weekly to achieve measurable progress. This translates to roughly 20-30 laps in a standard 25m pool – a realistic goal even for busy professionals. The path from novice to triathlon swimmer involves more than just logging pool hours. Your body position in water determines 70% of your swimming efficiency. Many beginners waste precious energy fighting the water rather than working with it. As you develop, structured workouts become essential – progressing from basic 1,500-meter endurance swims to more advanced interval training like 10 x 100 meters with short recovery periods. US Masters Swimming clubs offer invaluable coaching and structured environments for swimmers at every level. Whether you're battling sinking legs or preparing for the chaos of open water, this guide will take you through each stroke of your journey from anxious beginner to confident triathlon swimmer. Overcoming Fear and Getting Comfortable in Water A surprising 54% of adults lack basic swimming skills, making water anxiety a common hurdle for triathletes. The swim segment often becomes a mental battle before it's even a physical one. Start with shallow water adaptation Choose pools where your feet can touch the bottom while you build confidence. Studies show that shallow water programs create significantly greater water competence during the first 6 months of practice. Water temperature matters more than most realize. For beginning swimmers, select pools with warmer water (between 30-32°C) to eliminate the stress of cold water shock. Your body can focus on technique instead of fighting the temperature. Flotation devices aren't just for children – noodles and kickboards help maintain proper body position while you develop comfort in deeper water. Practice breathing and floating Have you ever noticed how many new swimmers hold their breath underwater? This creates tension throughout your body and accelerates anxiety. Try this instead: hold the pool edge with your face near the surface and practice breathing with half your mouth above water. This simple drill builds confidence handling water around your face during actual swimming. Many beginners fight floating by tensing their core – the exact opposite of what helps you stay up. Your body naturally floats when relaxed. Focus on pushing your belly button toward the ceiling and slightly arching your back. The "dead man's float" might sound ominous, but it's your fastest path to water comfort. Remember that everyone's legs naturally sink until they start kicking – this isn't a sign you're doing something wrong. Build confidence through repetition Water comfort develops through frequency, not marathon sessions. Experts recommend 3-4 weekly water exposures, even if each lasts only 20 minutes. Each session builds both confidence and crucial muscle memory. When panic strikes during swim training, stop immediately and tread water. Focus on slow, deliberate breathing – count to three during inhalation and exhalation to regain control. Learning a "safety stroke" like elementary backstroke gives you a reliable way to recover and catch your breath when needed. Remember that water confidence grows incrementally with each exposure. As one triathlete who conquered severe water phobia noted, "Once I was free from my mental prison, I gained confidence in open water swimming." Your journey follows the same path – from fear to freedom through consistent practice. Learning the Basics of Freestyle Technique Did you know that elite swimmers use 70% less energy than beginners to cover the same distance? This remarkable efficiency gap comes from mastering proper freestyle technique, not just building endurance or strength. Many experienced swimmers still struggle with inefficient strokes, unaware of the energy they're wasting. Unlike casual swimming, triathlon freestyle demands technical precision that dramatically reduces drag while maximizing forward motion. Body position and alignment Ever wonder why some swimmers seem to glide effortlessly while others appear to be fighting the water? The secret lies in body position. Your body should form a straight line from head to heels, parallel to the water's surface. The head position serves as the control point for your entire alignment – when your head lowers with eyes looking down, your hips naturally rise to the surface. To achieve optimal positioning: - Keep your head in a neutral position with eyes looking slightly forward and down - Engage your core by gently pulling in your belly button to maintain a straight spine - Use the "Pelvic Tilt" technique by lifting your stomach higher in the water, which straightens your lower back and automatically lowers your head Remember, high hips create less resistance. When your hips sink, you're essentially dragging your body through water, creating significant drag that slows your progress. Breathing rhythm and timing Have you ever noticed how your rhythm collapses the moment you turn to breathe? You're not alone. Breathing affects both oxygen intake and body position. Improper breathing disrupts alignment and increases drag. Effective breathing requires keeping your head low while turning to breathe – not lifting it. When taking a breath, rotate your head with your body rather than pulling it to the side. This rotation should be quick and efficient since any breathing movement disrupts your streamlined position. Establish a rhythmic breathing pattern that coordinates with your stroke. This ensures steady oxygen flow to muscles, maintains buoyancy, and promotes a streamlined position. Exhale continuously underwater through your nose or mouth when your face is submerged, then inhale quickly through your mouth when your face rotates to the side. Arm movement and propulsion The arm stroke accounts for approximately 70-80% of your forward propulsion in freestyle, making proper technique essential. The complete arm cycle consists of: - Entry: Your hand should enter water finger-first at approximately shoulder width - Catch: Position your arm to create the largest possible "paddle" surface area - Pull: The primary propulsive phase where you push water backward - Recovery: Bringing your arm forward over water to begin the next stroke For maximum efficiency, maintain a high elbow position during the catch phase and accelerate your hand throughout the pull. Your goal is to push water directly backward, maintaining a large surface area with your hand and forearm. Throughout your swim training for triathlon, focus on these technical elements before adding distance or speed. Beginner Swim Training for Triathlon Consistency trumps intensity when building your triathlon swim foundation. After conquering basic water fears and mastering fundamental freestyle techniques, your training structure becomes the next critical element. Short, frequent swim sessions Did you know that swimming just 20 minutes, 3-5 times weekly delivers better results than a single weekly 2-hour session? For beginners, this frequency-over-duration approach prevents technique breakdown while building both skill and endurance. Your neuromuscular system requires frequent exposure to proper movement patterns to create lasting adaptations. This explains why 3-4 shorter weekly sessions typically yield greater improvement than occasional marathon swims. Quality trumps quantity, especially when your technique remains fragile. Have you noticed how quickly swimming skills deteriorate with extended breaks? This rapid skill erosion doesn't happen with cycling or running—another reason why consistent pool time matters more than occasional intense sessions. Sample beginner workout structure Every effective swim workout, regardless of your level, contains three essential components: - Warm-up: 4x25m easy swimming to prime your muscles and nervous system - Main set: Skill-building drills and swimming (Example: 2x25m right arm only, 2x25m pull buoy, 2x25m left arm only, 2x25m kick, 2x25m catch-up) - Cool-down: 2-4x25m relaxed swimming to normalize breathing and heart rate As your swimming endurance grows, gradually extend workout duration to 45-60 minutes with increasingly structured sets. A well-designed 1,000-yard progression might include: 300 yards warm-up, 3x100 moderate pace, 200 yards drill-focused pre-main set, 400 yards main set (4x100), and 100 yards cool-down. Tracking progress and setting goals Triathlon success leaves clues—you just need to record them. Your training log becomes the roadmap for identifying patterns in your swimming development. Track metrics like distance, time, perceived effort, and heart rate to recognize what works specifically for your body. Many beginning triathletes make the mistake of chasing speed before mastering technique. This approach inevitably creates frustration when progress stalls. Instead, focus initially on technical milestones and completion goals rather than pace. After your first triathlon, you'll establish a performance baseline from which all future improvements can be measured. Choose a tracking method that fits your personality—whether a simple notebook, basic spreadsheet, or specialized apps like Training Peaks or Strava. The key isn't which method you select, but your consistency in recording each session's details. This disciplined tracking transforms your swimming journey from random splashing to purposeful progress. Advancing to Open Water and Race Preparation Moving from the controlled environment of pool lanes to open water represents your first true taste of triathlon reality. A startling 70% of triathletes report feeling anxious during their first open water swim despite being comfortable in pools. The vast expanse of murky water, unpredictable conditions, and absence of that reassuring black line below create an entirely different swimming experience. Transitioning from pool to open water Open water swimming introduces challenges that no pool can replicate - waves that disrupt your breathing rhythm, currents that alter your course, and reduced visibility that triggers instinctive panic responses. Before your first open water session, check water conditions, temperature, and safety factors. Remember that most open bodies of water lack the crystal clarity of chlorinated pools, drastically reducing visibility. Don't have immediate access to open water? Try these pool-based simulations: - Swim during early morning hours when pool water tends to be coldest - Train with friends who create waves and splash around you - Ask for lane ropes to be removed during certain practice slots - Occasionally swim with your eyes closed for short distances to adapt to reduced visibility Practicing sighting and navigation Did you know that the average triathlete swims 10-15% farther than the actual race distance due to poor navigation? Sighting—lifting your head to check direction—becomes your essential navigation tool in open water. To sight effectively, press down slightly during the catch phase of your stroke, using this downward pressure to propel your upper body higher. Simultaneously increase your kick power to prevent your legs from sinking. Keep your sighting efficient—in calm water, only your eyes need to clear the surface, not your entire head. The "Tarzan drill" builds the specific neck and trapezius strength needed for repeated sighting. Swim with your head above water, facing forward, to strengthen these muscles. Begin by sighting every 8-12 strokes, then adjust based on how well you maintain course. Remember, excessive sighting slows you down, while too little sends you off course. Simulating race conditions with brick workouts Brick workouts—training sessions combining two disciplines back-to-back—prepare your body for the shock of transitioning between sports. Your heart rate spikes, blood flow redirects to different muscle groups, and your brain must rapidly adjust to new movement patterns. While most triathletes focus on bike-to-run bricks (the notorious "jelly legs" transition), swim-to-bike bricks deserve equal attention. This transition forces your body to adapt from horizontal swimming with minimal leg engagement to vertical cycling with significant leg exertion. The blood flow shift alone can cause dizziness if not practiced regularly. Use brick sessions to rehearse transition efficiency—setting up a small T1/T2 area and timing your movements. Practice wetsuit removal, changing gear, and beginning the next discipline with purpose. Incorporate race pace intensities occasionally to train your digestive system to process nutrition at elevated heart rates—a crucial skill on race day when adrenaline runs high. Conclusion Elite swimmers convert only 9% of their energy into forward motion. The rest simply dissipates into the water. This startling fact highlights why mastering proper technique transforms average swimmers into efficient triathletes. Your journey from pool edge anxiety to open water confidence follows a predictable path with unpredictable rewards. Through consistent practice—not occasional heroic efforts—your neural pathways strengthen and muscle memory develops. The body adapts not through intensity but through repetition. Remember that moment when water first felt like an enemy rather than a playground? For many adult triathletes, that feeling eventually transforms into a powerful alliance. Your body position, breathing rhythm, and arm movements create a symphony of efficiency that separates successful triathletes from those who merely survive the swim. What truly sets accomplished swimmers apart isn't natural buoyancy or wingspan—it's disciplined technique refinement. Many triathletes who once dreaded the swim leg eventually list it as their strongest discipline. Training logs become your personal roadmap, revealing patterns invisible during individual sessions. Notice how your SWOLF score improves over weeks? That's efficiency quantified. See your sighting accuracy increase during open water practice? That's confidence measured. Each stroke brings you closer to triathlon success. The same water that once caused anxiety becomes your competitive advantage. The swim leg—often feared by many—can become your secret weapon with properly sequenced training. Are you ready to transform your relationship with water? Your journey awaits—one stroke at a time. FAQs Q1. How often should a beginner triathlete swim to improve their skills? For optimal improvement, beginners should aim to swim at least 2-3 times per week, with sessions lasting a minimum of 20 minutes. Consistency is key, and frequent shorter sessions are often more beneficial than occasional long ones. Q2. What are some effective ways to overcome fear of water for adult swimmers? Start in shallow water, practice breathing exercises, and use flotation devices initially. Gradually increase water depth as comfort grows. Regular exposure (3-4 times weekly) helps build confidence. If panic occurs, focus on slow, purposeful breathing and use a "safety stroke" like backstroke to regain composure. Q3. How can I improve my freestyle technique for triathlon swimming? Focus on maintaining proper body alignment, with your body forming a straight line from head to heels. Keep your head in a neutral position with eyes looking slightly forward and down. Practice efficient breathing by rotating your head with your body, and work on a high-elbow catch during the arm stroke for better propulsion. Q4. What should a beginner triathlon swim workout include? A basic workout should include a warm-up (e.g., 4x25m easy swimming), a main set combining drills and swimming, and a cool-down. As you progress, gradually increase workout duration to 45-60 minutes, incorporating more structured sets and focusing on both technique and endurance. Q5. How do I transition from pool swimming to open water for triathlons? Start with short swims in open water to familiarize yourself with conditions. Practice sighting every 8-12 strokes initially, lifting your head only as high as necessary. Simulate open water conditions in the pool by swimming with friends to create turbulence, removing lane ropes when possible, and practicing with your eyes closed. Incorporate brick workouts to prepare for race-day transitions. Read the full article
0 notes
Text

Did you know that flip turns can shave seconds off your lap times in competitive swimming? Elite swimmers understand this advantage – a well-executed flip turn maintains speed and momentum at the wall without losing precious time. Many new swimmers find this technique intimidating. Don't worry – you're not alone. The approach, the flip itself, and that powerful push-off can feel overwhelming at first. Mastering flip turns requires maintaining a tight tuck and generating enough power to propel yourself off the wall. Consistency makes the difference between struggling and succeeding. Regular practice refines your technique, improves timing, and builds essential muscle memory. Visualization becomes a powerful ally in mastering flip turns, helping you reinforce proper form and boost confidence. The ideal push-off angle sits between 15-20 degrees. This specific range helps you avoid surface drag while maintaining speed. Those 2-3 dolphin kicks during your glide phase? They sustain momentum and prepare you for transitioning back into your stroke. Ready to master this game-changing technique? Let's break down each step that separates good swimmers from great ones. Why Flip Turns Matter in Swimming Flip turns separate average swimmers from competitive athletes. That 0.5 to 1.5 second difference in short-distance sprint races? It's the margin between standing on the podium and watching from the sidelines. Elite swimmers know this reality well. Save time and energy during laps The continuous motion of a flip turn demands significantly less energy than the complex movements of an open turn. This energy conservation becomes crucial during longer races or intense training sessions. Your transition back into freestyle should flow seamlessly – your first stroke beginning the moment you break the surface. Here's a striking fact: elite athletes in short course swimming perform only 5-10 seconds of actual swimming work per length because of the tremendous power generated with each turn. This efficiency creates multiple advantages: - Maintain higher speeds throughout your swim - Conserve energy for the remainder of your race - Reset mentally between lengths without actually resting Maintain race momentum Turns comprise up to 30% of race time. That's not a small fraction – it's a massive component of competitive swimming. Studies reveal that turn velocity often determines final podium positions, even affecting Olympic medal standings. Properly executed flip turns maintain your momentum through the transition. A strong pull to the wall translates directly to more speed coming off it. Your approach velocity impacts your exit velocity, creating continuous flow rather than stop-and-start patterns. Improve overall swim efficiency The push-off phase stands as the most critical part of your flip turn. Push off in a streamlined position and you'll reach the second-fastest speed of your entire swim – surpassed only by your initial dive. This streamlined position dramatically reduces drag, allowing you to glide farther with less effort. Properly executed flip turns promote better underwater positioning. Take advantage of the 15-meter underwater rule in freestyle, backstroke, and butterfly. Maximize these underwaters and they'll account for 60% of your race in a 25-meter pool and 30% in a 50-meter pool. Stop viewing turns as interruptions. Start seeing them as opportunities to refresh your stroke pattern and harness the physics of water movement to your advantage. Mastering the Mechanics of the Turn Perfect technique separates swimmers who struggle at the wall from those who use it as a launching pad. The mechanics behind flip turns might seem complex, but breaking down each element helps you execute turns with precision and confidence. Body position before the wall Your approach determines everything that follows. Maintain your freestyle form and speed as you near the wall – slowing down kills your momentum and robs you of speed after the turn. Keep your body horizontal and parallel to the pool bottom during your approach. Timing makes or breaks your flip turn. Most pools feature that "T" marker on the bottom roughly two meters from the wall. Use it as your visual cue for when to initiate your turn. Begin your somersault approximately one arm's length from the wall. Count your strokes from the flags to develop consistent timing without lifting your head. How to execute flip turns with proper form Master the approach first, then focus on execution. Here's your step-by-step breakdown: - Take your final freestyle stroke, finishing with that hand by your thigh - Tuck your chin toward your chest to initiate the flip - Form a tight, compact ball by bringing your knees to your chest - Complete the somersault while maintaining this tight tuck - Plant your feet on the wall 6-12 inches below the surface - Position your hands in streamline above your head - Push off on your back with force, then rotate to your stomach - Maintain streamline position during the underwater phase - Begin your first stroke as you break the surface Exhale through your nose throughout the turn to prevent water from entering. Your push-off should be powerful and directed straight out from the wall. Common mistakes that slow you down Several errors can sabotage your flip turns. Lifting your head to locate the wall dramatically slows your momentum and disrupts body position. Trust the "T" marker and your stroke count instead. Sweeping your arms wide during the turn creates unnecessary drag. This movement delays getting into the streamlined position. Keep your hands close to your body, similar to a bicep curl motion. Breathing directly before or after the turn reduces speed and efficiency. Take your last breath at the flags before turning and wait until 2-3 strokes after pushing off before breathing again. Turning sideways instead of straight over creates additional water resistance. This mistake slows your rotation and weakens your push-off. Flip straight over, landing with your feet pointing directly up at the surface. Training Techniques to Improve Flip Turns Consistent practice separates swimmers who struggle with turns from those who execute them flawlessly. Specialized drills build the muscle memory and timing you need for seamless execution. Drills for beginners and advanced swimmers Start with basic somersault practice away from the wall. Coach Johnny Shelby recommends holding a kickboard in each hand with palms up while performing flips to prevent "windmilling" the arms during turns. This drill teaches you to use your core instead of relying on arm movements. Ready to advance your technique? Try these progressive exercises: - Underwater turns - dive down at the flags, kick to the wall, then perform your turn deep enough that your feet don't break the surface. This creates water resistance that strengthens your kick while improving breath control. - Mid-pool flip turns - beginning in the middle of the pool provides more turning opportunities within the same distance set. Practice approaching the wall at race pace, focusing exclusively on consistent stroke counts and underwater kicks. - Jump-tumble starts - stand slightly away from the wall, jump forward while bringing your arms and knees to your chest, then push off in streamline position with dolphin kicks. Using stroke count to time your turn Knowing your stroke count from the flags to the wall becomes essential for perfectly timed turns. You should have different stroke counts for different race distances since your speed will vary. For backstroke turns, count arm strokes from when you pass under the flags (typically 4-7 strokes for most swimmers). For freestyle, use the "T" marking on the pool bottom as your visual cue. Practice your timing by swimming toward the wall at good pace, spotting the "T," then leaving one arm extended in front until your hand touches the wall. This familiarizes you with the distance and timing needed for proper execution. Practicing with different wall distances Master turns at varying speeds by practicing approaches from different distances. Start by performing standing flips as close to the wall as possible, then take one step back after every two flips until you reach the T-mark. Incorporate flip turn drills at increasing speeds—start at 50% race pace, then progress to 70%, 80%, 90%, and finally 100% effort. Your body learns to adapt to different approach velocities. For maximum turning practice, try sets that incorporate mid-pool starts. Swim 75 meters starting from the middle (12.5m, flip, 25m, flip, 25m, flip, 12.5m) to maximize turning opportunities within standard sets. Tools and Mindset for Long-Term Success Mastering flip turns demands more than pool time—the right tools and mental approach separate swimmers who struggle from those who excel. Elite swimmers perform over 500,000 flip turns per season. That staggering number reveals why the right combination of equipment, mental preparation, and progress tracking becomes essential. Best gear for flip turns swimming The right equipment makes learning flip turns less frustrating and more effective. A nose clip prevents water from flooding your nasal passages during inverted positions, eliminating the constant need to exhale through your nose. This simple addition preserves valuable oxygen for those crucial underwater dolphin kicks. Pull buoys become excellent training aids for proper arm positioning. Place one in each hand at "position 11" while approaching the wall, then bring your hands behind you before flipping. This technique trains your arms to stay close to your body instead of windmilling outward—a common mistake that costs speed. Wearing your competition swimwear occasionally during training replicates race conditions precisely. Pace clocks or waterproof timers help you track improvements objectively, turning practice into measurable progress. Visualizing the perfect turn Mental rehearsal accelerates your physical progress significantly. Effective visualization starts with defining your specific outcome—a perfect breakout, tighter tuck, or faster overall turn. Engage multiple senses during your mental practice: - See yourself executing flawless technique from your own perspective - Feel the water gliding across your streamlined body during push-off - Hear the water rushing past as you accelerate off the wall Always visualize from your own viewpoint rather than watching yourself from outside. Include potential challenges in your mental rehearsal, but ensure you overcome them successfully each time. This builds confidence before you even enter the water. Staying consistent and tracking progress Consistency yields remarkable results that surprise even experienced swimmers. Research with Stanford swimmers showed that extending sleep by just 1-2 hours nightly improved turn speed by 0.10 seconds after six weeks. Small changes create significant improvements. Track your progress systematically. Time your underwater distances and measure how far you travel after each push-off. Count your dolphin kicks for consistency, gradually increasing underwater distance without sacrificing speed. Commit to flip turns during every workout—especially when you're tired. This dedication builds the physical endurance and mental toughness necessary for competition excellence. Remember, every turn you practice brings you closer to that perfect execution when it matters most. Conclusion Mastering flip turns separates good swimmers from great ones. You've discovered how proper technique saves precious seconds, maintains momentum, and boosts overall efficiency. This skill becomes your secret weapon in competitive swimming. The mechanics matter most. Body position, tight tucks, and powerful push-offs create the foundation you need. Your approach velocity determines your exit speed – every element works together. Mistakes happen to even dedicated swimmers. Head lifting, wide arm movements, and poor breathing patterns slow you down. Consistent drill practice builds the muscle memory that prevents these errors when it counts. Stroke counting gives you perfect timing. Mental rehearsals prepare your mind before your body moves. The right gear accelerates your progress significantly. Success requires commitment to consistent practice. Track your improvements, celebrate small wins, and adjust based on what you learn. The journey demands patience, but the payoff – faster times, better efficiency, and competitive advantage – makes every practice session worthwhile. Your next swim session awaits. Take these techniques to the pool and watch your performance improve with each turn you perfect. FAQs Q1. How can flip turns improve my swimming performance? Flip turns can significantly enhance your swimming performance by saving time and energy during laps, maintaining race momentum, and improving overall swim efficiency. They can shave seconds off your lap times and help you maintain speed through transitions. Q2. What are the key steps to executing a proper flip turn? To perform a proper flip turn, approach the wall at full speed, tuck your chin to initiate the flip, form a tight ball with your body, plant your feet on the wall, push off in a streamlined position, and begin your first stroke as you break the surface. Remember to exhale through your nose during the turn. Q3. How can I practice and improve my flip turns? You can improve your flip turns through consistent practice and specific drills. Try underwater turns, mid-pool flip turns, and jump-tumble starts. Use stroke counting to perfect your timing, and practice with different wall distances to adapt to varying speeds. Q4. What common mistakes should I avoid when doing flip turns? Common mistakes to avoid include lifting your head to locate the wall, sweeping your arms wide during the turn, breathing directly before or after the turn, and turning sideways instead of straight over. These errors can slow you down and reduce the efficiency of your turn. Q5. What tools can help me master flip turns? Useful tools for mastering flip turns include nose clips to prevent water from entering your nasal passages, pull buoys for arm positioning practice, and pace clocks or waterproof timers to track improvements. Additionally, visualization techniques and consistent tracking of your progress can greatly enhance your flip turn performance. Read the full article
0 notes
Text

Navy SEALs can cover 25 meters using just 3-5 strokes with their specialized swimming technique. That's remarkable efficiency most swimmers never achieve. The Combat Side Stroke (CSS) combines elements from sidestroke, breaststroke, and freestyle into one powerful method. SEAL candidates must swim 500 meters in under 12 minutes during their grueling selection process – and this stroke makes that possible. Here's what sets CSS apart from traditional swimming styles. The technique keeps your profile low in the water, making you nearly invisible during tactical operations. The wider scissor kicks generate more power than standard sidestroke movements while conserving energy for long-distance swims. Military personnel aren't the only ones who benefit from this approach. The balance of stealth, efficiency, and stamina makes CSS valuable for civilian swimmers seeking better water skills. Are you ready to master a swimming technique that emphasizes efficiency over speed? The combat swimmer stroke offers practical advantages whether you're a military enthusiast, competitive swimmer, or someone who wants to move through water more effectively. Why Learn the Combat Side Stroke? Most swimmers struggle with energy depletion during long-distance swims. The combat side stroke solves this problem while offering tactical advantages no other swimming technique can match. Energy conservation in long swims SEAL candidates face a demanding 500-yard swim in under 12 minutes 30 seconds during their physical screening test. The combat side stroke makes this possible through remarkable efficiency – your arms and legs work differently yet complement each other perfectly. One swimmer's experience tells the story best. After swimming approximately 5 miles out into Lake Superior and back, they still had energy reserves. How is this possible? The stroke includes a gliding phase where you drift in streamline position for several seconds between cycles, preserving energy during extended swims. The secret lies in asymmetrical movement. Rather than forcing both arms and legs to work identically, CSS lets each limb contribute its strengths to forward motion. Low visibility for tactical advantage Have you ever watched someone swim freestyle at night? The splashing arms create visible movement that compromises stealth. The combat side stroke eliminates this problem entirely. CSS creates minimal surface disturbance – no splashing, no noise, and a significantly reduced profile in the water. At night, this stroke appears similar to an animal swimming, if visible at all. This stealth factor proves essential during tactical operations where detection could compromise an entire mission. Traditional competitive strokes like freestyle or breaststroke break the surface with arm movements. The combat swimmer stroke keeps you streamlined and invisible. Versatility in open water and emergencies Military applications represent just the beginning. The side stroke technique works effectively in both calm and rough water conditions, making it invaluable for open water swimming where environments change unexpectedly. The combat side stroke enables you to: - Carry gear that requires balance and efficiency - Maintain directional control while swimming - Function well in emergency situations Lifeguards and emergency responders rely on this technique because it combines efficiency with functionality. This awkward-looking stroke saves lives daily, especially in open water situations where endurance matters more than speed. Don't underestimate CSS because it looks unconventional. The technique delivers results when traditional swimming methods fall short. Step-by-Step Guide to the Stroke Mastering the combat side stroke means breaking down each movement into manageable pieces. Practice these components separately before combining them into one fluid motion. Start with a strong push-off and streamline Position yourself in a squat stance against the pool wall. Push off like you're trying to jump and touch a basketball rim – but horizontally. Stack your hands one on top of the other, press your biceps against your ears, and lock your arms into a torpedo position. Hold this glide for 4-5 seconds to maximize momentum. A proper push-off carries you 5-10 yards without any additional effort. Top arm pull and body rotation Execute the top arm pull once your glide slows down. Think freestyle stroke – your top arm pulls from extended overhead position all the way to your hip in one smooth motion. Rotate your body toward that side as you pull. This rotation serves two purposes: it adds power to your stroke and positions you to breathe. Keep your elbow slightly bent throughout the pull for maximum efficiency. Bottom arm sweep and breath timing Your bottom arm begins its sweep as your top arm completes its pull. This movement resembles a half breaststroke pull. Timing matters here. Breathe as your top arm finishes and your bottom arm starts moving. Exhale underwater during the glide, then inhale as you rotate. Turn your head sideways rather than lifting it – maintain that horizontal body position. Kick and glide for propulsion The scissor kick provides your main propulsion, though some swimmers use flutter or dolphin kicks. Your top leg always moves forward regardless of which side you're swimming on. Execute your kick immediately after both arms have pulled and are recovering. This creates substantial glide for each stroke cycle. Hold your glide for 2-3 seconds before starting the next stroke – this is where energy conservation happens. Training Techniques to Build Skill Developing proficiency in CSS means breaking down complex movements into manageable pieces. Each drill targets specific skills that eventually flow together into one smooth, efficient stroke. Drill 1: Kickboard side float Grab a kickboard and place one arm on top. Rotate your entire body to a 90° angle – you'll kick on your side, not your back or stomach. Keep your head in the water with only your nose and mouth above the surface. Execute side kicks while keeping your knees and ankles relaxed. Think of your legs moving like scissors cutting through water. This drill teaches you the buoyancy and balance essential for proper body positioning. Don't worry if you feel unstable at first – most swimmers struggle with side positioning initially. Drill 2: Arm isolation practice The Single Arm Drill eliminates confusion by focusing on one movement at a time. Practice using one arm while the other remains stationary. For your pull arm (top arm), complete a full stroke from extension to hip – similar to freestyle but with more control. Your bottom arm practices the smaller, breaststroke-like pull. Think of your bottom arm as a rudder guiding your direction rather than providing power. This isolation approach prevents overwhelm and builds proper muscle memory before combining movements. Drill 3: Full stroke with timing focus Picture CSS as a perfectly timed relay race. Your lead arm finishes its pull first, then your trailing arm swings forward. Use the mental cue "pull–reach" to coordinate this sequence. Practice timing by separating your legs while pulling with your lower arm and extending your upper arm forward. Then push the water back with your upper arm while squeezing your legs together. The key? Allow yourself to glide smoothly after each cycle rather than rushing into the next stroke. Drill 4: Combat swimmer stroke with fins Nearly 99% of Navy Special Operations swimming involves fins. This drill mimics real-world conditions while building endurance. Swim 100 meters CSS at a steady pace, followed by 50 meters freestyle fast, then 50 meters turtleback to recover without stopping. Repeat this sequence 10-15 times for 2,000-3,000 total meters. Start gradually – your ankles may feel uncomfortable initially due to limited mobility with fins. Regular practice with fins prepares you for open water demands and builds the endurance necessary for longer distances. Common Mistakes and How to Fix Them Even experienced swimmers struggle with the combat side stroke. Don't worry – you're not alone. These common errors can sabotage your efficiency and leave you exhausted in the water. Lifting head too high Your head position controls everything else in your stroke. Lift it too high while breathing and watch your legs sink like anchors. This mistake forces you to swim uphill – a guaranteed way to waste energy. Think of your head resting on an invisible pillow while you breathe. Turn sideways rather than lifting upward. Only rotate enough to clear your mouth from water – half your head should stay submerged during each breath. Practice breathing like freestyle, not breaststroke. Overusing arms instead of core Many swimmers attack the water with their arms, especially that bottom arm pull. This leads to early fatigue and sloppy form. Your bottom arm needs a short, easy scull motion – not a power pull to your hips. This keeps you from popping up to breathe and maintains that crucial streamline position. Let your core provide stability while your arms guide movement through the water. Breaking streamline too early Proper streamlining creates the torpedo-like efficiency that makes CSS so effective. Most swimmers rush through the glide phase or let their arms drift apart. Lock your arms overhead for 2-3 seconds – one hand stacked on the other, biceps pressed against your ears. Count "1 Mississippi, 2 Mississippi, PULL" to develop timing. This extended glide saves energy for longer distances. Inconsistent kick timing Poor kick timing kills your propulsion while wasting effort. The biggest mistake? Kicking before your hands reach the front. Wait until your hands extend forward before executing that scissor kick. Kicking early is like hitting the brakes and gas pedal simultaneously. Remember – your top leg always moves forward regardless of which side you're swimming on. This coordination keeps you rotating smoothly through each stroke cycle. Conclusion The combat side stroke delivers results that justify your practice time. This Navy SEAL technique offers efficiency that most swimming methods can't match. Proper body positioning forms the foundation of everything you've learned here. Your streamlined glide, timed arm movements, and coordinated kicks work together to move you through water with minimal effort. The low profile creates advantages whether you're swimming for stealth or tackling challenging open water conditions. Don't worry if you struggle initially with streamline position or breathing technique. Many swimmers find these aspects challenging at first. Consistent practice transforms these movements into second nature, allowing you to swim longer distances without hitting that wall of fatigue. Start with the basic drills, then progress gradually to more complex exercises. Focus on form over speed during your early training sessions. Small adjustments to head position, arm timing, or kick coordination can dramatically boost your efficiency. The combat side stroke stands among the most practical techniques you can add to your swimming skills. Military training, open water swimming, or simply becoming a more efficient swimmer – CSS delivers remarkable results for each goal. Take these techniques to your next pool session. Experience firsthand why Navy SEALs rely on this stroke for their most demanding water operations. FAQs Q1. What are the key benefits of learning the Combat Side Stroke? The Combat Side Stroke offers excellent energy conservation for long-distance swimming, provides a low-visibility profile for tactical situations, and is versatile in both open water and emergency scenarios. Q2. How do I start learning the Combat Side Stroke technique? Begin with a strong push-off and streamline position. Practice the top arm pull with body rotation, followed by the bottom arm sweep. Focus on proper breath timing and use a scissor kick for propulsion. Drills like kickboard side float and arm isolation can help build fundamental skills. Q3. What are some common mistakes when performing the Combat Side Stroke? Common errors include lifting the head too high while breathing, overusing arms instead of engaging the core, breaking streamline too early, and inconsistent kick timing. Focus on maintaining proper form and body positioning to avoid these mistakes. Q4. How does the Combat Side Stroke compare to other swimming techniques? The Combat Side Stroke is more efficient for long-distance swimming compared to traditional strokes like freestyle. It allows swimmers to cover greater distances with less fatigue and provides a tactical advantage due to its low profile in the water. Q5. Can civilians benefit from learning the Combat Side Stroke? Absolutely. While developed for Navy SEALs, the Combat Side Stroke is valuable for civilian swimmers, especially those interested in open water swimming, water safety, or improving their overall swimming efficiency and endurance. Read the full article
0 notes
Text

Your kick contributes only 10 to 30% of propulsion in freestyle swimming. That might sound insignificant, but here's what many swimmers miss – mastering your 2 beat kick swimming technique can transform you from an energy-wasting flailing swimmer into an efficient gliding machine. Your arms handle the heavy lifting in freestyle. Yet your kick technique determines whether you maintain proper body position and swim with true efficiency. Elite swimmers understand this connection perfectly. Michael Phelps and Sun Yang don't just kick randomly – they strategically shift between kick patterns based on race distance, event demands, and breathing rhythms. The 6-beat kick delivers continuous propulsion without rest periods. Perfect for sprints. The 2-beat kick? Energy conservation during longer distances. Bob Bowman, Michael Phelps' legendary coach, advocates training with a 6-beat kick to build maximum fitness and speed. Most top coaches follow this approach. Competitive swimmers tell a different story during races – they switch between kick patterns depending on what their bodies need. Take the 4-beat kick. This asymmetrical pattern creates three kicks on one side and one on the other, typically matching swimmers who breathe consistently to the same side. Are you ready to discover which kick pattern matches your swimming goals? This guide breaks down everything you need to master both 2-beat and 6-beat kicks for freestyle swimming. Understanding the 2-Beat and 6-Beat Kick Different kick patterns give you the flexibility to match your swimming style with race demands. Distance, speed requirements, and energy conservation needs all influence your kick choice. Let's break down the two main kick patterns and their distinct characteristics. What is a 2-beat kick? Two kicks per complete arm cycle. That's it. One kick per arm stroke creates this minimalist approach that excels in long-distance swimming and open water events. Picture this coordination: your left hand begins its catch phase while your left foot kicks downward. This synchronized movement creates a crossbody connection that naturally facilitates hip rotation and propels you forward with minimal energy expenditure. The 2-beat kick primarily serves as a rotational kick rather than providing significant propulsion. Timing makes all the difference. The downward movement should happen precisely as the arm on that side begins its catch, not when the hand reaches mid-pull or approaches the hip. Get this timing wrong, and you'll feel disconnected from the water. What is a 6-beat kick? Six kicks per complete arm cycle means three kicks per arm stroke. This pattern creates continuous leg movement without pauses. More vigorous kicking provides additional propulsion and counteracts the sinking force of your hips that results from the arm pull. Think waltz rhythm: "one-two-three, one-two-three". Bob Bowman credits Michael Phelps' world-class freestyle to mastering the six-beat kick in training. Research backs this up – intermediate swimmers achieved a 10.21% reduction in 50m time trial performance after just four weeks of consistent six-beat kick training. How they differ in rhythm and structure Energy versus power. The 2-beat kick creates a minimalist pattern that prioritizes energy conservation and efficiency, making it ideal for distances beyond 400 meters. The 6-beat kick delivers maximum propulsion at the cost of higher energy consumption, making it preferable for sprints and shorter races. Both patterns share the same basic timing foundation – the two primary kicks still occur at the same time to facilitate rotational rhythm. Elite swimmers often switch between kick patterns depending on distance and race strategy. Sun Yang used a 2-beat kick for 90% of his 1500m world record race before shifting to a powerful 6-beat kick in the final 150 meters. Smart swimmers adapt their kick patterns like shifting gears in a car. Kick Timing and Coordination Have you ever felt like your arms and legs were fighting each other during freestyle? That disconnected feeling frustrates countless swimmers. Proper kick timing transforms this chaotic struggle into fluid, connected movement that feels almost effortless. The coordination between your arms and legs serves as the binding agent for your entire stroke. Get this wrong, and your efficiency plummets. Get it right, and you'll discover power you never knew existed. Why timing matters in freestyle kick technique Kick timing isn't just about moving your legs. You're creating an uninterrupted rhythm that connects your entire body from fingertips to toes. Swim coaches know this truth – swimmers lacking a connected kick find everything else falls apart, making swimming feel like an uphill battle. Proper timing unlocks your core's larger muscle groups. More power, less effort. Well-timed kicks also counteract the sinking force in your hips that results from arm pulls. Your legs become stabilizers, not just propellers. How to sync kicks with arm strokes Remember walking? Your right arm swings forward naturally with your left leg. Swimming follows the same diagonal pattern. Here's the secret to effective kick timing: - For 2 beat kick swimming, time your downward kick with the opposite hand's water entry - Left hand enters water, right leg kicks down - This cross-body coordination creates natural body rotation and rock-solid stability The foundation remains constant regardless of your kick pattern. Whether you use 2-beat, 4-beat, or 6-beat kicks, those primary kicks must occur at precisely the same time to maintain proper rotational rhythm. Common mistakes in kick timing Most swimmers develop disconnected movements between upper and lower body. The culprits include: - Kicking with the wrong leg (same side as pulling arm instead of opposite) - Timing errors – kicking too early or too late - Starting kicks from the knee instead of the hip - Excessive knee bending during kicks - Bringing feet up and out of the water Correcting these mistakes starts with feeling proper coordination. Try this simple fix: practice walking while focusing on how your opposite limbs naturally connect. That same diagonal pattern applies in the water. When to Use Each Kick Style Your kick pattern choice can make or break your race performance. Each style serves a distinct purpose, and smart swimmers know exactly when to switch between techniques based on their race strategy and energy demands. 2-beat kick for long-distance and open water Distance events beyond 400 meters favor the 2-beat kick swimming technique. The longer your race, the more this minimalist approach pays dividends in speed-for-effort. Your body conserves precious energy while maintaining proper alignment – exactly what you need when facing those grueling final laps. Open water swimming presents a perfect scenario for the 2-beat kick. Saltwater's natural buoyancy lifts your body higher, making this technique even more effective. Elite distance swimmers understand this advantage – the 2-beat kick remains the most efficient choice for virtually all distances and fitness levels in open water conditions. Remember this crucial point: your primary goal isn't propulsion but balance and rotation. Let your arms do the heavy work. 6-beat kick for sprinting and speed Sprint events demand the 6-beat kick's superior power output. Distances of 100 meters or less require maximum speed, and this continuous leg movement delivers exactly that. Yes, you'll burn more energy, but the propulsion gains justify the cost. Research backs this approach convincingly. Intermediate swimmers dropped their 50m times by 10.21% after just four weeks of dedicated six-beat kick training. Bob Bowman credits Michael Phelps' six-beat kick mastery as fundamental to his world-class freestyle. How breathing patterns affect kick choice Your breathing rhythm naturally guides your kick selection. Many swimmers discover this connection through trial and error. The 4-beat kick pairs beautifully with breathing every other stroke on the same side. This asymmetrical pattern – three kicks on the breathing side, one on the non-breathing side – supports your breath timing perfectly. Bilateral breathing changes everything. If you're alternating breathing sides, symmetrical kick patterns feel more natural. The secret lies in finding harmony between your breathing rhythm and leg movement. Adapting kick style mid-swim Elite swimmers master the art of strategic kick switching during races. Sun Yang's 1500m world record demonstrates this perfectly – he used a 2-beat kick for 90% of the race before unleashing a powerful 6-beat kick in the final 150 meters. Most swimmers unconsciously adapt their kick patterns based on swimming speed. Distance swimmers naturally shift from their usual 2-beat rhythm to a 6-beat pattern during sprint portions. This flexibility allows you to conserve energy during the main race, then access extra speed when victory hangs in the balance. Smart race strategy means knowing when to make these transitions. Training Tips to Master Both Kicks Effective training separates swimmers who struggle between kick patterns from those who switch seamlessly. Mastering both techniques demands more than just practice – it requires the right approach and dedicated focus. Using a kickboard to build rhythm Many swimmers grab a kickboard and immediately make the same mistake. They lift their head, which drops their hips and ruins their body position. Don't worry – you're not alone. Press your armpits and lats down while holding the kickboard. This engagement keeps your body horizontal and activates your hip flexors properly. Kick from your hips, not your knees. This maximizes surface area and power. Point your toes like a ballerina on pointe – make your feet as large as possible for better leverage. Drills to switch between kick styles The 636 drill works wonders for transitioning between kick patterns. Start with three arm strokes, then perform six kicks with your body turned to one side. You'll get forward propulsion while learning proper body positioning and kick timing. Try wearing one paddle and one fin on the same side. This creates an immediate connection between kick and pull. Here's a rhythm-building exercise that many swimmers find game-changing: - Swim 100m with the first 50m gradually increasing stroke rate (slow-medium-fast) - Maintain your chosen kick pattern throughout the first 50m - Second 50m: keep medium stroke rate but shift kick patterns (2-beat to 4-beat to 6-beat) Video analysis and self-assessment Record yourself from different angles. You'll spot technique flaws that remain invisible during swimming. Focus on body position, stroke mechanics, and kick frequency when reviewing footage. Listen to your body while swimming. Focus on one body part at a time without judgment. Notice sounds like splashing and feelings like body rotation and leg drive. Building endurance for each kick type Kick training differs from running or cycling. Short, fast repetitions beat long, slow efforts every time. Start with 25m high-intensity kicks using twice as much rest as work time. This develops kick-specific muscles and technique better than endless kicking. For 2-beat kick endurance, maintain proper timing during longer swims. For 6-beat kick stamina, gradually increase duration while preserving kick quality and rhythm. Keep your kick training purposeful – technique refinement matters more than mindless repetition. Your Path to Kick Mastery Starts Now Switching between 2-beat and 6-beat kick techniques transforms your freestyle swimming efficiency. This ability becomes your secret weapon, allowing you to adapt to different race distances and water conditions with confidence. The fundamentals remain clear. Use the 2-beat kick during long-distance events to conserve energy while maintaining body position. Deploy the 6-beat kick for sprints and shorter races where power trumps efficiency. Your kick timing must synchronize perfectly with your arm strokes – that fluid connection separates good swimmers from great ones. Sun Yang showed the world how strategic kick changes impact performance. Energy-efficient 2-beat kicks for most of his 1500m world record, then a powerful 6-beat finish in the final stretch. That's swimming mastery in action. Your training plan needs both kick styles. Build rhythm with kickboards. Practice specialized drills to perfect pattern transitions. Use video analysis to catch technique flaws your body can't feel. Focus on building specific endurance for each kick type through purposeful, high-quality repetitions rather than mindless laps. Don't worry if switching between patterns feels awkward at first – you're not alone. Most swimmers struggle with kick coordination initially. The breakthrough comes when you stop overthinking the mechanics and start feeling the rhythm. Your perfect kick pattern exists. One that matches your body mechanics, breathing rhythm, and swimming goals. You now have the knowledge to find your optimal freestyle technique and unlock your swimming potential. Time to get in the water and make it happen. FAQs Q1. What's the main difference between a 2-beat and 6-beat kick in freestyle swimming? A 2-beat kick involves one kick per arm stroke, while a 6-beat kick consists of three kicks per arm stroke. The 2-beat kick is more energy-efficient and suitable for long distances, whereas the 6-beat kick provides more propulsion and is ideal for sprinting. Q2. How do I improve my 6-beat kick technique? To improve your 6-beat kick, start by practicing with a kickboard to build rhythm. Focus on kicking from your hips, not your knees, and point your toes. Gradually incorporate the kick into your full stroke, matching the timing with your arm movements. Q3. When should I use a 2-beat kick versus a 6-beat kick? Use a 2-beat kick for long-distance events and open water swimming to conserve energy. Switch to a 6-beat kick for sprints and shorter races where speed is crucial. Many swimmers adapt their kick style mid-swim based on race strategy and energy levels. Q4. How does breathing affect my kick choice in freestyle? Your breathing pattern can influence your kick selection. For example, a 4-beat kick often pairs well with breathing every other stroke on the same side. If you're using bilateral breathing, a more symmetrical kick pattern like the 2-beat or 6-beat might feel more natural. Q5. What are some effective drills to master both kick styles? Try the 636 drill, where you perform three arm strokes followed by six kicks with your body turned to one side. Another useful exercise is to swim 100m, gradually increasing your stroke rate for the first 50m while maintaining your kick pattern, then keeping a medium stroke rate but changing kick patterns for the second 50m. Read the full article
0 notes
Text
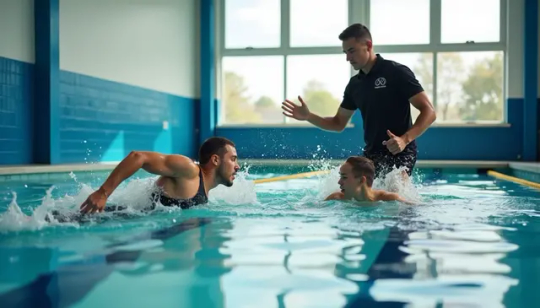
Private Adult Swim Lessons vs Self-Learning: Worth The Investment? A surprising 61% of parents choose private swimming lessons for their children, but what about adults? The benefits extend far beyond childhood, yet many grown-ups question whether professional instruction justifies the cost compared to teaching themselves. Drowning ranks as the leading cause of death for children ages 1-4 and the second leading cause for those under 14. Swimming isn't merely a childhood safety skill, though. Adults across all ability levels – from those with significant water fear to athletes training for specific events – can gain tremendous advantages from professional guidance. Most adults achieve noticeable progress within just 6-10 private lessons, while self-teaching typically involves extensive trial-and-error periods. Private instruction delivers approximately 30 minutes of dedicated swim time versus only 5-7 minutes in group settings, enabling students to learn twice as quickly. Do swimming lessons deliver enough value to justify their price tag? Private instruction requires financial commitment, but the benefits extend far beyond basic skill acquisition. Professional swimming lessons create safer learning environments, minimize injury risks, and build confidence through immediate feedback and personalized attention. For busy adults, the question shifts from simple cost to overall value – how rapidly you want to progress and how efficiently you want to learn. Let's examine whether you should invest in professional guidance or dive into self-teaching your swimming skills. Learning to Swim Alone vs With a Coach Swimming demands commitment regardless of your approach. The choice between self-teaching and professional instruction dramatically shapes your aquatic journey. Time to Learn: Self-paced vs Instructor-guided Did you know most adults master basic swimming skills in just 8-12 lessons with an instructor, especially when practicing consistently? Without professional guidance, this timeline stretches significantly longer. Swimming 2-3 times weekly under expert supervision places you on the fastest path to competency. Self-paced learning offers scheduling flexibility but lacks the structured progression that accelerates skill development. Many self-taught swimmers hit frustrating plateaus after initial progress. Despite the appeal of learning at your own pace, private adult swim lessons consistently produce faster, more reliable results through focused instruction. Skill Development: Trial-and-error vs Structured Progression Self-teaching relies heavily on experimentation—often leading to incorrect techniques that become stubborn habits later. Instructors, by contrast, provide methodical approaches that build skills sequentially. Structured swimming workouts enable safe progression toward specific goals. Professional coaching delivers targeted development across multiple dimensions: - Technique refinement through specific drills - Strength and endurance building through appropriate exercises - Adaptation of training based on individual progress This systematic approach prevents the diminishing returns commonly experienced with repetitive self-practice. Feedback Loop: No correction vs Real-time adjustments The most critical difference lies in feedback quality. When swimming alone, your "sensations" about performance rarely match reality. Professional instruction provides immediate correction that prevents bad habits from forming. Studies show that intermittent, expert feedback substantially improves swimming pace control and technique. Swimmers receiving personalized guidance demonstrated improved speed and results. This real-time feedback enables adjustments impossible to achieve alone. Instructors identify subtle technique flaws invisible to the swimmer, creating a faster improvement cycle than self-correction allows. Benefits of Private Adult Swim Lessons Did you know that nearly half of American adults fear deep water? Private swim lessons offer unique advantages that address this common anxiety while delivering exceptional value beyond basic instruction. Personalized Instruction: Tailored to Your Goals Private swim lessons create customized programs driven by your specific goals, timeline, and foundational skills. Instructors adapt their methods to match your learning style, ensuring every session addresses your particular strengths and weaknesses. This tailored approach proves especially valuable whether you're seeking basic water safety or advanced technique refinement. Faster Progress: One-on-One Efficiency Most adult students learn to swim within just 6-12 private lessons, achieving remarkable progress compared to alternative approaches. One-on-one attention provides immediate feedback and correction, resulting in faster skill acquisition. Private lessons typically last only 30 minutes but accomplish more than longer group sessions since every moment focuses exclusively on your development. Confidence Building: Safe Space to Overcome Fear The private instruction environment eliminates audience pressure, creating a judgment-free zone where you can face water anxieties at your own pace. Instructors help swimmers overcome specific fears through gradual exposure and positive reinforcement, building essential trust between student and teacher. This personalized approach transforms water from threat to opportunity. Flexible Scheduling: Lessons That Fit Your Life Have you struggled to fit swimming into your packed calendar? Private swim schools offer scheduling options from early morning through evening (6am-8pm), including weekends. Many programs allow booking several lessons in advance, accommodating even the busiest professionals. This flexibility removes a common barrier to skill development. Safety Skills: Survival Techniques Often Missed in Self-Learning Beyond basic strokes, private lessons teach crucial survival techniques overlooked in self-learning: - Floating and treading water for extended periods - Rolling from front to back position to rest while swimming - Safe entry and exit techniques without ladders - Proper breathing control during unexpected submersion These skills might save your life—approximately 3,500 Americans die annually from accidental drowning, underscoring the life-preserving value of proper instruction. Cost vs Value: Are Private Lessons Worth It? Did you know that most adults continue self-teaching swimming long after they've plateaued? The financial side of swimming instruction deserves careful examination. Let's explore what you're really paying for—and what you're getting in return. How Much Are Private Adult Swim Lessons? Private adult swim lessons typically range from $30 to $100 per session depending on location and instructor credentials. Most sessions last 30 minutes, with some extending to an hour. Facilities frequently offer package discounts when you commit to multiple lessons. For example, Sunsational Swim School charges $96 per hour for a 6-lesson package, dropping to $88 per hour when purchasing 12 lessons (8% savings), and $84 per hour for 18 lessons (13% savings). Meanwhile, YMCA prices for 30-minute sessions are $48 for members and $99 for non-members per lesson, with significant discounts for multi-lesson packages. Some facilities like JCC offer semi-private options (two participants) at reduced rates—starting at $36 for members/$46 for non-members—making quality instruction more accessible. Long-Term Value: Fewer Lessons, Better Results Group lessons may cost less initially, but private instruction often proves more economical long-term. The individualized attention leads to faster skill acquisition, requiring fewer total lessons to achieve proficiency. Some programs even offer guarantees. Sunsational's "Learn To Swim Guarantee Package" promises students will swim to the pool edge unassisted by their final lesson or receive up to four additional lessons free. Private lessons provide immediate feedback and corrections, accelerating overall progress. This efficiency translates to better value despite the higher per-session cost. Hidden Costs of Self-Learning: Time, Frustration, Risk Self-teaching swimming appears free, but have you considered the hidden expenses? The extended timeline—often months or years versus weeks with instruction—represents a substantial time investment. The risk of developing incorrect techniques might require extensive retraining later. Many adults who initially attempt self-learning ultimately seek professional instruction after limited progress. Beyond monetary considerations, safety risks present the most significant hidden cost of self-teaching swimming. According to professional instructors, no teaching method can "drown-proof" anyone, but proper instruction significantly reduces risk. While private lessons require financial investment, they deliver value through efficiency, safety, and long-term skill development unmatched by self-teaching approaches. Who Should Choose Private Lessons Over Self-Learning? For many adults, the question shifts from whether swimming lessons help to whether private instruction specifically addresses their unique circumstances. Some individuals gain extraordinary value from one-on-one coaching. Adults with Water Anxiety or Fear A staggering 100 million adults in the United States can't swim to save themselves, primarily due to fear. This overwhelming anxiety prevents many from ever entering the water. Private lessons create secure environments where instructors address fear through manageable "micro-steps" before students even get wet. Rather than forcing you to "push through" fear—a strategy that typically backfires—private instructors teach relaxation and breathwork techniques first. This personalized approach allows you to build confidence without embarrassment or judgment from peers, creating a psychologically safe learning space. Even former military personnel use these techniques to overcome water anxiety. Busy Professionals Needing Flexibility Private lessons revolve around your schedule instead of forcing you to adapt to fixed class times. This flexibility proves invaluable for adults balancing careers, families, and other commitments. Many services offer scheduling options from early morning through evening (6am-8pm), plus weekends. At-home lessons further eliminate travel time, making swimming accessible even within packed calendars. Your instructor focuses exclusively on your goals during each session, maximizing efficiency within limited available time. Fitness or Triathlon Training Goals For triathletes, swimming often represents the most challenging segment. Private coaching transforms this weakness into a strength through video analysis and tailored technique refinement. Specialized triathlon swim instruction addresses unique open-water skills that self-teaching rarely covers. Experienced coaches design customized training plans accounting for your current fitness level, goals, and timeline. Many athletes report swimming becoming their strongest discipline after professional instruction. Those Who Tried Self-Learning Without Success Many adults attempt self-teaching before seeking professional help. Common self-learning failures include incorrect breathing techniques, improper stroke mechanics, and persistent confidence issues. Unlike group settings, private instruction addresses your specific barriers to progress. An expert instructor immediately identifies subtle technique flaws invisible to you, creating breakthrough moments for those previously stuck. Comparison Table Did you know that elite swimmers use 70% less energy than beginners to cover the same distance? This efficiency gap highlights the critical differences between proper instruction and self-learning approaches. Aspect Private Adult Swim Lessons Self-Learning Time to Master Basic Skills 8-12 lessons Significantly extended timeline Learning Structure Structured progression with methodical approach Trial-and-error experimentation Feedback Immediate real-time corrections and adjustments No professional correction, relies on self-sensation Cost $30-$100 per 30-minute session No direct monetary cost Progress Rate Twice as fast as group lessons; noticeable progress within 6-10 lessons Often plateaus after initial progress Dedicated Swim Time 30 minutes of focused instruction per session Not mentioned Safety Training Includes survival techniques, proper breathing control, and safe entry/exit methods Often misses crucial survival techniques Scheduling Flexible scheduling (6am-8pm), including weekends Self-paced, completely flexible Technique Development Sequential skill building, prevents bad habits May develop incorrect techniques difficult to correct later Learning Environment Safe, judgment-free environment with personalized attention Independent learning without supervision Time matters in swimming progress. Each session with an instructor provides structured development that self-learning simply cannot match, especially for adults looking to build proper technique from the start. Conclusion Worth The Investment: Making Your Decision Private swim lessons deliver remarkable advantages over self-teaching for adults. The structured progression paired with real-time feedback creates an environment where you master proper technique from day one, rather than developing bad habits requiring extensive correction later. Most adults achieve basic swimming competency within just 8-12 sessions compared to the unpredictable timeline of self-teaching. Cost matters when weighing your options. Yet the efficiency of private instruction often makes it more economical long-term despite higher per-session pricing. Fewer total lessons with faster progress saves both time and money. The safety skills gained through professional instruction—techniques frequently overlooked during self-learning—provide value extending far beyond basic stroke development. Specific groups gain extraordinary benefits from one-on-one coaching. Adults with water anxiety receive personalized support in judgment-free environments. Busy professionals appreciate scheduling flexibility accommodating packed calendars. Athletes training for events acquire specialized techniques. Those previously stuck in self-teaching cycles experience breakthrough moments through expert guidance. Your decision should reflect your personal circumstances, learning preferences, and swimming goals. Consider not just the initial investment but the complete value proposition—including safety benefits, time efficiency, and confidence development. Swimming represents both a potentially life-saving skill and lifelong source of enjoyment, making proper instruction worthy of serious consideration regardless of your starting point. FAQs Q1. Are private adult swim lessons worth the investment? Private adult swim lessons can be very worthwhile, especially for those with water anxiety or specific goals. The personalized instruction and immediate feedback often lead to faster progress and better technique compared to self-learning or group classes. Q2. How long does it typically take an adult to learn basic swimming skills? Most adults can master basic swimming skills in 8-12 private lessons when practicing consistently. This is significantly faster than self-learning, which often has an extended and unpredictable timeline. Q3. What are the main benefits of private swim lessons for adults? Key benefits include personalized instruction tailored to your goals, faster progress through one-on-one efficiency, confidence building in a safe environment, flexible scheduling options, and learning crucial safety skills often missed in self-learning approaches. Q4. How much do private adult swim lessons usually cost? Private adult swim lessons typically range from $30 to $100 per 30-minute session, depending on location and instructor qualifications. Many facilities offer package discounts for multiple lessons. Q5. Who would benefit most from private adult swim lessons? Private lessons are particularly beneficial for adults with water anxiety, busy professionals needing scheduling flexibility, those training for specific events like triathlons, and individuals who have tried self-learning without success. Read the full article
0 notes
Text

Swimming Performance Program Every swimmer has unique training needs and goals. We encourage you to schedule a consultation with us. We'd be delighted to design a custom swimming program that meets your training needs and budget. This consultation is free and comes with no obligation. Click the link below to schedule your meeting with an experienced swimming coach near you. Schedule Consult To Discuss Your Training Needs Ready To Go | Sign Up Achieving your personal best in a triathlon, open water race, or a new PR in the pool isn't about pushing harder—it's about training smarter. Your Houston-based swimming coach offers a tailored program designed specifically for you, not a one-size-fits-all approach. Your swimming coach will assess your current fitness level, training history, and performance goals to maximize your potential. Whether you're a beginner, aiming for a new personal record, or looking to elevate your performance, your coach has you covered. With extensive experience, knowledge, and performance testing, your swimming coach can help you understand how your body responds to exercise. They'll make relevant adjustments to your swimming plan to ensure you get the adaptations you need. Whether your goal is to lean out, improve your swimming economy, train more efficiently, or increase your speed, your coach has the expertise to help you achieve your personal best. Read the full article
0 notes
Text

7 Triathlon Benefits of Sports Massage You Can't Ignore You know that feeling when you've just finished an intense training session and the next morning your body feels like it's been through a war zone? Every triathlete understands what it means to test their physical limits. Triathlon training puts immense stress on your body - from your muscles to your joints, and even your mind. Your training plan might be well-laid-out, but many athletes miss out on a powerful recovery tool: sports massage. Studies have shown that sports massage can transform how triathletes recover and perform. The benefits are way beyond the reach and influence of simple relaxation. These insights could change your recovery game completely, whether you're gearing up for your first sprint or getting ready to tackle an Ironman. Enhanced Recovery and Muscle Repair Sports massage does more than just make you feel good. It's a proven recovery tool that can substantially cut down your recovery time between training sessions. Triathletes who push through intense training blocks will find that understanding massage's role in recovery can transform their triathlon training plan. Recovery Time Reduction Sports massage can reduce your recovery time by up to 30% when you add it to your training routine. You'll get the most benefit if you schedule it within 24-48 hours after training or racing. Elite triathletes see the best results with twice-weekly sessions. Recreational athletes can benefit from monthly sessions during their peak training periods. Training Phase Recommended Massage Frequency Peak Training 1-2 times per week Race Week Early week session Recovery Block Once every 2-3 weeks Muscle Repair Process Triathlon training puts your muscles under intense stress and creates micro-tears that must heal. Sports massage speeds up this healing process by: - Increasing blood circulation to damaged tissues - Improving oxygen delivery to recovering muscles - Helping remove metabolic waste - Making muscle fiber repair faster - Reducing inflammation in affected areas Post-Training Recovery Benefits Regular sports massage provides lasting benefits that build up over time. Athletes who make massage part of their recovery routine experience improved blood circulation and enhanced muscle flexibility. This becomes vital when you balance the demands of swimming, cycling, and running in your triathlon training. Ironman triathlon competitors have seen remarkable improvements in muscle soreness and fatigue levels through massage therapy. Sports medicine journals report that even a 7-minute post-event massage can reduce pain and fatigue scores more effectively than passive recovery methods. The right timing makes all the difference. Short massages lasting 5-12 minutes work better than longer sessions to improve athletic performance metrics like cycling sprint power and endurance. Schedule your massage the day before a recovery day or light training session to protect your key workouts. Note that deep tissue work isn't always the answer right after a workout. Light techniques that boost blood flow without causing extra inflammation work better. This approach works naturally with your body's recovery process, whether you're training for a sprint triathlon or getting ready for a full Ironman. Improved Blood Circulation Blood circulation is vital to your triathlon success and builds the foundation of your body's recovery and performance systems. Sports massage helps optimize this bodily function. Blood Flow Enhancement Your muscles need more blood flow to perform at their best during triathlon training. Research proves that sports massage improves blood circulation through specialized techniques that dilate your blood vessels. These improvements create a chain of benefits that affect your triathlon performance. Circulation Benefit Impact on Training Increased Blood Flow Enhanced muscle recovery Improved Lymphatic Flow Reduced muscle edema Better Capillary Function Faster waste removal Decreased Blood Pressure Improved recovery state Oxygen Delivery Benefits Triathlon training puts extraordinary demands on your muscles' oxygen needs. Sports massage boosts oxygen delivery to your working muscles through better blood flow. This extra oxygen: - Speeds up recovery between training sessions - Helps muscle tissue repair - Keeps you going during long training blocks - Helps your body adapt to intense training Nutrient Distribution Your triathlon training plan needs proper nutrient distribution to maintain peak performance. Sports massage improves this process by boosting the exchange between blood and tissue cells, which supports your training goals. Regular massage therapy creates perfect conditions for nutrients to reach every part of your body. This improved delivery system helps keep your internal conditions stable - exactly what you need for endurance activities like swimming, cycling, and running. You can maximize these benefits by timing your massage sessions well within your training plan. Schedule your sessions after tough training days when your body needs extra nutrient delivery. Better blood flow, oxygen delivery, and nutrient distribution work together to build a strong foundation for your triathlon success. This improved circulation helps you stay consistent from morning swims to weekend rides, which leads to steady progress on your triathlon trip. Injury Prevention and Management Your body faces extraordinary physical challenges at the time you train for a triathlon, and preventing injuries is significant to succeed in the long run. You need to understand how sports massage prevents and manages injuries to stay competitive, whether you're getting ready for your first sprint triathlon or your tenth Ironman. Common Triathlon Injuries Triathletes face specific injury risks because they train repeatedly in three disciplines. Here's what you should look out for: Discipline Common Injuries Risk Factors Swimming Shoulder impingement, rotator cuff strain Poor technique, overtraining Cycling IT band syndrome, patellar tendonitis Improper bike fit, high mileage Running Plantar fasciitis, shin splints Impact stress, training volume Preventive Massage Techniques Regular sports massage helps spot potential problems before they become serious injuries. Your massage therapist should concentrate on: - Deep tissue work to address muscle adhesions - Trigger point therapy for specific problem areas - Fascial release to improve tissue mobility - Cross-fiber friction to prevent scar tissue formation - Joint mobilization techniques Your training volume determines how often you should get preventive massage. You should schedule sessions every 1-2 weeks during peak triathlon training. Maintenance massages work best when you schedule them during recovery weeks. Injury Recovery Support Sports massage becomes a vital part of your rehabilitation process if you get injured. Your massage therapy can speed up healing by working with your healthcare team to: - Reduce inflammation and swelling - Break down scar tissue - Maintain flexibility in unaffected areas - Support proper tissue alignment Timing makes all the difference to get optimal results. Schedule your massage sessions 48-72 hours apart during injury recovery. This gives enough healing time between treatments. Your therapist should collaborate with your physical therapist or sports medicine doctor to ensure massage techniques enhance your rehabilitation plan. Note that while some discomfort during training is normal, you shouldn't ignore persistent pain. Adding regular sports massage to your triathlon training plan doesn't just treat injuries—it prevents them. This forward-thinking approach helps you balance pushing your limits while staying healthy throughout your triathlon experience. Performance Enhancement Want to get ahead in your next triathlon? Your training plan might be solid, but sports massage could be the missing piece in your success puzzle and its effect on your performance might surprise you. Race Day Performance Benefits The right timing of your sports massage before race day can substantially affect your performance. Research shows that a well-timed pre-event massage can boost your race-day readiness: Timing Purpose Recommended Duration 3-5 days pre-race Performance preparation 45-60 minutes Race morning Warm-up enhancement 10-15 minutes Post-race Recovery acceleration 15-30 minutes Athletes who get pre-event massages show improved vasodilation and decreased pre-race anxiety, which leads to better race-day performance. But you should avoid deep tissue work 48 hours before your event because it might temporarily reduce your muscle strength. Training Quality Improvement Regular massage therapy can improve your triathlon training plan through: - Better training consistency from faster recovery - Improved biomechanical efficiency in all three disciplines - Better adaptation to increasing training loads - Lower risk of overtraining symptoms Athletes who include regular massage in their training maintain higher quality training sessions during their build phase, especially during peak training weeks to prepare for Ironman distance. Performance Metrics Impact The immediate performance improvements from massage might be subtle, but they add up to make a big difference in your triathlon experience. Scientific studies show: - Flexibility Enhancement: A 7% increase in range of motion helps your swimming and running efficiency - Recovery Acceleration: 13% improvement in delayed onset muscle soreness (DOMS) measures - Fatigue Management: Notable reduction in perceived fatigue helps during high-volume training weeks Schedule your massage sessions strategically within your training plan to get the best results. You should aim for bi-weekly sessions during peak training and focus on problem areas specific to each discipline. Your massage therapist should know the unique demands of triathlon training and adjust techniques based on your training phase and upcoming events. Note that massage won't directly improve your sprint speed or endurance capacity. Instead, it creates ideal conditions for quality training sessions. This improved training environment helps you stay consistent in your preparation for sprint, Olympic, or Ironman distance events and leads to better race-day performance. Mental Focus and Stress Reduction Training for a triathlon tests your mind as much as your body. You might focus on hitting intervals and getting faster transitions, but your mental game needs just as much attention. Sports massage can revolutionize your triathlon training with its powerful psychological benefits. Mental Recovery Benefits Your brain needs to recover just like your muscles. Sports massage is a great way to get a mental reset that helps you stay sharp throughout your triathlon training plan. Research shows that regular massage therapy: - Increases serotonin and dopamine levels - Improves mental clarity and focus - Boosts emotional resilience - Reduces training-related mental fatigue - Lifts overall mood and motivation These benefits help you a lot during intense training blocks for sprint, Olympic, or Ironman distance events where mental fatigue can hurt your training quality. Stress Management Athletic performance and stress have a clear connection. Sports massage helps manage this vital relationship through measurable body changes: Stress Hormone Massage Effect Performance Impact Cortisol Significant reduction Better recovery Serotonin Increased levels Improved mood Endorphins Enhanced release Natural pain relief Athletes who get regular massage therapy show much lower stress levels and handle training demands better. This stress reduction helps most during peak training weeks when you're juggling work, life, and triathlon preparation. Sleep Quality Improvement Quality sleep can make or break your triathlon success, and sports massage plays a vital part in optimizing your rest. Scientific research confirms that massage therapy improves sleep in several ways: - Hormone Regulation: Increases serotonin production, which aids in melatonin synthesis - Physical Relaxation: Reduces muscle tension that can interfere with sleep - Mental Calming: Decreases racing thoughts common among athletes - Recovery Enhancement: Improves sleep quality during heavy training periods The right timing of massage sessions can maximize these sleep benefits. You should schedule sessions at least 2-3 hours before bedtime so your body can ease into its natural sleep rhythm. During intense training blocks, bi-weekly sessions help maintain optimal sleep patterns. Ironman athletes, who deal with high training volumes, can see game-changing results from the sleep-boosting effects of regular massage. Better sleep leads to faster recovery, better training adaptation, and improved race-day performance. Keep in mind that mental recovery isn't optional—it's essential for triathlon success. Regular sports massage in your training routine strengthens both your physical and mental game, building a solid foundation to reach your triathlon goals. Flexibility and Range of Motion Your triathlon success story might be missing one key element - flexibility. Athletes often focus on endurance and strength, but your range of motion affects every stroke, pedal, and stride of your triathlon trip. Joint Mobility Enhancement Triathlon training puts unique stress on your joints, and they need specific attention to stay mobile. Sports massage techniques like myofascial release and deep tissue work target the connective tissues around your joints. Studies show that regular massage therapy can boost joint mobility by up to 30%. This improvement helps: Discipline Joint Focus Performance Benefit Swimming Shoulders Improved stroke length Cycling Hips Enhanced power output Running Ankles Better ground contact Your triathlon training plan should include regular massage therapy. This helps maintain full and balanced range of motion - vital for shoulder movement in swimming and hip mobility in cycling and running. Muscle Flexibility Benefits Your muscles need to stretch and contract efficiently to perform well in all three disciplines. Sports massage improves muscle flexibility through: - Increased blood flow to muscle tissues - Enhanced muscle fiber elasticity - Reduced adhesions and scar tissue - Improved muscle length-tension relationships - Better muscular contraction efficiency Ironman athletes face extreme endurance demands. Better muscle flexibility leads to more efficient movement patterns over long distances. You'll notice this most in the final stages of your race when form typically suffers from fatigue. Movement Efficiency Better joint mobility and muscle flexibility lead to improved movement efficiency. This matters whether you're training for a sprint triathlon or preparing for an Olympic distance event. Sports massage optimizes your movement patterns by: - Restoring muscle length for more effective muscular contractions - Breaking down adhesions that form within muscles and surrounding tissues - Improving biomechanical efficiency across all three disciplines - Enhancing energy conservation through better movement patterns Schedule your flexibility-focused massage sessions 48-72 hours before key workouts for the best results. This timing lets your body adapt to the increased range of motion while keeping the muscle tension needed for performance. During intense training periods, try to get bi-weekly sessions to maintain flexibility gains. Flexibility work through massage therapy does more than prevent injury - it optimizes every movement in your triathlon journey. Free-moving joints and properly functioning muscles don't just help you move better - they help you race smarter. Discipline-Specific Benefits Sports massage plays a unique role for each discipline in your triathlon experience. Learning how massage helps every part of your race can transform your training and race-day performance. Swimming Benefits Swimming success depends on upper body mobility and strength. Sports massage targets what the freestyle stroke needs through: - Rotator cuff maintenance to prevent injuries - Better shoulder girdle mobility - Upper back tension release - Relaxed neck muscles for smoother breathing Your triathlon training plan should include shoulder-focused massage sessions, especially when you increase swim volume. Studies show swimmers who get regular upper body massages keep better form during long-distance sets. This matters for both sprint and Ironman events. Cycling Benefits Cycling's repetitive motions create specific muscle needs that targeted massage therapy can address. Time spent in the saddle affects these key areas, whether you train for a sprint triathlon or an Ironman: Cycling Area Massage Focus Performance Benefit Lower Back Release tension Better aero position Hip Flexors Reduce tightness More power output Quadriceps Recovery support Longer endurance IT Band Prevention work Less knee stress The timing of massage sessions matters most during peak cycling blocks. Deep tissue work should happen at least 48 hours before key bike sessions. This helps maintain power while getting the most from improved muscle function. Running Benefits Running puts unique stress on your body as the final triathlon discipline, especially after swimming and cycling. Sports massage for runners works on: - Better impact absorption through calf and shin care - More knee stability from quadriceps and hamstring work - Hip mobility for an efficient stride - Plantar fascia release for foot mechanics Olympic and Ironman athletes need regular massage more during the running phase. Research shows triathletes who get consistent lower body massage keep better form late in their races. A good massage therapist understands how triathlon disciplines connect. Tight hip flexors from biking can throw off your running form. Shoulder tension from swimming might make it hard to stay aerodynamic on the bike. This complete approach makes each massage session boost your overall performance. Peak training weeks call for sport-specific massage sessions that match your hardest training days. This targeted plan helps keep muscles working well and stops bad patterns from developing across the three disciplines. The intensity and timing of massage sessions should change based on your training phase and race distance. Sprint athletes might focus on quick recovery, while Ironman athletes usually need deeper, more frequent work to keep tissue quality during longer training blocks. Read the full article
0 notes
Link
0 notes
Link
0 notes
Link
#CreatinganAthlete-SpecificSleepPlan#OptimizingSleepDuringPeakTraining#sleepbanking#SleepStrategiesforRacePreparation#Sleep'sRoleinMulti-SportRecovery#UnderstandingSleepCyclesinEnduranceAthletes
0 notes
Text

Did you know elite Ironman champions generate a staggering 4.01 watts per kilogram across 112 miles of racing? Most age group athletes target between 3.5 to 4.0 watts per kilogram just to stay competitive on the bike course. Your bike choice matters more than ever. Today's Kona qualifiers must sustain power outputs above 290 watts to earn their spot at the world championships. The right equipment can mean the difference between qualifying and missing the cut-off. Ready to discover the perfect Ironman bike setup? Let's explore the exact power targets you need, compare road bikes versus tri bikes, and uncover proven training methods to build Kona-level power. Your path to faster bike splits starts here. Understanding Power-to-Weight Ratio for Ironman A surprising 90% of cyclists misunderstand power-to-weight ratio and its impact on Ironman performance. Let's break down this crucial metric that could make or break your race day success. What is power-to-weight ratio Think of power-to-weight ratio as your cycling efficiency score. Calculate yours by dividing your power output (watts) by your body weight in kilograms. Picture two athletes with 250 watts FTP - at 50kg, that's 5.0 W/kg, while at 75kg, it drops to 3.33 W/kg. Target numbers for Kona qualification Have you ever wondered what power numbers it takes to qualify for Kona? Professional athletes like Pete Twelsiek push an impressive 315 watts (4.01 W/kg) during peak 20-minute efforts. Most age-group Kona qualifiers maintain 75-80% of their normalized power throughout the race. Your body demands serious fuel to sustain these power numbers. During an Ironman, you'll burn through 8,000 to 10,000 calories - that's roughly 1,000 calories every hour. Successful racers typically hold an Intensity Factor between 0.60 to 0.70, feeling like a 6 or 7 out of 10 on the effort scale. Why raw watts matter more than w/kg Don't get caught up chasing power-to-weight numbers. Raw power output often determines your Ironman success, especially on flat or rolling terrain. At race speeds, nearly 90% of a cyclist's power fights wind resistance. Most Ironman courses favor aerodynamic efficiency over power-to-weight ratio. Even on hilly courses like Ironman Wisconsin, maintaining an aero position with steady power delivers better results than focusing purely on watts per kilogram. Your bike segment alone burns through 4,900 calories. Here's the catch - your body can only absorb about 400 calories per hour while cycling. This nutrition puzzle proves just as crucial as your power numbers for race day success. Choosing Your First Ironman Bike Have you ever wondered why some triathletes spend $10,000+ on bikes while others qualify for Kona on $2,000 setups? Your first Ironman bike choice matters more than you might think. Let's explore the options that won't break your bank but still get you to the finish line strong. Road bike vs triathlon bike debate Road bikes shine for beginners with superior versatility and comfort. These bikes offer better handling, multiple hand positions, and simpler maintenance. Plus, you'll enjoy group rides and tackle challenging terrain while building fundamental skills. Triathlon bikes tell a different story. Their forward-positioned geometry places your hips directly over the crankset, maximizing quad engagement and straight-line speed. Don't rush into buying one though - these speed machines challenge new riders and rarely work well for group training. Budget-friendly options that work Ready for some good news? Quality starter bikes range between USD 1500.00 to USD 2000.00. Aluminum frames deliver outstanding durability and value, while carbon options offer smoother rides at premium prices. Here's what catches our eye for first-time Ironman athletes: - Giant Contend 3: USD 1000.00 brings you lightweight aluminum and reliable components - Trek Domane AL 2: USD 1200.00 delivers endurance-focused geometry - Specialized Allez: USD 1000.00 packs race-ready features into a value package Smart shoppers hunt off-season deals or explore pre-owned options. Whatever you choose, proper bike fitting makes or breaks your race day comfort. Remember - you can upgrade components as your skills and wallet grow. Here's a secret many pros won't tell you: countless successful triathletes start with road bikes and clip-on aerobars. Focus on building your engine first - the fancy gear can wait. Key Features of Kona-Qualifying Bikes Time matters in triathlon bike selection. Recent Ironman World Championship data reveals the exact features separating Kona qualifiers from the pack. Let's explore what makes these speed machines truly exceptional. Aerodynamic frame designs Here's a surprising truth about aerodynamics - approximately 85% of aerodynamic drag comes from rider position alone. Modern triathlon frames combat this with slim tubing profiles and boat-tail trailing edges, slicing through air at various yaw angles. The latest designs push engineering limits further. BMC's Speedmachine borrows F1 racing technology with its distinctive wide fork design. The Cube Aerium C:68X showcases remarkable stability, even in challenging crosswinds. Weight considerations Most triathletes obsess over bike weight, but here's the reality - adding 10 pounds to a bike costs only 87 seconds over a rolling course. Today's high-end tri bikes weigh 18-20 pounds, prioritizing aerodynamics over minimal weight. Component selection tips Kona qualification demands smart component choices. Recent data reveals critical trends: - Wheels: Zipp leads with 28% market share, while DT Swiss claims 21%. Deep-section wheels (60-90mm) deliver peak aero benefits - Hydration systems: Integrated front systems dominate at 37%, leaving traditional bottle cages behind - Groupsets: SRAM surges to 31% market share - Shimano's first time below 70% - Saddles: ISM and Selle Italia remain Kona qualifiers' top picks Smart upgrades focus on cutting drag. A clean, well-lubricated drivetrain saves 10+ watts. Proper tire selection reduces rolling resistance by 4-5 watts per wheel. Most impressive? An optimized aero position saves up to 70 watts compared to standard road setups. Training Your Way to Kona-Level Power Have you ever watched your power numbers plateau despite countless hours on the bike? Don't worry - you're not alone. Kona qualification demands smart power development, not just grinding out miles. Building base fitness Time matters in base training. Your journey to Kona-level power starts with 8-12 weeks of dedicated preparation. Keep your effort level comfortable - think 5-7 out of 10 on the effort scale. Here's what happens during Zone 1 and Zone 2 training: your heart grows stronger, tiny blood vessels multiply, and your cellular powerhouses expand. Most exciting? Your body transforms into a fat-burning machine. Smart athletes increase training volume by just 10% every few weeks. Consistency trumps intensity - aim for 5-6 training days weekly, gradually building your endurance foundation. Power-based workouts Ready to push your limits? Start by finding your Functional Threshold Power (FTP) through a 20-minute time trial. Multiply that number by 95%. Kona-level performance requires holding 70-72% FTP for 5:30 riders, climbing to 75-76% for 5:00 hour riders. Your power-building blueprint: - Sweet Spot intervals: Push 88-94% FTP to boost aerobic engine - VO2max sessions: Challenge yourself at 110-160% of Lactate Threshold - Long rides: Maintain 65-80% max heart rate for 3-6 hours Watch your Training Stress Score (TSS) - keep it under 280 during the Ironman bike leg. Your Variability Index (VI) should stay below 1.05 for consistent output. Spin those pedals at 80-90 RPM to save precious glycogen and fight fatigue. Conclusion Did you know elite swimmers use 70% less energy than beginners to cover the same distance? The same principle applies to Ironman cycling - efficiency matters more than raw power. While pros push beyond 4 watts per kilogram, smart equipment choices and structured training pave the way to Kona qualification. Raw power trumps power-to-weight ratio on most Ironman courses. Your aerodynamic position and steady power delivery determine race day success. Start with a quality road bike, master fundamental skills, then consider upgrading to a triathlon-specific machine. Deep-section wheels, integrated hydration systems, and optimized components can save precious watts. But here's the truth - structured training makes champions. Progressive base building followed by targeted power work creates Kona-level performance. Qualifying times drop every season. Focus first on sustainable power development through proper training. Let your fitness guide equipment upgrades, choosing improvements that match your goals and budget. Your Ironman dreams await - time to make them reality. Read the full article
0 notes
Text
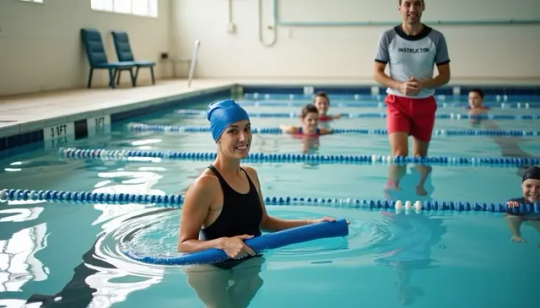
A staggering 25% of adults can't swim at all. Even more concerning, another 20-25% experience genuine fear when facing deep water, even in controlled pool environments. Nearly half – 44% of adults – would fail a basic water safety test if taken today. The myth that adults can't learn to swim properly is just plain wrong. Extensive research confirms there's no meaningful difference in motor skill acquisition potential between age groups. Your ability to master swimming remains fully intact whether you're celebrating your 25th birthday or your 65th. Many adults avoid the pool because of outdated beliefs about learning limitations, but with dedicated practice and proper instruction, you can become a confident swimmer at any age. For most adult beginners, the swimming journey begins by conquering fear. These anxieties often trace back to childhood experiences, and addressing them directly creates the foundation for real progress. Don't worry – you're not alone. Swimming instruction for adults typically starts with water comfort, basic floating techniques, and controlled breathing exercises. The key to success? Consistency matters most – practicing 2-3 times weekly delivers optimal results for building both skill and confidence. Tracking your swimming journey with SMART goals (Specific, Measurable, Achievable, Relevant, Time-Bound) keeps you motivated through inevitable challenges. While learning may test your patience at times, the rewards extend far beyond just acquiring a new skill – you're developing a potentially life-saving ability that opens doors to new activities and confidence. Have you been waiting for the perfect time to learn swimming? That time is now. Let's explore how you can transform from hesitant beginner to confident swimmer, regardless of your current age or experience level. Start the Right Swimming Mindset Beginning your adult swimming journey demands more than just showing up at the pool. Mental preparation often matters more than physical readiness when facing water for the first time. Forget Age-Related Swimming Myths Many adults create unnecessary barriers before even entering the pool. They believe swimming belongs exclusively to childhood learning, and that adult attempts are futile. The facts tell a different story. Research confirms adults can acquire swimming skills just as effectively as younger students. The tired belief that "it's too late to start swimming" is just plain wrong. With proper guidance and consistent practice, your swimming ability can flourish at 18, 40, or even 70 years old. Rather than dwelling on perceived limitations, focus on what you can achieve. Countless seniors successfully overcome water fears and master swimming basics every year—definitive proof that age presents no real barrier to acquiring this essential skill. Set Swimming Goals That Make Sense Swimming isn't a skill you'll master overnight. The journey requires weeks or months of steady practice. Initially, progress might seem frustratingly slow—completely normal for adult learners. You won't swim full laps on day one, and might not even complete a stroke during early lessons. Creating meaningful, achievable goals provides direction and comfort throughout your swimming journey. As you hit new milestones, your confidence naturally grows. Try these approaches: - Focus on specific technique improvements rather than comparing yourself to others - Break larger swimming goals into smaller achievements - Remember that swimming competency develops through consistent practice Make your goals relevant to your personal swimming objectives. If you're learning primarily for safety and enjoyment, you don't need to focus on advanced racing techniques. Find Your Swimming Motivation Understanding why you want to swim significantly impacts your learning journey. Research shows people with personal motives—those who genuinely value swimming or consider it part of their identity—exercise more consistently than those motivated by external pressure or guilt. Your swimming motivation might include: - Acquiring a potentially life-saving skill - Experiencing unique health and fitness benefits - Participating in water activities with family and friends - Overcoming a longstanding fear - Learning something you can teach your children Most committed swimmers cite "enjoyment" and "challenge" as their primary motivations. Making a simple list of what you enjoy about swimming helps strengthen your commitment through challenging phases. Remember that motivation typically follows action rather than preceding it. Starting swimming lessons creates motivation that sustains your practice—you don't need to feel motivated before beginning. This explains why consistent practice gets easier with time—each small victory builds momentum for the next step. Overcome Water Fear and Build Swimming Confidence Nearly half of Americans experience water anxiety, with many feeling genuine terror when facing deep water. Conquering this fear marks your first crucial milestone as an adult swimmer. While water deserves respect, it shouldn't trigger panic that prevents you from enjoying swimming. Dealing With Water Anxiety Understanding your water fear's root cause provides the foundation for overcoming it. Your anxiety might stem from a childhood incident, limited exposure to swimming environments, or simply feeling out of control. Acknowledging these concerns openly, without judgment, diminishes their power over you. The physical impact of water-related trauma runs deep. One swimming student who survived a car accident would excessively brace her hands and forearms whenever feeling afraid in water. Our bodies physically store fear responses that require specific techniques to address. Professional instructors trained to work with adults provide invaluable support for this process. They create safe environments for expressing anxieties while offering personalized approaches based on your specific concerns. Many successful adult swimmers credit their progress to instructors who "never gave up" on them, providing alternative exercises when standard techniques proved challenging. Building Water Confidence Step by Step The most effective approach involves small, incremental steps that gradually increase your comfort level. Start with these foundational activities: - Begin in shallow water where you can stand comfortably - Practice controlled breathing both in and out of water - Use flotation devices like kickboards for additional support - Gradually work toward submersion by first splashing your face, then blowing bubbles Never force yourself beyond your current comfort zone. Each person progresses at their own pace, especially when addressing deeply-held fears. A structured approach might begin with sitting at the pool's edge, then standing in shallow water, gradually walking around, and eventually attempting to float. For many adult beginners, recontextualizing thoughts about water safety helps tremendously. When fearful thoughts arise, remind yourself of all the instances when people swim safely. Practice deep breathing techniques—inhale for four seconds, hold for two, exhale for four—to manage anxiety when it surfaces. Celebrate Every Swimming Victory Every step toward water confidence deserves acknowledgment, no matter how small it might appear. Recognizing improvements in efficiency, such as lower stroke counts or increased distance per stroke, provides tangible evidence of your progress. One adult learner shares: "I can actually swim freestyle now, do an elementary backstroke, and a beginning breaststroke. More important, I feel comfortable in a swimming pool. I still have a ways to go, but I started at zero, not wanting to even step in the water, much less get my face wet!" This journey transforms more than just swimming ability. Many adults find that conquering water fear impacts other life areas. As another learner noted: "I used to 'fear' each birthday as I get older. I only now want to get stronger, faster, and look forward to new experiences." This renewed confidence often extends beyond the pool, creating positive ripple effects throughout your life. Learn Core Swimming Skills Step-by-Step Did you know less than half of Americans can perform all five basic water safety skills that could save their life? Mastering fundamental swimming techniques forms the cornerstone of adult swim learning. By focusing on these core competencies one at a time, you'll build both confidence and proficiency in the water. Master Breathing Technique First Proper breathing technique stands as perhaps the most crucial swim skill everyone needs to survive in water. Start by taking a deep breath and gently putting your face in the water. Once submerged, blow bubbles slowly through both your mouth and nose. This simple exercise acclimates you to exhaling underwater—a fundamental swimming technique. For structured practice: - Stand in chest-deep water facing the pool wall with hands on the edge - Bend at the waist, breathe in, and place your face in water - Slowly but forcefully exhale through mouth and nose - Tilt your head to one side as you exhale toward the surface - When your mouth emerges, inhale - Repeat, alternating sides With most swimming strokes, you'll breathe out when your head is underwater, then lift to take a quick breath before submerging again. Learning to time your breaths with strokes prevents exhaustion and enables coordinated movements. Perfect Your Body Position in Water Before advancing to swimming techniques, understanding buoyancy proves essential. Your lungs function as the fulcrum that holds you up in water, creating the foundation for proper alignment from head to toe. Think of your body as a seesaw with your lungs not positioned at center—there's more mass (hips and legs) on one end. To achieve horizontal alignment, press your head and chest down while creating tension in your lower back to lift your hips and legs. For back floating, take a deep inhale before starting—filling your lungs increases buoyancy and positions you higher in the water. Keep your entire body aligned with legs, hips, torso, arms, and head on the same level. Similarly, front floating (prone position) teaches balance and control. This skill forms the foundation for strokes like freestyle and butterfly, where maintaining a streamlined horizontal position creates efficient swimming. Develop Effective Kicking and Arm Movements The flutter kick—an alternating leg movement performed with relatively straight legs—serves as the glue that holds your stroke together. It maintains body position by keeping hips up, assists in rotating your body side-to-side, and contributes to propulsion. Common mistakes include: - Initiating kicks with bent knees instead of hips - Bringing feet out of water (creating splash but no propulsion) - Kicking without coordinating with stroke rhythm Practice by holding the pool side or using a kickboard while keeping your upper body above water. The kick should originate from your hips with legs straight and close together, toes pointed. As your kicking improves, you'll find it easier to incorporate coordinated arm movements for complete swimming strokes. Remember that effective swimming is about efficiency—with proper technique, you'll move farther with less effort. Practice Swimming with Purpose and Consistency Consistent practice stands as the cornerstone of swimming success for adults. Without regular water sessions, newly acquired skills fade quickly, undoing progress and extending your learning timeline. Finding Your Ideal Practice Schedule For beginning adult swimmers, aim to swim 2 to 3 times per week. This frequency optimally balances learning and recovery, giving your body sufficient time to adapt while reinforcing skills through regular practice. Single weekly sessions often prove inadequate, essentially forcing you to start over each time you enter the water. As your abilities improve, consider this progression: - One session weekly: Progress will be minimal, with skills potentially regressing between sessions - Two sessions: Maintains basic skills but limits breakthrough progress - Three sessions: Maintains decent fitness with potential for improvement - Four sessions: Opens significant potential for advancement - Five to seven sessions: Appropriate for advanced swimmers, though some should focus on technique rather than intensity Remember that swimming is highly technique-oriented—each day away from the pool often reinforces old habits rather than new skills. Drills That Improve Your Swimming Drills serve as powerful tools for isolating specific aspects of your stroke mechanics. To maximize their effectiveness: - Balance drills with regular swimming to transfer improvements to your normal stroke - Try "swim golf" by counting strokes per length to measure efficiency improvements - Alternate between slow, technique-focused drills and performing the same movements at speed - Seek feedback from coaches or through video analysis to ensure proper execution Ideally, beginners should divide pool time between drills and swimming, starting with approximately 75% drills and gradually increasing swim time as technique improves. Measuring Your Swimming Progress Monitoring improvement provides motivation and guidance for future practice. Effective tracking methods include: - Maintaining a detailed swim log recording distances, drills, times, and perceived effort - Setting specific, measurable goals focusing on technique rather than just distance - Conducting periodic self-assessments or formal evaluations with an instructor - Recording videos to analyze stroke mechanics and identify areas for improvement Review your logs weekly to identify patterns and measure progress across metrics like stroke efficiency, measured by combining stroke rate with distance per stroke. Ultimately, consistency creates momentum—each small victory builds confidence for continued growth throughout your adult swimming journey. Join a Supportive Swimming Environment Did you know that approximately 40% of people drop out of swim classes shortly after starting, compared to just 6% of those who participate with a friend? Finding the right learning environment proves crucial for long-term swimming success. Why Private Swim Lessons Work for Adults Private swimming lessons offer personalized attention that can transform your learning experience. In these one-on-one sessions, your instructor focuses entirely on your specific needs, adapting instruction to address your unique challenges. Unlike group settings, private lessons allow: - Immediate technique correction without waiting for turns - Customized lesson plans that evolve with your progress - Accelerated learning (often 2x faster than group settings) - Flexible scheduling options that accommodate your calendar Additionally, private lessons provide a supportive, non-judgmental environment where you can build confidence without feeling self-conscious. This personalized approach particularly benefits adults with water anxiety or past negative experiences. Finding the Right Adult Swim Program The American Red Cross offers structured adult swim programs through their learn-at-your-own-pace system, with three distinct levels designed specifically for adult learners. When searching for lessons, look for programs that: - Employ certified Water Safety Instructors - Allow progression at your personal pace - Include water safety education alongside technique - Offer small class sizes for adequate attention Primarily, select an environment where you feel comfortable. Station-based programs prove particularly effective as they allow you to "celebrate your achievements often enough that it provides encouragement." Connect With Fellow Adult Swimmers Joining adult swim clubs or communities creates accountability while combating isolation. These groups offer structured environments catering to various skill levels plus valuable peer learning opportunities. Likewise, online resources supplement in-person instruction. Many platforms provide technique videos, workout plans, and virtual communities where you can connect with fellow adult swimmers facing similar challenges. Remember that swimming with others significantly increases commitment—research demonstrates that people who participate with friends stay engaged longer and push each other to work harder. Seeking out supportive swim environments transforms swimming from a solitary activity into a fulfilling social experience. Your Adult Swimming Journey Starts Now Learning to swim as an adult represents a journey of personal growth far beyond simply mastering a new skill. Your ability to learn swimming remains intact regardless of age. The key factors determining your success include addressing underlying fears, practicing core techniques regularly, and maintaining 2-3 weekly sessions for optimal progress. Many adults who once believed swimming was beyond their reach now enjoy water activities with confidence and joy. Most importantly, recognize that swimming proficiency develops gradually. Each small achievement—from your first successful breath control exercise to your first complete lap—deserves celebration. These victories build upon each other, creating momentum that carries you forward. Swimming offers benefits extending far beyond water safety—though that alone justifies the effort. Physical fitness, stress reduction, and newfound social opportunities await as you progress. Additionally, many adult swimmers report increased confidence in other life areas after conquering their water anxiety. Whether you choose private instruction, group classes, or a combination approach, finding the right supportive environment significantly impacts your swimming journey. The path requires patience and persistence, but the rewards—both expected and unexpected—make every moment worthwhile. Ready to take the plunge? Your future swimming self will thank you. FAQs Q1. How long does it typically take for an adult to learn how to swim? For most adults, it takes about 20-25 hours of private lessons to gain basic swimming skills. However, the exact time can vary depending on individual factors such as comfort level in water and practice frequency. Q2. What should I expect in my first adult swimming lesson? Your first lesson will likely focus on getting comfortable in the water. You'll start in the shallow end, practice walking around, blowing bubbles, and learning basic techniques using flotation devices for support. Q3. How often should adult beginners practice swimming? For optimal progress, adult beginners should aim to practice swimming 2 to 3 times per week. This frequency allows for skill reinforcement while providing adequate recovery time between sessions. Q4. What are some effective ways to overcome fear of water as an adult? To overcome water fear, start with gradual exposure techniques in shallow water. Practice controlled breathing, use flotation devices for support, and work with a trained instructor who can provide personalized strategies for building confidence. Q5. Are private swimming lessons worth it for adults? Yes, private swimming lessons can be highly beneficial for adults. They offer personalized attention, customized lesson plans, and a supportive environment to build confidence. Private lessons often lead to faster progress compared to group settings. Read the full article
0 notes
Text
You’ll find a wealth of running articles and tailored programs designed to help you become a stronger, more efficient runner. Read the full article
0 notes