
A blog about technology in general and nonprofit technology in particular - musings, stories, tutorials, and links. Written by Jason Samuels, an IT professional working in the nonprofit sector. Any opinions stated here are my own.
Don't wanna be here? Send us removal request.
Statistics
We looked inside some of the posts by thoughtsontechnology and here's what we found interesting.
Average Info
Notes Per Post
2
Likes Per Post
2
Reblog Per Post
0
Reply Per Post
0
Time Between Posts
5 months
Number of Posts By Type
Text
17
Last Seen Tumblr Blogs


Fun Fact
There are dozens of funny blogs to kill time on Tumblr.
Text
Blackthorn Events for Salesforce how-to: build a screen flow to upload and manage attendee groups
My last blog post was about implementing a CSV import feature. This blog post documents utilizing that screen flow feature to facilitate attendee group management for Blackthorn Events.
The scenario is an events center that uses Blackthorn Events and Salesforce for their day-to-day operations. Most of their event registrations are processed in their own system, but some events they host are run by partner organizations who handle attendee registration independently. In those cases the partner organization sends the event center a list of registered attendees to upload, and the event center later issues one large invoice to the partner org for attendee lodging and other charges.
Administering these attendee groups and invoicing them back to the partner organization has been difficult, and we are on a path to improve this. The Blackthorn Events data model contains an attendee group object which it automatically utilizes when multiple people are registered in a single web transaction. That object provided a nice starting point to extend to more robust attendee group management functionality.
This was a technically challenging project that turned out to be the most complex thing I've yet built with Salesforce Flow Builder. The resulting Flow leverages brand new features and overcomes difficulties of working with a managed package's objects. Note that custom automations are specifically outside of the scope of Blackthorn support, so they cannot assist if you decide to leverage this in another Blackthorn org. The tricks and lessons in this post should be applicable to other non-Blackthorn use cases as well.
A reason why it's important to note all that up front is because before building this Flow, I questioned whether it was a good idea to build. Our consulting team inherited a client environment where the existing attendee import process was to use the data import wizard to upload a list of Attendee records with a custom field called Imported Attendee marked TRUE. That boolean value activated a record-triggered flow which would create the Attendee's associated Line Item, Invoice, and Transaction records.
That system fell short largely because of the governor limit errors that staff regularly encountered. It was initially my opinion that we'd be better off improving the existing system's efficiency and implementing Apsona as a better pre-built upload tool with batch size control to mitigate the governor limit errors. But my opinion changed when I saw the added value in how a Flow could accomplish tying together the attendee group upload, group deposit, and group payoff processes. In other words it made sense to do once it addressed a larger business process need than just the upload function.
An early build paired those three functions, but still relied on a CSV upload targeting the Attendee object to salvage the existing record-triggered Flow. That actually did work but only with the batch size set to 2 and there's a 30+ second wait between batches. That poor performance was the deal-breaker which brought me around to deprecating the record-triggered flow and rebuilding its functionality within the screen flow.
The core performance issue in the record-triggered flow was that it chained together multiple write operations on managed package objects. Each of those objects trigger some rollups and other custom automation that we know about. And each of those objects also trigger some Apex code that we don't have any visibility into. But the cumulative impact of it all counts towards the flow interview limits. And I don't think Salesforce bulkifies downstream write operations which are initiated when a record-triggered flow is invoked multiple times by a bulkified write of a collection of new records.
So I took on rebuilding the record-triggered flow functionality within this screen flow, staging each object (attendee, invoice, and line item) within a collection to bulkify the database writes for better performance, and utilizing batch sizes and pause screens throughout to stay within limits. I created a custom object to target the upload to, designed the system to write related object IDs back to the custom object record to track upload progress, and built an additional branch of functionality to resume an upload using those records if needed.
Screen flow user experience
Before diving deep into how the flow is built, here's a tour of what the screen flow does and how it works for the person running it. I like to think that the simplicity of this interface belies the complexity going on behind it.
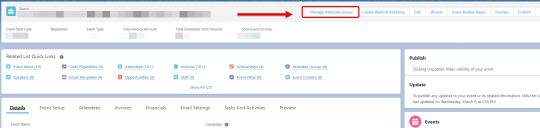
The screen flow is designed to launch from a button on the Event screen, which also passes the Event ID into a parameter.
The flow first executes a lookup for an existing attendee group. In our use case we are only ever expecting to manage one corporate group per event, so if a group is found then it is selected. If no group is found, then the user is prompted to input an Account ID to create a new group. When a new group is created, a group invoice is initialized.

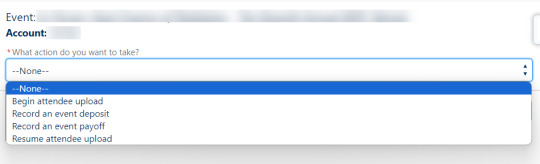
The four actions that the user can take are all connected back to selected attendee group or main invoice:
Begin attendee upload
Resume attendee upload
Record group deposit
Record group payoff
Begin attendee upload
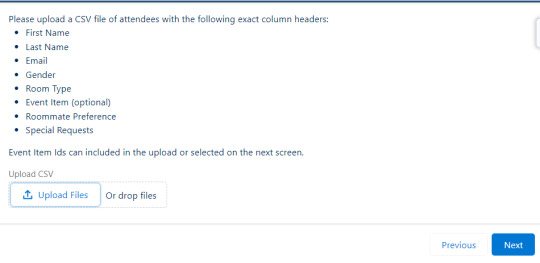
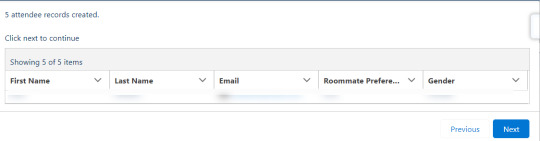
When a user selects Begin attendee upload they are first presented with a screen detailing the exact column headers that need to be in the CSV file.
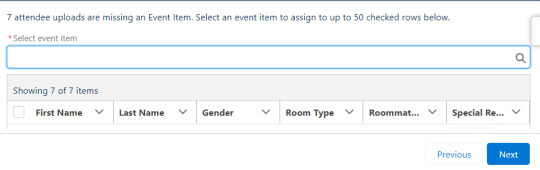
The user uploads their CSV file and the next screen shows a preview of records in the file. The file may contain an Event Item ID column, but if that's not included then rows which need an event item assigned are displayed along with a dropdown menu to select an event item to assign them.
After all rows have an event item assigned, then the user selects the batch size to proceed with creating attendees end clicks next.

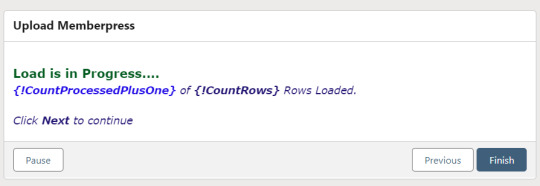
If the number of rows in the file exceeds the batch size then a pause screen will appear informing the user of the number of records created and prompting them to click next to continue. This will continue until the batch size is complete.
After this process is completed for attendees, it's repeated for invoices and then for line items.

Resume attendee upload
If an attendee upload is interrupted for any reason, it might result in a situation where some attendees were created with invoices but no line items, or attendees with no invoices at all, or a batch where some attendees were created and others weren't. All of those scenarios would be bad, so there is a resume attendee upload feature.
When a user selects Resume attendee upload, the flow queries for any attendee upload temp objects which are missing a corresponding attendee, invoice, or line item object. If any are found, then those records are loaded into the begin upload branch of the flow to finish processing them.

Record group deposit
Group deposits are pretty straightforward. When the user selects Record a group deposit, they are taken to a screen prompting them to record the amount of the deposit, a deposit memo, and indicate whether the deposit was paid or needs to be invoiced.
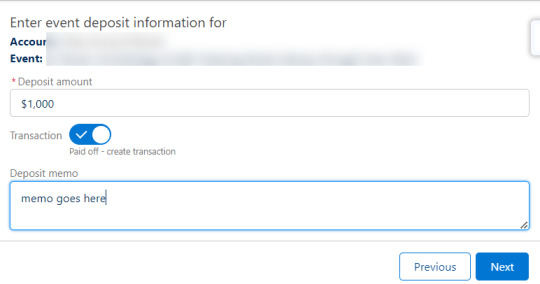
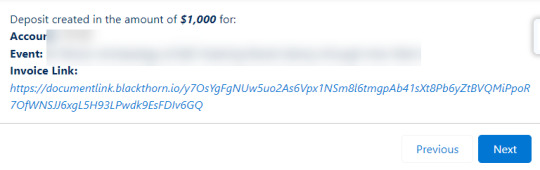
After clicking Next to continue, the flow creates an event item for the deposit then a line item attached to the invoice. If the user indicates that the deposit was paid, then the flow also creates a transaction. If the deposit was not paid then the invoice link displayed on screen can be sent to facilitate paying by credit card.
Record group payoff
Group payoffs are recorded after the event takes place, when the organization is ready to generate a final invoice for the group.
On the first screen in this interface the user is prompted to select any available deposits and attendees in the group that they would like to apply or transfer to the main invoice. A batch size selector allows for controlling the number of credits/charges to transfer in each batch.

For any deposits that are selected, the flow reverses the line item on the main invoice. It's honestly a little bit awkward that there is a line item for the deposit amount in the first place, given that it shouldn't be recognized as a charge - just as a payment credited towards their eventual final balance. But it's necessary create a deposit line item for the deposit amount in order to support invoicing deposits via Documentlink. So we set a line item for the deposit amount, back that line item out at the point when it's applied, and have our rollups at the event level set to make sure deposit line charges are excluded from invoice totals where that's necessary.
For all attendee line items that the user selects, a loop sends each one through a subflow that reverses each line item on their respective invoices and tabulates the total amount of attendee charges that needs to get added to the main group invoice.
When that process completes, the user is presented with a screen showing the total amount of attendee charges to be added, and is prompted to add the total amount of any miscellaneous charges (typically audiovisual and catering) to the invoice.

After clicking Next, the total amount due of the invoice is shown on screen, and the user is prompted to enter a payoff memo along with the total amount being collected and any amount being written off.

Screen flow architecture
This screen flow has a lot going on, and it's a little bit intimidating when you pull back and look at the whole thing. It isn't as bad as it looks though, much of this is repetitive, and I'll break it down piece-by-piece.
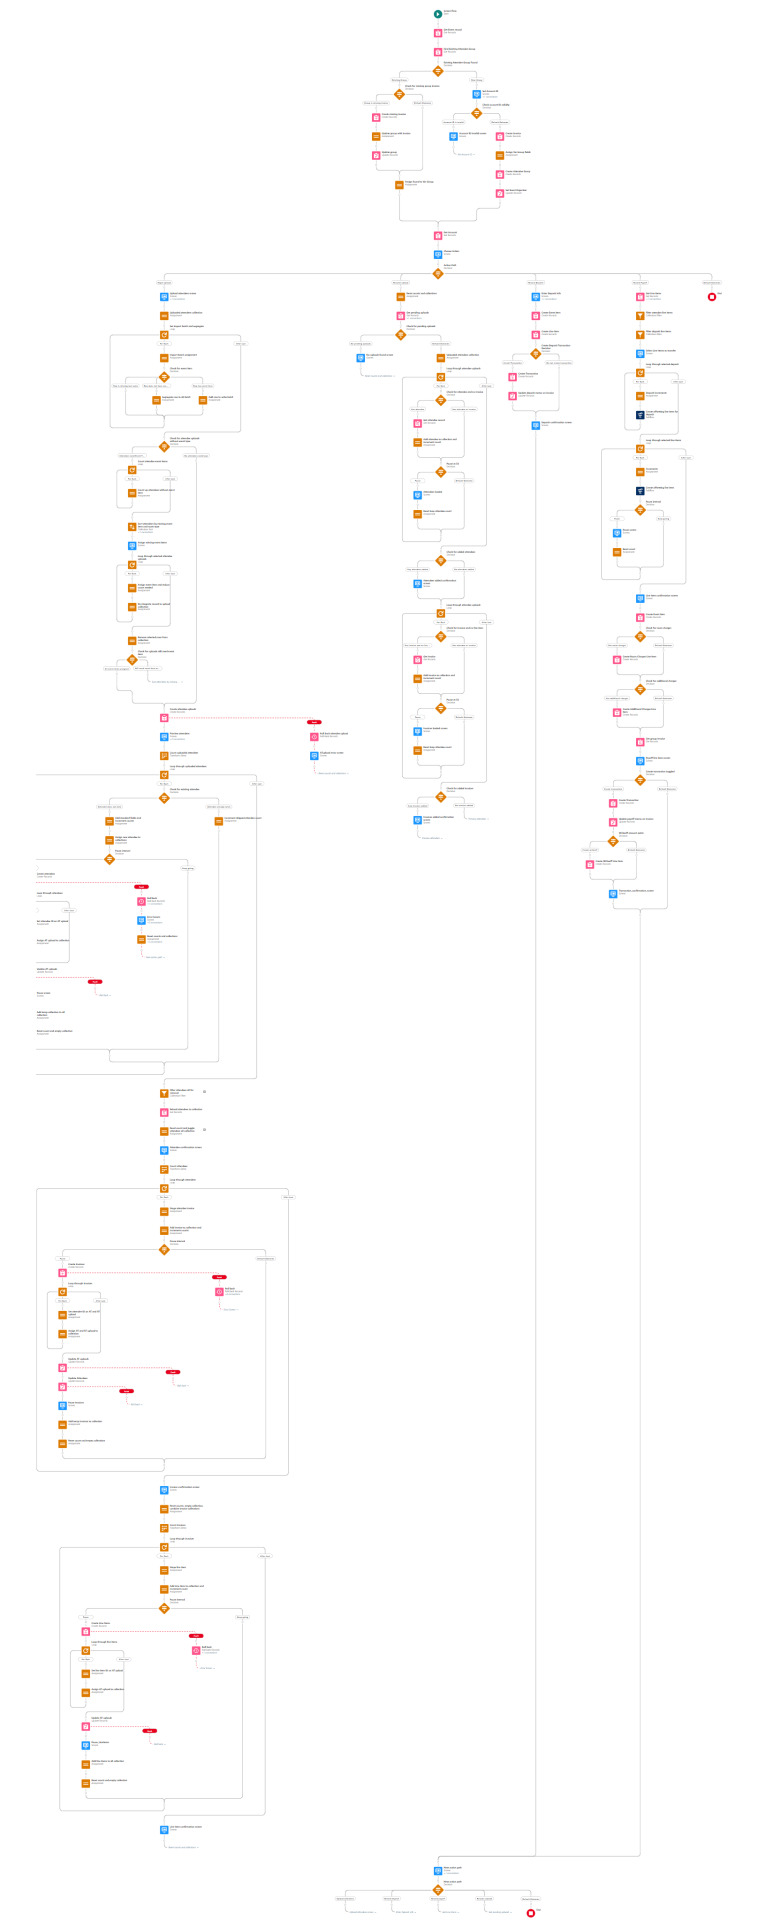
Flow intro
The first part of this flow loads in the Event record using the ID passed into the flow, then searches for an existing attendee group associated with the event.
If a group is found then it makes sure the group has a main group invoice (initializing one if missing) then assigns this group to the Var Group variable used later in the flow.
If no group is found, then the user is prompted to input an Account ID to create a new group. A validation check ensures that an 18 digit string starting with "001" was entered, then it creates a main group invoice billed to that account, sets the invoice on the Var Group variable, and writes that variable to the database.
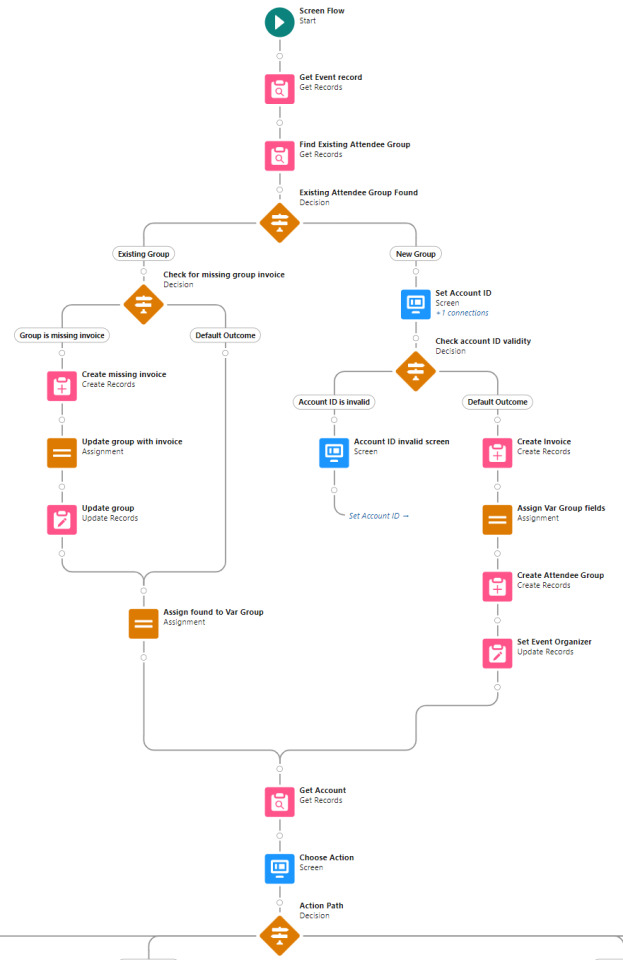
With these initial steps completed, the user is then presented with four options:
Begin attendee upload
Resume attendee upload
Record group deposit
Record group payoff
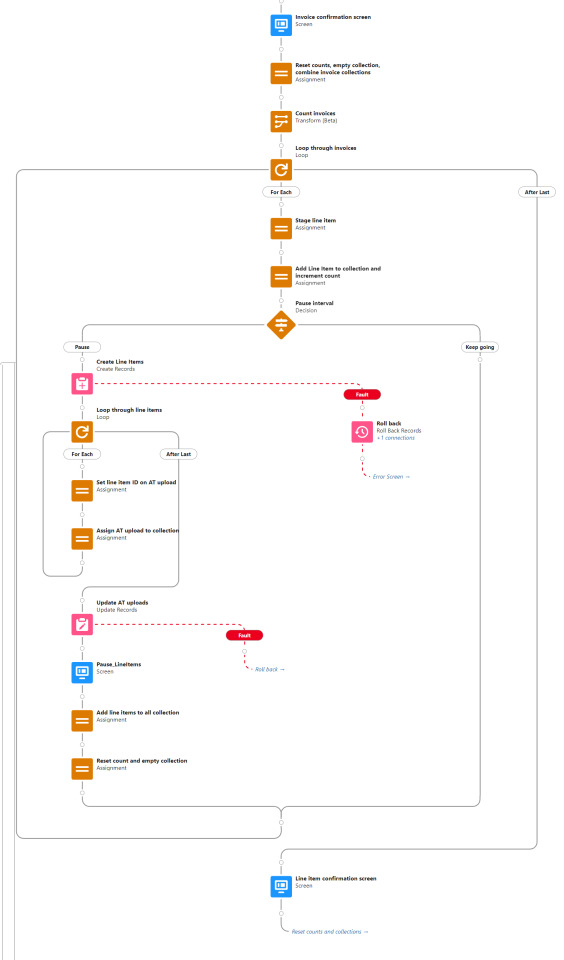
Begin attendee upload
A custom object called Attendee Uploads is employed. When the user uploads a CSV file, that custom object is targeted. The uploaded records are assigned to an Uploaded attendees collection and that collection is looped through.
Each row is assigned the Event ID and the flow start timestamp is set as a batch identifier. Then the row is evaluated to determine if it has or needs an Event Item ID. Rows that do and do not need an Event ID are assigned to separate collections. This decision step also looks for the absence of the Last Name field, which if found is taken as evidence of a blank row that is filtered out and not assigned to any collection.

The next steps deal with assigning missing Event Item IDs. A Record Choice Set serves a dropdown of all of the valid event item types for the event. The user is prompted to choose an item, select the rows to apply it to, then repeat until all rows have an Event Item ID assigned. If all rows already have an Event Item ID, then these steps are skipped and the Attendee Upload objects are written to the database.
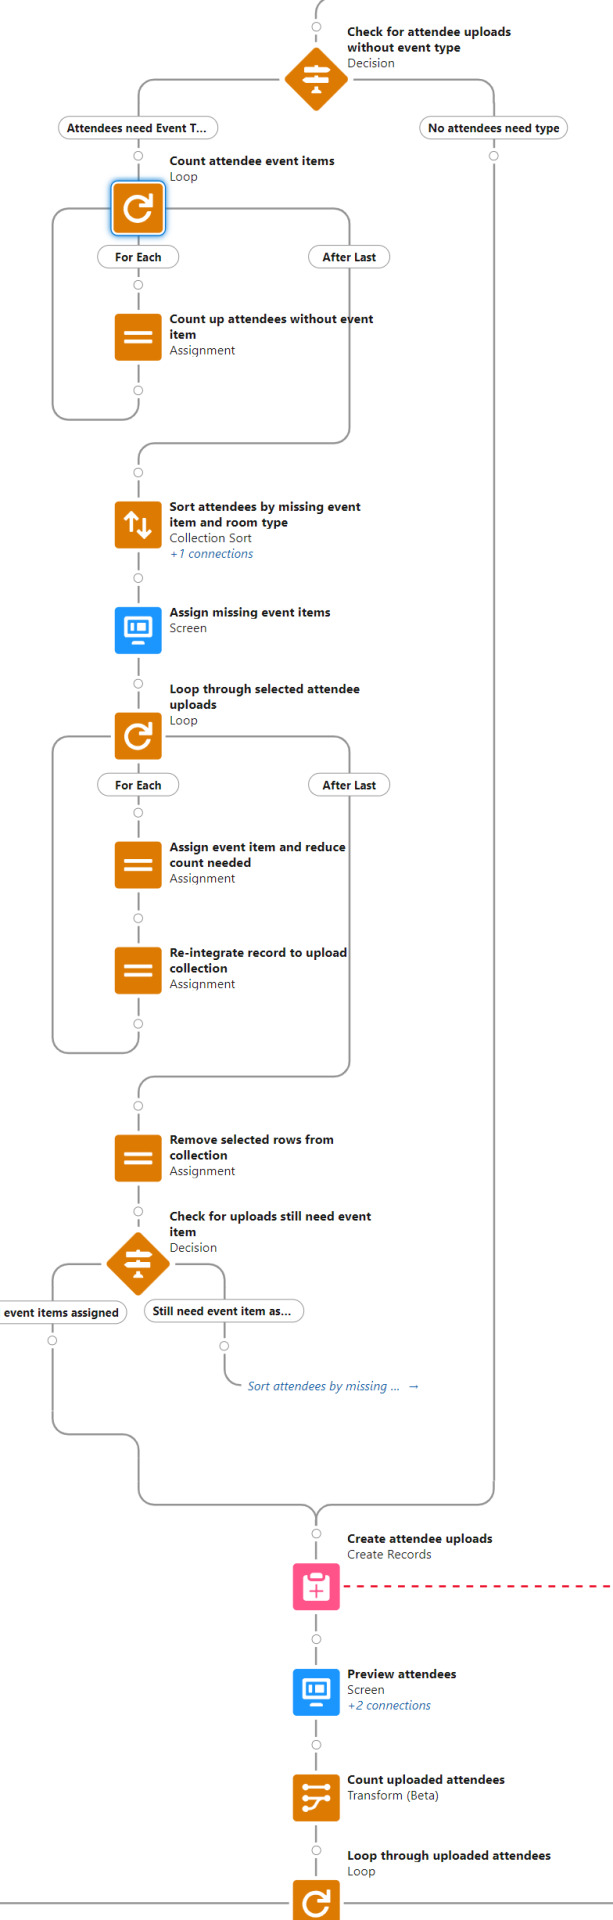
Now that the attendee uploads are in, the flow proceeds to looping through them. The first decision, which evaluates if an attendee is already associated with the upload row, only applies to resumed uploads. No attendees already exist for new uploads, so the attendee record fields are assigned in the following step and the staged attendee record is then assigned to the collection.
At this point there's a Pause Interval decision. This is where the flow evaluates if either the batch interval or the end of the batch has been reached. If it's time to pause, then a pause screen is displayed which commits the flow interview (writing attendee records in the collection to the database), the user clicks Next to continue, then the loop proceeds to staging further attendee records until either the next pause or the end of the batch. A second loop and write operation then loops through the new attendee records to stage an update batch to write attendee IDs back to the Attendee Upload records which created them, then update those Attendee Upload records in the database.
While useful for mitigating governor limits, there are drawbacks to saving work to the database mid-operation. If an error occurs or if the user simply navigates away from the flow prior to completion, the dataset they're uploading could be left in an inconsistent state. For that reason, each step where the attendees, invoices, and line items are committed to the database is accompanied by a step that updates the AT upload objects with those new IDs, and both of these write operations happen within the same flow interview with a roll back function included to help ensure the IDs tracked on the Attendee Upload object remain accurate in case an error occurs.
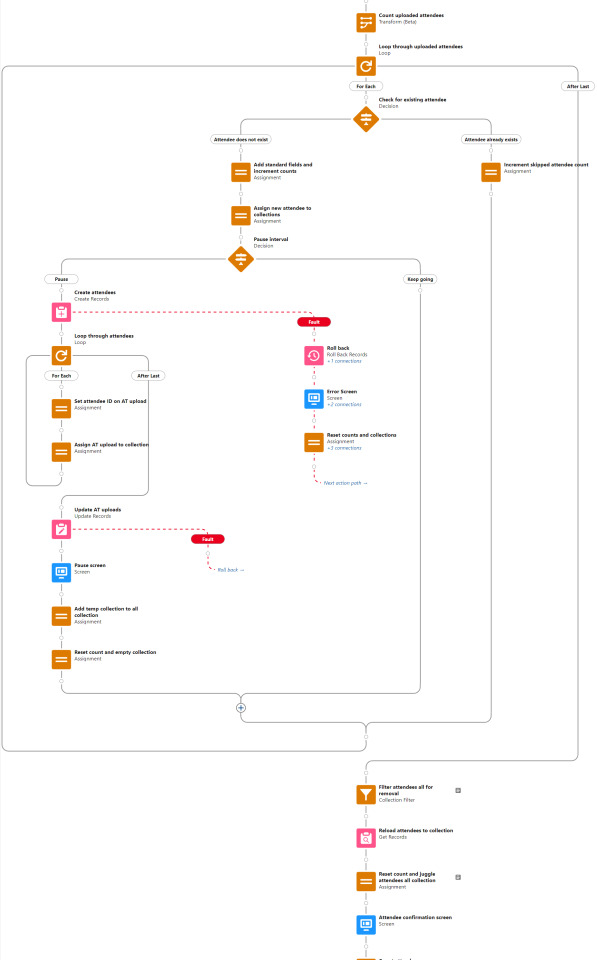
After the attendee creation loop is completed, there's a little bit of collection juggling done before moving on. The attendee record creation was bulkified by batching them into a collection and processing a single write operation. That's a vital practice for flow performance, but comes with the wrinkle that the newly created object IDs aren't immediately available in the flow the same way they are when objects are created individually. I get around that by using the batch identifier to empty the records out of the collection and then query the newly created records in order to reload them into the collection. It's also a nice trick for being able to reference the contact or account record that Blackthorn links with the attendee record after save.
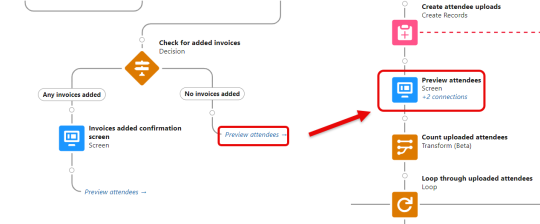
The remainder of this branch pretty much repeats the process from attendee creation - the attendees are looped through to create invoices for them, then the invoices are looped through to create line items. At the end of it, the user is returned to the menu asking what they'd like to do next.
Resume upload
The resume upload function exists to ensure that all attendee uploads are complete and accounted for. The first step searches for any pending uploads - attendee upload records where the event ID matches and the related ID either attendee, invoice, or line item is null. If none are found, the user is simply returned to the menu. If any are found, they are looped through twice.
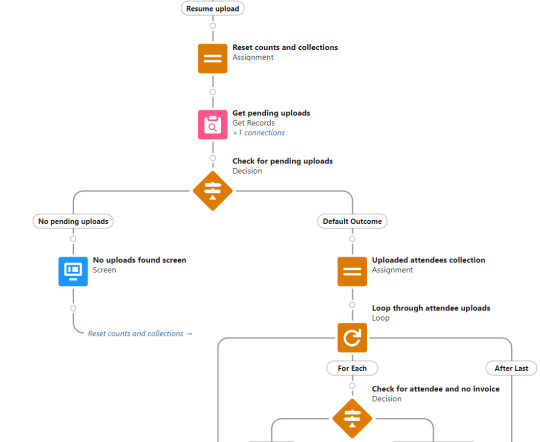
The first loop evaluates if the object has a related attendee but no related invoice, and for each of those records it gets the attendee record and adds it to a collection. A pause interval of 50 is built in.
The second loop evaluates if the object has a related invoice but no related line item, and for each of those records it gets the invoice record and adds it to a collection. A pause interval of 50 is built in.
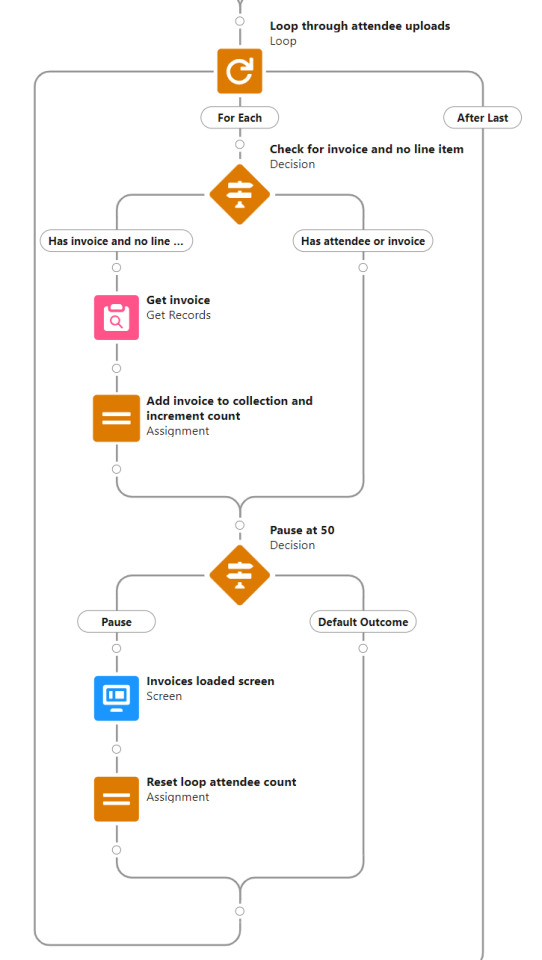
Those two loops exist to patch in related object IDs to the same collections used in the Begin attendee upload branch, before incomplete attendee upload objects are passed to the Preview attendees step in the Begin upload branch. The rest of the workflow for completing an upload is identical to a new upload as the flow proceeds through the new upload branch.
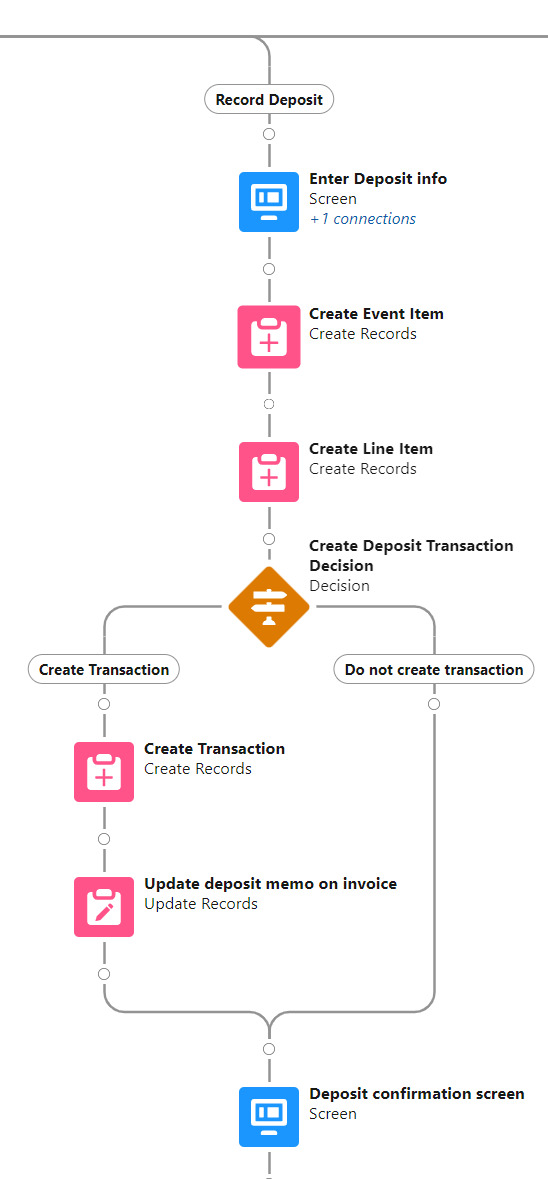
Record group deposit
Record Deposit is the shortest and simplest branch of this flow. The user is presented with a screen where deposit information is entered, the flow then creates an event item, a line item (on the group invoice), and optionally a transaction record and note on the invoice. The user is then shown a confirmation screen and taken back to the menu.
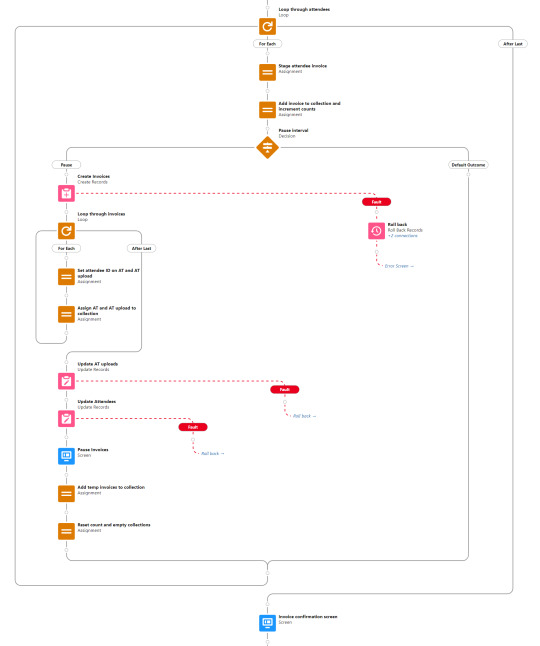
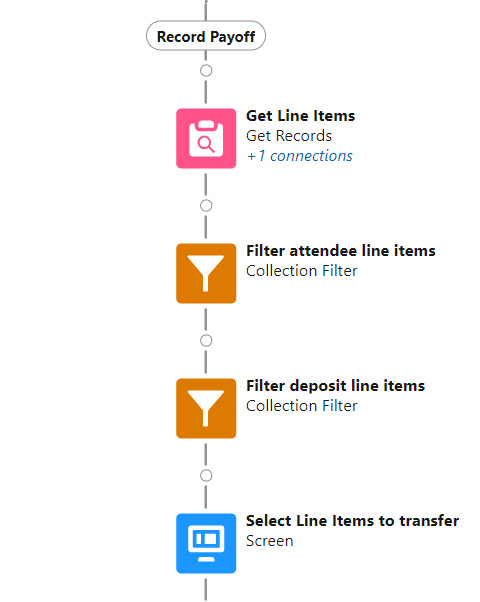
Record group payoff
The Record Payoff branch ties it all together at the conclusion of an event. The first step in this branch is a query that loads in all line items associated with the attendee group. Collection filters are then applied to parse those line item records out to a deposit collection and an attendee lines collection. A screen is then presented to the user enabling them to select which of those records to proceed with.
Selected objects from each of the filtered collections are then looped through independently. In both cases a Subflow is invoked which creates an offsetting line item to effectively zero out the charge. The difference between the loops is that the deposit loop sums up the amount to display as a credit, whereas the attendee lines are tabulated to sum up a new line item amount to be added to the group invoice.

The user is then presented with a confirmation screen that states the number of line items charges transferred, the sum of those line item charges, and the deposit amount applied. A fill-in field allows the user to input additional charges (audiovisual, catering, etc.).
When the user clicks Next, the flow creates an event item and line item for the room charges, then an event item and line item for the additional charges.
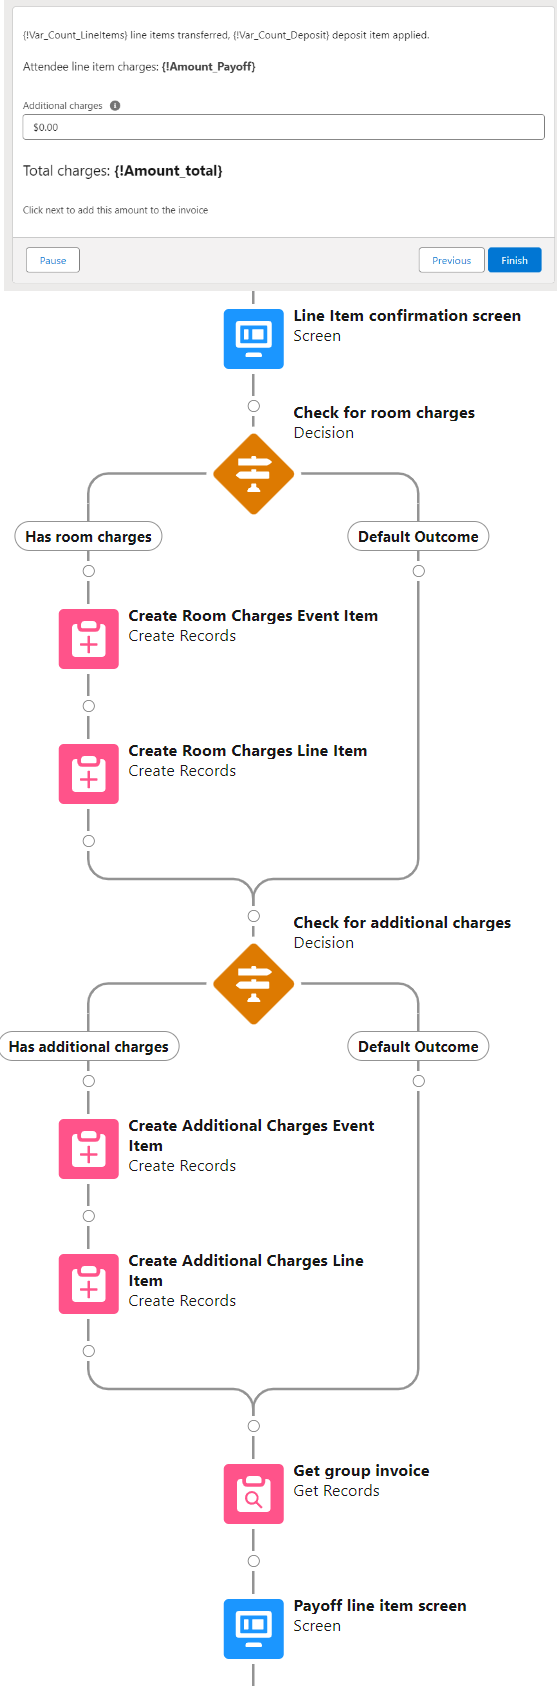
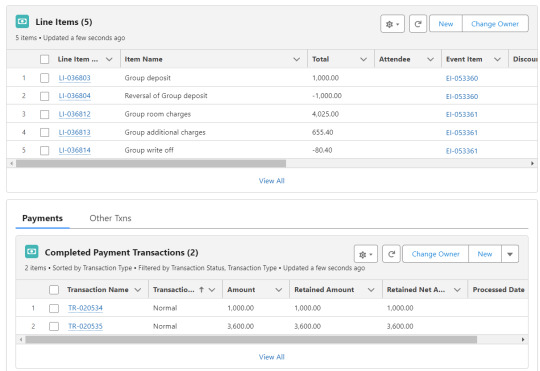
Finally, the Payoff line item screen displays the total charges on the invoice minus the deposit to arrive at an invoice total due. The flow may be ended here and the Documentlink invoice link sent to collect payment. Or if payment was already submitted, then the user may toggle on Create payoff transaction and additional fields are exposed to input the payment amount, payoff memo, and writeoff amount (if applicable).
When the user clicks Next then the flow either completes if no payment was entered, or creates the payoff transaction, updates the invoice with the memo, and creates a writeoff transaction if applicable.
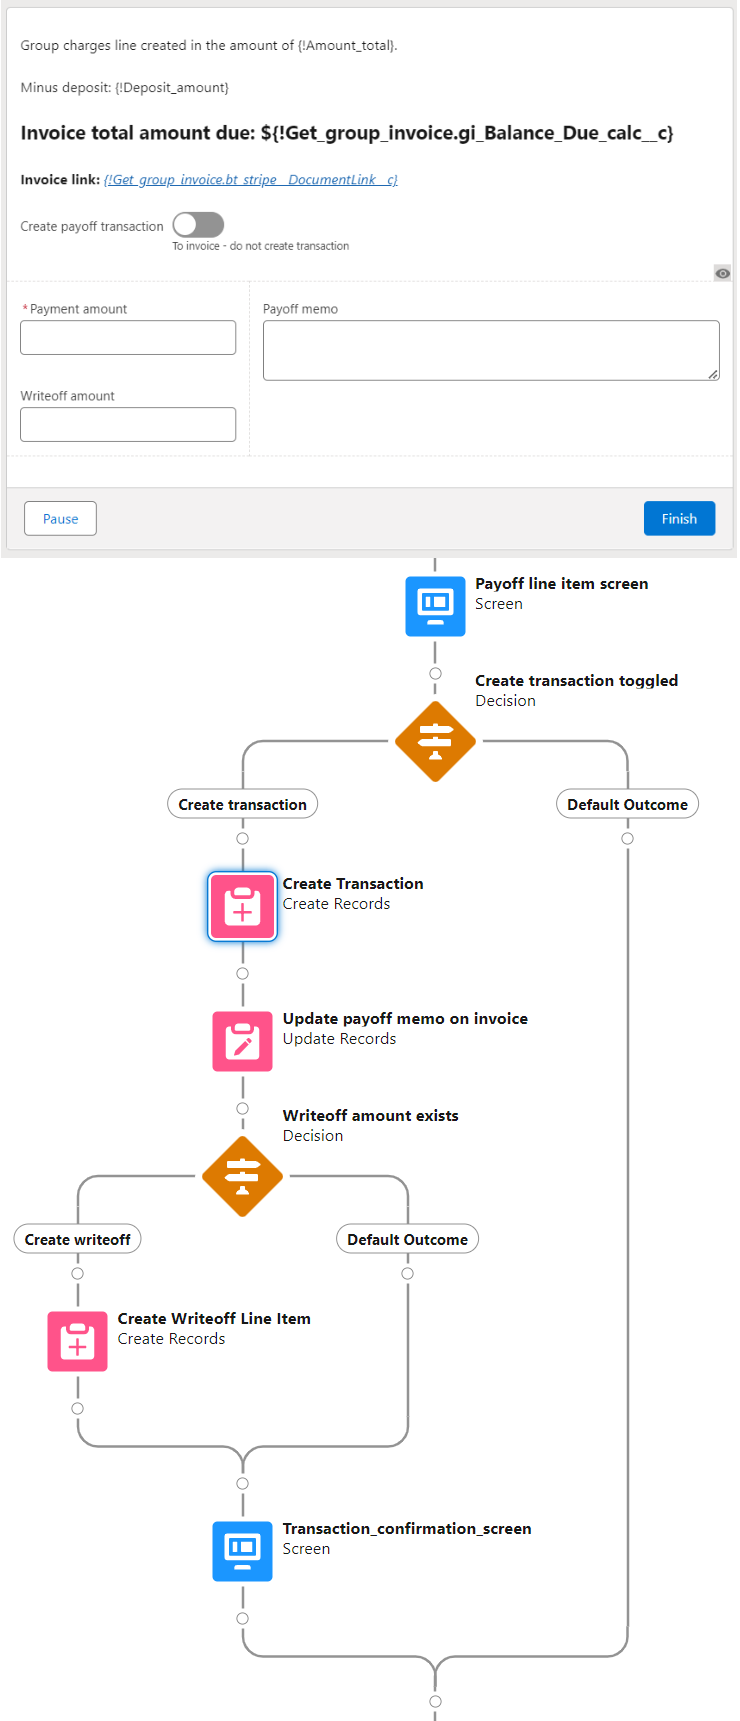
When this is all done the main group invoice contains multiple line items for attendee room charges, additional charges, group deposit, and writeoff amount. Transactions for the deposit and payoff are applied against these charges.
0 notes
Text
Enabling CSV data uploads via a Salesforce Screen Flow
This is a tutorial for how to build a Salesforce Screen Flow that leverages this CSV to records lightning web component to facilitate importing data from another system via an export-import process.
My colleague Molly Mangan developed the plan for deploying this to handle nonprofit organization CRM import operations, and she delegated a client buildout to me. I’ve built a few iterations since.
I prefer utilizing a custom object as the import target for this Flow. You can choose to upload data to any standard or custom object, but an important caveat with the upload LWC component is that the column headers in the uploaded CSV file have to match the API names of corresponding fields on the object. Using a custom object enables creating field names that exactly match what comes out of the upstream system. My goal is to enable a user process that requires zero edits, just simply download a file from one system and upload it to another.
The logic can be as sophisticated as you need. The following is a relatively simple example built to transfer data from Memberpress to Salesforce. It enables users to upload a list that the Flow then parses to find or create matching contacts.
Flow walkthrough
To build this Flow, you have to first install the UnofficialSF package and build your custom object.
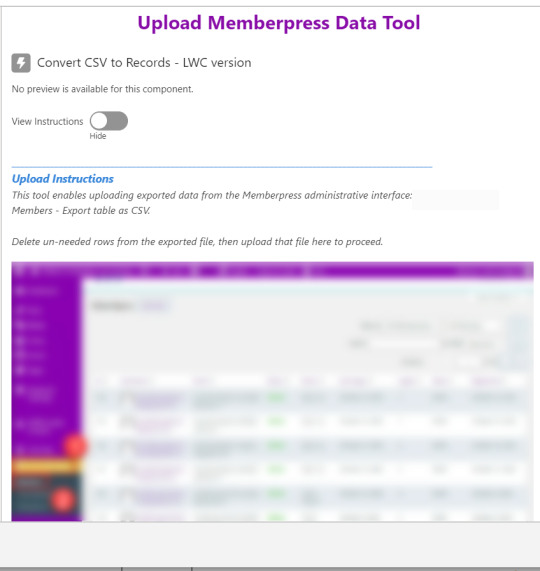
The Welcome screen greets users with a simple interface inviting them to upload a file or view instructions.

Toggling on the instructions exposes a text block with a screenshot that illustrates where to click in Memberpress to download the member file.
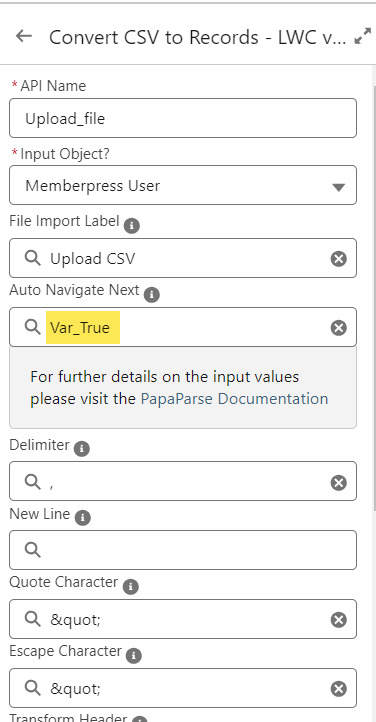
Note that the LWC component’s Auto Navigate Next option utilizes a Constant called Var_True, which is set to the Boolean value True. It’s a known issue that just typing in “True” doesn’t work here. With this setting enabled, a user is automatically advanced to the next screen upon uploading their file.
On the screen following the file upload, a Data Table component shows a preview of up to 1,500 records from the uploaded CSV file. After the user confirms that the data looks right, they click Next to continue.

Before entering the first loop, there’s an Assignment step to set the CountRows variable.

Here’s how the Flow looks so far..

With the CSV data now uploaded and confirmed, it’s time to start looping through the rows.
Because I’ve learned that a CSV file can sometimes unintentionally include some problematic blank rows, the first step after starting the loop is to check for a blank value in a required field. If username is null then the row is blank and it skips to the next row.

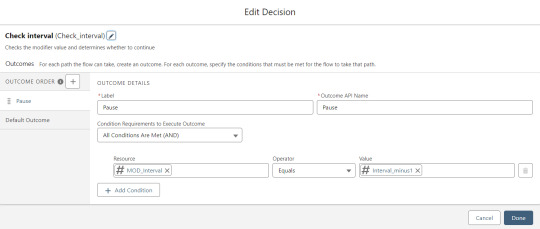
The next step is another decision which implements a neat trick that Molly devised. Each of our CSV rows will need to query the database and might need to write to the database, but the SOQL 100 governor limit seriously constrains how many can be processed at one time. Adding a pause to the Flow by displaying another screen to the user causes the transaction in progress to get committed and governor limits are reset. There’s a downside that your user will need to click Next to continue every 20 or 50 or so rows. It’s better than needing to instruct them to limit their upload size to no more than that number.

With those first two checks done, the Flow queries the Memberpress object looking for a matching User ID. If a match is found, the record has been uploaded before. The only possible change we’re worried about for existing records is the Memberships field, so that field gets updated on the record in the database. The Count_UsersFound variable is also incremented.

On the other side of the decision, if no Memberpress User record match is found then we go down the path of creating a new record, which starts with determining if there’s an existing Contact. A simple match on email address is queried, and Contact duplicate detection rules have been set to only Report (not Alert). If Alert is enabled and a duplicate matching rule gets triggered, then the Screen Flow will hit an error and stop.

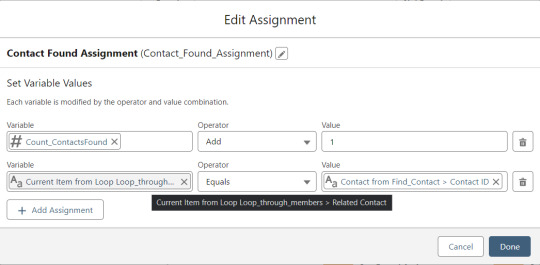
If an existing Contact is found, then that Contact ID is written to the Related Contact field on the Memberpress User record and the Count_ContactsFound variable is incremented. If no Contact is found, then the Contact_Individual record variable is used to stage a new Contact record and the Count_ContactsNotFound variable is incremented.


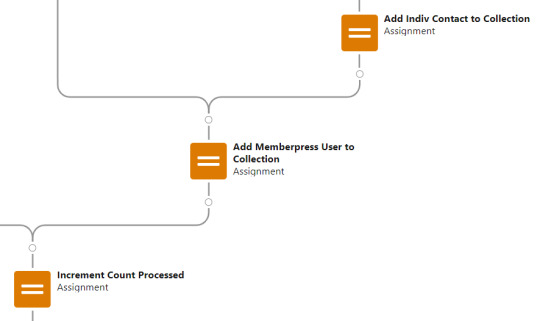
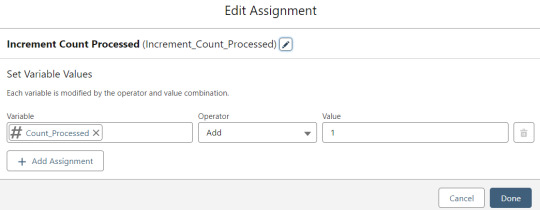
Contact_Individual is then added to the Contact_Collection record collection variable, the current Memberpress User record in the loop is added to the User_Collection record collection variable, and the Count_Processed variable is incremented.


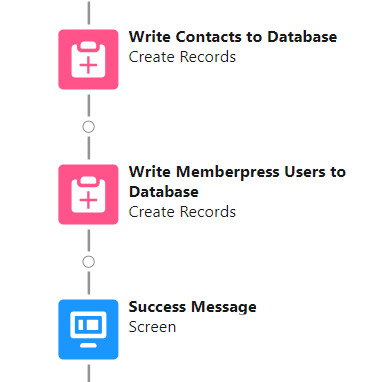
After the last uploaded row in the loop finishes, then the Flow is closed out by writing Contact_Collection and User_Collection to the database. Queueing up individuals into collections in this manner causes Salesforce to bulkify the write operations which helps avoid hitting governor limits. When the Flow is done, a success screen with some statistics is displayed.

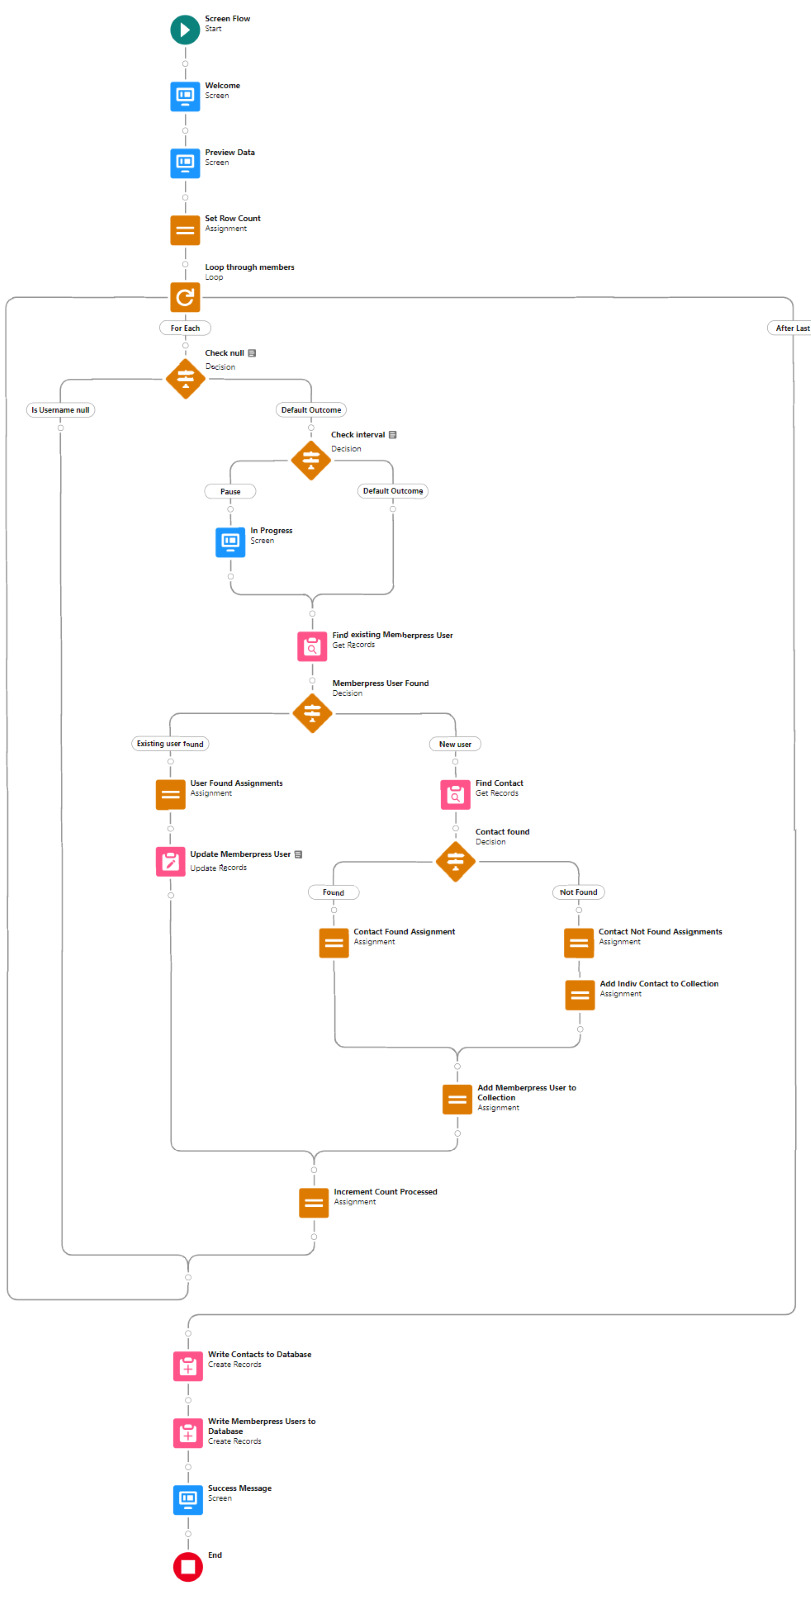
The entire Flow looks like this:
Flow variables
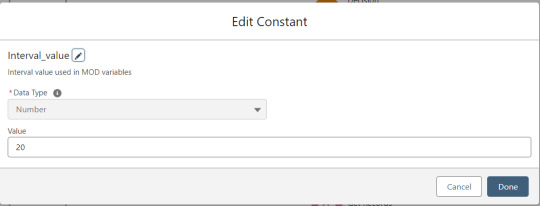
Interval_value determines the number of rows to process before pausing and prompting the user to click next to continue.
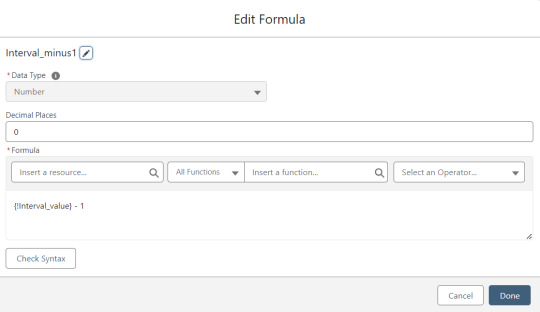
Interval_minus1 is Interval_value minus one.
MOD_Interval is the MOD function applied to Count_Processed and Interval_value.

The Count_Processed variable is set to start at -1.

Supporting Flows
Sometimes one Flow just isn’t enough. In this case there are three additional record triggered Flows configured on the Memberpress User object to supplement Screen Flow data import operations.
One triggers on new Memberpress User records only when the Related Contact field is blank. A limitation of the way the Screen Flow batches new records into collections before writing them to the database is that there’s no way to link a new contact to a new Memberpress User. So instead when a new Memberpress User record is created with no Related Contact set, this Flow kicks in to find the Contact by matching email address. This Flow’s trigger order is set to 10 so that it runs first.
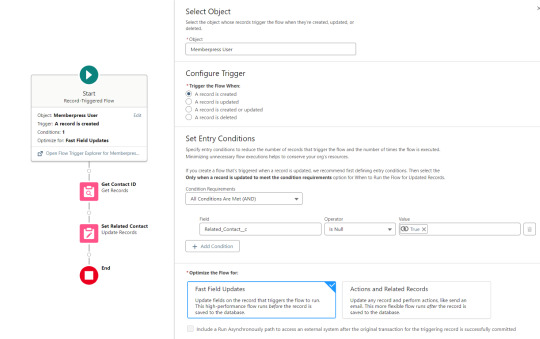
The next one triggers on any new Memberpress User record, reaching out to update the registration date and membership level fields on the Related Contact record

The last one triggers on updated Memberpress User records only when the memberships field has changed, reaching out to update the membership level field on the Related Contact record


0 notes
Text
Practical Python in Power BI: Cleaning constituent data using dataprep.ai
Power BI is a powerful tool. In my consulting work I utilize Power Query for Power BI to transform and prepare constituent data for system migrations. One recent breakthrough in regards to making that even more powerful and efficient was the implementation of Python scripting and the dataprep library.
The following articles were very helpful for figuring out how to do this:
How to Use Python in Power BI - freeCodeCamp
Run Python scripts in Power BI Desktop - Microsoft
There's a major discrepancy between those articles - the freeCodeCamp article provides instructions on how to use a Python environment managed via Anaconda in Power BI; whereas Microsoft's documentation warns that Python distributions requiring an extra step to prepare the environment, such as Conda, might fail to run. They advise to instead use the official Python distribution from python.org.
I've tried both, and as far as I can tell both methods seem to work for this purpose. When installing the official Python distribution, the only pre-packaged installer available is for the current version (currently 3.11.4) which requires a little bit of dataprep debugging post-install to get it working. Anaconda makes it easier to install prior Python versions and to switch between multiple Python environments (I successfully tested this in a Python 3.9 installation running in Anaconda). The following instructions are written for the former method though, using the latest version of Python installed via their Windows executable per Microsoft's recommendation.
To conceptualize how Power BI works with Python, it's important to understand them as entirely separate systems. For the purpose of data transformation, a Power Query Python scripting step loads the previous query step into a pandas dataframe for Python to execute, then loads the output of that back to the next query step.
So with that context, the way we'll approach this install is like so:
Set up a local Python development environment
Install the Dataprep library within that
Utilize a test script to debug and verify that the Python environment is working as expected
Configure Power BI to tap into the Python environment
1. Set up a local Python development environment
The first step is easy, navigate to python.org/downloads, click the Download button, and execute the installer keeping all the default settings.

Once you have Python installed, then open a command prompt and run the following commands:
py -m pip install pandas
py -m pip install matplotlib
After installing these two libraries, you've now got the basics set to use Python in Power BI.
2. Install the Dataprep library
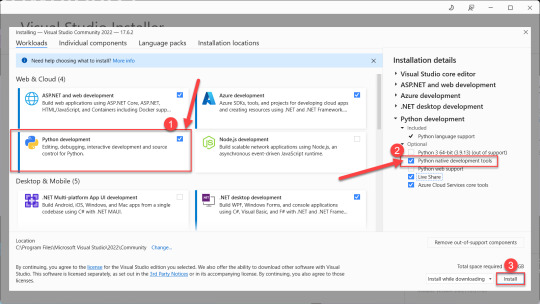
Installing the Dataprep library comes next, and to do that you need Microsoft Visual C++ 14.0 installed as a prerequisite. Navigate on over to the Microsoft Visual Studio downloads page and download the free Community version installer.
Launch the Visual Studio installer, and before you click the install button select the box to install the Python development workload, then also check the box to install optional Python native development tools. Then click install and go get yourself a cup of coffee - it's a large download that'll take a few minutes.
After the Visual Studio installation completes, then head back to your command prompt and run the following command to install Dataprep:
py -m pip install dataprep
3. Utilize a test script to debug and validate the Python environment
With the local Python development environment and Dataprep installed, you can try to execute this test script by running the following command in your command prompt window:
py "C:\{path to script}\Test python pandas script.py"
In practice this script will fail if you try to run it using Python 3.11 (it might work in Python 3.9 via Anaconda). It seems that the reason the script fails is because of a couple of minor incompatibilities in the latest versions of a couple packages used by Dataprep. They're easily debugged and fixed though:
The first error message reads: C:\Users\yourname\AppData\Local\Programs\Python\Python311\Lib\site-packages\dask\dataframe\utils.py:367: FutureWarning: pandas.Int64Index is deprecated and will be removed from pandas in a future version. Use pandas.Index with the appropriate dtype instead.
To fix this error, simply navigate to that file location in Windows Explorer, open the utils.py file, and comment out line 367 by adding a pound sign at the beginning. While you're in there, also comment out lines 409-410 which might produce another error because they reference that function from line 367.

After making that adjustment, if you return to the command line and try to execute the test script you'll encounter another error message. This time it reads: cannot import name 'soft_unicode' from 'markupsafe'
Googling that message turns up a lot of discussion threads from people who encountered the same problem, the upshot of which is that the soft_unicode function was deprecated in markupsafe as of version 2.1.0, and the fix is a simple matter of downgrading that package by running this command in your command line window: py -m pip install markupsafe==2.0.1

After those adjustments have been made, you should be able to run the test script in your command line window and see this successful result:

4. Configure Power BI to tap into the Python environment
You're so close! Now that you have Dataprep working in Python on your local machine, it's time to configure Power BI to leverage it.
In Power BI Desktop - Options - Python scripting, ensure that your Python installation directory is selected as the home directory. Note that if you manage multiple environments via Anaconda, this is where you would instead select Other and paste an environment file path.

Now in Power Query, select Transform - Run Python Script to add a step to your query. The script used here differs in a couple key ways from the test Python script run via your command prompt:
omit import pandas and import numpy
instead of defining df as your pandas dataframe, use the predefined dataset dataframe
My final script, pasted below, leverages the phone and email cleanup functions in Dataprep, as well as leveraging Python to calculate when a proper case cleanup is needed in a slightly more efficient manner than my previous PBI steps to clean that up.

Scripts
Power BI Python script syntax
# 'dataset' holds the input data for this script dataset['FirstName Lower'] = dataset['FirstName'] == dataset['FirstName'].str.lower() dataset['FirstName Upper'] = dataset['FirstName'] == dataset['FirstName'].str.upper() dataset['FirstName Proper'] = dataset['FirstName'].str.title() dataset['LastName Lower'] = dataset['LastName'] == dataset['LastName'].str.lower() dataset['LastName Upper'] = dataset['LastName'] == dataset['LastName'].str.upper() dataset['LastName Proper'] = dataset['LastName'].str.title() from dataprep.clean import validate_phone dataset['Valid Phone'] = validate_phone(dataset["Phone"]) from dataprep.clean import clean_phone dataset = clean_phone(dataset, "Phone") from dataprep.clean import validate_email dataset['Valid Email'] = validate_phone(dataset["Email"]) from dataprep.clean import clean_email dataset = clean_email(dataset, "Email", remove_whitespace=True, fix_domain=True)
Python test script syntax
import pandas as pd import numpy as np df = pd.DataFrame({ "phone": [ "555-234-5678", "(555) 234-5678", "555.234.5678", "555/234/5678", 15551234567, "(1) 555-234-5678", "+1 (234) 567-8901 x. 1234", "2345678901 extension 1234" ], "email": [ "[email protected]", "[email protected]", "y [email protected]", "[email protected]", "H [email protected]", "hello", np.nan, "NULL" ] }) from dataprep.clean import validate_phone df["valid phone"] = validate_phone(df["phone"]) from dataprep.clean import clean_phone df = clean_phone(df, "phone") from dataprep.clean import validate_email df["valid email"] = validate_phone(df["email"]) from dataprep.clean import clean_email df = clean_email(df, "email", remove_whitespace=True, fix_domain=True) print(df)
0 notes
Text
Lessons learned from my dumb smart home
So, uh, long time no blog. It's been over four years since my last post. A few things have happened since.
I figure the best way to brush off the digital cobwebs is to share something amusing. I like gadgets. I'm not embarrassed to admit that, except when I think back to my Google Glass year a decade ago.
Most of my technology purchases now are more reasonably priced, everyday tech, like smart home devices. I've had an Amazon Echo since the first generation was released, and accumulated them in most rooms of our house since. We have a Hue lighting system, and a Ring alarm, and assorted other small connected devices.
There are things I really enjoy about these amenities. I highly recommend the premium lighting package. I enjoy the convenience of controlling lights by voice commands, and calling out for a weather forecast or a song. It’s also neat that my devices have APIs which can talk to each other, allowing me to program custom automations and integrations between them.
But there’s another side to this technology. And I’m not talking about the level of access and control of our personal data we’ve handed to Amazon. *shudder* No, the other side I’m talking about is when the technology just doesn’t work. When my smart home gets really dumb, sometimes comically so.
Too many Alexas

The idea was to have a voice assistant system that works through the whole house. Turns out, “works” is doing a lot of work there. It does not work well when multiple Echos hear the same command, then a timer starts on the wrong device, or a song starts playing in adjoining rooms a couple seconds off from each other.
Zombie automations

A couple years ago when we took a holiday trip, I enabled a Phillips Hue routine which turns the lights on and off on a schedule with some randomness. I thought the latter part meant it would vary which lights came on, but it actually meant that all the lights in the house come on between 3:30 and 4pm and all the lights in the house turn off between midnight and 12:30am.
Five hundred plus days later I still haven’t gotten around to finding the setting to disable that automation. I just got in the habit of calling out “Alexa turn the lights off” in the late-afternoon, and reaching for the dimmer switch on my desk to turn them back on when I'm up late.
Janky integrations

A few years ago, I found that I could interface a motion sensor from the Ring Alarm with the Hue lights so that between 11pm and 6am motion detection would turn on a path of dimmed lights between the bedroom and bathroom. A second automation trigger on a ten minute delay would then turn the lights off. Well, it worked great, except those odd early mornings when a small child wants to hang out in that area before dawn, then the lights start turning off repeatedly.
When the kids get ahold of it

Smart home amenities are cool when you set them up and know how to use them, but can produce some unexpected results once the kids start playing with them. They push the Ring doorbell and yell into the camera every time we come in the front door. If a Hue dimmer switch isn’t working, we have to make sure it’s not controlling another room’s lights because a giggling child moved the switches around. And if we’re hearing Alexa play Who Let the Dogs Out for the thousandth time, I'm just thankful it isn’t Poop Poop Poop, by Poop Man in Fart Land. Again.
When the technology just doesn’t work

This anecdote isn’t about a smart home device, but another kind of home technology. Several years ago I needed to replace a broken toilet valve, and upgraded to a fancier "water saving" mechanism. It made sense to spend a little extra on something that would conserve resources and save money in the long run. Except it didn’t work as advertised. A few months after installing it, I noticed water continuously leaking into the toilet from around the valve seal. I tried a couple times to uninstall and reinstall to get it to seal properly, but each time it would soon go back to leaking again.
Finding parallels and lessons
I like to think that lessons learned from my personal tech fails can help inform my work, and can attempt to draw some parallels here:
Too many Alexas
Once upon a time, I built out a bunch of back end data flows to support my organization’s eCommerce initiative. Zapier was my best friend, and every Shopify transaction triggered a half-dozen different Zaps for different purposes. It was effective but messy, inefficient, and sometimes the nuance of how integrations differed resulted in confusing inconsistencies. We built something amazing with a minimal budget, but I regret the substantial technical debt.
Kind of like accumulating too many Echo devices, the results can be undesirable when an action triggers too many different processes. At home I addressed that by reprogramming the Echo devices to listen for different wake words, proving yet again that doing some basic analysis and disambiguation of tasks can result in low-effort high-impact improvements.
Zombie automations
Have you ever encountered a situation where nobody can quite explain how a particular type of data is showing up in a system? It just is. Probably got set up by a former co-worker, nobody knows which service account is running it, no less how to log in. And there’s a formula misconfigured so a calculated field is often wrong, but current staff are aware of what to look for and used to fixing them so it's all good.
Sometimes we just get too comfortable with inefficient systems, and the inefficiency leads to time constraints that push everyone to the point where nobody has bandwidth to consider change. You know what can be a great impetus for breaking the inertia? Talking through a business process and writing it down!
Business process documentation is a valuable exercise on its own, and it’s a powerful change driver when you look at a difficult system mapped out and go OMG I can’t just document this broken thing, let's actually fix it. Kind of like how writing this story finally prompted me to find and turn off that old holiday light schedule.
Janky integrations
Automations can get stuck in loops. A misconfiguration can trigger repeatedly and eat your entire Zapier monthly task cap in a day. Or sometimes you have a mandate to get something done, but the tools aren't well suited to the challenge, so you do your best to make them work and have to live with the poor result.
Years ago my then-new org wanted member data integrated with the CRM, but memberships were sold through a magazine fulfillment house whose only viable integration method was sending a nightly series of CSV files to an FTP server. The vendor had no way of receiving automated updates back or even bulk updating from a spreadsheet. Dirty data we’d corrected kept showing up. New duplicate customer records ran rampant. Transaction rows contained no unique identifier. I eventually dubbed that integration my river of shit, and wished I could get a do-over to narrow its scope and impact.
You’re best off identifying situations like that early, and rethinking them before they become fully implemented problems. My motion sensor / lights hack didn’t last long. Another Hue presence sensor purchase could have worked better, but wasn’t needed after I just put a cheap dumb motion sensor on the light in the laundry closet that we also walk by on the way to the bathroom.
When the kids get ahold of it
Your co-workers obviously aren’t small children, but there is an aspect of deploying systems that involves giving people new toys and then watching how they use them in unexpected ways. Observing behavior, adapting systems to meet it, and building in appropriate guardrails are all tactics that help serve your users better and prevent them from breaking new systems.
Conversely, our light switches are all labeled on the back in sharpie marker so we know where they’re supposed to go.
When the technology just doesn’t work
Sometimes you need to acknowledge when a system isn’t living up to expectations. After finally cutting my losses and getting rid of the “water saving” toilet valve in favor of a standard flap and pull chain, our water bill dropped by $5 to $10 a month.
Organizations experience extreme examples of that when an enterprise system choice isn’t aligned with their operations needs. It’s difficult to walk away from large sunk costs, but every single time you don’t it turns into an ineffective money pit and even larger opportunity cost.
0 notes
Text
Creating a box office member lookup app with Glide using data from Salesforce
It's a pretty cool feeling when you're looking to build something very specific and you find a platform that does that specific thing really well. I recently had that experience and as a result have become a fast fan of Glide Apps.
The use case at hand is for box office staff working at the American Craft Show to look up and check in members from our database. Free admission to the show is a benefit of membership in the American Craft Council, and a decent chunk of those member tickets are claimed on site the day of the show.
There's a longer backstory to how this evolved, but the pertinent part is that we have a relatively new Salesforce CRM database that we're now able to leverage to build systems on top of to make tasks like this more efficient. The first iteration of this app was built on a platform which enabled querying on the last name field to pull contact records into a grid, from which box office staff could then double tap a small edit button next to any one of them, which opened a modal window where they check a box and then the Update button to send that data back to the CRM.
It was a good first effort, but had some pretty glaring shortcomings. In particular we faced adoption challenges with box office staff, who had been used to a different vendor platform for years that required them to click through multiple screens to verify membership and then offered no way to check them in. We succeeded at provisioning an interface that made the lookup portion more efficient, but staff weren't used to checking people in and the mechanism for that was just too clunky. Four taps may not seem like much, but it's a big deal in a fast-paced environment with customers lined up, and especially when the edit button is too small and requires a quick double tap on just the right spot to work.
So I went back to the drawing board, and at a point in that process it occurred to me that I might be better off moving the data out of Salesforce to broaden the pool of potential options. That led me think of the Google Sheets Data connector for Salesforce, followed by a brief flirtation with building something native in there using Google Apps Script, followed quickly by the revelation that's beyond my technical depth and I'm not up for the learning curve right now, but hey maybe there's something else out there which can help leverage this.
Enter Glide Apps. They're a pretty new startup that promises the ability to create a code-free app from a Google Sheet in 5 minutes. And even better, Soliudeen Ogunsola wrote this tutorial on Creating an Event Check-in App with Glide. It was a magic "this looks perfect" moment, and sure enough after having spent hours trying a few things that didn't work I gave this a shot and within a half hour had a functional prototype of something that worked perfectly.
Some of the things that I learned while building this out and getting it ready to use in production:
It's important for both consistency and efficiency's sake to make the data refresh process as easy and repeatable as possible. With that in mind, it's really important to consider that the Salesforce Data Connector deletes and reloads all data in the spreadsheet whenever it's refreshed. On the up side though, as long as the column headings remain consistent then the mappings set up in Glide Apps continue working seamlessly after the spreadsheet data is refreshed.
Because of that, I created a custom checkbox field on the Contact object for ticket pickup which is set to FALSE by default. That enabled it to be included in the query rather than added manually each time the data is refreshed.
Glide allows only two fields to be displayed in the List layout. In our case I wanted to display the member's full name as the title, then their City, State, and ZIP Code as the subtitle. I initially concatenated those fields in the Google Sheet, but to make it more easily repeatable I subsequently created a formula field on the Contact object in Salesforce that did the same concatenation and then included that field in the Data Connector query.
Adding a Switch to the Details layout in Glide enables the user to edit only that data point. The allow editing option can remain off so they can't change any other details on the contact record - the only interactive element on screen is the button to check them in.
I attempted to build a connection back into Salesforce to record the ticket pickup on their record via Zapier. However, when I tested checking one person in it triggered thousands of Zapier tasks. Something in the architecture is causing Zapier to think lots of rows were updated when I think they maybe had just been crawled. Point is that didn't work and thank goodness Zapier automatically holds tasks when it detects too high a volume all at once.
The volume of records that we're dealing with (in the tens of thousands) causes the Glide App to take a couple minutes to load when it's first opened. It requires coaching a little patience up front, but the good news is that's a one time deal when the app is initially opened. From that point forward everything works instantaneously. It's ultimately an improvement over the previous iteration, which would load quickly but then took several seconds to bring contact data into the grid on every member lookup.
I'm not on site at our San Francisco show, but can see that on day one of the show there are dozens of members recorded in the spreadsheet as having checked in, and I haven't gotten any frantic phone calls about it not working, so at this point I'm going to assume that means it's a success. But then I was pretty confident it would work. When it's just this simple to use, the odds seem good:


0 notes
Text
Super simple read more link using only CSS
Had an interesting challenge to work through the other day - I wanted to hide some description text on a webpage behind a Show Description link, but had to accomplish that using only CSS animation because our CMS (rightfully) will not allow me to inject arbitrary Javascript into a page via the WYSIWYG.
I mean I didn’t really have to, I could have gone through the process of staging an update and pushing code to production. It’s more accurate to say I wanted to avoid that for this particular one-off project.
So while I had a general idea of how this could be built using a display:none property that toggles on/off by clicking another element, I did a quick web search for a code sample before reinventing any wheels. And sure enough, found this Codepen - Pure CSS read more toggle by Kasper Mikiewicz
Using that as a starting point, I stripped down the code and it works like a charm. The end result can be seen on my org’s conference schedule page. And here’s the code sample:
<style> .read-more-target { display: none; }
.read-more-state:checked ~ .read-more-target { display: block !important; margin-top: 1em; }
.read-more-state ~ .read-more-trigger:before { content: 'Show description'; }
.read-more-state:checked ~ .read-more-trigger:before { content: 'Hide description'; }
.read-more-trigger { cursor: pointer; color: #0000FF; font-size: 0.85em; } </style>
<input class="read-more-state" id="item1" type="checkbox" /> <span class="read-more-target"><i>Description:</i>Lorem ipsum dolor sit amet, consectetur adipiscing elit, sed do eiusmod tempor incididunt ut labore et dolore magna aliqua. Ut enim ad minim veniam, quis nostrud exercitation ullamco laboris nisi ut aliquip ex ea commodo consequat.</span> <label class="read-more-trigger" for="item1"> </label>
0 notes
Text
How to configure Salesforce Customizable Rollups to roll up contact soft credits to Households
My org cut over from Raiser's Edge to Salesforce in January 2018, and one of the pain points we encountered early on was that donation soft credits were recorded at the contact level but not at their household account level. A structural solution to this issue became available with the launch of NPSP Customizable Rollups in June 2018, and I'm now in process of building them out for my org. The process was confusing at first, but once I figured it out it was surprisingly straightforward and easy to do. This blog will lay out the process in concise and easy-to-follow steps.
What's a soft credit?
Before diving into the steps, a quick review of terminology.. Soft credits are when a donor is credited with a donation that they didn't actually write the check for. A common example is when the check comes from a family foundation or donor advised fund. The hard credit for that donation belongs to the entity that sent the check, but the soft credit goes to the donor who directed them to cut that check. Other examples can include matching gift campaigns or crowdfunding efforts. Guidelines for what gets counted as a soft credit vary at different nonprofit organizations, and consequently Salesforce provides some flexibility around how to configure them as referenced in the documentation on Soft Credit and Matching Gift Setup.
Contact soft credits vs. Account soft credits
A key concept that tripped me up at first is the distinction between Account Contact Soft Credits and Account Soft Credits. Finding this description in the NPSP Soft Credits Overview documentation was my aha moment where how to do this really clicked: "If you enable Customizable Rollups, you can create Contact Soft Credit rollup fields at the Account level. ... With Account Contact Soft Credits, it is now possible to see the total giving for all Household members."
In short, Account Contact Soft Credits are exactly what I wanted to configure. Account Soft Credits on the other hand are a very different thing, they're an entirely separate feature which enables directly soft crediting an Account for a donation made by another entity.
On to the tutorial
Based on the aforementioned aha moment, and on information gleaned from each of the articles linked to above, it dawned on me that the process of configuring Salesforce Customizable Rollups to roll up contact soft credits to Households is really quite straightforward:
Create new custom fields on the Account object
Add those fields to the desired page layouts
Configure customizable rollups to populate data to those fields
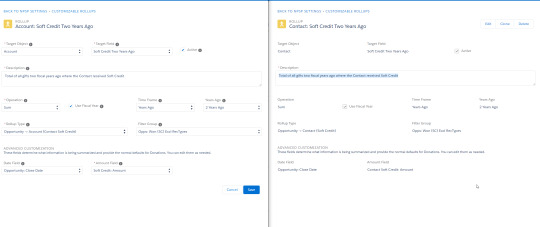
1. Create new custom fields on the Account object
First step in creating any customizable rollup is to create a field to populate the field to. In this case I'm creating fields on the Account object which mirror existing fields on the Contact object, so I just place two windows side-by-side - both in Setup - Object Manager, one to reference the existing Contact fields and the other to create new corresponding Account fields of the same field type. Then just copy-paste the title over, mirror the other details, save, and repeat for the remaining fields.

2. Add those fields to the desired page layouts
In Setup - Object Manager - Account, open the page layouts that you want to display Soft Credit info on and add them to the page layout. In the example here, I've created a new section on the page titled Soft Credit Totals and dragged the fields into them. If you want this to mirror how it's setup on the Contact page layout, you could also pull that up in another window and mirror the setup.

3. Configure customizable rollups to populate data to those fields
Now to configure the Customizable Rollup, would you believe that I'm about to tell you that's as easy as pulling up the existing Contact rollups in one window and mirroring the configuration in another window for new Account rollups? Because it's actually that easy. In NPSP Settings - Donations - Customizable Rollups, click Configure Customizable Rollups, then New Rollup. Target Object = Account, Target Field = a field you created in Step 1, Rollup Type = Opportunity -> Account (Contact Soft Credit). All other settings should simply mirror the Contact rollup in your other window.

Conclusion
That really doesn't look so hard, does it? I'm here to tell you it wasn't. Now go take two hours to implement it at your org and don't keep your co-workers waiting like I did (sorry Bekka).
0 notes
Text
Tips and tools to migrate data from Raiser’s Edge to Salesforce
This blog post is overdue. My organization cut over from Raiser’s Edge to Salesforce early this year. Data conversion was a huge challenge, and this post aims to pay forward some tips, scripts, and spreadsheets for tackling an RE migration.
It needs to start with some acknowledgements. These SQL scripts derive from the scripts in Jon Goldberg’s post on Exporting Raiser’s Edge for CiviCRM. I don’t know how we would have completed our migration without that resource. And these field mapping spreadsheets derive from templates provided by Andrea Hanson of Redpath Consulting Group. Andrea and the whole team over at Redpath have been amazing implementation partners.
Downloads
In case you’re just here for the downloads, and you didn’t spot the links in the preceding paragraph, here you go:
Download Raiser’s Edge extraction SQL scripts (.zip)
Download Raiser’s Edge to Salesforce field mapping templates (.zip)
These resources were used to migrate into Salesforce from The Raiser’s Edge Version: 7.93.5782.1
In order to execute the SQL queries, you will need access to the server on which RE is running and administrator credentials for SQL Server Management Studio. My preferred method to pull data out is to copy the query results in the Remote Desktop window then paste them into an Excel sheet on my local desktop.
Recommended Tools
Ablebits Ultimate Suite for Excel is an essential tool for comparing and merging tables in Excel.
A programmable keyboard helps automate repeated keystroke routines to cut through data combing tasks like a warm knife through butter. My go to model is the Logitech G610. That’s been a solid choice that was reasonably priced and serves me well, though I miss the dedicated macro record key from my trusty old G710 (now discontinued). The more expensive Logitech G910 appears to have a macro record key and could be a better choice for beginners.
DemandTools is a data quality power toolset that is essential for deduplicating data once it's in Salesforce. Up until mid-2018 the product was available via donation for most c3 nonprofits. The vendor's current NFP program offers a 20% discount to most nonprofits and via donation to nonprofits with less than $250,000 in net assets.
Tips
Like I wrote to open this blog post, it’s overdue. I have my excuses - another, even more daunting data migration came on the heels of this one; I also had a grad school program to contend with. But ultimately it’s been so long since our RE migration, and there were so many quirks involved, I would be hard pressed to write up a full case study at this point. But I still remember some of the pain points and can provide some tips here on what to watch out for.
Raiser's Edge has a Records table and a Constituents table. Constituents are basically a full-fledged customer. Records include constituents plus other leaner contacts in the system, such as spouses or affiliated contacts of a constituent.
In many of the back end RE tables, the primary key field is labeled CONSTIT_ID. This usually corresponds to the ID field from the Records table, not the CONSTITUENT_ID field. Except in a couple of cases where it doesn't
The ID fields in both the Records and Constituent tables are sequential numbers which began at 1, and for a significant chunk of customers who were imported into RE years ago when that was deployed, these two ID numbers are exactly the same. This can be a huge gotcha when figuring out how to join data between tables, because if you join the tables on the wrong ID it may appear accurate at first until you find later that it wasn't. For this reason, it's also important to check a true random sample of data, don't only spot check the longtime members who you know well.
Check your work thoroughly at each step to ensure the data is coming together as expected. Save your work often. Save a new version of the files you're working at least once a day. File system space and organization be damned, it's just more important to have point in time copies you can revert back to because at some point something will goes sideways and you'll need it.
Several of the SQL scripts are just a SELECT * FROM {table} function. These are pretty straightforward data points that I would extract with the basic query and then subsequently use Ablebits to merge into the import template by matching the ID number up.
Email addresses are technically a type of phone number in RE's data structure. In order to export them you have to join the records table to the constituent address table, joined to the address table, joined to the constituent address phones table, joined to the phones table. But on the bright side, once you get there you can export phone numbers as well
I counted 594 distinct tables in our Raiser's Edge SQL database. Of those 308 were completely empty. That has no real bearing on anything, but it's interesting trivia
The way that spouse relationships are recorded is a challenge. In some cases they each have a relationship pointing in the other's direction, others only have one relationship recorded moving in one direction. In our case about a third of them had it going both ways, which resulted in some duplication that I had to sort out. I don't remember exactly how I did that, just that it was tricky and time consuming and generally made me grouchy
Do not deduplicate customer records prior to import. There's too much risk that trying to do so could result in orphaned donation records, it's less risky and just easier to put them all into Salesforce first and then use DemandTools to merge the dupes. Also, if your RE deployment was anything like ours, expect a significant number of duplicate contacts to result because a contituent was also been recorded as an affiliated contact on other consitutent records in multiple instances.
The TABLEENTRIES table in Raiser's Edge is the key to translating many of the fields located in other tables. The other tables often contain a mysterious numeric value in places where you might expect to see actual data, that value needs to be matched to the data via TABLEENTRIES. Some of the data which this applies to are salutation types, campaign types, address types, countries, phone types, payment types, and relationship types. I used Ablebits to merge these in Excel as opposed to incorporating those mappings in the SQL scripts.
The way that campaigns are structured in Raiser's Edge is fundamentally different from how that works in Salesforce. This presents a challenge in terms of converting the data to fit the new system, but also presents an opportunity to streamline your campaign data structure!
In Raiser's Edge there are four defined levels - campaign, fund, appeal, and package. Objects at each level exist in a many-to-many relationship (i.e. a fund can be associated with multiple child appeals, and an appeal can be associated with multiple parent funds). Individual donations can be tied to an object at any level.
In Salesforce there is only one type of object, called a campaign. Campaigns can be structured in hierarchical relationships in a one-to-many relationship (i.e. a campaign can be associated with multiple child campaigns, but a campaign can only have one parent campaign). Individual donations can be tied to an object at any level.
Our legacy Raiser's Edge database contained hundreds of distinct campaigns, many of which were entered years ago and only used for a single donation or handful of donations. Through consolidation we reduced the number of campaigns by over 70%, then mapped legacy campaigns to new campaigns on the gift records prior to importing those so that they all magically landed where they were supposed to in the new structure
A breakthrough in our cleanup process came when we realized that most of the appeals and packages that were associated with multiple parent campaigns could be migrated to picklist values on the Salesforce campaigns rather than needing to remain as a distinct campaign in the new schema.
As part of this transformation effort, we implemented a canonical naming structure so that child campaigns incorporate the parent campaign's name. That makes them all line up hierarchically when viewed in a flat alphabetical list, which is nice, but due to Salesforce's 80 character limitation for campaign names required abbreviating in some cases.
The spreadsheet which I created to analyze and consolidate RE campaigns ended up being twenty feet long printed out - 46 11x17” pages taped together 2 across and 23 down. We rolled that out on the conference room table so that development and finance staff could work through it together, making final changes in red ink that I then incorporated into the data staged for import. The photo of them working through that ginormous spreadsheet is my favorite image from this project.
Raiser's Edge SQL extract queries
You can use this link to download the entire set of SQL queries as a zip file, or for your copy-pasting convenience they're also listed below. These are just the ones that involve table joins, the zip file also includes single table exports, most of which are simply SELECT * from {table name}.
Address - phones
USE RE7 SELECT RECORDS.id , RECORDS.is_constituent , RECORDS.last_name , RECORDS.first_name , RECORDS.org_name , PHONES.phonetypeid , PHONES.num , PHONES.DO_NOT_CALL , ADDRESS.address_block , ADDRESS.city , ADDRESS.state , ADDRESS.post_code , ADDRESS.country , CONSTIT_ADDRESS.type , CONSTIT_ADDRESS.indicator , CONSTIT_ADDRESS.preferred , CONSTIT_ADDRESS.sendmail , CONSTIT_ADDRESS.seasonal , CONSTIT_ADDRESS.seasonal_from , CONSTIT_ADDRESS.seasonal_to FROM RECORDS LEFT JOIN CONSTIT_ADDRESS ON RECORDS.id = CONSTIT_ADDRESS.constit_id LEFT JOIN dbo.ADDRESS ON CONSTIT_ADDRESS.id = ADDRESS.id LEFT JOIN CONSTIT_ADDRESS_PHONES ON ADDRESS.id = CONSTIT_ADDRESS_PHONES.constitaddressid LEFT JOIN PHONES ON CONSTIT_ADDRESS_PHONES.phonesid = PHONES.phonesid where num is not null order by records.last_name asc, records.first_name asc, records.org_name asc
Address - seasonal
use RE7 SELECT RECORDS.id , RECORDS.last_name , RECORDS.first_name , RECORDS.org_name , CONSTITUENT.records_id , CONSTITUENT.id , CONSTITUENT.key_name , CONSTITUENT.first_name , ADDRESS.address_block , ADDRESS.city , ADDRESS.state , ADDRESS.post_code , ADDRESS.country , CONSTIT_ADDRESS.type , CONSTIT_ADDRESS.indicator , CONSTIT_ADDRESS.preferred , CONSTIT_ADDRESS.sendmail , CONSTIT_ADDRESS.seasonal , CONSTIT_ADDRESS.seasonal_from , CONSTIT_ADDRESS.seasonal_to FROM RECORDS LEFT JOIN CONSTITUENT ON RECORDS.id = CONSTITUENT.records_id LEFT JOIN CONSTIT_ADDRESS ON CONSTITUENT.id = CONSTIT_ADDRESS.constit_id LEFT JOIN dbo.ADDRESS ON CONSTIT_ADDRESS.address_id = ADDRESS.id where seasonal = -1 order by records.last_name asc, records.first_name asc, records.org_name asc
Address
use RE7 SELECT RECORDS.id , RECORDS.last_name , RECORDS.first_name , RECORDS.org_name , CONSTITUENT.records_id , CONSTITUENT.id , CONSTITUENT.key_name , CONSTITUENT.first_name , ADDRESS.address_block , ADDRESS.city , ADDRESS.state , ADDRESS.post_code , ADDRESS.country , CONSTIT_ADDRESS.type , CONSTIT_ADDRESS.indicator , CONSTIT_ADDRESS.preferred , CONSTIT_ADDRESS.sendmail , CONSTIT_ADDRESS.seasonal , CONSTIT_ADDRESS.seasonal_from , CONSTIT_ADDRESS.seasonal_to , CONSTIT_ADDRESS.date_from as valid_from , CONSTIT_ADDRESS.date_to as valid_to FROM RECORDS LEFT JOIN CONSTITUENT ON RECORDS.id = CONSTITUENT.records_id LEFT JOIN CONSTIT_ADDRESS ON CONSTITUENT.records_id = CONSTIT_ADDRESS.constit_id LEFT JOIN dbo.ADDRESS ON CONSTIT_ADDRESS.address_id = ADDRESS.id
Attributes
SELECT DESCRIPTION , at.CODETABLESID , LONGDESCRIPTION FROM TABLEENTRIES te LEFT JOIN AttributeTypes at ON te.CODETABLESID = at.CODETABLESID ORDER BY DESCRIPTION --- SELECT DISTINCT * FROM AttributeTypes at LEFT JOIN TABLEENTRIES te ON te.CODETABLESID = at.CODETABLESID ORDER BY DESCRIPTION --- SELECT * FROM ConstituentAttributes
Constituent Codes
USE RE7 SELECT cc.constit_id as record_id, t.LONGDESCRIPTION, cc.DATE_FROM, cc.DATE_TO, c.NAME FROM dbo.Constituent_Codes AS cc INNER JOIN dbo.TABLEENTRIES AS t ON cc.CODE = t.TABLEENTRIESID INNER JOIN dbo.CODETABLES AS c ON c.NAME = 'Constituent Codes' AND t.CODETABLESID = c.CODETABLESID
Gifts
use RE7 SELECT gs.GiftId , g.CONSTIT_ID as records_id , p.APPEAL_ID as appeal_id , p.ID as package_id , gs.Amount , g.RECEIPT_AMOUNT , g.DTE as gift_date , g.DATE_1ST_PAY , g.DATEADDED , CAMPAIGN.DESCRIPTION as campaign , FUND.DESCRIPTION as fund , APPEAL.DESCRIPTION as appeal , p.DESCRIPTION as package , g.PAYMENT_TYPE , g.ACKNOWLEDGE_FLAG , g.CHECK_NUMBER , g.CHECK_DATE , g.BATCH_NUMBER , g.ANONYMOUS , gst.LONGDESCRIPTION as giftsubtype , g.TYPE , DBO.TranslateGiftType(g.TYPE) as type2 , g.REF , g.REFERENCE_DATE , g.REFERENCE_NUMBER , g.ANONYMOUS , g.ACKNOWLEDGE_FLAG , g.AcknowledgeDate , g.GiftSubType FROM GiftSplit gs LEFT JOIN FUND on gs.FundId = FUND.id LEFT JOIN APPEAL on gs.AppealId = APPEAL.id LEFT JOIN CAMPAIGN on gs.CampaignId = CAMPAIGN.id LEFT JOIN GIFT g on gs.GiftId = g.ID LEFT JOIN Package p on gs.PackageId = p.ID LEFT JOIN TABLEENTRIES gst on g.GIFTSUBTYPE = gst.TABLEENTRIESID
Pledge payments
/* Find all pledge installments, and their related payments if they exist. */ SELECT i.InstallmentId , i.PledgeId , i.AdjustmentId , i.Amount as scheduled_amount , i.Dte , ip.Amount as actual_amount , ip.PaymentId , g.CONSTIT_ID , g.RECEIPT_AMOUNT , g.DTE as receive_date , g.TYPE , DBO.TranslateGiftType(g.TYPE) as type FROM Installment i LEFT JOIN InstallmentPayment ip ON i.InstallmentId = ip.InstallmentId LEFT JOIN GIFT g ON ip.PaymentId = g.ID /* Adjustments are stored in here too - when an adjustment happens, the pledge ID of the original value is blanked */ WHERE i.PledgeId IS NOT NULL ORDER BY i.AdjustmentId /* Write-off Types: Covenant WriteOff, MG Write Off, Write Off */
Pledges
/* Find all GIFT records with one or more associated Installment records. These are pledges OR recurring gifts. */ SELECT DISTINCT g.CONSTIT_ID , g.ID as GiftId , g.Amount , g.DTE as receive_date , FUND.DESCRIPTION as fund , FUND.FUND_ID , CAMPAIGN.DESCRIPTION as campaign , APPEAL.DESCRIPTION as appeal , g.PAYMENT_TYPE , g.ACKNOWLEDGEDATE , DBO.TranslateGiftType(g.TYPE) as type , g.REF as note ,DATE_1ST_PAY ,g.DATEADDED ,g.DATECHANGED ,INSTALLMENT_FREQUENCY ,NUMBER_OF_INSTALLMENTS ,POST_DATE ,POST_STATUS ,REMIND_FLAG ,Schedule_Month ,Schedule_DayOfMonth ,Schedule_MonthlyDayOfWeek ,Schedule_Spacing ,Schedule_MonthlyType ,Schedule_MonthlyOrdinal ,Schedule_WeeklyDayOfWeek ,Schedule_DayOfMonth2 ,Schedule_SMDayType1 ,Schedule_SMDayType2 ,NextTransactionDate ,Schedule_EndDate ,FrequencyDescription , r.CONSTITUENT_ID FROM Gift g LEFT JOIN GiftSplit gs on g.ID = gs.GiftId LEFT JOIN FUND on gs.FundId = FUND.id LEFT JOIN APPEAL on gs.AppealId = APPEAL.id LEFT JOIN CAMPAIGN on gs.CampaignId = CAMPAIGN.id LEFT JOIN RECORDS r ON g.CONSTIT_ID = r.ID JOIN Installment i ON g.ID = i.PledgeId
Salutations
SELECT R.ID, R.Constituent_ID, R.FIRST_NAME, R.LAST_NAME, R.[DATE_LAST_CHANGED], case when R.PRIMARY_ADDRESSEE_EDIT = -1 then R.PRIMARY_ADDRESSEE else dbo.GetSalutation(R.PRIMARY_ADDRESSEE_ID,R.ID,'',0,0,0,getdate()) end as 'PRIMARY_ADDRESSEE', case when R.PRIMARY_SALUTATION_EDIT = -1 then R.PRIMARY_SALUTATION else dbo.GetSalutation(R.PRIMARY_SALUTATION_ID,R.ID,'',0,0,0,getdate()) end as 'PRIMARY_SALUTATION', ADDSAL_TYPE.LONGDESCRIPTION as 'ADDSAL_TYPE_DESC',CS.SALUTATION_ID, CS.SEQUENCE, CS.EDITABLE, case when CS.EDITABLE = -1 then CS.SALUTATION else dbo.GetSalutation(CS.SALUTATION_ID,R.ID,'',0,0,0,getdate()) end as 'SALUTATION_CORRECT', CS.SALUTATION as 'SALUTATION_FIELD_INCORRECT' FROM [RECORDS] R left outer join CONSTITUENT_SALUTATION AS CS ON R.ID=CS.CONSTIT_ID left outer join TABLEENTRIES AS TE ON R.TITLE_1=TE.TABLEENTRIESID left outer join TABLEENTRIES ADDSAL_TYPE on CS.SAL_TYPE=ADDSAL_TYPE.TABLEENTRIESID ORDER BY CS.SEQUENCE
Soft credits
USE RE7 SELECT GiftId , ConstitId , Amount , 'Soft Credit' as soft_credit_type FROM GiftSoftCredit
Solicitor relationship
SELECT CONSTIT_ID , SOLICITOR_ID , TABLEENTRIES.LONGDESCRIPTION as solicitor_type , AMOUNT , NOTES , cs."SEQUENCE" as weight FROM CONSTIT_SOLICITORS cs LEFT JOIN TABLEENTRIES ON cs.SOLICITOR_TYPE = TABLEENTRIES.TABLEENTRIESID ORDER BY weight
Additional resources
In addition to the essential Exporting Raiser’s Edge for CiviCRM post mentioned above, Accessing the Raiser’s Edge database using SQL by SmartTHING was a useful reference during our migration.
Salesforce Data Migration - Raisers Edge by Larry Bednar is insightful reading for planning an RE migration. The NW Data Centric downloads page is also a treasure trove, and I wish I’d found their Standard NWDC Raisers Edge to Salesforce Data Processing Download sooner.
These Do’s and Don’ts of Data Migration by Megaphone Technology Consulting provide some very sound advice on planning for the human side for a data migration.
Another great resource on change management and planning for the human side of a database implementation is Your CRM Is Failing and It’s All Your Fault, a session presented by Karen Graham, Danielle Gangelhoff, Kelly Kleppe, and Libby Nickel Baker at the 2017 Minnesota Council of Nonprofits Communications and Technology Conference.
If you've read this far, I hope it was helpful and worth your time. Good luck on your Raiser's Edge migration journey!
0 notes
Text
File downloads restored
Throughout the years I've written numerous case study blog posts which then contain a file download link to obtain a template of the work described. It recently came to my attention that most of my download links were broken. Turns out I missed this annoucement about Dropbox shutting down links from the old Public folder as of September 1. The links have been restored and files can be downloaded again now.
(P.S. if you find a link that's still broken please let me know about it)
0 notes
Text
How to export contacts and notes from ACT!
My organization is in the midst of a Salesforce implementation. We're going in phases, replacing systems in order and getting departments live as they're built out and ready to go. Our first department that went live on Salesforce converted over from a legacy ACT! database. This is a case study of the steps taken to get contacts and notes data out of that system.
The department that we migrated into Salesforce first was chosen in part because their data needs were relatively simple. The department consists of just one employee (ah, small staff nonprofit life) and their customer data was stored in an older ACT! database where the only features being used were contacts and notes. The simplicity of this data model made for a relatively low bar for entry into the new system. The version they were on at migration was Sage ACT! Pro 2011, and the age of that software already presented a couple of challenges. For instance, after upgrading that person's computer earlier this year I found that the version of ACT! required Microsoft Office 2010 to export reports to Excel. And for months afterwards their old computer stayed running under my desk so it could be RDP'd onto for that purpose. *sigh*
So the environment for this case study is a client computer running Windows 7 Professional, Microsoft Office 2010, and Sage ACT! Pro 2011.
I researched how to get data out of ACT! by scouring support articles and forum posts, and what I found was that there seemed to be a couple of methods for getting customer data out but couldn't find any successful methods for exporting notes data. I did find a couple of products for sale in the $300-$500 range which could ostensibly do that for me, but for a one-time deal like this I prefer elbow grease to tapping my limited available budget. The method I landed on as the best choice for getting data out of ACT! was to setup a connection to the source database file in Excel. Once again, the version of ACT! I'm working with requires Excel 2010. Along the way I did try running the data connection in Excel 2016 and it did not work.
The steps for setting up the data connection in Excel are as follows:
In the Data tab select From Other Sources - From Data Connection Wizard
Select Other/Advanced and click Next
Select ACT! OLE DB Provider for Reporting and click Next
In the Connection tab, select your database file (.PAD file extension) from wherever on your network that's stored, enter your ACT! user credentials, and click Test Connection to ensure that you're able to connect. Then click OK.
Select the desired table to export
Export into new worksheet


And boom, there I was able to get data out from the underlying contacts (VRP_CONTACT) and contact notes (VRP_CONTACT_NOTE) tables. Maybe it won't be so painful to extract that notes data after all. Eeeeeeexxxcellent!
With the data exported to Excel, I got to work writing formulas to convert it into our staging worksheets for upload into Salesforce. A detailed explanation of how those formulas work is beyond the scope of this case study, but you're welcome to download a copy of my ACT! data conversion template and pick them apart. The general idea is that the formulas get the data you need into the right columns, then select all and copy, paste values over the formulas, get to work cleaning it up, and once it's nice and pretty push it in to the new system.
It's important to note that in my experience the data connection proved to be brittle. It crashes easily, including every time I clicked the Refresh All button in Excel's Data tab. Therefore to update the data it was necessary to import each table again into a new tab, then go into the staging worksheets and run find-replace operations to modify the formulas to reference the new tables.
So I was chugging along getting data transferred from the source tables into the staging sheets when I got to the notes data and noticed something awry. That VRP_CONTACT_NOTE table had exported all of the notes data (enclosed in a ton of artifact coding), but there's no column indicating which customer each note belongs to. *commences swearing under my breath* So I had all the notes data in hand but no way of linking it to the proper customer records. That's a problem.
I started searching for a solution. First course was testing a bunch ACT! table exports, but nothing I found contained the data I needed to link notes back to their customers. I finally figured out a way to do it. It's not an elegant solution, nor for the faint of heart, but in the end this got the job done.
Step one is getting the notes data out of ACT!, which I accomplished via the Notes-History canned report inside of ACT! like so:
In ACT! navigate to Reports
Select Notes-History from the list
In the General tab select HTML File for the report output, Create report for All Contacts, and uncheck Exclude 'My Record'
In the History tab, uncheck all of the boxes (my use case didn't include this data)
In the Note tab, ensure that the Notes box is checked and click Custom for the Date Range
Click OK to export the report to an HTML file


Important caveat here, trying to export too much data at once via this method causes ACT! to hang. On my first attempt I tried to export everything and left it running at the end of the workday only to check several hours later and find that exported an HTML report with all of the customers listed but every notes field blank. So I started chunking it out a year at a time. If it doesn't spit out the report within a few minutes, then I'd cancel the operation, shorten the date range, and try again. At a point I realized that it was hanging on shorter and shorter date ranges, and figured out that I seemed to get better results by closing and re-opening ACT! after each export. And after rinse-wash-repeating that process through 15+ years worth of notes data, it was all successfully exported from the system. On to the challenge of parsing the HTML into usable data.
When you look at the HTML export it has a header at the top stating what the report is and who ran it, and a footer stating when it was run and the page number. In between it lists the date, time, and content of each note grouped together by contact. The contact's organization name is listed along with their name. The first step to extrapolating this is to remove the header and footer information. Open the HTML file in a text editor or code editor. The header is the first 94 lines of the file. The footer is the last 10 lines. Delete those, repeat for each of your export files, then copy-paste what remains into a single combined file.
Once all of your HTML is combined into one long document, then it's time to get it in to Excel. The key concept to understand is that each field in the HTML file is preceded by a span tag with a class declaration which corresponds to specific fields like so:
f28 = Contact Name
f29 = Organization Name
f43 = Date
f42 = Note Content
Because each piece of data is on a separate line, and the type of data can be derived from the span class in the HTML tag, it's possible to parse this out and win. Not easy, but possible. The first step is to use Excel's text file import wizard to import the file, specifying a text delimiter after that span tag.

With the HTML in Excel, start find-replacing your way to victory. The first goal is to strip that span tag down to just the class value so you can match data by it. The first two find-replace example functions in the list found in the template file should do the trick. After that, there's a whole bunch of formula writing needed to massage the right data into the right columns and roll it on up to a flattened row. I'm not going to get into detail, but here's my ACT! notes data conversion template for you to pick apart and use as a starting point. The gist of what's going on in there is that it parses out the necessary fields and rolls them up to the first row for each contact. Because there can be multiple notes grouped under a contact, the formulas are designed to flatten each note out to its own column. The intent is that you take the result of the formulas and copy-paste the values into a new worksheet. Then sort that by the New Record column so that the flattened rows are on top and everything below them can be deleted. Then follow the cues of what's going on in the Flatten worksheet to concatenate all of the comments into a single comments field for upload.
Understand that when you're doing this with a decent size data set things can get slow. In my case there were about 95,000 rows of HTML to parse, the Excel file grew to over 55MB, and once all the formulas were in place the re-calculation process was painful. This was neither an easy nor a fun data conversion process, but it was ultimately an effective one.
0 notes
Text
Hack a Surface Pro pen to work as an easy PowerPoint clicker
The Surface Pro is a great device for running PowerPoint presentations - it’s portable and low-profile, can lay flat on a lectern or table to be invisible to your audience, and if you really want to get fancy you can enable ink mode and use the pen to annotate your slides via the touchscreen.
One thing that’s been an annoyance for me though is that there’s no way (out of the box) to enable the button on the Surface Pen to work as a presentation remote. There is however a way to map custom keystrokes to that button, using a third-party application called AutoHotKey. Here’s the script that I use to make this happen:
#NoEnv ; Recommended for performance and compatibility with future AutoHotkey releases. SendMode Input ; Recommended for new scripts due to its superior speed and reliability. SetWorkingDir %A_ScriptDir% ; Ensures a consistent starting directory. #SingleInstance force
#F20:: if(WinActive("ahk_exe POWERPNT.EXE")) { Keywait, LWin Keywait, RWin Send, {Down} return }
#F19:: if(WinActive("ahk_exe POWERPNT.EXE")) { Keywait, LWin Keywait, RWin Send, {Up} return }
#F18:: if(WinActive("ahk_exe POWERPNT.EXE")) { Keywait, LWin Keywait, RWin Send, b return }
The key concept here is that the Surface Pen button’s normal behavior is to fire off the following Windows Key (#) plus function key combinations:
Single-click = #F20
Double-click = #F19
Click and hold = #F18
The way that the above script works is that it sets some standard environment variables, then reprograms the keystroke combinations to:
Single-click = Down key
Double-click = Up key
Click and hold = b key
So with this script is running, the Surface Pen does the following in PowerPoint:
Single-click = Next slide
Double-click = Previous slide
Click and hold = Blank screen (press again to un-blank)
Notes about this script:
The key mappings are wrapped in an If statement so that the button is only re-mapped if PowerPoint is the active window. Because there is no Else statement, the button otherwise does nothing.
The mappings include KeyWait functions to release the Windows key before sending the command. Before putting this function in I encountered a couple of issues with the Windows key remaining active after exiting PowerPoint, and occasionally popping up the start menu when pressing the button.
I mapped up and down keys in this version of the script, whereas in a past version I’ve mapped left and right keys. The latter had worked great until a Israeli presenter at my org’s conference encountered trouble with the button moving their slides the wrong direction. It seemed that the presentation being saved in a right-to-left language caused the right and left button mappings to behave opposite as intended. I think that up and down should resolve that, but haven’t tested.
A final step after creating the script, place a shortcut to AutoHotkey in C:\ProgramData\Microsoft\Windows\Start Menu\Programs\StartUp so that it runs automatically every time the computer boots up. Or don’t and just run it manually as needed. In my use case, where I’m setting up the tablet for other people to use, automated startup is essential.
And of course, this is just one example of what AutoHotkey can do. It’s a neat scripting tool that provides plenty of control over what the Surface Pen button or any other keystroke combination does. This script can be pretty easily adapted to other uses.
0 notes
Text
Personal career reflection upon changing jobs
This blog post is going to be a bit less technical and more personal than most of what I write here. I recently left my position at the organization where I worked for the past eleven years (where I established and built my career) to accept a job with another organization. As I prepare to walk into a new door and start a new adventure I’ve been reflecting on what I learned, how I work, what I want to keep and change, and what I hope to accomplish at the outset of my new role.
This past week has been a transition week off between jobs, and it feels like it’s been everything that should be. I caught up on personal errands and things around the house, bought some new clothes, got a haircut, went to the gym almost every day, got a massage, had some friends over for a crafting party, spent a healthy amount of quality time with my toddler and got a couple of papa naps in snuggled up with her. I also took some time to visit the reference library of the organization where I’ll be working to explore their materials on my own time, wrote a long overdue blog post reflecting on a past project, picked up and started reading a copy of The Happy Healthy Nonprofit, and went back through the personal career reflection notes that I jotted down a few months ago when I was gearing up to explore the job market.
I’m finding that those personal reflection notes are really helpful for taking stock of myself personally to prepare my mindset for starting the new job. When I did my personal retreat day back in November I started off by taking an eParachute assessment. The results of which went like so:
Holland code: Investigative, Enterprising, Artistic
Favorite fields: Computers & Electronics, Administration & Management, Design
Favorite skills: Create, Innovate, Invent, Initiate, Lead, Be a Pioneer, Follow Through, Get Things Done
I moved on from the assessment to just jotting down the hats that I wore in my previous organization, i.e. what skills and experience I bring to the table:
Systems administrator
Windows server and desktop
Firebox (WatchGuard firewall)
Exchange Server (previous experience managing on premise, current experience managing Foocie 365)
SharePoint Server (same as above)
Web servers and content management systems
Drupal
WordPress
Moodle
Omeka
IIS 7 (Windows Web Server 2008 R2)
LAMP stack setup on Ubuntu Linux
Database administration (support, configuration, strategy, report writing)
Data analyst
Business process analyst
Procedure writer
Web development
In house project manager for Drupal projects / liaison with contract developers
In house WordPress developer
Little bit of Moodle config, theming, administration
Bootstrap and jQuery Mobile development
HTML email design
Technology operations support
Desktop software support
Microsoft Office expertise - in particular advanced Excel skills and PowerPoint template development
PC repair and troubleshooting (and building)
Event audiovisual and technology management
Strategic planning and budgeting for technology
Technology procurement and vendor negotiation
Data manipulation / production
Product and program development
User experience research and design
Web content strategy facilitation
After writing down my skills and experiences, I moved on to writing down personal value statements. These are statements I believe to be true about myself and which describe my ethos as a professional:
I am more than just an IT director
I think strategically
I approach challenges from a business needs perspective
I work my ass off
I take steps back to evaluate course and look for opportunities to work smarter
I have fun by bringing energy, passion, and a positive attitude to my work
I value everyone’s input and try whenever possible to build consensus
My integrity means everything. I try to do the right things for the right reasons at all times.
I am creative. I thrive when given the opportunity to build something new.
I am human, I try to be the first to admit my mistakes, I recognize that others have circumstances and perspectives different from my own.
Empathy and kindness are important
I am detail oriented obsessed. Not every detail has to be perfect, but every detail has to be considered and made to work with the whole.
I try to follow up on every single thing that I tell people I will follow up about. I’m not perfect and sometimes something falls through the cracks, but I make a sincere effort to never leave a loose end hanging.
I’m a gap plugger. I’m not really interested in angling to get to do a specific task. I do really well on teams where people work their strengths and I can back them up by taking on supporting work and filling in the gaps.
I am smart, talented, and a quick study
I enjoy taking on new challenges
I have a tendency to take on too much. I have a hard time saying no. I have trouble not pursuing great opportunities, even when I’m already overloaded.
I tell others about my mistakes and failures, and the lessons learned from them. Sometimes I’m maybe a bit too talkative in that regard.
After accepting the new position and preparing for my transition week, my friend Rose suggested taking stock of what I want to keep and what I want to leave behind in the transition. In that spirit, here are a couple of things I know I want to change:
Burnout. I’ve been in the habit for far too long of eating lunch almost every day at my desk over email or project notes, of spending 9-plus hours in the office most days and then taking some work home most nights, of checking work email on my phone first thing in the morning and last thing before bed. I need to change those habits, and think that doing a little better job at self-care will make me happier, healthier, and more productive. My immediate goals are to take an actual break at lunch break every day, and not obsess over email at all hours. There are of course going to come times where projects or busy work cycles demand more of my time to get through, but I hope to make that the exception rather the the rule.
Leaving space for others to lead. At my previous organization I felt like there was a degree of “innovation fatigue” at hand. It was a bit of a double-edged sword. My title there for the past four years was Director of Innovation and Technology, it was my job to introduce and lead technology innovations. By the time I left, the org was pretty far ahead on the curve compared to similar sized nonprofits. But what I found over the past year or two was that I had become both the person on staff introducing and making the case for new technological innovations, and then also the person in charge of leading development and implementation of them. And subsequently, I often then became the go to person to operate and maintain that system indefinitely after. It’s not that I don’t know that people appreciated that. Just the opposite, I know from numerous heartfelt conversations with former co-workers and members that they appreciated my work deeply. But I feel that it was too often “my work.” I failed to leave space for others to lead. When I was leading the charge forward with improvements and innovations, what I wasn’t commonly doing was giving others space to champion progress. And by not fostering a sense of ownership for new systems innovations among my co-workers, I helped foster a situation where responsibility for those improvements was too much the domain of one person instead of being shared by the team. This is an area where I hope to do better in my new role.
And conversely a couple of things I hope to keep:
Leading with a strategic perspective. From some of my earliest implementation projects I heard some very flattering compliments about how the way that I think strategically is uncommon and very valuable. It just seems natural to me that the best approach is one that focuses on what the business goals are and then works to find and implement systems solutions that best meet them. I’ve been very lucky to work with people who value and foster that approach, and as a result it’s become pretty ingrained in how I approach problem solving. I know that going in to a new situation there may be pressing challenges and competing interests that it’s going to take me a little while to fully understand. My hope is that I’m able to strike a balance between being able to triage the most pressing pain points while also being able to have the time and access to information needed to develop a full picture of what the business needs are before pressing forward with larger system design decisions.
The freedom to innovate. Something I appreciated about my past job was that I had the access and authority to implement some out-of-the-box stuff. Most of the staff there now work on desktop computers that I assembled myself (and which incidentally have proven to be more reliable and perform far better than any mass market PC you can buy off the shelf). The AMS database has a javascript call injected on the back office attributes page to utilize Bootstrap to collapse a horribly long single form into multiple manageable sections which can be expanded as needed. When we launched a mobile application for our annual conference I registered an app. subdomain for the org and pointed it at a single page website which analyzes the user agent to direct iOS users to the appropriate App Store listing, Android users to the appropriate Google Play listing, and everyone else to the web version of the app. Like I mentioned before, these types of things were too often “my work.” I could certainly do a better job of empowering others to champion innovations that we work together to make happen. But I really hope that doesn’t come at the price of not having the trust and access to systems needed to empower these changes, and to which I grew accustomed at my last job.
On another tip from Rose I reviewed a white paper from http://intelligentexecutive.com called How to better approach your first 100 days in position. Although geared towards high level sales executives in larger companies, there are some really good points to sketch out a gameplan of general goals for the first three months at a mid size nonprofit:
When getting to know new colleagues, engage on what their work role is and how it impacts the organization. The white paper recommends doing this as opposed to “some banal generality” to set the tone for a working attitude. I appreciate that but also think there’s room to balance it with some genuine personal interest in who my new co-workers are and why they feel their work matters.
Establish focus for my new role, set SMART objectives (Specific, Measurable, Achievable, Relevant, Timebound)
Personal objectives should be attainable yet stretch performance, aiding development and growth
Be clear about what personal development will be needed to do my job and build it in to the plan. One instance of this I already know is that I’ll be supporting a mixed environment of Windows PCs and Macs, but I don’t have a lot of experience on the Mac side.
Look for high impact quick wins
Empower people and create opportunities to lead - yep, the white paper said this too :)
Do not assume that interpretations of what is expected of me are correct. Check in and make corrections as needed.
By the end of the first 100 days, I should have a solid understanding of how the organization works and what’s needed from my role.
Ask a lot of questions
Develop and maintain a sense of urgency
At this point I feel like I’ve self analyzed and prepared as thoroughly as I can. It’s time to get some rest and prepare for day one. I’m truly looking forward to this.
0 notes
Text
How to shop for a computer
Almost a year ago I published this guide on a website called personalcomputershopper.com. Long story short the project didn’t really catch on and I took it down just a few months later. But I still feel that the content is valuable and am preserving it here.
Last updated: February, 2017
Introduction
Amidst a crowded landscape of desktop, tablet, laptop, and hybrid options, it can be overwhelming to figure what kind of computer best suits your needs. This guide is a resource to help explain personal computing options, break down specifications, and explain in plain language how it all translates to everyday use. Finding the right computer for you is about striking a balance between what you need, what you want, and what you can afford.
Initial considerations
Before you start pricing out computers, stop and ask what you need the computer to be able to do. If you're planning to replace a computer could that computer be upgraded instead?
Do I really need to replace my computer? Can I upgrade what I already have?
Before we begin, it's worth the time to stop and ask this question. (If you're not replacing an existing computer then skip this.)
Are you replacing your computer because the old one died, because it's too old to run the latest software, or because you're just frustrated with how slow it's gotten? If the answer is the latter, and it's not more than a few years old, then consider whether a tuneup and/or upgrade is a better choice than replacement. Here are a few things you can try:
Tune up your computer. I recommend a free program called CCleaner. Once you've installed it take the following actions:
Analyze and sweep out the junk
Go through the list of installed programs and remove anything which isn't needed. If you're unsure about whether something is needed, check online at Should I Remove It?
Go through the list of startup files and disable services which aren't necessary. Be careful here not to disable anything critical like your wireless card or touchpad driver. Look for easy targets instead, like Adobe Acrobat Speed Launcher or iTunes Helper. Once they're disabled on startup it might take a couple extra seconds to open these items when you launch them, but that's time you save every time the computer boots up.
Install more memory. RAM is typically the easiest hardware to upgrade in a computer. Go to Crucial.com and use their Advisor tool or System Scanner to analyze your system. They'll let you know what type of memory your computer takes, the maximum amount that can be installed, and the number of open memory banks you have available.
The latter point is important when considering an upgrade - it's much more cost effective to fill an open memory slot than replace an existing chip.
It's also important to note the type of memory installed. DDR3 was the standard for the past several years, and DDR4 is the new standard in computers using Intel's latest CPUs (since around late-2015). Memory prices are low right now, expect to pay approximately $4 to $5 per gigabyte of DDR3 or $5 to $6 per gigabyte of DDR4 RAM. On the other hand DDR2 RAM was phased out several years ago, it has lower capacities, and now costs about considerably more per gigabyte than DDR3 or DDR4. If your computer takes DDR2 RAM then it's a far less cost effective upgrade, and that computer is probably at an age where it's due for replacement anyway.
Upgrade your hard drive to a solid state drive. From a performance standpoint an SSD is the most effective upgrade you can install in your computer. SSDs have lower capacities than traditional hard drives but perform 5-10x faster. That speed translates into dramatic increases in boot time, how quickly applications load, file access and search time. Up until recently an SSD upgrade came at a fairly high cost, but prices have now dropped to the point where most 250 GB SSDs now sell for between $60 and $130. To clone your existing hard drive you'll also need an external hard drive enclosure or USB to SATA cable, either of which cost around $10-$15. Upgrading to an SSD is a little more involved than installing RAM, but very do-able for desktops and most laptops. It's basically just a matter of cloning your disk and then swapping out the part.
In most laptops at least one memory bay and the hard drive are easily accessible by removing a panel on the bottom of the unit, but it's not always the case. I recommend searching online for a copy of the service manual before buying parts to upgrade. And remember, when undertaking any computer upgrade always disconnect the power cord, remove the battery, and touch something metal to discharge any static electricity before touching any internal components.
Do I need a desktop, laptop, or tablet?
Yes.
OK, really, that answer is a little contrite but it's a start. Here's a quick breakdown:
Desktop computers generally offer the most bang for your buck and the most customization options. They can be well suited for resource-intensive applications. They're just not portable.
Laptops offer a complete computer in a portable package. They can be attached to a full size keyboard and monitor at your workstation just like a desktop, and are generally well suited for everyday productivity. Laptops are somewhat more expensive than desktop computers for the same amount of computing power, while being not as customizable, upgradable, or easy to repair as desktop computers.
Tablet computers are generally cheaper and less powerful than either desktops or laptops. They are also the smallest and most portable option. A tablet computer has a touchscreen but no built-in keyboard. In general they are best suited towards web surfing, media consumption, and gaming. Tablets are less well suited for everyday productivity.
For a deeper look at the differences among categories I highly recommend checking out the Computer Buying Guide on GCFLearnFree.org.
There are some variations on the market which blur the lines between categories, such as convertible laptops and all-in-one desktops.
Convertible laptops (sometimes called 2-in-1 laptops) combine the features of a laptop and a tablet. They can be used either like a traditional laptop or as a touchscreen device without the keyboard. The transformation is accomplished by the screen hinging around 360 degrees, pivoting to lay flat against the keyboard, or detaching altogether. Convertible laptops are feature-rich but come at a cost. While they're priced similarly to laptops they typically offer less bang for the buck, and are generally bulkier than a true tablet.
All-in-one desktop computers have their components built in to the display. As a result they're more compact and very well suited for environments where space is at a premium, such as a kiosk, on a kitchen counter, or at the register of a retail establishment. The compromise is that they often use components designed for laptops and thus have the same disadvantages compared to desktops in terms of price, customization options, upgradability, and difficulty to repair.
What operating system should I choose?
Microsoft Windows
Windows is by far the most widely used operating system installed on personal desktop and laptop computers, with a market share around 85 to 90%. Consider it a default option suitable for most uses.
Apple OS X
OS X is the operating system that powers Apple Mac computers, and has roughly 10% market share. People who prefer OS X often cite its refined user experience and simplicity. Macs are particularly popular among artists, musicians, designers, and software developers.
Apple operating systems are closed platforms which are limited to running only on devices manufactured by Apple. OS X only runs on Macs, iOS only runs on iPads and iPhones. And OS X integrates tightly with iOS, so if you use an iPhone and/or iPad there are several ways in which Macs provide seamless transitions between using those devices and using your computer.
Apple devices have a reputation for premium quality and cutting edge design, and their customer service via in-store support is among the best in the industry. Their quality and style comes at a cost though. Macs typically cost at least 50% more than other computers with comparable specifications.
There is a common notion that Macs are more secure than Windows computers. This is true, though not because OS X is inherently more secure. Most malware targets Windows' bigger market. Macs are less frequently targeted but not impervious to malware and threats do exist. Mac owners are well advised to not take security for granted.
It's worth noting that Macs are capable of running Windows in addition to OS X, either via dual booting or third-party virtualization software which enables running both operating systems at the same time. Getting the best of both worlds in this way requires adding the cost of a Windows license on top of the already higher cost of a Mac though.
Generally I advise that you go for a Mac if you strongly prefer the operating system, if the integration with other Apple devices is important to you, if you work in an industry where applications specific to your job are only available for Mac, and if you're comfortable with paying Apple's price premium. If none of those things describe your situation, then you're probably better off getting more bang for your buck with a Windows PC.
Google Chrome
Chrome OS by Google is a minimalist operating system built around the Chrome web browser. Chromebooks (laptops) and Chromeboxes (desktops) offer essentially just that web browser plus access to a few system settings. All applications run inside of Chrome. Some of those applications run offline, but most are dependent on internet connectivity to function.
The main advantages are cost - most Chrome OS computers sell for under $250; and security - since Chrome OS doesn't actually install programs locally they're nearly impervious to malware. The main disadvantage is the inability to install programs locally. If you need your computer to run Microsoft Office or any other local software (not web browser based) then Chrome OS is not the right choice.
For more information about whether a Chromebook is right for you, see this guide on GCFLearnFree.org.
Chromebooks and Chromeboxes have become popular options for education and computer lab scenarios. They're great for situations where all you need is a lightweight computer to access the internet. We have a Chromebook that's an ideal everyday kitchen counter laptop at home and occasional travel computer.
Google has been moving towards converging Chrome OS and Android for a couple of years, and it was recently revealed that all Chromebooks launching in 2017 will be compatible with Android apps. While it's yet to be seen how well this is going to work, the implication is that the Chromebooks of the future will also work as de-facto Android tablets.
Tablet and mobile operating systems - iOS, Android, Fire OS, Windows
If you're shopping for a tablet computer the operating system choices are a little different.
iOS is Apple's tablet and mobile operating system, running on iPads and iPhones. As with OS X it is a closed system which is limited to only these devices manufactured by Apple, devices which largely defined the modern tablet and smartphone markets when they were released. iOS integrates tightly with OS X and is also renowned for it's elegance and simplicity. The Apple made devices it runs on are premium hardware and are priced accordingly in the market.
Android is an open source tablet and mobile operating system backed by Google, which runs on devices manufactured by dozens of manufacturers. It is the primary competitor to iOS on tablet and mobile devices, long since surpassing it in market share to become the most widely used operating system on the planet. Android is a much more customizable operating system than iOS, with greater flexibility for users to control the look-and-feel and for applications to access more of the hardware settings and share data with other applications. The Android user experience has come a long way in recent years catching up to iOS, but because many manufacturers overlay custom "skins" and features the end result varies. Fragmentation is a serious issue in the Android ecosystem, and security implications in particular are a cause for concern. From a hardware standpoint, Android devices run the gamut from premium hardware on par with Apple devices down to extremely inexpensive hardware. In general Android devices provide better bang for the buck, and current pricing trends (especially in the smartphone market) are that mid range to high end hardware is rapidly getting cheaper.
Fire OS is a heavily customized version of Android made by Amazon and used on Amazon's Kindle Fire line of tablets. Fire OS does not incorporate Google services, including the Google Play store from which most Android applications are published. As a result, only Android applications listed in the Amazon Appstore can be installed on a Fire device. Fire OS is far less customizable than other Android devices and is largely geared around delivering content from Amazon. Because the hardware is subsidized by Amazon, Fire devices provide better value for the money than most other devices on the market. Other advantages are durability and strong customer support.
Microsoft Windows has been trying and struggling for years to gain a foothold in the tablet and mobile OS marketplaces. According to one report, 2015 was the year that Microsoft "finally got tablets right," estimating that their market share had just surged to 10% and projecting growth to 18% by 2018. Windows tablets can run the same software that runs on Windows desktop and laptop PCs, are are increasingly displacing laptops and desktops at the lower end of the personal computer market. Hardware options run the gamut from less expensive hardware that's priced on par with mid range Android and low end iOS tablets, up to very high end options with the same internal components as higher end PCs that are priced accordingly.
The brain analogy
After you've decided on a type of computer and operating system, then you need to find a computer in that class which can do what you need it to do. I'm a fan of analogies, so here's one which explains core computer components like areas of a brain:
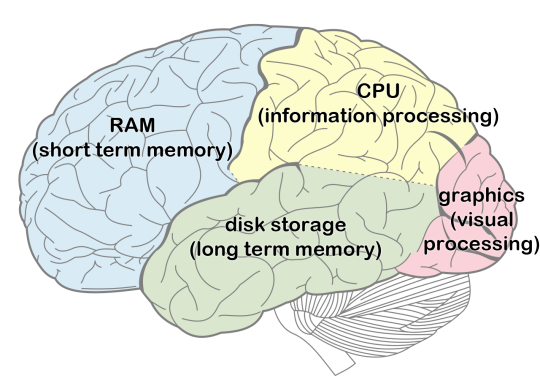
cpu = information processing (Parietal lobe)
graphics = visual processing (Occipital lobe)
ram = short term memory (Frontal lobe)
storage = long term memory (Temporal lobe)
The key when looking at computer specifications is to understand which tasks each of these areas impact and how they translate to your computing needs.
CPU
The CPU (Central Processing Unit) is the core component that basically determines how smart your computer is. Brainpower and cost are directly related here so it pays to choose wisely. When thinking about how much computing power you need, consider the following:
A low end CPU is all you need to surf the internet, answer email, and store some photos
A mid range CPU does a better job with multitasking, word processing, spreadsheets, desktop publishing, light photo editing or casual gaming.
A high end CPU is necessary if you're planning to use the computer for processing intensive tasks such as database queries, complex spreadsheet calculations, video editing, heavy photo editing, or graphically intense gaming.
When shopping for a CPU you'll find that they're primarily measured in clock speed and cores.
Clock speed determines how fast the CPU can think, and the faster it can think the more quickly it can complete demanding tasks.
Number of cores determines how many tasks the CPU can process at once. Some software, especially more sophisticated and demanding programs, can utilize multiple processing cores simultaneously to spread their workload out and make the most of higher-end CPUs.
The finer points: Other CPU characteristics include cache size, type and amount of memory supported, and integrated graphics capabilities.
The cache is a small amount of memory built directly on the processor die. It helps a CPU think more quickly by reducing the average time needed to access frequently used data.
Type and amount of memory supported determine what kind of and how much RAM (i.e. short term memory) can be installed in the computer.
Integrated graphics capabilities determine how many monitors can be connected, their maximum display resolution, and how well the computer can handle tasks like playing videos games or rendering media.
In mainstream computers the CPU costs between $40 and $450, making it potentially the most expensive part in your computer. The CPU is also anywhere from extremely difficult to impossible to upgrade later. In general it helps to understand how powerful a processor you need right now, but if your budget can support going a step higher in this area that's a wise investment for the long run. Several years down the line a little more powerful processor might help stave off obsolescence a bit longer.
Graphics processor (GPU)
The Graphics Processing Unit (GPU) determines how good your computer is at rendering images. For most users the integrated graphics capabilities built in to modern CPUs are more than sufficient. An Intel spokesman was quoted in January 2016 as saying that they "have improved graphics 30 times what they were five years ago" and noting that the integrated graphics inside Intel's 6th generation Core processors can handle three 4K monitors simultaneously. This illustrates the point that for several years mainstream processors have been more than capable of driving multiple displays and playing high definition video. The only reason you might need a discrete graphics card is you have specific applications which require extra graphics processing power, such as video editing, moderate-to-heavy Photoshop use, building a gaming rig, or wanting to hook up a virtual reality headset. Some much higher-end applications such as CAD rendering, medical imaging, and machine learning also make use of GPU acceleration.
On the laptop side of the PC market, there are limited GPU options available - ranging primarily from entry level to mid-range graphics cards, and largely marketed as gaming computers. On the desktop side of the PC market there are myriad options and the sky is the limit for how much graphical oomph (and cost!) you can build in.
Random access memory (RAM)
When shopping for a computer it's important to get a machine with enough memory to handle the tasks you're going to use it for. Having more memory than you need doesn't provide any performance benefit, but having less than you need can severely slow things down. RAM size is equivalent to your computer's short term memory capacity. If it fills up entirely then the computer resorts to page file swaps transferring information to and from disk storage (long term memory) at far slower speeds.
To gauge how much memory you need, think about the applications you run and how much multi-tasking you do. Keep in mind that web browsers can utilize a lot of memory, and the more tabs and windows you keep open the more they use. If you're the type that keeps dozens of browser tabs open so you can go back to them later, you might need a little extra RAM in your computer for that to not slow you down. An easy way to check how much RAM you're using right now is to click Ctrl-Shift-Esc (on a Windows computer) to open the task manager. Check your memory utilization in the performance tab. And if it's at or near 100%, try closing some browser tabs and then check again.
Generally, in 2017 I recommend getting a computer with at least 8 GB of RAM and 16 GB preferred. If your computing needs are light then 4 GB might work, but be wary. Even if the computer you buy has enough memory to run smoothly right now, will it still be enough two or three years down the line? As time goes on software gets increasingly demanding and utilizes more and more memory.
The good news is that in most cases adding more RAM is the easiest thing to upgrade later on down the line. On many laptops there's a panel on the underside which you can open to expose one or both of the memory module ports. Taking out one screw and adding (or replacing) the chip in that slot is pretty much all there is to it. Be aware that this isn't the case on all laptops though - some models are not user-serviceable (i.e. not easily opened up), some have the RAM slots deep inside the machine, and some even have the RAM soldered to the mainboard which makes them impossible to upgrade. If you plan to upgrade the RAM later, verify that's possible before purchasing.
Disk storage
Disk storage is a computer's long term or non-volatile memory. (As opposed to RAM which is called volatile memory because its contents clear out every time the power goes off.) Disk storage retains what's written to it. It's where your operating system and applications are installed, and where your data resides.
Hard disk drives (HDDs) long ago attained capacities far greater than most people need for everyday use. Whether you have a 500 GB, 1 TB, or 2 TB hard drive, disk space for normal computer operations will never be a problem. (Media file storage - such as music, videos, or high resolution photos - may be a different story.) So rather than capacity I prefer to focus on performance. While some hard drives are a little faster than others (5,400 RPM models versus 7,200 RPM models), the truly radical jump in performance comes with an upgrade to a solid state drive (SSD).
SSDs utilize a different architecture than HDDs. Rather than a magnetic platter spinning on a ball bearing, an SSD is comprised of NAND flash cells. SSDs have no moving parts, hence the "solid state" moniker. For this reason they also use less energy, generate less noise and heat, and are less susceptible to damage from a physical shock than HDDs. And SSD performance - data read and write speeds - is 5-to-10 times faster than an HDD. Which means the computer boots that much faster, every program loads that much faster, file system searches and opening files happen that much faster, etc., etc.
In this day and age I discourage buying any computer without an SSD, or if you do find a great deal on a machine which only has an HDD then plan to upgrade it to an SSD right away (and turn that HDD into an external hard drive by putting it in an enclosure). It's true that SSDs are still many times more expensive per gigabyte than HDDs, but considering that HDDs are far bigger than you probably need the cost difference between an oversized HDD and a right-sized SSD isn't very much. Go for the smaller, higher-performing solution and either use a high-capacity external hard drive or install a second high-capacity HDD in your desktop for those media files.
I do however recommend not going too small on the SSD. I've seen Windows computers with 128GB SSDs fill up to capacity after a few years of update files piling up, Outlook data stores growing, and remnants left by other software sticking around. It's possible but painful to use disk cleanup utilities to fight a full disk. 256GB SSDs are a marginal step up in price and worth it to save the headache later.
There's also a middle ground called a Solid State Hybrid Drive (or SSHD) which pairs a traditional hard drive with a small (usually 8GB) flash memory cache to accelerate it. SSHDs offer the capacity of an HDD with better performance, at a slightly higher cost. They're nowhere near as high performing as a pure SSD though. If you absolutely need lots of disk storage inside your laptop (not on an external drive), then an SSHD is a viable option to enhance performance over a traditional HDD while maintaining high capacity.
A new cutting edge of SSD technology has begun to appear in higher end laptops and the newest desktop computer mainboards. New M.2 SSDs utilizing a PCI express 3.0 (x4) interface now offer speeds 3-to-7 times faster than top-of-the-line conventional SSDs. The primary reason is because those conventional SSDs use the same SATA form factor and interface as traditional HDDs. The SATA 3 specification maxes out at a 550MB/second transfer rate. Most HDDs only deliver about 60-100MB/second speed, but SATA SSDs have been hitting the limit of the spec on both read and write speeds for quite some time. Current top-of-the-line PCIe SSDs are clocking 3.5GB/second read and 2GB/second write speeds, beginning to approach the 4GB/second maximum of the specification.
The rest of the computer
Since we've covered the core components with the brain analogy, the remainder of this guide will cover the rest of the computer; such as how to shop for a display, how to choose peripherals (keyboards, mice, webcams, etc.), and what the differences are among USB types. While these things aren't as big or expensive a part of the decision as the core computer parts, they ultimately play a big part in your computing experience and should be considered as a part of your overall budgeting and purchasing decision.
What to look for in a monitor or laptop display
Screen size and resolution are the main things to look for in a computer display, though not the only things.
Size is pretty self-explanatory, it's measured diagonally in inches. Most computer monitors and laptop displays now utilize a widescreen 16:9 aspect ratio. Resolution is quantified by the number of pixels (or dots) on the screen. Higher resolution displays can render a sharper picture, but more to the point they also just simply display more information. More room for information on the screen gives you more room to work, which helps increase productivity.
When shopping, know that higher resolution and/or bigger isn't always better. High resolution displays that are physically smaller will be information dense but text may appear quite small on the screen. If your eyesight isn't well suited to this level of information density then you may be better off with a larger size / lower resolution screen. Or you can compensate by turning text scaling up to make things more readable. It's also worth noting that older versions of Windows (prior to Windows 10) did not do a great job of scaling up to very high resolution screens. This is an area in which Windows 10 has greatly improved and Mac OS X has long performed better.
Laptop display considerations
It's still common to find laptop displays with only 1366 x 768 resolution on the lower end of the market. In mid range and higher laptops 1920 x 1080 is standard. On the high end, there are many with QHD (2560 x 1440), 3200 x 1800, or 4K (3840 x 2160) resolutions available as well. The Microsoft Surface Book offers a 13.5" display with a 3:2 aspect ratio and 3000 x 2000 resolution.
If you're shopping for a MacBook, the current generation MacBook Air offers only 1440 x 900 resolution. All other MacBook models have Retina Displays - the 12" MacBook at 2304 x 1440, the 13" MacBook Pro at 2560 x 1600, and the 15" MacBook Pro at 2880 x 1800. The term Retina Display was invented by Apple to denote a screen with very high pixel density.
There are two main types of laptop displays - glossy and matte. Glossy displays are shinier and colors appear brighter on them. However they reflect more light and are more prone to glare and reflections when used in direct sunlight. Matte screens (sometimes labeled anti-glare) have fewer of these problems though generally aren't as attractive as glossy screens. Windows laptops come in both varieties while MacBooks now are only available with glossy screens.
Another thing to look for in a laptop display is whether it has a touchscreen. This is pretty self-explanatory. For my part I've become accustomed to touch enabled laptops and like the option of interfacing with the computer that way, sometimes my finger is just closer to the screen than it is to the trackpad. Touchscreen displays are always glossy and the option adds some cost. They're now commonly found on mid-range and higher Windows laptops, and also available on a few Chromebook models. MacBooks do not yet offer touchscreens.
No matter what type, size, or resolution your laptop has - remember that you can also hook it up to a computer monitor when working at your desk. with the built in laptop display sitting alongside it as a second screen. Just be sure to compare the display output ports available on the laptop to the inputs on the monitor when planning this setup.
Peripherals - webcams, keyboards, mice
This guide wouldn't be complete without covering the important yet often overlooked peripherals which round out your computing experience.
When it comes to the keyboard and mouse on your desk, many people are content with the cheap keyboard and mouse packaged with a consumer desktop. Or with using the keyboard and trackpad built in to the laptop. There's nothing wrong with these, they get the job done, but there are other options which can provide greater comfort and enhance productivity for power users.
When considering laptops the quality of the built in keyboard and trackpad generally follows the overall expense of the computer; cheaper laptops have poorer input devices, more expensive laptops have better ones. I recommend reading reviews for mentions of how a specific model you're considering performs. Lenovo has a reputation for making some of the best laptop keyboards on their higher end business models but not on their lower end consumer models. Business class laptops from Dell and HP also generally have very good keyboards. And Apple MacBooks have a reputation for good keyboards and best-in-class trackpads. Many mid to high end laptops now also offer backlit keyboards, which is a very nice feature to have. The keyboard on your laptop is not at all upgradable so it's wise to consider this carefully when shopping.
A wireless keyboard and mouse set is a common desktop upgrade. They can be a good option to reduce cord clutter and provide better range of motion, are available at a wide range of price points, and some of the higher end options add additional features and comfort.
For a high end ergonomic option, Microsoft's new Surface Ergonomic Keyboard is garnering some rave reviews.
A mechanical keyboard is another option to consider. This PC World article does a good job of explaining the benefits of a mechanical keyboard. It boils down to durability and a superior typing experience. Mechanical keyboards are expensive though, usually selling for $75 to $200 or more.
"Gaming" keyboards and mice offer nifty lighting features and the ability to program automated keystroke combinations at the push of a button. I put gaming in quotation marks because while the equipment is marketed towards gamers, the functionality can also enhance other productivity.
There's not a lot to say about webcams which are built in to laptop computers. For the most part they're basic quality without much variation in the market. USB webcams for your desktop setup vary widely in quality and features. As with keyboards and mice I'm partial to Logitech products for their quality and reasonable prices. Logitech webcams range from the basic C270 which usually sells for $20 to $30 up to the business focused C930 which offers full high definition video and motion tracking and usually sells for around $100.
Buying guide - where to shop for a computer
The approach I recommend for buying a computer is to first get a general idea of what you need, then decide what your budget is, then try to find the best deal on something that fits. If you're in the market for a desktop PC and have the capacity to build it yourself, that's going to garner the best result in terms of flexibility and price-to-performance ratio, while likely being more reliable than anything you can buy off-the-shelf. In the absence of that here are some suggestions for finding the best deal possible:
Pounce on a sale or coupon
The trend these days is towards flash sales and coupons with extremely limited time periods or quantity caps. The bad news is that a deal you see today could very well be gone tomorrow. The good news is that there's always another deal right around the corner. Doing your homework up front to figure out what you need and are willing to spend can position you to pounce on a great deal once you see it. Here are some places to find those hot deals:
PC Mag best deals
Dealhacker
The Wirecutter Deals
Tech Bargains
eDeal Info
Slickdeals
Apple Insider Deals
Be aware that that while these sites list many of the best deals out there, not everything they list is a bargain. It's wise to always double-check the price against other sources before pulling the trigger.
Retail stores (online or brick-and-mortar)
The Microsoft Store (both online and physical locations) has emerged in recent years as a top tier place to purchase a computer. Their specialty is the "Microsoft Signature Edition" line of PCs which come free of any the pre-installed bloatware that many manufacturers load up their products with. Microsoft Stores also offer a very good customer service experience, and training and troubleshooting assistance on the products they sell. Their pricing is generally decent, and they get competitive with regular coupon offerings. I don't recommend buying cables or peripherals here, because while the quality of what they offer is generally great their prices on these items are not competitive.
The Apple Store is a good place to buy the latest and greatest Mac, and if you shop their online store you can customize the specifications. The advantage of buying directly through Apple is their selection, customer service and support. Apple typically does not compete on price. If you're hunting for a better deal on a new Mac, a couple of good places to shop are B & H or Adorama. Both often run discounts on new Macs, though be mindful to check whether you're buying the latest model and weigh that against the discount.
Amazon is my go to place for cables, monitors, keyboards, mice, and miscellaneous peripherals. They usually win on price and selection when shopping for these items. Understand though that although Amazon has many great deals available, not everything on there is a good deal. In fact there's a strange regular phenomenon on Amazon where sellers in their marketplace list antiquated technology for sale at absurd prices. Buyer beware. Also, while Amazon is generally great for computer parts and secondary items, it's a very hit-or-miss place to purchase an actual computer. PCs are not their specialty, the specs listed can be spotty, and pricing is all over the place. Again, some good deals are available but be cautious and always compare them to other sellers before purchasing. You can also compare Amazon against itself before buying, through a price tracking website called CamelCamelCamel.
Newegg is another go to place for monitors, peripherals, and computer parts. It also can be a very good place to shop for a computer, as their search function typically does a very good job of filtering specifications and their descriptions do a good job of listing what's under the hood. Newegg is generally competitive with their day-to-day pricing and very competitive with their coupon codes and sale pricing, which you can find (or sign up to get via email) here.
Micro Center is the only remaining brick-and-mortar computer parts retail chain in the U.S. It is a great place to buy components, monitors, and various accessories. It's a decent place to buy computers themselves and they offer the benefit of having a competent service department. Be aware though that Micro Center's floor sales staff is not always highly knowledgeable, and they work on a commission or incentive structure. Sometimes I get the impression that they try to steer customers towards certain products which are in their interest to sell more of. My observation is that Micro Center's prices can generally be hit or miss. Some of their in-store only computer component deals (such as Intel processors) are by far the best pricing available anywhere. Advertised prices are generally very competitive. But their pricing on some other items can be on the high side. Overall I recommend shopping there when building a computer, and can accept that a little higher price on some components is both the cost of convenience and offset by lower prices on other components.
I don't typically recommend buying a computer at a retail chain which doesn't specialize in this area, but Costco is an exception. My observation is that their prices are moderate, not the best but also not outrageous. Where they shine however is that every computer they sell comes with Costco Concierge Services, which extends the warranty to a 2nd year and provides free technical support by phone. Taking advantage of this does require being a Costco member, but it's a solid option for non-technical computer shoppers in particular.
Refurbished, used, and closeouts
Shopping for a pre-owned computer can be a high-risk high-reward proposition. I have some experience buying refurbished equipment. I've never had any issue with a refurbished computer monitor, but have seen a fair number of issues with refurbished PCs. I've also seen some fantastic deals on them, typically priced on the low end of the market for high end computers that are a few years old. If you do choose to shop for a refurb, make sure you check the warranty period up front and test the machine thoroughly after receiving it. And only ever buy from reputable sources.
Closeout models are a lower-risk proposition but don't always have as much of an upside. The latest model computers go on sale too, just maybe not as often or as sharply as the older models. So shop around and weigh the price against both the age of the computer and how much comparable computers of the latest generation are going for.
A few reputable places to shop for refurbished, used, and closeout computers are:
Buydig
Woot
Overstock
Dell Outlet
eBay -- Sometimes major retailers use eBay to clear out quantities of older or refurbished equipment, often at great prices. Aside that be careful to only buy from reputable sellers here.
The market for refurbished Macs is a little different. Due to initial cost and quality their resale life stretches on longer. And as a result there are several shops out there who make a business of buying, refurbishing, and selling used Macs. If you go this route make sure that the seller is reputable, check their warranty policy, and look to see if they're upgrading the memory and hard drive. A few reputable places to shop for a used Mac are:
Affordamac
Mac of All Trades
Powermax
Where not to shop for a computer
Best Buy. Their prices on bigger ticket items like computers and monitors might not be bad, but their markup on cables and small accessories is hideous, and their Geek Squad Goon Squad service department has a lengthy and well documented history of customer nightmare stories. Including mine. Shop there if you want to, but steer clear of their extended warranties and do not trust their service department.
Craigslist or any public classified ad. Most people selling goods through classified ads or sites like Craigslist are legitimate sellers, but they often don't understand how quickly computers depreciate and thus tend to overestimate the value of their used computer. So there are a lot of not-very-good deals advertised out there. And sometimes there are deals listed which just seem too good to be true, and sometimes those are - the computer might be stolen or you might be walking in to a dangerous situation. If you do choose to shop for a used computer from a stranger, compare the price that the seller is asking against an advanced eBay search for Sold listings of the same or a comparable machine. Ask them questions about where they got the computer and ask them to provide proof of ownership - if they balk or try to brush your questions off, walk away immediately. And if you do buy from them, meet at a Craigslist Safe Zone or well-lit public location.
Retail stores that don't specialize in computers generally aren't a great place to buy a computer. Their employees typically aren't very knowledgeable, prices tend to be moderately high, and cable and small accessory prices tend to be extremely high. Some of the stores which fit this profile are Wal-Mart, Target, Sears, Kmart, and Radio Shack. Big box office supply stores such as Staples and Office Depot are a small step up. In a pinch I would prefer them to the alternatives, but not as a first option.
1 note
·
View note
Text
On trying and failing
In 2015 I began working on an entrepreneurial concept in my spare time. In 2016 I finished work on the core website to support it. Three months later, I took that website offline. This is a story of lessons learned.
My dream was to follow the tried-and-true entrepreneur’s path of taking a thing that I’m uniquely good at and turning it into a business. In my case I’m good with computers (and lucky to have a decent career in IT as a result) but I’m especially good at shopping for them. I have deep knowledge of the market, a knack for analyzing needs, and a nose for finding a deal. And I genuinely enjoy matching up people’s needs to the right technology and then finding the best price available for it. I wanted to start a personal computer shopping service to help people find and buy the right equipment for them at the best possible price. If I could help someone save a few hundred dollars in the process, wouldn’t that be worth (maybe) a fifty dollar fee?
So that was the endgame. To get there, I thought of an approach inspired by open source software development. I registered the domain personalcomputershopper.com and a SquareSpace website to start building a guide to buying a computer. I wanted to put my knowledge out there both to help people who just want free advice, and as a means of establishing expertise. If that helps someone shop on their own, awesome. If it inspires confidence in my perspective making them want to hire me to do that legwork, even better!
I started work on writing the guide. But then I also decided that I needed to start tracking prices. By watching and recording data I could build a private database of market trends which could be a vital asset when comparison shopping, and could also enable writing periodic market analysis blog posts.
I set up a SharePoint list to track data, subscribed to a number of retailer and deal watching e-newsletters, and programmed a few keyboard macros to facilitate copy-pasting the info. I also established a Twitter account to broadcast the best-of-the-best deals spotted, and registered the domain techdealspotter.com with the intent of pointing that at a feed of those great deals embedded on the new website.
With a mechanism in place to track prices, I started work on crafting a survey for people to communicate what they want and need in a computer. I put it out to friends and family with the offer to help for free - by helping people I could draw upon the data I was already recording, plus help refine that collection process by letting real people’s needs inform what I looked for and recorded. With luck that would generate momentum which could carry forward to ramping up to a revenue generating service.
But it didn’t gain traction. My friends and family were supportive but only a few took me up on the offer to help. Others who I reached out to seemed to not really understand the idea and weren’t enthusiastic about enlisting help in their shopping process. In the meantime the creation of the online guide stalled and the bulk of the time I had available to work on this (around my full time job and with a new baby at home) ended up being spent just reading and recording product prices in the tracking list. By mid-summer 2015 the project was fizzling out and I stopped working on it.
At the beginning of 2016 I decided to try again. I realized that the initial effort was unfocused. I had tried to do too much. What I needed to concentrate on was just getting the guide finished and published. So I put some effort into that part and on March 1, 2016 finally launched personalcomputershopper.com. What happened after that was, well, disappointing.

In the few days around when I announced the new site on Facebook and Twitter, there were almost a hundred visits. But then traffic flatlined. If you build something people don’t necessarily just flock to it. I made a couple of attempts at mentioning it to people and posting links, but (obviously) that didn’t have much effect. When summer approached again and the annual SquareSpace renewal fee came due, I decided to pull the plug rather than throw any more money at keeping it online.
The idea ultimately had failed and while I’m writing to acknowledge that directly, this blog isn’t a pity party. I'm writing this to celebrate trying and to suss out some lessons learned:
Focus on one aspect of a project at a time. Jumping in with lots of ideas and enthusiasm but without a plan to fully execute on them wasn’t a successful strategy.
Recognize your capacity and don’t take on too much. I’ve long been prone to taking on too much, way before my life changed by having a family. Becoming a spouse and then a parent imposed definite limits on my available time for extra projects. Ultimately it brought some structure and discipline, which can be a big motivator, but learning to work within the new paradigm was a big adjustment. (And I’ve found the joys and challenges of having a family fulfilling in many other ways and on other levels, but that’s another blog post.)
Understand that offering a personal service is a sensitive thing. Putting myself out there before being able to articulate the idea well made the offer a lot less appealing. If a market does actually exist for this, the way to get to it would be through clearly demonstrating value rather than trying to sell people on the idea.
Understand that getting an idea out there takes promotion and persistence. If I ever try something like this again I need to either break out of my bubble or partner with somebody who can market the idea effectively. My strengths are geared much more towards product development than marketing.
Play the long game. Even though it didn’t materialize as a business, a few friends have since remembered the website and asked for help picking out a new computer. And the process sharpened my knowledge of how to shop, how to explain specs in relate-able terms, and ultimately made me more proficient in my career.
In the spirit of salvaging lessons and useful information from this experience, I finally just got around to resurrecting my guide to How to Shop for a Computer a little more than a half a year after it went offline. I trimmed out a few specific product recommendations which either already have or inevitably will become out of date, so that the guide now functions better as an evergreen resource.
I doubt that it’s going to bring the world knocking down my door looking for retail analysis or shopping advice. But it’s certainly something that helped me grow, that I can continue to take pride in, and that can hopefully help a few more people learn how to shop effectively for a new computer.
1 note
·
View note
Text
Website keyword taxonomy guidance
Four years ago, my organization undertook the interesting and arcane challenge of analyzing and improving the keywords taxonomy on our website. After several passes over the years distilling the key points down to easily understandable and actionable guidelines, here are the bullet points for how to structure website keywords:
Each term should represent a single concept
Predominantly lowercase characters be used. Capitals should be used only for the initial letter(s) of proper names and trade names.
Use of symbols and punctuation marks in terms should be minimized
Terms should reflect the usage of people familiar with the material
If a popular and a scientific name refer to the same concept, the form most likely to be sought by the users should be chosen
Verbs should not be used alone as terms
Unique entities are usually expressed as proper nouns
Noun phrases are compound terms if they represent a single concept.
If you're interested in reading deeper into the rationale for these, see our four page official Keyword Taxonomy Guidlines. If you want to read even deeper than that, see the NISO Standards document that's based on. At 184 pages, I guarantee that's more than you ever wanted to know about the construction, format, and management of monolingual controlled vocabularies.
Those guidelines were the work of the fantastic Ann Staton, who at the time was in a Masters of Technical Communication program and interning for us. Ann produced the guidelines, my job was to lead the work of applying them to the website and building out relationships between terms. I used lots of little slips of paper because low tech tools are sometimes a good way to arrive at highly technical results.
Taxonomy card sorting - it's how we're grouping related website keywords together. pic.twitter.com/asedHf7v
— Jason Samuels (@jasonsamuels)
January 4, 2013
Now I can't claim that our org has held strictly to our taxonomy guidelines over the years. Keywords lists just seem to grow messy over time. What this project did do though was provide official guidelines that we've come back to time and again over the years to help steer content editors in the right direction, and to provide guidance for one-off cleanups as needed. And now that we're in the midst of migrating our web content to a rebuilt site, we have official guidelines to follow for overhauling the keywords once more in the migration process. Plus the taxonomy is in far better shape than it would be had we never taken on this work.
0 notes
Text
Relaying publisher content alerts to journal receiving members
My employer is a professional association / academic society where access to scholarly journals is a traditional core benefit of membership. Our members have the option of receiving either print+online, or an online-only subscription. But long ago we heard feedback from members concerned they would miss out on knowing about new content if their access was online-only.
Our publisher, Wiley-Blackwell, offers the option of subscribing to email alerts whenever new content is published. But from a practical standpoint it’s not very effective to tell our members to go to their website, sign up for an account there, and then subscribe to the alert. We wanted to be more proactive about promoting our content, and landed on this procedure to forward the alerts on to all journal receiving members as a benefit of their membership.
There are a few precursors in place that are leveraged to set this up:
My own email address is subscribed to the Wiley content alerts for each of our journals
A dynamic distribution list is configured in our association management system (AMS) database, which queries all active members with a journal subscription included and enables sending an email broadcast to them
An email template is setup in the AMS with a custom header and footer for journal content alerts. The header informs the member that they’re receiving the content alert as a benefit of membership, and lists the URL where they can log in to our website to obtain full-text access to the content. The footer lists our organization’s information and a link to change email preferences or unsubscribe.
Our AMS e-contact options are configured such that journal content alerts are a user-controllable subcategory. i.e. Our members can log in and decide which of their email addresses on file they want to receive that type of communication or opt-out of that type of communication.
With these pieces in place, the actual process of forwarding the journal content alerts is pretty straightforward. All that we basically need to do is take a copy of the email, strip out a few things including the unsubscribe link provided by the publisher (so that nobody accidentally unsubscribes me instead of themselves), then forward the email on to the members.
Start by opening the content alert that I received in Outlook, then in the Message option tab select View Source.

Select all in the source code, copy, and paste into an HTML editor. Any editor will do but I recommend using one that shows closing tag hints such as Dreamweaver on the desktop or the free online LiveGap code editor. Then in the code editor strip out the following elements:
All of the header tags up to and including the opening <body> tag
The closing </body> and </html> tags
The entire table containing the publisher’s unsubscribe and privacy policy links
The entire table cell containing the publisher’s embedded right-sidebar advertisement

Then copy the modified code, create an email broadcast in the AMS database, go into Source code view in the template, and paste the code in the proper spot.

As a best practice I click the Save and Test button to make sure it looks right, and after ensuring it does proceed to sending it out to the distribution list of journal receiving members.

At the time of this writing (December 2016) we’ve been relaying journal alerts to our members in this fashion for over four years. This tutorial originally discussed how we configured Lyris Listmanager to integrate with our database so that all journal receiving members were subscribed to a distribution list, which received the alerts in a moderation queue, where they were then edited using the ListManager interface and subsequently sent. The blog has been updated to reflect our newer procedure of forwarding alerts via our AMS instead.
It’s also worth noting that since we originally implemented this, two of our three journals have begun participating in Wiley’s Early View program so that articles which are ready for publication are immediately published online rather than waiting for the entire issue release. That change has resulted in a significant uptick in the number of content alerts, since they’re now used to notify people about new Early View articles as well as full issue availability.
0 notes
Text
Building a Fab Fluid Hybrid HTML email template
It’s been over four years since first implementing mobile optimized email templates at my organization. Over the past month I’ve been working to rebuild our HTML email templates using the latest tricks and standards, and am generally in awe of how far the breadth and depth of community resources around responsive email design has come. The end result is a template that I’m proud of. This blog is here to explain what’s in it and share the work back to the community.
Getting right to it:
Try the Fab Fluid Hybrid template Download the Fab Fluid Hybrid template
There are the two primary resources upon which this template is based:
Nicole Merlin’s Fluid Hybrid framework
Rémi Parmentier’s Fab Four technique
I named the template Fab Fluid Hybrid because these two techniques form it’s basis. And, of course, because naming things is hard.
Technical challenges
The biggest challenges implementing the Fab Four method came from the way it utilizes multiple declarations on width and min-width elements. The inliner tool at Inliner.cm will only keep the last style declared, so at first I ran manual find-and-replace operations in the code to restore them before testing. But then I discovered that TinyMCE does the same exact thing and there doesn’t seem to be any way around that (and in our case the source code view in TinyMCE is the only interface to the production system). I resolved the issue by including those fab four CSS styles in the header of the email template as well as making them inline. So where you see duplicate styles after the media queries in the template’s stylesheet - those are intentional.
I inline the code using Inliner.cm, which requires that media queries be removed before running the tool. Other miscellaneous styles that I do want to exist in the finished document header are listed after the media queries to facilitate having them in the finished code. It’s maybe easier to show than explain, so here’s a video:
youtube
Update: Rémi Parmentier reached out to say that the PutsMail CSS Inliner tool by Litmus works well with Fab Four styles. So maybe try that before replicating this workflow verbatim.
One other TinyMCE issue to note, the fluid hybrid template relies on conditional comments targeting Outlook to keep the column widths from blowing out. In order to not break those conditional comments, the tinyMCE.init function has to include the setting allow_conditional_comments = true. Otherwise you will be a sad and frustrated panda after running your template through there. In our case getting that setting right required getting our CRM database vendor to apply a software patch, due to the init function being stored as a database object.
Template design
As mentioned, the base design of this template is Nicole Merlin’s Fluid Hybrid framework. I literally started by populating a new document with those code samples. Branding was applied to the first draft and bugs were worked through. After that was stable, two enhancements were added - a break point where it pops open to 800px wide on bigger screens, and Rémi Parmentier’s Fab Four technique for multi-column layouts.
The template cautiously prefers using Open Sans, a web font hosted on Google Fonts. This Campaign Monitor article on using web fonts in email recommends causing Outlook to ignore the web font by wrapping the web font stylesheet link in an Outlook conditional comment, or overriding the web font styles within a media query. The template does both, falling back to sans serif wherever media queries are not supported.
Our banner image has a 10 degree angle and the design calls for the headline text to come up into the negative space. This was addressed in the template by a negative top margin, which moves the text up 10, 60, or 70 pixels depending on whether the template is at its 400, 620, or 820 pixel breakpoint. The default when media queries aren’t supported is -10px. Email clients that don’t support negative margins render it as 0, placing the headline just below the banner image.
I tried to use block caps as a design cue for links to further information. Read more links utilize font-variant: small-caps and font-size: 1.2em. “Find all updates here” is all caps, white text against a link color table, letter-spacing: 1.1px, with the “here” link bolder.
The footer is split into two regions - one with light text on a dark background and a bar at the bottom with those colors transposed. This was born of necessity because the unsubscribe link generated by our CRM is a basic a tag with no styling. There’s no way to stop email clients that demand inline CSS to render it as anything but default blue, which is only readable on the light background. Ultimately though, I like the way that bar at the bottom displays the unsubscribe information.
Just for fun I threw in a CSS trick to print the unicode phone character before the phone number, but it looks like AOL Mail may just print that as 260e so remove it if that’s an issue. There are also a few tricks to encourage consistent link colors for address, phone, email, and unsubscribe; address and contact info are wrapped in a span that explicitly declares the font color, CSS styling for footer and unsubscribe links are included in the header, and a[x-apple-data-detectors=true] is styled to remove blue links on Apple devices.
Oh, also, the media queries for the 820px break point are coded as a range up to 10000px specifically so that Yahoo! Mail will ignore them. The way that Yahoo! responds to media queries (based on window size but rendering the message in just part of the window) doesn't play well with how that media query affects the small image left blocks.
Wrap up
Like I wrote to start this blog off, the resources and information now available on how to craft a responsive email template are dramatically better than what was available four years ago. I’m really proud of this product for my organization, but also grateful to others who’s work this is built on.
Download the Fab Fluid Hybrid template
Bonus template
Hey, you read (or at least scrolled) to the end of this blog! One more template for you!
After making the Fab Fluid Hybrid template, I worked backwards to create something simpler for my org’s weekly news sheet. It keeps many of the same tricks, doesn’t utilize Fab Four columns, and incorporates MailChimp’s Template Language.
Try the Single Column Newsletter template Download the Single Column Newsletter template for MailChimp
0 notes