Let me tell you about it. (This blog contains affiliate links.)
Don't wanna be here? Send us removal request.
Statistics
We looked inside some of the posts by tiffyfoundsomething and here's what we found interesting.
Average Info
Notes Per Post
344
Likes Per Post
222
Reblog Per Post
117
Reply Per Post
5
Time Between Posts
15 days
Number of Posts By Type
Text
16
Note
1
Last Seen Tumblr Blogs


Fun Fact
Tumblr’s website traffic is steadily declining.
Text
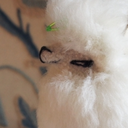
@armeleia posted some doll necklaces for sale on Instgram and I immediately sent a message when I saw this one because I thought it would look good with the Volks outfit @queenofsquids had sent me minus the default necklace and headdress.
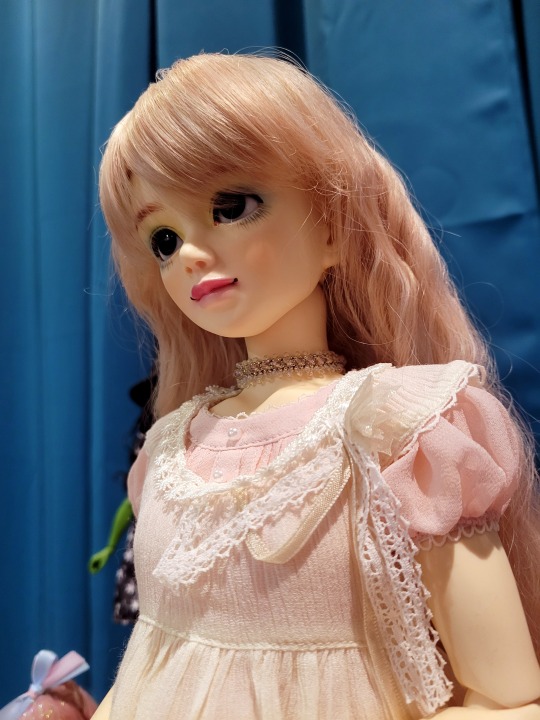
And it does. It's very subtly pink and the white beads give it a similar feel to the default necklace which is just a bit of lace.
Then there's this one
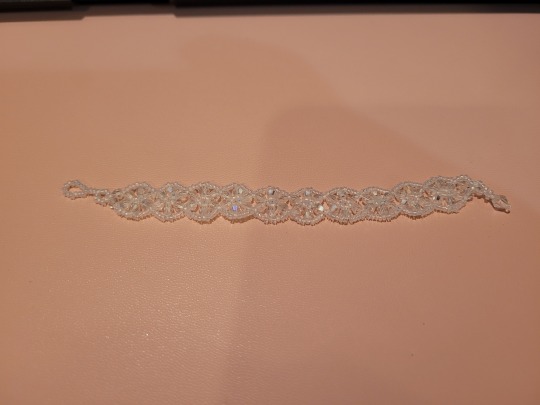
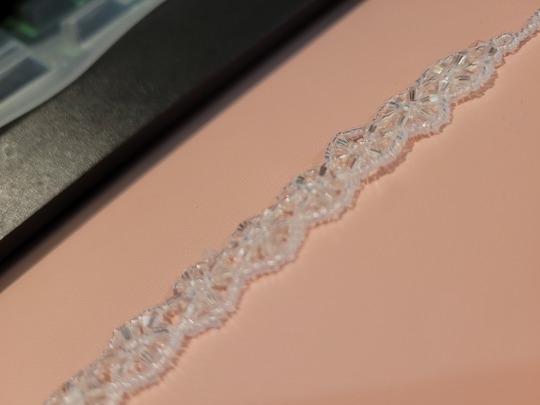
and I can't even photograph it well enough to show you want I want to show you about it but FIRST
The beads are SO. SMALL.
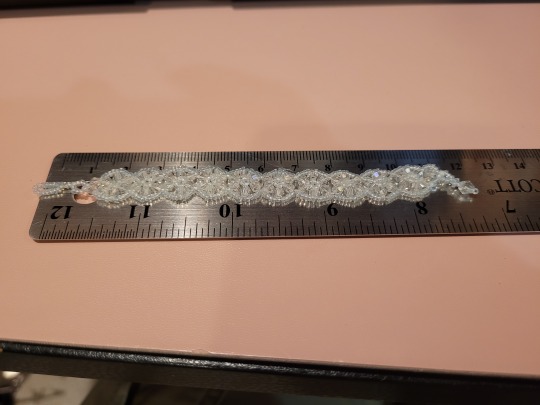
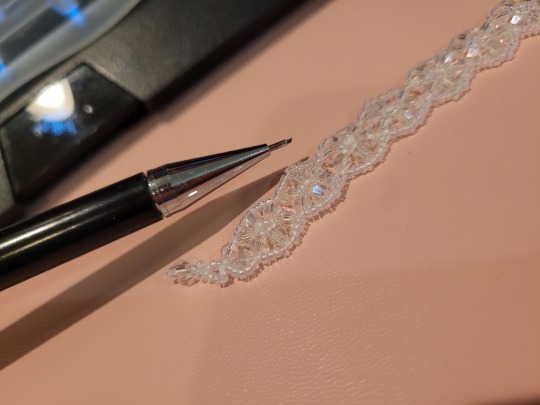
Small small.
Just as impressive is that the tension of the stringing is so perfect that it drapes like
like
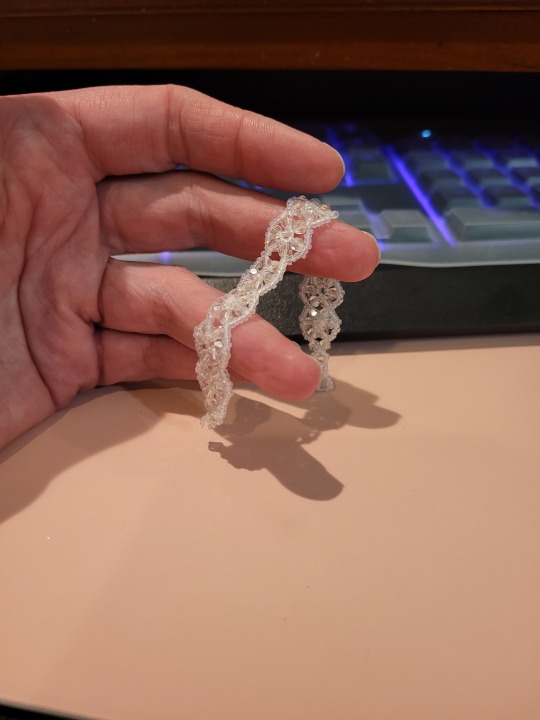
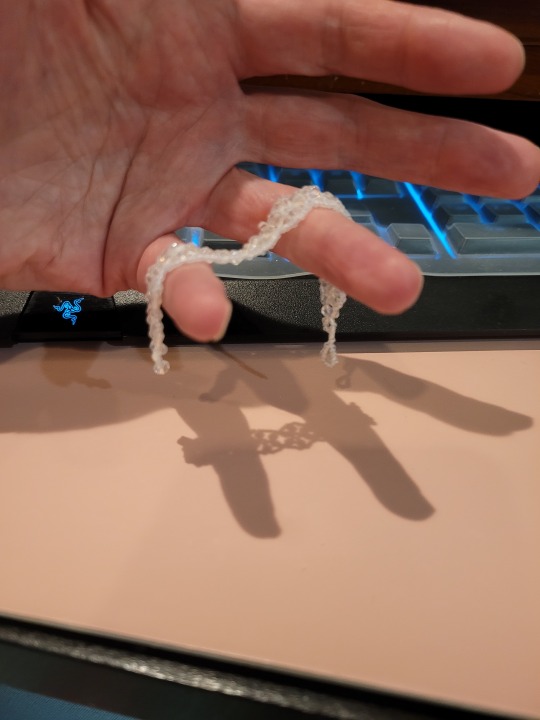
Like, you know how it's difficult to get doll-scale clothes to drape right because fabric is always people-scale? This drapes like it's bigger.
I've held larger beaded pieces that were stiffer.
It's as flexible as a worm on a string. I couldn't get good photos because it kept slipping between my fingers, just....

33 notes
·
View notes
Text
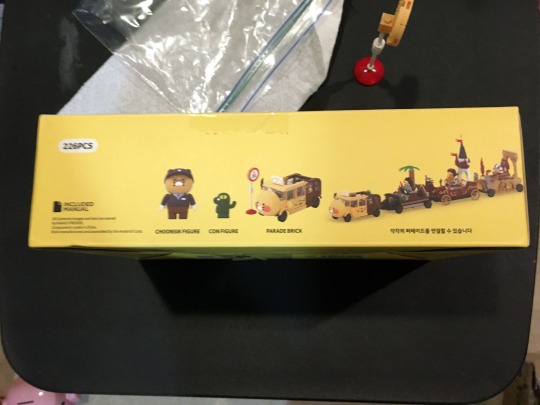
I picked this up at Goodwill today.

I didn't recognize "choonsikverse" so had to look it up. I guess it's like LINE, a messaging/photo sharing app with stickers, and Choonsik is a cat. This looks like the character Ryan the Lion, but I'm not sure, to be honest.
This also looks to be the front end of a connected caravan.
I'll be brief and say that the instructions could be better. They're not terrible. It's kind of difficult to see the darker brown pieces orientation, etc. because they're just dark. There was one place where the same step was repeated with the same brick in two consecutive steps, but there's only one of that brick in the parts list, and it wasn't supposed to be put in twice based on the result images.
There were some other small issues like structural integrity problems where the front kept popping off when I tried to attach other pieces because it was barely held on.
Eventually I stopped putting the front end back on and built both segments separately.
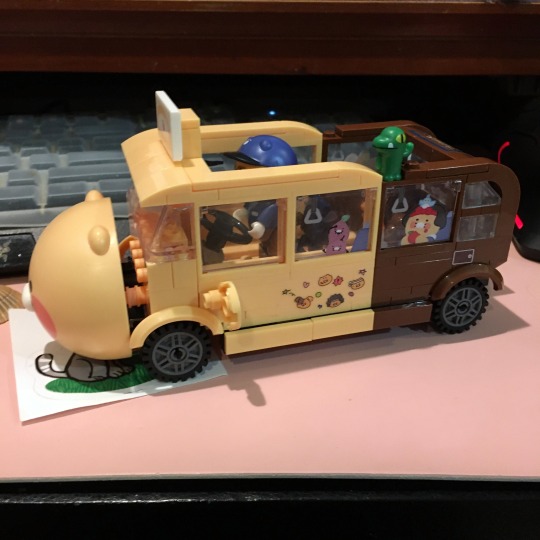
It's not the cream vs chocolate colored parts, though that is another structural weak-point because blocks don't overlap, there. It's the part right in front of the mirrors vs the rest of the bus? train? truck???
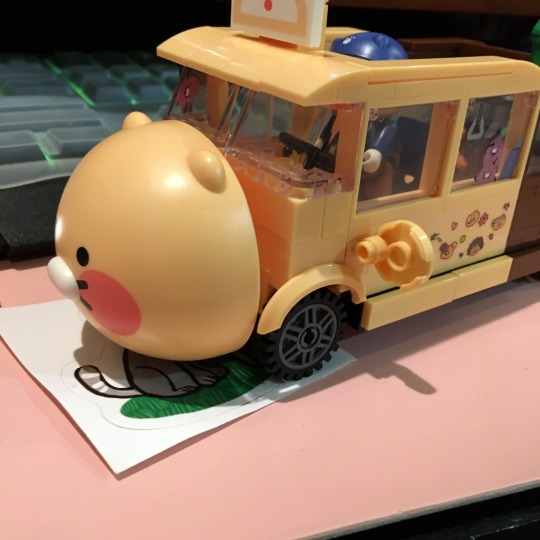
Another issue was the instructions told me to put the side mirrors on facing forward and then when it was stickers time, it looked more like it was telling me to choose between the mirror stickers and the tail light stickers to put on the back. I figured it out.
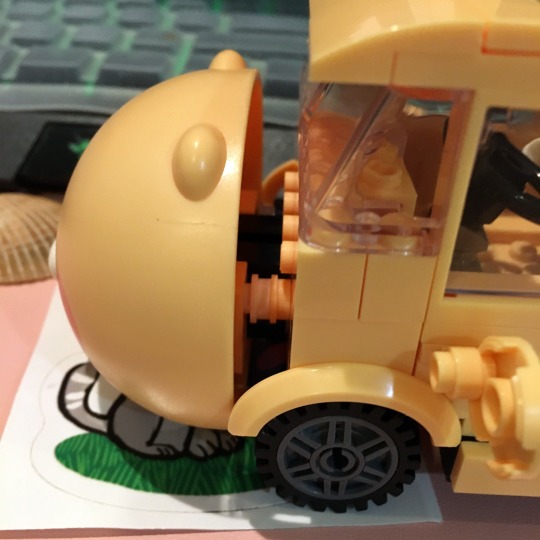
ANOTHER problem was that the decorative face rubs the front tires if it's installed as directed and would pop off if I tried to roll the vehicle, AND it would also completely block the view through the windshield. I know that doesn't actually matter on a toy car, the blocked view part, anyway, but it bothered me so I took some of the extra pieces that were included and used them to both drop and bump out the face. It looks ridiculous.
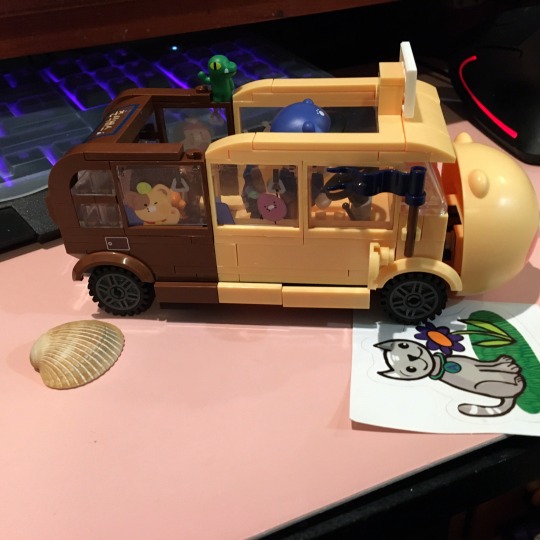
One thing I don't like about the set is that some of the stickers do stick blocks together.
The seats are missing, though that could be because it was used. It was partially assembled in the box.
There were some other random things in there, though, like a seashell, a sticker, a punching shiba ink pen, and some random little plastic animals that come up in a reverse image search as random trinkets from AliExpress which were in what I think are Squinkies capsules.
It's not a great kit but it's not too bad and I didn't find where to buy it to link to it. You can go look for yourself if you want.
5 notes
·
View notes
Text
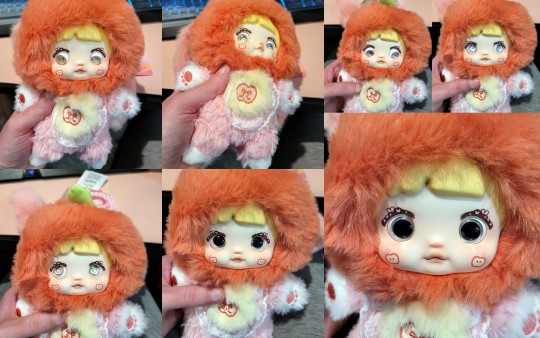
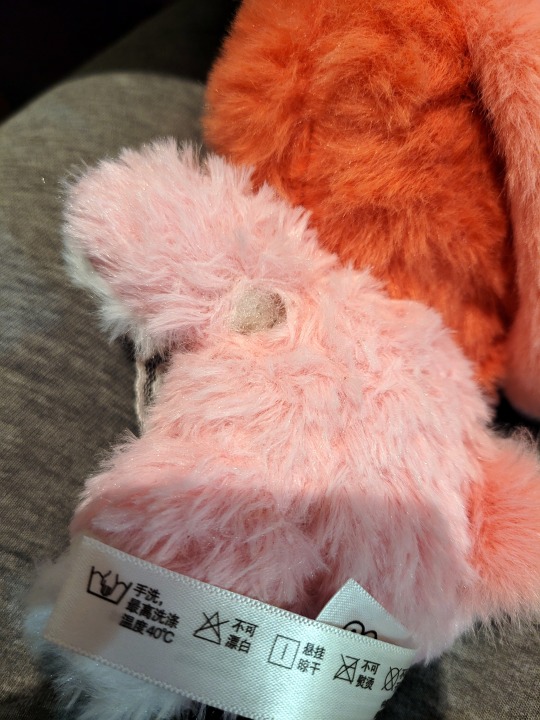
Been sitting here interacting with Apple and noticed another hole and some other things.
So, if you've ever made plush before you may know that to get seamless fluff you need to brush out the seams after sewing.
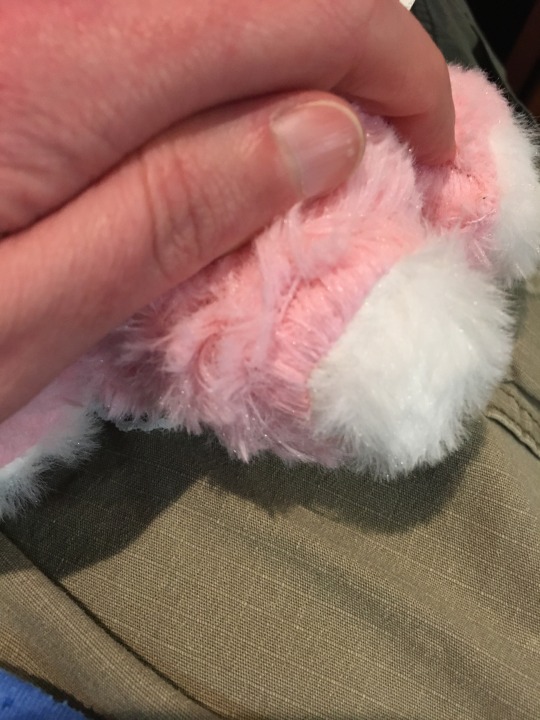
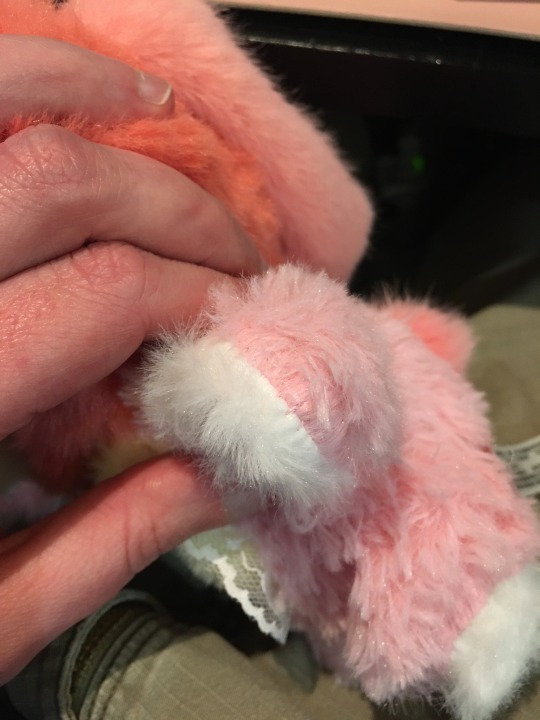
See how it's all tucked in, caught in the stitches?
Depending on your preferences as a plush maker (I.... haven't made plush in decades I learned I do NOT like sewing a long time ago), you might choose to leave it tucked in in areas like the paws, here, because it creates a more defined line between the body and paw.
I don't.
I went at her with a slicker brush and flea comb and pulled all the trapped fibers out all over.
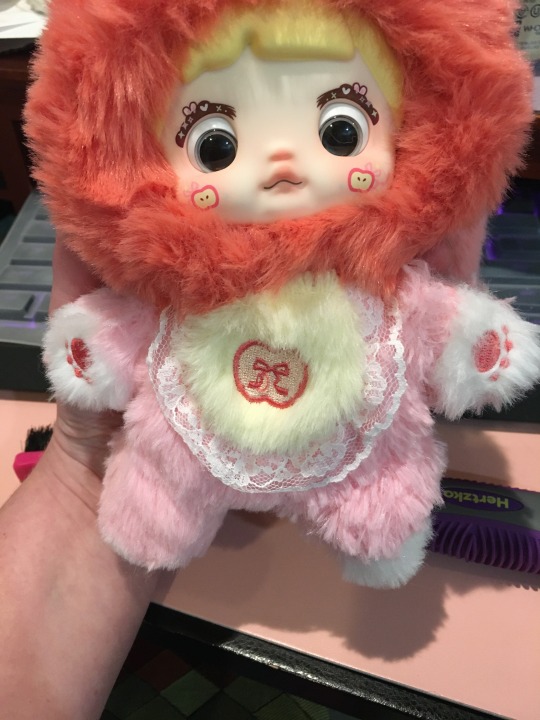
Right side of body is brushed, left side isn't.
I found and trimmed lots of random long bits, worked out some knots, etc.

Another view of her right side being brushed vs her left foot not brushed out, yet.
Then I was working on her ears and found another hole...
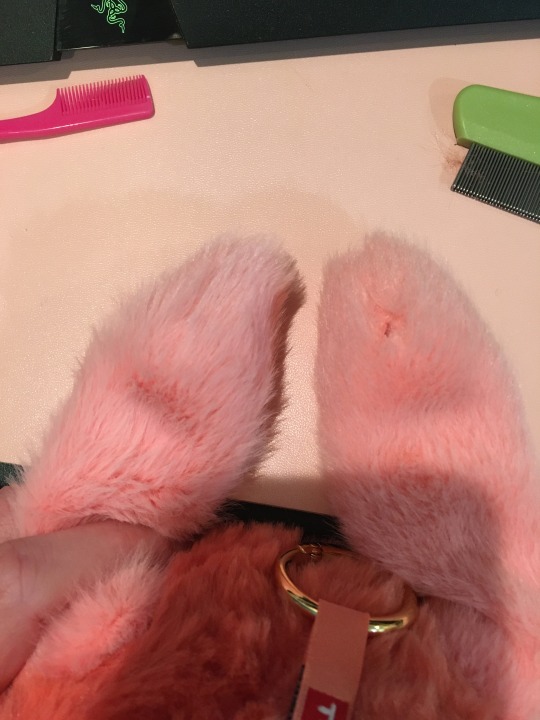
...
Disappointing.
She's all brushed out and fluffy, now.
I also would have done her stuffing and armature installation differently but these were made en masse in a factory by skilled but harried workers, not individually by artisans taking their time.
I've been kind of down and it just keeps piling up, so I went ahead and ordered myself a Nommi.
I'd been seeing them all over the place and was KIND of interested, though I'm not a plush collector and that's an expensive blind box.
Nommi have vinyl or ABS faces, inset eyes, and a plush body with an armature.
After looking at all of the different Nommi on Kikagoods, I chose Interesting Fruits because I liked all of the options.
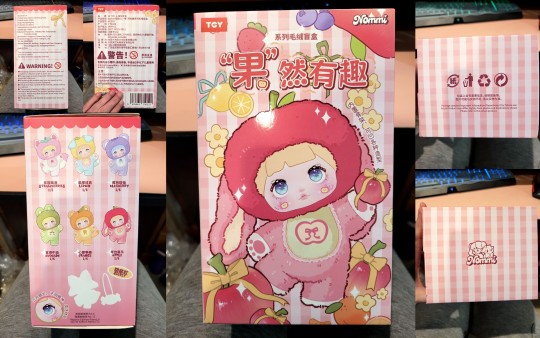

I went with the "with box" option so I could get to open a box...
One thing I don't like about some of the more recent blind box figures, especially more expensive ones that stores will open and then sell revealed ones individually is that there is often a little card in the box that reveals who's in the bag.
I did see an unboxing video on Insta today that I now know was fake because these little dolls come in bags inside their boxes, and the one that was opened didn't have a bag.
Now, there's a running.... I don't know if I'd call it a joke or a circumstance or what with my friends and me but I don't like the color red, and I VERY often end up with the red variant of blind box toys; the only one I didn't want. In the Nommi series, there is no red option! The closest is Apple, which is kind of dusty pinks.
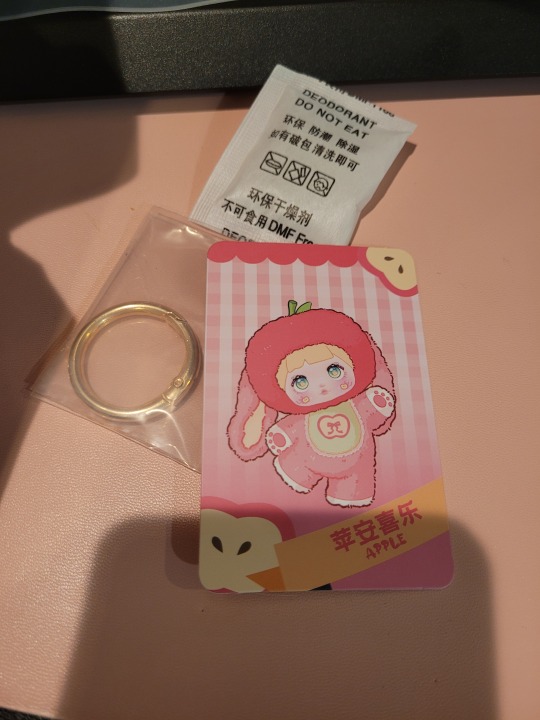
... I got the one closest possible to red 😂
The drawings look cute and kind of sweet but my Apple looks grumpy. That might just be me being in a bad mood because I've been having a less than stellar week.
She also came out of there with her eyes um....
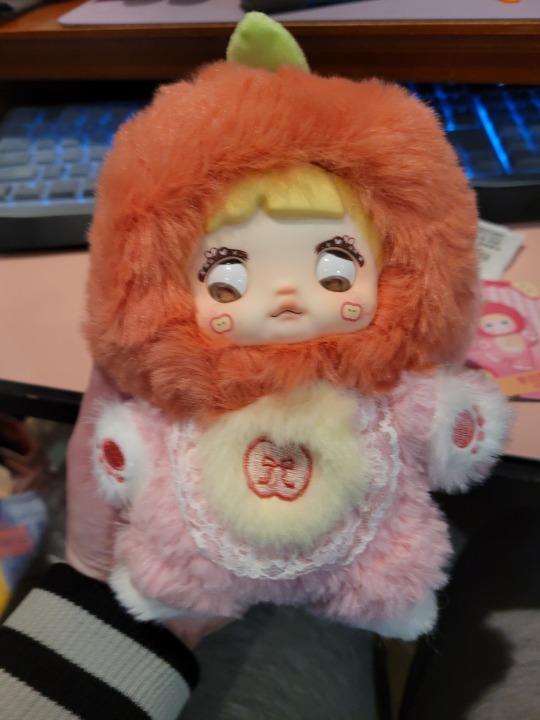
You ok, there, kiddo?
Even though the position is sort of fixed, there is some expression possible depending on position.
Apple is a lop-eared rabbit, and I didn't expect to find weights in her ears. The weights crunch like glass beads and are pretty heavy.
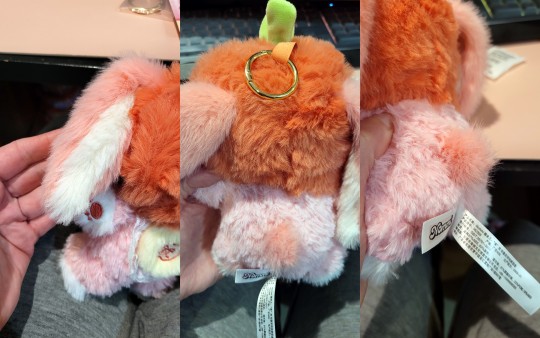
She also does have a little tail.
The fur is pretty soft. I've felt softer, but it's not bad.
Her armature is too short in her left arm so that arm doesn't pose as well, and it poked a hole in her fur shell.
That's disappointing.
19 notes
·
View notes
Text
I've been kind of down and it just keeps piling up, so I went ahead and ordered myself a Nommi.
I'd been seeing them all over the place and was KIND of interested, though I'm not a plush collector and that's an expensive blind box.
Nommi have vinyl or ABS faces, inset eyes, and a plush body with an armature.
After looking at all of the different Nommi on Kikagoods, I chose Interesting Fruits because I liked all of the options.
I went with the "with box" option so I could get to open a box...
One thing I don't like about some of the more recent blind box figures, especially more expensive ones that stores will open and then sell revealed ones individually is that there is often a little card in the box that reveals who's in the bag.
I did see an unboxing video on Insta today that I now know was fake because these little dolls come in bags inside their boxes, and the one that was opened didn't have a bag.
Now, there's a running.... I don't know if I'd call it a joke or a circumstance or what with my friends and me but I don't like the color red, and I VERY often end up with the red variant of blind box toys; the only one I didn't want. In the Nommi series, there is no red option! The closest is Apple, which is kind of dusty pinks.
... I got the one closest possible to red 😂
The drawings look cute and kind of sweet but my Apple looks grumpy. That might just be me being in a bad mood because I've been having a less than stellar week.
She also came out of there with her eyes um....
You ok, there, kiddo?
Even though the position is sort of fixed, there is some expression possible depending on position.
Apple is a lop-eared rabbit, and I didn't expect to find weights in her ears. The weights crunch like glass beads and are pretty heavy.
She also does have a little tail.
The fur is pretty soft. I've felt softer, but it's not bad.
Her armature is too short in her left arm so that arm doesn't pose as well, and it poked a hole in her fur shell.
That's disappointing.
19 notes
·
View notes
Text
Unfortunately for me Timberland isn't refunding the shipping fee from them to me so I'm out $14 on that.
I had also ordered my son some pants and they're taking $8 out of the return for return shipping.
:C that's two hours of work for me. I don't get paid enough.
2 notes
·
View notes
Text
Disappointmentland.
I splurged on "good" work shoes. I bought Timberlands.
These:
https://www.timberland.com/en-us/p/timberland-pro/mens-footwear-10171/mens-timberland-pro-powertrain-sport-alloy-toe-work-sneaker-TB1A1HRU001
They cost me two days of work. Most expensive shoes I've ever bought for myself. First Name Brand shoes.
They were delivered last Thursday. It's now Tuesday.
I was walking around work today, third day I've worn them, and they are UNCOMFORTABLE. The insides are so hard I might as well be plapping around barefoot... and suddenly my shoe was really loose. I looked down to see if it had come untied, which would be odd since I had double knotted them.
Nope.
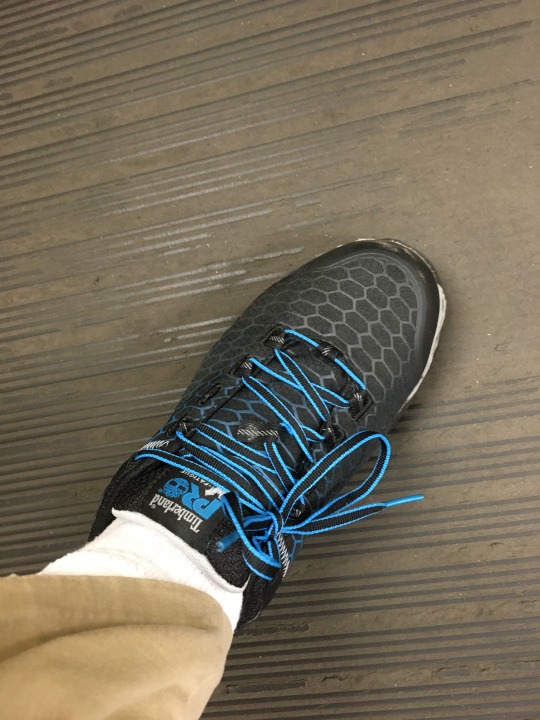
It broke.
...
Why aren't the tabs stitched in? These toe-protection WORK SHOES cost me $125 shipped, why aren't the tabs STITCHED. IN. ?
Imagine being on a job site and your shoe just suddenly starts flopping around. Thankfully I just work in a gas station.
8 notes
·
View notes
Text
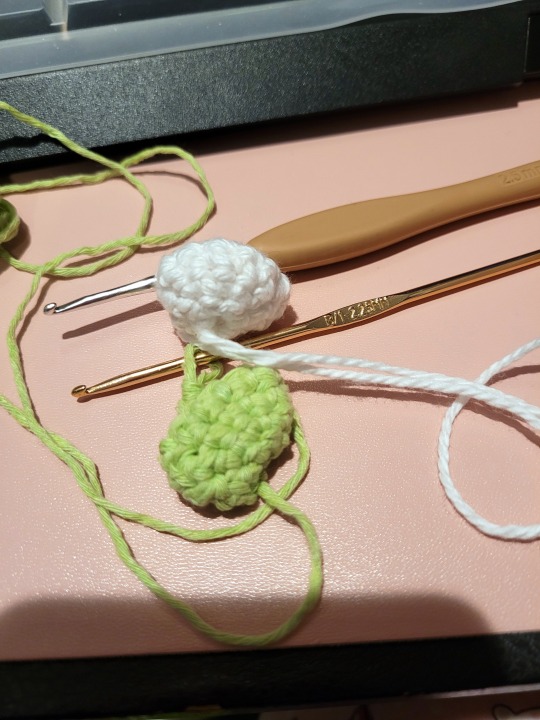
Just tried the hook from that amigurumi kit with a different yarn that's actually plied and it works fine. No splitting at all.
Tried the kit yarn with a slightly larger, deeper hook and split split split.
1 note
·
View note
Text
So...
I've been seeing these Red Heart amigurumi kits online mostly in unfavorable reviews, and decided I wanted to give it a try. I do crochet a good bit but rarely make amigurumi because I don't like making the same thing more than once, so having to make more than one arm, for example, annoys me.
That's silly because I can make blankets that are the same stitch over and over for ages, but animal legs? Eh.
I think you're supposed to stitch differently while doing amigurumi like yarn under instead of yarn over or something, but the instructions say yarn over, so I did yarn over every time.
I picked up Trevor the Frog at my local Walmart.
I wanted to see if these kits are as bad as everyone says.
The tl:dr is yes. My experience was very much Dead Dove do not Eat.
At the same time, I'm not unhappy that I had this experience and the resulting toy is cute enough.
Anyway.


Everything you need is in a little bag, except scissors and maybe pins if you really need pins. I don't need pins.


You get a bag of fluff, a tiny skein of their Amigurumi cotton "yarn", a hook with a firm, rubbery grip, a stitch marker, a needle, and a little bit of black "yarn".
I put yarn in quotes because it really is more like a little bundle of strings, like everyone has said.
I tried to do the whole kit with the supplies provided (plus scissors), but ended up swapping out the needle for a much larger one with an equally larger eye. This "yarn" is a pain to get through the eye of the provided needle.


Itty little skein.... I don't like this type of stuffing, but I understand it. If you use standard polyfil in amigurumi, the ends of the fibers like to stick out between gaps in the yarn. These little pilled up wads don't do that.
I very much do not like to touch it, though.
The instructions are fine other than in Body, Round 5 I would have added a tbl where you're working in the ch 2. You..... You'll have to read the pattern to see what I mean by that, I'm not duplicating any parts of the pattern here.
I also prefer to sew on parts as I go, like embroidering the black on the eyes and face while I can still access the inside of the head, or putting on the arms from inside the body. The pattern has you stuff the body and head as you're crocheting, then put those together, then attach the arms and eyeballs, then embroider. It's just easier for me to tie off and hide ends when I can get to the inside.
After a lot of fussing, a little cussing, and two crochet sessions over two days I have a frog with long arms and short legs.


The yarn splits so bad. SO bad. Annoyingly bad. I had to go back and redo stitches pretty often and still have missed loops here and there. I also struggled to keep the tension right so have loose, gappy stitches. That's a me problem, though.
The hook's hook is too shallow to grab the yarn well, too. It would have been easier to keep the yarn from splitting if there'd been room in the hook to actually hold it all. It's not a terrible hook for the size it is, but it's too small for this yarn. The grip is relatively comfortable, though may be a little small for some people.
Honestly, I don't think the yarn or the hook were "the problem" with this kit, it's just that the two of them don't play well together.

I don't even know what happened in this area... Maybe I skipped a stitch or something (I think I can see a stitch I missed.....). You can see there how dropping one strand of the yarn causes visual disruption.
I gave him a butt because why not.

24 notes
·
View notes
Text
Odile mermaid is $8 today.

Affiliate link:
18 notes
·
View notes
Text
We all know I'm a doll and pony person and that my primary focus is fixing up their hair after they've been played with a lot.
One thing I consistently struggle with is recurling 90's Barbie's bangs. Their hair fiber is usually Kanekalon, which melts with much heat. Also the short length makes it difficult for my clumsy hands to manage while trying to put a straw curler in. I assume they used pre-curled hair for the bangs when doing the factory rooting.
I don't need suggestions for curlers, I've been doing this longer than a lot of doll enthusiasts have been alive. I'm just clumsy.
For a long time I'd wished I had the technical knowledge to make myself a small curling iron specifically for this purpose and not too long ago, this terrifying contraption was pointed out to me.

Yeah, that's..... That's an electric, heated eyelash curler.
Affiliate Link:
That's scary, ngl. I mean, I know people have been heating their manual, metal curlers with a lighter for decades (....), but this is still scary.
It's great for recurling Kanekalon doll bangs.


It did take two attempts with one focusing on the length and one focusing on the roots and each attempt I held the iron in place for about 90 seconds. That seems like a long time but the plate doesn't get that hot and didn't melt the hair at all.
Stacey's bangs are mostly normal shape and position again, and that's exciting! They are a little imperfectly round but better.
This is a lot easier for me to manage than straw curlers and I didn't get a weird crimp where the cap straw or bobby pin sits.
There are some negatives of course.
The little bar that holds the hair is very weak and I have to manually hold it closed which is fine because this device doesn't get hot, just warm.
You can't really use this to do curls, expecting to slide the curl off the end of the curler because the curler has teeth/an embedded eyelash comb.


But if you're careful with it:


I think for this, straws would still be better.
It has 3 heat settings: 120, 150, and 190. Kanekalon can handle just-boiled water at 200F, so I used 190.
112 notes
·
View notes
Note
Hi there! I wanted to ask, what temperature on your flat iron do you use with Saran doll hair? I'm just partially asking because in the post about the flat iron, you don't mention it.
I generally do boil dunks for Saran instead of using the flat iron.
1 note
·
View note
Text
I think if the floors of my dollhouse weren't so bowed I might order this bathroom set for it.
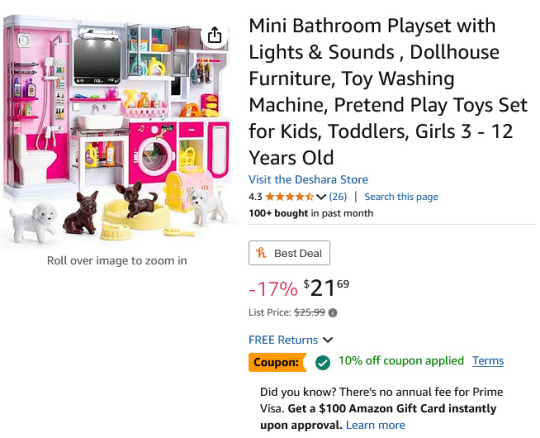
Affiliate link ^
I need to get new floors in there...
I like that it's actually 4 segments so you don't have to have it all on one wall if you don't want to.
8 notes
·
View notes
Text
I've seen the new Miniverse From Scratch sets on Insta lately and I've been super curious about what it IS.
So I got one at Target.
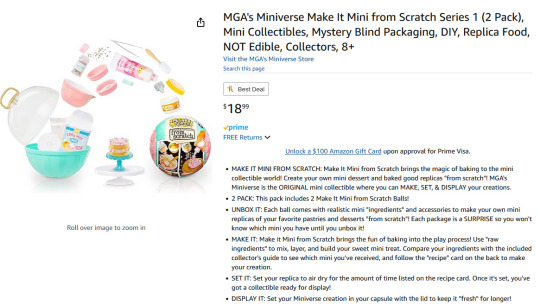
Amazon affiliate link: https://amzn.to/3DG3wwd
I got lemon and lavender cupcakes.


My favorite parts of this set are the utensils. There's a spreader, a silicone cupcake pan, a cute mixing bowl, and a 2-shelved stand.
Anyway, there is a powder that you mix with a liquid, pour into the mold, and wait.


The frosting is probably decoden or silicone. I haven't even gotten to that point, honestly. I'm still on "wait 1 hour and 15 minutes".

The warning/info sheet is a little alarming, and it wasn't until I'd started the kit in the kitchen, where the easy-to-clean surfaces are, then sat down to wait that I saw that it says do NOT put this in the kitchen or anywhere near food or drinks. As you can see, we'd just had our lunch, and I did have an open drink nearby.
Always read your info sheet first, kids.
...
I got spooked by there being powder all over the outside of the "cake mix" bag and my left index finger getting itchy and then my fingers getting super oily as soon as I tried to open the "brown butter" and went and put on some gloves.
What I was hoping was that the info sheet would have information about what these kits are. What am I mixing together? Is this an A+B foam? Is it 2-part epoxy of some sort?
There's nothing. No information other than the warnings not to breathe around it, don't touch it, USE THE TWEEZERS, and to wash wash wash your hands.
So. Still no idea.
13 notes
·
View notes
Text
If you don't have a rice cooker, I 100% recommend you get one, and this 6cup cooker (that's pretty big, but not huge) is $15 in Amazon Resale (Used to be the Amazon Warehouse), right now.
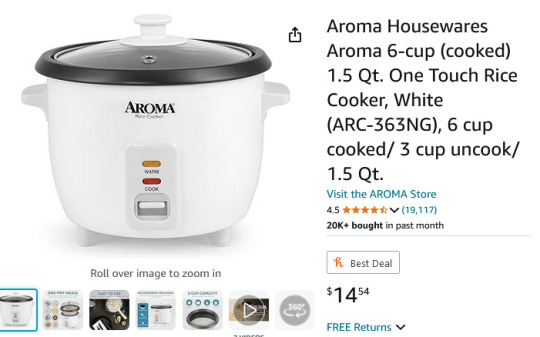
Affiliate link: https://amzn.to/3VMz6OS
31 notes
·
View notes
Text
A for real review.
I did get that budget book and it's nice enough for my needs.
This is about the mini washer that came in the same order, though.

They were on sale for $20, but I think I got a cheap knockoff of what's actually pictured.
Affiliate link: https://amzn.to/4giL9v9
And it is not inexpensive, it's cheap. There's a difference.


There's lots of flash, the hoses are super thin and fragile, they also came already dented...


The only way to stop the water from draining out is to clip the drain hose up. The clip, the bracket, and the hose are all super cheap and flimsy. Some of the reviewers said their drain hose developed holes at the bottom rendering the whole device useless because there's no way to make it hold water at that point.
I didn't even use the feed hose, I just filled it from the top and ran the whole thing IN the sink on a grate so it could drain without getting the power plug wet.
I had the same issue many had with the drying/spin basket in that it would just pop right off the bracket in the bottom, so I wrung the items out by hand instead of using the spin basket.
I also had to finish the rinse by hand because I had used a little too much soap. I think I put 3 or 4 drops, or a 1/4tsp of soap and needed less.
It sounds horrible and I expect the little motor to burn out pretty quickly.
It would rock less if it were on a flat, stable surface and does come with suction cup feet to help it stay level. They weren't engaged because I was using it on that grate.

The biggest, scariest problem is the plug. The prongs are too long so it can't actually sit flush in the outlet, and it's not grounded, which is concerning with something that uses water.
Anyway, I'd bought this to try using with doll clothes because I thrift stuff all the time and it takes me a while to wash the clothes. The washer is a little too violent for doll clothes because it did cause the Velcro-like strips to open and then they snagged themselves and other garments in the washer. I did think ahead and tried it with clothes that were already in poor condition so I didn't ruin anything nice. Less worn closure tape might stay closed better.
I do like that I can leave the top open and look in while it washes, but that's only because there are no sensors of any type in the machine. There's only go and not go on the button panel on the front, and you can choose 1, 5, or 10 minutes of go.
It... Works. It works ok. It did work to agitate the items I washed (some doll clothes and a couple cleaning cloths), used less water than I usually use to hand wash doll clothes (I usually soak them in a big bin for a while), and, I mean... It works???
I think it would be fine for washing like, one day of underwear or some baby clothes maybe. It does say not to try towels or sheets because it's very small. It does NOT hold 9 liters. It holds maybe 6 but I wouldn't put more than a half to a gallon in there.
It's cheap AF and will likely stop working sooner rather than later. The motor struggled. It's best use would be for soaking things with the benefit of having a drain hose.
7 notes
·
View notes
Text
This isn't even a review. I don't have the thing I just ordered, yet, but I'm in a blathery mood.
So I got a job back in August or so, and my pay is part check and part cash. That wouldn't be a problem but my bank only has one branch and it's in a different state, so I don't have an easy way to get the cash to the bank.
I have to either open a local account (I don't want ANOTHER account...) or buy money orders and rely on USPS to deliver them. USPS has been losing our outgoing bills, lately, so I'm a little reluctant.
Anyway, I'd been managing the cash with an envelope but that envelope is busting at the seams and looks ragged already so I looked for some better way to deal with it and decided to try this budget book.
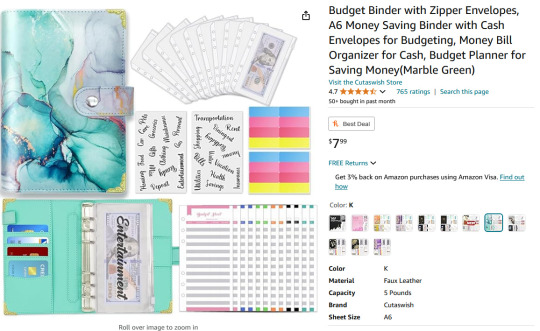
Affiliate link: https://amzn.to/3CS1Ajz
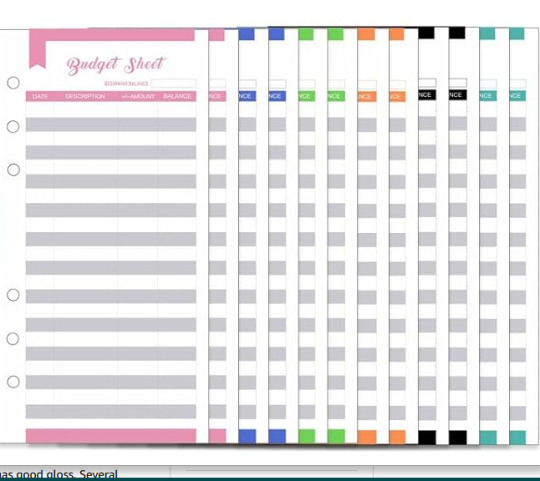
I went with this one because the envelope labels are stickers instead of printed on so I can choose what goes in what envelope which will likely be different denominations of bills as opposed to each envelope being for a specific expense type/purpose, and because this is the style of budget sheet I wanted.
Just a running list of what's changed. A lot of the others were different, but of course now that I'm looking for an example, I can't find one.
2 notes
·
View notes
Text
Small follow up: I decided to try the resin with my nail lamp and it did set!
Kind of!
So I tried again to make the daggers.
Instead of using the silver mica provided to coat the mold I used reddish one and made sure to shove the handle down into the mold much better.
I did waste a ton of resin, though, and got it all over myself and my desk. I had to get out the Totally Awesome to clean the sticky mess up.
That one turned out pretty good!
Then I wanted to try the micro-funnel, but to do that I had to stick a pipette into it because the tip meant for the resin bottle was missing in my kit.
It worked, and I added some chameleon and some glow powder to this one., but this time the handle slipped out again. I had to glue it back on with more resin.
And that resin refused to cure completely, which led me to cover it in mica powder so it's a mess. It's also still a little sticky. I might have to coat it in some gel polish top coat.
The painted "leather" on both hilts has started peeling off.

So, still not totally happy with this kit. It was difficult to use, and the results aren't amazing, but I do like the micro tool box quite a lot.
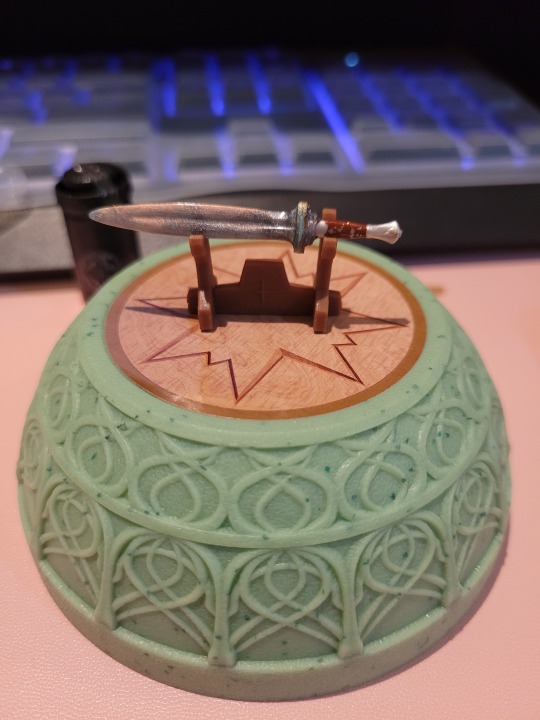
So I ordered one of the Lord of the Rings Miniverse balls.

Affiliate link: https://amzn.to/46PpgQA
You might remember the whole Miniverse line was recalled recently, and these have a different resin that's supposed to comply with regulations the older resin did not comply with. So they already knew before the recall.
I've been warned this new resin does NOT cure.

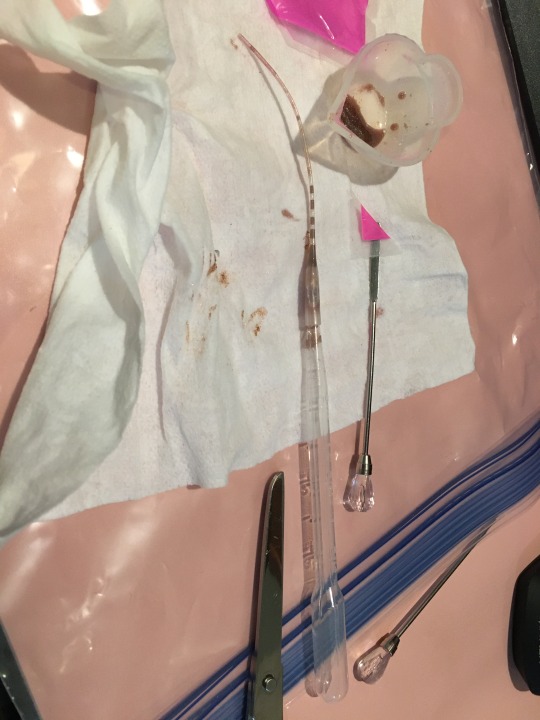
It's supposed to come with a tip for the resin bottle and a micro funnel because the mold is itty bitty and nearly impossible to fill otherwise...

Finger for comparison... My nozzle was missing, so I didn't even try to work with the resin it came with and used my own. The tiny crucible resin bottle looks like a coffee pot or edgy tumbler.
The mold is EXTREMELY difficult to fill because it's so small and narrow and I struggled with my thicker UV resin.

I got "Elven Dagger" which is rather generic, but it did come with two hilts so I could try twice and this little box of tiny tools which are, IMO, the best part of the whole thing. The "file" has sandpaper glued to it so it actually works, and the vial is metallic powder.
I'm starting to think no one at MGA actually knows how UV resin works because the instructions say to coat the inside of the mold with the silver powder, fill it, plop the hilt on the top, and cure.
With the already too-opaque mold coated in powder and a cap over the only area that ISN'T coated in powder, there's no way for UV light to get to the resin.
So I didn't do that.
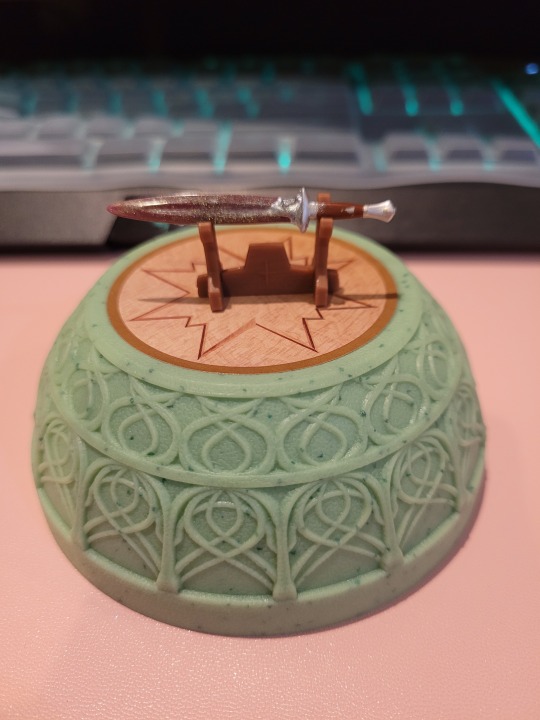
What I did do was mix up some glow-powder and mica into clear resin and cast that.
The piece is so thin and narrow that even after curing it was bendable. There were two large air bubbles; one right at the tip of the dagger and one near the hilt. I tried to patch them in but had some trouble...
The hilt popped right out of the resin while I was attempting to demold which was a pain, but it did cure.
Anyway, here's my messed up elven dagger, which is even more messed up because I ended up coating it with some UV builder gel to keep the tip on and THAT didn't feel like curing all the way, either, so I rubbed mica on one side to get rid of the persistent stickiness that was JUST on that side.


The hilt popped out again even though I tried reattaching it with more resin. That would be irritating if it didn't mean I can try again as many times as I want.
The end result is underwhelming and took an hour longer than the whole project needed to, but the little crate of tools is really fun.
41 notes
·
View notes