Don't wanna be here? Send us removal request.
Statistics
We looked inside some of the posts by time-of-objects and here's what we found interesting.
Average Info
Notes Per Post
4
Likes Per Post
3
Reblog Per Post
1
Reply Per Post
0
Time Between Posts
1 month
Number of Posts By Type
Text
17
Last Seen Tumblr Blogs


Fun Fact
Tumblr has 4 main sources of revenue.
Text
Dear Internet and How to... Lean Too performed at Hair Antics Micro-cinema
I preformed Dear Internet for the first time in Canberra early in 2023 at Hair Antics micro-cinema. It seems a little ironic to write this up for consumption of the internet but in a commitment to writing up my practice for Time of Objects. I place it here.

Affordance of development
Early development of the work began with paying attention to my fatigue in living a digital life. This feeling bubbled up in bits of scribbled writing on paper, in my personal smart phone notes and in typed word documents. Some of the writing I remembered doing could not be found. Collating this in a single document and trying to visualise what it might be, the idea got complicated. After seeing the Teaching and Learning Cinema perform the Mc Grice work at Hair Antics I became convinced the work needed to be simplified. Simplification came when I took the idea from theory to practice and started piecing it together with 16mm materials and the apparatus which was not only central to the theme but necessary as a design feature to help create and mould the work. It was the affordance of making it real that helped me make something concrete at all.
I attempted to document the process by filming it sometimes with a head worn action camera or with a digital camera rolling on a tripod. This I new made me more self conscious but perhaps also made me pay attention to the performance side of what was to become Dear Internet. It made me conscious of the body interacting with the apparatus and how I might put this on show and into the audiences mind when they watch it.
The affordance of working with the 16mm apparatus showed its hand when my minds eyes moved from page to the physical materials and objects. The materials allowed for creative decisions to be made because they provided boundaries to be traversed or avoided in the physical world. I also consciously took a stance of openness and attention to allow thoughts and responses to occur. Instead of focusing on a finished product my approach was to see what would happen by doing.
The process roughly took shape by:
1. Writing, reflecting and re-writing
2. Recording and editing the soundtrack digitally. I often check my grammar by using speech to text. When I heard the computer reading the text I decided this was better than my voice which I initially thought I would use.
3. Organising and breaking down the footage on the winding bench in searching and assessing mode
4. Assembling 16mm found footage and original shot material on the Steenbeck while playing it against the edited sound track. Experimenting with different speeds and direction.
5. Testing screen sizes and different screen material to project onto
6. Gathering objects at home to construct a portable winding platform with a screen that would feature as a kind of performance object.
Significant parts of the performance came from mistakes and failures which then become features and positive agents of affordance. For example I shot the opening title sequence upside down by mistake. This then led me to considering back projection, keeping this title reel separate, hanging it to were the audience could see it, and using the winders in both directions. All things that became significant features of the performance.
Before the show
Driving down to Canberra on a 30 degree day with cumbersome gear I really wondered if it was at all worth the expense and time. I was nervous not knowing if it would connect with an audience. I wondered if the combination of ideas I put together might have no meaning for other people or that I have muddied the water too much.
My judgment of the work was that is was a ‘work-in-progress’. That it was not complete. I expected that the work might change after the screening. That learning from this first performance would reduce or expand it. That technical problems might need to be incorporated or adapted. The three risks I saw where:
1. The globe might fail I had no back up as the projector viewer is not a common device.
2. The image be too dim for an audience to see.
3. My performance nerves might reduce my ability to adapt or fix the shutter effect that can turn the image into a blur and make it not easy to see.
I have heard Richard Touhy speak of priming an audience for expanded works. That how the audience enter the performance space is part of this priming. I thought a short introduction for the work would also help it to land. I planned to tell the audience Dear Internet is about digital fatigue of our times, beyond a frustration of password management, it is about how the materials we live with change our perception to our environment and change our behaviour and attitudes. It is a critic of technology that explores process through action. How what we do with our bodies changes our we are in our environment. I also wanted to incorporate that early projectionist hand wound the projector and that this art form changed with the automation of projection that came with sync sound.
An article (see below) about ChatGPT days before I screened Dear Internet made me feel I was expressing an ever growing concern for where technology was heading and the need to keep it in check. A reminder to be attuned to how technology corals our experience and how we are in the world. I made a note that GPT stands for Generative Pre-trained Transformer. What a strange name and something for future exploration.

Setting up
The three of us, Louise Curham. Carolyn Huf and I arranged to meet for half an hour or so the night before to be in the space and work out, where things where to go and in what order. I was a lot to do in a short time. I was fascinated that Lou hadn’t quite settled on what she would show. She seemingly comfortable, on the forward edge of creating to performing. I wanted to be as prepared as possible. I tested the strength of the globe on the winder for Dear Internet. I tested my projector and lens on which I would screen a contract work print I had made of How to…Lean Too. My short throw lens produced a bigger picture than fitted on the wall. I decided I would change lens during the film as an extension of preforming projection.
To borrow the Arthur Cantril term, Event Packages takes into account equally the event and the package. The event is a time based thing, that occurs with a kind of underling of a moment. Package, suggest themes but also the environment. How will people be welcomed, what does the space suggest? The three of us decided to select our own material with little consultation. Interesting links can emerge on their own. In deciding what work to show I settled on How To… Lean too to accompany Dear Internet not because they are similar in theme but because they have a similar approach. They both have a soundtrack with text that holds the shape of the overall effect. The text is a collage of material on the same subject. Their is a subtle shape to the structure of the text which creates a beginning, middle and end. Another approach to curation is I could have shown work such as Window which has no text to create a contrast.

Performing Dear Internet and How to… Lean too.
While performing the piece I felt the quite attention of the audience. It was special to share this moment with the room of 20 or more people. It felt worth it. I also felt a wave of emotion, something like grief, that underpinned making the work for me. A loss of connection to nature and our environment. A loss of choice in how one interacts with the world through the things we live our daily life with. Film making for me is a cathartic experience and I felt lucky to share that with a room of people that must bring so many different perspectives and stories to what they where observing.

Changing lens and speed during the projection of How to… Lean Too didn’t quite go to plan. The contact print I have made is quite dark in places, also when I changed speeds the brightness noticeably changed which impacted the readability of the image. I may have over complicated the screening of it but trying speed changes and lens changes. It was an experiment in context and performance. Perviously I have showed the work on a loop in a gallery setting wear audience members wear headphone and watch it on a small monitor. An intimate context. With the micro-cinema experience, it was to be shown larger than life and in a group setting. My partner who had seen it on a small screen before suggested that she missed the intimacy of the smaller screen. I want to make a better print of it and try it again.

Reflections after the event
Louise Curham and I discussed the event the next day. Of Dear Internet and How to …Lean Too she commented that both pieces have strong sound track but that I might get them mixed so the volumes and equalisation is better. A technical note I would like to improve. She also said that she was interested in it as the work said something. It appeared to present a position. To have an opinion. In contrast she said many experimental works from the history of the canon appear mute or seem reluctant to take a position. When comparing structure films against narrative films they can appear mute however there is a reflexiveness quality to structural films that in focusing on the material qualities of film. My approach of structural or formal design when incorporating the apparatus is to explore how things work. To bring the audience in to the process so they can be aware of all these things at play. It is like the rabbit and the duck image. I am attempting to have them see both at the same time. To look through the material and have its magic work on you and to step out of it and look at it from an discerning and critical point of view which questions the magic too. It is in engaging with story this way that spectators bring themselves to the work. It is the unknown part of what I am doing and the part that makes me feel most uncertain. This to me feels like the dangerous part when I attempt to see how far I can take an idea before it falls over.

We also discussed our mistake in not doing an acknowledgment of country. This was a big learning and a failure in rushing the set up and not discussing how we would introduce the show. Louise did the introduction. I was politely waiting to a moment to speak. In retrospect I should have politely interrupted. The good side of this mistake is we entered into a broader discussion about working with Indigenous people. Indigenous poet she recently interview suggested these goal posts:
1. Remember the history
2. Starts with one
3. Be consistent
4. Make it visible
5. Show people are welcome
6. Hold an event that is specific
I think the words ‘be consistent’ is really helpful here. Some of my thoughts about not interrupting Louise are really excuses for not being consistent. Being consistent will now be my guide because it helps navigate, nerves and uncertainty.
References:
0 notes
Text
Event Packages

Last week I had an opportunity to see a new space in Canberra set up for preforming expanded cinema works presented by Teaching and Learning Cinema. I brought two guests with me who hadn’t seen expanded work before. I explained that expanded cinema is more akin to a music concert than a film screening because the projector apparatus is not made transparent but employed as an instrument of light and duration. I was curious to see the space because I will preform a work I am developing there in the coming weeks.
Teaching and Learning Cinema is a project of Louise Curham and Lucas Ihlein’s that preforms expanded cinema works. Part of their art practice involves re-enacting work that is notoriously hard to document. It is best experienced first hand rather than read about or watched recorded on video. I attempt here to write about the event and my companions reactions to it to get a sense of the possibilities the space offers and what I might do there.

Ray Cantrill suggested ‘event packages’ as another term for expanded cinema in an interview from 2001. Louise and Lucas are especially attuned the package part of preforming expanded cinema. They encourage an openness and curiosity by warming welcoming guests into the space. On arrival 5 projectors are seen through a large window on the street. These face a big white square wall at the room end of a 8 metre long room. Louise and Lucas greet the attendee’s as we arrive and hand us folding stools. We are told to set-up where we like. We are a group of 25-30 people lining the walls in a semi-circle, not quite the straight rows one would expect to find in a cinema. How one sits in a space can effect how it is viewed and is one of the simplest ways of dismantling the usual dominant experience of viewing cinema. The event officially begins with Louise acknowledging country and First Nations people. Louise situates expanded cinema in a tradition of ceremony and event. We are then given a short introduction to expanded cinema and the work which will be presented; Linda Loo’s Autumn Fog and Malcom Le Grice’s Horror 1. If we find a work challenging or slow, they recommend us to ‘be’ with the work. In acknowledging that we might find the work uncomfortable they make it ok to struggle.

The first to be performed is Linda Loo’s Autumn Fog. A two projector work that Louise performs of overlapping photographic images a garden. One projector is laced up with the negative and the other a positive print. Louise follows a kind of visual score Loos has written for the piece. Sometimes she is instructed to obstruct one lens completely so the other can be seen in full and at other times coloured gels are placed in front of the lens creating new colour combinations. The effect creates an almost offset printer type image. An image associated more often with printed paper rather than the duration of moving image works. The negative and positive images act as ghosts of the other. This work expresses the copying and printing techniques at the heart of analogue film. Light is especially noticed because light is the material of expanded cinema. Reflected light from the street is thrown on the walls in the room during the performance as cyclists arrive which projects shadows of trees onto the walls surrounding us. Adding another layer to Loo’s work. I have seen Linda loos work before. In a smaller room more confided room with less people. My memory of the work was diminished and strangely I remember two images side by side and that it was murkier in colour. Seeing it again I was surprised by how vibrant I found it. How much it is about movement in stillness. Interesting how much context creates a different experience of the same work.

My companions and I talk a lot in the first 5 minutes of the work, sharing our reactions. One companion comments that the work is like the painting coming to you rather than you going to it. Another, comments that “it is like the work is breathing” and says it is “interesting as the person performing the work is alive” and that “this couldn’t happen if she wasn’t there” she says. We discuss how Louise performs the work like a recipe. Changing colours, the focus of the lens or closing the lens all together. One of us ventures that it in some ways it was like life drawing but following set instructions. Event and package create a unique experience. Eventually we give away to silence and watch with our own internal dialogues and thought processes for the remaining 10 minutes. At the end of the piece Louise frames the work by commenting that experimental cinema invites us into other ways of experiencing things that we “don’t usually succumb to.” It reminds us that the act of attending can offer other ways of being.

The next work is Malcom Le Grice’s work Horror 1 an re-enactment from 1971. Louse and Lucas provide a short introduction, telling us the context of when it was made. A time in the early 60s and 70s where artists sort to control their own means of production and not be at the mercy of commercial demands. They are in touch with the artist who is now 84. Le Grice heard about their re-enactment research and sort them out to perform Horror 1. Lucas says this “fits with our philosophy, which is to keep the work alive by keeping it performed and possible for next generation.”
This is work is more dramatic partly because of the title, Horror 1 which sets up certain expectations in the viewer and that it involves novelty of live nudity. Lucas turns up a loud soundtrack that sounds like heavy breathing and waves falling at one. Both Louise and Lucas perform the work. Louise monitors the 3 projectors and the Lucas preforms a live shadow play. The nature of the speed of the projectors, the fragility of the film print loops and the chance that these vintage machines or prints might break down is a real one that perhaps only the operators or those who work with analogue materials are most keenly aware of. The 3 machines project coloured light centred on each other which overlap, producing a box shape with in another. Lucas now naked, walks quicky in front of the light and about 1 metre from the wall on which his shadow is produced. The interruptions of his body make broken shadows of his silhouette, coloured in different tones and hues as they overlap. At first I think about how it is done and eventually I let this go and just watch. At one point the gestures seem to make Lucas touch the inside of his own head. I am quite moved by this gesture. An act of self-care that I find surprisingly tender in a work title Horror 1.
At the close of the piece we all clap enthusiastically and are invited to ask questions. I want to know why the title Horror. Nicky Haines who has preformed the work before thought it referenced a Hitchcock Approach to Horror. I wondered how different the experience is of performing it and watching it. How this experience offers different ways of interpretation. Lucas says there is a Horror 2 which they understand to be a lot more ‘literal and narrative’ in its approach. It is interesting to have a work that is serialised but with different approaches.
Questions also came up about what kind of instructions were made for the piece. Lucas describes Le Grice’s approach as jazz improvisation. Louise says it was “find out everything you can from this situation and show us that”.
I was struck by the affectedness of the simplicity of the two works. Ideas that I have been working on for an expanded cinema piece are more like an exploded diagram of how montage works rather than focusing on the apparatus. My interest is like an expanded edit because I focus on montage and changing combinations of content rather than the apparatus. With my years of thinking about how montage works I am interested in inviting the audience into the process of juxtaposition and exposing its bounds rather than what the apparatus does. After the Teaching and Learning Cinema performance I became more away of what I am trying to explore and where I might loosen my grip on the outcome.
My companions and I were energized and excited by the possibilities of new ways of experiencing and making cinema. The usual experience of cinema is making the apparatus transparent. If you bring out the apparatus and foreground what it does the machine becomes more akin to a musical instrument and therefore livelier.
0 notes
Text
Getting acquainted with failure
Working with a technology that has been superseded means getting involves in their maintenance and sometimes, resurrection. The maintenance, repair and collection of machines also means you have piles of various machines and devices piling up around you. Half worked through projects and dead ends are part of the analogue process that do not get displayed in screenings or installations. These nowhere projects profit learning and collecting of skills and knowledge that is acquired in failure.
Last week a film buddy gave me a Super 8 projector with a side screen called the Eumig RS 3000. It proudly boasts 'High Quality Sound" as one of its features. He said “it worked for a bit, and then I think a belt broke halfway through a reel”. Replacement belts often can still be found, so I decided to investigate. I am interested in these domestic side projection machines as they sit between a projector and a TV. The similarity between the Duo 16 and this Super 8 screen machine also seemed worth pursuing.
Turning it on it powered up, the lamp came on and the motor sounded like it was turning something but the arm that the film reel sits on wasn’t moving. This, I thought, did not bode well. The machine came with a manual with illustrated instructions on how to remove the back of the machine to access the belts. I opened the back surprised to find the belts working but the worm gear which distributes the energy from the motor to turn the shutter, sprocket wheels and the film arm in unison, had perished. These are plastic parts and the machine is from the 1980s so I thought this is the end of the machine. A google search of the model number brought me to parts sourced from the Netherlands.


The worm gear can be replaced with a stronger plastic which is encouraging. The other worn part called a 'friction axis' is also available. The website has helpful photos explaining the position of the parts they sell. My projector seems to have other wheels that are crumbling. So I am not sure if it is worth ordering the parts they have to resurrect the machine. It might be the death of this projector.
0 notes
Text
Media Archaeology: Duo 16
I am a hopeless browser of second-hand film equipment. A few weeks ago, I found a projector which plays cartridges loading with 16mm film and magnetic tape. It functions like a slide projector but with a soundtrack. It was used by traveling salespeople to sell products door to door. Up to 10-minute presentations could be played on a robust projector that looks a lot like a suitcase. My interest in working with film is also a media archaeological desire. Looking at it, I could see the potential form making a new work with it.
How to use it:
Plug it in to a wall socket.
Put the cartridge loaded with 16mm film and magnetic tape into the back of the machine.
Open or close a lever to project onto a wall or the internal screen.
Turn on the volume nob which also functions as an on switch
Press the green ‘start’ button.
The machine will play the full presentation till the end. The cartridge doesn’t need to be unwound, pressing ‘stop’ is akin to reset as after this is done the presentation is ready to begin at the start again.
The magnetic tape provides two operations; a soundtrack and a sync point between audio and picture. Embedded on the magnetic tape is a pulse that operates the ‘slide show.’
I only know this because I have another similar Elmo slide projector which marries 35mm roll film with a tape cassette. The Elmo is more open in a sense, because it has recording capabilities. I bought this machine in a similar desire to see how I could manipulate it for my own purposes. Perhaps this will allow me to embed the necessary pulse to engage the slide show in the Duo 16.
Both the Duo 16 and the 35mm Elmo projectors afford tinkering. The Duo 16 cartridge can be opened with a screwdriver.


Opening it, it is obvious how it works. One side holds a loop or 16mm film still frames. The other side holds the magnetic tape.


This loop is a little more complecated. It is threaded so as to untread through the middle. I was a bit clumsy opening it and will need to be careful to put it back together.
While there will be some hurdles to load the cartridge I can replace the content with my own media. This makes it the cartridge a friendly carrier, an open carrier. The pulse function which moves one image to another is the biggest hurdle to overcome. I am thinking to use it for an upcoming film screening as the speaker it quite loud and the dated content in the cartridges offers a point of reference for using the medium. Before I open more cartridges, I will ‘digitize’ them by playing them and recording it onto HD video. I have recorded one cartridge iPhone for now. The sample below, which describes the outdoors as an uncomfortable place, fits with themes I have been engaged with for the last two years and might be a good sample of found footage for an upcoming screening.
https://vimeo.com/761302462
Thinking about what I might make to insert into the cartridges in the future it is obvious that the soundtrack can afford a more complex design than the frame-by-frame imagery. Still pictures, accompanied by a soundtrack of my design. I could take an abstract approach, or a narrative approach supported by the soundtrack. It occurs to me that viewing a slide show is something like scrolling through a ‘story’ on Instagram or TikTok. The way the carriers work are different at a mechanical level. If I took to my Smart phone with a screwdriver nothing will be obvious. There are no levers or wheels. A user is locked out of the software in a Smart phone. The results might be surprisingly similar, however. Technology touted as ‘infinity in your pocket’ hasn’t really progressed more than home-made or commercial presentation slide shows. Instagram and Tiktok are the cartridges we slip into our phone. You might reach a wider audience, but you are not sharing time and space together. Not like the door-to-door sales person. What will I sell with my machine?
0 notes
Text
Turning on the Optical computer
This weekend I turned the Optical printer computer on. Fantastic that such an old beast turns on. Alas it wants a floppy disk to boot. This I don't have so I will need to replace the computer to get the Arri camera and Optical projector to roll in sync with one another. This is disappointing. Working with 16mm technologies doesn't rule out digital processes or computers. We are in an interesting time where cheap digital devices can potentially plug the gaps of the missing components of film lab processes. Working with film calls for knowledge of chemistry, mechanics, computer programming and electronics. I don't have time to learn all these technologies and have limited funds. This hurdle in getting the machine to run reminds me how precarious it is to make art that at its foundation is an industrial art. When the film machinery is offered up to artists collectives they are one step from being discarded and thrown into the rubbish. It is only time and money that can bring them back from the dead and make the machines useful again. This problem also highlights how the reliance of computers is a vulnerability. Perhaps with a re-build imminent it should be made with manual capabilities so if the computer fails it can still be used. Now I have got this far I will contact Richard and Dianna from Nanolab to see the scope of works required to move forward with the project.
2 notes
·
View notes
Text
Restoring an optical printer

The Workshop For Potential Cinema (AKA WPC AKA Peter Humble) a few years back inherited an Optical Printer from UTS. I plan to get this running again in hope to use it for my practical research for the DCA as well as add another functioning and useful tool for members to use at WPC in the future.
I have taken photos of all the ports to examine what might be missing or guessed at in how it should be connected to make it work again. Unfortunately, the leads have been lost and there is no manual. Knowing that an optical printer is at its very basic a projector and a camera I can guess at what does what and should fit where. I will get as far as I can knowing that Richard Touhy and Diane Barrie have restored many old cinema tools and they will no doubt be able to come to the rescue if I get stuck. I assume this project will take up to at least 6 months. Richard has advised to plug it in and go from there. If an Arduino build is necessary he said expect for that to be about one weeks work.
Step one:
Plug a kettle power lead into the external computer and see if anything fires up. If it does proceed to step two and purchase cable in the shopping list.
Step two – Port stocktake
Examining the ports on the back of the optical printer I count the wholes or pins to track down which size is needed. A Google search with 25 pin lead in the search column produces places to buy the port and a basic idea of what the port was made for. It seems the 25 pin port are called parallel or serial ports. These are also described as printer ports. They are ports for attaching peripherals to computers. My optical printer is indeed a printer after all.

Starting at the top of the back of the machine.
1 x computer (labelled) lead (25 pin male on printer side) This might connect to several ports on the back of the computer so I will need to cover the 4 different options. 1 (female) option has CRT next (top of computer ports) to it so I can assume that is for the monitor and rule that out. A male option has ‘serial’ written next to it and another female option has ‘parallel’. The last female option has no label. So if I get at least 1 x 25 pin female to male and 1 x 25 pin male to male I should be able to try a few options there.

1 x transport control (labelled) 13 pin female port.
2 x 25 pin female port labelled A and B. I am not sure what these should connect to except that it is the back of the camera part of the printer. I will call it Camera port and assume one can plug into A or B depending on the operation.
1 x 25 pin port not labelled but at the back of the projector side of the machine so I will call projector port.
Moving to the next box below the camera and projector. I am not sure what it does but everything connects to it so I shall call it the router box.

Router box:
1 x 25 pin male port labelled Camera
1 x 6 pin port female labelled Counter
1 x 13 pin female labelled Control (I assume it is the other end of the labelled transport control)
1 x 25 pin male port labelled Projector
The box also has female to male XLR ports. I shall ignore these for now.
Cable shopping list:
1 x 25 pin female to male Computer cable (for blue connector option)
1 x 25 pin female to female Computer cable (for serial option)
1 x 25 pin female to male Computer cable (for parallel option)
1 x 13 pin male to male Transport Control cable
1 x 25 pin female to female Camera cable (use A or B port)
1 x 25 pin female to female Projector cable.
I haven’t worked out what is needed for the Counter cable I assume this is for counting so won’t need it to get the machine moving (but will be useful once this is done). The above cables should be easy to find. A quick cable search has also shown me there are USB adapters out there so perhaps I could keep the ports on the optical printer if the computer proves to be difficult to power up. Fingers Crossed the computer powers up!
0 notes
Text
vimeo
Notes on processing with a Lomo tank
I filmed my self process a 100 ft roll of black and white 16mm film as well as a 35mm roll. I used a Gopro strapped to my head and a HD camera set up on a tripod with a wide lens. The processing takes about an hour and half. I didn’t film some of the early set up which involved me filling an esky of water to get the chemicals to temperature. The footage shows myself in the cramped space of my home laundry. Tasks I do are:
Put on safety gear such as gloves and jackets to reduce exposure to the chemicals
Set my iPhone countdown
Measure liquid developer and fixer
Washing in water
Hanging film out to dry
There are many moments of myself waiting and looking as well as repetitive moments of agitating the film in the chemistry by turning the Lomo spool. At some points I attempt to multi task by washing items I have finished with while I am waiting for development or fixer to complete the required time.
At the end of the fix cycle I give the film a quick rinse in water and have a look at what I have processed. I hold the film up to light to see through it. Using a magnifying class to inspect a few frames. Then complete the rinsing of the film.
Looking back at myself preforming the tasks of processing I observe some of what I do could be greatly improved with a different setup. I take a long time to wind the wet 16mm onto my drying rack. Holding my arms out above my head winding on the film in short amounts at a time, my arms eventually get tired. I remember thinking I really should improve this task by using a winder to hold the wet film. I am vaguely aware there is a better way to do this but as I don’t do it everyday I plod along with the tedious system I have. The drying rack is a better system them what I used to do before which was to hang it over a clothes rack. I later built a round rack which could be turned easier. I used to precariously hang this over my bath tub. Wanting to improve that system I attached the remains of the clothes rack to the wall above the sink in my laundry. This works fairly well but is still rather slow to wind the film on and off. Eventually I will improve this process.
In this video I am using a Russian made 100 ft 16mm Lomo tank and a Patterson style tank for the 35mm film. The film is wound onto a core so chemistry can get onto the film freely. When film is wet it becomes quite sticky and if it sticks to itself it won’t get the chemistry on it in places that it is stuck. Other options for developing would be in a bucket or a tray in the dark. This would be more restrictive because of working in the dark (or under red lights) and produce inconsistent results. I would like to know more about the history of the LOMO Russian made film tanks considering today these tanks facilitate processing film for artists and small arts run groups. A 100ft tank are becoming rarer and are about $1000 dollars now. Meaning it is becoming out of reach for many people.
The purpose of the video was to record the physical actions of darkroom processing. A process I find better done in solitude as there are many mental processes you are keeping track of while watching the clock and preforming many repetitive movements. Sometimes I will do it while listening to a podcast but often in silence as it can be quite meditative.
0 notes
Text
Prepared camera test

Today I made a test contact print of a length of clear leader which I had prepared with Letraset. I used high contrast film, a gang sync, a torch and D76 chemistry. Having made similar work with a 35mm film I want to try the technique with 16mm. The 35mm work was made with a cut down sheet of acetate with Letraset design transferred on to it. Using a dark bag I rolled this and a length of 35mm unexposed stock into a 116 paper roll film spool I had. When loaded into the camera, a slight outline of the clear part of the transfer is noticeable. To reduce this I wanted to try contrast printing with high contrast film. This adds more steps into the process but also protects the camera from bits of Letraset coming off and getting into the camera mechanism.
Making a contact print means I will have near clear Letraset marks instead of opaque black lines. I will need to make another contact print of this first print to get back to the original effect of black lines on a clear support. Making the contact prints also offer the possibly of mattes or masks strip with which I can print through. This technique enables cut-outs within the image by way of alternating opacity and transparency. It is editing or composing within the image frame. Work which embraces these techniques is situated very much at the heart of the apparatus.
In the darkroom I place on the work bench the instruments I need:
~ Unexposed film protected by black plastic bag and in a can
~ Synchroniser
~ Letraset prepared clear 16mm length
~ Torch

With everything on the work bench. I unwind the clear film and hang it above me on a drying rack so access it easily. I need to have it be able to run freely through the synchroniser. The advantage of the synchroniser is that I can make longer lengths than the 1 metre glass contact printer I have. The challenge of using the synchroniser is that I want to pull it though evenly to get an even exposure. A mechanical contact printer takes away these challenges. In the dark I fumble to find my torch and film can. I feel with my fingers the sprocket holes and corresponding bumps. Touching the spring mechanism to open the arm of the synchroniser which will hold the film on the sprocket wheel it moves responsively in my hands. It is build for hands to see in the dark. I easily feel that it is open and I can load the material. I wet my finger to find the emulsion side of the film as the unexposed film must be loaded face up to be reactive to light. I catch myself squinting. Funny how one does this is the dark.

Working in the darkroom with the synchroniser I am reminded that it is because of the sprockets that make so called structuralist work like Paul Winkler possible. It is because frames can be counted that they can be cut. It is that you can line up one shot in sync with another that you can program the frames to produce rhythms and superimposition cut outs. It is because film reacts to light that you can hide or reveal shapes. It is this that leads you to experiment with cut-outs and masks. It is because the physical aspect of film can be grasped by hands to line up ideas in the dark. These are potentials which the mechanical and chemical technology offers. Winklers work reminds us that cameras and projectors are shape shifters because of these mechanical and chemical potentials.

But why go to all this effort? I am interested in creating imagery that reveals the technology as well as concepts. The marks of the Letraset are made from different letter fonts. The shapes of the letters demand to be read but by disregarding the frame line they should become more abstracted shapes. I want them more for mark making then to be read as letters or words. Letters and words draw the eye in a way that you can’t help but read. This is interesting for exploring the idea of looking at or looking through concept I want to examine in this work. I think of it as the duck and rabbit problem of making with technology. How to see the image as a product of its carrier technology and the image at the same time. Part of me is not at all interested in making work with letters. There are some beautiful swirling shapes in the Letraset papers I have but I don’t have many of them which I want to be economical with. I could choose to draw onto clear film with other implements, such as scratching sharps or liquid pens but for now the machined fine edges of the Letraset fonts highlight the mechanical means that is at the heart of making work with the apparatus of film.
0 notes
Text
Hands on 16mm workshop
Last week I attended a workshop on experimental 16mm processes in Canberra at the Photoaccess gallery. Techniques explored were direct processes such as painting onto film, bleaching film, drawing onto, scratching into to, adding to or taking away, utilising the frame or disregarding the frame. We also explored the Ray-o-Gram and the similar plantogram technique. All of these processes are a physical dance with the substrate of film. Attendees learnt that the sprocket allows you to count, to frame, to un-frame, to sync, to tape onto, to join and to cut. Louise Curham, who organised the workshop demonstrates cutting long ways into the film strip to insert a beautiful errored leaf, the patterned organic web of veins inserted into plastic. The webs of the leaf are held and embedded into the structure of the film. This act reminds me that film is at the tangible scale of human hands, fingers and eyes. All of these acts are acts onto and into the substrate of film. Film a carrier to look at and to look through. Digital works allow for the act of destroying at another scale. Is scale important? I think it is when it can be matched to the everyday perception and experience of our bodies.
Recent research on pain has found that the brain can hold onto the site of pain long after it is gone. People who suffer from chronic pain are being treated to retain they beliefs about their pain. Therapy involves addressing acuity of touch. People who suffer back pain are known to have poor sense of touch around the site of pain. Therapy addresses a re-training of touch. A therapist uses callipers on the patient back and they must guess if there are being touched by one or two pronged callipers. Early success points to more research to be done in this area. The body remembers.
To describe darkroom processes one must explain how emulsion works. To expose the film you must shine the light against the emulsion side. Curham explains that to find out which side of the emulsion is on you can wet your finger and feel which side becomes tacky. Doing this engages you in the stuff that is happening directly by touch. This touching the material with which you shoot enables a kind of body memory you don’t forget and is the essence of why I started my doctorate, I wanted to know how this experience of touching film was the ground of my approach to film making.
I have taught experimental techniques at to students at the Sydney College of Art. A component of this was describing to the students film orientation. Most students I observed learned best by making mistakes. They only truly understood what was happening to their ideas when they plans became unstuck. For example, if they scratched text into the emultion on the wrong side it couldn’t be read because not enough light would pass through the film. Looking at the film without projecting it this wouldn’t be noticed. Some of the wrote text cross the whole frame disregarding the direction of the film or the fact that not all of the film is not normally visible through the film gate they would not be able to read their text as planned. If they intended to animated recognisable shapes but did not draw enough frames the image would disappear before it could be registered. They learnt by failure and by physically interacting with the material. This brings about a respect and knowledge of the technology you use to make the thing your are making. It acknowledges the agency of the material as well as the essence of how it functions.
Touching analogue tape was another process that has ground in my film making. During my doctorate I am working part-time as a Video Post Officer at AFTRS. The school is decorated with old media carriers. 35mm hand wound cameras, Nagra sound recording machines, Steenbecks and editor viewers decorated the halls and various shelves throughout the school. We sometimes need to digitise from various superseded analogue media from the last 20 years. We digitise; Umatic, Digibeta, Mini DV and VHS. Recently I had a dream I was using an analogue tape to tape editing system affectionately known as ‘punch and crunch’. It is called this because the shuttle dial would allow you to whirl up and down the tape till you found your ‘in’ point. To select the bit of tape while shuttling through with the dial you could forcefully press it down with your fist, effectively punching in your ‘in’. Slam it again and off you go to find your ‘out’ point. When both points where selected and edit button was pressed. You could preview the edit or commit to tape. This committing to tape was the crunch part. Punch and crunch editing had a physicality to it. My dream reminds me that analogue tape also left it body memory in me
0 notes
Text
Process of results
It is no mistake that when setting out to edit a film made over the weekend with other participants of Nanofest in February this year I choose to use the sound track to expose how many bodies, thoughts and machines came to make the film we shot. The film is as much about process as it is about results.
In the soundtrack we hear Richard Touhy explaining darkroom developing processes, we hear the actor preforming dialogue, the crew behind the camera discussing exposure, F-Stops and their laboured breath as they heave and maneuverer the camera while the camera clunks and whirls are also recorded. The soundtrack is a mix of reflective sounds as well as actions performed. The picture also shows cameras, sound devices and the environment of the camera shoot. The interaction of bodies within landscape, minds and machines cannot be separated. With all these moving parts foregrounded, the film appears more music than short drama. It is of the rhythms of making films with know-how, collaboration and experimentation. All these factors have an affordance of their own that pull in various directions. It is a recipe of these that brings an outcome and of cause the edit is the unseen hand that maneuverers all these things into place. My research is about the influence of technologies on artists and makers. I choose to shape the materials available to the edit in this way. Another editor would disappear the choices and discussions, make these transparent to perhaps tell a fictious story. The film attempts to show the making and the made. It is a portrait of the rabbit and the duck at the same time. It is about an experience more than story. It is a portrait of process.
0 notes
Text
Optical Snake
Today after I looked at my optical print of the snake print made at AFW on my Steenbeck. I have spent about an hour trying with no success of scanning the print on my Retro Scanner. The digital Retro Scanner works by detecting the sprockets with a laser. When the software reads/senses a sprocket hole it scans a frame. The system works quite well but fails over my prints as the base of the stock is clear and it isn’t able to read the holes. A frustrating limitation but one that reminds me of the pros and cons of a digital hybrid process that I rely on. In contrast to other film makers such as Richard Touhy who are more at home in the film apparatus.
Earlier in the year after the sit down Interview Touhy we took a tour around his studio which are situated in various rooms and out buildings at his and Dianna’s home. Standing in a dry room used for contact printing, optical printing as well as housing a film out unit I asked Touhy about his process. His process remains mostly in the analogue domain. Once a film is processed he tends to lace up the material on a projector to see the results. He stressed how different a piece of neg or print looks in your hand compared to viewing it as a moving image. Touhy is in the enviable position of having chemical, mechanical and electronic knowledge. He dwells in all three meaning he thinks in these domains. He can fix and adapt his instruments which I imagine creates a kind of flow different to mine. My process is a kind of a hybrid of analogue and digital worlds. While I have several 16mm projectors, I don’t find them easy tools to work with. My Steenbeck is an important part piece of my current filmmaking kit because I can easily slow something down and rewind it and review it again and again. Something which is more clumsy to do on a 16mm projector. I am more likely to make a digital copy of a film and edit it. This means surmounting the problem of digitisation. The frustrations of not being able to scan the material to review easily does impact the process as it impacts the sense of flow with the material.
My snake print is now hovering between potential directions based on affordances and my abilities and what I have access to. Whether you engage in making analogue film from beginning to end or practice a hybrid digital analogue model both processes involve delaying seeing exactly what you have shot till after the darkroom process and then building on from there. You can then digitise it or project it or view it through a small table editor viewer or on a large editing flatbed editor such as the Steenbeck. Editing on a Steenbeck is a process of cutting the footage down, pulling it apart, holding ideas and shots in your head till you are able to piece it together again with a splicer and then review what you have made by lacing up the device which allows the footage to be re-animated. It is much like sewing on a sewing machine. An item of clothing is assembled by sewing fabric cut usually to a pattern. The pieces sewn together on a machine. The overall structure isn’t realised till it is all joined up again. My snake print is hovering in my minds eye, in pieces, fabric like, with which to build an overall structure or effect. For I am only just now able to view it and imagine the next steps. The short roll of film was a bracketed test. I imagined printing every frame twice would give me the slow motion I desired but for the sake of taking the opportunity to see what other speeds would bring I decided to print every frame 5 times, then 4, then 3, then 2. Lacing up the image on the Steenbeck I see the 5 frame print is the result I was hoping for. By holding the abstract holes on the screen for longer they now appear to take on other characteristics. I showed my girl friend. She thought the white holes seemed like water drops. My first WIP screening at Photoaccess where viewers saw the film at direct contact print speed of snake skin to film skin. They thought it looked like smoke. It occurs to me with the assistance of sound effects or music, the imagery may become water like or smoke like depending on how it is presented. The optical snake print has been transformed by mechanical means. From here discissions can be made about further manipulation. These manipulations are based on my ability to tap into the affordance of the material. The potentials evident to me are utilising the hi-contrast print which lends itself to a mask with which to photograph other material. I could also bi-packing the film again with itself or with other imagery. The next steps are as much about affordance and my abilities as they are about how to present the material where it again will be changed by juxtaposition and context.
0 notes
Text


Artist Film Workshop JK Optical Printer session
I organised a session to use the JK optical printer when visiting Melbourne in June with the kind folk at AFW. Using an Optical Printer is a process similar to animation in that frame by frame you make a copy of the source material which can be re-framed, speed up or slowed down while photographing it so you can manipulate the original.
I wanted to make a step printed version of the snake print I made. A ‘slow motion’ version so the abstract shapes can be seen and contemplated for longer. On a Steenbeck you can play any material at least half speed easily by moving the controlling the lever at half speed. The lever has two natural positions it can be in without holding it there. But if you hold it between stop and full you can make it play the material at about 12 fps. Doing this with the snake skin I knew it would be interesting to make a slow motion print. If I am to make a live performance with the material having alternative speeds could be a feature of the performance and allow for more intersections with a potential sound track.
Carl Looper had written a new computer program allowing for intricate patterns to be programmed into the computer controlling the JK machine. Unfortunately he was unable to meet me so another AFW member Melody gave me a 15 minute introduction into how to thread the projector and set-up a Bolex with a motor. Melody explained by pointing to the various components not wanting to take too much of her time I gathered enough information to lace up the machine in her absence.
My next hurdle was there was no Bolex available to connect to the motor. Only relatively late models have the right connection to connect to a motor which can drive the Bolex as well as the advancement of the projector side of the optical printer. Kindly, Melody loaned me her Bolex and I treaded everything up manually. I have been aware of the principle of optical printers for some time. However having someone explain the direction of travel and the an estimate of exposure with similar stock was very helpful and no doubt speed up my learning process. The process is that you advance the source material which is laced up on the projector frame by frame and then frame by frame shoot and advance the Bolex which is set on rails and photographs the source material passing through the gate in front of it. With Melodies advice about exposure or amount of light on the projector which was set at 10 to 12 I made a bracketed test where I tried with the aperture set at 5.6, 4 and 2.8. Once I got into a rhythm with this I found it was the sound of the mechanisms which where giving me a sense of rhythm and connection to what I was doing as much as one driven by touch. I pressed a button on the projector mechanism, the film slips forward one frame and then by pressing the Bolex button I shoot one frame. A slow process if you wanted to do this on a long piece of film and in that sense the snake skin was a good process to start with as it was a short loop of 2 and half meters I was photographing. The bracketed test looked good across 5.6 to 2 so I decided to set it at 4 and start with 5 frames for every one and then 4 till I reached 2 frames per one which should equal 50 % speed. I shoot about 60 feet and processed it in D76. The material hanging up on the rack again reminding me of the original snake wrapped around the tree.
At home I laced up the print on my scanner. The scanner again works by photographing frame by frame but the camera finds the frame by a laser which detects the sprockets. The print film is clear so the scanner was not able to recognise the sprockets and after an hour I gave up. I will have to wait to see it on the Steenbeck or projected on a 16mm projector to what I have made in motion.
Working at AFW and the benefit of casual conversations I had there again remind me the value of an artist run lab. To be in company with others curious and committed to film a form not always forgiving was re-energising.
0 notes
Text

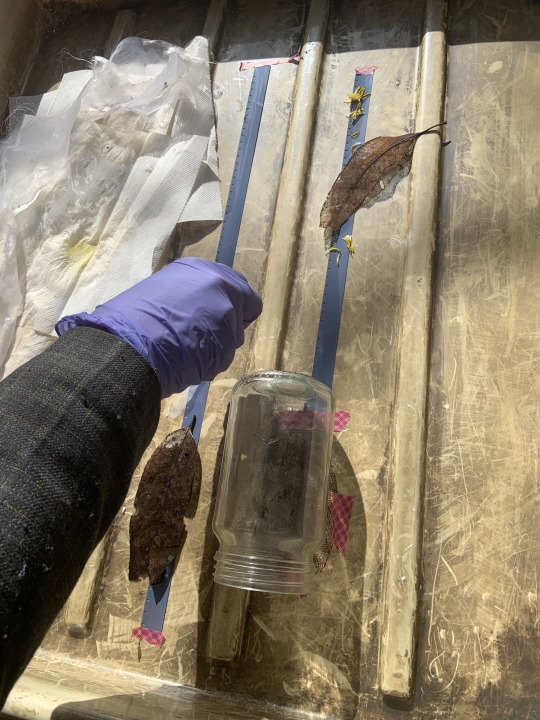
Snake contact print
About a month ago I had my first night sleeping alone in the bush. Not really far from a nearby small town but significantly away enough from others with the sounds of the night to myself. It was a bright moon light night so I was alert, sleeping lightly but not terribly. The next morning I went down to the river and got ready for a dip. My peripheral vision caught something in the tree. A snake skin was wrapped around a tree limb overhanging the water. I thought for a second that the snake might live nearby and want something of me. Then I realised I wanted something from it. The long length was semi transparent and would favourably lye against a strip of unexposed film. I gingerly unwrapped the skin from the tree hoping not to break it. This post is about the process of using hi-contrast 16mm film to make a Rayo-gram of a snake skin and then make a contact print of this to have a projectable print. I was curious to see if it would present animated movement anything like a snake or pure abstracted dots of light and dark.

Just putting those two thought together - snake skin and 16mm film - highlights the influence of what analogue film brings to film making. A length of film is physically relatable to a length of film. These strips want to do something together because they can. There is an affordance there that allows something to take shape. In noticing the snake skin I notice it’s suitability to the Rayo-gram technique because it is relatively flat, it is semi-transparent with intriguing shapes, it’s length is something I am used to holding like a strip of film. This perhaps wouldn’t have occurred to me if I hadn’t used the Rayo-gram before but working with strips of film makes you think in lengths and strips.

In the bush I thought I would just lye the skin against the skin of the film but in the darkroom I wondered if there was a more elegant solution. Sharing the space with a printing studio meant there was tubes around for posting large prints. I borrowed one of these. With some pins I wound the skin around the tube thinking I could tuck the film underneath the skin emulsion side up and doing this would keep it in place. I practiced in the light spinning the tube and running a touch over it. A little bit more fumbling in the dark I made the exposure in a nice sweep and then unwound the film placing it in a light proof bag to later load into the Lomo tank.

The Rayo-gram came up well. I can’t load the image here because of the pesky live image that my iPhone is set to. I will have to find a work around for that. I decided to make a print of it on the contact printer thinking of the endless possibilities of printing through the snake skin shapes or using the dark parts as a mask. The above image is the results from the contact printer. Next thoughts are about a hi-contrast print so it is only black and white or perhaps printing onto colour stock using filters.
0 notes
Text
Notes at the Steenbeck

Re-assembling a film I shot on film but cut digitally, I think of ways to trace back my digital edit to the physical film copy, which is necessary to produce a film print. I have made work prints (contact prints) of the camera negatives, assembling shots from the workprint will provide a cutting copy that I can then emulate with the camera negative. I label shots I can identify and hang them in the film bin.
With the film fastened to the up take reel on the right hand side of the Steenbeck, a lever directs the speed and direction of the film. The opening countdown passes in between of the prism and the light source. Holding the tail of this shot in hand I reach for the incoming shot, joining it the head to the tail of the outgoing shot. With clear tape the two shots are joined on the film splicer. The lever is engaged with my right hand pressing it into forward motion and the newly joined shot is pulled through my left fingers, sprockets allowing the film to hold steady pulling the film past the light filled prism. Hand and machine get into a system together. With the film passing through my hands, I get a tactile sense of the length of the shot. Duration is seen as a length of so many feet and so many frames. Continuing this assembly I witness different lengths, short after long, long after long, short after long. I imagine I am seeing and feeling rhythm.
Editing analogue film is non-linear in the sense you can lift out shots and move them around. However, it leaves a linear feeling of structure. When assembly you put each shot through the machine, you have a strong sense of head and tail. Head goes first and then the trail. We write head or tail on rolls of film. Without labelling head or tail on a roll of film or not labelling it at all means you have to at least open it up and hold it against a light source or run it through the machine. It might be tail out meaning the film hasn’t been rewind yet. So labelling camera shots or rolls, noting the head or the tail or a roll, assembling short and long lengths together you get a feeling for structure like this. You get a strong sense of beginning, middle and end.
Cutting 16mm directs you adopt a method to the system of joining shots. Without it you loose film and you are blind to making connections on which to build your film. Randomness and chaos could be an approach but it is not one that I easily fall into. Trained to track numbers and shots as an assistant editor working with film has left its mark on my approach. How to trace your steps back to the negative? This needs process. Computer editing for this reason can be much more chaotic. Digital editing, being non-destructive, you can carry on and click and drag and drop, sketching out your edit with the interface. Computers are fast. Working with film induces a thoughtful mind-full process. Film slows you down. Many artists search this out. We want to be slower. We want to think through the process. We want to think our hands.
0 notes
Text
Scanning vs DIY telecine - a short comparison video
This video starts with a scan of a phyto/caffenol-gram of the common Bindi plant which has been inverted and had a fair amount of post production to remove colour, increase the contrast and reduce the exposure. I often use a flat bed film scanner to get a look at short lengths of film soon after developing. It is handy because you get a hi-resolution image and a good degree of control on how the film is processed digitally. The down side is a scan of about 24 frames (1 second) can take about 5 minutes at 3200 DPI. So a pretty slow way to digitise film. After digitising you can then bring the large tiff file into editing software to break down the frames to the desired frame rate in the timeline. Because the Bindi plant is larger than the 16mm frame size I choose not to fill the frame so the shape of the plant is more noticeable. The second shot which is golden and more abstract was filmed off the Steenbeck screen with no post-production except for a speed change to reduce film speed to about 5 frames per second. The shape of the plant is less obvious but the subtle markings have a certain charm to them. The next shot I have placed the scanned image over golden full frame digitised footage. The following shot I have tried to apply the same post-production to the golden material that I did to the scanned image; inverted the negative image, reduced exposure and increased contrast. The full frame material becomes much more grainy which has a charm to it but translates very badly on the internet. Film grain texture is pretty, particularly when projected but filmed digitally off the Steenbeck or off the wall the grain can become pixel chunks which loose there charm for me.
This comparison process has me thinking about the digital era we live in. The way I was able to digitally unearth an image out of the thin negative is a valid pursuit. I haven't tried a contact print of the negative. Perhaps with hi contrast film I could achieve a similar or better result. It would be worth investigating. It is temping to take a purists approach to working with film because there is so much to explore in the darkroom, in the developing process, in the printing process and by exploring the film apparatus itself. But why not take advantage of the era I live in now? Perhaps I can free myself up by moving away from a purists approach to film to discovering the analogue/digital hybrid.
1 note
·
View note
Text

Talking a camera for a walk
I bought a sturdy monopod thinking it would be a light weight handy mini tripod I could take on longer hikes when a full tripod would be a burden. However, as hiking can’t be done under lockdown, I have only taken it as far as the local beach. Gibson wrote that a camera person kind of acts out the active locomotion perception he wanted to put at the centre of his ideas on visual perception by shooting different shot sizes and close ups. He even extended this idea to the active and therefore bodily work an editor does by joining different shot sizes up. With these ideas percolating in my mind I took the camera for a walk on top of the monopod. The results were a sweeping kind of vision nothing like what it is to walk on a skeleton with our in built cushioning. A simple piece of technology, like the monopod walking stick, leaves its trace in the gestures recorded by the camera. These gestures very much take on the characteristics of the one footed technology. Just by displacing one element of a ‘normal’ filming procedure it is easier to see what technology brings to the results. I am really not sure if I will expand on this exercise any further but it did remind me of how the presence of technology can show up and our habit of trying to impose on the camera and the filming apparatus our human experience.
0 notes
Text


Film in the digital Era
I took these images during the 90s and early 2000s when I was working as an assistant editor in the independent feature industry in Melbourne and Sydney. It was working in this capacity that left its unique mark on my approach to film making. It was exciting to work with film materials and the large editing apparatus within the big machine of feature film production itself. The image at the 16mm Steenbeck was taken on while working as an second assistant on the film Mallboy (Giarrusso, 2000). My job was to sync up rushes, film the rushes on a video camera off the Steenbeck monitor for distribution to the director and producer, put away trims back into their camera rolls, as well as lay up sound effects to enhance the soundtrack. Mallboy was a low budget film so the production decided to take the rare step (at that time) to cut on film. Digital edit suites were expensive and the hiring of Steenbeck and edit rooms were cheaper which meant the edit schedule could last for longer. We would have more time with the material and longer time to try things out. I am forever grateful that the production took those steps because I learnt valuable lessons about editing with physical materials. An assistant editors role now is much less interesting than during the time of editing on film. Syncing audio to picture digitally is now automatic, files are copied at the stroke of a mouse click which means the assistant might not even watch the raw rushes. The editor needed more assistance with filing and syncing and laying up music and sound effects which meant more time with them so we witnessed their craft and learnt what they do by being present at all the stages of the edit. A digital timeline may be navigated swiftly, you go to the head of a sequence in a stroke. At the end of a reel it must be physically rewound on a winding bench or on the Steenbeck. Rewinding on the Steenbeck gives you the opportunity to watch the film back and notice patterns in the edit from another point of view. This is useful information to the editor that time and the physical matter of a film reel imposed on them. Now because the digital edit suite is so quick at performing many seemingly mundane functions, this opportunity must be purposely sort out or is lost.
Another effect of cutting on film might be learning how to cut in your head. Because film handling can be laborious one becomes adept at watching rushes and cutting them in your head before you make the effort to find the shot, mark it up, take the spicer and trim away the excess. I want to know what other things can be learned by constructing a film on the Steenbeck that I may have not paid attention to before. So one of the tasks I have set myself in this research is to cut something on the Steenbeck again. So far I have used it as a way to make DIY digital copies of my film negs and I have also used it as a way to reconstruct a film shot on film but edited digitally. To cut on the Steenbeck I will need to make film prints or what we used to call a work print. Something you feel free to cut up before cutting the original film negative. This will have a financial cost and I am aware I don’t need to apply all the industrial methods of the feature film process to my personal process but I want to think through what might be useful. I have also read about using the Steenbeck machine as a DIY contact printer (in the Artist Film Workshop magazine Film Is) too which would make the Steenbeck an even more valuable tool to have use of. There is a great many possibilities and avenues to explore. I will be documenting them here on this blog.
Revisiting these images of my time as an assistant editor I can see I was already charmed by the materials during the rise of digital processes. The image of the 35mm print in the glow of the light bench treaded into the gang sync. My winding bench, a work station with books, music and photos arranged around it like any work desk. The pizza boxes full of the rushes. A pile of effort and time wound up sleeping and waiting to be put to use. The Super 8 projector and the beaten up 16mm camera on top of the Steenbeck monitor, objects becoming totems, symbols of an artisan approach. I took these photos from a stance of affection for the materials. It is puzzling that an industrial art form can take on the cloak of an artisan appeal. And this artisan appeal it seems to me to rest on not only that the surface of film that may be scratched or photochemically explored but importantly that the physical nature of working with film means you hold it, carry it from apparatus to apparatus, push and tug the film strips through different machines in different work spaces which requires action and energy of your body to a greater extent than working with the keyboard and the mouse plugged into a machine that is also receiving your emails, streaming content and social media. Again it could be considered only as a matter of degrees but the active movement of the body and machine is film art practice.
1 note
·
View note