
Statistics
We looked inside some of the posts by tobias-nf and here's what we found interesting.
Average Info
Notes Per Post
176
Likes Per Post
123
Reblog Per Post
53
Reply Per Post
0
Time Between Posts
2 months
Number of Posts By Type
Text
11
Last Seen Tumblr Blogs


Fun Fact
Forty percent of Tumblr users are between the ages of 18 to 25.
Text

★ 【前髪】 「 shimarin & ayano 」 ☆ ✔ republished w/permission ⊳ ⊳ follow me! insta • x • bsky
77 notes
·
View notes
Text

★ 【yas△】 「 全員集合✨ 」 ☆ ✔ republished w/permission ⊳ ⊳ follow me on twitter
91 notes
·
View notes
Text
planned ext upgrade, unplanned t1 upgrade.

So swapping out the fans and radiator for my external radiator setup went as planned, disassembling the custom loop for the first time wasn't even as scary as I had initially imagined it. One neat trick I made use of was connecting an electric air duster to one of the tubes and blasting most of the coolant out with it, after that I just had to be extra careful when unscrewing fittings with some paper towels on hand and a few G1/4 plugs to seal sections off. All the work on the EXT was done throughout the end-of-the-year holidays and went by without any hitches, full build time (draining and taking it apart included) was around four days. Quicker than I anticipated, all of that experience I gained from putting the original build together last year made things a lot easier to figure out.
Everything went as envisioned, new build finished and a job well done, right? Well, there were a few things that I wasn't quite happy with. First were my choice of fittings, originally I wanted to replace all the ones from EK on the external sections but issues with the new fittings forced me to put a few of those EK ones back in and that resulted in a really incoherent look. Being more specific one was with the Koolance coupling adapters that were meant to bridge the quick disconnects and soft tube fittings but these are only compatible with the super short threads on Koolance fittings so having the soft tube fittings from Optimus on one end just wouldn't work. The other fitting issue was a result of the T1 and EXT trading places on the desk (with the HOTAS set to move to it's own dedicated mount at some point in the future rearranging the PC this way will free up enough space to have a 900x400mm deskmat, thats basically the standard sizing for deskmats and thus makes it much easier to find replacements compared to my current 700x300mm one that I mostly got because it was the only size I could find back then that'd fit my desk, I don't hate it or anything but I would love to get a cuter one instead), swapping the two parts of the PC meant the radiator also changed it's orientation and because of that the single 90° adapter on the reservoir for the tubing segment to the case wasn't working well, there was just too much stress on the tubing to the point where messing with it would unscrew that adapter. Beyond the fitting woes, working on my build just in general was reminding me of some of the stuff with the T1 that I wasn't satisfied with. One of those was with the side/top panels on my unit having fitment issues that made getting all of them to sit right a borderline Sisyphean task, get one side of a panel to fit and it knocks another side out of alignment, that sort of thing. Initially I thought this was because of a misaligned thread on one of the M3 standoffs on the GPU strut but while taking the T1 apart I also noticed that where the PSU mount is attached to the front panel there is meant to be a tiny gap between these two parts that was absent because I overtightened the screw on it, so it was probably a combination of these two that offset the front and rear panels to such a degree that it resulted in the other panels having trouble fitting. I'm jumping a little ahead but both of these got remedied by setting the T1's spine up for a 3-slot GPU where that one standoff isn't used and adding a washer to that spot on the PSU mount respectively. Now there are zero issues with panel fitment and I'm also relieved that none of them have warped despite having had them forced into place for almost a year. Beyond all of this there's also the thing that's been bothering me the most about this build ever since I put it together, which is the overly complex setup of fittings inside the T1. So as this project had already ballooned into something a lot bigger I decided I might as well go all in and work on that while I'm at it.
With all of these new goals set I went back to the drawing board and a few orders later it was back to disassembling the build in late January, this time taking apart the whole thing instead of just the external radiator. Things once again went well though I did get a bit too complacent while draining and spilled a little more coolant than I'd like to admit (fortunately just on the floor and not onto any electronics, also good thing I don't have a carpet floor in my room).


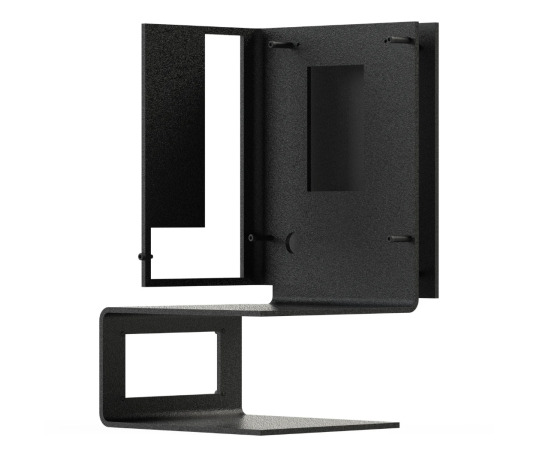
Shown above is the final configuration of the external radiator. What is probably the most visible change is the move to a push-pull setup featuring a set of 8 Noctua NF-A14x25 G2 fans, these are also made up from the sets of fans that have a minor rpm offset for a better acoustic profile when running them in push-pull or side-by-side configurations. I did opt to have fan grills on the front-facing fans because of the new position of the radiator on the desk, in addition to it now being a lot closer to me the T1 also doesn't act as a barrier between it and everything else on the desk anymore so this had me worried about the growing number of anime woman precious memorablilia accidentaly getting caught in the fans. In order to power all those fans I also had to come up with something as the 8 of them could potentially draw more power than the single 1A fan header on the motherboard can supply. Noctua's NA-FH1 fan hub was the natural solution for that, support for exactly 8 fans and powered via a SATA cable while a 4-pin fan cable connects it to the motherboard so that fan speed is still managed through the BIOS. The fan hub has magnets on the backside so I just slapped it onto the backside of the EXT, it does hold fairly securely with all the cables plugged in but I'd still like to come up with a more proper way to mount it in the future. Cable management, despite doubling the fan count was actually pretty manageable since there's no need for any y-splitters and each fan just gets plugged into its own port on the fan hub, there is a bit of an ugly excess of cables towards the bottom though as I'm still just using the stock extension cables that came bundled with the fans.
The second big change was swapping the EKWB X560M radiator out for a Hardware Labs GTR560. It does feel a little odd to replace a component that came out in 2022 with one that is almost a decade old but it still remains the best-performing option for extremely high airflow setups (I'm actually not entirely sure when the GTR lineup first hit the market, most reviews and articles about them are from 2017 but there are also some forum discussions from 2016, but either way for computer hardware they could be considered relatively old). Because these radiators are so specialized for high airflow they actually don't get recommended that often as rads optimized for lower airflow will outperform them in scenarios where there's less airflow, i.e. when running fans at low rpm to achieve a quieter build and usually also in a push or pull only configuration as well. But since these fancy new Noctua's in push-pull should move plenty of air even at lower fan speeds the GTR seemed like the more appropriate choice for my build.
As I mentioned in the beginning the fittings also got overhauled, now using Koolance ones for all the adapters and Optimus compression fittings for the tubing. The two issues from the December overhaul also got fixed, the Koolance coupling adapters got swapped out for slightly longer, swiveling adapters from them that had no issues working with the Optimus fittings and the 90° adapter on the reservoir got replaced with a 45° one that doesn't put the tubing under any stress.


On the other end of the loop there's the updated T1, featuring some new unusual fittings inside. Now I've brought this up multiple times already but the amount of angled adapters and extenders used for the custom loop inside the case was way too complicated in the previous iteration of the build, something that was done out of necessity back then as it was the only way to make the tubing runs possible in super tight sections like in the rear of the case where the pass-through fittings are. If I kept it as is it would've piled on a ton of extra busywork for any future changes/upgrades as any adjustments inside SFF cases usually involve taking the whole build apart and I'd need to disassemble and reassemble all those fittings every time, not to mention that every fitting also adds more points of failure to the loop. In order to remedy this I actually went for hardware that wasn't intended to be used for PC liquid cooling and got some push-in fittings for pneumatic applications that have become fairly popular recently within the SFF custom loop community because of how small they are compared to regular water cooling fittings. These are Festo NPQH ones for 8mm tubing that are also on a 90° angle, that rotary 90° part is super handy as it eliminates the need for an extra adapter, further reducing the total number of fittings (the part number for them is NPQH-L-G14-Q8-P10, I also got some straight NPQH-DK-G14-Q8-P10 ones but the 90° versions were a more suitable fit for every connection in the build so I didn't make use of them). One thing to note is that these fittings have 6,5mm threads that are too long for use on Koolance fittings so I had to pair them with fitting spacers from Bitspower (specifically they are the 2mm thick BP-BSWP-C43 ones in the "Black Sparkle" finish, not to be confused with their thicker 3,5mm spacers that prevent the thread on the pneumatic fitting from gripping), while the spacers were probably not needed on the CPU and GPU block I did put them onto these two anyway to have a more consistent look. The 8mm tubing used here is polyethylene PEN-8x1,25-SW (also from Festo), it's pretty stiff in comparison to the EPDM tubing I'm used to but it's still more than flexible enough to work comfortably in all of the tubing sections, also because this is an industry-type product they only sell it in a relatively large package so I'm here with a 50m roll that basically amounts to a lifetime supply.
The only other fittings inside the T1 besides the ones used for tubing and the quick disconnects are a 45° adapter to make the QDC to CPU run possible and an inline temperature sensor on the opposite side between the GPU and the other QDC, both from Koolance. I also made the decision to remove the internal 240mm radiator, although it hurts to lose that extra bit of cooling it's more valuable to me to have a simpler interior, with all those changes combined I think the new setup cuts the amount of fittings used in half (TBH I don't remember the exact count on the old build and I'm too tired to look up what it actually was while I'm also including the fitting spacers on the new one towards the total but it is a big improvement for sure). The two Noctua NF-A12x25 fans from the radiator did stick around so that there's still a little bit of airflow over the components inside the case, mainly for the motherboard and RAM.
Since I had to take everything apart I also completely rerouted all of the cables, while I'm still stuck with the stock PSU cables I think I managed to lay out everything a little cleaner this time. One that I'm especially proud of is the power extension cable that goes from the rear of the case to the PSU that is now mostly hidden by running it along the strut for the GPU riser and then having it disappear between the GPU and motherboard (it did take me about 3 hours in total to get it set up this way because it is a very stiff and unruly cable but there shouldn't be a need to remove it even when disassembling the build so I think it was worth the effort).

When it comes to thermal performance it's a little hard to directly compare the new and old build as the temperature sensor changed (readouts may vary a little from unit to unit as they're probably not laboratory-grade calibrated) and I also moved it to a different place in the loop (it's now after the GPU instead of before so the heat from it might bump the reported temperature up a little bit). When factoring those variables into account it does look like the new setup performs about the same as the old one, the cooling performance I lost by removing the 240mm radiator (and the pneumatic tubing possibly being more restrictive as well due to the small inner diameter of only 5,7mm) I gained back by the push-pull fan setup on the EXT. Noise levels on these new NF-A12x25 G2s are also excellent, all that R&D Noctua put into these fans really paid off it seems. I'm also still just using the fan curves from the old build so there's probably still room to optimize it even further.
Wrapping things up this upgrade project was a worthwhile endeavor despite grossly running out of control when it comes to scale, getting rid of a lot of the pain points from the original build means I can focus more on actually advancing it when it's time for the next round of adjustments. There is still a lot I wanna do with this build and I look forward to sharing it in the future (also wow, the paragraphs in this one sure turned out quite lengthy). Thank you for reading!
(≧◡≦)
0 notes
Text
2024 recap and 2025 plans.

Another year has passed so I'm here once again with a sitrep on my deskspace. Beyond the one large project, moving my PC to the FormD T1 and the custom loop that accompanied it there weren't a lot of changes. Though two smaller things were replaced that didn't warrant their own posts so I'll go over those before laying out the plans for the future projects I'm planning.


One of those smaller things was my Sennheiser IE300 falling apart. Starting sometime this spring the two halves on one of the shells got gradually looser and even separated occasionally when I removed it from my ear. This was fine for a while but back in June (somewhat unsurprisingly) the stress on the wires from the shell coming apart was finally too much and one of them snapped off. In retrospect I wonder if cleaning them with isopropanol caused this, the two halves were only glued together from the looks of it and applying the alcohol at least once a week might've removed the adhesive over time.
By pure coincidence Chris Person of Aftermath (who is someone I have a lot of trust in when it comes to basically any tech) published an article on IEMs the day after mine broke so I didn't have to do much digging to find a suitable replacement [link]. Luckily the IEM market these days is incredibly competitive and what I ended up with was a pair of Truthear ZERO:REDs for €59.98, which is about half the price of what I paid for the IE300. I'm not really an audiophile so I can't get all technical on them but from a purely personal preference point of view I flat-out enjoy the sound of the ZERO:RED over the Sennheiser ones by a good margin. The only complaint I have about the new IEMs is that it took a while to get a decent fit with the included ear tips. The medium-sized ones were the only ones that worked on my ears but only just barely, being so big that the IEMs would occasionally even pop out on their own as I couldn't insert them deep enough (the small-sized ear tips on the other hand were the polar opposite, way too small to get a good fit so they'd also fall out). Fortunately the medium-sized ones seemed to have adjusted in shape from daily use over the course of a few months to the point where they now have a very comfortable and secure fit (the failsafe option if this didn't happen would have been to look into aftermarket ear tips). The vivid red faceplate on the new IEMs is also a nice change compared to the drab look of the IE300, so overall the Truthear ZERO:RED were a really great purchase and I'm hoping that they'll last for a good while.

The other small change was swapping out my Xbox Design Lab controller for a DualSense. No grand reason behind this change, I just got curious about how Sony's offering compared to the Microsoft one in terms of ergonomics. The overall build quality and button feel of both controllers is basically the same, either one seems decent and there's nothing that really makes one stand out from the other. Though one thing to keep in mind when using the DualSense on PC is that the haptic feedback only works when wired, in my case this wasn't an issue at all as I only use it seated at my desk and the USB-C cable gets wrapped around the monitor arm when not in use so there's no extra clutter created. In the end the symmetric stick layout on the DualSense felt more comfortable to me and the Design Lab controller went on to find a new home through eBay like any other still functional hardware that I retire.

So what is planned next? Well, since it's about time for the annual coolant change of the custom loop I'll use that as an opportunity to make a few adjustments to it, specifically to the EXT. Back when I was originally making the plans for this whole T1 build I was expecting Noctua's next generation of 140mm fans to have been released but the release date kept being pushed back, but now after almost a decade of development they're finally available. I ended up getting a full set of 8 of them for a push-pull setup, cable management is going to be even more tricky with this many but I'll be able to squeeze out the best performance and noise levels from the radiator this way. The EK X560M radiator is also going to be replaced with a Hardware Labs one that should be able to make full use of these high-end fans. All the new parts for this project have arrived already and the plan is to assemble everything over the end of the year holidays.

The other, much bigger project that I'm currently planning is about changing my HOTAS setup. At the moment I'm using an all VKB setup with a Gunfighter Mk.III stick base that's paired with their aluminum MCG Ultimate grip via a 200mm extension, all attached to the desk with a UCM-L mount and below it are T-Rudder Mk.IV rudder pedals with the older cylindrical-shaped pedal design. The throttle is a GNX THQ, it's a bit of an odd choice compared to the other sim hardware and was only meant as a cheap stopgap solution initially as VKB's more advanced throttle, the STECS had not yet been released back when I got the other parts (though I never got around to switching to it even though it's been available for well over a year by now). Oh and also as a sidenote I fly in VR with a Valve Index, that's why the stick and pedals are not in front of the monitor.
The DCS Mi-24P is currently the only aircraft I fly so having a setup where your hands are on the throttle/collective while flying at basically all times is the ideal, the GNX THQ being placed on the desk where I have to reach so far forward to access the throttle levers is pretty much the opposite of that. Improving the ergonomics of my simpit is one goal but there's also the somewhat recent development of force feedback flight sim hardware making a comeback, RedKite made a great video on how FFB works in DCS in its most basic implementation and why even just that can be a game changer for certain types of aircraft (it's also a neat example of how flight sticks on real aircraft behave and how they differ from the typical spring-centered joysticks made for flight sims) [link]. One thing to note about most of these newer FFB stick bases is that they don't seem very suited for use with desk mounts as they're pretty large and heavy, not to mention all the extra force created by the motors in them. This had me looking into those aluminum profiles that are commonly used for racing sim rigs, though I'm not planning on building something all that complex with a dedicated seat and all but instead just a stand for the stick, pedals and throttle to mount onto that can be used with my desk chair. I'm pretty sure on what stick base and rudders to get but still undecided on the grip and throttle so this project is currently still in the early planning phase.
Getting a proper, actually ergonomic HOTAS setup will also be the last big project for my deskspace (at least in the foreseeable future), with it complete I'll have everything I want out of my little hobby corner covered. Now this won't mean that there'll be nothing to work on after, it'll just be more incremental upgrades like the aforementioned changes to the EXT and more importantly I also want to start getting a little more creative. What I mean by the latter is that up till now I've mostly just assembled stuff but I haven't really created something proper, something more in the direction of DIY so that'll be the big goal moving forward. Well this basically wraps everything up, 2025 is shaping up to be another fun year for deskspace projects and I'm excited to share them on here in due time!
(≧◡≦)
0 notes
Text
formd t1 × liquidhaus ext.

So it's finally done, moving my components to the FormD T1 and building a fancy custom loop with an external radiator setup on an Liquidhaus EXT to cool it. It was actually built and has been running since mid February of this year but I'm only just now writing about it due to procrastinating a whole lot. The PC has been working without any issues so far, no hardware problems, leaks or stuff growing inside the loop so I do have confirmation that I didn't mess up anything while building it at least. In this post I'll cover the hardware of this build, both the new additions and the old stuff I carried over from my previous Meshlicious build since I never actually wrote about the specs of my PC before.
The case, as already mentioned is a FormD T1 v2.1. This being the T1 from the original team/factory (being sold at formdt1.com [link]), something I have to clarify as the dispute between the two founders behind the original case has only gotten messier and both are now offering their own T1's on different sites (Caselabs.org has a writeup on it if you're curious [link]). I got the case in Titanium with matching side panels, being surrounded by largely black colored devices it stands out to a surprising degree despite the T1's minimalist exterior design which I really enjoy. The build experience with the T1 is fairly intuitive as the inside of the case is basically just a few aluminum struts to mount the components to, I did have to use YouTube build guides for additional reference though as the offical manual is extremely lackluster. The only notable pain point for assembling the case was having to bend the riser cable, it has a reputation for being fragile but requires a scary amount of force in order to fit.

When it comes to custom loop components, specifically the fittings I mostly have ones made by EKWB. It's something I wanna mention up front as a few months after I completed this build it came to light that EK was doing some really awful stuff to their employees (Gamers Nexus were the ones who broke the news on this whole mess [link]). While I don't think it'd be reasonable to replace those parts just because the company that made them turned out to be shitty I'll definitely choose other brands when I'll swap out fittings or other components in order to simplify/optimize the loop in the future.
Now onto the thing that's largely responsible for keeping the PC cooled, which is the external radiator setup. When it comes to external rads, Watercool's MO-RA in a square, two columns of two 200mm fans seems to be the most popular option, though personally I'm not a huge fan of the car radiator aesthetic and as I also wanted something to sit on the desk the footprint of those radiators was also way too large. So what I went for instead is a Liquidhaus EXT radiator stand, combined with an EKWB X560M radiator and a quarted of Noctua's NF-A14 140mm fans. Mounted on the backside of the radiator is a Watercool Heatkiller Tube reservoir that also houses the D5 pump that's powering the loop. I really love how this whole assembly towers over everthing else on the desk and while the PC can't run without it due to the pump being in there it does make filling the loop trivially easy. Cable management for the fans could use some improvement though, I'll probably need to learn how to make custom cables if I want to make it really presentable.

Tubing used throughout the build is 10/16mm (inner/outer diameter) EPDM from Watercool, it's rubber soft tubing that's easy to work with and won't discolor or leech any substances into the loop over time like transparent soft tubing options. Liquidhaus, who besides making the EXT also make some really cool PC builds where they'll sometimes wrap soft tubing in MDPC-X (the same kind of cable sleeving some fancy custom PSU and keyboard cables use), it's something I really want to try myself in the future. Though I'll have to confirm wheter or not Watercool's EPDM is even suitable for this beforehand, softness of this type of tubing can vary between manufacturer/supplier and with the additional sleeving layer it might be impossible to secure the collars for the compression fittings.
The external radiator and case are linked together with two pairs of Koolance QDT4 quick disconnect fittings, they are basically scaled up versions of the much recommended QD3 quick disconnects that don't restrict liquid flow as much due to that size increase. Originally I wanted to mount them on 90° fittings, pointing downwards but the QDT4's are so heavy that they put too much stress on the o-ring inside the rotary part of those fittings that they wouldn't hold pressure during leak testing. Because of this I just screwed the quick disconnects into the T1's pass through fittings directly, this does add some extra length to the case but I've honestly started to enjoy how this looks, with the two large connectors much more visible this way.
The pass through section on the inside of the case has some really messy tube runs on both the gpu and motherboard side. I failed to account for the radiator bracket extending so far to the back of the case and also the large amount of cables on top of the motherboard taking up so much space so I had to use some complex fitting combinations in order to make these two runs work. These sections of the loop will definitely need some improvements in the future, I wanna reduce the amount of fittings used and simplify them, will probably also need silicone sleeved PSU cables to free up some space in order to allow for that.

For a motherboard I have an Asus B550-I, Asus are the only ones that put 2-pin temperature sensor headers on ITX boards (at least on AM4) so I'm glad I chose this board years ago even though I wasn't even sure whether I'd get into custom water cooling back then. Because of this I can have the fan speed adjust to the coolant temperature directly through the BIOS and don't need an additional controller that would need mounting, cables and software running in the background to get that same functionality.
On the board sits a humble AMD 5600X that I've had since I first got into DIY PC's back in late 2020 and it has so far offered enough performance for all my gaming needs. A lot less humble is the brick of copper that's cooling it, the Optimus Signature V3 waterblock that was more expensive than the actual CPU. When I'll upgrade my CPU at some point in the future I'll almost certainly move to AM5 (which shares the cooler mounting with AM4) so I figured I can treat myself to a fancy boutique part as I can carry it over to the next build.
RAM is a TeamGroup Dark Pro DDR4 32GB 3600MHz CL16 kit, one neat feature about these is that the plastic bit on top of the heatspreader can be removed to make them a few mm shorter which made the straightfoward tubing run from the CPU block to the internal radiator possible. For storage I have a single Samsung 980 PRO 2TB SSD, the previous build in the Meshlicious had a second one in the rear M.2 slot but the T1's riser cable hugs the back of the motherboard so tightly that the drive couldn't fit with it's heatsink attached and running it without the cooler is a bit to risky to me (more so out of concern for the riser than the SSD itself). I mainly got this second drive because it was at a decent price during a sale rather than a need for this much storage so it's not really a loss, regretfully it was a needless purchase of me though.
Powering the PC is a Corsair SF750, a SFX PSU that has been held in high regard by the SFF community that's recently been discontinued (though it is being replaced by a newer, identically named SF750 as part of a new SFX PSU lineup from Corsair that'll hopefully live up to the original's quality). The paracord sleeved cables that came with the PSU are decently flexible but they're also excessively long for such a small case that led to a lot of excess cable being shoved onto the GPU side as you can see below. I made it work but it would've been much better if I had gotten a tailor made PSU cable kit instead.

To make full use of the T1's space I have an XSPC TX240 radiator paired with two Noctua Chromax NF-A12×25 fans that provide a bit of extra cooling. This radiator/fan combo taps so close to the 46mm of clearance in the T1's top that I had to remove the fans rubber anti-vibration pads and use screws that don't go through the whole fan frame as just one extra millimeter would prevent the top panel from fitting. At first I also tried to have the radiator mounted on top of the fans but found out that it's sides were scraping against parts of the top panel which is why there's a few scratch marks on the rad, whoopsy!
The GPU side of the case is pretty straightfoward and there's nothing really spectacular I had to build here. The little column coming down from the radiator is a t-splitter where, on the G1/4 thread facing the inside of the case a generic plug-style temperature sensor from Koolance is screwed in. Next in the loop order is the GPU, an Nvidia RTX 3080 Ti Founders Edition with a waterblock from EKWB. Thanks to the compact PCB of this card the GPU shrunk quite a bit with the new cooler, this turned out to be very useful as it left a lot of room for the aforementioned excess of PSU cables. This side of the case is also where all the cables for the external radiator go out, the T1's back is pretty much just open so they're only fixed in place there with a few cable ties.

Putting this whole build together turned out to be a pretty big challenge, while the regular PC building stuff wasn't an issue I grossly underestimated the amount of time it would take to assemble the custom loop. Initially I thought it'd take me maybe four or five days with a weekend during that period to complete it but instead it was a full two weeks of work, starting from disassembly of the old build to completion of the new one. Having started this project with neither the case, tubing or fittings in hand meant that I only had a rough idea of how I'd lay out the tubing runs and this led to a lot of redoing of sections becasue what I had planned beforehand would simply not work. I did however get extra fittings for potential alernate routing options in advance and managed to make things work with what I had on hand, there's two 45° adapters in the loop that I initially didn't plan on using but the build would not have been possible without them so thankfully I managed to compensate for my sloppy planning this way.
Overall I'm satisfied with how this project turned out. It's currently the middle of summer here in Germany and despite having no AC in my room the PC remains quiet even under full load, the fan speed changing in a much more gradual manner due to it being controlled via the coolant temperature also makes for a much more pleasant noise profile compared to the old AIO/air cooled Meshlicious. For that previous build I used some fairly conservative, set and forget undervolt settings for both the CPU and GPU but I do want to squeeze out a better performance to watt ratio on this new one after spending so much time, effort and money on such a complex cooling solution (and also save a bit of power at the same time). There's still lot's of places in this build that could do with improvements as right now it's very much function over form, but then again the goal of this whole project was to lay the foundation for further refinement projects so I'd say it accomplished that quite well.
(≧◡≦)
0 notes
Text
Turns out I did have some time for a little update!
So the last box has arrived a few days ago after juggling around orders at various shops due to differences in availability so I could get all of the many, many items here in the least amount of shipments. This turned out to be a bit chaotic (though I can only blame myself for that as I wanted to fast-track this project) but I'm really taking my time with the actual build now and I've already started preparing some of the components.

I did leak tests on both the GPU and CPU block, along with the two radiators using EK's Leak Tester Flex, which is more or less a repurposed bicycle pump and since airtight also means watertight you can use it to check for faults on blocks, rads or the whole loop. I also rinsed out the EPDM soft tubing and the radiators, cleaning the latter is pretty important as rads will have loose debris leftover from manufacturing in them that you wanna get out beforehand. There's a bunch of ways to clean radiators and opinions seem to vary on what the best method is. The one I ended up doing is filling the rad partially with distilled water, turning and shaking it for a bit, emptying it and then repeating this a bunch of times (just to be safe I also did a few of these rinsing cycles with the actual coolant at the end so nothing starts growing in them before I put them to use). This took a few hours and turned into a bit of a workout as one of the radiators is a massive 3kg heavy 560mm one!

So this wraps up the final update (for real this time!) on my migration to the FormD T1 that also has me dip my feet back into custom loops.
I've also noticed that I've never actually posted the full specs of my PC which is very funny given the focus of this blog but it's something I'll do in the full writeup about this upgrade. Though that writeup is gonna be a few months after I've finished the build as this gives me more time to fine tune the fan cuves and undervolting to give a better perspective on it's performance, also with custom loops some issues might only show up after the system has been running for a few weeks so I wanna make sure that everything's actually working properly.
new sffpc/custom loop parts arriving.

So my room is starting to look more like a warehouse as some of the numerous parts required for this project are getting here. Originally I had planned to start this build sometime in March but I ended up putting it on fast-track for a few reasons:
First is that the FormD T1 pass-through fittings were in-stock after being unavailable for as long as I've been eyeing the case, I really didn't want to miss out on that as availability for boutique sff cases like this can be quite unpredictable sometimes.
Lack of availability was also a concern for the 3080 Ti's waterblock. With the original 3080 being over three years old at this point the blocks for them are starting to reach EOL, the EKWB one I specifically wanted for this build was sold out on most sites already and also listed under the clearance section in their own webshop.
Last is that EKWB had a winter sale going on which I wanted to take advantage of as building a custom loop from the ground up is super expensive.
There's still a few items I have to order before I can start putting things together but all of the parts I had to import from outside the EU have arrived here without any major troubles from customs. This is shaping up to be the most complex PC build I have ever done and I'm feeling equal parts excited and anxious about it, this build will open up lots of options for fun projects in the future but custom loops also do come with a whole set of risks. I will probably be too occupied with the build itself when the remaining parts arrive so the next update on it will be after it's up and running though I'll promise to report on it even if it all goes horribly wrong.
(≧◡≦)
3 notes
·
View notes
Text
new sffpc/custom loop parts arriving.
So my room is starting to look more like a warehouse as some of the numerous parts required for this project are getting here. Originally I had planned to start this build sometime in March but I ended up putting it on fast-track for a few reasons:
First is that the FormD T1 pass-through fittings were in-stock after being unavailable for as long as I've been eyeing the case, I really didn't want to miss out on that as availability for boutique sff cases like this can be quite unpredictable sometimes.
Lack of availability was also a concern for the 3080 Ti's waterblock. With the original 3080 being over three years old at this point the blocks for them are starting to reach EOL, the EKWB one I specifically wanted for this build was sold out on most sites already and also listed under the clearance section in their own webshop.
Last is that EKWB had a winter sale going on which I wanted to take advantage of as building a custom loop from the ground up is super expensive.
There's still a few items I have to order before I can start putting things together but all of the parts I had to import from outside the EU have arrived here without any major troubles from customs. This is shaping up to be the most complex PC build I have ever done and I'm feeling equal parts excited and anxious about it, this build will open up lots of options for fun projects in the future but custom loops also do come with a whole set of risks. I will probably be too occupied with the build itself when the remaining parts arrive so the next update on it will be after it's up and running though I'll promise to report on it even if it all goes horribly wrong.
(≧◡≦)
3 notes
·
View notes
Text
2023 recap and 2024 plans.

Hey everyone, this year turned out to be a bit bumpy for my deskspace projects. Starting with the Iris Aluminum Edition, which ran into shipping troubles before the cases were even put up for sale (apparently the 3rd party shipping agent for the manufacturer used counterfeit shipping labes [link]). Most of this batch couldn't be recovered and because of that a new set of cases was made as a replacement which delayed availability until late November. Keebio did use this as an opportunity to add two new colors into the fold, one of them being navy blue and it's the one I ended up getting.

I also had some trouble with the keycaps for this build. Back in May I pre-ordered GMK Peach Blossom which was supposed to ship by Q3 2023 but there's an ongoing dispute between the EU vendor of this set, MyKeyboard.eu and GMK (there's also quite a few more GMK sets that are also affected by this), unfortunately I only found out about all of this well after I had already paid for the keycaps. In the last update from mid October MyKeyboard.eu stated that they had reached an agreement to have some of the keycap sets released, this batch of a dozen or so sets didn't include Peach Blossom and it's been radio silence on this issue ever since. I considered refunding the pre-order but other people have been reporting that it takes forever to get your money back (if you get it back at all) so I dediced to just write it off as a loss and if MyKeyboard.eu does manage to sort things out maybe I'll still get the keycaps sometime in the future.
So with the original keycaps I had in mind stuck in limbo I decided to replace them with another set and got GMK Yuri (the monocolor Skydata base specifically). In hindsight it's kinda odd from me to not have gone for the Soviet Aeronautics themed keycap set in the first place. I think when I started looking for fitting keycaps earlier this year I wanted to have different colors for accents and the additional kit that would've made the standard Yuri base kit work better with split boards was already sold out and I dismissed it based on that.
Despite all these woes along the way I'm here now with a really wonderful keyboard, yay! The fitment on the aluminum case is excellent, the seam between the upper and lower halves is barely noticabley when you run your finger along it and the anodization on the outer sides is literally spotless. GMK Yuri has also massively grown on me with it's pale, light blue that's reminiscent of the cockpits from 80s Sukhoi aircraft, there were some initial worries that the orange legends on the keycaps would make for a harsh contrast based on the renders from the store page but the colors on the real ones actually mesh well together. On the board I have some Witch Girl switches from Mintlodica. This makes it my first tactile board and it feels really great to type on, the little bump on these switches also solved the accidental double taps that were a continued issue on my linear Tofu60 even after years of typing with it.
Adjusting to the split ergo typing experience has been relatively easy to my surprise. The largest hurdle was getting used to enter and backspace being on the thumb cluster but after roughly two weeks it started feeling very natural, now I actually think that those keys are much better placed here compared to where they'd be on a regular keyboard. Having a bit of distance between the two halves also corrected my old bad habit of never using right shift and typing with arms parallel is very comfortable. I dont think I type as fast as on my old Tofu60 yet but even so, the improvements in ergonomics that the Iris offers would not have me switch back to it.

I've also had some trouble laying the groundwork for the PC case swap I want to do next year as the case I've been eyeing, the Yuel Beast Motif Monument isn't being produced anymore and subsequently sold out (there are actually multiple copycat versions of this case but none of them seem like they match the original in build quality or aesthetics). Being an open frame made from a single sheet of bent steel would've made for a really unique looking PC, it would also avoid most of the clearance issues that usually come with small form factor cases and would even allow for easy maintenance of the eventual custom loop I want to build for this project.
While open cases/frames like this are a great showcase for components that also offer excellent thermal performance they do come with some notable downsides. The most obvious one being dust, for me this would've been a non-issue as there isn't a lot of buildup in my room and I clean my desk once a week with an electric duster anyway. The big issue that actually made me somewhat glad the Monument isn't an option is that I discovered that there's a ton of static buildup in my doom during the winter. At first it was a bit of static rustling coming from my IE 300 In-ear monitors alongside Windows showing some sort of USB disconnect error message whenever I stood up at my desk, something I originally dismissed as the IEMs or the extension cable they're attached to being damaged (the Sennheiser IE 300's dont exactly have a stellar reputation when it comes to durability). Then one day after getting off my chair not only did the usual problems occur but my monitor also completely glitched out, for a moment I thought my GPU had died but fortunately everything fixed itself after turning the power on and off a few times, this event convinced me that I was dealing with some sort of ESD issue. Since this happened I've been a lot more mindful about the humitidy in my room and make sure to ground myself properly before doing anything at my desk, this mostly resolved the problems from what I can tell but I fear that my room would not make for a good enviroment to run an open frame build in.
So with the Motif Monument unavailable and my now higher caution around electrostatic discharge the current plan is to get a FormD T1 (I always knew it in my heart that my SFF journey would have me build in one of these sooner or later). I did completely miss that there was some kind of dispute between the people behind the T1 at some point and now the case is now being sold on two, very similar named websites. The original one hasn't had a restock for a while it seems but the other, newer storefront has had some variants of the case consistently availabe so hopefully I wont have trouble getting one sometime early next year.

A smaller addition to the desk this year are two of these bookshelves that I placed to the left and right under my monitor, they're from this shop on Etsy [link]. Made from a single piece of bent steel (like the unobtainable Motif Monument) and coated in a pale, almost pastel green they fill the previously empty space nicely even with the monitor hiding a bit of their top.
I'm super glad I found them as I began reading manga this year, starting (unsurprisingly perhaps) with Laid-Back Camp which made me fall in love with that series all over again, the art of the original is just incredibly beautiful (not that the C-Station adaptation doesn't look great or anything, it's more that the manga really stands on its own in a way that could not have been adapted into motion). In addition to that K-On!'s four main volumes were something I enjoyed very much, a bit to my surprise as I heard people weren't huge on the four-panel style in comparison to the anime. I'm looking foward to continuing my Laid-Back journey throughout next year and also starting Bocchi the Rock!, all while filling my fancy new bookshelves along the way.
So this wraps up 2023 for me, despite a few hick-ups I'm pretty happy with how my deskspace evolved over the past twelve months. The PC case swap and the custom loop that will be built around it are shaping up to become a pretty massive task, so 2024 is already looking like it'll be very busy but I'm looking forward to sharing my progress on all of it in due time.
(≧◡≦)
0 notes
Text
Well... a bunch of boxes that had the round 3 aluminum cases got lost on their way to Keebio which is really unfortunate, they did already order a replacement batch from the manufacturer but the ETA for it is currently set for October.
There is however a small silver lining in that they added navy blue and green as colors to the remake run. Assuming they'll look the same as their prototype counterparts I'll probably get one of those as I do prefer the look of either over the lilac one I was originally planning to buy.

new keyboard.
So I mentioned in a previous post that I want to swap keyboards but before introducing the one I'm planning on getting I want to give a quick overview of the Tofu60 that I've been typing on for the past 3 years. Also quick disclaimer that I have limited experience with custom mechanical keyboards (this Tofu was actually the first one I built!), so I won't write about feel or sound qualities of the board as I believe I'd need to try other options first before I could give useful opinions on those qualities.

A 60% keyboard built from the name-giving Tofu60 aluminum case by KBDFans and a HS60 PCB from Mechboards, it's part of a wider series of interchangeable cases and PCB's (though parts are made by many different companies and I don't think the standard is like an official thing which can lead to some issues as I would discover). This broad compatability was originally what drew me to it, a wide variety of cases I could've swapped to if I wanted to change the look along with not having to worry about spare parts since there's plenty of vendors that sell compatible PCB's if mine ever broke. It's now been three years and I haven't taken advantage of this even once, basically all of the available cases are just rectangles in different colors or materials so paying for a new one never seemed worth it. There are also some minor fitment issues with the USB-C port not aligning properly on the cutout of the case, which leads to either the keycaps or cable connector scraping against the aluminum side.
For switches I have linear Turquoise Tealios from ZealPC in the 63.5g variant that I lubed and filmed. On the keyboard I originally had some plain SA White on Black keycaps from Maxkey that I swapped out for the marginally more colorful Drop MT3 Susuwatari set about a year ago.
So this covers my current board but what will replace it? Previously I've written that I want the new keyboard to be some type of split keyboard, having limited space for my mouse to move around has been an issue for playing shooters so being able to move one half away for those games would be great while potentially also getting a more comfortable typing experience. When it comes to split keyboards there's a lot of models to choose from but after a few months of research and reading I found one that really piqued my interest.
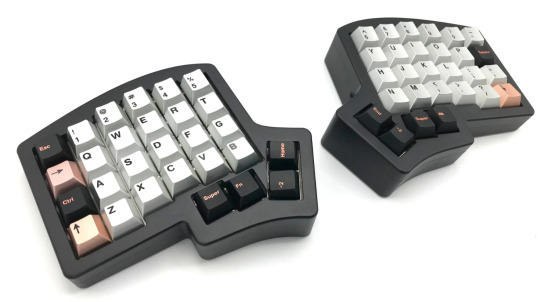
The Iris AE (Aluminum Edition), Keebio's full aluminum chassis for their Iris series of keyboards. The layout hits all the right marks by having enough keys to avoid requiring complex layers, and the simple thumb cluster makes it compatible with basically any keycap base kit. The case itself has a 5° tent built into it which gives a slightly more natural hand position for typing, this also adds extra height on the inner sides which makes the keyboard look very imposing. Keebio sells the aluminum version in rounds with the next one scheduled for June 2023, this one will also include one anodized in lilac which will be the color I'll try to get. Hopefully they won't sell out before I can order mine, while black and grey options have been in stock for quite a while on previous rounds I'm not sure it's going to be the same for this lilac one so fingers crossed!
I will definitely write more about it when it arrives but the switches and keycaps I want to put on it will most likey arrive a bit later than the keyboard itself, so it might be a while before I do a build log/full review of it. So that's all for now, thanks for reading! (≧◡≦)
1 note
·
View note
Text
new keyboard.
So I mentioned in a previous post that I want to swap keyboards but before introducing the one I'm planning on getting I want to give a quick overview of the Tofu60 that I've been typing on for the past 3 years. Also quick disclaimer that I have limited experience with custom mechanical keyboards (this Tofu was actually the first one I built!), so I won't write about feel or sound qualities of the board as I believe I'd need to try other options first before I could give useful opinions on those qualities.
A 60% keyboard built from the name-giving Tofu60 aluminum case by KBDFans and a HS60 PCB from Mechboards, it's part of a wider series of interchangeable cases and PCB's (though parts are made by many different companies and I don't think the standard is like an official thing which can lead to some issues as I would discover). This broad compatability was originally what drew me to it, a wide variety of cases I could've swapped to if I wanted to change the look along with not having to worry about spare parts since there's plenty of vendors that sell compatible PCB's if mine ever broke. It's now been three years and I haven't taken advantage of this even once, basically all of the available cases are just rectangles in different colors or materials so paying for a new one never seemed worth it. There are also some minor fitment issues with the USB-C port not aligning properly on the cutout of the case, which leads to either the keycaps or cable connector scraping against the aluminum side.
For switches I have linear Turquoise Tealios from ZealPC in the 63.5g variant that I lubed and filmed. On the keyboard I originally had some plain SA White on Black keycaps from Maxkey that I swapped out for the marginally more colorful Drop MT3 Susuwatari set about a year ago.
So this covers my current board but what will replace it? Previously I've written that I want the new keyboard to be some type of split keyboard, having limited space for my mouse to move around has been an issue for playing shooters so being able to move one half away for those games would be great while potentially also getting a more comfortable typing experience. When it comes to split keyboards there's a lot of models to choose from but after a few months of research and reading I found one that really piqued my interest.
The Iris AE (Aluminum Edition), Keebio's full aluminum chassis for their Iris series of keyboards. The layout hits all the right marks by having enough keys to avoid requiring complex layers, and the simple thumb cluster makes it compatible with basically any keycap base kit. The case itself has a 5° tent built into it which gives a slightly more natural hand position for typing, this also adds extra height on the inner sides which makes the keyboard look very imposing. Keebio sells the aluminum version in rounds with the next one scheduled for June 2023, this one will also include one anodized in lilac which will be the color I'll try to get. Hopefully they won't sell out before I can order mine, while black and grey options have been in stock for quite a while on previous rounds I'm not sure it's going to be the same for this lilac one so fingers crossed!
I will definitely write more about it when it arrives but the switches and keycaps I want to put on it will most likey arrive a bit later than the keyboard itself, so it might be a while before I do a build log/full review of it. So that's all for now, thanks for reading!
(≧◡≦)
1 note
·
View note
Text
2023 plans, also launching this blog.
Hey everyone, Toby here!
I started this blog mainly as an outlet to write about my deskspace since I often do a lot of research beforehand on all the bits and pieces that go on and around my desk. Tumblr isn't really the website to post about SFF cases, flight sim gear or mechanical keyboards but Twitter's character limit makes it hard to go into detail and Reddit isn't really made for adding and building stuff onto older posts. I'll probably also talk about other things like video games, anime/manga, wanting to but never going hiking and Cold War-era Soviet military aviation, y'know those types of normal regular things.

My desk as of early 2023. It's all perfectly serviceable right now but there are two items I currently want to change.
First thing is the Tofu60 which I want to swap for a split ergonomic keyboard. I dont have as much space as I'd like for my mouse to move around for shooters (bumping into the side of the keyboard full force happened a few times, oops) so being able to move half the keyboard away for gaming along with splits looking like a fun typing experience makes me want to give one a try.
The other one is my Meshlicious, this SFF case has proven to be a really great home for my system. So good in fact that I haven't tinkered with it in almost a year which has left me with an itch for PC building. Having basically maxed out what I can do with the Meshlicious I want to move to a case that can be more of a long term project, eventually doing custom water cooling at some point (something I could do in the Meshlicious but when factoring in the cleaning thats required to keep custom loops running I'd rather build one in a case with a more maintenance friendly layout).
Another thing I want to change more broadly is that everything on the desk is a bit monotone right now, black PC case, black keyboard & mouse, black HOTAS and so on. Swapping out the keyboard and case like I mentioned with more interesting looking options will help somewhat but I'll definitely need to make changes in non hardware related ways to dampen the sterile vibes it gives off right now.
Anyway thats all from me for now. I'll probably go into much more detail about the individual parts of my deskspace as I replace and work on them in the future, thanks for reading!
(≧◡≦)
0 notes