
Don't wanna be here? Send us removal request.
Statistics
We looked inside some of the posts by tofirstperson and here's what we found interesting.
Average Info
Notes Per Post
3
Likes Per Post
1
Reblog Per Post
2
Reply Per Post
0
Time Between Posts
6 days
Number of Posts By Type
Text
17
Last Seen Tumblr Blogs


Fun Fact
70% of Tumblr users say the Dashboard is their favorite place to spend time online.
Text
Adding a dash while midair
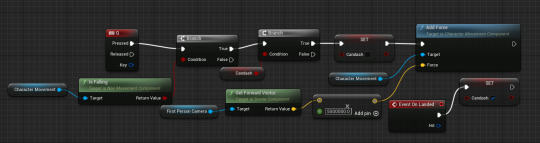
this is the code I used for a mid air dash, I dedicated the key "Q" for the input to dash.

this part of the code is checking if the player is in the air/ falling, if the player IS falling then they will be able to dash this is checked by the branches and their condition either being met or NOT being met.

these 2 nodes enable the dash again once the player has landed, this results in a bunny hop mechanic becoming usable, this can be done by chaining together sliding then jumping and then using the mid air dash, and then repeating those steps.

this section of my code determines the dash strength, this is then linked into the "add force" node, resulting in the strength of the dash becoming adjustable.
0 notes
Text
Adding a flash light

this is the code I'm using to make my flash light turn on and off using the "F" key, using the node "set intensity" I could adjust the brightness of the light making it appear to have been turned off but its just been darkened

here is the flash light working in my level.
0 notes
Text
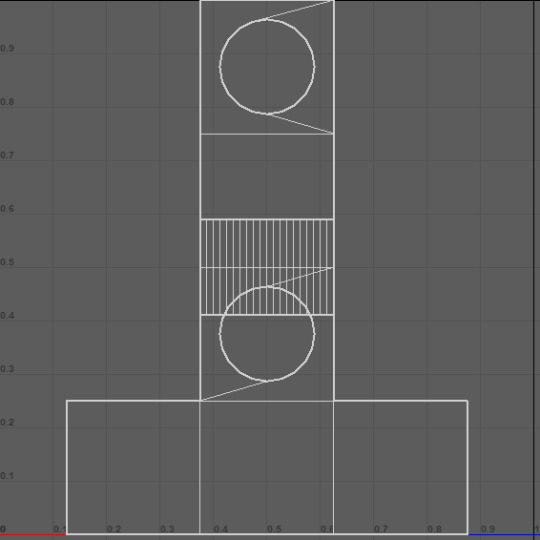
MAya Animating

I first opened Maya and then placed a cube in the work space, once the cube is in my workspace I press the "s" key to set a frame. this is how I set the starting point for the animation. A key frame saves the information (location, scale, rotation) of the object at that current time.

When we go to add the next keyframe we will chose what frame we want it to happen and move the object into the desired position ( location, rotation and scale). When we do the next keyframe the program creates a transition between the key frame

this graph at the bottom is showing the time along the bottom and its also showing distance and scale on the right and shows the transitions made (lines) by the program between the keyframes.
0 notes
Text
What is Magica Voxel

This is the look of the workspace inside of Magicavoxel where there are multiple tools you can use.

The attach tool adds voxels to the model so you can use it for building onto the model. I have added a top hat.
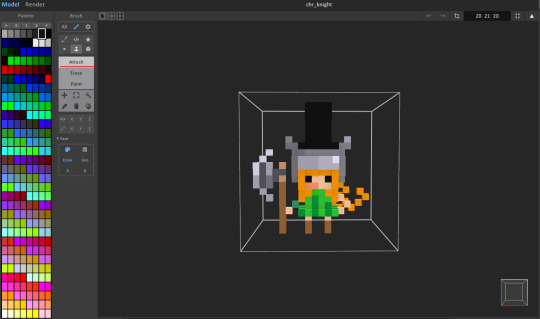
You can use the erase tool to take away parts of the model. I have removed the axe.
You can use the paint tool to change the colour of the voxels.I have used this to change the hair colour to pink.

The highlighted tool in the bottom right allows us to rotate the workspace.

0 notes
Text
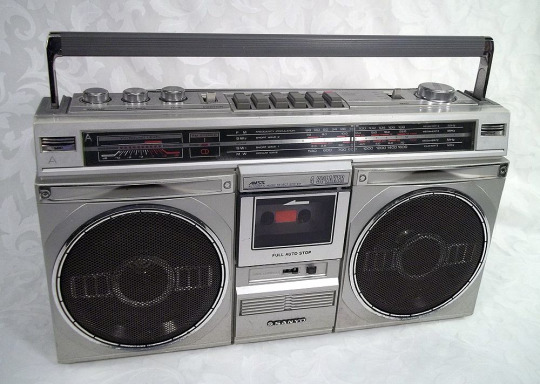
Maya making a boombox
Similar to how I made the med kit I used a cube which is scaled to be a big rectangle for the boom box base. And used the multi cut tool and extrude tool to make the handle which I then combined to make the 2 parts into 1 objects.

I then went into the UV editor and wanted a better UV to work with so I used the UV automatic unwrap tool.


From there I then took a snapshot of the UV map and imported it into photoshop where I added in my texture and reimported it into maya and applied it to the model.

This is the finished model inside of unreal with the texture on it.

0 notes


Text
What is a UV map


We can use UV maps to texture 3d models and make them look how we want. We can import the UV map into editing software like photoshop to add in the images we want to it before applying it to the model.
This is used in things other than modelling such as making wrappers for chocolates:

3 notes
·
View notes
Text
Making my own ammo pack:

When I went into Maya making my health[pack I didn't have a clear idea of what I wanted it to be I just knew I wanted it to be a basic looking health kit.
I added a square to the workspace, i firstly scaled the shape to make it longer and thinner, the next thing i did was make it a taller shape.
I then used another square and scaled it side ways to be a rectangle. I then used the multi cut too to make the faces which were then extruded downwards to make the sides of the handle.
0 notes
Text
Health and ammo pick ups
Half life alyx health:

Overwatch health pack:

Fortnight shield pack:

Borderlands health pack:

Left for dead med kit:

Call of duty Warzone:

Borderlands ammo pick up:

Dayz ammo crate:

0 notes
Text
Maya making a chair

the first thing I did in Maya was adding a cube to the workspace. I did this by pressing the orange cube in the top left of the screen.

I then molded the cube into a flattened version using the scale tool located in the middle left of the screen, once the cube was the desired shape I used the cut tool to make sections within the shape, I made the cuts across the whole shape by holding down the control key and clicking the shape, I can then use the extrude tool to make the desired part of the shape grow in length, width and height.

i wanted to add a hole to the back of my chair, i did this using the Boolean tool on the difference setting.


i accidentally had the selection the wrong way round, but when i fixed it i managed to cut out the hole in the chair

at the end i made the hole in the chair bigger by scaling it.
0 notes
Text
Tools inside of maya

The add primative shape tool in maya adds shapes to the work space. I used the cube button to add a cube to my workspace.

the extrude tool allows me to pull on a certain face of the shape either elongating it or making it shorter/indented.

the multi-cut tool allows me to section parts of the shape so i can create extra faces , edges and verts to edit.

Booleans have different setting which do different things:
Union: Combine shapes
Difference: Cut out holes
Intersection: Gets the intersected part
I will used the difference boolean to cut a hole.

0 notes
Text
Gun particle effects (Confetti)

To make my spark particles I first created a new asset called a Niagara system
0 notes
Text
Crouch/Sliding

this is my code for crouching and sliding within my game.

this Boolean if true will allow the character to slide, the next part of the code checks to see if the player is falling, this is a deciding factor as to whether the player is able to slide or crouch.
(this code is shown below)

if the player is falling they will not be able to slide or crouch in the air, if the player is NOT falling then they will be able to slide/crouch freely.
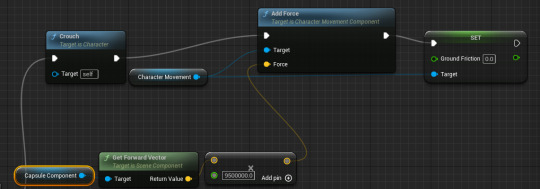
this part of the code gives the player an applied force that will propel them along the ground but only when sprinting, I also changed the friction on the ground while sliding so that the slide doesn't fall short and seem pointless.

this checks if the player is sprinting, if the condition of sprinting is not met then the player will not slide when pressing the Ctrl key, instead they will crouch making them able to crouch without being pushed forward.
0 notes
Text
Change gun mesh
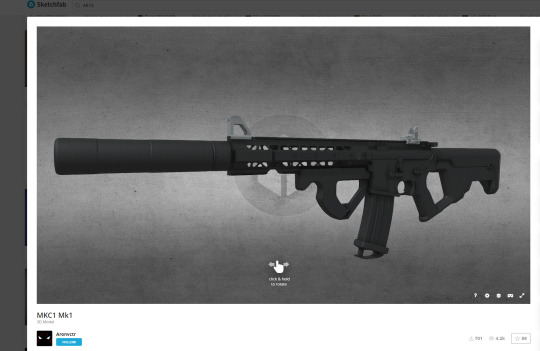
Credit to the creator of the gun model that I'm using in my game goes to: Aronvctr on sketchfab
I found my gun model that I wanted to use in my game using sketchfab, I searched for an AR 15 to import into my game. once I downloaded the model I took it to blender where I had to group all the different parts of the model together so that it would be one solid model inside of unreal engine.

once the different sections of the model were put together I exported it to unreal engine where I could then replace my original gun with the new mesh. however i encountered an issue with the mesh, it was offset in my characters hands. (as shown below)

I fixed this issue by adding an extra node to my weapon components code, I added a "set relative location" node and countered the offset by changing the relative location of the mesh while my character is holding the weapon.

this is the whole section of code I used to make the gun rest In the characters hands rather than floating.
0 notes
Text
Rapid fire/Full auto AND Sprint

this part of my projectile spawning code makes the gun fire full auto meaning that I can just hold down the fire button, the event tick allows the gun to fire every tick, I found this to be firing far to quick so I added in a delay to make it fire slower allowing the game to run nicer.
ADDING SPRINT:

The first thing I did was make a Boolean called "is sprinting". I then dropped 2 of those into the code linking them to the input key I designated as the sprint button which I had decided was going to be "left shift".

I then linked the "is sprinting" booleans into a set speed, if the player isn't pressing/holding the "left shift" key then the player character would stay at normal speed, however if the player was/is holding down the left shift key then the player character would speed up.

i then linked the "set max walk speed" nodes into a timeline, which i then linked to a "lerp" node and also into a "set field of view" node, when the player character is detected to be sprinting the FOV (field of view) will increase from 100 - 110, this gives the effect of a speed increase. The "lerp" node changes one value to another value linearly.
0 notes
Text
Teleporter

this is all the code I used to make my teleporter, the 2 nodes at teh bottom of the picture are getting the location of a sphere which i have made into the location that the teleporter sends you too when you make contact with it. The very end node in this code is setting the actor location after colliding with the teleporter, this location is just going to be the sphere
0 notes