
Hi, I'm Tommy Le, Digital Marketing from Magepla and Avada. This blog to share knowledge about E-commerce, Magento, Shopify,...
Don't wanna be here? Send us removal request.
Statistics
We looked inside some of the posts by tommy11 and here's what we found interesting.
Average Info
Notes Per Post
2
Likes Per Post
2
Reblog Per Post
0
Reply Per Post
0
Time Between Posts
2 days
Number of Posts By Type
Text
17
Last Seen Tumblr Blogs


Fun Fact
Mobile US users spent an average of 115.8 minutes on Tumblr app monthly.
Text
How to Find Instagram Influencers for Shopify?
Step 1: Figure out your business goals
Have you set any goals for yourself? Why do you want to work with people who are popular on Instagram? Before you look for Instagram influencers, you should have a clear goal in mind.
Do you want more people to know about the brand?
Do you want to get leads or make sales?
Or do you want more people to follow your business Instagram account?
How they act will affect who you choose as influencers. To get more people to follow you on Instagram, you might need to make contests or quizzes that involve hashtags. It might be best to choose an influencer who can get fans excited about the contest.
On the other hand, to make sales and get new leads, you would need affiliate marketing and discount codes. So, make sure to work with influential people whose fans are likely to buy your product. Now that you've set a goal for your business, you should ask yourself if it fits with your brand.
If the influencer and your brand don't go together, the ROI is likely to be very low. So, find someone who fits with your brand. So, an influencer who is known for having great style would be a good choice to promote a new pair of heels. It might not be worth your time to look for music influencers on Instagram.
Step 2: Look for engagement

When you do Instagram influencer marketing, engagement is one of the most important things you need to look at. On average, about 3% of Instagram posts are liked or commented on. Of course, each type of influencer is involved to a different degree. So, take the time to compare some things so you can make the right choice.
Step 3: Look at what people say
Watch out for phony influencers! Checking the comments on the influencer's posts is one way to figure out if they are real or not. Comments with emojis and vague phrases like "nice picture," "cool dress," or "looking good" are more likely to be fake and posted by bots. Many influencers buy fake followers or engagements to improve the look of their profile. Conversational comments are also a sign of real commitment, which brings us to the next point:
Step 4: Search for genuine engagements
How to tell if someone is a true follower:
Ask meaningful questions
Make personal statements
Tag their pals
Check out this post by Instagram fashion and beauty influencer Jeanne Damas. All of her posts get real responses from her real fans, not from automated programs. Here's one to look at:

Step 5: Look for hashtags that are related to your brand
Find Instagram users who have already talked about brands or products like yours. They might be a good influencer for your campaign. Do some analysis of hashtags to do this.
Avoid using a lot of hashtags.

Hashtags are like SEO keywords. High-density hashtags are the most used hashtags on Instagram. They are like seed keywords in SEO. You shouldn't use it for your post at all. It's a waste of time to use these hashtags to find influencers. If you start your search with the word "floral," you will have to look through more than 19 million results.
But if you look into longer hashtags, you'll find that there are fewer posts. In this example, there are 22,581 posts under #floralshop, 2,75 posts under #floralstore, and 84 posts under #floralshopmiami. I think the search results would be more accurate if you used #floralstore.
Step 6: Use words that describe your brand or the people you want to reach
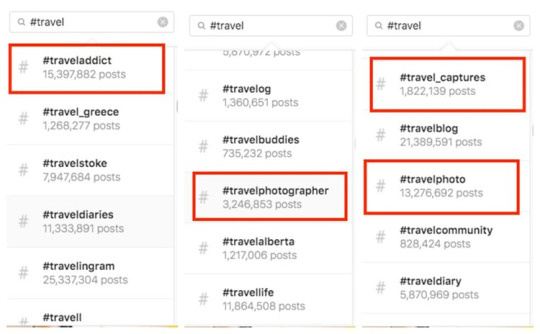
You can start your research on hashtags with keywords that also describe your brand or the people you want to reach. Try #travel if you're selling travel gear, and Instagram will suggest the most popular and relevant hashtags. Here, you can look for influencers in a certain niche by using hashtags like #traveladdict, #traveldiary, or #travel captures. You might even find Instagram's Top Travel Influencers this way.
Step 7: Use #sponsored or #ad as a search term
Influencers can mark their posts as #sponsored or #ad to show that they are advertising something. You can use these two hashtags to find influencers on Instagram, which will make it easier to find posts sponsored by influencers.
Step 8: Look at platforms used by influencers
Since the above ways to find Instagram influencers are useful but time-consuming and manual, you can use platforms that connect Instagram influencers with businesses to make things easier. But remember to ask yourself the following questions when choosing a platform:
Does your niche have influencers on the platform? How good are the people who have influence?
What tools for making, sharing, and keeping track of content does the platform offer?
Does the platform offer analytics and reporting tools that work in real time?
What do people who have used that platform before say about it?
Source: How to Find Instagram Influencers for Shopify?
0 notes
Text
Exit-intent Popup Case Studies You'll Want in Your Store

Numerous marketers and business owners fear that utilizing pop-ups on their online stores may irritate customers. However, do you know what is more terrifying? People should leave your website and never return. Without exit-intent popups, visitors will simply leave your site.
Here are some Exit-intent popup case studies from which you can learn how to increase your conversion rate and encourage potential consumers to remain on your website for longer. Let's go into the topic at hand!
Personalize the popup

Don't let your exit-intent popup be generic. To give a touch of individuality to your offer, it is effective to address visitors by name. When individuals see their names on a new campaign or deal, it can attract greater attention. This is possible for users who have already opted-in to your website.
In order for them to opt in, you can collect the visitor's name when they subscribe to the email list, create a customer account, or provide it in a previous popup.
Add a progress bar

When a visitor accepts your offer by clicking on your pop-up, they are genuinely interested. A completion progress indicator can elicit the Zeigarnik effect, which is the nagging feeling one experiences when they have not completed a task.
This straightforward progress bar will encourage visitors to complete a procedure in which they are already partially invested. In the above CoSchedule popup, for instance, visitors may see that they are halfway through. To earn the special incentive, customers must provide their email address before leaving the site.
Spin to win

A little amount of risk is always exhilarating, especially when tourists are aware of the availability of great discounts. A spin to win exit-intent popup wheel is a fun approach to engage users who are about to leave your website. They only need to submit their email address to receive a prize that you can customize to your liking.
This type of exit-intent popup is entertaining, thrilling, and lucrative. Additionally, you may change the needed action of your exit-intent popup from subscribing to the email list to merely spinning for a reward and beginning to purchase.
Use social proof
Generally, social proof is effective because we tend to model our behavior after that of others. Many stores use the number of users or subscribers to impress their customers, indicating that a large number of individuals have joined the cause. The visitor may then be left wondering why they did not join your community sooner.
However, large numbers are not required to make this work. In fact, you do not even need to utilize the number of your own store to leverage social proof. You can simply use numbers or results supported by facts as an illustration. Your social proof feature demonstrates to your visitors what others have done and how they might follow suit.
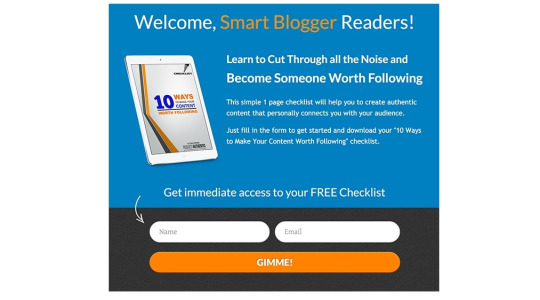
Unlock a secret

"unlock" is a particularly strong term for making your offer feel unique. Visitors will know that they have been provided a unique opportunity to access something of extraordinary value.
In this example of an exit-intent popup, Tim Ferris uses a popup to catch the attention of the visitor. Just as visitors are about to leave, they are notified that they have the chance to access incredible tools and methods that can revolutionize their enterprises and even their lives. Is this not very effective?
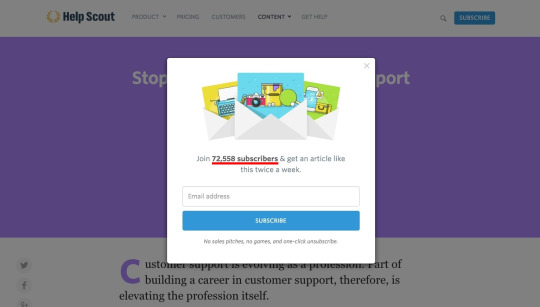
Join the newsletter
If your website contains a great deal of useful content, your newsletter is something that users will truly want. Then why not recommend that they join the club of subscribers? The term 'join' evokes a sense of access or oneness. In the best communities, we all desire to feel included.
Your pop-up can demonstrate why they should join your vast group of members and receive the best social media material on the Internet. Alternatively, you might briefly outline the advantages of becoming a subscriber, such as obtaining special offers, articles, or items.
Send messages based on the referral source
Personalization is essential for making pop-ups friendlier, more relevant, and more accessible. Changing the popup based on the referral source is a clever technique to boost the level of customization.
Another option is to customize exit-intent pop-ups based on the social media platforms from which the site's traffic originates. If your visitors arrive from Facebook, for example, you can invite them to join the chat on Messenger or to join your Facebook group.
Add some authority
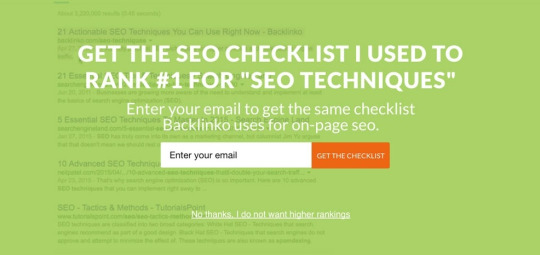
If your offer is supported by a credible source or case study, it gains instant credibility. Similar to this post, if you observe that stores have employed exit-intent popups with success, you will naturally want to use them as well.
Therefore, if you are an expert in the subject or have proof that your offer is the foolproof method for accomplishing anything, don't be scared to demonstrate this in your popup. Brian Dean of Backlinko, for instance, is a well-known SEO specialist who has accomplished a great deal in a field where many people strive to succeed. As a result, he becomes an authority on the issue and has no problem demonstrating this in his exit-intent offer.
0 notes
Text
You'll discover how to effectively sell eBooks with Shopify in this lesson. Also keep in mind that the following stage is to set up your store such that you are not involved in the sales process. As a result, the download link will be sent to your consumers as soon as they take advantage of a deal and pay for it.
Brainstorm your idea
Do not start anything unless you have a thorough understanding of this industry in order to help you take your first step in it. Defining the paper's topic is the first step. Let's start with a topic that will pique your audience's interest because it will do so initially.
You must make sure that the content is well-written and arranged. Additionally, despite your efforts, your postings still score five stars because of the originality of your content. Remember to break up your main theme into subtopics. You can thoroughly analyze each narrative by using subtopics. You should proofread your book once you've completed writing it to make sure there are no grammatical or punctuation issues. For added security, you can enlist the aid of your friends to double-check the quality of your book.
If you've read this far, you might be asking how, if you're not a good writer, you'll make money. You have two choices in this scenario. You can either find digital products with your own brand and resale them on Shopify, or you can hire a freelancer to help you with books.
Set up your store for selling eBooks using Digital Downloads app
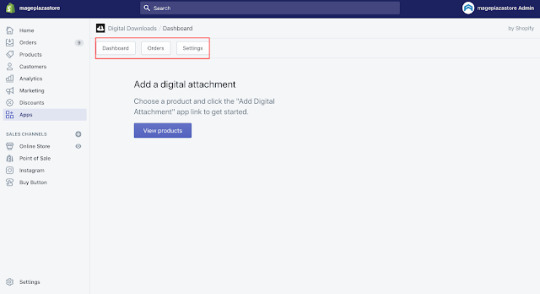
You may sell digital assets like music, films, and graphic arts in your store with Shopify's Digital Downloads app. Customers who purchase certain digital goods will receive a link to the file's download.
You may also notice that the Digital Downloads app has three main parts, including::
Dashboard: where digital products can be checked, viewed, edited, and installed.
Orders: where you are able to see every order made up of digital goods that is made in your store.
Settings: where the email designs and checkout choices can both be customized.
Install a Digital Downloads application on your Shopify account
Step 1: Click Apps
Go to your Shopify admin page and select Apps as your first step.

Step 2: Choose Visit Shopify App Store
The Visit Shopify App Store option is the next one you can select.

Step 3: Type Digital Downloads and select Digital Downloads
You can choose Digital Downloads from the drop-down option and continue by typing Digital Downloads.

Step 4: Opt for Add app and Install app
Don't forget to select Add app and then click Install app to complete the process.


0 notes
Text
How to Refund An Order
You will discover how to refund an order on Shopify for Desktop, iPhone, and Android in this article. After creating and sending a customer's order, you can cancel it. As soon as the order is refunded, you can replenish the items and notify the buyer. The locations allow you to choose where to refill these things.
Step 1: Go to Orders.
After logging into your Shopify admin, you may navigate to the Orders section.
Step 2: Select an unfulfilled order.
Next, you can choose a pending order.

Step 3: Choose Refund.
Choose Refund items in this phase.

Step 4: Type the item quantities in this order.
Type the item amounts in the following order.

Step 5: Choose the location you want to restock the item.
You can decide where you want to refill the item.
Step 6: Uncheck Restock items.
You can uncheck Restock items in the event that you've previously dispatched the items and your consumers haven't yet returned them. Keep in mind that checking the box requires keeping track of the inventory for the goods in the order.
Step 7: Uncheck Send a notification to the customer.
Uncheck "Send a notification to the customer" if you don't want to annoy your customer by sending him an email about your refund.

Step 8: Click Refund.
Finally, you can select Refund to cancel your customer's order.
0 notes
Text
Edit Shopify Customer Profile Tags in under 3 Minutes
This article will advise you on how to edit a customer profile’s tag on Shopify on Desktop, iPhone, and Android. Tags are incredibly effective at saving time and paving the way for more time spent on customer service.
Step 1: Choose Customers.
In your Shopify admin, you can select Customers after logging in.

Step 2: Select the customer profile you want to have it updated.
Next, choose the client profile you wish to modify.

Step 3: Edit a customer profile’s tags.
In the Tags section, you can either add new customer profile tags or change existing ones.

Step 4: Choose Save.
Remember to choose Save to finalize your current work.
0 notes
Text
How to Export Inventory on Shopify
If you wish to export your store inventory quantities to utilize in other systems, you can export a CSV file on Shopify.
You could export this file for a specific place or all locations in your list.
Your file will be downloaded to your browser or emailed depending on its size.
Here's how to export Shopify inventory.
Step 1: Go to Products, then visit Inventory
Visit Products after first logging into your Shopify admin account. Navigate to the Inventory section of Products.
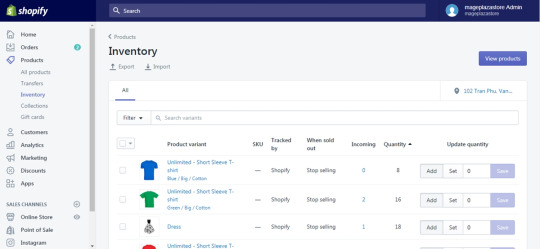
Step 2: Click Export
Click the Export button next to the Inventory title at the top of the page.

Step 3: Specify the location you want to export from
Indicate every specifics mentioned in the dialog.

Step 4: Click Export inventory
Click the Export inventory button when you're finished.
0 notes
Text
How to Pause your Shopify Store
Shopify, as an e-commerce platform that enables you to operate a business, also includes a function for when you decide to temporarily halt the operation. This article explains how to pause your Shopify store in order to utilize this functionality efficiently.
Step 1: Go to Account
Sign in to your Shopify account first. There, you may access the administration page. Examine the content on the left side of the screen. Then, scroll to the bottom of the page to locate the Settings button. Select Account thereafter.

Step 2: Click Pause store
Scroll down to locate the Store status area in this step. When you locate it, you will be presented with three options. Click the Pause store button to continue.
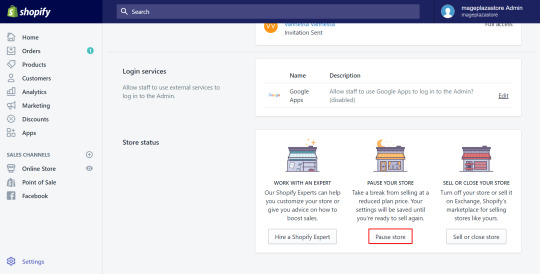
Step 3: Choose Pause store again
You will very certainly be requested to stop by the store again. A dialogue box will display the conditions and prices. After reading, select Pause shop once more to conclude.

0 notes
Text
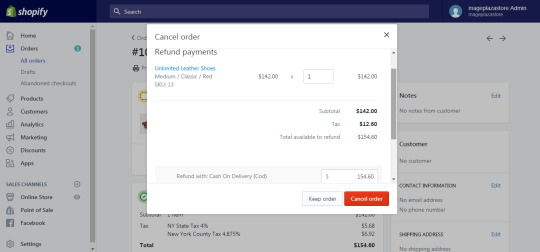
How to Cancel an Order on Shopify
Only after logging in to your Admin webpage on Desktop is it possible to cancel a purchase. See the steps below for a clearer understanding of how to cancel an order on Shopify.
Step 1: Visit Orders
After logging in as an administrator, navigate to the Orders area.

Step 2: Select the order to be cancelled
Your order list is currently visible. Select the order you'd want to cancel.
Step 3: Click More actions, then click Cancel order
Under the order number at the top of the page, click the triangle-shaped More actions icon. In the drop-down box, select Cancel order.

Step 4: Specify the reason for order cancellation
The Cancel order dialogue will now display. Choose the reason you wish to cancel your order from the drop-down option at the bottom of the page.
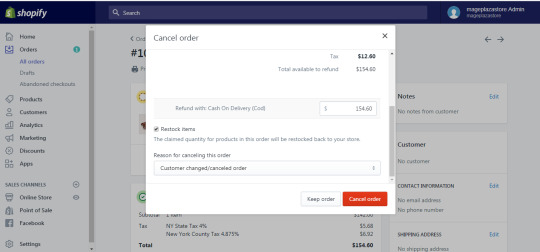
Step 5: If you intend to make a partial refund, specify the related information
Full refunds are issued by default. Change the numbers in the product quantity and refund total boxes to adjust the amount of a partial refund.
Step 6: Check/Uncheck the Restock items box
Check or uncheck the Restock items box to restock your inventory with things you've recovered.
Step 7: Click Cancel order
Before clicking "cancel order" to confirm your cancellation, ensure that you have double-checked all details. Once an action has been canceled, it is irreversible.
0 notes
Text
How to build a Shopify theme from scratch?
If you have an online business and utilize the Shopify platform, you might be interested in learning how to create a Shopify theme from scratch. You can find the answer by reading our article. Please do not depart.
Before we show you how to build a Shopify theme from the scratch, we'll define a theme and explain how it works. Let's get this party started!
Planning and Analyzing

You must not only ensure that you have all of the technical expertise before beginning the project, but you must also ensure that you meet all of the non-technical standards. It is critical to review the many Shopify theme design options before beginning to construct your Shopify theme.
While you are harmonizing your ideas or allowing innovation to rule, some of the possibilities may be available, but keep in mind that the new theme should be something distinct, and the difference may be rather significant. There's no point in investing effort on something that won't stand out from the pack.
Look at what's already available to see what's missing. This could contain the requirements of a target market. For instance, it is critical to examine further presentations of key product aspects or remarkable layout styles.styles.
Learning the Liquid code
Some files end in.liquid, which you may have noticed. Liquid files are just HTML files with programming embedded in them. This embedded code is designed with curly braces like and %% to make it easier to read.
Without knowing any back-end code, Liquid allows us to manage our output and add logic to the templates. More specifically, you can leverage information from your store, such as product titles and pricing, with Liquide.
Let's begin by taking a look at the output. Here's a simple illustration. If you want the title of your product to appear in your h2> element, use the available product data and perform the following in your template:
<h2>{{ product.title }}</h2>
If Shopify is used, the Liquid code will be substituted with the name of the product. Consider how "dot" syntax is used in liquid. Your product has a price, which you can display by using:
{{ product.price }}
The "dot" allows you to obtain and display information about a product's attributes.
It will also be simple if you want your product title to be all capital letters:
<h2>{{ product.title | up case }}</h2>
Liquid allows you to swiftly create elements. Consider the following picture tag:
{{ 'logo.png' | img_tag }}
When it's done, the HTML will look like this:
<img src="logo.png" alt="" />
As a result, it won't help much because it has led to a relative approach to the file, which isn't going to work. If you add an additional filter, Shopify will attach the entire access to the file. You can add the following to your alt text to make it more clear:
{{ 'logo.png' | asset_url | img_tag: 'Site Logo' }}
It will generate the HTML as below:
<img src="/files/shops/your_shop_number/assets/logo.png" alt="Site Logo" />
Learning the Timber framework
Timber is an open-source framework that makes creating new Shopify themes considerably easier. This excellent tool might be a terrific place to start for a web designer. Templates and code are two other tools that might aid with the process. You can modify them to meet your own requirements. Not only that, but snippets and other useful tools can be used.
Timber handles the back-end integration, so you don't have to worry about it. It will save you time in this situation because you will not have to repeat the same processes from the beginning. As a result, you may devote more time and effort to creating things that users will find fascinating and will encourage them to interact with you.
Learning Shopify Asset CDN
Every asset (images, fonts, CSS, and JavaScript) you upload to the server is immediately deployed, concatenated, minified (except for JavaScript), gzipped, and finger-printed on Shopify's CDN. Asset helpers in the templating language can be used to refer to assets.
1 note
·
View note
Text
Best Highest Converting Shopify Themes
In actuality, the best product will generate the best outcomes for your store. However, having the best themes to make a particular impact on visitors is what can truly help your business flourish. But what are the highest converting Shopify themes? Then, this post is here to provide you with a list of store themes to consider.
1. Booster theme
Booster theme is regarded as a Shopify theme that is simple to use and modify. Overall, this theme is fairly popular, as over 3000 online retailers currently rely on it. This theme's biggest and most impressive feature is its flexibility to be easily customized in Shopify to match your needs.

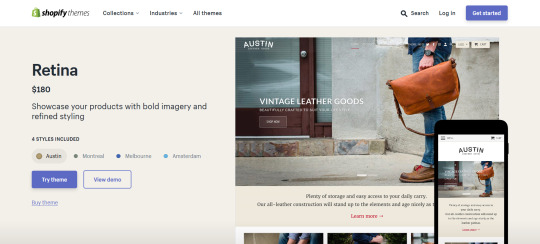
2. Retina theme
Retina theme is an excellent option for more contemporary designs with all the latest bells and whistles. This theme's category pages feature a "Quick Shop" button that leads to a streamlined product page and provides the user with an alternative shopping experience.
3. Art Furniture theme
The Art Furniture theme is renowned as one of the most responsive and expertly crafted web layouts for furniture stores. The parts of this theme are easily customizable to your specifications. In addition, you can easily convert them into an entirely other store. This image-focused design will be concentrated on your items and will be an excellent fit for advertising your goods and services.

4. Jasper theme
Jasper theme is an excellent option for individuals in search of an easily configurable and flexible Shopify theme. Specifically, this theme is intended to provide customers with a vast array of customization options. For instance, you will be able to edit and modify any part of the store, and you will have the option of using up to 14 distinct homepage themes.

0 notes
Text
Shopify SEO Overview
Read full: Shopify SEO vs Wordpress SEO: Who wins?
Shopify overview
With the help of Shopify, you can establish, grow, and manage a business by building and personalizing an online store. Shopify enables you to sell in a variety of locations, including web, mobile, social media, online marketplaces, physical locations, and many more. You will also be given the authority of an admin to control orders, payments, and delivery at the same time.

Shopify SEO
Pros
Easy to implement: Since the SEO setups on the site are very simple to execute thanks to their very simple backend, Shopify SEO is well-constructed to help many businesses increase their revenues without the hindrance of technology and other tedious administrative work.
Fully SEO-featured: The majority of store owners want Shopify to support their important SEO choices. For instance, it will provide you access to the sitemap creation that is done automatically, canonical instructions, 301 redirects, personalized URLs, and configurable title tags, among other things.
Speed: Shopify is a lightweight platform that adapts, allowing you to operate your online store efficiently.
Uptime: Shopify offers a high uptime, which can be advantageous for your company.
Support: When in doubt, SEOs can benefit greatly from reliable communication help. Therefore, you can get in touch with Shopify's support staff by email and live chat. Additionally, depending on your location, you can reach them at any time of day using one of four different phone numbers.
Apps: Numerous useful Shopify SEO apps are accessible to make your life better. In particular, Shopify creates apps that help the websites with particular needs unique to the nations in which they operate.
Cons
App reliant: We have a lot of reservations about app shops. We do sincerely appreciate the diverse and enticing selection of apps, but the more in-house features the better. To meet complex SEO standards, Shopify relies a little too heavily on apps.
Many useful but pricey apps: The only free plan on Shopify is for the Lite edition, which costs $9. You cannot create a completely functional internet store using this. However, without these tools, you'll have to manually enter your data into your software, which takes a lot of time. Alternately, you may decide to hire someone, but that would cost $50 to $300 per month. What's so expensive!
Unavailable phone support outside of North America, United Kingdom, Australia, and New Zealand If you live outside of the aforementioned regions and experience technical issues, you might encounter difficulties in getting immediate assistance from the general support. To get a response from a developer in these situations, you might need to post your query to a forum.
0 notes
Text
How to Edit Menu Item on Shopify
Source: Edit a Menu Item on Shopify in 6 Simple Steps
Step 1: Go to Navigation
Click on Online Store in the very left column after logging into your Shopify admin account. A menu of options will show after you select Online Store. Select Navigation from the menu.

Step 2: Choose Menu
A list of menu items will appear once you land on the Navigation page. The menu item you want to edit is listed under its title, so click on that.

Step 3: Edit menu
When you access the menu's details page, a list of the items will appear in the Menu Items section. Click Edit next to an item's title to make changes.

Step 4: Make changes
After choosing Edit, a menu item box for that option will show up. To modify a menu item's name, click the Name box, type a new name in its place, and then click the crossing icon in the Link field to choose an alternative kind of external link for the item.

Step 5: Apply changes
Once you have finished making changes to the chosen menu item, click Apply changes in the bottom left corner of the Edit menu item box. It subsequently becomes impossible to select Edit from the menu.
Step 6: Save menu
Check your changes once more, then select Save to confirm them. The Save menu button can be found in the top or bottom right corner of any page.

0 notes
Text
How to Backup Shopify theme
Source: How to Backup Shopify theme
Step 1: Navigate to the Theme page
Click the Online Store menu option in the Shopify admin's left toolbar to get started. After that, you would be taken directly to the Theme page. The default theme is Debut, and as you can see from the image on the main themes page, you can also locate this tab towards the bottom of the "Themes" sub-menu. Themes are available here in both free and premium versions, depending on your needs.

Step 2: Make a copy of the current theme
To find out what you can do, click the Actions button. So that the primary website doesn't change, we want to maintain the present theme in this instance. Select Duplicate from the drop-down option. The most recent Shopify theme will be provided to you. It's important to keep in mind that your site can only have 20 themes, so you might need to delete any that you haven't utilized.

Step 3: Rename the theme copy
Your theme copy will then have two links next to it: Action and Customization. Choose Rename under Actions in the drop-down menu.

This could be frustrating because you won't want to utilize the copy as a "Copy of..." anymore. We suggest a naming rule that will also benefit potential backups. Here, we can utilize the theme's name in the format of a date (YYYY-MM-DD). If not, you are free to use any format you like.
0 notes
Text
How to Set Shopify Primary Domain
Source: How to Set Your Primary Domain on Shopify in 4 Easy Steps
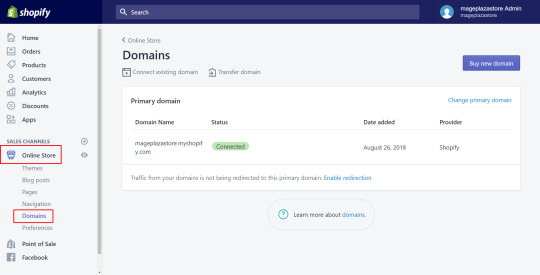
Step 1: Go to Domain
First, login in to your Shopify account. After that, select Online Store and click Domains in the SALE CHANNELS section.
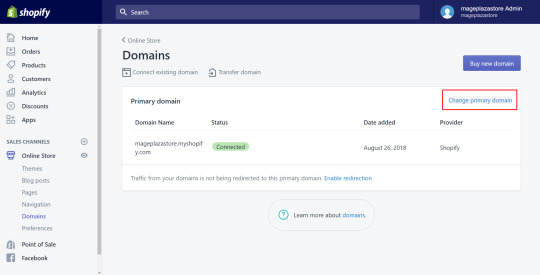
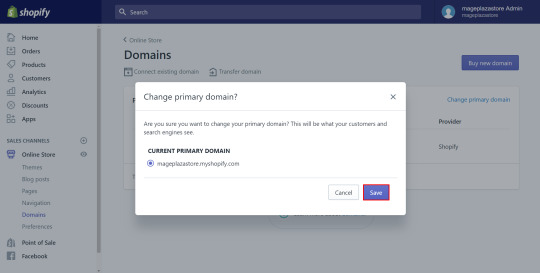
Step 2: Change the primary domain
Click Change primary domain after looking at the Primary domain section.
Step 3: Choose the domain
Select the domain you want to be your primary domain.
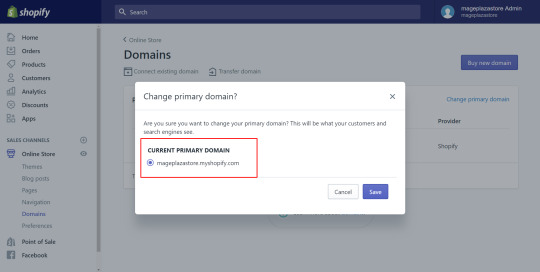
Step 4: Save primary domain
Finally, select Save to finish.
It might not finish working for several hours. The address bar will then display the new principal domain. It can have negative effects if you alter it frequently. The principal domain ought to be steady.
0 notes
Text
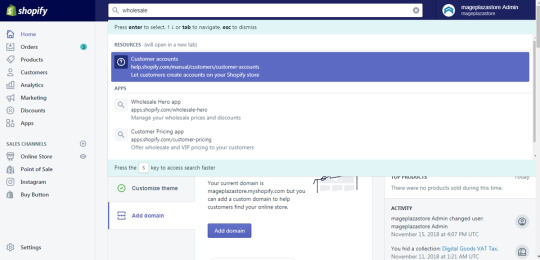
How to Search by Tag on Shopify
Step 1: Enter the tag name
You may see a search bar at the top of the Shopify home page. To get all the results that are relevant to a particular tag, enter the tag into the search field.

Step 2: Select a result
All relevant findings will be shown on the screen after the previous step. Find and choose the result that you wish to view in its entirety.
0 notes
Text
How to create customer groups on Shopify
Step 1: Search or filter customer list
To start, you can search for clients or utilize the Filters tab to whittle down your clientele. There are numerous options available to you. Customers who have used the tag "facebook" will appear, for instance, if we use the filter "tagged with" and add it.

Step 2: Select Save search

Step 3: Type the name for your search result
Then, to continue, input the name of the item you want to find.
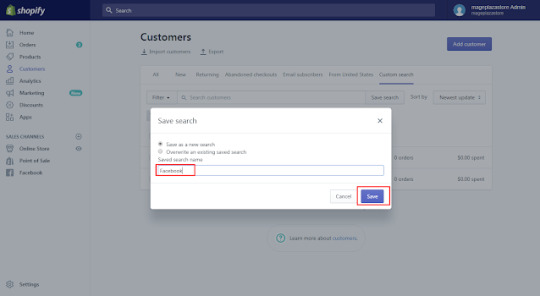
Step 4: Create customer groups
When saving a search, you have two choices: save as a new group or just overwrite an existing save search.
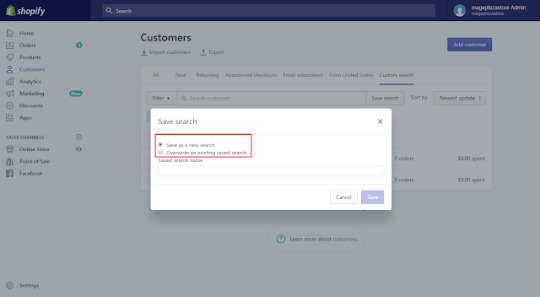
Step 5: Choose Save
You should be aware that customer groups can be automatically updated. As a result, clients may be added to or removed from their group depending on the criteria or search terms used to form the group.
0 notes
Text
How to select products to edit in bulk on Shopify
Resource: https://blog.avada.io/shopify/docs/how-select-products-edit-bulk-shopify.html
Step 1: Go to Products
Go to Products after logging into your Shopify account. The system will automatically navigate to the All items page. As seen in the image below, the screen will display a list of all of your products:

Step 2: Tick on boxes
Each item on the list has a box next to it. To choose all of the products you want to alter at once, tick the boxes next to each one. Remember that you can select one item or multiple ones at once. By checking the first box with the icon next to it, you can also select every item you own. That is to say, the box remains next to the Filter.

Step 3: Select Edit products
Following a selection, the quantity of those things will be displayed on the screen directly beneath the search field. The Edit products button is located next to it. Press that lever. For instance, if I wish to modify the first three things in the list, I can tick the corresponding boxes, which will indicate that I have picked those three products. In addition, the Actions button is still between it and the Edit products button, which I must click.

Here's an example of what you'll get if you follow all the steps above:

1 note
·
View note