Don't wanna be here? Send us removal request.
Text
How to smudge your home
Have you heard of 'smudging'?
I started smudging my home about 3 years ago – my husband thought that I was a bit crazy but after the first time I smudged our home he noticed a difference too!

Smudging is a common practice in feng shui and many Native Americans as well. You will also hear followers of alternative healing mention speak of this practice, too! In short, it involves burning certain herbs (I will explain more about the types of herbs , keep reading). The smoke from burning these herbs will fill the air and it helps to clear out negative energy. Don't be intimated by the practice – it's quite simple!
The benefits of smudging
I try to smudge my home once a month but we are a busy family and if I'm being totally honest it doesn't happen every month. One routine I do try to stick to with this practice is – to smudge after having guests over. Why? People carry energy with them and you never know what energy they are surrounded by….so we like to clear it all out!

Photo credit: Apartment Therapy
Clears out negative energy.
Improves mental focus
Clears the air from pollutants
Relaxing effects
Increased energy
Improved sleep
Everytime I smudge my home we all notice a big difference. Everything in the house feels lighter. If you want to read more about the practice and it's benefits – I found this article to be very useful – 8 Reasons You Should Try Smudging
How to smudge and what you need
There are different herbs that can be used to smudge and they all deal with different aspects that affect your home's energy in a negative way.
Cedar is said to be calming, purifying, comforting and protect.
Juniper is clarifying, cleansing, helps with focus and centering.
Pine is for renewal, strengthening and cleansing.
Sweetgrass is for healing, purification and encourages positive energy.
Sage is for clearing negative energy and encouraging balance.
Personally I use White sage most of the time. If you are wondering about the smell when you cleanse your home with buring white sage – I don't mind it (it smells a bit spicy, like Christmas spices).

Photo credit: Cedar Lake
You will need a bundle of dried herbs also known as a 'smudging stick'. You will also need matches, a candle and a fireproof bowl (if you look online you will see a lot of sheels being used but any fireproof bowl is fine). Some sand – you will spave it in the fire proof bowl (I don't always use sand, to be honest). You might also see feathers used in smudging. You don't have to use one (I don't) if you carry the smoking herb bundle (aka smudge stick) around the home with the fireproof bowls in the other hand (to catch any falling embers that's just fine). I also keep my windows open while I smudge the house – this allows the negative energy to be released from the home. I'm not sure if this is how everyone practices but this is how I was taught.
So how do you smudge your home?
Start by getting out all of the supplies you need.
Next light your candle with a match – you will use the candle to light the smudge stick. It's not a torch you want it smoldering. So once lit wave it around. Be sure to have the fireproof bowl under the smoldering smudging stick – for safety reasons and for catching embers that may fall off.
I circulate around my home – smudging room by room and waving the smudge stick around (some use a feather to circulate the smoke but I like to keep it simple). Be sure to focus on corners – it is believed that negative energy 'sticks' in the corners of a room. Pay attention to all rooms not just the main or mostly used rooms – laundry rooms, closets and even the garage can have stagnant energy.

So now that you have circulated around the entire home – you need to conclude the session. You will put out the smoldering sage stick in the sand in the fireproof bowl. You can keep the candle burning (I ujsually do for anothwr 30 mins or so). When it comes to smudging be sure to set aside enough time – this process shouldn't be rushed (15-20 minutes is usually enough time – the time depends on the size of your home).
Shop – Home Smudging

Smudging Kit

Pack of 3 Smudging sticks (white sage) – this is the one that I like to use!

Smudging stick with copper bowl and sand
Smudging your home is a great way to start the new year – a clean slate, a clear energy in your home and peace of mind. I will be smudging this week and I know you will enjoy this practice too!


The post How to smudge your home appeared first on interiorsbykiki.com.
0 notes
Text
Why You Need Pest Control in the Winter in Tennessee
Pest control in the winter? Absolutely! Pest control isn't just something you should have during the summer months. Pests can be a serious problem all year long. In fact, some pests become more of an indoor problem when temperatures outside become undesirable. Let's take a look.
Rodents
We have many species of rodents in Tennessee. The most common are mice, Norway rats, and roof rats. These critters can get into your home during any part of the year, but dropping temperatures and a reduction of food options gives them even more reason to come inside. When they do, they can spread harmful bacteria and diseases. They can contaminate stored foods, dishes, silverware, food-prep surfaces, and more.
As they explore your home from top to bottom, they can spread parasites around as well. Flea and tick infestations are commonly linked to rodent infestations. These secondary pests bring with them their own list of diseases.
Rodents don't just enter homes during the warm months. They can get in any time of the year.
Spiders
Common house spiders become even more common when the cold temperatures of fall arrive. While spiders have the ability to create a sort of antifreeze that protects them from freezing to death, most of the food they eat doesn't have this ability. When their food goes inside, the follow. So, when you see overwintering insects during the cold winter months, don't be surprised to see those spiders too.
Ants
Most ants in Tennessee disappear during the winter months. They hide in their nests underground and wait for conditions outside to become favorable again. But, when an ant species as established itself inside a home, where it is warm, they can be active all winter long. This is especially true of carpenter ants because carpenter ants are much more likely to create a nest inside a man-made structure than other species of ant are. When they do, they can weaken the wood they inhabit. This can be bad news for a property owner looking to protect their equity.
Year-Round Pest Control is the Way to Go
Tennessee pests have a way of getting into our homes and causing trouble all year. The best way to keep them out and reduce the threats they can pose is to have a licensed and experienced service professional apply appropriate treatments in each season and guide you in steps you can take to reduce the impact pests can have on your health and your property. If you need help with this, remember, the team at All-American Pest Control is always available to assist you.
0 notes
Text
Bathroom Organization Ideas for Your Small Space

It's easy to find a bathroom in disarray, after all it's one of the smallest rooms in the house that's also used by everyone and guests. Thankfully, there are some bathroom organization ideas that can help shape up your small space!
“People are stuck with a lot of clutter and disorganization going on in their bathroom, because they're in and out fast and don't take the time to put things away,” said Susan Stone, a professional organizer in New England.
If you're ready to create an organization system to keep your bathroom clutter at bay, keep reading for some great bathroom organization ideas from Stone and another professional organizer! Your space and morning routine will be in order in no time.
Only Store Everyday Essentials in a Bathroom
If there are items you don't use every day – such as cold medicine or 20 rolls of toilet paper – then it should be stored in a linen closet or storage space outside the bathroom, said Sara Barba of XOXOrganizing.
“In any bathroom in a regular-size home, you don't have a ton of space,” she said. “If you go and buy in bulk, I always say don't keep everything in your bathroom. That's going to take a lot of space and it's going to take months to get through all that shampoo, or whatever it is.”
If you have a lot of hair products or makeup, only store what you need to get ready the next day.
“Maybe just pare it down to what you're actually using,” said Barba. “I have so many hair products for my curly hair and then I have some for when I'm in my straight hair faze. Take the products that you're not using and store them somewhere else until you're ready to use them again.”

Bathroom Organization Ideas: Utilize Vertical Space
Instead of cramping the space under the sink with towels and bathroom necessities, or your bathroom floor with more cabinets, consider adding shelves or hooks on walls or doors to free up storage space.
“Hang shelves on walls, or baskets and hooks over the door,” said Stone. “Think vertically, because bathrooms are often space-challenged.”
She also suggests adding hooks to the inside of cabinet doors for curling irons or blow dryers, because hanging those items will free up storage space elsewhere.
“This reduces the visible clutter on the back of sinks and toilet tanks,” she said.
But before you go to the store and buy storage bins, shelves or other bathroom organization supplies, make sure you make room for them by removing what you don't need in your bathroom.
“Bins are adding more stuff, and if you're constantly adding stuff your bathroom will start to look really messy,” Barba said. “Make sure you subtract things from your bathroom before you start adding new things.”
Reorganize a Bathroom Seasonally
During your fall or spring cleaning routines, go through you bathroom and toss expired products, switch out seasonal necessities and toss old linens, said Stone.
“You should go through your bathroom once a season, because you'll want to switch out moisturizers in the winter with sunblock in the summer,” she said. “Twice a year, when you're switching out your wardrobe, you should also consider your bathroom products.”
This includes getting rid of items you never used – like a shade of lipstick that you hoped would look good, but never did. Or shampoo brands that you were excited to try, but just didn't work out.
“Your space is really special, and it should only hold the things you also consider special,” said Stone.
The post Bathroom Organization Ideas for Your Small Space appeared first on Public Storage Blog: Decluttering, Moving, Storing Tips – The Organized Life.
0 notes
Text
M1 Finance Review: The Free Robo Advisor YOU Control
If you've been fascinated with the idea of robo-advisors, but still prefer to go the do-it-yourself route, you need to check out M1 Finance. It's a robo-advisor for sure, but one with a unique twist: you choose your own investments.
That's the self-directed part. But once you choose your investments, you get all the benefits of a robo-advisor. M1 Finance then manages your portfolio for you, including periodic rebalancing and dividend reinvesting. Your only responsibilities are to choose your investments and fund your account.
It doesn't fit neatly within the description of a robo-advisor, but it's really a hybrid between robo-advisors and self-directed investing. It wouldn't be an exaggeration to say it represents the best elements of both.
Interested?
How M1 Finance Works
M1 Finance is based in Dallas, Texas, and was launched in 2015. The service is built around what it refers to as “Pies”. These are individual portfolios that are comprised of a mix of exchange-traded funds (ETFs) and individual stocks. ETFs are a staple of the robo-advisor universe. But individual stocks are offered by only a few providers, and when they are, they're usually selected by the robo-advisor.
The use of individual stocks–and your own ability to choose which stocks and ETFs go into your pies–is what sets M1 Finance apart. It gives you complete control over the investments you'll hold.
Another departure from typical robo-advisor practice is that M1 Finance does not have you complete a questionnaire to determine your risk tolerance. In this way, the platform is better for experienced investors, who are able to determine their own investment comfort level.
But still, another distinguishing factor is that you can create an unlimited number of pies. You can choose existing pie templates provided by M1 Finance, or create your own. For example, you can create a technology-based pie, a socially responsible investment pie, and an emerging market pie–all at the same time. And there's no limit on the number of pies.
M1 Finance then manages your portfolio using modern portfolio theory (MPT), just as other robo-advisors do.
In this way, M1 Finance is both an active and passive investment platform. It's active in the sense that you select your own investments, and can change them at any time. But it's passive in the way the pies are managed.
M1 Finance Investment Methodology
M1 Finance's investment methodology is really a discussion of the pie concept. Each pie can be made up of up to 100 individual “slices”, which are represented by ETFs and individual stocks. M1 Finance provides more than 60 pre-selected pies that you can choose from, or you can construct your own.
There is a limitation however in that you cannot include mutual funds in your pies. In addition, individual stocks must be selected either from the New York Stock Exchange, the NASDAQ, or the BATS system. Which means you won't be able to invest in stocks that trade only on foreign exchanges.
Each pie will contain general asset allocations, which you can choose to fill with investments of your choice. M1 Finance will rebalance your pies consistent with that allocation. The allocations will also be maintained as you add additional funds to each pie.
You can create pies that are made up entirely of ETFs or of stocks or a combination of both. For example, you can choose a pie for FAANG stocks, that holds only positions in each of those five companies. But you can also adjust the mix. You can choose higher allocations for one or two stocks, and lower ones for the others.
This flexibility gives you complete control over how you will invest your money, but within the scope of a robo-advisor platform.
M1 Finance Tax Advantages
This area is a mixed bag. M1 Finance does offer a tax loss strategy, in which an algorithm determines which securities are sold when you withdraw funds from your account.
They do this by setting a selling priority that looks like this:
Losses that offset future gains.
Lots that result in long-term capital gains, to get the benefit of lower long-term capital gains tax rates.
Lots resulting in short-term capital gains, which are taxed at ordinary tax rates.
However, M1 Finance doesn't offer tax-loss harvesting, which is becoming an increasingly common feature of robo-advisors.
M1 Finance Features & Benefits
Available accounts. M1 Finance accommodates individual and joint taxable accounts, trusts, and traditional, Roth, SEP and rollover IRA accounts.
Minimum investment requirement. You can open an account with no money whatsoever. But you'll need a minimum of $100 to begin investing in a taxable account, and at least $500 in a retirement account.
Account custodian. Funds invested with M1 Finance are held with Apex Clearing Corporation. M1 Finance just manages your account. As a result, your account is protected by SIPC for up to $500,000 in cash and securities, including up to $250,000 in cash. This is of course protection against broker failure, and not against losses due to market factors.
M1 Finance Mobile App. The app is available for both Android (5.0 and up) and iOS (10.0 or later) devices and can be downloaded at The App Store or Google Play.
Exporting tax information. Your annual investment results can be exported directly to either TurboTax or H&R Block tax preparation software.
Dividend reinvestment. M1 Finance automatically reinvests your dividends once they reach $10.
M1 Borrow. You can borrow up to 35% of the value of your portfolio for any purpose, and without a credit check. Once borrowed, the money can be paid back on your own terms. The interest rate is 4.00% APR as of December 7, 2018.

Since the funds borrowed represent margin against your account, you may be subject to a maintenance call if your portfolio value falls below a certain threshold. A maintenance call normally happens when your account equity falls below 30%. However additional restrictions may be placed if your portfolio is deemed to be particularly high risk.
Referral program. If you refer a friend who signs up for an M1 Finance account, both you and your friend will receive $10 to invest in your respective accounts. You'll be given a unique link on the mobile app that you can share with friends by email, text, or even social media.
M1 Finance customer service. You can reach M1 Finance by either phone or email, Monday through Friday, 9 am to 5 pm, Central Time.
Get started with M1 Finance today.
M1 Finance Pricing
This is one of the most compelling features about M1 Finance. There are no fees!
That means:
No annual advisory fee
No monthly fees
No trading fees

So how does M1 Finance make money if they don't charge fees to investors? After all, if they don't make any money, they won't be in business very long.
M1 Finance explains it this way:
”Brokerages make more money via lending securities they hold, interest on cash held in a brokerage account, extending credit through margin to customers, and getting paid for distributing certain funds or to transact on various exchanges. These revenue streams are more than enough to support a strong, vibrant company. This is also true at M1 Finance, and we will make more money from transactions and holding the assets than we would from our fee.”
So there you have it: a brokerage platform that admits to making its money on the back end, in favor of offering investment services to customers for free. You've gotta love the honesty, along with the fee-free service.
How to Sign up with M1 Finance
To open an account with M1 Finance, you'll need to:
be at least 18
be a US citizen or permanent resident with a “green card”
have a current US mailing address.
You'll begin by entering your email address and creating a unique password. You'll also need to provide your name, address, and phone number.

Once you open your account, you can dive right into creating your investment pies. As discussed earlier, you can either choose from one of more than 60 pre-selected templates or make your own custom pie.
The next step is to link your bank account to your M1 Finance account. From there, you can fund your account. But the link means you can also withdraw funds, as well as contribute additional money going forward.
M1 Finance can automatically link to a large number of banks, saving you time inputting information. But if your bank isn't one of the choices, you can add it. Just add the name of your bank, the type of account, your bank routing number, and personal account number, and you'll be ready to go.
Get started with M1 Finance today.
M1 Finance Pros & Cons
Pros:
M1 Finance has no fees of any kind.
There is no required initial deposit to open an account, and you can begin investing with as little as $100.
M1 Finance lets you choose the investments you'll hold in your account, and then automatically manages them for you.
Through the pie format, you can create any number of individual portfolios for your account.
Pies enable you to invest in individual stocks, as well as ETFs. You can even create a pie composed entirely of stocks.
You can change your investments at any time.
You can borrow up to 35% of the value of your account at just 4% APR, and repay on your own terms.
Cons:
M1 Finance is not a trading platform, so you won't be able to use it to trade individual securities. Stock purchases are only permitted in connection with the creation of pies.
There's no ability to include mutual funds in your pies.
M1 Finance doesn't offer tax-loss harvesting. That's not a problem with retirement accounts, but it's now being offered on taxable accounts by many competing robo-advisors.
Since M1 Finance doesn't determine your risk tolerance, you'll need to adjust your holdings to match your own investing temperament.
The DIY aspect of M1 Finance means you'll have to have at least some investment experience. The platform isn't suitable for inexperienced investors looking for a completely passive investment experience.
Why You Should Invest with M1 Finance
M1 Finance isn't for all investors. If you're completely inexperienced, the self-directed aspect of the service may leave you taking on more than you want. There are plenty of other robo-advisors that are very well suited to completely passive investing for beginners, including Betterment and Wealthfront.
But if you're an experienced investor, who prefers to go the do-it-yourself route, but doesn't want the hassles of day-to-day portfolio management, M1 Finance is the perfect robo-advisor for you. You can build your own portfolios and as many as you want. You can even select the stocks and ETFs included in your pies. But you won't have to concern yourself with rebalancing for reinvesting dividends.
And you've gotta love that you can invest completely free. Unlike most robo-advisors, there's no annual advisory fee. And unlike discount brokers, there are no trading fees. Plus, you can borrow up to 35% of the value of your account at below market rates, and pay it back at your leisure.
That's a powerful combination that's unmatched anywhere else in the investment universe.
If you'd like more information, or you'd like to start investing, check out the M1 Finance website.
The post M1 Finance Review: The Free Robo Advisor YOU Control appeared first on Part-Time Money.


0 notes
Text
Survey: Gen-Xers & Older Millennials Believe Stocks are a Better Investment than Real Estate
35-44 year olds were hit hardest by the housing bust just as they reached prime first-time homebuying age
Less than half of homebuyers and sellers between the ages of 35 and 44 believe that real estate is a better long-term investment than the stock market, according to a survey Redfin commissioned in December of more than 2,600 people nationwide who bought or sold a home in the last year, attempted to do so, or have plans to buy or sell soon.
Buyers who reached the median first-time homebuyer age of 31 years old between 2008 and 2012 during the Great Recession and housing market collapse are now 38 to 42 years old. Redfin's survey results show that this was the only age group that has less confidence in real estate as an investment than the stock market. Just 48 percent of homebuyers and sellers in this age group believe that real estate is a better long-term investment than the stock market.

“The oldest Millennials and youngest Gen-Xers entered their late twenties or early thirties during the housing crash, which explains why they are more skeptical about investing in real-estate,” said Redfin chief economist Daryl Fairweather. “This generation experienced a major setback during the housing bust, which hit just as they were most likely to be getting married, starting a family, and becoming a first time homeowner. Looking into the future, we expect to see homeownership increase as Millennials enter prime home-buying age. This is because Millennials have a more favorable opinion of real estate as an investment than Gen-Xers, and Millennials are a larger group than Gen-Xers.”
In every other age group, buyers and sellers who believe that real estate is a better long-term investment outnumbered those who believe the stock market is better.
This finding is surprising given that it comes from a survey of people specifically buying or selling homes, which is a group that presumably would be biased toward real estate to begin with. Younger Baby Boomers, respondents aged 55 to 64, were the most optimistic about real estate as an investment. Previous Redfin surveys of homebuyers and sellers have not asked this specific question, so we do not yet have any data on whether this has changed over time.
Methodology
Redfin contracted Qualtrics to field a study between November 2 and December 10, 2018 of 2,647 people from the general population who indicated they had bought or sold a home in the past year, tried to buy or sell a home in the past year or plan to do so this year.
This report focused included data from the 1,784 people who answered the question: “Which do you believe is the better investment for those who do not plan to move their money in the long term, the stock market or real estate?” People who answered either “Real estate is the slightly better investment” or “Real estate is the better investment by far” were grouped together, and those who answered “The stock market is the slightly better investment” or “The stock market is the better investment by far” were grouped together.
The survey had respondents from all 50 states and Washington, D.C.
For more information about the survey and its findings, contact Redfin Journalist Services at [email protected].
The post Survey: Gen-Xers & Older Millennials Believe Stocks are a Better Investment than Real Estate appeared first on Redfin Real-Time.
0 notes
Text
4 Weed Killer Mistakes a Lawn Care Service Will Help You Avoid in Lagrangeville, NY
Weeds are a common foe of many Lagrangeville, NY, homeowners. But their attempts to get rid of crabgrass or other types of weeds tend to result in weed overgrowth. You can bring life back to your patchy, unhealthy lawn and avoid weed killer mistakes by hiring a professional to take great care of your yard.
Mistake #1: Relying on One or Too Many Herbicides
Lots of factors go into properly handled weed control, such as timing and frequency of herbicide use, the types of herbicides used, and proper lawn fertilizing. One of the biggest mistakes by homeowners is relying solely on one or a mixture of too many herbicides to get the job done, not realizing that improper herbicide use is one of the easiest ways to damage the lawn and increase the number of new weeds.
Weed control requires knowledge and dedication to do it right. Weeds are resilient and difficult to control, so applying just a herbicide, especially when the weeds are too tall, doesn't even come close to solving this problem.
To tackle weed issues in your lawn, our team at Lehigh Lawns & Landscaping Inc. offers the Premium 5 Step Lawn Fertilization Program. This program will keep your lawn weed-free and healthy all year-round. It includes applications of organic fertilizer, weed control, and the prevention of crabgrass, dandelions, and grubs from finding a home in your lawn. It is a plan that ensures weeds are under control even before they have the chance to spread.
Related: When to Apply Weed Killers in Wappingers Falls, NY
Mistake #2: Not Investing in a Proper Weed Management Plan

Possibly the biggest mistake of homeowners regarding weed control is not undertaking a weed prevention plan. As a rule of thumb, it is easier-and more cost-effective-to prevent weed with a pre-emergent fertilizer program than to try to control them with a post-emergent one.
On top of it, homeowners usually lack the time to learn how to use a pre-emergent herbicide, how to apply it, how to choose the right one, what is the correct percentage of components, or how to fertilize properly. With our fertilization program, you can rest assured that the overall health of the lawn is in good hands. Contact us for a free estimate for getting your beautiful yard back.
Mistake #3: Overwatering and Frequent Mowing
Just like everything in nature, your lawn needs a specific amount of water to be healthy. Having too much of a good thing-in this case, water-can cause greater damage to the yard. Unfortunately, weeds like overwatering and are likely to thrive and take over the lawn when grass has a difficult time deepening their root system.
Related: How to Keep Pets Safe from Weed Killers in Fishkill, NY
You may think mowing the grass more often would be the answer. However, frequent mowing may uproot the nutrients the grass needs and allow weeds to grow more rapidly and thicker than before. Mowing about once a week will keep your lawn in top shape. Professional lawn services offer the knowledge and care your grass needs.
Mistake #4: Not Contacting a Professional Lawn Care Service
Applying low amounts of herbicides may damage your grass instead of killing the weeds you don't want. The best tip you can receive regarding weed control is to contact a professional lawn care service-especially when things are getting out of control. Lawn care service will save you from the nightmare of weeds.
0 notes
Text
A Renovating Couple Gains Their Urban Chops
Classic design and deep color tones anchor a home for new New Yorkers
The move to New York from the West Coast landed Jeremy, an advertising executive, and Chris, a nurse managing an emergency department, in a 778-square-foot co-op in the developing neighborhood of Hudson Yards. A “simple” tiling job that crumbled while living there led the couple to the bigger renovation that they had been saving up for. With each of their “must-haves” in mind, they posted their project on Sweeten, a free service matching renovators with vetted general contractors and found a Sweeten design-build firm. The result? Herringbone floors, an array of new custom millwork-and sound advice to share with future renovators.

Guest blog post by Sweeten homeowner Jeremy
A first-and obvious-lesson in renovating: it really is harder in New York. When my husband Chris and I embarked on this adventure, we had thought we knew what we were doing. After all, we'd undertaken a remodel of our 1914 Seattle condo before. But that was all before we decamped to New York for work-and learned what a reno here really takes.

After the move, we rented in the Financial District while debating where to settle. I pushed for Brooklyn, dreaming of a leafy side street, but Chris' job in an emergency department required getting to work even if the subways and bridges shut down-that meant living in Manhattan. Our real estate agent brought us to a 1929 building we would have never come to on our own, smack next to the construction zone that is Hudson Yards. I was hesitant, but Chris saw a decent amount of room and a good layout in a neighborhood that would develop restaurants in place of jackhammers soon enough.
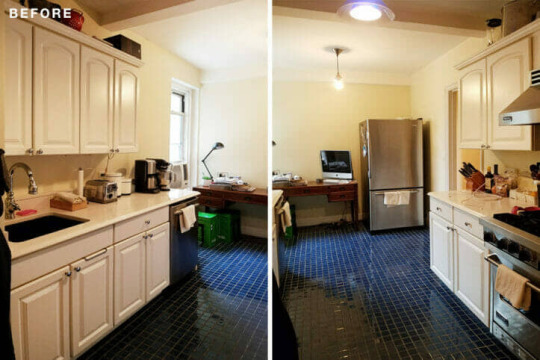
Photo: Sweeten contractor

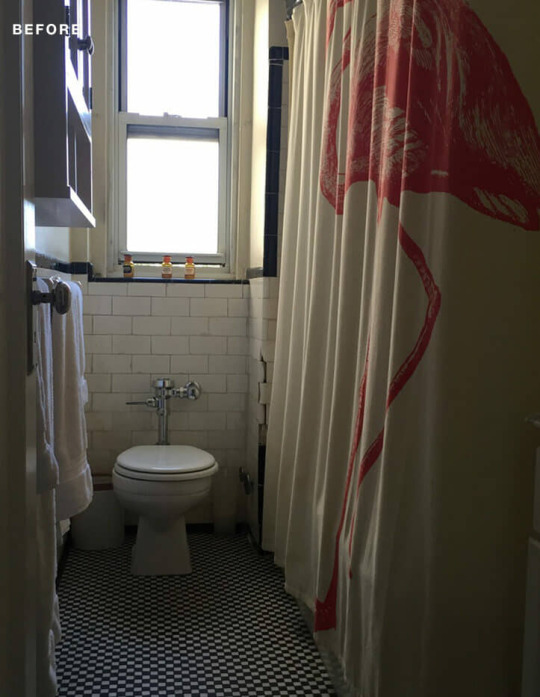
After moving in, we wanted to redo the kitchen, but the most urgent fix was the bathroom. Some prior higher-floor leak had unmoored a section of tile, and the previous owner refused to repair it as a condition of closing. This was our first lesson in how different a Seattle and New York renovation could be.
Our foray bidding a standalone bathroom remodel proved short-we got as far as finishing the design when the co-op came back with a series of unexpected plumbing requirements, chock full of things we'd never heard of like water hammer arrestors and Laticrete. The price nearly doubled, and if we were going to spend much more on a remodel, we decided we should save up and do the larger apartment renovation we had hoped to.

With regular re-spackling, we figured we could pull through. That folly ended a year and a half later when, hours before leaving for vacation, a precarious section of tile came crashing down. Our super covered the crumbling wall with a plastic tarp, but it was clear: it was time to begin bidding.
We weren't sure exactly what we needed-walls weren't moving per se, but our co-op seemed to want an architect. So while we asked the initial bathroom contractor to bid, we also thankfully posted our project on Sweeten. To complete our renovation, Sweeten paired us with a design-build firm with architecture training. They also did custom millwork, making it the perfect fit for our project. Not only did the general contractor immediately understand our aesthetic, but we also had a great rapport.

In planning the remodel, we knew we wanted to play off the building's modest Art Deco bones, but in a way that wasn't slavish or theme-y. We also both brought mild obsessions to the mix-for me, an inexplicable passion for English cabinetry, for Chris, a desire to put a banquette in any possible corner.
The first big choice was how to manage the kitchen layout. The room was spacious enough-designed as an eat-in when 24” of counter space seemed ample-but the two doorways weren't in an ideal location. One opened onto the foyer and the other onto a back hallway by the bedroom. It had also been poorly updated in the intervening years: half of the footprint was wasted, with a lonely refrigerator in one corner and an errant desk in another.
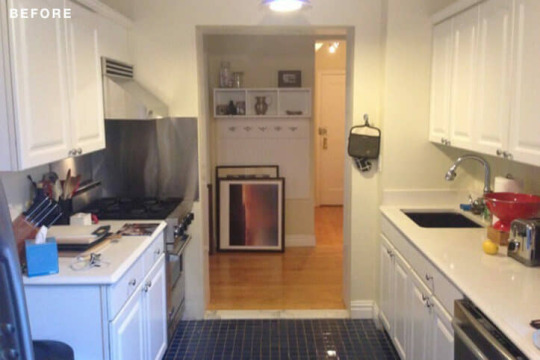

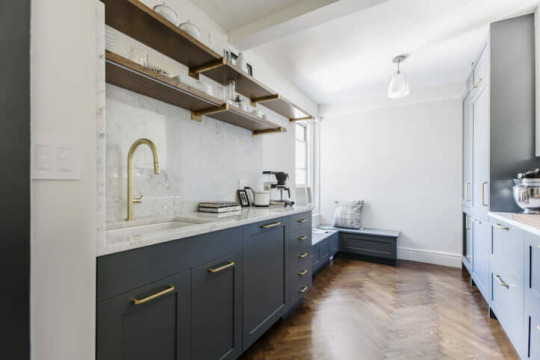
The location of the gas riser dashed our hopes of moving the entry to adjoin the living room, so our contractor suggested closing the smaller opening to create a wide galley with room for a banquette. This would extend the cabinetry the length of the room on one side, doubling the counter space and creating room for a wine fridge and pantry to boot.
While we played with centering the sink and range on the counter runs, our Sweeten contractor advised against it to preserve prep space. In hindsight, we were happy to have lived in the space before renovating: symmetry looked better on paper, but from experience cooking in the space, we knew her recommendation would be more functional.
To keep the room from feeling enclosed, we substituted upper cabinets for extra-long open shelves on one side, then tucked in under-cabinet lighting for function. The banquette capped off the space, creating both more storage and a place for friends to hang out while cooking.
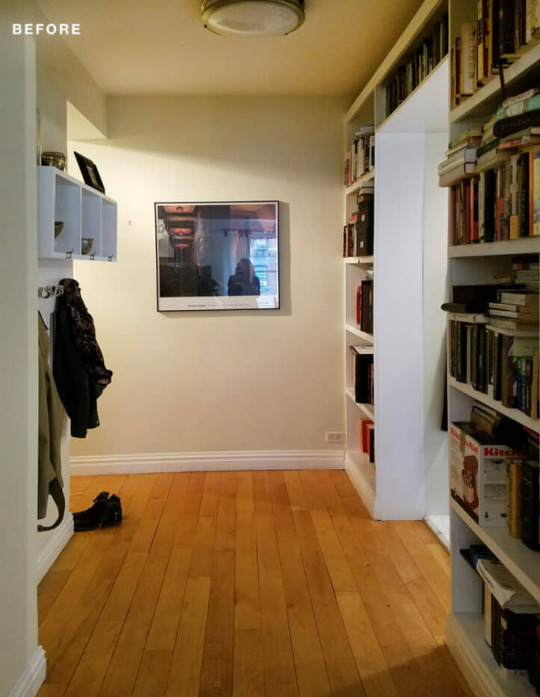
Photo: Sweeten contractor


Our foyer situation was a classic New York City conundrum: too small to do much anything useful but large enough to be wasted if empty. We decided on a full-height bookcase that's only 8” deep and it holds loads more than we expected. On the opposite side, our general contractor fitted narrow custom cabinets to serve as a bar. There's just enough depth to squeeze in double rows of liquor bottles and glasses, saving precious room in the kitchen. We ran new electrical to hang art lights over tall mirrors-the goal was to make the whole space pull triple duty as an entryway, a library, and a bar-then painted the foyer and kitchen cabinetry the same deep gray so that the two spaces relate.

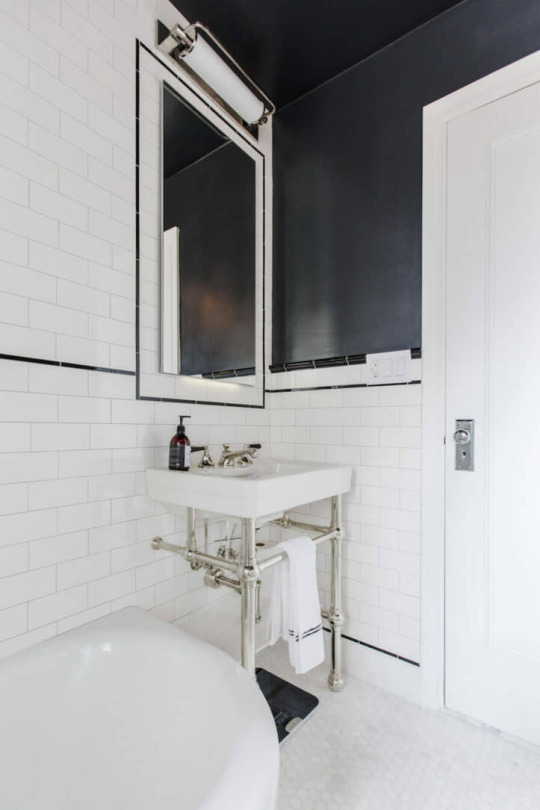
In the bathroom, we preserved and refinished an original tub and stuck to a classic black-and-white New York-inspired scheme with updated finishes. Given the narrow layout, the primary play here would be with subtle geometries-and taking advantage of our building's extra thick walls. A hex marble floor worked well with the warmer white subway tile and porcelain. Our contractor recommended extending the floor tile onto the base of the walls to stretch the visual plane of the room.
The hexagon echoed in new shower controls that help tame the notorious temperature fluctuations that come with living in an old building. In such a small space, we took a cue from hotel bathrooms and put a pedestal sink atop console legs to keep the space open. An extra-tall recessed medicine cabinet provides both storage and electrical outlets.

My favorite thing of all is the towel warmer which took forever to source but that I deeply love for its hex bars and Anglophilic appeal. The contractor placed it in a deep niche so that the warm rails wouldn't risk singeing passersby.
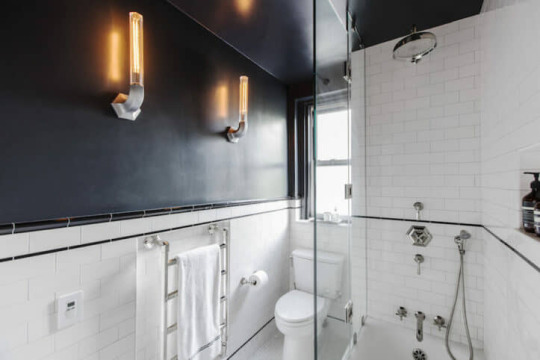
We decided to paint the walls and ceiling in a black high sheen that makes the ceiling recede and the white surfaces gleam. Strangely, of all the things in the apartment, the shower glass proved one of the most frustrating: it wasn't installed until five months after everything else wrapped up.

New wood floors were the most unexpected part of the reno. We had only budgeted for the kitchen alone. But the more floor options we looked at-and after our contractor dissuaded us from several temptations like Moroccan Bejmat tile-the more we wanted hardwood in the kitchen. That meant either putting down maple boards to match the rest of the apartment-despite disliking their color-or redoing everything. Our contractor's opinion was that changing the kitchen floors would make one of the biggest impacts in the space. So a month into the renovation, after all the other demo was done, we raided a savings account and scrambled to add herringbone floors to the scope. The late choice delayed the project by a month, but it was one of the best decisions we made.
Stepping back from it now, our major lesson was in developing a deep comfort with flexibility. We found that we could be much more controlling of our remodel in Seattle than here. New York's interminable series of permits, co-op requirements, and engineering reports-paired with the inelasticity of old spaces-meant we had to take a go-with-the-flow approach that made trust and an ability to laugh key. Also, best to know exactly what you're looking for before you start to remodel.
Our contractor taught us the biggest lesson of all: do it all at once if you can. It's not the disruption that's the problem, really, or that rework ends up costing more-it's that few of us really have the talent to create a cohesive space in small increments. Unfortunately, we didn't quite learn this last lesson in time. During our reno, our bedroom became the storage unit for our furniture.
More than anything else, we were lucky to have a real partnership with our Sweeten general contractor to see us through the changes and warn us off of bad choices. We feel a bit like we've earned our honorary New Yorker stripes: we chose a space that we thought was a diamond in the rough and hoped we could turn it into a classic city respite. We feel like-at least to our taste-we got there, and now we have this lovely, large-living one-bedroom to come home to in one of the most dynamic parts of Manhattan.
Thank you, Jeremy and Chris, for sharing your new New York home with us!
KITCHEN RESOURCES: White oak hardwood floors in espresso stain: Minwax. Kitchen cabinets and under-cabinet lighting: Custom by general contractor. Kitchen cabinet paint in Down Pipe, wall paint in Strong White, and ceiling paint in Wimborne White: Farrow & Ball. Regent Collection cabinet pulls: Restoration Hardware. Super White Carrara marble countertop and backsplash: HG Stones. Shaws Original farmhouse sink: Rohl. Faucet in satin brass: California Faucets. Refrigerator, dishwasher, stove, hood, and wine fridge: Thermador. Haleigh ceiling light fixture: Rejuvenation.
BATHROOM RESOURCES: Fitzgerald Collection sink: DXV. Console legs in polished nickel: Palmer Industries. Monterey faucets: California Faucets. Bianco Dolomiti 1 ¼” hex floor tile: Artistic Tile. White subway wall tile and black liner tile: Subway Ceramics. Astor collection hardware and shower fixtures: Jaclo. Verenne sconces: Restoration Hardware. Thomas O'Brien light fixture over medicine cabinet: Circa Lighting. Recessed medicine cabinet: Robern. Eco Drake toilet: Toto. Frameless glass shower surround: Glasscrafters. Ceiling and wall paint in Off Black: Farrow & Ball. Towel warmer: Vogue UK.
FOYER RESOURCES: Cabinetry: Custom by general contractor. Super White Carrara marble countertop: HG Stones. Cabinetry and wall paint in Down Pipe, ceiling in Wimborne White: Farrow & Ball. Regent Collection cabinet pulls: Restoration Hardware. Kelly Wearstler flush-mount ceiling light fixtures, Thomas O'Brien art light fixtures: Circa Lighting. Baseboards: Kuiken Brothers.
-
Angela's bathroom in a landmark New York City building gets a classic yet modern update.
Refer your renovating friends to Sweeten and you'll both receive a $250 Visa gift card when they sign a contract with a Sweeten general contractor.
Sweeten handpicks the best general contractors to match each project's location, budget, and scope, helping until project completion. Follow the blog for renovation ideas and inspiration and when you're ready to renovate, start your renovation on Sweeten.
The post A Renovating Couple Gains Their Urban Chops appeared first on Sweeten Blog.
0 notes
Text
Landscaping Stone Borders Around Flower Beds

Stone Border Around Flower Bed
Austin Chopped Stone with a Flagstone Cap

Landscaping Stone Borders
Austin Chopped Stone Borders with Flagstone Cap around Flower Beds Landscaping Project

Stone Wall Borders
Raised flower beds with stone wall borders

Raised Flower Bed Landscaping
Landscaping stone walls border on raised flower beds

Curved Stone Borders
Flower bed island with curved stone border all the way around.

Flower Bed Landscaping
Landscaping stone borders around flower bed

Stone Border Around Pond
Landscaping a Pond with Stone Borders in Back Yard

Mulching Flower Beds with Stone Borders
Adding mulch to flower bed with stone borders

Large Stone Divider
Large stones dividing a garden bed landscaping

Large Rocks Border
Landscaping flower bed with large rocks as border

Flat Brick Stone Borders
Flat stone borders around flower beds

Stone Border Around Tree Bed
Tree and Flower Bed with Stone Border Landscaping

Stone Retaining Wall
Landscaping a Stone Retaining Wall Around Flower Bed
Get Stone Borders Installed
Request Quote
When you feel stressed, and you need a place to have a significant relaxation, your outdoor area will always serve as a perfect spot. So, investing in improving the look of your landscape is a fantastic treat for yourself.
Nature's view has its unique and effective way of providing you a valuable tranquility. It can even make it easier for you to forget all the negative vibes around.
After a busy weekday, it is ideal to put an effort visiting your garden area and recharge yourself. To make this more effective, providing your flower beds with landscape stone border can improve your experience.
Here, you will be able to learn different ideas for your next landscape stone border project. So, how are you going to choose the right stone for your flower beds.
Type of Edging Stones for Borders
There are different types of stone to choose from and each type has its unique characteristics. We can generally install any type of stone you prefer, but what we usually like to recommend is listed below:
Austin Chopped Stone
Oklahoma Chopped Stone
Leauders Chopped Stone
Boulder Moss Stones
Shape and Texture
Natural stones are known for its rounded shape resulted from long exposure to water in the streams, rivers, lakes or ocean. Manufactured stones provide a shape which is intended to imitate the appearance of natural stones. You have no trouble choosing the best stones for your flower bed landscaping because there is already a wide variety of man-made stone that provides organic and attractive look. Thus, it offers a uniform size and shape, with various color options.
With the help of a different type of landscape stone, it is made easier for you to create a more attractive look for your flower bed.
Artistic Medium
When you are deciding for landscape stone border design, you can play with your imagination. You may come up with a rock garden theme where you can use stones with a natural round shape and then choose plants that can enhance the overall look.
Different Rock Features
Landscape stones can be you to different landscape ideas where you can take advantage of different stone features to fulfill your creativity. In building a stone border, you can use either collection of pebbles and smaller stones or larger sizes within the gabion cages. This provides an attractive look while staying functional as a retaining wall.
Learn how to build a stone retaining wall – pdf
Water Feature Accent
Landscape stones are attractive and artistically dry. However, if you combine it with a water feature, its beauty, color, and texture become full of life. For a natural look for your flower bed, you can use paddle stones because of its neutral colors. Thus, they are quite flexible when it comes to creating natural mosaic designs.
There is no way for you not to try a landscape stone border to create an attractive and unique look for your flower bed. The next time that you will visit your garden, you will get more satisfaction with the view.
For help with installing stone borders around your flower beds contact JC's Landscaping for a free estimate.
Facebook Pinterest Twitter Google+ Reddit
The post Landscaping Stone Borders Around Flower Beds appeared first on JC's Landscaping LLC.
0 notes
Text
6 Tips for a Successful Finished Basement Remodel

Finishing the basement in your home is a great way to maximize the space you already have, without having to add on any square footage in the form of an addition. Whether you want to go the more luxurious route and turn your basement into a home theater, or you're simply looking for a way to create more living space in your home, finishing your basement is a great way to do so. However, there are a few things you'll want to keep in mind for a successful basement remodel. Below, we cover 5 tips to get you started.

0 notes
Text
Three Approaches to Lead Generation for 2019

Amy Chorew, the VP of Learning at Better Homes and Gardens® Real Estate, interviewed three top brokers to gain insights on their best practices for lead generation. John Jackson from John Jackson Neighborhood Real Estate, Lane Hornung from 8z Real Estate, and Heather Bush from Better Homes and Gardens Real Estate Capital Area were excited to share their expertise.
John Jackson,
John Jackson Neighborhood Real Estate: Racing for Approachable
John takes a friendly approach to lead generation. By being both approachable and desirable, his brokerage finds much success in being able to convert leads. To make their presence known, the traditional avenues of open houses and Facebook ads are used. However, their major investment lies in nurturing client relationships rather than cold leads.
As an avid runner, John heavily supports athletic events that are not necessarily client-focused. By sponsoring local races and having the company name on running bibs, the brokerage is able to present itself to the local public in a community-oriented way. John believes that inspiration and a bit of runner's high, first- or second-hand, will inspire the public.
While it is always a challenge to define measurable market presence, being approachable, knowledgeable and desirable makes prospective clients want to engage. Sixty percent of leads are company-driven and agents drive the other 40 percent in a high-support setup. John makes it part of his responsibility to be the inside sales person. He nurtures leads and matures them before handing them off to a team member. A shared Google doc tracks hot, warm and cold statuses as well as every communication sent to all leads, regardless of how they were shaped. Agents can count on these leads, but are also incentivized to nurture their own.
Lane Hornung,
8z Real Estate: Get visual
Lane believes in the power of a visual to explain his approach to lead generation, which is driven by numbers. He imagines the process as a triangle – internet, sphere and hyperlocal. The first side of the triangle is dedicated to new lead generation sourced from the internet using SEO, organic and paid traffic, Facebook campaigns for market listing ads and name recognition ads. Ads are hyperlocal, within a half-mile radius of the brokerage in most cases. The sphere, which is the foundation, is next, where sweat equity ensures measurable leads. Finally, the high-support brokerage uses SEO, Facebook market listings and a digital farming strategy in which each agent is assigned a neighborhood.
Leads are given to the client care team to improve the prospective client's chance of closing to 10 percent or better.
Heather Bush,
Better Homes and Gardens Real Estate Capital Area: Relocation, relocation, relocation
Heather harnesses the power of technology and outsourcing for lead generation. Her brokerage's unique system focuses on relocation as a primary source of business. Military personnel must buy and sell houses quickly for deployment or new assignments. Additionally, members of the corporate world also need a reliable agent to help with their specific housing needs. This niche has proven quite lucrative for the brokerage.
Opt City is a referral source that does away with upfront costs and requires payment only upon closing for brokerages. Inquiries are filtered and nurtured until the lead is warm enough to be handed off to an agent. Clients are introduced with a live, warm phone transfer. Agents start with lower quality leads until their performance score indicates that they're ready to receive a higher volume and improved leads.
Another tool, Cartus, is a leader in global/logistical relocation services for military personnel and corporations. As a Better Homes and Gardens® Real Estate in-house resource, ZAP provides lead generation strategic insights. With the website and app, the client begins the homebuying process by selecting their preferences. Online activity is meticulously tracked and algorithms indicate when a transaction is imminent. Agents receive metrics and insights to boost daily and long-term projections.
Heather believes that while resources aid in lead generation, ultimately, what makes a transaction is the relationship. By getting to know clients and addressing their specific needs and lifestyle, a lifelong connection can be formed that will result in referrals upon referrals. Follow-up is essential with market news, design advice and other relevant information.
Visit our AllThingsRE Facebook Page to view the full panel live, or click here.
No matter your approach, consider leveraging these insights to help shape and improve your business in 2019.
The post Three Approaches to Lead Generation for 2019 appeared first on Clean Slate.
0 notes
Text
DIY Repairs You Should Leave to a Professional

While everyone is talking about doing your own repairs, we thought we would discuss the repairs you should not do on your own. Performing home improvements, appliance repairs, and other such projects on your own is a great way of saving money. You have so many resources at your disposal to complete these projects: employees at your local home improvement store, experts on their personal blogs, and video tutorials on various websites. These can all help you complete a project accurately and safely.
However, there are certain projects and certain appliances that you should never undertake yourself. As safe as you intend to be, an accident with one of these appliances or improvements can lead to serious injuries, to you or to others. In some cases, they can lead to death. So, if you have a project you are planning on doing yourself, consider if it falls under one of the following. We want everyone to stay safe.
Gas Appliances
There is so much that can go wrong with equipment that is gas powered, industrial-use appliances have warning labels plastered all over them. Home appliances do as well, but people have become so blind to signage they go unnoticed. Gas appliances should never be worked on by yourself (unless you are a qualified expert with training and experience). If anything goes wrong with your gas furnace or water heater, call it in. The same goes for an oven or gas fueled dryer. (adsbygoogle = window.adsbygoogle || []).push({});
You may think you have fixed the problem, but the risk remains that it was not done completely. There is also the chance of doing further damage to the appliance, damage that could result in an undiscovered gas leak. If a leak occurs, the natural gas could fill the house and cause major health issues to you and your family; the gas could even suffocate them. You also risk the chance of catching the house on fire, especially if there are sources of heat or sparks (such as a cigarette). The house, as well as your neighbor's house, could get caught in an explosion. While everyone wants to save money wherever they can, this is one area you do not want to risk it. Call in the professional.
Electrical Work
You do not want to mess with wires either. It is one thing to install a new ceiling fan, the fixture is designed to just have the wires plug into them, and the wires in the ceiling are left out for that purpose. But to move those wires around, or attempt to install your own wiring to give a room an additional power outlet or to brighten a corner is not a good idea. There is a lot to consider when dealing with electricity, and if you do not have the proper training to understand all of these factors, then you should not handle the wiring.

Electrical currents and voltages should not be taken lightly. It takes professional electricians years to comprehend all of the eccentricities involved in their craft. While it may seem like a good idea to just add some wires into the circuit breaker and run it through the attic then back down into the mini wall you installed between the kitchen and the living room, it is not that simple. How strong is the current going through the wires? Can the circuit take the load going through it?
Handled improperly, the wiring in your home could become a danger to your family as well. Mishandled or exposed wires could spark and catch the house on fire. You could go to plug an appliance into your newly-installed outlet, only to get electricuted. To save yourself from a potential trip to the hospital – or worse – have a licensed professional perform the electrical work for you.
Structural Effects
Home Improvement shows are everywhere. You can't turn the TV on without finding one of these shows airing. They have somehow replaced the Saturday morning cartoons, and even the kids are enjoying them. They have, however, created a problem among DIYers. People are demolishing parts of their homes in an effort to replicate the effects they see in these shows. Without realizing it, where they may be taking out part of a wall to open the area up, they are actually causing structural stress to their homes.
They do not understand that not all walls are there to simply hide the the beams and guts of the house. Some are in place for a purpose, usually to support the weight of the roof or second floor in that part of the house. If there is a wall you want to take out, consult a professional before you do. They may tell you that it is a load bearing wall and what you were wanting to do on your own should not be done – at least not without a contractor's help.
The same goes for your basement. Do not try to remove beams and pillars in an attempt to create a secondary living space or an additional room or two (doing this may require a building permit, anyway). You may not realize it, but those pieces of wood are there for a reason, and to remove them could cause part of your house to collapse into the basement.
Some things you see in these shows just cannot be replicated, as much as you may wish it so. To force the issue would be to create stress on your home's structure, risking cracks, breaks, and implosions.
There is absolutely nothing wrong with doing repairs on your own. Not spending money on a contractor is a good reason to do them yourself. DIY projects also come with a sense of accomplishment. However, there are some things you should not do on your own. One of these days, you may become the expert with the blog, or the guy in the tutorial video, but not for these things; not without the proper training.
Be safe. Keep your family from having to go through the ordeal of a burned-down house or a hospital-ridden handyman. Your neighbors are also depending on you to keep your DIY projects from affecting them as well. There is nothing worse than having your next door neighbor tell you they told you so. (adsbygoogle = window.adsbygoogle || []).push({});
The post DIY Repairs You Should Leave to a Professional appeared first on Handyman tips.
0 notes
Text
Beauty Out of Necessity: Landscape Drainage in Landscape Design

The landscape drainage plan shown in this rendering brings excess rainwater to an infiltration trench at the front right side yard where it can seep back into the ground
The first questions I ask when I stand on a new site are: where is the water coming from, where is it going to go, and what's going to happen when it gets there? Howard Cohen, Landscape Architect
Landscape drainage is a critical factor in the success of any landscape design project. And most Northern Virginia properties have pre-existing drainage problems that must be addressed within the scope of a landscape design project.
The first step for your landscape architect is to conduct a thorough site analysis and evaluation taking note of the existing slopes and elevation changes on the property, surface and groundwater (wet and dry areas), and soil composition. We want to be sure that rainwater is not puddling on hard surfaces but is directed to run off and sink into the ground. We want soil around plants and trees to drain efficiently so plants will stay healthy.
The Necessity of a Landscape Drainage Plan
The effectiveness of the drainage system on a property overall and techniques that support well-drained planting beds have a direct bearing on the health and longevity of your garden plants. A sound landscape drainage plan is comprised of two principal parts: one relates to hardscaping and the other to planting beds.

An aggressive re-grading of the slope, terracing, raised planting beds and permeable hard surfaces resolved drainage issues in this front entry area. PHOTO Morgan Howarth
Drainage and Hardscaping The drainage system is built into the hardscape. The landscape architect may specify permeable surface areas with buried drainage pipes and retention wells that allow water to percolate naturally back into the soil.
We often use slot drains along the perimeters of patios and walkways to take rainwater straight into the ground. We also adjust grading on the property to control the direction and flow speed of surface water. We may direct rainwater toward a natural slope or to an area where we've installed a small culvert or drain box.
Drainage and Plants In Virginia, we have dense clay soil that stays wet. We try to select plants that can take sustained periods of moisture. We also plant in raised or mounded beds with sand mixed into the soil–which ensures that water drains well away from plants and keeps the roots dry.
A raised bed will usually have low retaining wall bordering it. Mounding doesn't require hardscaping. In both, we use a balanced blend of sand, soil, and compost to build up the mound so it is stable, provides nutrients, and drains properly.
Drainage Solution 1: A Damp Yard Reclaimed

An infiltration trench, concealed by landscaping, allow excess rainwater to seep slowly back into the ground. PHOTO: Morgan Howarth
The owners of this McLean residence rarely used their backyard patio because it always felt damp and uncomfortable. During heavy rainstorms, water would sometimes flood the lower level of the house. A landscaping project not only beautified the backyard but permanently fixed their serious drainage issues.
We dug an infiltration trench in the front right corner of the side yard. All the downspouts from the house tie into it. An infiltration trench sinks about six feet into the ground. It is lined with fabric, filled with layers of sand, clean washed gravel and topped off with about a foot of well-draining topsoil. Excess water filters into the ground.
Although you can't see it, this part of the drainage plan was vitally important the success of this landscape design project. If the property didn't drain properly, plants and people would suffer from too much moisture. Making an outdoor environment beautiful is important, making it comfortable and fully functional is essential.
Drainage Solution 2: A Low Spot Becomes a Highlight


This Herndon residence had drainage problems that made it impossible to plant anything to make the front entry attractive. The ground sloped left along the front of the house toward a lot spot where water collected and pooled against the foundation.
A front entry landscaping project beautified the curb appeal of the home while solving the drainage problem.
We ran drainage pipes under the driveway to draw excess water away from the house, then built up the garden beds above the previous ground level and held them in place with a low retaining wall.
Drainage Solution 3: Beautiful & Practical

This Oakton residence sits on an expansive lot that had a combination of steep slopes and low areas. Extensive regrading and terracing made the backyard highly functional. A highlight of the drainage plan is the biofiltration sinks disguised by lush planting beds. The biofiltration sinks receive water from upper levels on the landscape and let it percolate naturally back into the ground-and at the same time feeding the moisture-loving bedding plants on the surface.
The Design You Don't See

Drainage design is the part of every landscape design you will never see. But everything you see and enjoy above ground is supported by it. If you skip investing in landscape drainage to save a little money, you will end up with issues after the fact. And that could end up costing you more because you may have to remove expensive hardscaping and landscaping to install a solution.
All of the example projects began with a desire on the part of a homeowner to correct a drainage problem that was preventing them from using their yard or was interfering with the ability of landscaping plants to establish and thrive. If you feel that landscape drainage issues are preventing you from fully enjoying your outdoor living areas, contact one of our landscape architects to schedule a consultation.
0 notes
Text
QUIZ: 9 Alcohol Cheats in Animation
Brought to you by responsibility.org for their TalkEarly campaign.
In the past, animated films and shows were, um… rather boozy. A review of every G-rated movie created from the 30s up to 2000 said 47% showed alcohol consumption, and in that same period about 9% percent of all cartoons did as well. That's a LOT of drinking in kids' media.
But times have been changing for a while. Nowadays, it's very rare that you'll see any alcohol references in children's animation. BUT!
When they weren't allowed to show alcohol, writers and animators have cleverly tried to cheat the filters by simply replacing it with something else, so they could still show comical drunkenness, bar scenes, or savage hangovers.
Let's see if you can guess which “kid-friendly” substitutes these cartoons used. Even if you completely strike out on all 9, it's pretty interesting!
What Was Used Instead of Alcohol?
1) The Secret Life of Pets (2016)
Illumination Entertainment
Toilet Water
Gravy
Sausages
Cheese Puffs
SAUSAGES
Continue >>
2) Adventure Time (2014)
Cartoon Network
Cucumber Water
Soul Nectar
Melted Glacier
Roll-on Deodorant
CUCUMBER WATER
Continue >>
3) Phineas and Ferb (2008)
Disney Channel
Milkshakes
Juice Boxes
Chocolate Milk
Sports Drinks
MILKSHAKES
Continue >>
4) The Legend of Korra (2014)
Nickelodeon
Noodles
Algae
Soy Sauce
Tree Bark Tea
NOODLES
Continue >>
5) All Hail King Julien (2016)
DreamWorks Animation Television
Pineapple Juice
Dates
Coconut Milk
Vine Sap
COCONUT MILK
Continue >>
6) Chip N' Dale's Rescue Rangers (1989)
Disney Television Animation
Acorns
Rotten Fruit
Catnip Tea
Cheese
ROTTEN FRUIT
Continue >>
7) SpongeBob SquarePants Movie (2004)
Nickelodeon Movies
Ice Cream
Kelp Juice
Jellyfish Jelly
Tar Smoothies
ICE CREAM
Continue >>
8) Transformers (1985)
Hasbro Studios
Metal
Lava
Energy
Lightning
ENERGY
Continue >>
9) My Little Pony: Friendship is Magic (2018)
Hasbro Studios
Maple Syrup
Wheatgrass Juice
Cider
Flower Pollen
CIDER
Continue >>
QUIZ: Alcohol Cheats in Animation
You didn't do so well, but the answers are interesting, right?
Share your Results :
Facebook Twitter Google+
QUIZ: Alcohol Cheats in Animation
You did okay! Interesting answers, eh?
Share your Results :
Facebook Twitter Google+
QUIZ: Alcohol Cheats in Animation
Super well done!
Share your Results :
Facebook Twitter Google+
QUIZ: Alcohol Cheats in Animation
Wah wah! You scored a perfect zero.
Share your Results :
Facebook Twitter Google+
QUIZ: Alcohol Cheats in Animation
NAILED IT! Impressive. Most Impressive.
Share your Results :
Facebook Twitter Google+
PLAY AGAIN !
This honestly isn't to cast judgement on films or cartoons that show alcohol consumption. We all may have varying opinions on that, but we can probably ALL agree that cartoons aren't always the best teachers.
Apparently, it's okay to animate someone comically misusing alcohol I mean eh-hem… something not-alcoholic that seems very much like alcohol. Characters can “binge” and “drown their sorrows” and “self-medicate,” so long as it's milk or ice cream or such, right? Hmmmm.
Talk to your kids early about responsible drinking, okay? Earlier than you probably think you'll need to. The world is already teaching them more than you know.
–
Thanks to Responsibiliy.org for sponsoring this post. Working with them has opened my eyes much wider to the importance of parents consciously working to stay engaged with their kids, and not just about school or Pokémon or the latest Pixar movie, but especially to have meaningful conversations about often overlooked topics like responsible drinking. As well as all the obvious bigger life stuff they'll need to have a good head on their shoulders about. Like wearing socks and sandals. Ugh.
0 notes
Text
5 Garden Resolutions That Are Easy To Keep
Improve Your World With These Garden Resolutions
We can all do a little more to improve the world. Why not start in your own garden with these very easy garden resolutions. Every little bit helps!

Start Composting
Composting is easy, reduces waste, and gives you back great soil to put back in the garden. Why send garden and food waste to a landfill, which would waste fuel, emit pollution, and take up valuable space, when you can keep it cleanly tucked away in a corner of your property and re-use it for good. Composting is easy.

Use Native Plants
There are so many benefits to using native plants. Chief among them is that they are very tough and resilient. They also look good, have less pest problems and are easy to care for. This all makes sense because native plants are adapted to the local environment. Besides all else, native plants provide food and shelter to wildlife. Check out our blog Native Plants For Maryland Gardens for a list of some species you may want to try.

Plant A Pollinator Garden
Want to see more butterflies and birds, not to mention giving them and other pollinators a much needed helping hand? Then plant a pollinator garden. The bottom line is that we need more pollinators in order to produce the food we eat. Planting pollinator plants helps increase this activity. Plus, pollinator plants are beautiful. Some varieties to consider include coneflowers, salvias and sunflowers.

Grow Your Own Vegetables
Now here is something that is both good for the environment and great for your health. Who doesn't love fresh vegetables and fruits? Not only is the fresh food good for you, being out in fresh air and working with soil is good for your health and soul. One other huge benefit, it is a great activity and learning experience for children.

Recycle and Upcycle
We love to recycle, and upcycle! Anything we can keep out of the landfill is a plus. Plastics, cans, bottles, paper, food waste, tires, pallets and on and on and on. Upcycling not only keeps items out of the landfill, it gives them another use. Items that can be donated for someone else to use gives them a new life and can benefit others.


Remember, Allentuck Landscaping Co. is always here to help you design, install, construct and maintain you lawn and landscape. Give us a call!
Allentuck Landscaping Co. is Your Residential Landscape Company
Phone: 301-5-515-1900 Email: [email protected]
At Allentuck Landscaping Company, our mission is to create beautiful environments for people to enjoy. We see landscaping as a way to improve people's lives.
The Allentuck Landscaping Company team has been delighting homeowners in Maryland, Washington DC and Northern Virginia for over 28 years with our turnkey approach to landscape design, installation, construction and maintenance. Most companies try to serve many types of customers at the same time; homeowners, shopping centers, office buildings and the list goes on. At Allentuck Landscaping Co., we focus on one customer, you, the homeowner. We have a singular focus on bringing you the best landscape practices, the best customer service, and the best value for your home.
Services Provide – Master Landscape Plans, Complete Maintenance Programs, Plantings, Patios, Walkways, Retaining Walls, Water Features, Outdoor Lighting, Outdoor Kitchens, Trellises & Pergolas, Irrigation Systems, Drainage Solutions, Grading & Sodding. Fire Pits & Fire Places, Spring Clean Ups, Decks, Fences Areas Served – Chevy Chase, Bethesda, Potomac, Rockville, North Potomac, Darnestown, Gaithersburg, Germantown, Boyds, Clarksburg, Ijamsville, Urbana, Frederick and Washington DC.
The post 5 Garden Resolutions That Are Easy To Keep appeared first on Allentuck Landscapes.
0 notes
Text
2018 Recap
Here we go, starting a new year! I'm a little late in getting this post up, it's hard to get back to work after a lazy week off, but I'm finally feeling recharged and ready to go. :)
This time of year always feels so good to me, the promise of a fresh start and a new calendar year. It's also a time of year to look back on what you've achieved, that's the nice thing about having an online journal like this, I can pat myself on the back for everything I created, everything I accomplished, and everything I learned.
I'm finishing up my new office space and will feature that soon, hopefully next week! Meanwhile, I rounded up some of my favorite content, a few space renovations, some DIY projects, and few amazing places I had the opportunity to visit and write about last year.
Here's a look back at the Best of 2018!
Design Articles
Every other week I'll write about trends or classics in interior design, this year there were at least a dozen but these resonated most:

mixing metal finishes in bathrooms / alternatives to white shiplap
blue kitchen cabinets / terra cotta floors / suspended kitchen shelving trend
Space Makeovers
You know me, I love a great space renovation! This year I featured four that I remodeled, and one client that I guided through her kitchen renovation.

black and white bathroom / flip house kitchen / kassie & david's kitchen
flip house bathroom / laundry room refresh
DIY Projects
I'm an incurable DIYer, if I envision something and need to make it happen, I do it myself! These are my five favorite projects (with tutorials) from the year:

ocean inspired resin art / pantry shelves with dividers
modern subway tile installation
no sew curtains and pillows / resin top desk
Resources
Most of my articles on resources flow from my own search for something, be it a piece of furniture or a decorative object or space makeover I'm working on, and I love to share my online finds with you.

single handle kitchen faucets / hip house plants
black + white pillow sources
abstract artists to know / minimalist mirrors
Travel
Second only to interior design, travel is the thing that excites me most! I was fortunate to visit new cities I've never seen and a few new countries too!

snapshots from seattle / the best of belgium / walking around bergen
cool things to do in austin / prague & overtourism
And the most popular article of 2018 was….. my reflections on the “sea of sameness” in design.
I look back on 2018 I consider it a difficult year, mostly because of the fact that I lost my best friend and it took about two months before I felt like I could face the world and do good work again. I still think about that experience every day, and mourn her loss, but I hear her voice in my ear telling me to keep moving forward, creating and designing and sharing it with you, which is my plan for 2019.
February will be the ten year mark for me (what? wow!!) If you'd suggested to me in February of 2009 that I'd be where I am today, I never would have believed it, but that's the power of putting yourself out there, working hard, and having that work resonate with readers.
So from the bottom of my heart, I am so thankful to all of YOU who continue to read along. Cheers to a creative, exciting, productive 2019!!
.
0 notes
Text
Top 10 Posts of 2018

I always get a little nostalgic at the beginning of a new year and enjoy reflecting back on the year that has past. As always, I continue to be amazed at the opportunities that this blog provides for our family and I'm so grateful for everyone that has supported me on this blogging journey. This blog would be nothing without YOU!
Top Blog Posts of 2018
I'm continuously looking for ways to improve the blog and serve you guys better. It totally makes my day when you email me or comment on my posts and I absolutely LOVE getting your input. Since I don't always hear from you though, I often look at what posts are the most popular and try to plan some additional blog content around those topics. Sometimes it surprises me!
This year, many of your favorite cleaning tips and organization posts from years' past continue to stay in the top 10, along with a couple of fun holiday projects. The home decor posts didn't quite make it into the top 10 but they were close! So here they are – the top 10 blog posts of 2018!
Number 10: The January Decluttering Challenge
If you're ready for a clean and decluttered start to the new year, join in my January decluttering challenge! I know many of you joined me last year and I hope even more join in this year. The post has been updated with all of the 2019 free organization printables for you, so feel free to join in. It's never too late!
Number 9: Family Binder Budgeting Printables
If you're looking to get your budget on track after the holidays, these printables are a great way to keep track of where your money is going. Get started on the road to financial success!
Number 8: Turkey Treats
These little turkey treats have been a Thanksgiving favorite for a few years now and they've received over 15 million views on my Facebook page!
Number 7: Eleven Daily Habits to Keep Your House Clean and Tidy
It can be hard to keep up with all of the daily cleaning around your house, but these simple habits can make it so much easier!
Number 6: How to Clean Upholstered Chairs and Other Upholstery
If your upholstery is looking stained and dingy, give these cleaning tips a try. You'll be amazed at how clean they can get!
Number 5: How to Remove Burned Food from Pots
This is always a favorite – especially after the holidays! This tip works great for really bad burned on food as well as just a good pot cleaning after a busy cooking season.
Number 4: Ten Things to Clean After the Flu
No one likes it when the flu comes to visit! Follow these cleaning tips to get your home clean and disinfected, and help it from spreading to everyone else in the household.
Number 3: Popsicle Stick Sleds
These are one of my favorite craft projects and I love seeing how everyone puts their own spin it! I even added some popsicle stick skis this year!
Number 2: How to Organize Bills – Bill Payment Tracker Printables
I've used these bill tracking printables for a few years now and I have found them SO helpful! Now that many of our bills are just sent electronically I find them even more helpful to keep track of what I have {and haven't!} paid.
Number 1: How to Clean your Washing Machine
This post has been my number one post for 4 years running! There are lots of helpful tips to get your front loader looking and working its best. You might just love your front loader again!
And there you have it – the top 10 blog posts of 2018! Thank-you again for such a wonderful year and I look forward to connecting with you more in the year ahead. As always, please let me know if there are any specific post ideas that would be helpful for you. I love to hear from you and I hope that we can continue to build this little community together.
Top Home and DIY Bloggers Best Posts
If you're looking for more home and DIY inspiration, please take a minute to check out my DIY and Home blogger friends' top posts from 2018! This is the very best the web has to offer and you're sure to find some amazing ideas!
TIDBITS | Miss Mustard Seed | Farmhouse on Boone | Maison De Pax | A Burst of Beautiful
Simply Designing | Bless'er House | Taryn Whiteaker Designs | Designthusiasm | Unskinny Boppy
Live Laugh Rowe | Kendra John Designs | House by Hoff | So Much Better With Age | Life On Virginia Street
ZDesign At Home | Town and Country Living | Shabbyfufu | Happy Happy Nester | Stacy Risenmay
Cherished bliss | Clean and Scentsible | anderson + grant | The Happy Housie | Summer Adams
Decor Gold Designs | Maison de Cinq | Seeking Lavender Lane
The post Top 10 Posts of 2018 appeared first on Clean and Scentsible.

0 notes
Text
New Year New Pine Forest Acrylic Painting
Hi everyone! Happy New Year! We closed the shop for the week between Christmas until just after the new year. I have to tell you, it was pretty amazing. I ate a ton of food. My family and I put together a brand new puzzle, only to discover it was missing one piece at the end (insert mad face here.), and just hung around. I did sneak out one day to the closed shop, to nurture my creative side, and work on a new pine forest acrylic painting.
Even though I love design, sculpture,ceramics, and just plain making stuff, paint has always played a part in all of those. It's probably why when I got back into creating, I was painting furniture, and murals. In the very beginning, I was making the most horrible looking mason jars, picture frames, and a few stuffed, felted snowmen ever.
Don't believe me? Here is a picture from one of my first craft shows :

Well, you gotta start somewhere, right? So, if you are reading this now, and you want to dive into creating something, but are worried its going to be bad… That's ok. Just start making things. The more you make, the better you get. Remember: we all start at the beginning.
I really love putting paint to canvas, and working in acrylics and gouache. One of my main goals for this year is to dive back into canvas work, and start offering my paintings for sale again in the shop.

I decided to paint my pine forest acrylic painting over a simple picture I did for my holiday housewalk over my faux mantel. It was such a big canvas, I thought it was better to reuse it, rather than buy a new one.

I started by adding a layer of white acrylic paint over the top of the old painting. The hardest part is waiting for it to dry, so I can add more paint!

After I did a cover coat on the old painting, I did a quick layout painting over the top in my colors. I wanted to get my valley, and my tree positioning correct. I know there is a whole rule of thirds, but as someone who was never formally trained in art, I just kind of go with what is pleasing to the eye for me. I I decided I wanted to use shades of black, green, blues and grays for my canvas to give it a wintery feel.
I used DecoArt Premium Acrylic Art paints for my canvas, but this is not a sponsored post.

After I did my initial layout, I added my pine trees using under-painting. It's a technique I use a lot. I like how it gives me a good, dark base to lay my lighter colors over. I feel like it enriches the colors painted over the top. This works well in acrylics, but not so much in other mediums like watercolor, or gouache. I don't work in oil paint, so I am not sure if it's used in that kind of painting at all. Maybe some of you more versed in oils would know?

I added snowy branches by using a round brush, touching the tip fill of white paint, and adding gentle pressure downwards. After the snow, I added some simple shading to the bottom of the trees.

I have a tutorial in this post on how to paint a winter scene, which includes a basic pine tree. You can also see how to paint a birch tree here, and an agate pattern here.

Once it was dry, I added it to my winter mantel decor. I kept my deer up, and my felt garland from Anthropologie, and added a few birch logs and candles.

The snowy canvas looks nice above our faux fireplace. It gave me such joy to take the time to really create! I hope to have a pillow or two of it available in the shop soon, I just need to photograph it with my big girl camera, so I get a good resolution for prints!

The post New Year New Pine Forest Acrylic Painting appeared first on Jennifer Rizzo.

0 notes