
Don't wanna be here? Send us removal request.
Statistics
We looked inside some of the posts by tp-6 and here's what we found interesting.
Average Info
Notes Per Post
0
Likes Per Post
0
Reblog Per Post
0
Reply Per Post
0
Time Between Posts
4 days
Number of Posts By Type
Text
17
Last Seen Tumblr Blogs


Fun Fact
The most popular pages on Tumblr are about Minecraft, GIFs, and David J. Peterson.


Text
UHGA_Final project_Exterior Design
I gave up the previous design, because I can't feel anything watching it.
I'm starting a whole new one now
0 notes

Text
UHGA_Final project_Exterior Design
I decide to restart my exterior design, the previous sketch is not working as I thought
Btw I want to record my process of finding reference, I separate them into two different aspects to find resources. First is the shape, what kind of portion looks better? What face structure match my style?
Second, I need to consider the structure details, such as how faces connect to each other and what features I can reference and modify to use in my dropship.
0 notes
Text
UHGA_Final project_Exterior Design
Ok, I'm stuck.
I built the upper surface first and am trying to proceed, but things are not going right.
The sharp edge structure makes it difficult to go through the next step. Let me think about it for a bit.
0 notes
Text
UHGA_Final project_Documentation Strategies Symposium
How you are approaching documenting your development process.
I use Tumblr to document my process.
The thing I'll document:
Stage result. and when I'm thinking, which can include: 1. I'm stuck, and what happened? Can be something like feeling an inefficient workflow, a technology issue, or needing more research or brainstorming. 2. Tough day report. Why is it tough? Write it down. 3. Trying something new or about to make a risky move.
How often? When something above happens.
How long? It depends.
2. Why this is an appropriate process for your particular project.
The function that Tumblr has is quite enough.
All I need is to post words, screenshots, and maybe some links. Sometimes when I'm organizing a new workflow I'll use Illustrator to make the chart and post it here.
3. How you are approaching reviewing your documentation and reflecting upon your activity.
In most cases, when I need to review my documentation is to find: The reference video link, The tutorial I make for myself when learning new skills, and the most important part, workflow or working method remind.
4. Some preliminary judgments or observations about how effective your planned strategy is.
I've been testing this strategy since semester A, and the goal is to work well on my final project. Right now, everything seems quite fine.
5. Any changes you plan to make.
Not yet, I'll write them down when something changes.
6. Any especially effective or striking aspects you think might be useful to other members of the group.
0 notes
Text
UHGA_Final project_Exterior Design
How to blend the top plate structure and the front exterior structure?

This is the part I miss in the sketch; it's time for some extra research


Tomorrow, try adjusting this line to sweep a surface which cover higher area.
先給它長上去再喬要怎麼銜接
0 notes
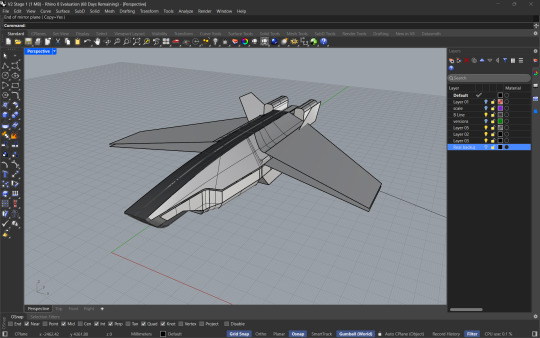
Text
UHGA_Final project_Exterior Design
-From view sketch to 3D, day 1

Model analyzation

Parts were inserted to check the structure, the right screenshot is the line I swept, I need to adjust the curve to fix the problem indicated on the left side


Body structure

0 notes
Text
UHGA_Final project_Exterior Design
My requirement of this dropship:
Wings
VTOL
Modular cargo bay
For the design method, this time I want to do something different, which is to separate the thing we call "臉譜" in Mandarin, which means "Face Spectrum"
0 notes
Text
UHGA_Final project launched
First things first, to check the list I need to present in August.
I was doing deeper research about the Houdini workflow because I want the rotor wash dust effect.
The thing is:
Do I still need Unreal Engine while I can do everything in Houdini?
Am I good enough to master Houdini this quick?
How does the Houdini plug-in in UE5 work? I've tried it on the PC in LRC, but it's kinda confusing and there's not much tutorial I can find on the internet, and this is kinda pushing me away.
If I really need the effect, the best workflow I can assume right now is:
Done everything in UE5, especially the rigging part, and baked the animation and exported it into Houdini to do the VFX part.
Before figuring out all those things, I'll set my goal a bit safer: Except for making the cinematic landing video with VFX all over the scene, my goal is to make a proper dropship design with mechanical rigging and the 360-degree rotation detail render video.
0 notes
Text
UHGA_Final project_DropShip design
More studies, several interesting forms.
First, listed the basic function requirement of the dropship.
VTOL
Modular cargo bay
Wings
and the figures of St. Bernard: Strong, helpful, reliable.
The most obvious point of the exterior appearance of a strong figure is that it can't be skinny. For helpful and reliable, I'll say compared to sharp edges, the smooth surface will provide more of it.
0 notes
Text
Preproduction Study_What I gonna need
1.Of course a 3D model
Tool use: Rhinoceros 3D.
Outcome: A dropship with modular cargo bays and vertical takeoff ability.
2. Material and texture
Tool use: Substance Painter
Skill, normal things and decal
For decal I'll 1.Paint the line and bolt with height channel. 2.Words decal 3.Normal map painting
3. Mechanical rigging
Tool use: All done in UE5
Experiment: Already done the experiment at previous project.
4. Environment
Broken runway and dust
Tool use: UE5
Experiment, two environment object blending and dust creating.
5. Studio style close-up render and rigging showcase
Done that in keyshot. It's easier to set the clean environment.
6. Animation show case of a landing scene
Mix everything above and this is it.
0 notes
Text
Preproduction Study_Skill testing
In previous post I reveal the three new decal technique I'll use in my final project, I build the words decal, normal map painting, and bolt and carve line drawing on my previous project. I didn't make it looks coordiantes because it's just for effect testing and it works!

But there's one thing I found different is at the line and balt drawing part:
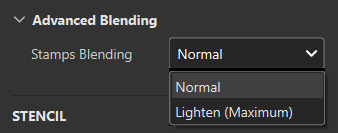
The tutorial told us to select '' Lighten (Maximum) '' to get a smoother carve, but...

(L: Lighten, R: Normal)
In my case select normal is better, although the line is still not smooth enough but it looks fine from distance so I'll stop here because I believe it is resolution problem.

It looks working, great.
0 notes
Text
Preproduction Study_Pacific Rim study
youtube
Key point: the water, building & rigging, and the moving speed, because of the scale.
In Pacific Rim, the water is also the actor; it's not only a simulation based on the movement of the machine and monster, but it was created intentionally to make a more intense scene.
Second, the detail needed in the model building and rigging is due to the scale of the huge character. Everything on the scene needs to look "working" and reasonable. Sometimes, for some small machine character, the rigging and mechanism don't need to be that detailed because the joint won't look that obvious, so the builder can "cheat" in some way.
Another thing is the moving speed of the monster and the robots. It's reasonable that the larger the slower when it's on the same planet. The detail of the movement speed makes everything real and makes the scene intense and entertaining.
It's interesting to know how many details are behind successful sci-fi movies, all the technologies, skills, and efforts. I definitely need to feel it more.
0 notes