
Statistics
We looked inside some of the posts by traveldentalkit and here's what we found interesting.
Average Info
Notes Per Post
0
Likes Per Post
0
Reblog Per Post
0
Reply Per Post
0
Time Between Posts
1 month
Number of Posts By Type
Text
17
Last Seen Tumblr Blogs


Fun Fact
12.7% of mobile users access Tumblr.
Text
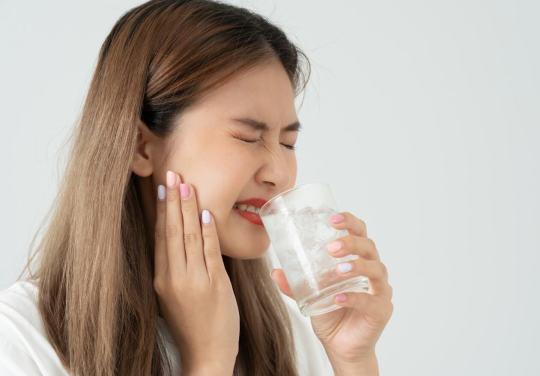
🦷 Say Goodbye to Tooth Pain: The Ultimate Guide to Sensitive Teeth Treatment Products That Actually Work!

Tooth sensitivity is one of the most common dental complaints around the world. That sudden jolt of pain from a cold drink, a hot coffee, or even a breath of fresh air can take the joy out of everyday moments. But you're not alone—and more importantly, there are real solutions.
In this ultimate guide, we’ll dive deep into sensitive teeth treatment products, understand what causes tooth sensitivity, explore your options, and help you make confident choices for your smile.
🧊 What Exactly is Tooth Sensitivity?
Tooth sensitivity, also called dentin hypersensitivity, is when your teeth feel pain or discomfort in response to certain stimuli—like temperature changes, sweet or acidic foods, or even brushing too hard.
This usually happens when:
The enamel (the tooth’s protective layer) wears down
The gums recede, exposing the inner tooth (dentin)
Microscopic holes in dentin expose nerves to external stimuli
🔎 Common Causes of Tooth Sensitivity
Understanding the root cause is essential before choosing the right sensitive teeth treatment products. Here's what might be triggering your discomfort:
1. Aggressive Brushing
Brushing too hard with a stiff toothbrush can damage enamel and gum tissue.
2. Gum Recession
Often caused by gum disease or aging, receding gums expose tooth roots.
3. Tooth Grinding
Bruxism (clenching or grinding) can wear down enamel, exposing nerves.
4. Acidic Diet
Frequent consumption of soda, citrus fruits, and vinegar can erode enamel.
5. Teeth Whitening
Over-the-counter or professional whitening products may temporarily increase sensitivity.
🧪 Top Sensitive Teeth Treatment Products: What Works and Why
Not all sensitive teeth treatment products are created equal. Here’s a breakdown of popular and effective options, along with how they help.
1. Desensitising Toothpaste
How it works: Contains compounds like potassium nitrate or stannous fluoride that block nerve signals.
Examples:
Sensodyne Rapid Relief
Colgate Sensitive Pro-Relief
Oral-B Gum & Enamel Repair
💡 Tip: Use twice daily for at least two weeks for noticeable improvement.
2. Fluoride Gel or Mouthwash
How it works: Strengthens enamel and helps reduce nerve exposure.
Examples:
ACT Restoring Mouthwash
Prevident Fluoride Gel (prescription-based)
3. Enamel Repair Rinses
How it works: Re-mineralize enamel with calcium phosphate or arginine compounds.
Examples:
Colgate Enamel Health
Apagard Premio Toothpaste (Japan-based but globally popular)
4. Dental Sealants or Bonding Agents (In-Clinic)
How it works: Applied by a dentist to cover exposed dentin and block pain signals.
5. Electric Toothbrush with Sensitive Mode
Why it helps: Gentle vibrations and pressure sensors protect gums and enamel.
Examples:
Philips Sonicare ProtectiveClean
Oral-B SmartSeries 7000
6. Natural Alternatives
Some users prefer natural sensitive teeth treatment products free of harsh chemicals.
Ingredients to look for:
Hydroxyapatite (remineralizing agent)
Aloe vera
Coconut oil
Green tea extract
⚠️ The Hidden Challenges in Treating Tooth Sensitivity
Even with good products, many people struggle to get lasting relief. Here's why:
❌ Inconsistent Use
Sensitive teeth products take time. Many stop using them too soon.
❌ Choosing the Wrong Product
Using whitening toothpaste or abrasive brushes can worsen sensitivity.
❌ Lack of Professional Diagnosis
Sometimes sensitivity is a symptom of a bigger issue—like a cracked tooth or cavity.
❌ Diet and Habits
Even the best sensitive teeth treatment products won’t help if you drink soda all day or grind your teeth at night.
🛠️ Step-by-Step Guide: How to Treat Sensitive Teeth the Right Way
Let’s make it easy. Follow these clear, actionable steps to manage your sensitivity with confidence.
✅ Step 1: Identify the Cause
Visit a dentist to rule out cavities, cracks, or gum disease.
✅ Step 2: Switch to a Sensitive Toothpaste
Choose one with potassium nitrate, stannous fluoride, or hydroxyapatite. Use it consistently, morning and night.
✅ Step 3: Use a Soft-Bristled or Electric Toothbrush
Avoid scrubbing—use gentle, circular motions. Let the toothbrush do the work.
✅ Step 4: Avoid Acidic or Sugary Foods
Minimize soda, citrus, wine, and sugar. Rinse with water after consuming them.
✅ Step 5: Add a Fluoride Mouthwash or Gel
Strengthen enamel and boost protection. Use it before bedtime for best results.
✅ Step 6: Address Grinding (If Applicable)
Use a nightguard or consult your dentist if you grind your teeth.
✅ Step 7: Follow Up Regularly
Sensitivity that lasts more than 3-4 weeks despite treatment needs a professional review.
📘 Case Study: How Sarah Found Relief with the Right Products
Name: Sarah, 35, Sydney Problem: Couldn’t enjoy ice cream or hot tea due to severe sensitivity in her molars. She had been brushing aggressively and using whitening toothpaste.
Solution:
Switched to Sensodyne Repair & Protect
Bought a soft-bristled electric toothbrush
Started using ACT fluoride rinse before bedtime
Reduced citrus fruits and carbonated drinks
Results: Within two weeks, pain significantly reduced. After a month, Sarah could drink cold smoothies again. She continues the routine today with no issues.
🛍️ Shopping Tips: What to Look for in Sensitive Teeth Treatment Products
When buying sensitive teeth treatment products, check labels for these keywords:
Ingredient
Purpose
Potassium Nitrate
Nerve desensitisation
Stannous Fluoride
Enamel repair, nerve blocking
Hydroxyapatite
Natural remineralization
Arginine
Seals dentin tubules
Sodium Fluoride
Enamel strengthening
Low Abrasiveness
Protects enamel
Also consider:
ADA seal of approval
Alcohol-free if using mouthwash
“Sensitive” mode on electric toothbrushes
🌿 Can Natural Products Help with Sensitive Teeth?
Yes! Some users find relief using gentle, natural sensitive teeth treatment products. Just make sure they’re clinically tested.
Top Natural Options:
Boka Ela Mint Toothpaste – contains nano-hydroxyapatite
Risewell Toothpaste – fluoride-free and effective
Oil pulling with coconut oil – ancient practice that may reduce inflammation
💡 Caution: Not all natural products are effective. Always read reviews and check if they’re backed by science.
🧠 FAQs: Answering Your Top Questions
Q: How long does it take for sensitive toothpaste to work?
A: Most users notice relief in 2–4 weeks with consistent use.
Q: Can I still whiten my teeth if they’re sensitive?
A: Use sensitive whitening products or consult your dentist for safer alternatives.
Q: Should I stop brushing my sensitive tooth?
A: No. Continue brushing gently using a soft toothbrush and sensitive toothpaste.
Q: Is it safe to use sensitive teeth products daily?
A: Yes, most are designed for long-term daily use.
🏁 Conclusion: Your Path to a Pain-Free Smile
Tooth sensitivity can feel overwhelming—but it doesn’t have to be permanent. The right sensitive teeth treatment products, combined with gentle care and small lifestyle changes, can make a world of difference.
Start small:
Choose a proven toothpaste
Use a soft-bristled brush
Avoid acidic foods
Be consistent
And remember—lasting relief is possible. Don’t ignore persistent sensitivity. Talk to your dentist, follow the right steps, and take charge of your oral health today.
🛒 Bonus: Top 5 Dentist-Recommended Sensitive Teeth Treatment Products
Sensodyne Repair & Protect
Colgate Sensitive Pro-Relief Enamel Repair
ACT Restoring Fluoride Mouthwash
Oral-B iO Series Electric Toothbrush (Sensitive Mode)
Boka Ela Mint Nano-Hydroxyapatite Toothpaste (natural alternative)
✅ Final Thoughts
Investing in your oral comfort is worth every cent. Whether you're dealing with mild twinges or sharp pain, today’s sensitive teeth treatment products offer a range of reliable, safe, and effective solutions.
Smile without hesitation—because a life without tooth pain is a life well-lived.
0 notes
Text
Braces Products 101: What You Need to Know Before, During, and After Your Orthodontic Journey

Straight teeth and a confident smile are something many people dream of, and thanks to modern orthodontics, that dream is more achievable than ever. Whether you're a teen, adult, or a parent looking into options for your child, understanding braces products is a crucial step.
In this blog, we’ll explore common types of braces products, real-life challenges, a step-by-step guide to managing them, a case study to illustrate the journey, and wrap it all up with a helpful conclusion. By the end, you’ll be fully equipped to make informed decisions about braces.
🌟 Unique Title: “Beyond the Brackets: A Guide to Braces Products You Didn’t Know You Needed”
Braces are more than just brackets and wires. There’s a whole ecosystem of braces products that make the journey smoother, more hygienic, and even faster. Let's explore what these are and why they matter.
🔍 What Are Braces Products?
Braces products refer to a range of items designed to work with or support orthodontic treatments. They are essential for:
Cleaning and maintenance
Pain and discomfort management
Enhancing effectiveness
Shortening treatment time
Improving aesthetics
Common Braces Products Include:
Orthodontic wax
Interdental brushes
Floss threaders
Water flossers
Electric toothbrushes
Mouthguards (for sports)
Retainers (post-braces)
Elastic bands
Cleaning tablets for retainers
Dental mirrors and kits
These products may seem minor, but they can make a significant difference in comfort, cleanliness, and treatment results.
💡 Why Braces Products Matter
Proper use of braces products helps in:
Preventing plaque build-up
Avoiding tooth decay and gum disease
Reducing irritation caused by brackets and wires
Keeping your mouth fresh and clean
Ensuring that braces function optimally
Skipping these products can result in delayed treatment, extra costs, or even permanent damage to teeth.
🚧 Common Challenges People Face With Braces
Wearing braces can be life-changing, but not without its difficulties. Let’s look at the top challenges most users encounter.
1. Discomfort and Irritation
Brackets can rub against the inner cheeks and lips, causing sore spots. New wires may cause tightness and pain.
2. Food Restrictions
Sticky, hard, or chewy foods are usually off-limits. This can be frustrating, especially for younger users.
3. Difficult Oral Hygiene
Cleaning around braces is tricky. Food particles and plaque can easily build up.
4. Broken Brackets or Wires
Accidents happen—biting too hard or not using a mouthguard during sports can cause damage.
5. Speech Difficulties
Some people temporarily struggle with pronunciation and clarity.
6. Self-Consciousness
Teens and even adults may feel less confident about their appearance during treatment.
🛠️ Step-by-Step Guide to Using Braces Products Effectively
Here’s a simple guide to help you make the most out of braces products before, during, and after your orthodontic journey.
📅 Step 1: Before Getting Braces – Prepare Early
Products to use:
Electric toothbrush
Antibacterial mouthwash
Floss and interdental brushes
Start with strong dental hygiene habits. Using braces products early ensures your teeth and gums are in optimal health for braces.
🦷 Step 2: Getting Braces Installed – What to Expect
Recommended products:
Orthodontic wax
Over-the-counter pain relief
Soft-bristle toothbrush
Expect soreness for a few days. Use orthodontic wax to cover sharp areas of brackets and reduce discomfort.
🍽️ Step 3: Daily Cleaning Routine – Keep It Consistent
Morning and night routine:
Rinse with water or mouthwash.
Brush with an electric toothbrush.
Use a water flosser or floss threader.
Clean brackets and wires using interdental brushes.
Tip: Carry a portable dental kit to school or work to clean your braces after meals.
🏃 Step 4: For Active Lifestyles – Stay Protected
If you play sports:
Use a mouthguard (preferably orthodontic-friendly).
Keep wax in your gym bag.
Braces products for active people should focus on protection and quick hygiene solutions.
🧼 Step 5: Weekly Deep Clean – Prevent Build-Up
Products to use:
Dental mirror
Retainer/aligner cleaning tablets (if applicable)
Floss and fluoride rinse
Once a week, do a thorough check using a mirror to ensure no spots are missed and that nothing is broken.
🪥 Step 6: Post-Braces – Retainers and Maintenance
Once your braces are off, your journey isn’t over.
Essential products:
Retainers
Retainer case
Cleaning tablets
Mouthwash
Nightguard (if recommended)
Clean your retainers daily and wear them as instructed. This keeps your teeth from shifting back.
🧑⚕️ Case Study: A Teen’s 18-Month Braces Journey with Braces Products
Meet Emily, 14 years old, from Brisbane.
Initial Problem:
Severe crowding
Overbite
Self-conscious about smiling
Treatment Plan:
18-month braces
Monthly orthodontic visits
Required rubber bands for bite correction
Challenges:
Struggled with flossing early on
Got a mouth ulcer from a bracket
Lost her retainer after treatment
Braces Products That Helped:
Orthodontic wax for ulcers
Water flosser for easy cleaning
Interdental brushes for hard-to-reach spots
Customized mouthguard for netball
Retainer cleaning tablets post-treatment
Outcome:
Straight teeth and corrected bite
Boost in confidence
Learned lifelong hygiene habits
Emily’s story shows how the right braces products make a huge difference in staying comfortable and on track.
🛒 Popular Braces Products You Can Buy Today
Here are some top-rated braces products that dentists and users swear by:
Product
Use
Benefits
Orthodontic Wax
Covers brackets
Reduces pain and irritation
Water Flosser
Cleans between teeth
Reaches difficult areas
Electric Toothbrush
Brushing
Better plaque removal
Retainer Cleaning Tablets
Retainer care
Kills bacteria, freshens
Mouthguard
Sports
Prevents dental injury
Interdental Brushes
Tight spaces
Easy food removal
Many of these are available online, at pharmacies, or recommended directly by orthodontists.
❗ Mistakes to Avoid With Braces Products
Avoiding these can save you time, pain, and extra visits to the orthodontist:
Not replacing your toothbrush heads regularly
Skipping flossing because it’s “too hard”
Using toothpaste with whitening agents (can leave uneven coloring)
Forgetting to clean your retainers
Not wearing your rubber bands as instructed
Skipping mouthguards during physical activity
📘 Educational Tips for Parents and Teens
For Parents:
Pack a dental kit in your child’s school bag.
Supervise cleaning routines for the first few weeks.
Encourage them to use orthodontic wax and report discomfort early.
For Teens:
Use a mirror when cleaning to check for missed spots.
Don’t chew gum or eat sticky foods—it’s not worth the damage.
Keep your wax and rubber bands in a pouch at all times.
📊 Quick Braces Product Checklist
Here’s a summary you can print or save:
✅ Electric toothbrush ✅ Interdental brushes ✅ Orthodontic wax ✅ Floss threader or water flosser ✅ Antibacterial mouthwash ✅ Mouthguard (if playing sports) ✅ Retainer + cleaning tablets ✅ Pain relief (for adjustments) ✅ Retainer case ✅ Dental mirror
🧾 Conclusion: Braces Products Are More Than Accessories – They’re Essentials
Braces can truly transform your smile, but the journey takes care, discipline, and the right tools. Investing in braces products isn’t about luxury—it’s about making the process easier, healthier, and more successful.
From the first day of getting your braces to the last day you wear your retainer, these products serve as your support system. They help manage pain, improve hygiene, and ensure your orthodontic results last for a lifetime.
If you're about to start or already on your braces journey, take the time to stock up on the right tools. Your future smile will thank you.
0 notes
Text
Smile Strong: Everything You Need to Know About Remineralisation of Teeth

Have you ever wondered how to naturally restore your tooth enamel and avoid fillings or decay? You're not alone. Many people are now turning their focus to the remineralisation of teeth — a natural process that helps strengthen and rebuild tooth enamel without invasive dental procedures.
In this comprehensive guide, we’ll explore what remineralisation is, how it works, common challenges people face, a practical step-by-step guide, and even a real-life case study of success. Whether you're trying to reverse early decay or just want a brighter, healthier smile, this article is for you.
What is Remineralisation of Teeth?
Remineralisation of teeth refers to the natural process of restoring minerals—like calcium, phosphate, and fluoride—back into the enamel layer of your teeth. It’s your body’s way of healing minor damage caused by acids, bacteria, or wear and tear. Think of it as a repair system that works at a microscopic level to rebuild enamel and prevent cavities.
Enamel is the hardest substance in your body, but it isn’t invincible. Over time, it can erode due to diet, poor oral hygiene, acidic beverages, or medical conditions. When enamel weakens, your teeth become more sensitive, prone to decay, and discoloured.
The good news? Remineralisation can help repair this damage—if you act early.
Unique Title: “The Tooth Truth: Why Remineralisation Might Save Your Smile”
Most people are told that once enamel is gone, it’s gone for good. But research shows that remineralisation of teeth can partially reverse early enamel erosion. This makes remineralisation a powerful prevention tool and even a treatment option for minor tooth decay.
Let’s dive into how you can use this knowledge to protect your teeth for life.
Common Signs Your Teeth Need Remineralisation
How do you know if your teeth are crying out for help? Look for these signs:
Increased tooth sensitivity (especially to hot, cold, or sweet foods)
White spots on teeth, indicating early demineralisation
Translucent edges on the teeth
Rough or sandpaper-like surfaces on enamel
Cavities forming more easily
Bad breath and plaque build-up
If you’re experiencing one or more of these symptoms, it’s time to consider remineralisation as part of your dental care.
Why Teeth Lose Minerals in the First Place
Your mouth is a constant battleground between demineralisation and remineralisation.
Demineralisation occurs when:
Acids from food and drink (especially sugar and carbonated drinks) eat away at your enamel.
Plaque bacteria break down sugars into acid.
Poor oral hygiene allows bacteria and food particles to linger.
Dry mouth or low saliva production reduces natural protection.
Medical conditions like GERD or bulimia introduce acids into the mouth.
On the flip side…
Remineralisation is supported when:
Saliva flows properly and contains calcium and phosphate.
Fluoride is present (from toothpaste or water).
A balanced diet includes minerals and vitamins.
Oral hygiene keeps acid-producing bacteria in check.
Top Benefits of Remineralisation of Teeth
Prevents cavities from progressing
Reduces tooth sensitivity
Strengthens enamel and prevents future erosion
Improves appearance by reducing white spots
Delays or avoids costly dental treatments
Promotes natural healing instead of artificial fixes
In other words, remineralisation helps you protect your natural teeth, save money, and smile with confidence.
Challenges in Remineralising Teeth
Remineralising your teeth isn’t always easy. Here are some common challenges people face:
1. Misunderstanding the Process
Many people assume brushing alone will remineralise their teeth. But it requires the right products, habits, and diet to truly work.
2. Unrealistic Expectations
Once deep decay or cavities have formed, remineralisation can’t completely reverse the damage. It’s most effective for early-stage enamel erosion or white spot lesions.
3. Poor Diet Choices
Acidic foods and drinks (like soda, juice, and citrus) work against remineralisation. Even healthy diets can sometimes be too acidic.
4. Inconsistent Oral Care
Using fluoride-free toothpaste or brushing irregularly hinders your efforts. You need a consistent routine to see results.
5. Dry Mouth
Without enough saliva, your teeth don’t have the minerals or pH balance needed for remineralisation to happen naturally.
Understanding these obstacles is the first step to overcoming them.
Step-by-Step Guide: How to Remineralise Your Teeth Naturally
Step 1: Use a Fluoride or Hydroxyapatite Toothpaste
These ingredients are clinically proven to help deposit minerals back into the enamel.
Brush twice daily
Do not rinse immediately after brushing — let the minerals sit
Step 2: Reduce Sugar and Acid Intake
Limit foods like:
Soda, juice, energy drinks
Candy and refined sugar
Citrus fruits (in excess)
Vinegar-based dressings
Instead, focus on:
Cheese and milk (calcium-rich)
Leafy greens
Nuts and seeds
Whole foods with magnesium and vitamin D
Step 3: Rinse with a Remineralising Mouthwash
Look for products that contain:
Fluoride
Xylitol
Calcium phosphate
Nano-hydroxyapatite
Use daily after brushing.
Step 4: Increase Saliva Production
Saliva is your natural defence. Stimulate it by:
Drinking plenty of water
Chewing sugar-free gum with xylitol
Avoiding mouth breathing
Treating dry mouth conditions
Step 5: Oil Pulling (Optional)
While research is mixed, many believe swishing coconut oil for 10–20 minutes daily helps remove harmful bacteria and improve oral health.
Step 6: Regular Dental Check-Ups
Have your dentist monitor enamel loss, detect early signs of decay, and recommend professional-grade products if needed.
Case Study: Jessica’s Remineralisation Success Story
Background: Jessica, a 28-year-old graphic designer, noticed white spots and increased sensitivity on her front teeth. Her dentist warned that she was at risk of early enamel erosion due to her frequent soda consumption and inconsistent brushing habits.
What She Did:
Switched to a fluoride toothpaste with nano-hydroxyapatite
Started drinking more water and reduced soda to once a week
Used a remineralising mouthwash daily
Chewed xylitol gum after meals
Included calcium-rich foods in her diet
Went for a dental check-up every 6 months
Results After 6 Months:
The white spots faded noticeably
Her tooth sensitivity dropped significantly
Her dentist confirmed no new cavities and signs of enamel hardening
She gained confidence in her smile and avoided expensive dental work
Jessica’s story proves that with the right habits and consistency, remineralisation of teeth is both achievable and rewarding.
Myths and Facts About Remineralisation of Teeth
Myth
Fact
Brushing harder helps remineralise enamel
Brushing too hard can actually cause enamel wear
Only fluoride can remineralise teeth
Hydroxyapatite and diet also play key roles
You can’t repair enamel
You can’t regrow enamel, but you can strengthen it
Only children can remineralise teeth
Adults can benefit too, especially in early stages of decay
Whitening toothpastes help remineralise
Many are abrasive and may make sensitivity worse
Best Products for Tooth Remineralisation (2025 Update)
Note: Always consult your dentist before trying new products.
1. Toothpaste with Hydroxyapatite
Examples: Boka, RiseWell
Gentle and fluoride-free option
2. Fluoride Toothpaste
Examples: Sensodyne Pronamel, Colgate Total
Time-tested and dentist-recommended
3. Remineralising Mouthwashes
Examples: ACT Restoring Mouthwash, GC MI Paste (Rx)
4. Xylitol Gum
Brands like Spry or PUR
Stimulates saliva and reduces cavity risk
Prevention is the Best Cure
While remineralisation of teeth is powerful, prevention is still your best bet. Small changes in your daily routine can make a huge difference:
Drink water throughout the day
Brush with remineralising toothpaste
Floss and rinse daily
Avoid sugary snacks and late-night snacking
Visit your dentist regularly
The goal is to support your mouth’s natural ability to protect and heal itself.
Conclusion: Strengthen Your Smile, Naturally
To sum it up, the remineralisation of teeth is an incredibly effective way to protect your enamel, prevent cavities, and even reverse early decay. It's safe, affordable, and accessible for nearly everyone.
Don’t wait for your next dental emergency to start caring about your enamel. With the right habits, knowledge, and tools, you can keep your teeth strong and healthy for life.
Start today — your future smile will thank you.
0 notes
Text
Brighten Your Smile Naturally: The Complete Guide to Teeth Whitening Gel

A white, radiant smile is one of the most desired beauty features worldwide. It boosts confidence, makes a lasting impression, and even contributes to better oral hygiene habits. But achieving that sparkling smile doesn’t have to involve expensive dental treatments or harsh chemicals. One of the most accessible and cost-effective solutions is teeth whitening gel.
In this comprehensive guide, we’ll walk you through everything you need to know—from what it is, how it works, common challenges, how to use it step-by-step, and even a real-life case study. Let’s dive in!
What Is Teeth Whitening Gel?
Teeth whitening gel is a peroxide-based solution (usually hydrogen peroxide or carbamide peroxide) applied directly to the teeth to break down and remove surface stains and discoloration. It can be used at home or in dental offices and is often part of whitening kits that include trays, LED lights, or applicators.
These gels work by penetrating the enamel and breaking apart the stains through an oxidation reaction, revealing a whiter and brighter tooth surface.
Why Do Teeth Become Discolored?
Before we jump into the gel, it’s important to understand why your teeth might need whitening in the first place.
Common Causes of Tooth Discoloration:
Coffee, tea, and red wine: These drinks contain tannins that can stain enamel.
Smoking and tobacco use: Nicotine and tar cause yellowing.
Poor oral hygiene: Plaque buildup can darken the appearance of your teeth.
Aging: As we age, enamel thins and reveals the yellowish dentin underneath.
Certain medications: Antibiotics like tetracycline can cause deep stains.
Top Benefits of Using Teeth Whitening Gel
Affordable: Significantly cheaper than in-office dental procedures.
Convenient: Can be used at home at your own pace.
Effective: Noticeable results in as little as a few days to weeks.
Non-invasive: No need for drills, injections, or harsh treatments.
Customizable: Available in different strengths and types to suit your needs.
The Truth Behind the Smile: Common Challenges
Despite its popularity, teeth whitening gel comes with a few challenges. Knowing them beforehand can help you use the product safely and effectively.
1. Tooth Sensitivity
Some users report increased sensitivity during and after treatment. This is due to the peroxide temporarily opening up the enamel’s pores.
Tip: Use a lower concentration of peroxide or whitening gel formulated for sensitive teeth.
2. Uneven Whitening
Teeth may whiten at different rates, especially if there are crowns, veneers, or fillings involved.
Tip: Understand that only natural teeth respond to whitening.
3. Gum Irritation
Improper application can cause the gel to spill onto the gums, causing irritation or chemical burns.
Tip: Use trays that fit well, and avoid overfilling.
4. Short-lived Results Without Maintenance
Your newly whitened teeth can become stained again if you don’t make lifestyle changes.
Tip: Avoid dark drinks, smoking, and brush regularly.
Step-by-Step Guide: How to Use Teeth Whitening Gel at Home
Here’s a beginner-friendly guide to get the most out of your whitening routine.
Step 1: Choose the Right Gel
Look for gels with:
Hydrogen or carbamide peroxide (10%-35%)
ADA or dental approval
Safe for enamel
Reviews that back its performance
Step 2: Clean Your Teeth
Brush and floss your teeth before application. A clean surface allows the gel to work more effectively.
Step 3: Prepare the Trays
If your gel comes with mouth trays:
Place a small amount of gel into the tray (do not overfill).
Spread it evenly using a cotton swab if needed.
Step 4: Insert and Set the Timer
Place the trays into your mouth.
Follow the time instructions (usually 15-30 minutes).
Step 5: Remove and Rinse
Take out the trays.
Rinse your mouth with lukewarm water.
Clean the trays thoroughly for next use.
Step 6: Repeat as Directed
Most treatments are used once daily for 1–2 weeks, depending on the product. Always follow the instructions provided.
Best Practices to Maximize Results
Avoid food or drink for 30 minutes after treatment.
Store your whitening gel in a cool, dark place to maintain potency.
Limit acidic foods while whitening to reduce sensitivity.
Use a remineralizing gel or sensitive toothpaste if discomfort occurs.
Natural Ingredients to Look For in Teeth Whitening Gels
Not all whitening gels are created equal. Here are a few natural or gentler ingredients to look for:
Aloe Vera – Soothes gums and reduces irritation.
Activated Charcoal – Absorbs surface stains (less common in gel form).
Baking Soda – Mild abrasive that can aid whitening.
Coconut Oil – Sometimes included for added oral health benefits.
Teeth Whitening Gel vs. Other Whitening Methods
Whitening Method
Cost
Convenience
Sensitivity Risk
Speed of Results
Teeth Whitening Gel
Low-Medium
High
Medium
Moderate
Whitening Strips
Low
High
Medium
Slow-Moderate
In-Office Whitening
High
Low
High
Fast
Whitening Toothpaste
Very Low
Very High
Low
Slow
LED Light Kits
Medium
Medium
Medium
Fast-Moderate
Case Study: Emma’s Journey to a Brighter Smile
Background:
Emma, a 32-year-old teacher, was self-conscious about her stained teeth due to years of coffee and tea consumption. She wanted an affordable and easy solution.
What She Used:
She chose a reputable teeth whitening gel kit that included trays and an LED light. The gel contained 35% carbamide peroxide and was advertised as safe for enamel.
Timeline:
Week 1: Mild sensitivity after use, but noticeable improvement in whiteness.
Week 2: Stains significantly reduced. Smile looked 2–3 shades lighter.
Week 3: Final results achieved. Emma maintained with a whitening toothpaste and occasional touch-ups.
Emma’s Tips:
“Always brush before using the gel and go slow. A little discomfort is worth the confidence boost. I smile more now—and drink my coffee through a straw!”
How to Choose the Right Teeth Whitening Gel for You
When buying a teeth whitening gel, consider the following:
Peroxide Strength: Beginners should start with 10-15%. Experienced users can go up to 35%.
Delivery System: Some come with trays, others in pens or syringes.
Flavour and Texture: Minty gels are more pleasant for daily use.
Reviews and Recommendations: Check online or ask your dentist.
Safety Certifications: Look for ADA approval or dentist endorsements.
Maintaining That Dazzling Smile
After whitening, your teeth are more porous and can easily absorb new stains. Here’s how to protect your results:
Use a straw when drinking tea, coffee, or wine.
Rinse your mouth with water after every meal or beverage.
Limit dark or acidic foods like soy sauce, tomato paste, and balsamic vinegar.
Whiten occasionally with a top-up gel every few months.
Keep up your brushing and flossing routine (twice a day!).
When to See a Dentist
While teeth whitening gels are generally safe, you should consult a professional if:
You have deep intrinsic stains that gels can’t fix.
You notice persistent sensitivity or gum pain.
You have dental restorations (like crowns) and want uniform whitening.
A dentist can recommend a tailored treatment or even use professional-grade gels under supervision.
Frequently Asked Questions
1. How long does it take to see results?
Usually 3–7 days with daily use, but full results can take up to 2–3 weeks.
2. Is teeth whitening gel safe?
Yes, when used as directed. Overuse or misuse can lead to sensitivity or gum irritation.
3. Can I use teeth whitening gel with braces?
No. Wait until after your braces are removed to avoid uneven results.
4. Is whitening permanent?
No. Results last a few months to a year depending on your habits. Maintenance is key.
Conclusion: Smile With Confidence
Teeth whitening gel offers a simple, affordable, and effective way to enhance your smile without stepping into a dental office. With the right product, proper application, and a little patience, you can achieve a noticeable difference in just a few days.
Whether you're preparing for a big event or just want to feel more confident in your day-to-day life, this solution is both accessible and empowering.
Just remember:
Use it responsibly.
Follow directions.
Maintain your results with good habits.
A brighter smile is only a few applications away!
0 notes
Text
The Secret to a Healthier Smile: Why Everyone Should Use an Interdental Brush

Maintaining oral hygiene is more than just brushing your teeth twice a day. While regular brushing is essential, it often misses the spaces between your teeth where food particles and plaque can accumulate. That’s where the interdental brush comes into play. This simple yet powerful dental tool is revolutionizing how people care for their teeth and gums.
In this comprehensive guide, we’ll explore what interdental brushes are, why they matter, how to use them correctly, the challenges people face, and a step-by-step guide to integrating them into your routine. Whether you're new to oral care or looking to improve your routine, this article will give you the insights you need.
What Is an Interdental Brush?
An interdental brush is a small brush specially designed to clean between your teeth, where your regular toothbrush can't reach. Think of it as a tiny bottle brush. It’s particularly helpful for removing plaque and food debris stuck in these hard-to-reach areas.
Key Features:
Small, cone-shaped or cylindrical head
Available in various sizes
Reusable or disposable
Made with soft bristles and a flexible wire
Unique Topic: "Not Just for Braces – The Interdental Brush Everyone Should Be Using"
Many people mistakenly believe that interdental brushes are only for individuals with braces or dental implants. While these brushes are indeed crucial for those with orthodontic appliances, they are just as essential for the average person. Regardless of whether you have braces, crowns, or completely natural teeth, an interdental brush can significantly improve your dental health.
Why Everyone Should Use Them:
Prevent gum disease
Reduce bad breath
Lower risk of cavities
Improve overall mouth cleanliness
Common Challenges When Using an Interdental Brush
1. Finding the Right Size Many people use an interdental brush that's too big or too small, which can make it ineffective or uncomfortable.
2. Bleeding Gums It’s not unusual for gums to bleed when you first start using an interdental brush. This can be alarming but is typically a sign that plaque has built up.
3. Technique Troubles Improper technique can cause discomfort or even damage your gums. Many users either push too hard or don’t insert the brush correctly.
4. Inconsistency People often forget to use their interdental brush daily, undermining its benefits.
5. Discomfort or Sensitivity Especially in the beginning, using an interdental brush may cause mild discomfort or sensitivity in the gums.
Step-by-Step Guide: How to Use an Interdental Brush Correctly
Step 1: Choose the Right Size Consult your dentist or dental hygienist to determine the correct size. Brushes come in a variety of widths to fit different gaps between teeth.
Step 2: Hold the Brush Correctly Grip the handle firmly but comfortably. Ensure your hand is steady for precise movements.
Step 3: Gently Insert Between Teeth Insert the brush gently between your teeth. Do not force it. If it doesn’t fit, try a smaller size.
Step 4: Move Back and Forth Once inserted, move the brush back and forth a couple of times. This action removes plaque and food particles.
Step 5: Rinse the Brush Rinse the brush under water after each use to keep it clean.
Step 6: Use Daily Integrate it into your daily oral hygiene routine. Most people use it once a day, ideally at night before brushing.
Step 7: Replace When Needed Depending on the type, replace your interdental brush every week or when it starts to wear out.
Benefits of Using an Interdental Brush
1. Superior Plaque Removal Interdental brushes remove more plaque than floss, especially in wide gaps.
2. Gum Disease Prevention They help prevent gingivitis and periodontitis by keeping gum lines clean.
3. Fresher Breath Removing trapped food particles can significantly improve your breath.
4. Easy to Use Once you get the hang of it, using an interdental brush is straightforward and quick.
5. Complements Regular Brushing It doesn’t replace your toothbrush but works alongside it for complete oral hygiene.
Case Study: Emily’s Journey to Better Oral Health
Emily, a 35-year-old marketing professional, had always brushed twice a day. However, during a dental check-up, her dentist noticed early signs of gum disease. The solution? Introducing an interdental brush into her routine.
Within just two weeks, her gums stopped bleeding, and a follow-up visit showed no signs of inflammation. Emily found the brush easy to use and quick to incorporate into her routine. Today, she swears by it and often recommends it to friends and family.
Expert Tips for Maximum Effectiveness
Use multiple sizes if you have different gap widths between teeth.
Be gentle to avoid damaging your gums.
Combine with floss if needed, especially in very tight spaces.
Travel with it – compact and easy to carry, great for use after meals.
Store hygienically – use a protective case or cap.
Addressing Common Myths About Interdental Brushes
Myth 1: They are only for people with braces. Fact: They benefit everyone, including those with natural teeth.
Myth 2: Floss is better. Fact: Studies show interdental brushes are more effective in certain cases, especially where there’s space between teeth.
Myth 3: They are painful. Fact: Initial discomfort is normal but subsides as gums become healthier.
Myth 4: They're hard to use. Fact: With proper technique, they are easy and convenient.
Long-Term Benefits of Regular Use
Reduced dental bills: Preventive care means fewer costly treatments.
Healthier gums: Consistent use leads to stronger, healthier gums.
Confidence boost: A cleaner mouth can improve your self-confidence.
Improved overall health: Oral health is linked to conditions like heart disease and diabetes.
Conclusion: Small Tool, Big Impact
The interdental brush is a simple, affordable, and highly effective tool that can dramatically improve your oral hygiene. From removing plaque to preventing gum disease and improving bad breath, its benefits are wide-ranging and significant.
Don't wait for dental problems to appear. Start using an interdental brush today and make it a non-negotiable part of your daily oral care routine. Your teeth and gums will thank you.
Remember: a healthy mouth is the gateway to a healthy body. Start small. Think big. Use an interdental brush.
0 notes
Text
Chew on This: The Surprising Benefits of Dental Chewing Gum

When you think of chewing gum, you might picture bubble-blowing contests or a quick breath refresher before a date. But dental chewing gum? That’s something more people should be talking about. With growing awareness of oral hygiene and convenience, dental chewing gum is fast becoming a daily go-to for many individuals who want healthy teeth on the go. In this comprehensive guide, we’ll explore what dental chewing gum is, how it works, the science behind it, real-world challenges, and how to integrate it into your oral care routine.
1. What is Dental Chewing Gum? – More Than Just a Minty Treat
Dental chewing gum is a special type of sugar-free gum formulated to promote oral health. Unlike regular chewing gum, which may contain sugar and artificial colors, dental chewing gum is packed with active ingredients like xylitol, calcium phosphates, and sometimes even fluoride. These ingredients are clinically proven to support dental hygiene by:
Stimulating saliva production
Neutralizing plaque acids
Reducing bad breath
Strengthening enamel
These benefits make it an excellent oral care companion, especially when brushing or flossing isn't possible.
2. The Secret Weapon in Your Pocket: Unique Benefits of Dental Chewing Gum
We all know the basic routine: brush twice a day, floss, and rinse. But dental chewing gum adds another layer of protection—and convenience—to your oral care regime. Here's how:
2.1 Saliva Stimulation
Chewing naturally increases saliva flow. Saliva is the mouth’s natural defense mechanism. It washes away food debris and neutralizes acids that erode tooth enamel.
2.2 Plaque Control
Some dental chewing gums contain xylitol, a natural sweetener that bacteria can’t digest. It literally starves the plaque-producing bacteria.
2.3 Enamel Remineralization
Gums with calcium and phosphate ions help rebuild microscopic enamel damage, which is especially helpful after meals.
2.4 Portable and Discreet
At work, in school, or on a plane—dental chewing gum is a convenient way to care for your teeth when a toothbrush isn’t in sight.
3. Chew with Caution: Challenges You Should Know
While dental chewing gum is helpful, it’s not without its drawbacks or limitations. Here are some common challenges to consider:
3.1 Misunderstanding Its Role
Many people wrongly believe chewing gum replaces brushing. In reality, it supplements brushing and flossing—not substitutes them.
3.2 Overuse
Too much gum chewing can lead to jaw discomfort or temporomandibular joint (TMJ) issues, especially in people who already experience jaw tension.
3.3 Sensitivity to Ingredients
Some gums contain ingredients like sorbitol or aspartame, which might cause digestive discomfort in sensitive individuals.
3.4 Not All Gums Are Equal
Many "sugar-free" gums are marketed as healthy but lack the active ingredients needed to make them genuinely beneficial for dental health.
4. Step-by-Step Guide: How to Use Dental Chewing Gum Effectively
Adding dental chewing gum to your routine isn’t complicated, but doing it right ensures you maximize its benefits. Here’s a simple step-by-step guide:
Step 1: Choose the Right Gum
Look for gums that are:
Sugar-free
Contain xylitol, calcium, or fluoride
Approved by dental associations (look for seals like ADA or similar)
Step 2: Time it Right
Use dental chewing gum:
After meals or snacks
When brushing isn't feasible (e.g., at work or while traveling)
To combat dry mouth
Step 3: Chew for the Optimal Time
Chew for at least 20 minutes to ensure saliva stimulation and full release of active ingredients.
Step 4: Monitor Quantity
Stick to 3–5 pieces per day to avoid overuse. If you’re using multiple oral care products, check for overlapping ingredients like fluoride.
Step 5: Store Properly
Keep dental chewing gum in your bag, desk, or car—but avoid storing in hot places, as ingredients can break down or lose effectiveness.
5. Real-Life Case Study: Meet Sarah, a Busy Professional
Background: Sarah, a 35-year-old project manager, often found herself skipping brushing after lunch at the office. Over time, she noticed an increase in plaque buildup and occasional bad breath.
Challenge: Her job required frequent meetings, and she was self-conscious about her breath and tooth stains but had no time for midday brushing.
Solution: After a dental check-up, her dentist recommended incorporating dental chewing gum with xylitol after meals.
Outcome: Within two months:
Sarah’s dentist reported a noticeable decrease in plaque.
Sarah experienced fresher breath and felt more confident in meetings.
She developed a healthier overall oral routine by pairing gum with brushing and flossing.
Takeaway: Dental chewing gum became Sarah’s secret weapon—simple, effective, and perfect for her fast-paced lifestyle.
6. Science Behind Dental Chewing Gum: What the Studies Say
Multiple clinical studies back the benefits of dental chewing gum:
A 2020 study published in the Journal of Clinical Dentistry found that xylitol-based gums reduced Streptococcus mutans, the bacteria responsible for cavities, by up to 75%.
Another trial revealed that chewing gum with calcium and phosphate promoted remineralization of early enamel lesions, making it a practical tool in preventive care.
The American Dental Association has recognized certain chewing gums for their plaque-reducing properties, endorsing them as beneficial when used correctly.
This data reinforces that the gum you choose matters, and clinical-grade ingredients make a big difference.
7. Dental Chewing Gum vs. Regular Gum: What's the Difference?
Feature
Dental Chewing Gum
Regular Chewing Gum
Contains Xylitol
Yes
Often No
Sugar Content
Sugar-Free
Often contains sugar
Fights Cavities
Yes
No
Strengthens Enamel
Often yes (via added minerals)
No
Approved by Dentists
Usually
Rarely
Purpose
Oral health support
Taste & entertainment
8. Popular Brands to Consider
While we don’t endorse any specific brand, some popular and widely available dental chewing gums include:
Orbit (Sugar-free) – ADA-approved, great for basic maintenance.
Spry – Contains xylitol and comes in a variety of flavors.
Trident – Longtime player in the sugar-free gum game.
PUR Gum – All-natural, non-GMO, xylitol-rich formula.
GC Recaldent – Professional-grade, enamel-repair focused.
Always check the packaging for active dental ingredients before purchasing.
9. Who Should Consider Dental Chewing Gum?
Dental chewing gum is beneficial for many, but especially helpful for:
Busy Professionals – No time for brushing at work? Gum is a lifesaver.
Teens and Students – Keeps mouths fresh in long school hours.
Elderly Individuals – Helps stimulate saliva, especially for dry mouth sufferers.
Frequent Travelers – Portable solution for oral hygiene on the go.
Braces Wearers – Soft gums designed for braces can assist with oral hygiene (check with your orthodontist first).
10. Common Myths About Dental Chewing Gum – Debunked
Let’s tackle some common myths:
❌ “Chewing gum causes cavities.” ✔️ Not if it’s sugar-free and contains xylitol.
❌ “It’s just for fresh breath.” ✔️ It does much more—like neutralizing plaque acid and protecting enamel.
❌ “Gum can replace brushing.” ✔️ Never! It’s a supplement, not a substitute.
❌ “It’s bad for your stomach.” ✔️ Only if overused or if you’re sensitive to ingredients like sorbitol.
11. Tips to Enhance Your Oral Routine with Dental Chewing Gum
Combine it with a proper brushing and flossing routine.
Use it as a reward for finishing meals (especially kids).
Set reminders to chew after meals if you're forgetful.
Teach your kids about healthy oral habits through fun gum flavors.
12. Environmental Concerns: Is Dental Chewing Gum Eco-Friendly?
Most chewing gums are made from synthetic gum bases which don’t biodegrade. However, eco-conscious brands are emerging with natural chicle bases and biodegradable packaging.
If sustainability is important to you:
Look for gums labeled biodegradable or plastic-free.
Dispose of gum in the trash—never the street or drains.
Conclusion: Is Dental Chewing Gum Worth It? Absolutely.
Dental chewing gum is one of the most underrated oral hygiene tools in the modern world. It’s backed by science, endorsed by dental professionals, and used by millions to boost oral health every day. Whether you're on a plane, in the office, or rushing to your next meeting, popping a piece of dental chewing gum can make a world of difference for your teeth and your breath.
However, like any good thing, moderation and the right knowledge are key. Chew wisely, combine it with traditional hygiene methods, and you’ll be smiling brighter in no time.
Want a quick, simple way to improve your oral health today? Try adding dental chewing gum to your routine—and feel the difference.
0 notes
Text
Brighten Up: The Truth About Teeth Whitening Strips Everyone Should Know

Teeth whitening has become one of the most popular cosmetic dental procedures around the world. From social media influencers to everyday folks, everyone wants that dazzling smile. Among the many methods available, teeth whitening strips stand out as a convenient and cost-effective option. But are they worth the hype? In this in-depth blog post, we’ll explore everything you need to know about teeth whitening strips—how they work, the challenges involved, how to use them properly, a real-life case study, and more.
The Smile Revolution: Why Teeth Whitening Strips Are Trending
In today’s image-conscious world, having a bright smile can go a long way. Whether it's for a job interview, a first date, or just to boost self-confidence, teeth whitening has become more than just a trend—it’s a lifestyle choice.
Teeth whitening strips are thin, flexible pieces of plastic coated with a whitening gel containing hydrogen peroxide or carbamide peroxide. They work by gently bleaching the enamel to remove stains and discoloration caused by coffee, wine, smoking, or aging.
Why are they so popular?
Convenience: Easy to use at home or on the go.
Affordability: Cheaper than professional whitening.
Availability: Can be found in most pharmacies or online.
Common Topics With a Unique Twist
Let’s dive into some of the most frequently asked questions and concerns about teeth whitening strips—each with a fresh perspective.
1. "How Safe Are Teeth Whitening Strips?"
What everyone asks: Are whitening strips harmful to your teeth?
The twist: They’re generally safe when used as directed. However, overuse or improper application can lead to tooth sensitivity or gum irritation. Understanding the ingredients and choosing reputable brands is crucial.
2. "Do They Actually Work?"
What everyone asks: Will I see noticeable results?
The twist: Results vary based on your natural tooth color and the severity of the stains. Whitening strips work best on yellowish stains but are less effective on brown or gray stains.
3. "How Long Do Results Last?"
What everyone asks: Will my teeth stay white forever?
The twist: Whitening isn't permanent. Results usually last from a few weeks to a few months. Maintenance, diet, and oral hygiene play key roles in how long the brightness sticks around.
4. "What If I Have Sensitive Teeth?"
What everyone asks: Can I still use teeth whitening strips?
The twist: Yes, but opt for lower-concentration products and limit usage frequency. Some strips are specially made for sensitive teeth.
The Real Challenges Behind the Smile
Using teeth whitening strips may seem like a no-brainer, but there are some obstacles you should be aware of:
1. Tooth Sensitivity
Many users report mild to severe sensitivity after using whitening strips. This happens because the peroxide in the gel penetrates the enamel to reach the dentin layer.
2. Uneven Whitening
Whitening strips may not fully cover all teeth, especially molars. This can lead to uneven results.
3. Short-Term Results
Unlike professional treatments, the results of whitening strips are temporary and usually require repeated applications.
4. Damage with Overuse
Some people mistakenly believe that more frequent use means better results. In reality, overusing whitening strips can erode enamel and irritate gums.
5. Interaction with Dental Work
Whitening strips won’t work on crowns, veneers, or fillings, leading to color mismatches.
Step-by-Step Guide: How to Use Teeth Whitening Strips Correctly
Want the best results without the side effects? Follow this simple guide:
Step 1: Choose the Right Product
Look for ADA-approved teeth whitening strips.
Choose a concentration level that matches your needs.
Consider strips made for sensitive teeth if needed.
Step 2: Prepare Your Teeth
Brush your teeth (but do not use toothpaste that contains fluoride right before applying strips).
Make sure your teeth are dry for better adhesion.
Step 3: Apply the Strips
Peel the strip from its liner.
Apply it to your teeth, aligning with the gum line.
Press gently to ensure it sticks well.
Step 4: Wait and Relax
Follow the product’s recommended wait time (usually 10–30 minutes).
Avoid eating, drinking, or talking during this time.
Step 5: Remove and Rinse
Carefully peel off the strip.
Rinse your mouth with water.
Avoid brushing immediately afterward if your teeth feel sensitive.
Step 6: Repeat as Needed
Use the strips for the number of days indicated (typically 7 to 14 days).
Avoid overusing them beyond the recommended duration.
Real-Life Case Study: From Coffee Stains to Confidence
Meet Sarah, a 32-Year-Old Marketing Executive
Sarah used to drink two cups of coffee every morning, and over time, her teeth became visibly stained. She didn’t want to spend hundreds on professional whitening, so she gave over-the-counter teeth whitening strips a try.
The Journey:
Day 1-3: Noticed mild sensitivity but no visible difference.
Day 4-7: Teeth began to appear lighter, especially the front ones.
Day 10: Received compliments from coworkers.
Day 14: Her teeth were noticeably whiter, and she felt more confident.
She continued maintenance by cutting down on coffee and using the strips once every two months. A year later, Sarah still has a radiant smile.
Tips and Tricks for Best Results
Use a straw when drinking staining beverages like coffee or wine.
Rinse your mouth after meals.
Avoid tobacco products.
Maintain regular brushing and flossing.
Don’t skip dental checkups.
Conclusion: Smile Brighter, Live Better
Teeth whitening strips offer a practical and accessible way to enhance your smile. While they’re not a miracle solution, with proper use and realistic expectations, they can make a big difference. Like anything beauty-related, it’s all about balance—don’t overdo it, choose quality products, and complement your whitening routine with good oral hygiene.
Whether you’re preparing for a special occasion or simply want to boost your confidence, teeth whitening strips can be the quick fix that keeps you smiling.
Ready to brighten your smile? Always consult with a dental professional before starting any whitening treatment, especially if you have dental work or sensitive teeth.
0 notes
Text
Brighten Your Smile: Benefits of Teeth Whitening Strips

In a world where a bright, confident smile can make all the difference, more people are turning to at-home solutions to enhance their teeth. Among the most popular and affordable options available today are teeth whitening strips. These handy strips have become a go-to for those looking to achieve a whiter smile without the hassle or high costs of professional dental treatments.
But what exactly are teeth whitening strips, how do they work, and are they right for you? In this article, we’ll explore everything you need to know about this popular whitening solution and how to use it effectively.
What Are Teeth Whitening Strips?
Teeth whitening strips are thin, flexible pieces of plastic coated with a peroxide-based whitening gel. When applied to your teeth, the gel penetrates the enamel to remove stains and lighten discolouration caused by things like coffee, wine, tobacco, and aging.
These strips are typically worn for 15 to 60 minutes a day, depending on the brand and strength, over a period of one to two weeks. They are an excellent alternative to professional treatments because they’re convenient, relatively inexpensive, and easy to use at home.
How Do Teeth Whitening Strips Work?
The active ingredient in most teeth whitening strips is hydrogen peroxide or carbamide peroxide. These chemicals break down stain molecules on the surface of the teeth through an oxidation process, effectively whitening the enamel and dentin beneath.
The strips are designed to conform closely to the shape of your teeth, allowing the whitening agent to stay in contact with the enamel long enough to produce noticeable results.
Benefits of Using Teeth Whitening Strips
Choosing teeth whitening strips as part of your dental care routine comes with several benefits:
1. Affordability
Compared to in-office whitening treatments, which can cost hundreds of dollars, whitening strips are budget-friendly and provide great results at a fraction of the price.
2. Convenience
You can use whitening strips at home, at work, or even while travelling. There’s no need for appointments or expensive dental equipment—just peel, apply, and go.
3. Gradual Whitening
Because you use them over time, teeth whitening strips allow for a gradual lightening of your teeth, which can appear more natural and be easier on sensitive enamel.
4. Availability
Teeth whitening strips are widely available online and in stores, so you can start your whitening journey any time you like.
Are Teeth Whitening Strips Safe?
Yes, most teeth whitening strips are safe when used as directed. However, overuse or improper application can lead to tooth sensitivity or gum irritation. Always read the manufacturer’s instructions and avoid using strips more frequently than recommended.
For those with sensitive teeth, there are low-peroxide versions available that are designed to be gentler on enamel. If you have dental concerns or restorations such as crowns or veneers, consult your dentist before beginning any whitening treatment.
Tips for Getting the Best Results
To maximise the effectiveness of teeth whitening strips, keep the following tips in mind:
Brush your teeth beforehand: Make sure your teeth are clean, but avoid brushing too hard right before applying the strips.
Follow the recommended schedule: Don’t try to speed up the process by using multiple strips in a day.
Avoid staining foods and drinks: Coffee, red wine, and berries can counteract whitening efforts. Try to avoid these while using the strips.
Be consistent: Use the strips consistently for the full recommended course to see the best results.
Store properly: Keep your strips in a cool, dry place to preserve their effectiveness.
How Long Do Results Last?
The whitening results from teeth whitening strips can last from a few months up to a year, depending on your oral hygiene habits and diet. Regular brushing, flossing, and occasional touch-ups with whitening strips can help maintain your bright smile for longer.
Final Thoughts
Teeth whitening strips offer a simple, effective, and affordable way to enhance your smile from the comfort of your home. With consistent use and proper care, you can achieve noticeable whitening results without breaking the bank or scheduling time-consuming dental appointments.
Whether you're preparing for a big event, boosting your confidence, or just maintaining your appearance, teeth whitening strips can be an excellent addition to your oral care routine.
0 notes
Text
The Ultimate Guide to Fresh Breath Products: Achieve Long-Lasting Freshness

Introduction
Bad breath, or halitosis, is a common issue that affects millions of people worldwide. Whether it's caused by poor oral hygiene, certain foods, or medical conditions, maintaining fresh breath is essential for confidence and overall health. Fresh breath products are designed to help combat bad breath and leave your mouth feeling clean and refreshed. In this comprehensive guide, we will explore the best fresh breath products, common challenges people face, a step-by-step guide to using these products effectively, a real-life case study, and a conclusion to help you achieve long-lasting freshness.
Common Topics with Unique Titles
1. The Science Behind Bad Breath: What Causes It?
Bad breath occurs when bacteria break down food particles in the mouth, releasing foul-smelling gases. Some common causes include:
Poor oral hygiene
Dry mouth (xerostomia)
Smoking and alcohol consumption
Strong-smelling foods like garlic and onions
Medical conditions such as gum disease, acid reflux, or diabetes
2. The Best Fresh Breath Products for Everyday Use
There are several types of fresh breath products available in the market. Some of the most effective ones include:
Mouthwashes: Antibacterial and alcohol-free varieties help eliminate bacteria and provide lasting freshness.
Toothpaste: Fluoride toothpaste with antibacterial properties fights bad breath and strengthens enamel.
Breath Mints and Chewing Gum: Sugar-free options freshen breath instantly and stimulate saliva production.
Tongue Scrapers: Removing bacteria from the tongue can significantly reduce bad breath.
Oral Sprays: Convenient and portable, oral sprays provide quick freshness on the go.
Challenges of Maintaining Fresh Breath
1. Finding the Right Products
Not all fresh breath products work for everyone. Some may contain ingredients that cause irritation or dry mouth.
2. Short-Term vs. Long-Term Solutions
Breath mints and sprays offer temporary relief, but they do not address the root cause of bad breath.
3. Medical Conditions and Bad Breath
Certain medical conditions, like sinus infections and acid reflux, can cause persistent bad breath that fresh breath products may not completely eliminate.
4. Consistency and Oral Hygiene Habits
Many people struggle to maintain a consistent oral hygiene routine, which is crucial for fresh breath.
Step-by-Step Guide to Using Fresh Breath Products Effectively
Step 1: Brush and Floss Regularly
Brush your teeth at least twice a day with fluoride toothpaste.
Floss daily to remove food particles between teeth.
Step 2: Use a Tongue Scraper
Gently scrape your tongue from back to front to remove bacteria buildup.
Step 3: Rinse with Antibacterial Mouthwash
Use an alcohol-free mouthwash to kill bacteria and maintain a fresh scent.
Step 4: Stay Hydrated
Drink plenty of water throughout the day to prevent dry mouth.
Step 5: Chew Sugar-Free Gum or Use Breath Mints
Chewing gum stimulates saliva production, which naturally fights bad breath.
Step 6: Monitor Your Diet
Avoid strong-smelling foods and eat fresh fruits and vegetables to naturally cleanse your mouth.
Step 7: Visit Your Dentist Regularly
Schedule dental check-ups every six months for professional cleaning and early detection of dental issues.
Case Study: How Fresh Breath Products Transformed Sarah’s Confidence
Background
Sarah, a 32-year-old professional, struggled with bad breath despite brushing her teeth daily. She often felt self-conscious in meetings and social interactions.
The Solution
After consulting with her dentist, Sarah followed a strict oral hygiene routine that included:
Switching to antibacterial toothpaste and mouthwash
Using a tongue scraper daily
Staying hydrated and avoiding sugary foods
Keeping sugar-free gum handy for quick freshening
The Result
Within a few weeks, Sarah noticed a significant improvement in her breath and confidence. She no longer worried about bad breath affecting her professional and personal life.
Conclusion
Maintaining fresh breath is essential for social interactions and overall well-being. By choosing the right fresh breath products and following a consistent oral hygiene routine, you can achieve long-lasting freshness. If bad breath persists despite using fresh breath products, it’s best to consult a dentist to rule out any underlying health issues. Start today, and enjoy the confidence that comes with fresh, clean breath!
0 notes
Text
The Ultimate Guide to Teeth Whitening Kits: Everything You Need to Know

A bright, white smile is often associated with confidence and good oral hygiene. In recent years, teeth whitening kits have become increasingly popular as a convenient and affordable way to achieve a dazzling smile from the comfort of home. But with so many options available, choosing the right kit can be overwhelming. In this comprehensive guide, we will explore everything you need to know about teeth whitening kits, including common topics, challenges, a step-by-step guide, a case study, and a conclusion.
Why Teeth Whitening Kits Are So Popular
Teeth whitening has been a part of dental care for centuries, but it has become more accessible with the introduction of at-home teeth whitening kits. These kits provide an easy and cost-effective way to achieve whiter teeth without the need for expensive dental procedures. Some reasons why people opt for at-home whitening include:
Convenience – You can whiten your teeth at any time without scheduling dental appointments.
Affordability – Professional whitening can be expensive, while at-home kits provide a budget-friendly alternative.
Ease of Use – Most kits come with straightforward instructions for hassle-free whitening.
Gradual Results – Unlike in-office whitening, at-home kits allow users to achieve their desired shade over time.
Common Teeth Whitening Topics You Should Know
1. How Do Teeth Whitening Kits Work?
Most teeth whitening kits use a bleaching agent, typically hydrogen peroxide or carbamide peroxide, to break down stains on the surface of the teeth. These chemicals penetrate the enamel and lighten the underlying dentin, making teeth appear whiter.
2. Types of Teeth Whitening Kits
There are several types of whitening kits available, each with its own benefits:
Whitening Strips – Thin, flexible strips coated with a whitening gel that you apply directly to your teeth.
Whitening Gels and Trays – Custom or pre-made trays filled with a bleaching gel that you wear over your teeth.
Whitening Pens – Small, portable pens that allow you to apply whitening gel directly onto your teeth.
LED Light Kits – These use a special light to accelerate the whitening process and enhance results.
3. How Long Do Results Last?
The longevity of teeth whitening results depends on several factors, such as diet, oral hygiene, and the type of whitening kit used. On average, results last from six months to a year. Regular maintenance, such as using whitening toothpaste and avoiding staining foods, can help extend the effects.
4. Are Teeth Whitening Kits Safe?
Most teeth whitening kits are safe when used as directed. However, overuse or improper application can lead to issues like tooth sensitivity or gum irritation. Always follow the manufacturer’s instructions and consult with a dentist if you have concerns.
Challenges of Using Teeth Whitening Kits
While teeth whitening kits are an excellent option for brightening your smile, they do come with some challenges. Here are a few common issues users may face:
1. Tooth Sensitivity
One of the most common side effects of whitening treatments is tooth sensitivity. The bleaching agents can temporarily weaken enamel, making teeth more sensitive to hot and cold foods.
2. Uneven Whitening
Whitening results may not be uniform, especially if you have dental work (crowns, veneers, or fillings) that does not respond to whitening agents.
3. Gum Irritation
If whitening gel comes into contact with the gums, it can cause irritation or a burning sensation.
4. Temporary Results
Since teeth naturally absorb stains over time, regular touch-ups are necessary to maintain a bright smile.
Step-by-Step Guide to Using a Teeth Whitening Kit
Follow these steps for the best whitening results:
Step 1: Choose the Right Kit
Select a teeth whitening kit that suits your needs, considering factors like strength, application method, and sensitivity level.
Step 2: Prepare Your Teeth
Brush and floss before applying the whitening treatment to remove any plaque or debris that could interfere with the whitening process.
Step 3: Apply the Whitening Gel
Depending on the kit, you may need to apply strips, fill trays with gel, or use a whitening pen to coat your teeth evenly.
Step 4: Use the Kit as Directed
Follow the instructions carefully. Some kits require you to leave the gel on for 30 minutes, while others use LED lights for accelerated whitening.
Step 5: Rinse and Moisturize
After the designated time, rinse your mouth thoroughly. If you experience dryness or irritation, use a fluoride rinse to help rehydrate your enamel.
Step 6: Maintain Your Results
Avoid coffee, tea, red wine, and smoking immediately after whitening to prevent new stains from forming. Regular touch-ups can help maintain your bright smile.
Case Study: Sarah’s Teeth Whitening Journey
Sarah, a 28-year-old marketing professional, wanted a whiter smile for an upcoming wedding. She decided to try an at-home teeth whitening kit after reading positive reviews online.
The Process:
Sarah chose a LED light whitening kit that claimed to deliver visible results in one week.
She followed the instructions carefully, applying the whitening gel every night before bed.
After five days, she noticed her teeth were visibly brighter, and by the seventh day, she had achieved her desired shade.
She continued to maintain her results by using a whitening toothpaste and reducing coffee intake.
The Outcome:
Sarah was thrilled with her results. The kit provided an affordable and effective solution that gave her the confidence to smile more at the wedding. Her only challenge was slight tooth sensitivity, which subsided within a few days after completing the treatment.
Conclusion
Teeth whitening kits offer a convenient, affordable, and effective way to brighten your smile at home. While there are various options available, it’s essential to choose a kit that suits your needs and follow the instructions carefully to avoid common challenges like sensitivity and gum irritation. With the right product and proper maintenance, you can enjoy long-lasting whitening results and boost your confidence with a radiant smile.
If you’re considering trying a teeth whitening kit, start with a trusted brand and take the necessary precautions for a safe and successful experience. A brighter smile is just a few steps away!
By following this guide, you can make an informed decision about teeth whitening kits and achieve a beautiful, white smile with ease.
0 notes
Text
Top Remedies for Sensitive Teeth
Sensitive teeth can make everyday activities like eating and drinking an uncomfortable experience. Whether triggered by hot coffee or cold ice cream, the sharp pain of sensitivity can be frustrating. Fortunately, there are effective remedies to help alleviate the discomfort and protect your teeth. Let’s explore the causes of sensitive teeth and the best ways to manage them.
What Causes Sensitive Teeth?
Tooth sensitivity occurs when the protective layers of enamel or cementum wear away, exposing the underlying dentin. This layer contains tiny tubules that connect to the nerves, making your teeth react to:
Hot or cold temperatures
Sweet or acidic foods
Brushing or flossing Common causes include:
Tooth decay or cavities
Gum recession
Teeth grinding (bruxism)
Overuse of whitening products
Acidic foods and drinks
Effective Remedies for Sensitive Teeth
1. Use Desensitizing Toothpaste
Desensitizing toothpaste is formulated to block nerve signals in your teeth, providing relief from pain. Look for products containing active ingredients like potassium nitrate or stannous fluoride.
2. Switch to a Soft-Bristled Toothbrush
Aggressive brushing can wear down enamel. Opt for a soft-bristled toothbrush and use gentle, circular motions to clean your teeth.
3. Avoid Acidic Foods and Drinks
Limit your intake of acidic items like citrus fruits, soda, and vinegar-based dressings, as they can erode enamel and worsen sensitivity.
4. Try Fluoride Treatments
Fluoride strengthens tooth enamel and reduces sensitivity. You can use fluoride mouthwash or consult your dentist for professional fluoride applications.
5. Maintain Good Oral Hygiene
Brushing twice daily and flossing regularly helps prevent gum recession and cavities that can lead to sensitivity. Ensure you use non-abrasive toothpaste to protect your enamel.
6. Wear a Mouthguard for Grinding
If you grind your teeth at night, wearing a custom-fitted mouthguard can protect enamel and reduce sensitivity over time.
7. Rinse with Salt Water
Salt water is a natural antiseptic that soothes irritated gums and reduces sensitivity. Mix ½ teaspoon of salt in a glass of warm water and rinse twice a day.
8. Explore Dental Sealants
Your dentist can apply a sealant to cover exposed dentin and reduce sensitivity. This is especially effective for cases caused by wear and tear.
When to See a Dentist
If your sensitivity persists despite trying these remedies, consult your dentist. Persistent pain could indicate underlying issues like:
Untreated cavities
Cracked or chipped teeth
Severe gum disease
A dentist can offer advanced treatments, such as bonding, root canal therapy, or laser procedures, to address sensitivity at its source.
Protect Your Smile and Ease Tooth Sensitivity
Sensitive teeth don’t have to disrupt your life. With the right care and remedies, you can reduce discomfort and enjoy your favorite foods again. Start by incorporating these tips into your daily routine and seek professional advice if needed. Need Relief? Contact your dentist today for personalized solutions to treat sensitive teeth and keep your smile healthy and pain-free!
0 notes
Text
How Long Do Tooth Gems Last?
Tooth gems are a popular way to add a personal touch to your smile with a hint of sparkle. These tiny gems, usually crafted from Swarovski crystals, gold, or diamonds, are applied to the surface of your teeth, offering a semi-permanent way to accessorize your look. But how long do tooth gems actually last? This guide will walk you through the longevity of tooth gems, factors that impact their durability, and tips for extending their wear.
Understanding the Longevity of Tooth Gems
Generally, tooth gems can last anywhere from 6 months to a few years, depending on the type of adhesive used, personal dental care habits, and the gem material. Most professional tooth gems are attached with a high-quality dental adhesive, similar to the one used for braces, which ensures durability and safety. Here’s what you can expect in terms of longevity:
Temporary Tooth Gems: These are usually attached with lighter adhesives and last around 6 months to a year.
Semi-Permanent Tooth Gems: Using high-strength adhesives, these gems can last up to 2 years or longer with proper care.
When placed by a professional, tooth gems have a higher chance of staying intact for a longer period. The placement, quality of adhesive, and gem size are all factors that influence how long they stay attached.
Factors That Affect Tooth Gem Durability
Several factors can impact how long your tooth gem will last:
1. Application Quality: Tooth gems applied by a licensed dental professional are likely to last longer than DIY options. Professionals use high-quality adhesive and tools to ensure the gem is securely placed.
2. Tooth Surface Condition: The smoother and cleaner the tooth surface, the better the gem will adhere. Any pre-existing dental work, like fillings or crowns, might affect how well the gem sticks.
3. Eating Habits: Biting into hard foods or ice, or grinding teeth, can put stress on the gem, potentially dislodging it. Limiting hard foods can extend the gem’s longevity.
4. Oral Hygiene Routine: Brushing, flossing, and regular check-ups are essential for keeping the area around the tooth gem clean. However, brushing too vigorously over the gem can weaken the adhesive, shortening its lifespan.
5. Gem Size and Weight: Larger, heavier gems may be more prone to falling off compared to smaller, lighter gems, as they exert more pressure on the adhesive.
How to Extend the Life of Your Tooth Gem
To get the most out of your tooth gem, follow these tips:
Visit a Professional: Get your tooth gem applied by a certified professional who specializes in cosmetic dentistry. They can ensure that the gem is securely attached, reducing the risk of it falling off.
Use Gentle Brushing Techniques: When brushing, be gentle around the tooth gem area. Soft-bristled toothbrushes are recommended to prevent damaging the adhesive.
Avoid Hard Foods: Crunchy or sticky foods can loosen the gem or cause it to fall off. Try to avoid biting directly into hard foods to keep the gem in place.
Avoid Chewing Gum: Gum can stick to the gem and weaken its hold. If you choose to chew gum, avoid chewing on the side with the gem.
Regular Dental Check-Ups: Inform your dentist about your tooth gem during regular check-ups so they can check its condition and ensure it doesn’t interfere with oral health.
Are Tooth Gems Safe?
Tooth gems are generally safe when applied by a professional, as they do not require any drilling or damage to the tooth’s surface. Professionals use dental-safe adhesives that are strong yet non-damaging to the enamel. However, proper care is important to prevent any potential buildup of plaque around the gem, which could lead to decay.
Additionally, if you’re planning to remove the tooth gem, it’s best to visit a professional to avoid any damage to the enamel. A dentist can safely remove the gem and any adhesive residue, leaving the tooth surface smooth and intact.
When to Replace a Tooth Gem
The adhesive bond of a tooth gem naturally weakens over time, so even with great care, it will eventually need replacing if you wish to maintain the look. Temporary gems generally last around 6 months, while semi-permanent options can last 1-2 years. Signs it may be time to replace your tooth gem include:
Looseness: If the gem feels wobbly, it’s best to remove it before it falls off.
Discoloration: Gems may become dull over time; replacing them can refresh your look.
Wear on Adhesive: If you notice any visible adhesive wear, a professional can assess whether a replacement is needed.
Tooth gems are a unique and stylish addition that can last anywhere from a few months to several years, depending on how well they are applied and cared for. Following good oral hygiene practices, avoiding hard foods, and visiting a professional for application and removal are key steps to ensuring your gem lasts as long as possible. With proper care, your tooth gem can remain a sparkling enhancement to your smile, adding a touch of personality and style to your everyday look.
0 notes
Text
Teeth Whitening Gel: Everything You Need to Know

A bright, white smile is often seen as a sign of good health, youth, and confidence. Over time, though, it’s common for teeth to become discolored due to factors like aging, diet, and lifestyle habits. Teeth whitening gel has become one of the most popular solutions to combat discoloration and bring back a radiant smile. But before diving in, it’s important to understand how these gels work, the potential challenges, and how to use them correctly for the best results.
In this comprehensive guide, we’ll break down everything you need to know about teeth whitening gel—from the science behind it to a step-by-step guide on how to use it.
What Is Teeth Whitening Gel?
Teeth whitening gel is a peroxide-based substance used to bleach teeth and remove stains or discoloration. The active ingredient in most gels is either hydrogen peroxide or carbamide peroxide, both of which work to break down stains on the enamel, making teeth appear whiter.
Teeth whitening gel is commonly found in various forms such as strips, trays, and pens, but the principle remains the same—apply the gel to your teeth, wait for it to take effect, and enjoy a brighter smile.
Why Do Teeth Get Discolored?
Before we dive into teeth whitening gel, it's important to understand why teeth get discolored in the first place. Discoloration can be caused by:
Age: As we age, the enamel thins, revealing the yellow dentin beneath.
Diet: Foods and drinks like coffee, tea, red wine, and dark berries can stain teeth over time.
Smoking: Nicotine and tar can leave yellow or brown stains on your teeth.
Medications: Certain medications, especially antibiotics, can cause intrinsic staining.
Oral Hygiene: Poor oral hygiene can lead to plaque buildup, which can cause teeth to appear yellow or dull.
Understanding the cause of your discoloration can help you determine how effective teeth whitening gel will be for you.
Common Misconceptions About Teeth Whitening Gel
Many people believe teeth whitening gel offers instant, permanent results, but this isn't the case. Let’s debunk a few common misconceptions:
1. "Teeth whitening gel works overnight."
While some gels do promise quick results, the majority require multiple applications over a period of time. Results are gradual and depend on factors like the concentration of the gel and the severity of discoloration.
2. "Teeth whitening gel damages your enamel."
When used properly, teeth whitening gel is safe and does not harm your enamel. However, overuse or misuse can lead to sensitivity and irritation.
3. "Teeth whitening lasts forever."
Teeth whitening results are not permanent. With regular exposure to staining agents, such as coffee or tobacco, your teeth can begin to discolor again. Maintenance treatments are often necessary to keep your teeth bright.
The Benefits of Using Teeth Whitening Gel
Before moving into the potential challenges and how-to guide, let’s explore the benefits:
Convenient: Most teeth whitening gels can be used at home, allowing you to whiten your teeth on your schedule.
Affordable: Compared to professional treatments, over-the-counter teeth whitening gels are a cost-effective solution.
Non-invasive: No surgery or drilling is required, making it a relatively painless and easy method for whiter teeth.
Effective: Teeth whitening gels can provide noticeable results, especially with consistent use.
Challenges of Using Teeth Whitening Gel
While teeth whitening gel offers a straightforward way to brighten your smile, there are some challenges to keep in mind:
1. Tooth Sensitivity
One of the most common side effects of teeth whitening gel is increased tooth sensitivity. The peroxide in the gel can irritate the nerves inside the teeth, leading to temporary discomfort. This sensitivity can be particularly noticeable when consuming hot or cold foods and drinks.
2. Gum Irritation
Accidentally applying the gel to your gums can lead to irritation or a burning sensation. This can be avoided by carefully following the instructions and ensuring the gel only comes into contact with your teeth.
3. Inconsistent Results
If the gel is not evenly distributed across all your teeth, you may end up with uneven whitening. This is especially common with gels that come in trays or strips, as it can be difficult to ensure complete coverage.
4. Temporary Results
As mentioned earlier, the effects of teeth whitening gel are not permanent. Regular touch-ups will be needed to maintain your smile, especially if you continue to consume staining foods or drinks.
Step-by-Step Guide to Using Teeth Whitening Gel
If you’re ready to try teeth whitening gel, follow this step-by-step guide to achieve the best results:
Step 1: Choose the Right Gel
Not all teeth whitening gels are created equal. Make sure to choose a product that contains either hydrogen peroxide or carbamide peroxide as the active ingredient. If you have sensitive teeth, look for gels that are specifically formulated for sensitivity.
Step 2: Read the Instructions
Each product will have specific instructions, so it’s crucial to read them thoroughly. Overuse of whitening gels can lead to negative side effects like sensitivity or irritation.
Step 3: Brush and Floss Your Teeth
Before applying the gel, make sure to brush and floss your teeth to remove any debris. This will ensure the gel can evenly coat the surface of your teeth.
Step 4: Apply the Gel
Most teeth whitening gels come with trays, pens, or strips. Apply the gel to the tray or directly onto your teeth, ensuring you avoid the gums. If you're using a tray, place it in your mouth and adjust it for comfort.
Step 5: Wait
Follow the product’s instructions regarding how long to leave the gel on your teeth. Typically, this ranges from 15 minutes to an hour, depending on the strength of the gel.
Step 6: Rinse
After the required time has passed, remove the trays (or strips) and rinse your mouth thoroughly with water to remove any leftover gel.
Step 7: Repeat as Needed
For the best results, you’ll likely need to repeat the process for several days or weeks, depending on the product.
Step 8: Avoid Staining Foods
To maximize the longevity of your whitening, avoid consuming staining foods and drinks like coffee, tea, red wine, or dark berries immediately after treatment.
Case Study: John’s Whitening Journey
John, a 35-year-old coffee enthusiast, noticed his teeth becoming increasingly stained over the years. Embarrassed by his yellowing smile, he decided to try an over-the-counter teeth whitening gel. After researching different products, he opted for a gel with a medium concentration of hydrogen peroxide, which promised gradual but noticeable results over a two-week period.
Week 1: John followed the instructions carefully, applying the gel to his teeth every evening before bed. After a few days, he began to notice a slight improvement in the color of his teeth, but he also experienced mild tooth sensitivity, especially when drinking cold beverages.
Week 2: By the end of the second week, John’s teeth were noticeably whiter, and his friends even complimented him on his brighter smile. The sensitivity he initially felt had subsided, and he was pleased with the overall results.
Conclusion: John’s experience highlights the importance of patience and consistency when using teeth whitening gel. Although he experienced some sensitivity, following the instructions carefully and being mindful of his diet helped him achieve the results he was looking for.
Conclusion: Is Teeth Whitening Gel Right for You?
Teeth whitening gel offers a convenient, affordable, and effective solution for those looking to brighten their smile. While there are challenges such as sensitivity and temporary results, following proper instructions can help mitigate these issues.
Whether you’re looking for a quick touch-up or a more significant transformation, teeth whitening gel can be a great option. Just remember to choose a high-quality product, follow the step-by-step instructions, and be patient—results take time.
With the right approach, you’ll be on your way to a brighter, more confident smile in no time!
0 notes
Text
Brighten Your Smile: The Ultimate Guide to Teeth Whitening Pens

A bright, white smile is often seen as a sign of health and vitality. With the increasing popularity of at-home teeth whitening solutions, many people are turning to teeth whitening pens for a quick and convenient way to achieve a dazzling smile. In this comprehensive guide, we’ll explore the ins and outs of teeth whitening pens, addressing common topics, challenges, and providing a step-by-step guide to ensure you get the best results.
Understanding Teeth Whitening Pens
What Are Teeth Whitening Pens?
Teeth whitening pens are portable, easy-to-use tools designed to help individuals brighten their teeth on the go. They typically contain a whitening gel that includes active ingredients such as hydrogen peroxide or carbamide peroxide, which are known for their ability to lift stains and whiten teeth effectively.
How Do They Work?
The active ingredients in teeth whitening pens penetrate the enamel and break down stains, resulting in a brighter appearance. The gel is often applied directly to the teeth, making it a quick solution for those who want to maintain or enhance their smile without the need for elaborate treatments or trips to the dentist.
Benefits of Using Teeth Whitening Pens
Convenience: Teeth whitening pens are small and portable, making them easy to carry in a bag or pocket.
Ease of Use: With a simple application process, they are user-friendly and require no special skills or tools.
Cost-Effective: Compared to professional whitening treatments, teeth whitening pens are a more budget-friendly option.
Quick Results: Many users report noticeable results in a matter of days, making it a fast solution for those needing a smile boost.
Common Topics Everyone Should Know About Teeth Whitening Pens
1. Effectiveness Compared to Other Methods
Teeth whitening pens can be less effective than professional treatments but are often more effective than over-the-counter whitening strips. Understanding how each method works can help users set realistic expectations.
2. Safety Considerations
While most teeth whitening pens are safe for use, it’s important to follow the manufacturer’s instructions carefully. Overuse can lead to tooth sensitivity or gum irritation.
3. Choosing the Right Product
Not all teeth whitening pens are created equal. Users should look for products that contain a higher concentration of active whitening ingredients, check reviews, and consider any additional features like flavor or ease of application.
4. Post-Whitening Care
After using a whitening pen, it’s essential to maintain good oral hygiene and avoid foods and drinks that may stain teeth, such as coffee, tea, and red wine.
Challenges of Using Teeth Whitening Pens
1. Uneven Application
One of the main challenges users face is applying the gel evenly across all teeth. If not applied carefully, certain areas may whiten more than others, resulting in a patchy appearance.
2. Tooth Sensitivity
Some individuals may experience increased sensitivity after using whitening products, including pens. This can lead to discomfort, especially when consuming hot or cold foods and beverages.
3. Limited Lifespan of Results
While teeth whitening pens can provide quick results, the effects are often temporary. Users may need to repeat the application regularly to maintain their desired level of whiteness.
4. Stains and Discoloration
Not all stains respond equally to whitening treatments. Intrinsic stains, which are deeper within the tooth structure, may not lift as easily as extrinsic stains, which are on the surface.
Step-by-Step Guide to Using a Teeth Whitening Pen
Step 1: Choose the Right Pen
Research and select a teeth whitening pen that suits your needs. Look for one with positive reviews, a reputable brand, and an appropriate concentration of active ingredients.
Step 2: Prepare Your Teeth
Before applying the whitening gel, ensure your teeth are clean. Brush your teeth to remove any plaque or food particles that might interfere with the whitening process.
Step 3: Apply the Gel
Twist or Click the Pen: Depending on the design, twist or click the pen to dispense the gel onto the brush applicator.
Apply to Teeth: Carefully paint the gel onto each tooth, ensuring even coverage. Avoid getting the gel on your gums to minimize irritation.
Allow to Dry: Let the gel sit on your teeth for the recommended time (usually about 10-30 seconds) to allow the active ingredients to work.
Step 4: Rinse Your Mouth (if necessary)
Some whitening pens require you to rinse your mouth after the application. Follow the product instructions carefully to determine if this step is necessary.
Step 5: Follow Up
For optimal results, consider using the teeth whitening pen consistently over a specified period (usually a few days to a couple of weeks). Monitor your progress and adjust your usage as needed.
Case Study: A Real-Life Example
Meet Sarah: A Teeth Whitening Journey
Sarah, a 28-year-old marketing professional, always dreamed of having a bright smile. After years of consuming coffee and tea, she noticed her teeth had become increasingly stained. Seeking an affordable solution, Sarah decided to try a teeth whitening pen.
Choosing the Right Product: After researching various options, Sarah selected a highly-rated whitening pen with a user-friendly applicator and positive reviews.
Application Process: Over the course of two weeks, she followed the steps outlined above diligently. Initially, she experienced some sensitivity, but she adjusted her application frequency to accommodate her comfort level.
Results: By the end of the two weeks, Sarah noticed a significant improvement in the brightness of her teeth. Her confidence soared, and she felt more comfortable smiling in social situations. However, she learned the importance of post-whitening care and maintained her results by avoiding staining foods and beverages.
Key Takeaways from Sarah's Experience
Patience is Key: Results may take time, and it’s essential to follow instructions for the best outcome.
Monitor Sensitivity: Be aware of any discomfort and adjust usage accordingly.
Maintain Results: Practice good oral hygiene and be mindful of dietary choices to prolong the effects of whitening.
Conclusion
Teeth whitening pens offer a convenient, cost-effective way to achieve a brighter smile. By understanding how they work, recognizing potential challenges, and following a step-by-step guide, you can enhance your dental aesthetics from the comfort of your home. As seen in Sarah's case, these pens can deliver impressive results when used correctly.
However, always remember that maintaining your smile is an ongoing process. Combining the use of a teeth whitening pen with good oral hygiene practices will ensure your smile remains bright and confident for years to come. Embrace the journey to a whiter smile and let your confidence shine through!
0 notes
Text
Secrets of Dental Scale and Clean: Unveiling the Hidden Gems of Oral Health

Maintaining optimal oral health goes beyond just brushing and flossing; it often involves professional dental care. One key aspect of this care is the dental scale and clean procedure, commonly known as a dental cleaning. In this article, we will delve into the secrets behind this essential dental practice, exploring its benefits, the science behind it, and how it contributes to a dazzling smile.
The Science Behind Dental Scale and Clean
Dental scale and clean involve the removal of plaque and tartar from the teeth. Plaque, a sticky film of bacteria, can harden into tartar if not removed promptly. This procedure utilizes specialized tools to carefully scrape away these deposits, ensuring a clean and smooth tooth surface. Exploring the science behind this process helps us understand its significance in preventing various oral health issues.
Beyond the Surface: Gum Health Matters
While dental scale and clean focus on the visible tooth surfaces, their impact extends to the gums. Removing plaque and tartar helps prevent gingivitis and gum disease, promoting overall gum health. Healthy gums are crucial not only for oral well-being but also for preventing systemic health issues linked to gum disease.
The Art of Polishing
Dental cleanings aren't just about removal; they also include polishing to make the teeth shine. This polishing step not only enhances the aesthetic appeal of your smile but also helps to smooth out microscopic rough spots on the tooth surfaces, making it more difficult for plaque to accumulate.
Prevention is Key
One of the secrets of dental scale and clean lies in its preventive nature. Regular cleanings can help prevent cavities, gum disease, and other oral health issues. Incorporating this practice into your oral care routine ensures that small problems are addressed before they escalate into more significant concerns.
Case Study: Transforming Smiles Through Dental Cleanings
To illustrate the transformative power of dental scale and clean, let's delve into a real-life case study. Meet Sarah, a patient who struggled with persistent staining and plaque buildup despite regular brushing. Through a series of dental cleanings, Sarah's smile underwent a remarkable transformation. This case study highlights the tangible benefits of this simple yet powerful dental procedure.
Background: Sarah's oral health concerns
Treatment Plan: The frequency and type of dental cleanings recommended
Results: The visible improvements in Sarah's oral health and smile
In conclusion, the secrets of dental scale and clean lie in its multifaceted benefits, preventive nature, and transformative impact on smiles. Beyond the routine of brushing and flossing, integrating regular dental cleanings into your oral care routine can be the key to achieving and maintaining optimal oral health. So, unveil the hidden gems of oral health by embracing the secrets of dental scale and clean for a brighter, healthier smile.
0 notes
Text
Gleaming Horizons: A Definitive Voyage to Illuminate Your Smile through Gold Coast Teeth Whitening

Welcome to a journey of radiance and confidence—where every smile is a testament to self-assurance. If you're on the quest for a luminous, gilded grin on the Gold Coast, this comprehensive guide is your compass. Join us as we embark on an expedition into the realm of Gold Coast teeth whitening, exploring a myriad of options, considerations, and the path to achieving a truly radiant smile.
**1. Understanding Teeth Discoloration: Unmasking the Culprits:
Before immersing ourselves in the world of teeth whitening, it's crucial to uncover the factors behind teeth discoloration. From lifestyle choices to the natural aging process, we'll unveil the common culprits that may be dimming the brilliance of your smile, setting the stage for an informed journey toward teeth whitening excellence.
**2. Professional vs. At-Home Whitening: Navigating Your Choices:
Gold Coast offers a spectrum of teeth whitening options, from professional treatments to convenient at-home solutions. We'll explore the advantages and drawbacks of each, empowering you to chart a course based on your lifestyle, budget, and the level of radiance you aspire to attain.
**3. Professional Teeth Whitening Clinics: A Treasure Trove of Excellence:
Step into the realm of professional teeth whitening clinics on the Gold Coast—a treasure trove of excellence in oral care. From cutting-edge facilities to seasoned practitioners, we'll provide an insider's look at what these clinics offer. Discover the latest technologies and techniques that promise effective, safe, and swift results.
**4. At-Home Whitening: Products, Tips, and Considerations:
For those who prefer the comfort of home, we've curated insights into the range of at-home whitening products. From whitening strips to gels, uncover effective application techniques and receive valuable tips for maximizing results, all while maintaining sensitivity in check.
**5. Considering Sensitivity: A Gentle Approach to a Gleaming Smile:
Sensitivity concerns are common during teeth whitening endeavors. We'll explore precautionary measures and strategies to minimize discomfort, ensuring a gentle and painless experience whether you opt for professional treatments or embrace the convenience of at-home solutions.
**6. Benefits Beyond Aesthetics: The Health and Confidence Nexus:
While a sparkling smile is visually enchanting, the benefits extend beyond aesthetics. Discover how teeth whitening can boost confidence, enhance oral hygiene habits, and positively influence overall well-being—a radiant smile as a gateway to a more vibrant and confident you.
**7. Long-Term Maintenance: Nurturing Your Gilded Smile:
Maintaining a dazzling smile requires thoughtful care. We'll share practical tips and habits for long-term maintenance post-whitening, guiding you on preserving the brilliance of your smile and extending the longevity of your teeth whitening efforts.
**8. Choosing the Right Path: Crafting Your Personalized Teeth Whitening Expedition:
As you embark on your teeth whitening journey on the Gold Coast, the ultimate decision rests with you. We'll offer guidance on selecting the right path based on your preferences, lifestyle, and desired outcomes. Your personalized expedition to a gilded grin awaits!
**9. DIY Natural Teeth Whitening: Embracing Nature's Gilded Touch:
For nature enthusiasts, our expedition extends into the realm of DIY natural teeth whitening. Explore the benefits of ingredients like baking soda, activated charcoal, and coconut oil as natural teeth-whitening agents. Uncover the gentle yet effective power of these elements in illuminating your smile.
**10. Navigating Cost Factors: Budget-Friendly Strategies for Gilded Grins:
Teeth whitening options come with varying price tags. In this section, we'll navigate the cost factors associated with professional treatments, at-home products, and DIY solutions. Learn how to make an informed decision that aligns with your budget while ensuring your gilded grin meets your expectations.
**11. Combating Stains: Strategies for Coffee, Wine, and Tobacco Aficionados:
For enthusiasts of coffee, wine, and tobacco, dealing with stains is a common concern. We explore effective strategies and preventive measures to combat and minimize the impact of these common staining agents. Enjoy your favorite indulgences without compromising the gilded brilliance of your smile.
**12. Smile Enhancement: The Synergy of Teeth Whitening and Cosmetic Dentistry:
Teeth whitening often synergizes with cosmetic dentistry. Explore how teeth whitening can be part of a broader smile enhancement plan. From veneers to cosmetic bonding, discover complementary procedures that elevate your grin to a gilded masterpiece.
**13. Real Stories: Personal Chronicles of Gold Coast Teeth Whitening Journeys:
To infuse a personal touch, we showcase real stories from individuals who have undergone teeth whitening on the Gold Coast. Hear firsthand about their experiences, challenges, and the transformative impact a brighter smile has had on their lives. These testimonials offer glimpses into the diverse journeys people embark on for a gilded grin.
**14. Choosing a Qualified Provider: Expert Tips for Your Whitening Professional:
Selecting a qualified provider for professional teeth whitening is paramount. We provide a checklist of considerations, from certifications and reviews to facility standards. Ensure you make an informed decision when choosing a professional for your gilded grin expedition.
**15. Smile Care in the Digital Age: Apps and Gadgets for Gilded Oral Wellness:
In the era of technology, innovative apps and gadgets contribute to gilded oral wellness. Explore the latest digital tools designed to enhance your oral care routine, from smart toothbrushes to apps that remind you to maintain your radiant smile with diligence.
Conclusion:
Embark on this expedition into gilded grins—a journey where each smile is a radiant masterpiece reflecting confidence, health, and the vibrant allure of the Gold Coast. Whether you choose professional treatments, at-home solutions, or nature's remedies, may your gilded grin be the hallmark of your radiant self. Here's to brighter smiles, newfound confidence, and the radiant charm of your journey to a gilded grin! Click here to see related article about Gilded Grins: A Comprehensive Expedition into Achieving Radiant Smiles through Gold Coast Teeth Whitening.
0 notes
Text
The Unsung Hero of Oral Hygiene: The Toothbrush

In the world of oral hygiene, there's one tool that often takes a back seat to its flashier counterparts - the toothbrush. This unassuming yet crucial instrument has been a cornerstone of oral care for centuries, quietly helping us maintain healthy smiles. In this article, we will explore the fascinating history, evolution, and importance of the humble toothbrush.
The Historical Evolution of the Toothbrush
The concept of cleaning one's teeth dates back thousands of years, but toothbrushes, as we know them today, are a relatively recent invention. Here's a brief look at the evolution of the toothbrush through history:
Ancient Chewing Sticks: In many ancient cultures, people used thin twigs or plant stems as primitive toothbrushes. The frayed ends were used to clean their teeth. This method, known as "chewing sticks," was prevalent in places like Egypt, China, and India.
Animal Hair and Bristles: The first true toothbrushes appeared in the Middle Ages, featuring bristles made from animal hairs. These were attached to handles made from various materials, including bone, wood, and ivory. They were effective but quite costly.
The 18th Century Innovation: The design of the toothbrush took a leap forward in the 18th century when William Addis, an Englishman, invented a toothbrush with a bone handle and swine bristles. This marked a significant step towards the modern toothbrush design.
Nylon Bristles and Plastic Handles: The 20th century brought further advancements in toothbrush design, with the introduction of nylon bristles and plastic handles. This made toothbrushes more affordable, comfortable, and durable.
Electric Toothbrushes: In the latter half of the 20th century, the electric toothbrush emerged as a game-changer in oral care. These devices use oscillating or rotating brush heads to enhance cleaning efficiency and are often recommended for those with limited dexterity.
The Role of the Toothbrush in Oral Health
The toothbrush plays a pivotal role in maintaining good oral health. It primarily serves two crucial functions:
Plaque Removal: The primary purpose of a toothbrush is to remove plaque, a soft and sticky film of bacteria that forms on the teeth. Brushing helps prevent plaque from hardening into tartar, which can lead to gum disease and tooth decay.
Gum Stimulation: Proper brushing also massages the gums, promoting healthy blood flow and preventing conditions like gingivitis. This gentle stimulation keeps the gums firm and pink, contributing to an attractive smile.
Choosing the Right Toothbrush
Selecting the right toothbrush is essential for effective oral care. Consider these tips when making your choice:
Bristle Type: Soft or extra-soft bristles are recommended to prevent enamel damage and gum recession. Hard bristles can be abrasive and harm your teeth and gums.
Toothbrush Head: The size of the toothbrush head should allow you to reach all areas of your mouth comfortably.
Manual or Electric: Both manual and electric toothbrushes can be effective, so choose the one that you find easier to use consistently.
Change Regularly: Regardless of the type of toothbrush you choose, it's essential to replace it every three to four months or sooner if the bristles are frayed.
0 notes