
Statistics
We looked inside some of the posts by tutorialelectronic-blog and here's what we found interesting.
Average Info
Notes Per Post
0
Likes Per Post
0
Reblog Per Post
0
Reply Per Post
0
Time Between Posts
23 hours
Number of Posts By Type
Text
17
Last Seen Tumblr Blogs


Fun Fact
There are dozens of funny blogs to kill time on Tumblr.
Text
How to install and hack eyeBeam - Download
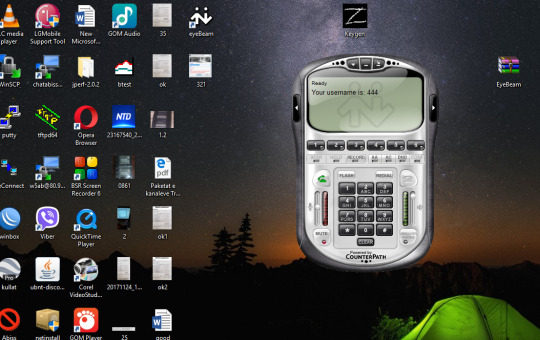
To download and install eyeBeam you must first download it but as you know it is with pages, here you can find crack which just gives you serial number to have your eyeBeam full version. To be istallur you have to follow these steps: 1. Remove from RAR and click on setup 2. You must continue with the instructions that will come to your screen (Next) etc. 3. Then the program opens where you open it to set the serial number you want to continue to use 4. After you open the Keygen file and you will go to select the photo version and after the serial copy and past the program and see that it will open and work successfully whatever you want. Other tutorials will tell you how to set up a Phone ext.
Download

0 notes
Text
Download Nulled Flashlight 4.3 – Themeforest fullscreen background portfolio

Flashlight wordpress theme happens to be an unique and also accommodating WordPress platform based Portfolio and Digital photography Web theme, best for individuals without having programming understanding as well as those people with. The particular template contains a variety of choices so you may improve styles, styling, hues as well as typefaces directly through within the management panel. 5 distinct Gallery Types ensure that you could show off your own work the actual way it matches most effective for the web page.
Sales Page: http://themeforest.net/item/flashlight-fullscreen-background-portfolio-theme/616050
Download Links:
http://ul.to/us3z3qab http://www.mirrorcreator.com/files/0C4S8UAX/Flashlight_4.3_-_Themeforest_fullscreen_background_portfolio.zip_links http://www119.zippyshare.com/v/ORqrfz9R/file.html https://tusfiles.net/jzgv5jasscbl https://userscloud.com/z8w3819w66wf http://ge.tt/8xks77m2 https://www.solidfiles.com/v/QMQ3eeQLnRw3v http://turbobit.net/45gdprb6tt1h.html http://uppit.com/vxtzqr2spmy5 http://www.girlshare.ro/3489903595.2
0 notes
Text
Download Nulled UberMenu v3.3 – WordPress Mega Menu Plugin

UberMenu wordpress plugin is the most effective menu plug-in pertaining to wordpress platforms. It creates an adaptable range of menu kinds plus sub-menus. UberMenu likewise features a extremely robust admin board which will assist you build virtually any variety of menu you need. UberMenu is completely responsive and looks wonderful on any device. Should you personal a large weblog or if you would like to improve the old menu bar of one’s website with a brand-new menu this really is the wordpress tool for you personally.
Sales Page: https://codecanyon.net/item/ubermenu-wordpress-mega-menu-plugin/154703
Download Links:
http://ul.to/sstbrb5c http://www.mirrorcreator.com/files/0MSPQPFG/UberMenu_v3.3_-_WordPress_Mega_Menu_Plugin.zip_links http://www45.zippyshare.com/v/rJlg0Yg9/file.html http://ge.tt/45iYF7m2 https://tusfiles.net/9cl1bq874za7 https://userscloud.com/lcioiv97gm6r http://turbobit.net/55liq9ds7hlt.html http://uppit.com/y8a6fuuyui0l https://www.solidfiles.com/v/YnBRDR3AeLxa2 http://www.girlshare.ro/3489903774.5
0 notes
Text
Download Nulled Avada v5.2.2 – Responsive Multi-Purpose Theme

Avada wordpress theme certainly is the number 1 best selling design template at the biggest WordPress theme market place, ThemeForest. It is a basic WordPress platform based design template that may be as flexible as you’d like it to become. It is possible to work with it to build all sorts of diverse looking web pages in unique niche categories. Avada was developed to construct distinctive, imaginative along with professional internet sites through market major network without having to touch a single line of html/css. Regardless of exactly what type of site you would prefer to develop you’ll be able to develop a functional along with beautiful web-site making use of the Avada wordpress theme.
Sales Page: http://themeforest.net/item/avada-responsive-multipurpose-theme/2833226
Download Links:
http://ul.to/tfyugxhd http://www.mirrorcreator.com/files/14H8WEND/Avada_v5.2.2_-_Responsive_Multi-Purpose_Theme.rar_links https://www.solidfiles.com/v/8Gav8RxgYdgN2 http://ge.tt/6iPip7m2 http://www73.zippyshare.com/v/bLKL3fNZ/file.html http://uppit.com/4q18da84xdln https://tusfiles.net/tysmfd4psqr8 http://turbobit.net/55j8j5edcx9a.html https://userscloud.com/nlbmkwp0puua http://www.girlshare.ro/3489904190.3
0 notes
Text
How to config UBNT Radio

To configure UBNT of all Rocket, Airgrid, Litebeam, Powerbeam etc. You have to follow these important steps.
1.The network card network must be on a radio station.
2. Make sure that getting into the radio must be done with the management code of the states.
3. You should follow the sequence to configure Wireless SSID, Channel Width, Frequency, and so on.
4.These radios give you the ability to pass the router to manage the data according to the requirements you want by setting PPoE, IP management, DHCP, NAT, VLAN etc.
5. The player in these radio can also manage the virtual gates always according to the requirements we have, for example to capture this radio does not port 80 but another port (8080) and so on for SSH etc.
6. As all of these devices can update the system in a newer version by fixing many problems, there is also the name of the device and without forgetting the placement of the password to enter the radio that is indispensable for a radio that is online.
In this tutorial I showed the link between two radios to send the internet at a distance of 11.2 Km. And as I have shown in the picture below, one of the radios should be Stion and the other one should be Acsses Point and the configuration below is almost only one with the exception that at Acsses Point we should set the frequency. To find a frequency as clear as possible from interferences I will show you in a tutorial in the future.
0 notes
Text
PHP Live Chat Pro Nulled Download

First of all I should say that, I have chosen this item after long searching period of live chat applications. This one is quiet satisfying and meeting your needs. Compare to other monthly billed applications, php live chat pro is much more efficient, effective and economic.
Firstly i will briefly write about pros: +Cheaper than all other applications +If you server is fast enough then it works very well. +There is an option admin initiated talk +Android app +Canned Messages
Now i will mention things that i wish authors will add them soon: -Didn’t find triggered automatic messages such as after visitor visit certain pages automatic customized messages welcomes them based on page. -No ios app -No windows app -Emojis are quite weird feeling so nostalgic -Geo location is not accurate sometimes working sometimes not working.
To continue the installation you have to start with the admin because the code is very private and not for everyone.
Live Support Chat. PHP & MySQL based. For any website. No monthly fees.
Works with any website – HTML, PHP, WordPress, Joomla, Drupal, OpenCart (any website with PHP & MySQL back-end)!
Easy installation
Departments
File sharing
Operator initiated talks
Map with chatting visitors
Full translation support
Images & videos in the chat box
Widget display blacklist
Geolocation
Automatic language switch
Widget can display in the left/right-bottom corners or inline
Performance settings (users & chat refresh rate, maximum number of chatting users)
Compatible even with IE9!
Works on any PHP 5 & MySQL server
Contact form fallback
Mobile support (responsive guest widget)
Desktop Notifications
Multiple operators and guests chatting
Clean and modern look
High quality set of avatar images
Chat box with high quality emoticons set
Initial „welcome” message after guest logs in
Operator knows which page the guest is currently visiting!
Message views auto-updating their relative delivery time
Sound notifications (10 predefined sounds to choose from)
Conversations history with filtering
Widget colors and texts/language customization
Unlimited usage — no monthly fees
Requirements:
PHP 5 or 7 (with PDO support),
MySQL 5.
To continue the installation you have to start with the admin because the code is very private and not for everyone.
Download Now
0 notes
Text
Introduction to TCP/IP Networking

This chapter covers the following exam topics: 1.0 Network Fundamentals 1.1 Compare and contrast OSI and TCP/IP models 1.2 Compare and contrast TCP and UDP protocols Welcome t o the first chapter in your study for CCENT and CCNA! This chapter begins Part I, which focuses on the basics of networking. Because networks require all the devices to follow the rules, this part starts with a discussion of networking models, which gives you a big-picture view of the networking rules. You can think of a networking model as you think of a set of architectural plans for building a house. A lot of different people work on building your house, such as framers, electricians, bricklayers, painters, and so on. The blueprint helps ensure that all the different pieces of the house work together as a whole. Similarly, the people who make networking products, and the people who use those products to build their own computer networks, follow a particular networking model. That networking model defines rules about how each part of the network should work, as well as how the parts should work together, so that the entire network functions correctly. The CCNA exams include detailed coverage of one networking model: Transmission Control Protocol/Internet Protocol (T CP/IP). TCP/IP is the most pervasively used networking model in the history of networking. You can find support for TCP/IP on practically every computer operating system (OS) in existence today, from mobile phones to mainframe computers. Every network built using Cisco products today supports TCP/IP. And not surprisingly, the CCNA Routing and Switching exams focus heavily on TCP/IP. The exams also compare TCP/IP to a second networking model, called the Open Systems Interconnection (OSI) reference model. Historically, OSI was the first large effort to create a vendor-neutral networking model. Because of that timing, many of the terms used in networking today come from the OSI model, so this chapter’s section on OSI discusses OSI and the related terminology. “Do I Know This Already?” Quiz Take the quiz (either here, or use the PCPT software) if you want to use the score to help you decide how much time to spend on this chapter. The answers are at the bottom of the page following the quiz, and the explanations are in DVD Appendix C and in the PCPT software.
TCP/IP Networking Model
A networking model, s ometimes also called either a networking architecture or networking blueprint, refers to a comprehensive set of documents. Individually, each document describes one small function required for a network; collectively, these documents define everything that should happen for a computer network to work. Some documents define a protocol, which is a set of logical rules that devices must follow to communicate. Other documents define some physical requirements for networking. For example, a document could define the voltage and current levels used on a particular cable when transmitting data.
You can think of a networking model as you think of an architectural blueprint for building a house. Sure, you can build a house without the blueprint. However, the blueprint can ensure that the house has the right foundation and structure so that it will not fall down, and it has the correct hidden spaces to accommodate the plumbing, electrical, gas, and so on. Also, the many different people that build the house using the blueprint—such as framers, electricians, bricklayers, painters, and so on—know that if they follow the blueprint, their part of the work should not cause problems for the other workers. Similarly, you could build your own network—write your own software, build your own networking cards, and so on—to create a network. However, it is much easier to simply buy and use products that already conform to some well-known networking model or blueprint. Because the networking product vendors build their products with some networking model in mind, their products should work well t ogether. History Leading to TCP/IP Today, t he world of computer networking uses one networking model: TCP/IP. However, the world has not always been so simple. Once upon a time, networking protocols didn’t exist, including TCP/IP. Vendors created the first networking protocols; these protocols supported only that vendor’s computers. For example, IBM published its S ystems Network Architecture (SNA) networking model in 1974. Other vendors also created their own proprietary networking models. As a result, if your company bought computers from three vendors, network engineers often had to create three different networks based on the networking models created by each company, and then somehow connect those networks, making the combined networks much more complex. The left side of Figure 1-3 shows the general idea of what a company’s enterprise network might have looked like back in the 1980s, before TCP/IP became common in enterprise internetworks.
0 notes
Text
How to creat Spanning Tree , VLAN

When an interface on the firewall is configured for a Layer 2 deployment, the firewall now rewrites the inbound Port VLAN ID (PVID) number in a Cisco per-VLAN spanning tree (PVST+) or Rapid PVST+ bridge protocol data unit (BPDU) to the proper outbound VLAN ID number and forwards the BPDU out. This default behavior beginning in PAN-OS 7.1 allows the firewall to correctly tag Cisco proprietary PVST+ and Rapid PVST+ frames between Cisco switches in VLANs on either side of the firewall so that spanning tree loop detection using Cisco PVST+ and Rapid PVST+ can function properly. The firewall is not participating in the Spanning Tree Protocol (STP) election process and there is no behavior change for other types of spanning tree.
This feature is supported on Layer 2 Ethernet and Aggregated Ethernet (AE) interfaces only. The firewall supports a PVID range of 1-4,094 with a native VLAN ID of 1 to be compatible with the Cisco native VLAN implementation.
To support the PVST+ BPDU rewrite feature, PAN-OS now supports the concept of a PVST+ native VLAN. Frames sent to and received from a native VLAN are untagged with a PVID equal to the native VLAN. All switches and firewalls in the same Layer 2 deployment must have the same native VLAN for PVST+ to function properly. Although the Cisco native VLAN defaults to vlan1, the VLAN ID could be a number other than 1.
For example, the firewall is configured with a VLAN object (named VLAN_BRIDGE), which describes the interfaces and subinterfaces that belong to a switch or broadcast domain. In this example, the VLAN includes three subinterfaces: ethernet1/21.100 tagged with 100, ethernet1/22.1000 tagged with 1000, and ethernet1/23.1500 tagged with 1500
0 notes
Text
Nulled WowWay v2.1.3 – Interactive & Responsive Portfolio Theme

WowWay wordpress theme is definitely a unbelievably unique in addition to highly dynamic WordPress platform based web theme intended for inventive profiles. Based upon the responsive grid, filled up with a lot of awesome capabilities plus designed on a powerful admin board, this could turn out to be the perfect template for you personally!
A few of the features:
Unique design
Fully responsive
Retina ready
AJAX portfolios
Smooth effects
Complex modal window projects
AJAX gallery with minimalistic galleries
Minimal blog
Interactive contact maps
Shortcodes generator
41 pages manual
Valid HTML5 code
Blazing fast
Support Policy
Due to the large amount of support questions and for keeping everything organized, all tickets will be directed through my private support forum: http://wordpress-support.krownthemes.com/
Please check out the Knowledge Base (which is constantly improving) before posting tickets there, to see if your questions aren’t already answered.
We do not offer refunds for our themes, except when you find a real bug which we are unwilling to fix. Our themes function exactly as we advertise them, so no refunds are given for reasons such as mistake purchasing or customization problems.
More Information: http://themeforest.net/item/wowway-interactive-responsive-portfolio-theme/2374321
http://ul.to/3xwqad1l
http://www.mirrorcreator.com/files/JBQI6OF9/WowWay_v2.1.3_-_Interactive___Responsive_Portfolio_Theme.rar_links
https://tusfiles.net/kw5121o301y1
http://www32.zippyshare.com/v/HbC9bRvZ/file.html
http://ge.tt/7jcEr7m2
http://turbobit.net/86jvqn7hzyd1.html
https://userscloud.com/0z7aawd9azl0
http://uppit.com/enyvl18kd19z
http://www.girlshare.ro/3489904226.6
0 notes
Text
Nulled Sailing v1.13.1 – Hotel WordPress Theme

Sailing wordpress theme is usually a design template made for hotel web-sites. It’s excellent fit with regard to operating hotel, vacation resort and other accommodations website pages. The wordpress platforms template comes equipped with a reservations program that your particular clients will certainly love. Sailing wordpress platform based web theme is equally incredibly breathtaking as well as functional at the same time. This can be the ideal web template with regards to your hotel and resort site.
Download Link and Mirrors:
http://ul.to/hzddj1mf http://ge.tt/31BN87m2 http://www.mirrorcreator.com/files/QICQG0A8/Sailing_v1.13.1_-_Hotel_WordPress_Theme.zip_links https://tusfiles.net/rik52uq4rzg4 https://userscloud.com/e3iy76jd8sag http://www74.zippyshare.com/v/W2W5siH9/file.html http://turbobit.net/85fo69efi5t7.html http://uppit.com/kvo07esdaz6e http://www.girlshare.ro/3489903606.2
0 notes
Text
Nulled Blanco v3.6.2 – Responsive WordPress Woo/E-Commerce Theme

Blanco wordpress theme is truly a fresh, straightforward to customise WordPress design template. With Quite a few fresh options such as potent admin module, slideshow, new items display on homepage, further links in addition to blocks and so forth. This specific WordPress theme is one of the most highly effective along with versatile templates pertaining to WordPress web page merchants.
Download Link and Mirrors
:
http://ul.to/6aar25ss http://www17.zippyshare.com/v/qwWlp1id/file.html https://tusfiles.net/j5ugxnrr4a1u http://www.mirrorcreator.com/files/0LAGAFDM/Blanco_v3.6.2_-_Responsive_WordPress_Woo_E-Commerce_Theme.rar_links http://turbobit.net/nxv7x94c0f2a.html http://ge.tt/7TToq7m2 https://userscloud.com/hmhu3c65sa7u http://uppit.com/079a5gejbpe4 http://www.girlshare.ro/3489904213.4
0 notes
Text
Convert any website into an Android application with Android Studio
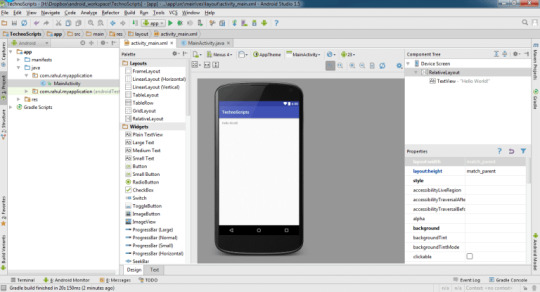
Now you can create an Android app for your website within minutes. With Android studio, you can automatically convert any web site into Android application. Just we have to follow some steps.
Every startup company, Business, Firm, and all organizations have their websites. Without website, there is no business firm or company. But maximum people are using internet on their mobile and the android is a very popular operating system now-a-days, and many people addicted to phone so everyone has android phone. Because of this reason, every startup company, Business, Firm, and all organizations are starting mobile application development.
There are varieties of mobiles with different operating system. But commonly every organization starts mobile application development with Android OS. Because which is very popular and maximum users have an Android phone.
The following steps will help you to convert any website into an Android application with Android Studio:
activity_main.xml
<?xml version=“1.0” encoding=“utf-8”?> <FrameLayout xmlns:android=“http://schemas.android.com/apk/res/android” xmlns:tools=“http://schemas.android.com/tools” android:layout_width=“match_parent” android:layout_height=“match_parent” android:paddingBottom=“5dp” android:paddingLeft=“5dp” android:paddingRight=“5dp” android:paddingTop=“5dp” android:orientation=“vertical” android:gravity=“center_horizontal|center_vertical” tools:context=“com.rahul.technoscripts.MainActivity”> <WebView android:id=“@+id/webView” android:layout_width=“fill_parent” android:layout_height=“fill_parent” /> <LinearLayout android:id=“@+id/layoutProgress” android:layout_width=“fill_parent” android:layout_height=“fill_parent” android:orientation=“vertical” android:gravity=“center_horizontal|center_vertical” > <TextView android:id=“@+id/textLoading” android:text=“@string/label_loading” android:textSize=“20sp” android:textStyle=“bold” android:layout_width=“wrap_content” android:layout_height=“wrap_content” /> <View android:layout_width=“fill_parent” android:layout_height=“20dp” /> <ProgressBar android:layout_width=“fill_parent” android:layout_height=“wrap_content” android:id=“@+id/progressBar” style=“?android:attr/progressBarStyleLarge” android:layout_gravity=“center_vertical” /> </LinearLayout> </FrameLayout>
strings.xml
<resources> <string name=“app_name”>Technoscripts</string> <string name=“label_loading”>Loading…</string> </resources>
MainActivity.java
package com.rahul.technoscripts; import android.content.Context; import android.graphics.Bitmap; import android.net.ConnectivityManager; import android.net.NetworkInfo; import android.support.v7.app.AppCompatActivity; import android.os.Bundle; import android.view.View; import android.webkit.WebSettings; import android.webkit.WebView; import android.webkit.WebViewClient; import android.widget.LinearLayout; import android.widget.ProgressBar; import android.widget.Toast; public class MainActivity extends AppCompatActivity { private WebView webView; private ProgressBar progressBar; private LinearLayout layoutProgress; @Override protected void onCreate(Bundle savedInstanceState) { super.onCreate(savedInstanceState); setContentView(R.layout.activity_main); webView = (WebView) findViewById(R.id.webView); progressBar = (ProgressBar) findViewById(R.id.progressBar); layoutProgress = (LinearLayout) findViewById(R.id.layoutProgress); webView.setVisibility(View.GONE); WebSettings settings = webView.getSettings(); settings.setJavaScriptEnabled(true); settings.setBuiltInZoomControls(true); settings.setSupportZoom(true); settings.setDisplayZoomControls(false); webView.setWebViewClient(new WebViewClient() { @Override public boolean shouldOverrideUrlLoading(WebView view, String url) { view.loadUrl(url); return true; } @Override public void onPageFinished(WebView view, String url) { webView.setVisibility(View.VISIBLE); layoutProgress.setVisibility(View.GONE); progressBar.setIndeterminate(false); super.onPageFinished(view, url); } @Override public void onPageStarted(WebView view, String url, Bitmap favicon) { layoutProgress.setVisibility(View.VISIBLE); progressBar.setIndeterminate(true); super.onPageStarted(view, url, favicon); } }); if(isOnline()) { webView.loadUrl(“http://www.technoscripts.com/”); } else { String summary = “<html><body><font color=’red’>No Internet Connection</font></body></html>”; webView.loadData(summary, “text/html”, null); toast(“No Internet Connection.”); } } private void toast(String message) { Toast.makeText(this, message, Toast.LENGTH_LONG).show(); } private boolean isOnline() { ConnectivityManager cm = (ConnectivityManager) getSystemService(Context.CONNECTIVITY_SERVICE); NetworkInfo netInfo = cm.getActiveNetworkInfo(); return (netInfo != null && netInfo.isConnected()); } }
AndroidManifest.xm
<?xml version=“1.0” encoding=“utf-8”?> <manifest xmlns:android=“http://schemas.android.com/apk/res/android” package=“com.rahul.technoscripts”> android:versionCode=“1” android:versionName=“1.0” > <uses-sdk android:minSdkVersion=“8” android:targetSdkVersion=“23” /> <uses-permission android:name=“android.permission.INTERNET” /> <uses-permission android:name=“android.permission.ACCESS_NETWORK_STATE” /> <application android:allowBackup=“true” android:icon=“@mipmap/ic_launcher” android:label=“@string/app_name” android:supportsRtl=“true” android:theme=“@style/AppTheme”> <activity android:name=“.MainActivity”> <intent-filter> <action android:name=“android.intent.action.MAIN” /> <category android:name=“android.intent.category.LAUNCHER” /> </intent-filter> </activity> </application> </manifest>
0 notes
Text
How to config Mikrotik
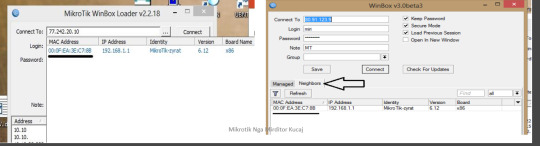
This tutorial explains how to configure the Mikrotik with the Winbox program. The Mikrotik as a router provides us with many configuration options that enable us as an ISP to have: 1. Higher control in end devices 2. Advanced configuration options 3. Troubleshoot (with tools that can pinpoint problems that may have a client)
How to access the Mikrotik
Usually the new Mikrotik come with a default configuration that provides IP IP with class 192.168.88.xx where the Mikrotik IP is ..88.1 A chrome / firefox (ip ..88.1) browser opens the microcut menu where you you are given the option to download the winbox program. If it is configured before and you do not have usr / pass with reset it returns to default settings again with IP ..88.1 (Reset is done by pressing the reset button while removing and setting the power).
Winbox
• There are two ways to open the Mikrotik with the winbox.
• By IP, which may be public or private. The advantage of this is that you can access remote.
• By mac address. This requires that the microcomputer and pc be in the same LAN (broadcast domain)
After accessing the microprojector with winbox (mac or IP), the first step is to delete the default configuration. This is done at system-reset configuration (check-> no default configuration). The terminal is the command:
system reset-configuration no-defaults = yes
• After reset, the only way to enter the microticker is via the MAC. In this way there are times when the winbox disconnects with the microprocessor while you continue configuring.
• If this does not happen, you need to right-click and select add uptime if time continues to be connected unless you connect again.
PPPoE
• PPPoE is the way of connecting to abissnet. We need to create a mictonic interface. This is done in MENU: -> interfaces (tab interface) -> + -> PPPoE-client.
• In the General tab of the name, write Abissnet while in the interfaces we choose the port that is related to the abissnet ie the wan port that is usually ether1 (if ether1 does not work to select another port that should not be in the bridge)
• On the Dial Out tab we fill out the Username Password and check-ojme Add to default route and Use peer DNS
0 notes
Text
Next to config Mikrotik

DNS
• In our setup mode, the microcomputer behaves as the first DNS with PC, laptop, cellular clients etc. MENU -> IP -> DNS
BRIDGE
• Simple routers have a WAN port and 4 LAN ports, we will also configure the microprocessor in this way. Gate 1 (ether1) will be WAN while other ports and wireless when there are LANs. To join the ports we create a BRIDGE interface.
• MENU: Bridge (tab bridge) -> + name set LAN name -> ok to add ports go to tabs Ports -> + to Interface select port to add (or wlan1 (wireless when microtop to WiFi)) and to Bridge choose LAN. This is done for any ports that will be added.
IP & DHCP server
The router will set up a private ip that will be a gateway for hosts / clients. This is set to MENU: IP -> Addresses -> + to ip address address ip 192.168.1.1/24 (any number can be placed, for example 192.168.66.1 if the client is selected) and choose the bridge interface LAN that we created to join the ports -> OK After setting ip, create a DHCP server to enable the router / microticker to give the ip ip. DHCP Setup -> choose LAN interface -> Next -> Next> Next> Next -> OK
NAT & Filter
• MENU: IP-> Firewall -> tab Filter rules-> + -> tab General -> fill / select Chain = input, protocol = udp, dst.port = 53, In. interface = Abissnet and on the Action tab, choose DROP
Port Forwarding
• If customers have static IPs and have DVR cameras. You need to know the Public IP, Private DVR and DVR ports (eg 8080.34567) MENU: -> IP -> Firewall tab NAT and +
WIRELESS
• Models 951 or 751 are wireless. The wlan1 interface should not be forgotten to be included in the LAN bridge so that wireless clients are in the same network with cable clients (plus receiving IP ip from the DHCP server that was created on the LAN bridge). MENU: Wireless -> tabs Interfaces -> wlan1 wireless tabs mikrotik
USER & IDENTITY
• Each router has usr / pass to login. This usr / pass is also used by the winbox to log in to the Mikrotik. MENU: System-> Users .. Here the username will be the admin while the password should be a username of PPPoE ie 04430XXXX plus and ip of the access that will be ip of the Office Public IP and the subnet LAN 192.168.0.0/16 this for security reasons the router enters only from our offices or from the customer’s network)
• If the client wants to have a custom usr / pass add a new but no ACL with the above ip.
IDENTITY
Mikrotik Routers We put an identity to be identified in the network. In our case, we put the name in the customer’s contract
GRAPHING
• This serves to monitor router and router performance (CPU, RAM)
• This is done in MENU: Tools -> Graphing. To the tab Interface rules add PPPoE Abissnet (so I monitor PPPoE traffic) and to the resource rules tab just plus + and ok
0 notes
Text
Mikrotik : How to Block Facebook – Youtube and Other sites using L7 (Layer7)
Below i will show you how to block facebook and youtube sites using Mikrotik L7 Protocols (Layer 7). here i use RouterBoardOS RB951Ui 2ND.

STEP 1:
you have to create new Regexp rule at Layer7 Protocols by Press
, and name it as “DENIED” (withoue quote), see details below:
Firewall
^.+(facebook.com|youtube).*$
After you have written and followed the steps above you should continue
to take the second step.
STEP 2
Every peg that is shown in the picture is necessary to follow the dog otherwise we will not have the result. Another option is to set up an IP which can be placed as requested. If we put 192.168.1.0/24 then we have blocked all the IP block coming from this microticker. If you want to block only 1 - IP enough to write just that example 192.168.1.102. And you will see that only this IP can not open either FB or Youtube
0 notes
Text
How to creat VPN in Mikrotik – PPTP

PPTP setup for MIKROTIK
Once logged in, click on the “PPP” tab on the left-side menu. You should have the “Interface” tab open. Now click on the “+” sign and select “PPTP Client”
(Please make sure you enter the correct details in the appropriate fields. Use the images as guides also)
This new window that you’ve opened is where you’ll create your PPTP VPN connection. Please edit the settings as follows:
Name: In this field, you can enter anything you like, for example “pptp-out1”.
Max MTU and Max MRU: 1490
When you’re done, please click on the “Dial Out” tab (right next to the “General” tab).
User: Your account username Password: Type your special PPTP password. Allow: Leave only maschap1 and mschap2 authentication methods checked.
Click on “OK” when you’re done. (Please double-check all settings before clicking “OK”)
Now please go to the “IP” tab on the left-side bar and select “Firewall”. Click on the “NAT” tab and then click on sign”+”, as shown below.
You should be in the “General” settings now so please carry out the following:
In “Chain”, select “srcnat” from the drop down menu
In “Out. Interface”, select the name of the pptp-out1 connection you just created.
Click on the “Action” tab when you’re done.
In the “Action” field, select “Masquerade” from the drop down menu.
Click “OK” when you’re done.
Now that you’re back to the “Firewall” window, click on the “Mangle” tab, click on the “+” sign:
In “Chain”, select “prerouting” from the drop down menu.
In “Src. Adress”, enter the IP range you want to have routed through the VPN connection. To
When you’re done, click on the “Action” tab
route all IPs in the Mikrotik routers subnet (assuming the router is 192.168.88.1), enter
“192.168.88.2-192.168.88.254”.
Now that you’re in the “Action” tab, please edit the settings as explained below:
In the “Action” field, select “mark routing”from the drop-down menu.
In the “New Routing Mark” field, enter any name for the routing mark, e.g. “vpn”
Check “Passthrough” option.
Click “OK”, when you’re done.
Now, click on “IP” (in the left side menu). In the “Routes List” window, click on “Routes” and then click on the “+” sign.
Dst. Address: has to be “0.0.0.0/0” Gateway: Enter the name of the VPN connection you created. (in this case it’s “pptp-out1”) from the drop down menu. Routing Mark: Select the routing mark you created before. (e.g. “vpn”) Click “OK” when you’re done.
0 notes
Text
How to setup Hotspot in Mikrotik (Full)
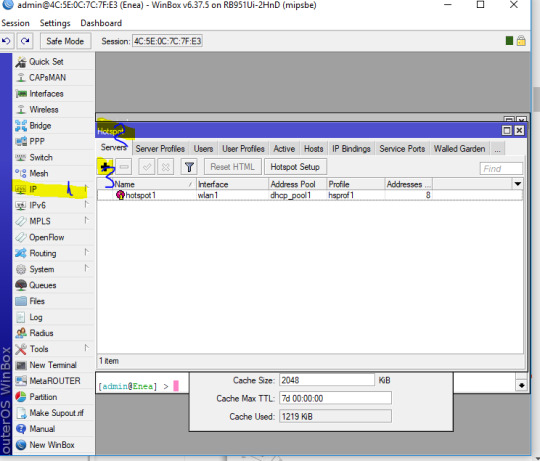
To better control the internet that comes out of your Mikrotik there is an option that the microtop offers for free it is HOTSPOT. The hotspot is an option that helps you control the internet coming out of your router. Both LAN and WLAN modes. In the configuration that I have shown below, it seems that the WLAN output should be commanded in the Hotspot by also setting the template to set the user pass. For any ambiguity I will help you with comments or on the Blog Page.
Let’s begin.
Setup IP Address Ethernet.
In my case, the Mikrotik to connect to the internet, simply by setting IP address dhcp. Open winbox, Click IP – DHCP Client. In the open dialog box, click plus (+)
The new Open dialog box will be appear again, like below. Select ether1 interface, and check peer dns, ntp peer and the default route. Then click Ok.
Click new Terminal. Make sure Mikrotik connect to internet. Use command ping. Look at picture below.
Setting DNS
Click IP – DNS. In the open dialog box, click Settings. New open dialog will be appear. Input IP DNS in the box Servers, for example 8.8.8.8 or add DNS your ISP examle 80.91.12.34. and check Allow Remote Requests. Then click OK.
Setting NTP (Network Time Protocol)
Click System – NTP Client. Continue to check enable and select Unicast mode, and then input IP address for Primary NTP Server & Secondary NTP Server, as shown below. Then click OK.
Setting Mikrotik Hotspot
Continue to setting Hotspot. Click IP – Hotspot
In the Hotspot dialog box, Click Hotspot Setup.
Then Mikrotik Hotspot Setup wizard, will be appear. This is easiest way to setup Hotspot interface in Mikrotik. IP address for Ethernet, DHCP Server, routing and firewall will be configured automatically. In the Mikrotik Hotspot Setup wizard, select ether2 as hotspot interface. Then click Next.
Set hotspot IP address. Then click Next
Set Pool dhcp, then click Next
Because we don’t have SMTP server, enter 0.0.0.0. Click Next
In the wizard Setup DNS, input IP DNS, then click Next
For DNS name, leave blank, then click Next.
Create users, and password, then click Next
Done. Setup has completed successfully.
Back to the Mikrotik Hotspot dialog box. Click tab Server Profiles, then click twice to hsprof1 (look at example picture below). New open dialog box will appear about Hotspot Server Profile.
And then in tab Login, make sure in the section “Login By”, uncheck cookie, then click OK.
Until here, Mikrotik has been successfully configured as a hotspot. For testing of the client, create a voucher for the user / client. In the Mikrotik Hotspot dialog box, select tab Users – plus (+)
In the new open dialog box, input name & password. You can customize how the speed, duration of use, the mac address, and so on. It depends on your desire. Then click OK.
In the computer client, browsing to any site, If the login page appears, it means mikrotik hotspot is working properly. Input username and password, that have been created. If everything is normal, the browser will be redirect to destination site.
0 notes