
Don't wanna be here? Send us removal request.
Statistics
We looked inside some of the posts by tyronemw and here's what we found interesting.
Average Info
Notes Per Post
0
Likes Per Post
0
Reblog Per Post
0
Reply Per Post
0
Time Between Posts
31 minutes
Number of Posts By Type
Text
17
Last Seen Tumblr Blogs


Fun Fact
Tumblr Inc. has $15.1M in annual revenue.
Text
Developing Skills - Further Development - Red Vs Blue
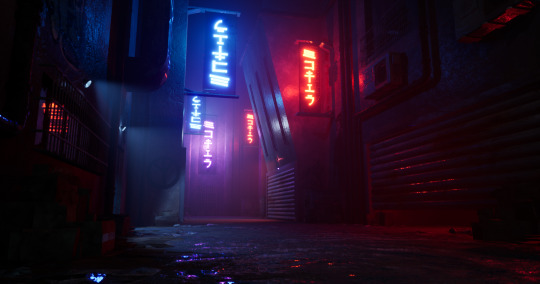
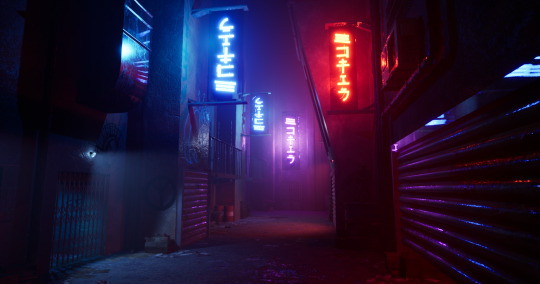
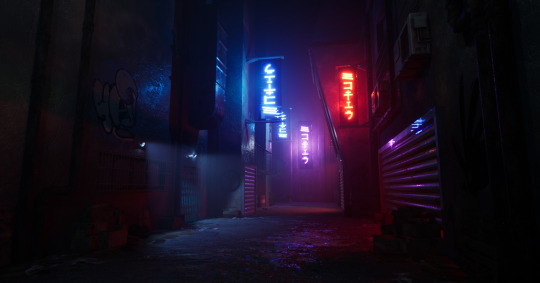
Today I just set up some cameras and messed around with the sequencer to get some static and action shots of my scene, really trying to capture the essence of scene and show off all the angles that the scene has to offer. I began with the main hero shot of it down the middle, as well as a few angled to the left and to the right. I wanted to make sure that I had got the right composition, using the leading lines towards the end of the alleyway looking towards the purple neon light at the back to really display the lights well and showcase the reflections and how every prop has its place in the scene and display its quality.
After messing around with the cameras settings make sure I got the correct focal lengths and composition, I made sure not to do too much with the colour grading as I wanted it the environment to look as real to what the scene actually is as possible, I wanted it to be as genuine as possible so I didn’t really touch those settings, with all this done, I captured the images and everything from now was completed!


0 notes
Text
Developing Skills - Further Development - Red Vs Blue
Over the last week I have made few and slight details over the scene, but at last I would say the piece is now done! I am very happy with the way it looks and feel like I have stuck to the plan of what I wanted to have achieved from the start and have captured well what it feels like to be in the heart of a busy urban city down in the alley ways of a dystopian cyberpunk world.
After completing this environment, id like to look back on a few things that I would change or if I had more time to learn and develop what I would do differently or add to the scene. Starting of with the screen that would display something like an advert or showcase something, one thing I would admit my scene is lacking is a bit of movement somewhere, everything is very static so something to create a bit of movement I think would serve the scene well. I wasn’t able to get this done in time as I felt like I need to make sure that other parts of the environment was well done and done in time, this felt like the sacrifice that had to be made given the time it would have taken for me to learn how to get this done along with how important it was to the scene, and overall I had to make the decision that the scene could go without it, though I would love to revisit this as a future asset to the scene.
Another thing I would do different is trying to better keep up with time management and plan when I want things to be done by, I know things like Gantt charts can be helpful understand when you need to start and have things finished by. With this environment I found myself not knowing how much time I would need for certain things and found that most times when I was creating an asset or creating a texture, I would actually take way more time that I initially anticipated. With the added extra of working full time outside of university I always try to dedicate a lot of time towards my studies but sometimes wish I had more time so I can really dive deeper into creating an environment with even more details and even more parts. I do understand however that in the games industry there is always deadlines to hit and targets that need to be met so it’s a good way of learning how to manage time correctly.
0 notes
Text
Developing Skills - Further Development - Red Vs Blue
The completion of the urban cyberpunk alley way is almost coming to an end! I would say that the environment now is more or less done, however there are a few details and alterations that I still wanted to make. These alterations are more based on look and feel rather than strict design focus from the mood board and plans. I feel like these types of changes are a good thing in the sense that somethings its good to change things in what feels better rather than keeping it strict on the real-life aspect or judging environments based on what it would look like in real life.
Some of the changes I made was duplicating the walls and adding them on top of the already places ones to fill in the space that was above the buildings, it felt a bit empty towards the top of the scene so adding some height to fill it in like a canopy created a more atmospheric feel and enclosed the scene a bit more to really heighten that tall building alley way vibe.
Another addition, though not much of a change, but I did add an atmospheric fog and post process volume to really kick out the most of the colours and feel of the environment, the atmospheric fog is a very powerful tool and you can really notice the difference with and without this effect, I like it a lot because it also adds more notice of the interaction between it and the beam of the lights.
I plan on setting up the cameras and taking some short clips and images of the environment to use to showcase the scene, and once that has finished, I believe this piece has been completed!

0 notes
Text
Developing Skills - Further Development - Red Vs Blue
As mention the other week, I have been looking at changing the roughness values of the materials and adding puddles to the scene, this has had a big impact to the scene because the reflections from the walls and the floors bounce the light and gives it that better level of detail that you would fine in high quality games.
Here is where I also added some graffiti to the walls, I did not design the graffiti and instead downloaded them from Fab, from the user Casein[1] which has some high quality 2D Art for free so used that and fit that into the scene. I added these just to give it a bit more detail into the scene and some personality into the environment of it being an urban cyberpunk alleyway.
I also made some basic window textures using a plane from Maya and texturing it inside of substance painter, these window panes would be used in a few locations around the environment, but not to many so I knew that I only needed to create two different versions of a single pane, and I would then be able to duplicate this without it looking to obviously repeated.
I first thought that I would want to emit a light from the window pane to give and sense that someone would be in and the light is on, that was what I was originally thinking however I also thought it might be best if I keep them off to not cast more unnecessary light into the scene as I wanted the main focus to be held in the centre of the hero shot with the red and blue neon lights being the focal point. I figured if there were more lights to the side of the buildings too it would diminish from the vibrance and eye catching part of the main priority of the scene that is the neon lights so I decided against lighting the windows.

[1] https://www.fab.com/listings/8dd2a8b5-3e85-48ff-9872-893cd6c509d3
0 notes
Text
Developing Skills - Further Development - Red Vs Blue
After creating the 3D Signs and adding the emissive colour to the neon signs I further looked at the general lighting of the scene and focused on that for the past weeks. I also had to make some creative choices and changes for a few different reasons. Starting with some of the changes, I wanted to have the scene done within the next couple weeks, this is because I didn’t want to get stuck in perfecting the scene to every minute detail which I know I can be slightly susceptible to do. Going back on the mood board and the concept piece of which I’ve based my environment on as mention before, there are a few creative difference I have decided to change, one being the small shop on the right, there are many small intricate parts of this small area that I fear would take up a lot of time, so decided to just use a metal shutter and shut half of, but have a small light emitting from the space that is open, this way it gives off a bit of a mysterious impression as to what could be under there but still fits the theming very well. Another change I have decided to make was to scrap the interactive TV on the wall, again more because of time constraints, the way that the environment is looking without it currently still looks very good in my opinion, though granted this is something that maybe I could go back on and add in the future as it also seems like quite a complicated task to perform correctly and for it too look like a high quality piece of work. I still do like this idea of having this so maybe will come back to this later on if the time is available.
As for the lighting I have included a few spotlights around the scene of both blue and red to fit the theming of the Red vs Blue for the module, a couple of blue spotlights on the left in areas that would have lights such as doorways or shop openings, and some on the right too. The spotlights and neon signs would be my only source of light, so I made sure to pay attention to the details of these as I knew I needed to get it right to really give off that cyberpunk alley way vibe.
When creating all of the textures one thing I didn’t take into consideration would how they would interact with the lighting in the scene, so as of right now everything seems a little flat, I will look into changing some roughness values and adding puddles to the floor so that the reflections can really bring more life into the scene.
0 notes
Text
Developing Skills - Further Development - Red Vs Blue
I started making some progress towards the neon signs, I wasn’t too sure on how exactly I wanted to go about making these, but the first thing that I tried was making a basic 2D plane in maya and exporting that into Unreal Engine. I then went into photoshop and drew together some Japanese Symbols for the neon sign to roughly the same sizes as the plane. With the symbols done I then exported the texture into unreal and made it into an emissive material as I need the neon signs to glow and produce light like they do.

I found that I wasn’t quite getting the results I wanted with the emissive colour onto a 2D plane, so decided to instead make the sign in Maya and use a 3D object and apply the emissive material to a 3D object instead of a 3D one, of which the desired effects came out much better. The 2D material wasn’t emitting that much light and even after cranking up the intensity on it from the material instance, still wasn’t giving it that glow that I wanted. I wanted the signs to be the main source of light for my scene, so it was important that I got it right, after trying it with a 3D model instead the emitted light looks much more vibrant and in place, lighting the scene nicely and looking very authentic.

(Screenshots of images are from a later version, but including them as a progress pictures on the neon signs)
0 notes
Text
Developing Skills - Further Development - Red Vs Blue
Making good progress on the environment so far and continued making more of the bigger props, this time I’m making a doorway metal shutter, some tv screen brackets as well as some safety metal guards to go over the windows. With these again similar to the other week, using the same workflow as all the other bigger props made by modelling them in Maya and UV unwrapping, then taking them into substance painter to then texture it, ready to be used into unreal engine.

I also need to start looking into how I will get the big screen on the side of the building working, this is something that would be new to me and something I haven’t really touched on inside of unreal at all as I would like to have a big screen displaying something like an advertisement, but rather than a picture its displaying an actual video. I think this would really give the scene some life and some movement, however given the position of it, I don’t want it to interfere to much with the red and blue signs with to much emitted light going on.
0 notes
Text
Developing Skills - Further Development - Red Vs Blue
Over the last couple of weeks I have been just adding props and continuing with making items for the asset library, things just as the Aircon unit, the air vent, metal stairway etc, all of these props was made using the same work flow as I had used for the rusty metal pipe in which I created them in Maya and UV unwrapped them, to then take them into Substance Painter to get the desired texture, and then add them both into Unreal and place them into the scene.

There are a few other props I have added into the scene, however these was not made by me, I wanted to added some more rubbish and rubble to the floor to give it more of an authentic feel to a real life alleyway, lots of these style of alleys always have junk and trash to the sides of them and are never completely clean so I knew I needed to incorporate that look into the scene. I wanted to save some time rather than create all of these props myself, and I found a really good quality one on the Fab store which I downloaded and added to the scene. The Industry Props Pack 6 by SilverTm[1] provided a free download with high quality assets including newspaper pieces, cardboard, barrels, wooden pallets and more. Using this pack allowed me to focus on the bigger pieces at hand and save some time with my project. I understand the importance of these finer props and how they can really tie a scene together so I knew that I wanted something of a high quality, but I also need to make sure that I stay on time with the project as creating these all from scratch myself would be very time consuming.
[1] https://www.fab.com/listings/b5603e44-e1b0-4346-9c3d-04887aa9f87d
0 notes
Text
Developing Skills - Further Development - Red Vs Blue
With the main body of the environment more filled in, I started to look at the smaller, modular pieces that I can make, and duplicate around the scene, things like the metal shutters and pipes. With the pipes, I have created 3 different versions, a short pipe, a long pipe and a 90-degree angle pipe, these would be enough to get some nice shapes and geometry added to the scene. I created these pipes in Maya and UV unwrapped them ready to be textured, again trying to make sure that they are decently detailed with the number of vertices without going over the top that could affect performance. Different to the walls, I have decided to use Substance Painter to texture these objects. I feel like subject painter is better for these types of objects as they are more personal to the object and will most likely only be used to texture the particular object in hand. With substance painter I would say I have more experience in this than I am than with substance designer, I created a rusty pipe texture within substance to really give off a cyber punk alleyway vibe, rusty metal with a low roughness amount so that I can really get a glisten from the material when reflecting off of the lights, and feel like its meant to be there within the environment. With this texture I then went about it in the normal way of exporting the textures and uploading them into unreal engine, creating a basic material shader and applying it to the pipes I uploaded from Maya into unreal engine. I then placed the pipes around the environment and the blockout.

0 notes
Text
Developing Skills - Further Development - Red Vs Blue
Creating the wall and floor texture I decided to use Substance Designer, I’m not all too experienced in this software and have only used it a handful of times but understand the basics and what it is and does. I also know that it is a very powerful tool in the world of 3D, with everything made in Substance Designer being procedural, means that any and every part of the process can be changed along the way. I wanted to first give it a go with my knowledge of substance and create a somewhat basic texture for the walls, using some different noises with some blends to create a plastery and worn look to the texture, with the use of other noises and greyscales to achieve the scratches. Overall I was happy with the way it turned out. As for the floor I wanted to really challenge and increase my knowledge of the software and learn more about it, I had found this YouTube[1] video by Nathan Mackenzie[2] detailing how he makes a warn tarmac texture within substance designer, this helped a lot as it demonstrates not just how to get the desired results, but because there is a lot to it can help me use different techniques to achieve other results, introducing me to a lot of other tools and nodes and how they can be used. The way that this turned out I am very happy with, I like the detail shown with the stones, the colours really do give off a more authentic look of classic stone rubble flooring, however I may make some more changes in the future depending on how I’m feeling with its place in the environment, possibly making it more dark grey and asphalt looking. I was able to create a few materials after exporting them from designer, I had the original wall texture made with grey, and then after saving and exporting it, changed the colour to a more washed out beige colour and exported them too, then I could create the two materials in unreal and use the brush tool to vertex paint and get a really nice effect on the walls for some extra details.

[1] https://www.youtube.com/watch?v=6JjsWIYZ618&t=1s
[2] https://www.artstation.com/nathanmackenzie
0 notes
Text
Developing Skills - Further Development - Red Vs Blue
I started researching and looking at what pieces I would need to use for the modular kit, with the main shapes down from the blockout with the doorways and windows etc, I now could start making work on the wall pieces for the modular kit. I created all of the modular pieces in Maya, I enjoy using Maya as I have the most experience using this software and understand that it is used in the gaming industry a lot so its within my best interest to use this as much as possible. I need to make sure that the way pieces have enough vertices on them, but at the same time not too many. I plan on creating 2 wall textures in the future, and vertex blending them together in Unreal Engine to create a bit of variety and get a really good-looking cement texture for it. My first ideas are to create a cement style wall texture with two different colours, a dark grey and a light grey, so that I can the vertex blend the two textures together to give of this nice warn effect on some areas of the wall. I must be careful not to give the wall too many vertices however as too many can become an issue in performance, the walls are a big part of the environment so they do need to be high in detail, the more vertices the more detail the texture will look once applied, though does come at a price of hardware performance, so that is something I will need to consider.

0 notes
Text
Developing Skills - Further Development - Red Vs Blue
With the main blockout completed for the environment, I have a good idea for the general layout of the scene and what kind of composition I would have for the layout. With the blockout now in place it enables me and sets me up for iteration of the piece without major rework. First thing i wanted to start looking at was the modular pieces and set up and the asset gym that I would need to create. I understand that working with modular assets is a very efficient way to build and environment and planning the asset gym helps understand what it is that needs to be created and can be a good way to get things done in a timely manner.
With Modular pieces, these are the pieces that usually can make up the majority of the scene, building walls or doorways, parts of a roof or structural planes can be part of a modular kit. Modular kits are super useful in modern day 3D environments as it can save a lot of time, rather than creating 5 different houses individually, creating each part of a house as its own wall, window, doorway, roof piece, you can then snap them together in a game engine to create different versions and improve variety. The asset gym is something a little more specialised, for my environment of a cyberpunk alleyway theme, things like air vents or aircon units, pipes or neon signs, these assets are a little more unique in its place in the environment but still hold great importance.
0 notes
Text
Developing Skills - Further Development - Red Vs Blue
I began working on the block out for the cyberpunk alleyway environment, I found myself always referring to the same image from my mood board, which was the work of Vitaly[1] as mentioned before, so I decided to use this piece as the main inspiration for the environment. The reason as to why I like this environment so much is because I feel like it has a lot to offer, the little shop on the right-hand side, emitting light and showing a bit of life to the environment. Where is on the left is quite dark dull a bit of mystery as to, we don't know what could be going on inside the building, possibly an apartment, but I like the fact that is up for interpretation, and I could always change this part of the environment to better suit what I would want. Looking further on down the alleyway, you can see what looks like a large building far in the distance, giving off the perception that the alleyway is only a small part of a much larger scope. I knew I needed to incorporate the red versus blue theme, going back to my initial ideas I still think that having the neon lights either side of the buildings could make for a really cinematic and ambient look to the environment, one side would have red neon lights the other side would have blue neon lights and maybe further on in the back could be a purple neon light where in the middle of the environment the two contrast of colours combine, maybe with a purple neon light of its own. I created a basic blockout in Maya using the reference from my mood board, just so I could start to put thoughts and ideas into practise.

[1] https://www.artstation.com/artwork/W2ba32
0 notes
Text
Developing Skills - Further Development - Places of the Mind
Project completed, I’ve now stopped working on my Places of the Mind project, and the farmhouse is now complete! With the project now done, id like to look back and reflect on how I have found working on the project, my thoughts, and some takeaways from this project.
Starting with how I feel about the end result, I think given what I wanted to do with the project from the beginning I’m happy with the number of methods, techniques and tools I was able to use within this project to make it happen. I’ve used a number of different software’s, Maya, ZBrush, Painter, Designer and Unreal and used them to a decent capability to the point where I feel comfortable using any of the software again now to create a high-quality artifact. With all this considered, I’ve learnt so much with creating this project, however I do feel like I can up the quality of some of the textures and objects and create more detail in those areas to really make everything look a bit sharper and cleaner.
An area I would like to tackle is the lighting, I had no real intention on tackling lighting in this project as there was already so much happening within the project, and as for a first project I fear I would have been a bit to overwhelmed, so thought it best to just keep it as it is and not do to much with the lighting in this scene as it didn’t really need to much adjustments anyway. There could have been an opportunity to create a dark and sinister atmosphere with the windows emitting a light and some added fog effects which could have worked quite well as an option, though I know I will be looking at this area much more in detail in the next project.
I like to think of this project as the practice for the next one, now I’m in the feel of everything regarding what it takes to create a 3D environment, I’m very positive, excited and inspired to create a really good piece next time! So overall I’m happy as I have hit my own personal goals and outcomes from this environment, and eager to really show my skills in the next!


0 notes
Text
Developing Skills - Further Development - Places of the Mind
The scene is very much coming together with not much left to go now! I have been continuing on with the blockout just adding more parts that needed to be replaced from the blockout and overall, just making progress. I sculpted a brick within ZBrush and used the low poly high poly technique to create the stones around some edges of the farmhouse, adding in the windows with the wooden trim sheets along with some wooden boxes using the other wooden texture I created.
There are only a few last bits I need to do just to finalize the scene, some last parts in the blockout, a few tweaks on some materials, and then setting up some cameras for compositions. I forgot to mention I added a forest skybox just to add a little bit more feel to the farmhouse, however I’m unsure if I will keep this in the final render.
I’m looking forward to the next couple weeks and seeing the progress I’ve made over the last couple months with this project and will give a full breakdown and review on it then!
0 notes
Text
Developing Skills - Further Development - Places of the Mind
Overall, I’m quite happy with how the farmhouse is looking so far, I’m slowly adding the parts into the unreal engine with the blockout, and everything is going fairly smoothly after importing everything and making the materials etc. At this point I did have another decision to make and that’s if I was to attempt making the trees seen in the reference photo. Personally, I don’t enjoy making foliage and it is by far my worst attribute, so I had a couple thought processes before coming to a decision.
I could start creating the tree and going through and learning its process which I know will take me a lot of time to get done and correct, I am familiar with the workflow but it’s the quality which I really need work on, I could spend some time in perfecting that. Alternatively, I could focus on the hard surface materials and not include the trees but focus more on what I enjoy and what I want to focus on more, I ultimately choose to do this. The reason for this is for 2 reasons, the first being the time element, it would take me a significant amount of time to be able to get this done at a high standard and would require a lot of practice as I have attempt it before in my own time and found it quite challenging, I think I would rather practice it separately, not in a project where the whole scene could get ruined by the sight of poorly created tree looking like an eye saw, and just practice the craft that way in my own time. The second reason is because hard surfaces is more my area and I enjoy that the most, I understand that as an environmental artist you want to be able to make and create anything you may be asked to create, but hard surfaces in environments is something I want to master, and I believe in the gaming industry its better to be a master at one particular thing over a jack of all trades.

0 notes
Text
Developing Skills - Further Development - Places of the Mind
Over the course of the last couple weeks, I’ve been using painter and designer to create some textures for the scene, I took a look at the blockout and asset gym and made a list of all the main textures that I would have to create in both software’s respectively, I created 2 wooden textures, one for the wooden beams that I had made earlier in the project, and another for other parts such as the door, and window trims. A patchy concrete texture, giving the walls some depth and character, adding in marks and scratches to show age, a cracked roof texture for the roof, stone patterns for the stables and chimney along with a grassy texture for the flooring.
These textures aren’t too difficult to create, it was more about getting used to the tools and techniques again, but overall, I’m happy to how they have turned out and I’m much more confident I can create better textures next time around now that I’ve had a bit of practice. I will look into bring all of these together within the next couple of weeks, meaning ill start to put it all together within unreal engine to really see how much progress I’ve made and how the environment is looking.

0 notes