
Don't wanna be here? Send us removal request.
Statistics
We looked inside some of the posts by uni-livebrief and here's what we found interesting.
Average Info
Notes Per Post
0
Likes Per Post
0
Reblog Per Post
0
Reply Per Post
0
Time Between Posts
3 days
Number of Posts By Type
Text
9
Last Seen Tumblr Blogs


Fun Fact
The “We are the 99%” Tumblr blog became the slogan for the Occupy Wall Street movement.
Text
Reflection
Throughout this project, I have learned a lot about myself and group work. I have expanded my understanding of the industry by practicing elements outside of my skill range. Even though we were a small group I believe we have achieved an amazing outcome but there is no doubt I wish I had more time or freedom to work on the models. However, when faced with other tasks and issues I couldn’t spend as much time on them as I wished. In the future, I think I would take on less work and spread it out more to the rest of the team as Modelling and texturing 3 Characters by myself felt like a lot of work, and was easily overwhelmed. I do wish I added more detail to these models as they felt too flat and rough but the overall concept for them, I think was very good despite not being my expertise.
0 notes
Text
Uploading and Finalisation
With the characters completed my next goal was to upload these files to Google Drive where Zoe could download them and import them into the unreal project. However, the lack of experience with unreal led to multiple problems when trying to transfer these files.
For the cutscene, they required animations which meant transferring the model to Mixamo and applying a t pose ready for other Mixamo animations. This meant turning the A pose of the models into a T pose. First to prepare the model I must join all the mesh together and remove all existing information such as the textures, and armature from previous work as well as reset any rotations or scaling effects. I originally exported it as FBX however, it struggled to read the skeleton of the mesh so once exported as an OBJ it worked. Once Mixamo has given the mesh the T pose I'll export it back into Blender however, when importing the animations the arms would cross over. This is because the mesh is still being read as A Pose, so I'll have to duplicate the armature and apply the armature to force the T pose and then reset all transformations on the original armature.
Once that issue was fixed, I first exported the T pose to unreal however there were a lot of issues, firstly there were many extra bones added as well and the rotation of the model was incorrect along with scale. This was because the measurements and information in Unreal are far different in Blender.

After some trial and error, I was able to correct the transformations for the T pose to face the correct way by changing its forward axis to Y. I was also able to remove the extra bones by turning off the leaf bones. The scale was fixed by increasing the scale by 50 within the options as well.
However, whilst exporting these FBXs there were no materials to apply to the mesh this was because it was removed for Mixamo. Therefore, I had to read them all and assign them to each part of the mesh which will allow Zoe to apply the meshes back onto the material. Whilst doing this for the warrior there was an unknown issue as to why the file would become corrupted when attempting to add the materials. Unsure what's causing this I exported mesh as OBJ which fixed most of the errors however certain parts of the texture were unable to show up on the mesh such as the weapon. With limited time we decided to put this issue aside and place some base textures on the weapon for now.
Another issue whilst uploading these T Poses was Unreal’s inability to read the empties provided by Blender. Because of this, I had to reimport all the T Poses along with the weapons and then simply weight-paint them to a bone for it to follow. It is like empties but you lose a lot of control over the weapons and are unable to move them, however, did provide a fix in the meantime. The final issue to fix was to rename the Armature to something else such as “Warrior_rig” This just allows Unreal to read the armature easier and avoid future issues.
Now with the T Poses working correctly, I was able to continue working on the animations. This was luckily far easier as it required just copying the animations onto the T-pose's Rig and exporting them. I first baked the animations before exporting them ensuring I remove NLA strips as this likely causes a few animation issues. One small issue was clipping in the rogue's animation so to fix this I went back to the T Pose and used the inflate tool in sculpt to push out the mesh more to avoid clipping. These were all exported as FBX as this provides better animation bakes.
0 notes
Text
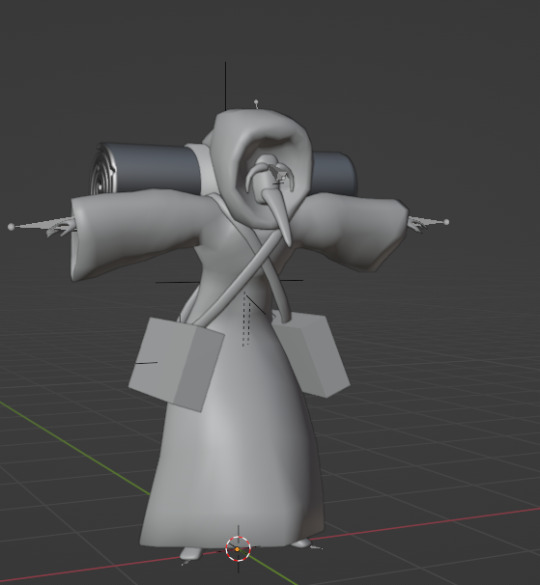
Character Work – ROGUE
Finally, I finished off my last character, the rogue using what I have learned from previous characters. To create the wraps, I couldn’t use the base mesh and instead must use planes that are shrink-wrapped around the mesh, this will force the plane to follow the shape. I looped the planes around the mesh before adding a solidifier modifier to thicken them. Repeated the original method for other clothing such as the pants by using the base mesh, selecting the shape of the pants, and duplicating that mesh. Created a separate mesh which I then adjusted the shape later to fit the reference. To add more detail I duplicated the wraps and created higher poly ones to sculpt creases to give it a more natural feel. I did the same with the pants as well. This would all be later baked into the low poly as normals.
Next is to check how the model looks in motion by adding a rig. I used Mixamo as it automatically adds a rig for me which will allow me to spend more time fixing the weight paints if needed just to check how the model looks moving. The only issue was some stretching with the wraps that joined themselves to the arms which were easily fixed.

With the modeling part done, I could move on to texturing. Like before I exported the low poly meshes into Substance Painter where I can use the base textures and modifiers to create dirt. I would also create my own layers to touch up adding shadows where needed. I also brought in the high poly meshes that would bake onto the low poly meshes to add a little more detail. Once done this was all exported back into Blender where the textures were added to the model. Finally, the swords made by Alec were imported in and joined to the rig by using empties same as the Mage and Warrior.
0 notes
Text
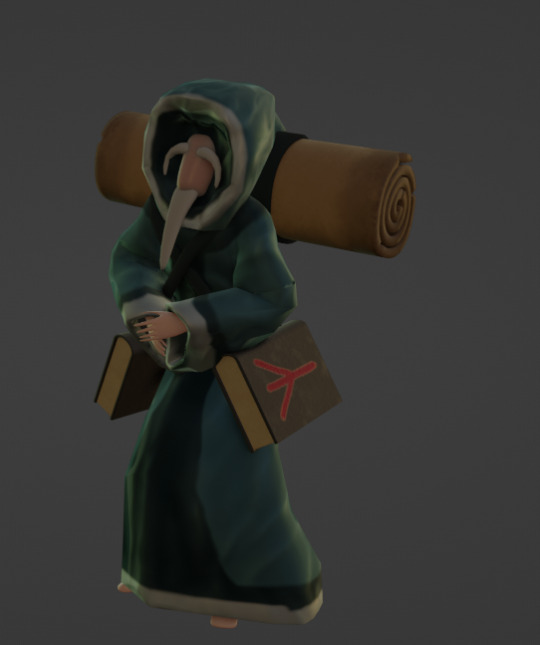
Character Work – MAGE
Today, I worked on the modeling of the Mage, which would be a guide that turns evil within the project cutscene. Starting off similarly to the Warrior, I changed the body shape of the base mesh provided using the sculpting tool to make him skinny.
I then began shaping out the main clothing for him which is his robe and hood. I originally was going to make them connected however, the unique shape of the hood would not be able to be created with cloth simulation. Therefore, the robe itself was created by cloth simulation which then is turned into a full mesh that is solidified. To add the folds to the mesh I used the low poly mesh and added the modifier multiresolution to give me more vertices to sculpt details. The hood was created separately and was blocked out using the reference. Both were UV unwrapped ready to be textured later.
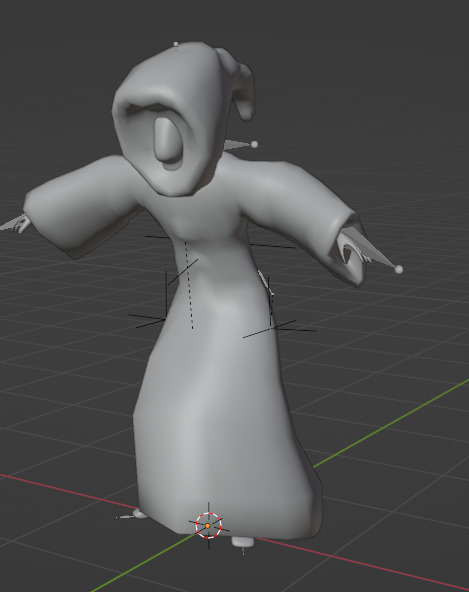
Next adding the rig to the mesh, using the base mesh of the body I imported it into Mixamo which adds an auto rig to the mesh where I can download animations. Importing the rig into Blender I replaced the old mesh with the new rigged mesh to apply the clothing.
To add clothes to the rig I used mesh transfer data which uses the already weight-painted body to copy the same weights onto the clothing. This was not perfect so did require some touch-ups but worked well. The hood however was attached by parenting the object to the bone as it only needs to follow the head like the warrior’s helmet. To add more movement/life to the hood I created extra bones that have a damp track which causes the bones to sway when the head moves. This was all weight painted to the hood later. Extra assets to the mesh such as books, scrolls, and hair. The creation of these assets was created by Zoe which I then added to the scene. Similarly to the hood, I used parenting to join objects such as the scroll, books, or straps to follow the rig and its animations.
Finally, I created and added the textures to the meshes, for the clothing I used substance painter. Downloading online I used the premade smart martial known as silk. Using this as a base creates the desired visual, we were after whilst also tweaking it to make it match the colours and patterns of the concept.
Exporting these textures separately however in the future I believe the better option is to create joined uv maps to avoid having to create as many separate textures as possible.
0 notes
Text
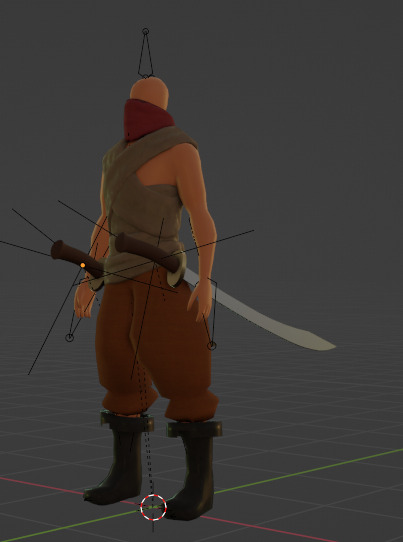
Character Work – WARRIOR
Today I started with creating the 3D characters for the cutscene. Firstly, I’ll be creating the Warrior. As originally planned, I had found an Asset with a 3D mesh Base which will allow me to start off quicker and keep proportions correct. As his build is far bigger, I used the sculpt tool and grabbed the mesh to pull it into shape.

With the base mesh in shape next was to add clothing. There were two methods to do this, originally I wanted to use cloth simulation and sewing. However, I found it very laggy to use and was very finicky to get the correct simulation without clipping. Instead, I opted to use sculpting by using the base mesh and duplicating the shape of the clothing before adding a solidifier modifier. This gave me more control however It did mean the clothing would become static. A personal goal was to add a cape which would be done by using Blender’s cloth simulation, however, did not require sewing so there were few clipping issues. Therefore, to begin doing this I needed to add a rig to the mesh to test the simulation out. To do this I brought the base mesh to Mixamo to add a skeleton and walk animation. By adding collision around itself and the base mesh It was able to perform a good simulation.
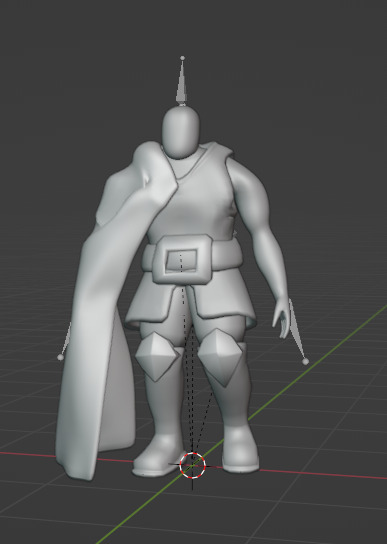
With most of the clothes added to the mesh, my next goal was to add the extra parts of the mesh onto the model such as the weapons and helmet I used empties. Empties are ways to join meshes to a rig whilst still maintaining control over its transforms this is great for meshes that might be removed or moved around. Once these are joined to the mesh they follow its movement without needing any form of weight painting. These meshes were made separately by Zoe and Alec which was to be added later.

0 notes
Text
Second Concepts
Today I returned to concept art again to create new concepts suggested as the original designs made them far too similar. Therefore, we opted to use a different theme, so I began researching and finding references for the new concepts. I used Pureref to create a clear Ref sheet for each character.


Once collected all the images I began building up a silhouette of the characters using similar methods within Photoshop when I created the first concepts. This time I had the advantage of different armour and weapons of characters to help create more dynamic silhouettes.
Main Character (Warrior)

SideKick Character (Rogue)

Guide Character (Mage)
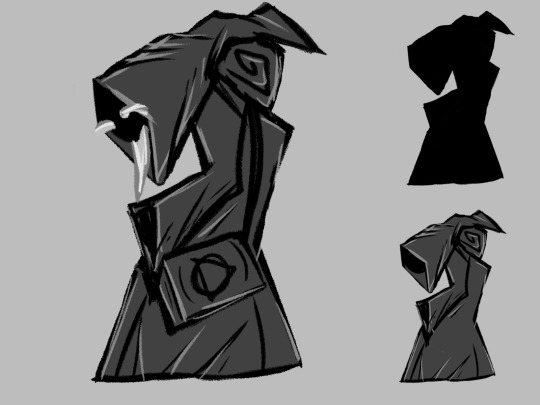
Once completed with the silhouettes I shared my progress with the team to see their opinion on the concepts. With their approval, I began adding colour to these characters to help build up a better concept of the model to help with future texturing.


0 notes
Text
First Concepts
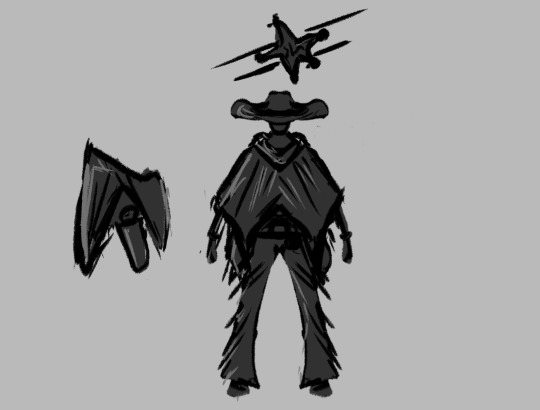
Today, I worked on concepts. With our group small and without a concept artist I was willing to take up the role of a concept artist to create more visualisation for the group as well as explore more about the role of concept artists. It was unclear what the theme of the potential characters was, so I started off with a similar theme to “Spy Kids 2” (Rodriguez, 2002), and “Indianan Jones” (Spielberg, 1984) by using a country style.

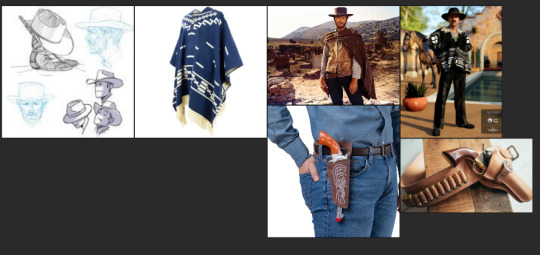
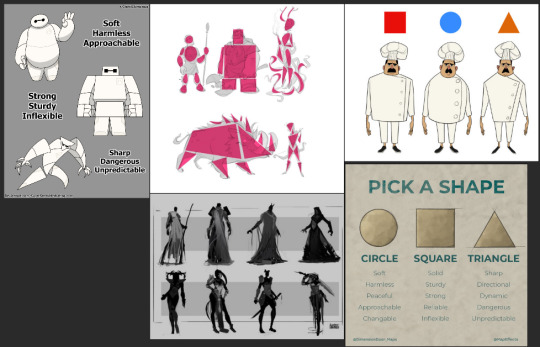
Using PureRef I began researching inspiration and general information on concept art such as shape language and how they create silhouette concepts. The idea is to create a range of designs to show different characteristics so people can read the personality of the character without context. This is very critical for the project as we are unable to provide dialog or any background story.
Main Character

Side Character
Guide Character

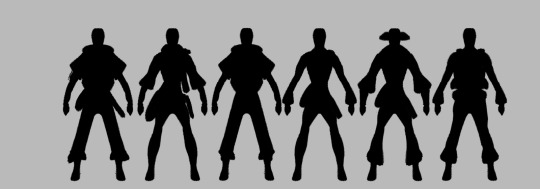
Using Photoshop I created a line of multiple designs of silhouettes for each character. These were then sent to my friends and the group to see what they thought would be best. Using this information, I can create the final concept which would be ready to be 3d modeled.
Final concepts
Main Character

Side Character

Guide Character
Reflection Showing this to David he suggests that they are all far too similar in their concepts and can be still too hard to tell the difference between the two. Therefore, would require a large change up. After returning to the team, we had a discussion on how to resolve this issue. In conclusion, we came up with the idea using the stereotypical RPG theme of Warrior, rouge/ranger, and mage. This way we can not only use weapons to separate the two but also the clothing, and armour type as well to communicate with the audience. References Rodriguez, R. (2002). Spy Kids 2: The Island of Lost Dreams. Dimension Film
Spielberg, S. (1984). Indiana Jones and the Temple of Doom. Paramount Pictures.
0 notes
Text
Idea Development
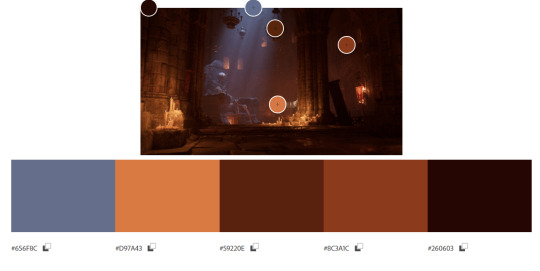
With all our ideas created, we had a discussion on the projects on what would be suitable without the time frame and team size. We settled with Alec’s concept of “Two adventurers led by a guide into what they thought was a place for treasure only to be betrayed and realise they’ve been led into a trap by the guide.” It's simple and focuses on the characters and the environment which is far more suited as we are 3-character artists. For today I was tasked with the colour pallet. I was taking up the concept Artist role I was also given the task of referencing out the colour pallet for the cutscene. There were a few sources of inspiration for colour themes such as “Spy Kids 2” (Rodriguez, 2002), “Indianan Jones” (Spielberg, 1984), and “Solo Leveling” (Chugong, 2016).
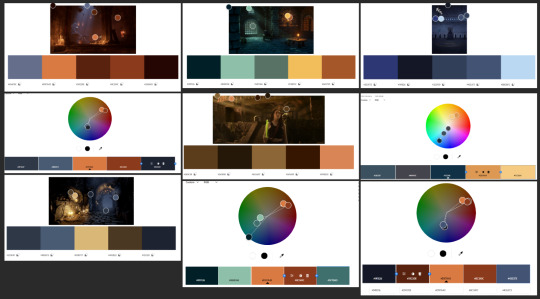
The colour theory of cold blues complements the warm orange which helps create the emotion we are looking for. Orange and red evoke the feeling of danger whilst blue evokes the feeling of cold and loneliness.
My next goal within the group was to create a block out of the potential scene that we wanted to create. This was a very rough design, but it will help the whole team visualise and stay on the same page. I created this block out by using blender and recording the scene to show the movement of the camera. I also made note of what each object is by colour, so we are aware of what's going on. I also took out core moments also known as “beats” and made notes of what was going on in the scene and the movement.
Creating a general Lighting scene as well to help the environmental artist get an idea of what the environment will look like and general spacing.

References
Chugong. (2016). Solo Leveling. [TV series]. Crunchyroll. Original air date: January 6, 2024. Fozworth. (2016). Darksouls Style Dungeon [3D Art]. Retrieved from https://polycount.com/discussion/181553/ue4-darksouls-style-dungeon Rodriguez, R. (2002). Spy Kids 2: The Island of Lost Dreams. Dimension Films. Soto, G. (2019). Lighting Study- Dungeon [3D Art]. Retrieved from https://www.artstation.com/artwork/A955Vz Spielberg, S. (1984). Indiana Jones and the Temple of Doom. Paramount Pictures. Wójciak, G. (2023). Dungeon Re-Light [3D Art]. Retrieved from https://www.artstation.com/artwork/vDEw4v
0 notes
Text
Initial idea
Idea 1 Antagonist: Mage Protagonists: Warrior and Ranger Location: Lava River/plains Start: Walking towards the lava river stepping in the first few rocks. Pans back to the mage straggling behind. Cutscene starts. Cutscene: Mage slams staff down and breaks the rocks in parts causing the other two to start floating off the river. The ranger attempts to shoot arrows at the mage but fails. Pans around as the protagonists scan their situation. Lava bubbling rock and potential lavafall. When noticing the waterfall, it pans back to the warriors' shoulders. Cutscene ends End: players then enter battle stance ready for movement. Inspiration: Ice age 3 (Saldanha et al., 2009), Star Wars 3 Anakin vs obi-wan (Lucas, 2005).
Idea 2 Antagonist: Head Chief Detective Protagonist: Two Junior Detectives Location: Town center late at night Start: juniors step out of a car followed by a separate car where the head chief is. Separated by clear typing of cars. Cutscene: both juniors start scanning the crime scene before they hear a gun click. They turn back to see the head aiming a gun at them. One shows fear and panic the other shows rage and aims to pull for his gun. He is then shot. The player's expression turns to rage and ducks behind some objects to hide from more shots. Pans the player back into battle to fight him. End: The player now is resting against the object shuffling with the sound of gunshots. Inspiration: line of duty (Mercurio, 2012), ashes to ashes (Graham et al., 2008), Detroit become human (Quantic Dream, 2018)
Idea 3 Antagonist: Tutorial lady Protagonists: New players Location: Starter zone. Forest. Start: Fighting slimes and the last one dies finishing the attack pose animation. A text box appears with a PNG of the tutorial lady. She begins congratulating the players. Cutscene: from the forest you see a shadow forming until you see a lady just like the tutorial lady claps approaching the players. She baits the players closer with rewards before drawing a sword to attack them. She throws a few swings before the cutscene ends to begin the fight. End: Players enter a battle stance ready for combat. Inspiration: Sword art online (Kawahara, 2009), Solo leveling (Chugong, 2016)
References
Chugong. (2016). Solo Leveling. [TV series]. Crunchyroll. Original air date: January 6, 2024.
Kawahara, R. (2009). Sword Art Online. [TV series]. Aniplex . Original air date: October 22, 2022
Mercurio, J. (2012). In Line of Duty. [TV series]. BBC Two. Original air date: June 26, 2012.
Graham, M., Jordan, T., & Pharoah, A. (2008). In Ashes to Ashes. [TV series]. BBC One. Original air date: January 7, 2008
Quantic Dream. (2018). Detroit: Become Human. [PlayStation 4]. Sony Interactive Entertainment.
Saldanha, C., & Thurmeier, M. (2009). Ice Age: Dawn of the Dinosaurs. Blue Sky Studios.
Lucas, G. (2005). Star Wars: Episode III - Revenge of the Sith. Lucasfilm.
0 notes