
Don't wanna be here? Send us removal request.
Statistics
We looked inside some of the posts by unit8586specialistisaacbewley and here's what we found interesting.
Average Info
Notes Per Post
4
Likes Per Post
4
Reblog Per Post
0
Reply Per Post
0
Time Between Posts
2 days
Number of Posts By Type
Video
1
Photo
6
Text
7
Last Seen Tumblr Blogs


Fun Fact
Tumblr’s website traffic is steadily declining.
Video
vimeo
https://vimeo.com/342202399
Final animated project
For my final project, I decided to do a short animation to tell a short and simple narrative about a few characters. In the end, I decided to try and portray a short story of a character hiding from a policeman in an older era (loosely based on Victorian), and this is what I based my animation off. In the industry, a project like this probably wouldn’t be a very large-scale production. The aim of telling a clear and simple narrative to a consumer is a format that can be utilised for many purposes, including things as advertising a product to full-on entertainment films and shows. However, due to the aesthetics and subject matter of my animation, I believe the most appropriate purpose for it in the industry would probably be as some form of entertainment for younger audiences.
At the very start of my project, I did a lot of research into CAPS and traditional animation including the history and development of it. I also unintentionally learned a few other things about the process through my research on various artists that work in the industry and have personally inspired me. This helped me understand a lot more about the process and gave me insight into what made a good digital animation which I was very grateful for, as previously I didn’t have much experience with animating a full piece in Adobe Animate. Although, doing research alone didn’t help me fully understand the processes and skills since I learn a lot from actually doing things myself as a kinaesthetic learner. This was a challenge to work with, as I didn’t exactly have the time to hone a large amount of skill and experience with Animate before starting production on the animation, but the only way to really build on this weakness would be to simply use Animate more and create more animations in the future. I could have also tried to do more preliminary test animations and exercises as part of my final project production, although this could have conflicted with my time management restrictions during the project.
Personally, I think that I did a very substantial amount of research on the topics of my chosen final project, and this is very apparent through my production logs and hopefully the effort I made to complete my project on time. Despite the fact I think some of the research I chose to do was not completely necessary to the project at hand and wasted a bit of my time (such as the very early history of CAPS and traditional animation), I think my analysis’ of my chosen artists and animators were very succinct when it came to detailing useful things about their art styles and techniques and I even experimented with techniques inspired by their processes in my final project to help save time and enhance my aesthetic.
In total, I did research on 5 different artists and also looked into the history and development of CAPS and traditional animation. I was mainly interested in the history of the latter as I believed the same principals and methods would be useful for digital animation, and for the most part I was correct although the history itself was not as relevant. I chose artists and animators that drew in all sorts of styles and specialised in various things, although in hindsight I realise that nearly all of my chosen artists graduated from the same animation college and this did make my research pool a little stale. However, simply going to the same school didn’t make their work any less unique or offer less things to learn from, so this wasn’t a large issue in the end and overall I learned a variety of things.
As part of my analysis’, I wrote about some aspects of the related animators’ process and work that I felt I could perhaps transfer to my own development. These were mainly things about their style and production that I believed would save me time, with things such as considering doing a more messy and less polished lining style in order to save time while also exploring a potential new aesthetic. I think I used my research very well in this aspect, as overall using new methods inspired by these processes, I managed to complete the brunt of my animation within 2-3 days. The vast majority of the development in this final project has actually been more about the writing, so I would consider this a sign that I utilised my research very well and definitely took away key lessons that adhered to my project proposal and self-imposed goals of time management.
Compared to other projects, thankfully I had a lot less problems than I anticipated. One of the major problems I had with the project, however, was an issue where I realised I would not have enough time to do a more complex animation that I had storyboarded out before final production where the character moves their entire body to look behind them. This was difficult to deal with, as without the action the rest of the animation looked rather stale and boring. It was hard to find a compromise since it was hard to continue to make the animation look dynamic and interesting without the body of the main character moving at all, but in the end I decided I could salvage the animation of the head moving, and keep the rest of the body static. This did effect the overall quality of the animation, but it did help me save time and adhere to the guidelines in my project proposal. To try and make the animation more interesting to look at I also decided to add in a policeman character at a very late stage of development. The animations on this character were not the most polished either, but using colour and the composition of the animation I think I managed to add in a lot more interest to the overall piece and got it to remain still visually engaging and interesting for my chosen audience. While I did manage to solve this problem in a somewhat effective way, a lesson I took away from this was that perhaps I should have put in more effort to the pre-production and storyboards, as this issue could have been completely avoided if I drew the storyboards more consistently and had more time to perfect them. This is less of a time management issue and more of a priority issue that I should keep in mind for future endeavors.
I think for the most part, I planned out my production very well. My overall goal was to improve on my time management and make sure to finish everything within my deadline, and I am glad that I achieved this goal that I set out in my project proposal. However I ran into a few issues with prioritising which parts of development to focus on and do more work for - the key offender of this was how much research I put into the history of animation rather than having more time to perfect my storyboards so I could preserve the more complex animations that I wanted to use to make my animation look visually appealing. While in the end I did somewhat manage to work past these problems and still meet my goal of finishing all of my work on time and get it polished to a good standard, I now know that I need to work on understanding what aspects of my production process I need to prioritise and work more diligently on.
Honestly, I think I didn’t use as much practical skill as I could have in the final animation. A lot of this was down to me needing to cut out some animations that I didn’t have the time to perfect, and although me not including these extra animations did help me meet my goal of finishing the project on time it definitely does detract from the whole appeal of the animation. Some of the motions are quite stiff, and though I did try and make it flow as nicely as I could it is not as smooth as I initially envisioned it to be. Quality of the animation itself aside, however, I think that I did really good work on the colours and creating the background and shadows. I had a lot of difficulty narrowing down what sort of art style to do, and in the end I am very pleased with the aesthetic and quality of the background and extra effects. While this doesn’t completely make up for the lack of dynamic animations, it did help with keeping my animation more engaging and it is good progress towards improving on background and environments in general. I also included a few principals of animation, although they weren’t completely obvious, but I think they added some nice little detail. The head moved in arcs which made it quite satisfying to look at, and I also included some small smear frames in the eye darting movements. While these little details weren’t bad, I think if I increased the scale of them and made the effects more noticeable it would have really increased the quality of my animation.
Generally working on this project has really helped me improve with navigating and using Adobe Animate. Beforehand I never really used it for much, and often deferred to using After Effects to create animations for tasks as it was very clean and smooth to use. However in order to create a sense of the ‘hand-drawn charm’ that I wanted to emulate after doing my moodboards and researching artists, I pushed myself to use Animate for a fully-fledged animated project and I think it has been a really vital and engaging experience for me. I also got the chance to experiment more with smear frames, which was very good as I did a small mini-teach lesson on them and I finally got the chance to exercise my skills and knowledge in a final project. Of course there are still a lot of things I need to improve, such as making more dynamic animations and the like, but I think I have made a very good start and my animation is still fairly appealing despite the flaws.
All in all, I am very pleased with my final project despite the disappointment with some aspects of it and the difficulties I had during development. In my project proposal, I outlined that my main goals to achieve in this project was to improve on my time management and use colour and shape to create a visually appealing animation for a younger audience. I think that my method of analysis for the artists I researched really did help make a difference in my final piece, as it helped me develop and flesh out aspects I was struggling with such as colour and art style to use, and this reflects well in the final animation in my opinion. Working on this project has also helped me recognise new goals that I need to work on in future, such as prioritising different aspects during development and using critical thinking to consider if I need to be exhausting all of my effort into small insignificant parts of development (notably the research into the history of animation.
0 notes
Photo


Now I am in the process of animating and polishing off my final project. I have taken some images of my progress on various parts such as lining and colouring the characters and backgrounds, and I am very pleased with how it is turning out.
The colour scheme I have selected for my animation is a mix of grungy greys, blacks, blue and yellow. Taking into account the tests I did with my first preliminary storyboard and colour tests, the inspiration from my moodboard and the overall feeling of the actions in my final storyboards, I feel this colour scheme works very well with my overall final piece, as it helps engage my target audience well with the use of colour and also sells the narrative and scene I am trying to portray I decided later in development that I would not have the time to create an overly complicated and detailed background, so I drew it out in simple square shapes in Animate. I tried to emulate the lessons I learned from studying the art style of Rachel Kim, although instead of using curvy circular shapes to sell a dynamic character I tried to make a very oblong setting to reinforce the gloom of the setting. The images and environment of dark alleyways in my moodboard also inspired me, and when considering the main pose of the character in my storyboards I believed that an alleyway setting would be the most appropriate. It fit well with the actions where the character seemed to be peering at something, and also darting their eyes around the environment in concern.
I had created a quick mockup of the background in Paint Tool SAI before importing it into Animate to use as a base to create my final, more polished background. I decided to omit a few details and change things, notably the colour scheme for aforementioned reasons and a few hanging lights since I felt it didn’t fit very well and added too much detail into a background that I will be diverting the audience’s eyes away from anyway. I decided not to use the shape tools in Animate to form my backgrounds, as I felt this made the environment look far too rigid and not have the charm of a 'hand-drawn' animation at all. Using the pen tool to manually draw everything was my alternative, and while this may not have helped me in managing my time well I think that it made the bricks in the wall look pleasing visually alongside the rest of the background. I also think the fact the black gate also has somewhat wobbly lines adds to the charm of the piece as well, although admittedly I think the sewer pipes look a bit too rigid and didn't fit too well overall. However I don't have much time to spend perfecting the background, and since I selected the colours to make the characters stand out more I think this shouldn't be too noticeable to my target audience, as they will have their eyes drawn to the characters rather than the pipes on the wall.
Thanks to the use of my storyboards and sketches, drawing and animating the characters took a lot less time and issue as I had very clear bases to draw from and use. I used the basic pen tool to create smooth lineart, and then I used the bucket tool inbetween the lines to colour them in. I took a lot of inspiration from Grace Lee’s style of drawing, as she does clean (albeit a bit messy in some cases) lineart with clear dark colours. They are not messy sketch lines, but cleanly drawn from start to finish even if the proportions are slightly off. I thought this would work well with my animation as although it would sacrifice some proportions and potential frames, it would help me with my time management and generally clean and simple lineart is very pleasing to look at, which I also find important to engage with my younger target audience. Since I was only animating parts of the head and face with my foreground character, I drew his head and body on different layers so that I may save time drawing new frames that would move, as I wouldn’t disturb or need to redraw the body in order to do so for the head. I think this worked very well even though sometimes it was confusing to navigate so many layers.
So far, I have been using 2 keyframes for each movement frame. I decided to do this as from some tests with animation timing in my storyboards, I felt that this speed made the animated frames fast enough so that the illusion of movement is still present, but the movement does not happen so fast that it breaks the immersion and appeal of the animation. Doing the storyboards and animation tests helped me a lot to make these decisions, and if I had not done these earlier tests and parts of pre-production I would have likely lost a lot of time as I would have needed to rearrange and constantly reshuffle frames around in Animate.

0 notes
Photo


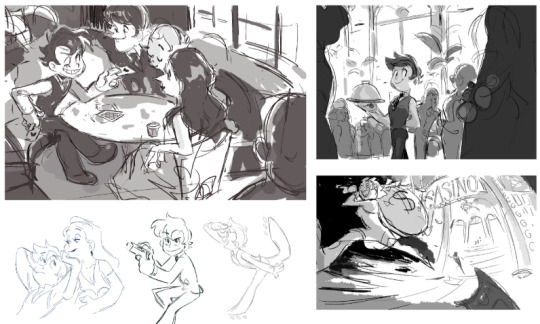
This is the final collection of storyboards I have made for my final animation. I have decided to go about creating storyboards by doing them for numerous basic animations, and the end goal is that I will select a few that I will use in my final animation and string them all together. There are some scrapped storyboards in this collection, but it is important to include them as it was a learning experience to experiment with numerous actions and determine which ones would and would not be included. I created these with Paint Tool SAI and animated them into a GIF with Photoshop.
While creating the storyboards I had to consider the narrative I was trying to tell with my animation, and create animations based off that story. To appeal to my target audience, the basic premise of the animation was a character ‘in hiding’, and this eventually evolved into a very ‘Fallen London-esque’ scene where a thief is hiding in an alley from a policeman. In order to show this story, my main animation ideas were generally shifty movements - eyes darting left to right, checking over shoulders, mouth movements in worry about getting caught. There were also some general ‘filler’ animations such as blinks, and I made sure to include those as I felt they would make the animation feel a bit more natural and would help the suspension of disbelief. In the end I was quite satisfied with my array of storyboards, but it was quite hard choosing which ones would make the cut into the final animation.
Very early on, I decided to not include the very drastic movement of the whole body moving up from the initial hunched pose, as I found this quite difficult to animate well with the time limit that I had. I also had a few difficulties doing this with the art style I selected, as the body was much more straight and lanky than the face and hair, so this made it quite hard to move it dynamically without it looking extremely clunky and generally off. I decided to scrap this animation which I was slightly disappointed by as it made the animations I was left with quite basic, but I thought the head turning animation would be key in selling the ‘in hiding’ narrative of the scene so I decided to adapt it so I could use it with the rest of the body staying still. This was a success, so even though I had to sacrifice a good character animation in order to keep the aesthetic and deadline I had intact, I still managed to salvage parts of it so that my final piece wouldn’t be completely stale in movement.
While it was quite hard to include some principals of animation in such small animations, I tried to include some principles so the animation could look slightly better, if any. The head turn in all my storyboards follow an arc pattern which makes it flow rather nicely, and I am quite pleased I managed to include it in my final set of storyboards. I also tried to use a slight smear frame on the darting eyes storyboard, and while it is quite a small thing I thought it added a nice effect if you pay attention to it.
Despite the restrictions with the main body, I feel like I made some good animations for the narrative I am trying to sell to my target audience. I think some of the smaller details might not be noticed much by them, and the decision to cut the one ‘noticeable’ animation might not go over well in entertainment value, but I think despite the smaller animations the story can still be somewhat seen. If it is visible in the storyboards, I think that means that my animation will look quite good when I have finished lining and colouring the whole thing in Animate.
1 note
·
View note
Photo


Now I am in the process of beginning to draft out my storyboards for my final animation. Here I have finished sketching the main pose of the animation, and have been doodling several face and emotion tests for potential use in the animation. I did a quick storyboard for a potential movement, but after cosidering time constraints I will likely be scrapping this as I don’t have the time nor have selected the appropriate art style to facilitate the body moving in such a way. After studying Kim’s art style, various aesthetics that fit my vision and theme for the animation, and taking pointers from my older storyboard and colour tests, I have confidently chosen my art style for this project and believe it fits the requirements I have set for this project.
For the bodies I have decided to do a slightly more realistic (albeit not by much) way of drawing them, mostly inspired by the lanky figured of Cotugno’s comic ‘The Glass Scientists’. I have decided to draw minimal and near to no clothing folds due to ease of drawing, and I think with the pose and general aesthetic I have chosen this suits the animation well. Due to time constraints I will likely not be moving the body of the main character much at all, so I figured it would be easier and quicker to have a more stiff body as this would be quick to draw and I wouldn’t need to make any additional frames or edits to it at all. For the face I took the lessons I learned from my Rachel Kim study and took my normal art style face and made it more circle-based and curvy with simple pupil eyes. The small emotion doodles I did alongside these drawings prove that I can still successfully show emotion with this design choice. However I didn’t completely curve the face, and I believe this was very successful as it makes the character look slightly older. This was key since I was trying to portray an adult character, and if I did the face exactly as Kim does then I feel it would throw my chosen narrative for the animation off since the character looks too young to be in the situation I am trying to portray. Since the brunt of the animation for this animation will be the head, this will help a lot (and has already in other storyboards in progress) with drawing new frames for the head and showing simple emotion. I also think this gives the art style a somewhat cute vibe despite the general aesthetic of the animation, which I feel is appropriate for my younger target audience.
I have also kept the hair very simple, and I decided to include the somewhat commonplace animation trope where the hair ‘switches around’ when the face is turning. While I was drawing the frames I expected it to be quite jarring when the animation occurred, but I was pleasantly surprised when it looked very nice in the storyboard. Keeping the hair fairly curly made it easy and fun to draw, so I decided to keep it as part of the character design. I am very satisfied with my final art style, and now I am confident in drawing it I can continue developing more storyboards. Creating the storyboards at this stage is very important, as they will save me a lot of time in Animate as I can simply trace the poses without needing to draw completely blind into Animate. Since I am content with my designs now, I will now be focusing on creating storyboards and selecting what animations I will be using.
0 notes
Photo


A few weeks into production, I am now in the stage where I am exploring art styles to use in my final animation. In my project proposal I outlined that I was going to use a simple, appealing and stylized art direction in my animation in order to connect more with my target audience and help meet my deadlines through better time management. Here I have decided to study the art style of Rachel Kim, as out of all the artists I have studied I believe her art style is the best to learn from in terms of simple but effective. Her designs and art style are very clear and concise, but she has stylized them very well so despite the cartoon proportions and anatomy we can clearly tell what the character is and what they are doing. I believe that her art style would also be simple enough that it helped her during the production of Diamond Jack and Burger Boss in terms of time management, and thus I spent a few pages studying it and trying to replicate frames from her animations in order to understand how her art style works. I do not intend to copy her art style outright for my final animation at all - rather the aim of this session was to see how she forms and creates her art so that I may use similar techniques to create my own unique art style and save time. Some of the later examples are me using Kim’s art style as inspiration and trying to create a new art style inspired by her style, but not close enough that it is just copying.
Like many artists, the foundations of Kim’s art is based on basic shapes. In particular the face and chest areas are composed heavily of circles, which gives them a very smooth and curvy look. This would have helped Kim in animating her characters in dynamic actions no doubt, but I do not plan on doing very movement intensive or dynamic animations due to time constraints so I will likely not make my art style too curvy, although I found the way Kim draws head shapes very useful. I found the way she draws eyes and faces in general very interesting and useful also - the lack of detailed pupils might make it harder to show some emotion, but they are very quick to draw and with the support of the rest of the face the lack of emotion from eyes alone can easily be forgiven. The curvy nature of the faces as well make them very easy to draw and also appealing to look at, and this is one of the key lessons that I took away from the study session. I think softening up the curve of my faces will help a lot with making them easier to draw while making them appealing, and this will help a lot with meeting my goals of time management and attractiveness to my target audience.
Overall I have learned a lot from these small studies on Kim’s style. While I don’t think her overall style of drawing bodies was very useful for me as it goes against my chosen aesthetic in my opinion, I thought her technique for drawing faces and eyes in particular were highly useful and have highlighted the importance of curves in simple art styles. Choosing to research a lot of cartoonists at the beginning of production was highly useful in this regard in general too, and I feel like I am getting closer to my final art style choice from their influence.
0 notes
Photo


Right now I am still in a somewhat early stage of development, and am still trying to narrow down the exact aesthetic that I am trying to achieve with my animation. Now that I have done some preliminary colour tests, I have a vague idea of the sort of colours and atmosphere I’d like to create in my animated scene, but it is still vital to explore exactly what I am wanting to create so I can adhere to the theme and gain inspiration for the gritty details of the project. One way to help do this is to create a moodboard, which I have done here.
While my preliminary animation test had a completely different theme to the one I have decided to go for my final animation, the colour tests I did gave a me a good idea of what palettes worked well with whatever other theme I came up with. I enjoyed the darker, somewhat gritty and muddy colours of green, browns and blacks, and thought this could make a very good atmosphere and offer a chance to explore some niche possibilities in atmosphere with the animation. With my idea of having an animation of a character ‘in hiding’, and a dark green colour scheme, I was immediately inspired by the aesthetics of the game ‘Fallen London’, which brought me to create this moodboard.
With the theme of a character ‘in hiding’ and the setting of Fallen London, a few ideas came to form. Putting two and two together, I immediately thought of the possibility of an old-timey urchin thief running away from the police, hiding in an alleyway, a sewer, or just generally skulking around. I decided to gather images of the environment first and foremost, as I have difficulty imagining and creating backgrounds and environments and I wanted to tackle this issue head-on for my final project. The imagery of a dark alleyway and grungy sewers stayed very clear in my mind, so I decided to include pictures of environments like that both old and new. I also gathered some pictures of the general colour scheme that inspired me as well (including a few pictures from the Fallen London game itself, since it in itself was such a big inspiration), and I decided to include a few pictures of the fashions of those times in case I needed any inspiration for potential characters that would show up in the animation.
In the past I generally did not use moodboards very effectively, but I think making this one has definitely helped me gather a few ideas for the development of my animation. Now that I have a moodboard and a solid selection of inspiration to draw on, I can start doing some sketchwork and trying to develop a potential character and actions that will happen in the animation. When I need to draw the background and environment of my animation also this moodboard should help a lot, as I made sure to include environments as well which resonated with the ideas in my mind.
1 note
·
View note
Photo


Now that I have decided on what my final project will be, I have decided to do some storyboard and colour tests for my animation. As these are just short tests to regain familiarity with Animate and also explore potential colour schemes they are not finished, but I believe they will help my production by letting me explore possible themes and colours.
Since I was very inspired by Grace Lee to do this type of format in the first place, I decided to do a test animation of something that would start as normal, but when properly animated would look a bit vivid and strange, so I decided to go for a quick drawing of a hand stirring a pot of honey. The colour tests were meant to give the strange esoteric feel to the animation, as while the shapes would be easily recognisable as a hand and some sort of liquid in a pot, the colours would give it a strange and unearthly vibe as it is clearly not what they should be.
As a quick test I did not have the time to try and properly animate and line it in Animate, but this quick exercise did give me some inspiration for my project, although mostly on the colours rather than subject matter. I think that the green-blue colour scheme were more interesting and suited to creating the strange unearthly tone I wanted, so I think I will create a moodboard and explore ideas that relate to this sort of atmosphere. I also think that the idea of creating a scene that looks somewhat believable but making it look odd by use of colour scheme could be an interesting idea to pursue, and perhaps I should look more into Grace Lee’s animations if I choose to do so as her work fits this aesthetic very well.
0 notes
Text
Final project proposal
Now that I have done some preliminary research on artists and animators, I have finally decided exactly what sort of project I wish to move ahead on. Due to time and equipment constraints I am unable to do a fully polished production such as a short film which was my original idea, but recognizing I do not have the ability to do such an ambitious project has helped me narrow down my options to something more achievable. I was especially inspired during my research of Grace Lee and her short looping animations, and I have decided to do something similar and create a short looping animation or GIF of an atmospheric or character related scene.
I believe this would be the best project for me to go ahead with, as due to the short and looping nature of the animation I would be able to cut down production time and be able to meet my deadline. I have previously had a lot of trouble with meeting deadlines and managing my time, so I decided to make this a key issue to solve with my final project. Also thanks to my artist research, I now am interested in and have the ability to experiment and employ a variety of potential time-saving techniques to further cut down production time while also adding to the aesthetic of my final animation (such as using a sketchy art style and heavily stylizing my characters to make them quicker to draw like Rachel Kim and Grace Lee did in the films I studied).
I will be creating the animation solely in Adobe Animate, as a vast majority of the animators I studied use that program and I also have personal experience with it, which will enable me to use it with more ease and meet my deadline. As I will be animating much more complicated shapes and movements, After Effects would be a poor choice of program to animate with as it would be extremely difficult to create and import assets that are stylized to my liking, and from experience I find it very hard to believably animate humanoid objects within that program without it looking clunky and unappealing to look at. Animate is much more appropriate and easier to use to create the ‘hand-drawn’ animation look which I am going to be using for my project, and to fit with my goal of using my time management better I am going to be using it.
Since I am going to be using a more cartoonish and stylised art style to create my animation, I am going to set my target audience as a bit younger than me at around the young teenager range. It is a bit difficult to set exactly what audience I should try and aim my animation at, since cartoons appeal to such a large group of people in these times, but taking into account the cartoons I am currently inspired by (primarily Sabrina Cotugno’s work in SvtFoE) I think it would be a better idea to set my animation at the same audience as the work that I am inspired by and taking pointers from. From all the similarities in my artist research I’ve found that a lot of the younger audience will be engaged much more by good colour work and a smooth but appealing art style, so these will be key components of my final project. I will need to select an appropriate art style to use for my animation and do some colour tests to compliment my animation, but my research has given me many good pointers and I have several ideas that I have begun experimentation on to prepare for production of my final piece. My aim with the project is to show a simple but clear narrative and story within a short looping animation, and I think this would engage best with a slightly younger audience as younger audiences do not need overly complex stories or art styles involved with their entertainment for them to enjoy it, but they will enjoy a simple story and appealing art style without feeling patronised. Creating an animation aimed for them would both helpful for me to create a simple project to meet my deadlines with while also exploring an industry I want to become a part of, while also still being appropriate for an audience.
Overall I am fairly confident in my final decision on the format of my final piece. My main concern about time management shouldn’t be a large issue within this project as I have specifically researched a lot of artists that have given me ideas to save time while keeping my project aesthetically pleasing and preserving a clear narrative. I also think I have achieved a reasonable mix of research on and plan to use techniques and things I am both comfortable with and can use well in a production, with new ideas that will push me out of my comfort zone and challenge me during the process of creating my final piece without delaying or ruining the project.
0 notes
Text
James Baxter analysis
James Baxter is a British animator mostly known for his work in Disney, James Baxter Animation and Dreamworks Animation. He has a great amount of experience as an animator and animation supervisor, and in recent times he has done a great amount of work as an additional animator on cartoon shows such as Adventure Time and Steven Universe. While mainly specialising in 2D animation, he has worked on 3D or live-action films such as Mary Poppins Returns and How to Train Your Dragon.
Baxter owns a youtube channel where he showcases a lot of his work, finished and in-process. Some of these videos are what he calls ‘pencil tests’, which were a new concept to me. I did some research, and discovered that it was in fact another step in traditional 2D animation - after an animation is cleaned up from the rough sketches, it is photographed and played frame by frame to see if the animation is ready to move onto the next stage of lining and colouring. In computer 2D animation this obviously isn’t done, but in 2D animation it would be vital to do this step as it was harder to manually fix mistakes, so you needed to be sure an animation was correct and polished before spending time and money on colouring and inking it on a cel. It was very interesting to see these pencil tests on Baxter’s channel, both as a testament to his skills and also to see the process of traditional animation. I’m not sure there is a similar method in computer animation as you do lining and colourings in the same program with an easy method to fix mistakes, but it could serve as a reminder for quality control in digital animation as although it is slightly easier, the quality should not suffer for it.
youtube
Alongside his pencil tests, Baxter has many videos of rough animations from films such as The Prince of Egypt. These were also highly interesting to look at due to having already seen the finished products, and seeing how the scenes looked like before any polished work was done was very fascinating. The videos are also good guidelines for how my roughs should be for when I am planning out my final piece. I noticed that he used a lot of frames to convey more complex animations or moments, while simple talking and motions are only given a few frames. It makes sense to spend less time on simple motions that won’t be too complex to animate, as these roughs are guidelines and the more complex animations will obviously need more guidelines to polish the animation from. I don’t think my final animation will be too complex to require so many rough frames, so I can be more efficient and draw less so I can focus on the final animation.
youtube
youtube
0 notes
Text
Grace Lee analysis
Grace Lee is an independent animator from the UK who currently works in London. She is one of the more lesser known artists out of the few I have selected to analyse and learn from, but I think considering the process and techniques of all sorts of artists will help me in my final project regardless of their fame. She made a short series of looping animations with vivid imagery and colouring which inspired me to do a 2D animation in the first place, and her short film ‘The Baths’ was shown on television and at numerous British film festivals.
Lee has a vimeo where she uploads some of her work. One in particular stood out to me, as it was not a polished animation, but a video of her process as she animated one of the trees for one of her short looping animations. This was very helpful as it showed her entire animating process including lining and colouring. She used the ‘onionskinning’ feature to animate frame-by-frame, as this emulates the traditional method of tracing parts from the previous frame onto paper as traditional animation does. Even with computers, we still use techniques created for hand-drawn 2D animation, so this reinforces my view that traditional techniques are as important to study as the more modern, digital ones today. While watching I also saw that she didn’t colour her lines until she was fully finished with lining the original animation, and I realised that this was a much better approach to the one I had previously been using while experimenting with Animate. Overall this process video has actually taught me a lot and I will most likely be using a very similar process while digitally animating myself.
vimeo
In the video, Lee also seems to animate different parts of the scene separately, then put the animations together for the final shot. Here we see that she is animating a tree, but at the end of the process video we see the tree animation being played alongside the rest of the scene. While I was animating some tests for my final piece, I also animated single parts of the scene first rather than drawing each part of the scene out for each frame. Watching this process video has somewhat reassured me that my process was at least somewhat effective, and I should do this for my final piece to be more efficient with my workflow. Drawing and animating different parts of a scene would also make me more likely to catch mistakes and be able to fix them without ruining the rest of the animation. This feels similar to how precomposing things in After Effects works, as a precomposed scene can be edited without effecting the other aspects of the animation that were not precomposed with it.

Similar to Rachel Kim’s art style, Lee’s animation tend to have lining that isn’t completely smooth and flowing from each frame. I feel like Lee’s vivid and unique subject matters and style make this work well, and also reminds me of my own rotoscopes in the past that had similar lining problems. However this could also mean that Lee herself uses rotoscoping for her animations, as everything else in the animation seems to animate slightly differently with less lineart discrepancy, and the movement of humanoid characters has a very realistic look to it that I think would be difficult to achieve if it wasn’t rotoscoped. Rotoscoping for my final piece is an option I could explore, although it does have certain advantages and disadvantages that I would have to consider (similar to using a messy lineart style inspired by Rachel Kim). Rotoscoping could help me save time as I wouldn’t have to storyboard and sketch out frames to trace off, but the movement style may not fit the tone of the animation I end up doing. However recording videos of people doing motions I want to animate for reference is always an option I could explore.
vimeo
0 notes
Text
Sabrina Cotugno analysis
Sabrina Cotugno is primarily a storyboard artist, however she has past experience in 2D animation from being a CalArts graduate and creating her own films. This led to her working as a storyboard artist and also director on several cartoon shows, such as the critically acclaimed Gravity Falls and Star vs. the Forces of Evil. Currently she still operates as a storyboard artist, but also has an ongoing comic based on Jekyll & Hyde called ‘The Glass Scientists’. She is an artist I have personally followed throughout the years, and having personally inspired me I believe she would be a good candidate to analyse the work of in my chosen specialism despite her not being a full-time animator at this moment in time.
While very proficient in digital drawing, Cotungo once wrote that she had trouble drawing pencil to paper. She does most, if not all, of her work digitally, and has a fairly cartoonish style. This is typical of most CalArt students, although in the specific industry she works in having a more ‘cartoon-like’ or simple style can actually help. It depends on what kind of work you are currently doing, but simple styles are much easier to animate in typical digital animation programs which saves a lot of time, which is quite vital in the field Cotugno works in. I can attest to this first-hand, as I have spent time doing more realistic proportions and then simpler ones when animating people, and it was much faster and often more appealing to do simple caricatures compared to proper proportions. Alongside being easy to draw, simple styles are easy to colour as well. Cotungo has confessed to not being very good at colouring her work and hires a colourist for her comic, but when storyboarding she makes use of her simple style and this makes it fairly easy to be able to shade and colour-code parts of the storyboard that need it as compared to doing it in something like a painted style.


Using a simple animation and colouring style like this to help plan out my final animation piece would be very useful, as I need to save time while also expressing to myself exactly what I want to animate and not cause confusion further down the line.
is a very public artist, and often shares past WIP’s for episodes of shows she worked on that have aired. This has helped a lot on giving me an idea of how things such as storyboards are produced and formatted - I previously had no idea that the time of the storyboard was often displayed as it played, or the frame numbers. Videos of her storyboards also remind me that to be able to storyboard, one must have a good experience in animation in the first place. There are several scenes in her latest animatic that would have been hard to express properly to the animators, so she drew extra frames for them and made the motions nearly as clean as a proper animation so that she could exactly show how she wanted the characters to move.
youtube
As an animator, a lot of Cotungo’s principles remain the same. In her CalArts final ‘Kagemono: The Shadow Folk’, her simple style is used once again to very great effect by making her characters appealing and very smooth to animate. She also uses simple colour schemes with minimal shading on her animated characters, although some background images are given a painted effect. This most likely doesn’t interfere with the animation process much, though, as since it wasn’t animated it wouldn’t have taken much time to draw and then import into her chosen program of animation to display behind whatever she had actually animated. The use of simplicity to make appealing characters and also save time could be very useful to me in my final piece, and I should really consider using a more streamlined style so I can meet my deadline and also make an appealing piece.
youtube
1 note
·
View note
Text
Rachel Kim analysis
Rachel Kim is less of a publically known artist than the rest of my chosen specialists to research, but she is a CalArts graduate who currently works at Disney as a storyboard artist and animator for “Darkmouth”. She gained a lot of traction in her career from her 2 student films, ‘Diamond Jack’ and ‘Burger Boss’, which I found very interesting and got me very interested in animation in the first place.
Another CalArts student, Kim has a somewhat simple style but I find it to be quite unique. While many graduates from CalArts tend to have a very clean and smooth-lined style, Kim’s style looks somewhat messy and ‘unfinished’ in some ways, which I feel gives it a certain charm. This sort of style wouldn’t fit everywhere, but Kim makes it work very well in her chosen subject matters for her films. But aside from her unique lining style, the rest of her work typically adheres to other common CalArt student styles - simple colouring with minimal shading unless a scene requires it, and stylised proportions. These traits are reoccurring amongst a lot of artists, and it definitely fits the narrative that these sort of styles are the most effective when attempting to animate something. However, Kim’s work does make me consider that perhaps neat lining is not always the right thing to do. Messy and even sketching lining could definitely fit certain aesthetics and subject matters when animating, and this is something I could take into account when brainstorming ideas for my final piece. Doing messy lining could help me further save time, but it would not be ideal to do unless it fits a certain aesthetic within the final piece.


In Kim’s films, I also noticed a few shortcuts being taken with the animation. More prevalent in Burger Boss, I saw that she didn’t always fully animate speaking when she was able to. Most often it would be cut off by other movements which allowed her to take attention away from the mouth, such as when the character Basil was telling Olive that she would have to clean up his leftovers - we are distracted by the hand motions that Basil is doing rather than what his mouth is doing, so Kim didn’t fully match up mouth shapes to his speech. I think this is another interesting way to same time and be efficient, although it does seem to have a lot of drawbacks. I think Kim was able to get away with this a lot more easily due to her messy style, but with a cleaner style it would be much harder as there would be more frames and more noticeable if certain parts of the body didn’t move as much as the others. Also the fact that I noticed these shortcuts would imply they were not fully effective, although of course I had been watching closely to analyse the films and casual viewers would likely not catch it. This was risky however as it was a final year project. It is certainly a technique to consider when doing more casual work, but again it also depends on the style you are using in the animation.
youtube
The main thing I enjoy about Kim’s work is how she doesn’t really fully ‘polish’ off her work and intentionally leaves it kind of choppy and messy. This makes it a good resource to see what you can and can’t get away with taking shortcuts in while making an animation, and I found this very useful as something I have consistently struggled with in animating is managing my time. Watching Kim’s videos and seeing her art has given me a few possible solutions for my time issues (such as a messier approach to lineart) although they also gave me a lot of questions I would need to ask before incorporating these ideas - would my final piece fit the right aesthetic for messy lineart? Could I leave a motion unfinished and get away with it so the whole scene isn’t ruined? These are all valid things I could consider in order to meet my deadline and work on my timing issues.
youtube
1 note
·
View note
Text
Glen Keane analysis
Glen Keane is one of the most well-known animators living, having worked for Disney during their renaissance period and receiving numerous rewards for his contribution to the field of animation. He is primarily a 2D animator, however he has worked on 3D productions before such as ‘Tangled’ and has experience as a director, storyboard artist and character designer. He was also named a ‘Disney Legend’ in 2013, a reward reserved for only the most proficient of workers in the Walt Disney company.
After working at Disney for so long, I noticed that a lot of Keane’s independent animations still contain the stereotypical ‘Disney style’. Of course this is only natural to have happened after drawing in that sort of style for so long, and it does have some benefits. While it is still stylised, Disney proportions tend to be the most accurate in animation, with only the faces being a telltale sign of what group produced the drawings. However I’ve found that a lot of his faces look the same. This is quite notable in his ‘Duet’ short and ‘Lux Animatic’ that he produced for Riot Games, and if I hadn’t already been familiar with the characters then I would have likely assumed they were Disney characters. While this isn’t particularly tied to animation, I think it is an interesting thing to note as it says a lot about character recognition, and also is something to consider when animating numerous humanoid characters. ‘Sameface’ leads to uninteresting and bland character designs, and in animation, character design is very important. When producing my final piece I should definitely make sure to have all my characters (if any) be unique in appearance and experiment with styles so my art doesn’t become stagnant. Character appearances can also help with interesting animation jokes and gags - there is a lot of possibility with it!


As a veteran animator, Keane’s independent animation process is still pretty similar to how classic animated films were made. He still uses the traditional animators desk and flips through pages of frames to test and see if his animations work. It was very interesting seeing this method still be used today, as it was one of the stepping stones to digital animation and I will likely experiment with the same technique one day. While I am creating a digital animation and therefore not be using this exact method, it could still be noteworthy to study to help me create the rough animation to start with. Obviously I would not be using paper and a light-desk as this would be far too time consuming to finish and transfer to a computer (which is one of the reasons I am choosing to pursue digital animation rather than traditional), but Animate has the ‘onionskin’ feature which allows a digital artist to emulate that aspect of traditional animation fairly well. I am not quite sure yet how I can incorporate the lessons of Keane’s process into my own as we are working in different mediums, but it is something that could help me be more patient with my own frames.
youtube
For his film ‘Nephtali’, Keane records himself in the process of collecting real-life references to use for the animation. I had heard that using realistic references was always the way to go when animating, but I had never seen it in a process and it was quite enlightening to see what Keane was doing while collecting his references. For me, this video reinforced that I should definitely look for real-life references when I have decided on what I am doing for my final piece, possibly even using myself or my friends. I have used myself as reference before for things such as drawing hands or expressions (using a mirror), but never for an animation and I think this probably shows in my work - the impact of Keane’s references in his final piece are very apparent (although as I mentioned before, his drawing style is still very Disney-esque here and it could pass as concept work for an animated film or something along those lines). Taking references could also help me a lot in my normal drawing, which could also use a fair amount of improvement, and in turn that would improve my animation too as that depends on my drawing unless I am doing something such as motion graphics, which is not my chosen specialty.
youtube
0 notes
Text
2D animation
My chosen specialism is key frame animation/2D digital animation, aiming to create a hand drawn animation in Adobe Animate for my final project. This would be a more digitised approach to animation, however the history of key frame animation did not begin by using computers as they did not exist at the time. In the past, this type of animation was mostly done by using pencil and paper (special ‘animation’ paper was later developed and is still used today) and a transparent drawing desk with a light underneath, so it was easier to trace from previous frames and make the animation consistent. This was how most of the ‘animation renaissance’ movies were created, although the more traditional method has fallen out of favour in recent times due to the efficiency of using a computer to quickly fix mistakes and draw. The traditional method (known as ‘hand-drawn’ animation) is still used a fair amount, albeit in smaller productions like cartoons and not so much for full feature films.
The more modern approach to key frame animation needs a computer and a drawing tablet or cintiq. Many programs and pieces of software enable users to draw quickly, and then create new frames to keep on drawing without using paper. Instead of using a light-desk to trace from previous frames, instead computer users tend to use features such as ‘onionskinning’ which functions in the same way – previous frames are shown while drawing new ones, but their opacity is reduced so they can be traced off and you can still primarily see what you are currently drawing. This tends to be much more efficient to create frame animation because of the ease of use, and less resources like paper and pencils are needed. One computer can also create numerous animations, while a multitude of pencils and paper sheets would be needed to create numerous hand-drawn animations. However the two different methods are very closely intertwined and key frame animation would never have come into creation if hand-drawn was not perfected first. Both methods use the same principles, so I believe it is key to study both as this will help my final animation.
One of the earliest examples of hand-drawn animation is considered to be the 1908 film ‘Fantasmagorie’ by Émil Cohl. It is also considered to be possibly the first ever hand-drawn animation in history. It was only 2 minutes long, but started a trend of hand-drawn animation features at the beginning of theatrical releases. This was how many famous animators released their cartoons, notably Walt Disney and Max Fleischer, until feature films eventually started being made. This did not happen for a very long time, however, as people thought that trying to make a full film of hand-drawn animations would be ruinously expensive and poor work. When Disney’s ‘Snow White and the Seven Dwarves’ was announced, the first fully animated feature film, people predicted that it would be ‘Disney’s folly’ and spell ruin for him. It was actually a major success, and paved the way for the multitude of classic Disney animated films to be made. Fleischer also made a lot of breakthroughs in the animation industry as well, most notably the method of rotoscoping which is still used in both traditional hand-drawn animation and computer key frames as well. Disney actually used rotoscoping a lot in Snow White and other films such as Sleeping Beauty, so this new method did have a lot of impact on the hand-drawn animation industry.
Eventually when computers grew advanced enough, animations began to be draw and animated on those instead of solely on paper. The first fully CAPS animated film was the 1990 film ‘The Rescuers Down Under’, although CAPS had been utilised in another feature film ‘The Little Mermaid’ for a rainbow shot at the very end. Many films in the Disney renaissance period made use of CAPS, including ‘Aladdin’ and ‘The Hunchback of Notre Dame’. The team that worked on CAPS (Rabbdy Cartwright, David B. Coons, Lemuel Davis and more) received awards for their work on developing the technique. However, after the renaissance period CAPS became less popular, and the CAPS studio was eventually closed down as Disney producers believed that 3D and CGI feature films were more popular. CAPS-styled animation was reintroduced in 2007 with Toon Boom Animation studio programs, which led to the creation of films such as ‘The Princess and the Frog’.
It used to be near impossible to make use of CAPS-like techniques outside of working at an animation studio, due to the cost of the programs and computers required. However since the revitalisation of CAPS with Toon Boom, many free or relatively cheap programs have been developed for hobbyist animators and artists. More complex programs designed for professional animators to use are also available, although they cost a lot more money. It is not only 2D animation that is more readily available to the public – many 3D programs such as SFM and Blender enable the everyday person to experiment with that style of animation also.
Many digital keyframe animations today are done with Adobe Animate or TV Paint. TV Paint in particular has also been used for more commercial products, such as feature films ‘The Breadwinner’ and upcoming cartoon series ‘Hazbin Hotel’. Adobe Animate is also used with both beginners and experts in animation alike, and many students from the acclaimed CalArts university use Animate for their final projects. I feel this shows the development from digital animation from a very expensive craft that could only be practiced in studios, to something that is now affordable to people new to art in general and students who cannot spend time in studios. People can now create their first animation of a ball bouncing in the same program that a feature film can be produced in, and this really shows the development of animation from what it used to be in the past.
It is hard to predict where digital animation could develop from here, as I feel it is in the best possible spot it could be. While the popularity of 2D animation in feature films has gone down, the style is still used for television shows and many online projects, so it is still a worthwhile specialism to pursue as the demand still exists (albeit not in the form that many people would hope).
0 notes