
Statistics
We looked inside some of the posts by unzipcraft and here's what we found interesting.
Average Info
Notes Per Post
2
Likes Per Post
2
Reblog Per Post
0
Reply Per Post
0
Time Between Posts
1 day
Number of Posts By Type
Text
17
Last Seen Tumblr Blogs


Fun Fact
The Tumblr office adopted Tommy, an 11-year-old Pomeranian.
Text
Hidden Danger: Chinese Lantern Plant Poisonous

Poisonous Compounds Found in Yellow Lantern
Overview of Toxic Alkaloids
Yellow Lantern is notorious for being a source of harmful alkaloids. Solanine is the most prominent source. The compound is present throughout the plant, but is particularly present in the berries that are not yet ripe and leaves.
Mechanism of Toxicity
How does solanine affect the human body? Ingestion of it causes disruption to cell functions, leading to digestive distress and neurological symptoms.
Solanine can affect nerve function, leading to dizziness and confusion. In extreme cases it can result in cardiovascular problems which is why it is important to know the risks.
The recognition of these toxic substances is essential for anyone who comes across Yellow Lantern in their environment. Be aware of this can avoid accidental poisoning as well as promote more secure interactions with this plant.
As we dig deeper into the signs that are a sign of Yellow Lantern poisoning, it's essential to be aware and alert. Knowing the dangers associated with this plant can help you to safeguard yourself and other people.
Symptoms of Yellow Lantern Poisoning
Common Symptoms
Yellow Lantern poisoning can lead to a variety of digestive symptoms. This includes nausea diarrhoea, vomiting, and abdominal pain that can be very uncomfortable.
The symptoms of neurology are common. Patients with this condition can be afflicted by confusion, dizziness, and headaches. It is important to identify these symptoms before they become serious.
Severe Symptoms and Potential Complications
In more serious cases the risk of cardiovascular problems can be high. The symptoms of irregular heartbeats and low blood pressure can be a sign of a serious reaction to the toxic substances.
The long-term effects of poisoning could be alarming. The possibility of neurological damage is there which is why it is imperative to seek urgent medical care.
Special Considerations for Vulnerable Populations
Children are at particular danger due to their diminutive body size and their natural curiosity. Ingestion by accident from Yellow Lantern parts can happen rapidly and suddenly.
The elderly and those with immunodeficiencies are at risk of being more vulnerable to dangers. The weaker immune system makes them more susceptible to serious adverse effects of exposure, requiring more precautions.
Understanding these warning signs and the dangers can help people to act quickly and safeguard themselves and those they love. We'll then look at the ways that it is that exposure to Yellow Lantern may occur, as well as the potential risks that come with it.
Exposure Risks
How Poisoning Can Occur
Intentionally ingestion of Yellow Lantern could occur in the event that someone eats its leaves or berries believing they're harmless. Contact with the sap of the plant could result in allergic reactions or irritation which can make handling the plant risky.
The inhalation of smoke from a the burning Yellow Lantern is another concern particularly in traditional practices in which the plant could be utilized for rituals or medicinal reasons. The exposure could introduce harmful substances into the respiratory system.
Likelihood of Accidental Exposure in Various Environments
Parks, gardens, and natural areas are all common locations where accidental exposure to Yellow Lantern may be a possibility. The bright color can attract interested people, particularly youngsters who might not be aware of the dangers.
The awareness of these places is essential for preventing. Knowing the areas where Yellow Lantern thrives helps mitigate the risk.
Historical or Cultural Practices Leading to Intentional Exposure
In the past, certain cultures have relied on Yellow Lantern for medicinal purposes and often without knowing the dangers. Traditional practices may result in accidental exposure, placing people at risk of getting poisoned.
The need to educate people about the dangers of using this plant in traditional remedies is vital. It could help avoid unneeded health problems and encourage more safe alternatives.
Emergency Response
When to Seek Medical Care After Exposure
If you suspect that you have been exposed for Yellow Lantern, certain signs need immediate medical attention. Insomnia, severe stomach pain or heart-related symptoms are indicators that shouldn't be overlooked.
0 notes
Text
Discover the Charm of Chinese Lantern Plant Varieties

Description/Taste
Chinese Lantern plants are straight stalks with large and heart-shaped, flat leaves that are decorated with white flowers and vibrantly colored bulbous seeds in pods. White flowers have five petals that have a slight bent shape, which ranges from between 1 and 2 centimeters in diameter. As the flower ages it will lose its petals and allow the calyx to grow and cover the growing berry. The calyx that is inflated, often referred to as the seedpod of the plant, is green at first it changes to orange, yellow, and red-orange with the onset of maturity. As the pod matures it also becomes thinner and brittle, with a paper-like consistency typically between 4 and 5 centimeters wide. Chinese Lantern berries average 1 to 2 centimeters and are aqueous, which means they contain numerous tiny white seeds. The berries change in color from bright red to an orange creamy hue as they mature and change in flavor from very acidic and sour to slightly sweet, acidic and tangy when they reach maturity. It is vital to know that only ripe berries can be eaten of the Chinese Lantern plant. the leaves, calyx and stems are considered to be inedible.
Seasons/Availability
Chinese Lantern flowers bloom in the first part of fall.
Current Facts
Chinese lanterns, botanically known as Physalis alkekengi, are beautiful, herbaceous perennial that is less than a meters in height. It belongs to Solanaceae which is also known as nightshade. Their Chinese Lantern's name Chinese Lantern was derived from the flowering plant's bright and inflated seed pods. They are reminiscent of Asian lanterns. Although the pods of seeds aren't real blooms, they're frequently described as Chinese Lantern flowers when found on the plant. Apart from the pod's vibrant color the calyxes, which are protected by a protective layer, contain tiny berries that can be used in medical and culinary applications once they are ripe. Chinese lanterns are a well-loved garden plant, however despite their attractive appearance it has an aggressive nature and is able to develop rhizomes in the underground and earn it the designation as an invading species within a few parts in Europe as well as Asia. The plants are typically grown in containers to stop their spread and the seeds are removed, dried and used as a decorative element in floral arrangements. Dry Chinese lanterns keep their vibrant hues and last for a long time without degrading. The seed pods are sometimes cut open, which allows the seeds to expand into various shapes as they dry.
Nutritional Value
Chinese Lantern The berries of Chinese Lantern are a great supply of Vitamin C, an antioxidant that enhances collagen production on the skin, decreases inflammation and also boosts your immune system. The berries also have vitamin A, a nutrient which aids in maintaining the health of organs calcium, which helps strengthen teeth and bones, and lesser amounts of iron and the mineral phosphorus. In the traditional Chinese and Unani treatments, Chinese Lantern berries were utilized in the past to diuretize and were believed to possess anti-inflammatory properties.
Applications
Only ripe berries from Chinese Lantern plants are edible The calyxes, leaves, and berries that are not ripe are considered poisonous which is why they should never be eaten. Chinese Lantern fruit berries change into light cream or orange when they mature. They have a subtle sweet, tangy flavour which can be consumed fresh cooked, dried, or cooked. The berries that are raw can be consumed in a single serving as a snack or they can be added to salads with greens and chopped into relishes. They can also be cut into salsas or blended into smoothies and juices. Chinese Lantern berries can also be chopped and spread over toast, to replace sweet tomatoes in cooking or simmered into sauces for roasting meats. Alongside savory dishes they can also be made into jams, or incorporated into pie fillings or baked into tarts, cakes and Scones. Chinese Lantern berries are delicious with a variety of meats, including turkey, pork poultry, fish cucumbers, avocadoes corn honey, dark chocolate citrus, peaches and herbs like rosemary, basil and parsley. These berries are kept in husks of paper until they are ready for use. They continue to mature. After being husked, the berries will last between 1 and 3 days in a refrigerator.
Ethnic/Cultural Info
The Japanese are known as the "Obon" or "Bon". Japan, Chinese Lantern flowers are also referred to in Japan as Japanese Lantern flowers, and the bright orange pods symbolize used in bon or Obon. Bon Obon or Obon festival. The mid-summer to early autumn holiday is a celebration of the return of spirits of the ancestors back to earth. In the course of the celebration, each town has its own celebration that include music, dance as well as live music. A lot of Japanese families also place lanterns on their homes to help guide spirits. Graves are cleaned and decorated with gifts for the ancestors. Japanese lantern flowers are an extremely popular gift because the seed pods that are inflated closely resemble lanterns, which is a symbol of harmony and guidance between deceased and living family members. In the lead up to the Bon festival every summer, a market referred to in the form of Hozuki Ichi is held to offer offerings for the coming holiday. From the Edo period the market is held every year for the past ten years, in addition to Japanese Lantern flowers are the most popular item sold at the market. They are offered in a variety of sizes or as individual stalks. Japanese Lantern berries can also be offered for sale and are believed to have more healing properties when consumed during the market.
Geography/History
Chinese Lantern plants originate from temperate regions that span between Southeastern Europe to East Asia and have been thriving wild since the time of the ancients. The robust plant exhibits strong nature, allowing it to spread quickly once it is planted. Throughout their natural surroundings, the plant has spread into wild landscapes and has even extended across Western Europe. Chinese Lantern plants also were brought in North America and Australia, where they are cultivated as a unique cultivar for home gardens. Presently, Chinese Lantern plants are cultivated wild across Asia, Europe, North America as well as Australia. The berries aren't commercially manufactured and are instead harvested from wild or domestic gardening plants.
1 note
·
View note
Text
Digging Deep: How Deep to Plant Gladiolus Bulbs?

Gladiolus Winter Hardiness
The most common zones of hardiness for standard Grandiflora gladioli(your typical garden gladioli) can be found in zones 8 or warmer. It is nevertheless well-known that if you cover the corms with good mulch it is possible to keep the plants alive even in zone 6 or 7 with specific species like "Nanus Hybrids." In cooler climates glad corms need to be removed, dried, and stored until winter months.
To ensure the most stunning flowers, plant glads in full sunlight (6 -8 hours sun every day) in soil that's well-drained and moderately fertile. They'll not thrive in soggy, heavy soil. Add the compost (humus) with your dirt to increase the consistency and fertility of your soil.
When to Plant Gladiolus
Plant gladiolus corms early in the spring, once the risk of frost is gone and the soil is warmed up to at the very least 55 degrees Fahrenheit (13degC).
From the date of your last frost until early summer, you can plant a new corm every 10 days or so. This will lead to constant blooms until early fall!
Based on the type, it will take between 60 and 90 days after the time that glads are planted to allow the corms of the plant to take root grow, develop, and then bloom.
How to Plant Gladiolus
Prepare your garden making use of a tiller or garden fork to loosen soil, which should be 12 - 15 inches of depth. After lifting the soil then mix in two to four inches layers of compost. You can also mix in old manure.
For blooms that are large For large-sized blooms, you should plant corms that measure at least 1 1/4 inches in diameter.
Place the corm into the hole approximately 4 inches deep, with the pointed side facing upwards. Then cover the corm with soil and then press it firmly.
The corms should be spaced 6-8 inches apart.
If you plant gladioli mostly to be cut flowers, place the flowers in rows. It's easier to care for the plants and collect the flowers.
If you are planting it alongside different flowers that are in the borders of beds, place them in clusters of seven or more to get the greatest impact.
The corms should be soaked in water prior to the time of planting.
If you're planting taller varieties ensure that you stake them prior to planting. Be cautious not to harm the corms using stakes.
How to Grow Gladiolus
Apply a 2 to 4 inch layer of mulch around your gladioli in order to keep the soil moist and prevent the growth of weeds.
If you only get less than one inch of rainfall per week, you should make sure to water your plants frequently all through summer. In other cases, you can water them less during growth to ensure that the soil stays damp.
Take out the dead or faded flowers to ensure that the flowers continue to bloom. When every flower on the plant are gone, cut the stem off about 2 to 3 inches over the soil.
Make sure you leave the plant in its original condition so that it will mature and develop the corms for the following season.
Winter Protection for Gladiolus
If you are in USDA Zone 8 or higher place in an adobe layer or straw to provide winter protection. Gladiolus will be kept in the ground throughout the winter months, provided that a strong freeze (28degF or lower) isn't a common occurrence in your region.
In colder areas (Zone seven or less colder) Dig out gladioli corms after the foliage is faded after the first frost of fall. A slight frost could destroy the foliage, but not the remainder of the plant. Make sure you dig up the gladiolus corms prior to an extremely cold freeze (28degF) otherwise the plants may be fatally damaged.
However, many gardeners who reside in "border" zones 6 and 7 have tried putting their gladiolus in the soil and discovered that they survived It's a judgment decision based on your microclimate and the variety of gladiolus and the climate shifts.
Digging Up and Storing Gladioli Corms
To get rid of the gladioli corms to use for Winter storage purposes, use these guidelines:
Make use of a spade to take the whole plant out by grasping the top of the plant to remove it from the soil. Avoid injury or bruising corms when digging. Shake off any dirt (do not rinse it off) and then discard the damaged corms. Cut the stalk to 1 or 2 inches over the corm. Keep the smaller cormels separate If you want to. They will flower within two to three years If you plant them every spring.
Let the corms remain dry under the shade for a day or 2 days if weather cooperates. Remove any soil that is not needed and put corms in wooden flats or tray. Then, let them rest in a warm and airy area for a period of about 2 weeks. Take and dispose of the oldest corms at the bottom (from the base of new corms).
Do not remove the husks from the corms.
Clean the corms by using a chemical called a fungicide ("bulb dust") to prevent health issues. Put bulbs and the dust in a bag of paper and shake it vigorously.
Place the corms into cloth or paper pantyhose bags, old onion bags. Hang the containers on a rack or stack them so that air can circulate among them. Keep the corms in a temperature of 35 to 45 degF (2 to 7 degrees Celsius) at a moderate humidity. Cool basements are appropriate. Don't allow corms to get frozen.
Plant these corms again in the spring to enjoy another beautiful year of blooms.
0 notes
Text
Exploring the Diverse World of Ranunculus Varieties
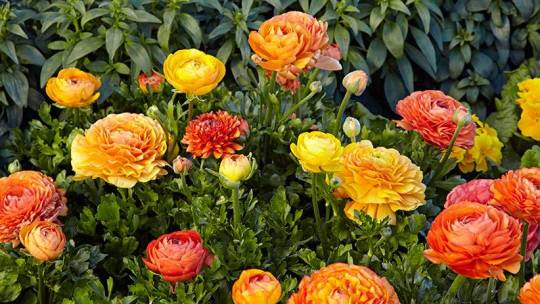
Introduction to Ranunculus
We invite you to read our complete guide to Ranunculus which is among the more beautiful flowers to be found in the garden. They are known for their vivid multi-layered flowers and numerous colors they are a popular choice for both gardeners and flower lovers. This guide will provide all the information you need to cultivate and maintain the stunning flowers that will provide an impressive display at your home garden.
Botanical Overview
Understanding Ranunculus' Botanical Roots
Common Name: Ranunculus, Buttercup
Scientific Name: Ranunculus asiaticus
Families: the Ranunculaceae species are renowned for their beautiful papers-like petals as well as their bright shades. Originating from Asia Minor and southeastern Europe These perennials are grown as annuals throughout the majority around the globe due to their resistance towards extreme temperatures.
Varieties of Ranunculus
Exploring the Diverse World of Ranunculus
"Tecolote Giant" Ranunculus The name is a reference to their massive blooms, reminiscent of roses and their long stems that are perfect for cutting arrangements of flowers.
"Bloomingdale' Ranunculus: Compact and vibrant perfect for gardening in containers.
"Mache" Ranunculus: It has large double flowers, and is renowned for its outstanding performance in colder climates. Each variety comes with a distinct color and size that make Ranunculus an excellent choice for a garden of any design.
Planting and Growth Conditions
Ideal Growing Zones for Ranunculus
To ensure that Ranunculus is grown successfully it is important to determine the most suitable zones to grow these beautiful flowers. Understanding the ideal conditions for the climate ensures an optimal growth rate and abundant blooms.
Hardiness Zones
Zones of Preference: Ranunculus typically thrives in USDA Zones 8 through 11, however, they can also be grown as annuals in cooler climates.
Temperature Tolerances Ranunculus favor warm winters with cool summers. They can be a challenge in areas that experience extreme cold or heat therefore it is essential to select the appropriate timing and place of planting based on the local climate.
Climate Considerations
sunlight Ranunculus are tolerant of full-sun, not just partial shade but they are tolerant of some shade in hotter climates.
Temperature and Moisture These plants flourish in conditions with moderate temperatures and steady humidity. Do not plant them in areas susceptible to extreme heatwaves or heavy rain, since these conditions can strain the plants.
Adapting to Your Local Environment
microclimates Be aware of the microclimates in your garden before planting Ranunculus. Regions with more cool temperatures and better drainage might provide better conditions for the flowers.
The Seasonal Maintenance: In cooler zones think about planting Ranunculus annuals or to provide protection during the cold snaps. Mulching can help control soil temperatures and moisture levels particularly in winter.
When you choose the right location for your planting and considering the microclimate and climate of your area to make the perfect setting for Ranunculus to flourish and blossom stunningly inside your backyard. Make sure you consult local experts in gardening or extension services for more guidance tailored to your particular area of cultivation.
Care and Maintenance
Keeping Your Ranunculus Thriving
The importance of watering is to Make sure the soil is always moist, but not soaked to stop the spread of rot.
Fertilizing Make use of a lower-nitrogen fertilizer with high potassium to promote strong flowering.
Deadheading Get rid of flowers that have been used frequently to ensure that they continue blooming. Regular maintenance will ensure that Ranunculus plants are healthy and vibrant throughout the entire season.
Benefits and Uses
The Multifaceted Appeal of Ranunculus
aesthetic appeal: Adds a burst of elegance and color to garden borders, beds and containers.
cut flowers: Ranunculus are excellent for arrangements and bouquets that provide a long vase life and beautiful arrangements.
Pollinator Friendly Attracts bees as well as various beneficial insects your garden. Integrating Ranunculus in your garden does more than enhance its beauty, but also contributes to the local biodiversity.
Potential Problems
The Common Issues to be Solved with Ranunculus
Bugs Beware of spider mites and aphids that may occasionally infest Ranunculus.
diseases: Fungal diseases such as botrytis and powdery mildew Blight are common, particularly when the environment is damp.
Environmental Stress Ranunculus bulbs are susceptible to rotting when they are in a soil that is wet So, ensure that the drainage is adequate. Monitoring and proactive care can aid in preventing most issues and help keep your Ranunculus plants in good health.
Conclusion Ranunculus can be an absolute delight to grow because of their stunning blooms that convey the nature of the spring. No matter if you're a beginner gardener or an experienced one they provide an aesthetic delight as well as a satisfying gardening experience. With proper care, Ranunculus will provide vibrant colors and life to your garden year-round.
0 notes
Text
Red Creeping Thyme Plants: Transform Your Garden

Thyme is everywhere all over our garden as well as spice cabinets, but the genus of thyme has a lot to be coveted beyond its culinary benefits. Thyme species that grow upright are the most commonly used for kitchen and herb garden usage. While it's not as useful for harvesting culinary use (but it is still edible) The creeping thyme carpets spaces with an abundance of fragrance and color. It also helps to maintain healthy ecosystems in the most challenging areas that the land. There are a variety of this groundcovering plant and species, the red variety is renowned due to its beautiful blooms that cover the ground in deep, wine-like hues.
All About Red Creeping Thyme
The red creeping thyme ( Thymus praecox "Coccineus") is a drought-resistant herbaceous perennial that is sun-loving and sun-loving that is part of the mint ( Lamiaceae) family. While it may appear fragile, this thyme is able to adapt well to a variety of conditions that are well-drained and can even withstand moderate foot circulation. This makes it a low-maintenance, an easy plant to grow. It is hardy in Zones 4-9. the red creeping thyme is evergreen in warmer regions The leaves take an orange-bronzed color in the autumn. It is often known as Thymus serpyllum or other names such as the mother of thyme.
As with other species of thyme, the red creeping thyme is a magnet for butterflies and also hosts beneficial insects which makes it an excellent option for those looking to preserve biodiversity. Red creeping thyme also receives the highest marks for its effectiveness as a repellent. The spring blooms of red creeping thyme vary from crimson to purple and provide a dense layer of color on top of wide-spreading low-growing, 4-inch tall foliage that has 12 to 18 inches of spread. The density of the growth helps reduce weeds and fill difficult spaces in your landscape.
Some of the most well-known applications for red creeping Thyme include rock gardens, walkways as well as xeriscapes, walls for retaining and understories, containers, and alternative lawns. Learn the best ways to grow and appreciate red creeping thyme plant within your home. You're sure to keep this plant in your pocket after you've experienced its beautiful beauty and versatility.
How to Grow Red Creeping Thyme Plants
Starting Red Creeping Thyme Plants
The red creeping thyme can be grown from seeds or even from plants in the nursery. Thyme, however, is slow-growing and seeds of this variety aren't readily available. To make it easier and more efficient buying plants is suggested. If you're planting the whole area or a huge cluster of creeping thymes, you can afford to purchase plugs, the smaller transplants landscapers purchase in bulk, and which provide the best value for money when planting in large quantities (say 30-plus plants). Plugs are less established roots than larger transplants, and so you must take care to ensure that they're well-watered once they settle. When shopping for plants be sure to look for plants with lush foliage. Avoid root rot and waterlogged roots.
Preparing a Bed for Red Creeping Thyme
After you've found healthy red creeping thyme bushes choose a sunny area that they will freely grow. Creeping thyme is tolerant of only a little shade, but full sunshine (6or more hours a day) is the ideal time for the peak blooming. Then, ensure that the drainage in the soil is great. Add compost leaf mold or soil conditioner to help lighten the soil, and add sand in the case of clay-based soils that are heavy.
Planting Red Creeping Thyme
The red creeping thyme can be planted in the spring or fall as it can be difficult for new plants to become established during summer's temperatures. Spacing is determined by the size of plants you choose to start with, the size of your area is and the speed you'd like your landscape to fill in with the growth.
Great Garden Plants outlines the following spacing for starting by using the 32-inch landscape plugs (a typical size tray) 6 inches of spacing encompasses 6 square feet. the 8-inch space covers 7.5 sq. feet. a 10-inch spacing is 11 sq. feet 12 inches of spacing is 16 feet. If you're buying larger plants at the garden centre, 10to 12 inches spacing is suggested. For different types of creeping thyme check the tag on the plant for suggestions on spacing. To get a faster groundcover you should plant creeping thyme slightly closer.
Place the plants at the right spacing prior to transplanting, and then visualize the final outcome. If you are planting in drifts, stay clear of straight lines and opt for more organic forms that are in line with the natural curves. When the overall design appears balanced -- perhaps an attractive border, a dense drift, or an fuchsia-colored carpet Get busy planting and have fun.
To transplant thyme dig each hole slightly bigger in depth and bigger than that of the root ball. remove the soil using your fingers, and then gently loosen the roots. If you've made the proper amendments to your soil ought to be light and loose. Place each plant in the hole, then gently fill the soil with roots. Make use of your hands to push the soil in place and then water it thoroughly. When plugs are planted, ensure constant soil moisture to aid the roots to establish themselves. After they have settled in red creeping thyme, they can withstand drought.
Red Creeping Thyme Propagation
The process of propagating red creeping thyme simple, either through cutting off the stem or division. To cut a stem take the stems that have not yet bloomed and remove the lower leaves, and then place the stems in water and place them on a window to establish roots. When some roots have sprouted the cuttings can be placed in pots.
The red creeping thyme can even be split. As the plants expand they will break up one of the root balls and divide it into two halves. Replant one half, then transplant the other half or give it to a friend. Be sure to water well to aid the roots in recovering from the strain. The best time to divide is in the spring or early autumn at least every few years. If you begin with a tighter spacing between plants, you might discover that division should be carried out earlier.
0 notes
Text
Green Thumb Guide: How to Plant Hosta Bulbs

Hostas are beautiful ground covers. Their big, stunning leaves and tiny, delicate flowers make a wonderful feature for any garden or garden. Hostas aren't difficult to take care of so long as they are planted at the appropriate time and in the correct place We've prepared for you! Follow the steps below for more information on what you need to do in order to establish your hosts, and to keep them healthy, full and green throughout the summer and spring.
Getting the Seed Bed Ready
Be patient until the right moment for planting hosts. Hostas aren't overly sensitive to cold temperatures, so you can plant them as quickly when the ground is warm enough to be productive in spring. Late summer and spring is the ideal time to plant hostas as they are growing in active phase and will establish quickly.
If you plan to plant hostas in the late summer, plant them within six weeks in advance of when the first frost will appear.
Pick a place that offers enough shading. Hostas are shade-tolerant plants that require only a small amount of sun, though they won't flourish in extreme shade. The ideal spot is that is protected from strong hail and winds which is shaded during noon until 4 p.m. Then, it gets some sunlight.
Hostas can be protected from the sun, wind and hail by planting them beneath established trees. Be careful not to place them in close proximity to roots, as the hostas will need to fight for nutrients.
Hosta's tolerance to shade varies based on the kind. In general, hostas that have yellow leaves are able to withstand more sun than hostas that have blue, green or even white foliage. Blue hostas require the greatest protection from sunshine.
Hostas can also flourish in areas that have a little sunlight.
3. Make sure to amend by tilling the ground. In the area in which you intend to plant the hostas, till the soil to an 8-inch depth (20 centimeters) by using the manual tiller, rototiller or hoe.[3Make sure to amend the soil by adding organic matter to reduce soil compaction, repel rodents from entering the area, and also alter the pH of the soil.
A good organic matter to use for the hosts is aged manure, compost, peatmoss as well as leaf mulch.
A good pH range for Hostas is between 6 to 6.5.
Hostas don't need a large space for planting. If you're planting hostas in a single pot The hole will only need to be as large in the same way as your root system.
2. Planting the Hostas
Douse the plant in water. Sometimes hostas come from nurseries with no roots. It's crucial for you to soak roots in case this is the case for your hostas because it will assist in the preparation of the plants for transplant.
Pick a bowl or bucket that is a little larger than the crown on the.
The bucket should be filled with water that is cold. One hosta's crown is placed on the edge of the bucket to ensure that the roots soak up the water beneath. Repeat this for each hosta.
The plants should be soaked for at least one hour prior to transplanting. If you're not transplanting your hostas in a hurry, leave them in the water to keep the roots damp.
Remove the root. Right before planting remove the hostas from the buckets and then use the hands of your fingers to unravel the roots. Make use of your fingers to gently arrange the roots in such a way that there aren't any tangles and make sure that every root facing in the direction that they are growing in.
Hostas, in particular those in pots, are prone to roots that are tangled. They could strangle themselves if you attempt to put them into the soil, with their roots in knots.
Make holes in the ground and then plant hostas. For each hosta make an opening in your garden bed, which is approximately 2.5 feet (76 centimeters) wide and one foot (30 centimeters) deep. Put one hosta into each hole, ensuring that the roots don't get bent or get caught in. Fill the hole up with soil, but don't put the soil in a tight circle around the roots. Be sure that only those roots are covered and that the whole crown is elevated above the surface.
Make sure to water each plant properly immediately after the plant has been planted.
Make sure you leave enough space between the hosts to allow their mature size. This will be contingent on the type of hostas you own. If you're not certain you should leave three inches (76 centimeters) in between your hosts.
3.Keeping Hostas Healthy
1. Install a top layer mulch. The mulch will to keep soil moist and stop the growth of weeds, and also protect plant from pests. Following planting, you should add a three-inch (7.6-cm) layers of mulch on surface of your garden. It should be placed around the hostas.
The ideal mulch for hostas is pine needles, pine bark or leaves that have been mulched.
2. Make sure that the plants have constant water. Incubate the soil following planting the hostas. Maintain the soil always moist and evenly throughout the lifespan of the plant. Hostas that have to be exposed to a lot of sun require more water to avoid burns.
Give the hostas around one centimeter (2.5 millimeters) of water every week during the active growth phases during the summer and spring.
Cut dead leaves off in autumn. Hostas will enter into a state of dormancy in the autumn and winter, which means they will not grow and don't require as much nutrients. In the fall, you can prune the hostas with trimming off yellow or dead leaflets.
Even dying leaves can drain nutrients away from plants and can be a good way to aid in conserving energy for the hostas to last through winter by removing the leaves in autumn.
0 notes
Text
Pink Teddy Bear Sunflower: Twist on Garden Elegance

Definition and Characteristics
What is Sunflower Teddy?
Sunflower Teddy is a specific variety of sunflower, renowned for its compact size and distinctive flower shape. Unlike traditional sunflowers, which often feature a single, large flower head, Sunflower Teddy produces smaller, multi-branched heads that resemble a teddy bear’s face due to their fluffy, round appearance. This unique look, combined with its vibrant yellow or golden petals, makes it a standout in gardens and floral arrangements.
Unique Features of Sunflower Teddy
Sunflower Teddy is characterized by its bushy growth habit and striking flower heads, which are typically about 4 to 6 inches in diameter. The petals are densely packed, creating a fluffy, almost pom-pom-like effect. The plant itself grows to a height of about 3 to 4 feet, making it suitable for a variety of garden settings, from flower beds to containers.
History and Origin
Historical Context of Sunflower Teddy
The development of Sunflower Teddy involved selective breeding to create a variety that combines the classic beauty of sunflowers with a more compact and unique flower form. This variety was bred to appeal to gardeners looking for a charming and visually interesting sunflower that differs from the traditional tall and single-headed types.
Introduction and Adoption in Different Regions
Since its introduction, Sunflower Teddy has gained popularity worldwide due to its distinctive appearance and ease of care. It has been adopted in both home gardens and commercial settings, appreciated for its ability to add a whimsical touch to landscapes and floral arrangements. Its popularity continues to grow as gardeners seek out new and interesting plants to enhance their gardens.
Botanical Characteristics
Physical Appearance
Sunflower Teddy plants typically reach a height of 3 to 4 feet and feature a bushy growth habit. The flower heads are smaller than those of traditional sunflowers but are densely packed with fluffy petals, creating a unique and eye-catching appearance. The petals are usually a bright yellow or golden color, and the centers are dark brown or black, providing a striking contrast.
Growth Habits
Sunflower Teddy follows a similar growth cycle to other sunflowers, with a relatively fast growth rate. It is an annual plant that completes its lifecycle within a single growing season. It is adaptable to a range of soil types and climatic conditions, making it a versatile choice for various garden settings.
Cultivation
Climate and Soil Requirements
Sunflower Teddy thrives in full sun and well-drained soil rich in organic matter. It prefers slightly acidic to neutral pH levels and can tolerate a range of soil types, though it performs best in loamy soil. Adequate sunlight is essential for healthy growth and vibrant flower production.
Planting Techniques
Plant Sunflower Teddy seeds directly into the soil after the last frost in spring. Sow the seeds about 1 inch deep and space them 12-18 inches apart to allow for their bushy growth. Ensure they receive plenty of sunlight throughout the growing season to support healthy development and flowering.
Care and Maintenance
Regular watering is important, particularly during dry periods, but avoid overwatering to prevent root rot. Fertilize with a balanced fertilizer to encourage vigorous growth and flowering. Sunflower Teddy typically requires minimal staking but may benefit from some support if the plants become top-heavy. Monitor for pests and diseases, and address any issues promptly to maintain plant health.
Popular Varieties
Overview of Notable Sunflower Teddy Varieties
‘Teddy Bear’: Known for its classic teddy bear appearance with fluffy, golden petals and a compact growth habit.
‘Sunny Teddy’: Features bright yellow blooms with a slightly more pronounced fluffy texture, perfect for adding a cheerful touch to gardens.
‘Mini Teddy’: A smaller version of the classic Sunflower Teddy, ideal for container gardening and smaller spaces.
Pests and Diseases
Common Issues
Sunflower Teddy can be affected by common sunflower pests such as aphids, spider mites, and sunflower beetles. It may also face fungal diseases like powdery mildew and rust.
Prevention and Treatment Strategies
Preventive measures include proper plant spacing for air circulation and regular inspection of plants. Organic treatments like neem oil and insecticidal soap can manage pests, while fungicides may be necessary for controlling severe fungal infections. Integrated pest management (IPM) practices can enhance overall plant health and productivity.
Uses and Benefits
Ornamental and Aesthetic Uses
Sunflower Teddy is an excellent choice for garden design, providing a unique and whimsical touch with its fluffy flower heads. It is also ideal for cut flowers, adding a cheerful and distinctive element to floral arrangements and bouquets.
Environmental Benefits
These sunflowers attract pollinators such as bees and butterflies, contributing to garden biodiversity. Their deep root systems also help improve soil structure and prevent erosion.
Commercial and Agricultural Uses
In addition to its ornamental value, Sunflower Teddy is used in specialty flower markets for its unique appearance. Its compact size and distinctive look make it a popular choice for floral designers and gardeners seeking to add a special touch to their collections.
Cultural Significance
Symbolism and Meanings
Sunflower Teddy symbolizes joy, cheerfulness, and a playful spirit. Its teddy bear-like appearance represents warmth and friendliness, making it a popular choice for events and occasions that celebrate happiness and positivity.
Sunflower Teddy in Art and Literature
Sunflower Teddy has inspired various artworks and creative projects due to its unique appearance. Its charming look continues to capture the imagination of artists and writers who incorporate its playful essence into their work.
Festivals and Celebrations
Sunflower Teddy is often featured in flower festivals and garden events, where its distinctive blooms are showcased as part of displays and exhibitions. These events may include flower shows, gardening workshops, and family-friendly activities.
0 notes
Text
Unraveling the Beauty of Flower Ranunculus

Ranunculus, with its radiant charm and captivating petals, is more than just a flower; it's a symbol of love and joy. Discover the rich history and significance of this ornamental beauty, from its origins to its role in weddings. Learn about the various ranunculus varieties, each with its own unique charm, and get expert tips on how to grow and care for these enchanting blooms. Join us on a journey through the world of ranunculus, where beauty and symbolism combine to create a delightful floral experience.
When it comes to exquisite flowers that captivate the heart and the eye, few can rival the allure of the ranunculus. This ornamental beauty, with its vibrant petals and delicate charm, has a rich history, significant symbolism, and is a popular choice for various occasions, from weddings to garden landscapes. In this article, we will explore the world of ranunculus, from its origins to its symbolism, and share tips on how to care for these captivating blooms. The History of Ranunculus: Ranunculus, a genus of flowering plants in the Ranunculaceae family, has a storied history. Native to Europe, Asia, and North America, these stunning flowers have been cultivated for centuries. The name "ranunculus" derives from the Latin word "rana," meaning frog, possibly because some species in the genus thrive in wet environments. Over time, ranunculus has earned a place in gardens and florists' hearts worldwide. Significance and Symbolism:Ranunculus holds special significance in the world of flowers:
· Ornamental Beauty: The allure of ranunculus lies in its ornamental beauty. With multi-layered petals and a spectrum of colors, it's no wonder these blooms are beloved in gardens and floral arrangements.
· Weddings and Special Occasions: Ranunculus is a top choice for bridal bouquets and wedding decor. It symbolizes charm, grace, and radiance, making it the perfect choice for celebrating love on special days.
Interpreting Symbolism:
· Radiant Charm: Ranunculus is often associated with radiant charm and attraction. The vibrant colors and intricate petals symbolize the allure and magnetic personality of the recipient. Buttercup Family Connection: Being part of the buttercup family (Ranunculaceae), ranunculus can symbolize childlike happiness, cheerfulness, and joy. It reminds us of simpler, carefree times and the youthful spirit within us.
· Persian Symbolism: In Persian culture, ranunculus flowers convey a message of love and attraction. They are exchanged as a symbol of romantic feelings, capturing the essence of love and desire.
Varieties of Ranunculus: Ranunculus comes in various colors and forms, each with its own unique charm:
· Persian Buttercup (Ranunculus asiaticus): Recognized for its vibrant and layered petals, this is one of the most common and widely loved varieties.
· Cloni Ranunculus: These hybrids come in a wide range of colors and boast larger, more dramatic blooms, perfect for creating eye-catching floral arrangements.
· Ranunculus aconitifolius: Featuring finely divided, fern-like foliage and delicate white flowers, this species adds an air of elegance to any garden.
Growing and Caring for Ranunculus: If you're considering adding ranunculus to your garden or working with them in floral arrangements, here are some essential tips:
· Planting: Ranunculus bulbs are typically planted in the fall for spring blooming. Ensure well-draining soil and a sunny location to encourage healthy growth. Watering: Keep the soil consistently moist but avoid overwatering, as these flowers prefer well-drained soil.
· Cut Flowers: Ranunculus is a favored cut flower. To keep them fresh in arrangements, change the water regularly, and trim the stems at an angle to encourage water uptake.
Conclusion:In the world of flowers, ranunculus stands out for its beauty and symbolism. Whether you're giving it as a gift, using it in wedding celebrations, or adding it to your garden, ranunculus continues to enchant with its radiant charm and graceful presence. Embrace the allure of the ranunculus, and let it brighten your life with its vibrant colours and profound symbolism.
0 notes
Text
Can Dogs Eat Jamun? Discover the Safety and Benefit

In order to keep our pets happy and healthy, a lot of us love sharing a little of our meals with them. It doesn't matter if it's a tiny piece of apple, or even a few leftovers from a cooked chicken We often ask what foods that are safe for our pets. One fruit that could spark your interest is jamun. Jamun, also referred to as Indian blackberry, also known as black plum is one of the tropical fruits adored for its tangy and sweet flavor. What about dogs eating jamun? Let's look into this in greater detail.
What is Jamun?
Jamun is scientifically referred to by the scientific name of Syzygium cumini is one of the tropical fruits that is native in the Indian subcontinent. It is renowned for its deep black or purple color, its juicy texture and distinct taste. Jamun is a great source of antioxidants as well as vitamins and minerals that contribute to its status as a healthful fruit for human consumption. It is often consumed fresh as an juice, or in desserts or jams.
Nutritional Benefits of Jamun
For humans, jamun has many health benefits.
High in Antioxidants: Jamun contains anthocyanins antioxidants, which aid in protecting the body from inflammation and oxidative stress.
A good source for Vitamin C This vitamin is vital for increasing immunity and keeping healthy skin.
Includes Essential Minerals Potassium iron, and calcium are some of the minerals that are found in jamun that contribute to overall well-being and health.
Helps with Digestive Health The fiber content in jamun assists in digestion and may help with digestion problems.
Can Dogs Eat Jamun?
When you are having jamun for you dog, solution isn't always straightforward. Here are some crucial points to consider:
Possibility of toxic: Jamun is not considered to be toxic for dogs, but it contains compounds which may not be appropriate for their. For instance, the fruit's organic sugars, as well its acidic components could cause stomach upsets if consumed in massive amounts.
Pits and seeds: Jamun has large seeds, or pits within, which could pose the risk of choking or cause digestive blockages when consumed. It is important to get rid of these prior to offering any kind of fruit to your pet.
Moderation is the key If you decide to feed your pet a small amount of jamun, ensure that it's moderately. In excess of the fruit, regardless of whether it's not harmful, could cause digestive issues like diarrhea or upset stomachs.
How to Safely Introduce Jamun to Your Dog
If you're keen to share jamun with your dog be sure to follow these rules to ensure that it's done in a safe manner:
Talk to Your Veterinarian Before you introduce any new food into your pet's diet, you're best to talk with your vet. They will be able to provide you with individualized advice depending on your dog's condition size, size, and diet requirements.
Prepare the fruit Clean the jamun well and then remove the seeds or pits. Slice the jamun into smaller pieces that are manageable to avoid the fruit from choking.
Start small Start by giving a small amount of the substance to observe what your dog's reaction. Be aware of any symptoms of stomach upset including diarrhea or vomiting.
Watch Your Dog Check your dog's reaction to new fruit. If they have any negative reactions, stop feeding jamun and speak to your veterinarian should you need to.
Alternative Fruits for Dogs
If you're worried about feeding your dog jamun or when your dog doesn't like it There are many other fruit options for dogs that you can explore:
Apples remove the seeds and core and serve slices for a tasty snack.
Blueberries Blueberries small berries are brimming with antioxidants and are simple for dogs to take in.
Bananas are high in potassium, bananas are an excellent treat for a few occasions. Be aware of the sugar levels.
Peaches Do not remove the pit prior to serving peach slices to your pet.
Final Thoughts
Jamun is a tasty nutritious fruit that is healthy for humans, however in the case of our furry pets, we should be cautious. While jamun isn't extremely harmful however, the seeds it contains and its natural sugars can be a naughty dog treat. If you decide to serve jamun, make sure you be careful and make sure the jamun is prepared properly.
Make sure to take care of your dog's health and wellbeing by consulting your veterinarian and limiting your dog's diet to healthy fruits and treats. If you do this you can ensure your pet has a balanced diet and living a healthy, happy life.
0 notes
Text
Sunflower Seeds Benefits for Females: Better Health

Health Benefits of Sunflower Seeds
Sunflower seeds, a common snack amongst many Indian households, are not just delicious, they offer a variety of health benefits due to their rich nutritional profile. Here are 10 benefits of eating sunflower seeds:
1) Reducing Inflammation
One of the key health benefits of sunflower seeds is their ability to reduce inflammation. They are laden with vitamin E, flavonoids and other plant compounds that possess anti-inflammatory properties. If you suffer from conditions triggered by chronic inflammation, consider incorporating sunflower seeds into your diet. Regular consumption could help lower inflammation levels, providing relief from such conditions.
2) Supports Skin Health
The sunflower seeds benefits for skin are evident due to their high vitamin E content, which plays a significant role in maintaining skin health. Acting as an antioxidant, vitamin E in sunflower seeds shields skin cells from free radical damage. This contributes to better skin texture and appearance, illustrating the sunflower seeds benefits for female skin health.
3) Helps in Improving Heart Health
Sunflower seeds are rich in healthy fats, including polyunsaturated and monounsaturated fats. Regular consumption of these seeds can significantly support heart health. Studies have shown that incorporating sunflower seeds into your meals is associated with lower rates of cardiovascular diseases and high cholesterol, highlighting their valuable sunflower seeds uses for heart health.
4) Helps to Lower Blood Pressure
High blood pressure, or hypertension, can lead to serious health issues such as stroke or heart disease. The magnesium content in sunflower seeds is beneficial for regulating blood pressure. Magnesium helps relax blood vessels, thereby lowering blood pressure levels and reducing the risk of heart disease.
5) Helps in Maintaining Regular Blood Pressure
Consistent consumption of sunflower seeds can help maintain stable blood pressure levels. The benefits of sunflower seeds lie in their unique combination of healthy fats, fibre, and magnesium, which supports overall cardiovascular health and enhances blood pressure regulation. This makes sunflower seeds an excellent snack for those aiming to keep their blood pressure in check.
6) Supports the Immune System
Sunflower seeds nutrition includes nutrients like zinc and selenium, which are crucial for a healthy immune system. Zinc aids in the development and function of immune cells, while selenium has anti-inflammatory properties that enhance the immune response.
7) Boosts Energy Levels
One of the key sunflower seeds benefits for male health is their potential to boost energy levels. This is attributed to their high content of protein and B vitamins. Specifically, vitamin B1, or thiamin, plays a crucial role in converting food into energy, helping men stay active throughout the day. For a quick energy-boosting snack, sunflower seeds are an excellent choice.
8) Reduces Cholesterol
In addition to providing energy, the benefits of sunflower seeds include their potential to lower cholesterol levels. Regular consumption can improve lipid profiles, thanks to their rich content of healthy fats and fibre. By incorporating sunflower seeds into your diet, you can reduce your risk of heart disease and support overall health.
9) Reduces Risk of Cancer
The sunflower seeds nutrition profile includes antioxidants like vitamin E and selenium, which are vital for reducing the risk of certain cancers. One of the valuable sunflower seeds uses is their ability to protect cells from oxidative damage and inflammation, potentially aiding in cancer prevention. Incorporating sunflower seeds into your meals can be an effective part of a preventative health strategy.
10) Helps in Managing Diabetes
The benefits of eating sunflower seeds extend to managing diabetes, particularly type 2 diabetes. They contain bioactive compounds that may improve insulin sensitivity and help regulate blood sugar levels. For individuals dealing with this condition, including sunflower seeds in their diet could provide valuable nutritional support.
How To Eat Sunflower Seeds?
Sunflower seeds are quite versatile and can be enjoyed in many ways. Sunflower seeds for hair or skin can be a great addition to your diet, as they provide essential nutrients that promote healthy hair growth. Here’s how to make the most of sunflower seeds nutrition:
Raw or Roasted: Crack the outer shell with your teeth, spit it out, and then chew the seed. If you prefer a crunchy snack, try roasted and salted sunflower seeds.
In Powdered Form: Grind sunflower seeds into a fine powder and add it to your smoothies, oatmeal, yogurt, or even baked goods. It enhances the nutritional profile and adds a subtle, nutty flavour.
In Salads, Pasta, Curries, and Stir-Fries: Sunflower seeds add a wonderful nutty crunch when sprinkled over salads, pasta dishes, curries, and stir-fries. This not only enhances the taste but also adds to the nutritional profile of your meal.
In Protein Bars and Baked Goods: Sunflower seeds can be added to homemade protein bars for an extra boost of protein. You can also use sunflower seed butter in baked goods like breads and muffins.
In Eggs: For extra flavour and crunch in your omelettes or scrambled eggs, consider adding sunflower seeds to the egg batter.
As Sunflower Seed Butter: By blending sunflower seeds with sea salt and sugar, you can make your own sunflower seed butter. Use it as a spread or add it to sauces and smoothies for a nutrition boost.
Sunflower Seeds Side Effects
While sunflower seeds uses into your diet offers numerous health benefits for both males and females alike, it’s essential to be aware of potential side effects that may arise from excessive consumption:
Digestive Issues: Overconsumption can lead to digestive problems such as vomiting, stomach ache, and constipation due to the high fibre content.
Unhealthy Weight Gain: Sunflower seeds are rich in calories. Therefore, overeating them could contribute to unhealthy weight gain.
Allergic Reactions: Although relatively uncommon, some people may be allergic to sunflower seeds, leading to adverse reactions.
Potential Exposure to Cadmium: Sunflower seeds contain cadmium, a toxic heavy metal that can accumulate in the body over time if consumed excessively.
0 notes
Text
Do Sunflowers Need a Lot of Water Daily for Growth

Sunflowers aren't just an attractive addition to your garden, but also contain seed that could be used to make oil and food. Knowing the needs for watering of sunflowers is crucial to their development and growth. This guide will explain the amount of water that sunflowers require to be able to determine if they need a lot of water and give tips on when to ensure they are watered regularly to maintain optimal health.
Understanding Sunflower Water Requirements
Sunflowers require sufficient water to ensure their rapid growth rate and massive and nutrient-rich flowers. But, their requirements for water will vary based on a variety of variables, such as the type of soil, climate, and the stage of growth.
Key Factors Influencing Water Needs
Climate and Temperature Climate and Temperature: In dry, hot conditions, sunflowers will require more frequent watering in order to help compensate for water loss due to transpiration and evaporation. However, in cooler climates that are more humid and cool they may need less water.
Its soil type: ability of the soil to hold water affects the frequency at which sunflowers require irrigation. Sandy soils drain fast and might require frequent watering, while clay soils hold water for longer.
Sunlight Flowers thrive in full sunlight, and more exposure to sunlight could boost their water requirements. They might require more water during prolonged periods of intense sunlight in order to avoid becoming wilted.
The plant's maturity Young sunflowers have different requirements for watering than mature plants. As they mature and mature, their needs for water decrease as their root systems get more established and efficient in extracting moisture from soil.
How Much Water Do Sunflowers Need?
Sunflower Water Requirements.png
Sunflowers usually require around 1 - 2 inches water each week. This can be achieved through rain or additional irrigation. It is crucial to water thoroughly and allow the soil to soak for at minimum 6 inches. A deep watering will encourage strong roots, which helps sunflowers survive dry conditions.
Watering by Growth Stage
Germination and Seedling stage The germination stage and the beginning of growth, sunflowers require constant watering to establish roots. They need to be watered regularly to ensure that the soil stays wet, but not dripping with water.
The stage of vegetative growth: When sunflowers enter their vegetative phase, they establish an extensive root system that can withstand less frequent irrigation. They should be watered two to three times a week, making sure that the soil is kept wet.
The Flowering Stage: During the stage of flowering sunflowers require sufficient water in order to allow the development of their flowers. Maintain a consistent moisture level in the soil and water it every two to three days based on the weather conditions.
Steps in Seed Development: After flowers have blossomed and the seeds start to sprout cut down on watering every week. This will prevent root rot as well as promoting the healthy maturation of seeds.
how-often-to-water-sunflower.png
Do Sunflowers Need a Lot of Water?
Although sunflowers don't require much water, they do require regular and frequent watering in order to flourish. Overwatering can cause root rot, and submerging can lead to the plant to wilt and slow growth. Achieving a balance is crucial to ensuring healthy sunflowers.
Signs of Underwatering and Overwatering
Sunflowers that are submerged may exhibit wilting or dropping leaves, or the browning or yellowing of foliage. If you notice any of these symptoms you should intensify the amount and intensity of the watering.
Overwatering: Signs of overwatering include roots rot, yellowing leaves as well as stunted growth. Check that your soil is having proper drainage and stop watering if these signs appear.
How Often to Water Sunflowers
The frequency at which sunflowers are watered is dependent on the conditions of the environment and the needs specific to the plants at various growth stage.
Tips for Watering Sunflowers
It is crucial to water sunflowers properly to their health and efficiency. Here are some tips from experts to ensure your sunflowers get the correct quantity of water in the correct time.
Check Soil Moisture
Testing the Finger: One of the most simple method to test soil moisture is to use the finger test. Put your finger into the soil until you reach the point of your first knuckle. If the soil is dry at this level it's time to soak it in water. If it seems damp then hold off watering until it has dried out some more. This test will help you avoid excessive watering and helps ensure that you only add water as needed.
Moisture Meters: For more precise measurement, think about the use of a soil moisture gauge. These devices will give you precise readings of your soil's moisture content, which can help you make a more informed decision on watering.
Timing
Early Morning watering: Watering sunflowers during the day is ideal since it reduces the loss of water through evaporation, and permits the plants to take in moisture effectively prior to the time when the sun's heat begins to set in. This helps to prevent fungal diseases since leaves dry more quickly in the early morning sunlight.
Evening Watering Evening Watering: If morning watering is impossible, then late evening is the best time. But make sure the leaves are dry prior to nightfall, in order to lessen the chance of fungal infections.
0 notes
Text
All About Lucky Bamboo Plant Benefits

This is some of the most gorgeous and adaptable indoor plants there There's a plant that is beautiful and versatile: the Lucky Bamboo plants! If you've been looking for the latest option to add to your plant collection take a look at this. Learn more about amazing advantages that come with The Lucky Bamboo plant, which will benefit the home and you.
With its long, green stalks with bamboo-like leaflets, it's not difficult to understand the place where it is that the Lucky Bamboo plant gets its name. Don't let the name make you believe it's in fact bamboo. This Lucky Bamboo plant is also often referred to as Dracaena sanderiana It is which is a perennial plant that is native from Central Africa. It's gorgeous, easy to care for, and comes with many intriguing characteristics and benefits.
The most sought-after house plants on the market is the lucky Bamboo plant is a top house plant for those who want to grow it at home. Not only is it simple to take care of however, it is also an amazing array of religious and spiritual significance, especially in China.
The Bloom Box Club Bloom Box Club, we have three kinds from Lucky Bamboo plants that are waiting to thrive under your watchful eye. The three varieties are Lucky Bamboo 'Gold', Lucky Bamboo 'Victory' and the Lucky Bamboo 'White', each with its individual Feng Shui-friendly qualities.
The benefits that come from Lucky Bamboo plant
1. It is believed to bring luck and wealth
A Lucky Bamboo indoor plant plays an essential role within Feng Shui. A long-standing Chinese method of finding harmony and synergy within our homes, Feng Shui is now practiced throughout the world.
It is believed that the Lucky Bamboo plant is now an extremely popular element in homes that are influenced through Feng Shui practices. The plant is believed to bring luck and cleanse energy to your home The lucky Bamboo tree has been utilized for hundreds of years to generate positive energy and luck.
Fun fact! In Chinese traditions, the number in stalks from the Lucky Bamboo plant you have is correlated with the energy you'll be attracting. Examples:
Two stalks draw the attention of a lover.
Three are the best for longevity and happiness.
Five is a symbol of harmony and balance.
Six is a magnet for wealth.
Seven will bring health.
Eight is a magnet for growth and development.
Grow and care for Your Lucky Bamboo indoor plant, and feel the mystical potential that are Feng Shui soothing and streamlining your home's flow. There is a legend that says when a Lucky Bamboo is placed upon the desk, it can encourage prosperity in all activities (like job!) which take place in the area.
2. Easy to increase
Lucky Bamboo They are very easy to grow.
In comparison to other indoor plants As compared to many other indoor plants Lucky Bamboo plants are simple and easy to cultivate. The plant can also be established in the soil however, it could be even easier than it. It is a Lucky Bamboo plant grows great when placed in a vase of water and some pebbles on the bottom. Be sure to change the water regularly to ensure the best freshness.
Additionally this, it is also known that the Lucky Bamboo indoor plant is an indoor plant that is growing very quickly. Place it in an area with a warm, comfortable temperature and allow it to flourish. When you are thinking about the best place to put Your Lucky Bamboo plant Try to envision your house as a forest. Lucky Bamboo plants aren't fond of direct sunlight, but instead prefer filtered, gentle light as is found in the canopy of a rainforest.
3. Only requires minimal care
Have you ever developed an emotional connection to a plant in your home and then find out that you've left it neglected? We've certainly done it been there, and we're aware of how frustrating it can be as a homeowner. This is one reason the Lucky Bamboo indoor plant is an ideal plant for beginners as it needs very minimal care to remain strong and healthy.
Although many plants require extensive pruning and attention to keep healthy The Lucky Bamboo plant needs only some trimming every now and then. This is only to prevent this plant from turning over-heavy or to maintain it in an appropriate size for the size of its container. Cut off the branches of the Lucky Bamboo plant with scissors when you feel it is appropriate. After that, you can sit back and relax in a garden that will take care of itself.
4. Cleans the air inside your home
The best benefit that comes with having one of the benefits of having a Lucky Bamboo plant as a bamboo plant suitable for use in your home is its ability to purify the air. Similar to other indoor plants it is believed that Lucky Bamboo is also believed to purify the air. Lucky Bamboo plants are believed to cleanse the air around your home, creating a more pleasant and healthier environment to reside in.
The cultivation of plants at home is one of the ways to ensure that the air quality inside your home improves - all due to the increase in oxygen. Some individuals believe that plants like those of the Lucky Bamboo plant can reduce harmful substances and chemicals that are within the air at your home. It's an advantage for your lungs and also for the environmental.
5. Gorgeous ornamental feature
Gorgeous decorative feature
In addition to bringing luck, energy, and fresh air It is also a source of clean air and good luck. Bamboo plant is a stunning feature that can brighten any area you put it in. Because of its massive stalks and delicate foliage, it creates a delicate but beautiful design feature. Put it in a glass vase adorned with white pebbles and welcome it to your new living space's favorite pet.
Like other indoor plants like other indoor plants, the Lucky Bamboo plant is an excellent method to bring green and freshness to your home. The vibrant colour of this plant can create an environment that is natural and relaxing which will allow you feel more peaceful and at peace.
Due to its low-maintenance characteristics It is easy to maintain. Lucky Bamboo plant is a excellent gift for new gardeners. It's not just about giving your loved ones an attractive and sturdy plant that is easy to cultivate as well as providing them with luck, fortune, and a vital boost to your Feng Shui.
Wrapping Up
Lucky Bamboo plant
In a nutshell in a nutshell, in short, the Lucky Bamboo plants is a great indoor plant suitable for home gardeners due to a variety of reasons. If you've been looking for an exciting addition to your home or a plant that can get you started on your journey to becoming a plant-parent The lucky Bamboo plant is a good option.
The Lucky Bamboo plant an easy one to care for and maintain, it has also been in use for a long time for bringing luck and prosperity to homes. Now is your chance to carry on the tradition. You can simply purchase an Lucky Bamboo Plant today and take advantage of the many advantages of this distinctive and stunning plant.
0 notes
Text
Some Best Cucumbers For Pickling By Yourself

Choose your cuke
There are a variety of cucumbers to choose from and the variety you pick will influence the pickle, so you need to pick carefully. True pickling cucumbers, also known as Kirby pickles, tend to be tiny around 2 inches in length. They have a more thicker skin which is flecked with yellow, green and white, as well as a very few seeds. They have a light and sweet taste when they are raw. I'd recommend them whenever you can, as they are designed for picking. However when you don't grow yourself or are able to access a farmer market or farmstand, you'll be left with cucumbers in the grocery store and are available in two varieties: traditional and English or seeds-free.
Regular cucumbers come with a thick bitter, dark green skin, and lots of seeds. They are great when you are looking to make pickles that have no skin and has seeds removed. This gives a great shape of a smiling U and is ideal if you're using it in salads.
If you're planning to use cucumbers with their skins in order to give it the appearance and texture I recommend English or seeds-free varieties that have a smooth skin that isn't too sweet and has a lovely shape with ribs, and a some seeds. Seeds release more water into your pickling liquid, which could make the flavor less palatable too. There are miniature varieties of these that are known as babies cucumbers, or Persian cucumbers. They are actually smaller. I'm a huge fan of cute food items, so I often employ these since they are cute little circles.
Make sure you prepare your cuke
It's pretty simple. If you're looking for an un-skinless pickle, cut it in half and peel it. If you'd like a pickle that is seedless, cut lengthwise in half and employ an ounce of a teaspoon to scrape the seeds out. If you're using skin-on, rinse them well. Cut off all ends from the cucumber, and form into any shape that would be most appropriate for what you want to do with the cucumbers.
If you're planning to use them on sandwiches with flat sides Long planks or thin rounds work well. However, If you plan to put them in sandwich bags or substyles You might want to use small sticks or cut into julienne. If you are planning to make them for salads, round, bias cuts or half moons are beautiful. It is also possible to make use of a fork to scrape off the skin or alternate peeled and unpeeled pieces to create a beautiful pattern. If you're looking to transform the cucumbers that you pickled into salads by themselves, thicker cuts or chunky cut work best.
Soften the cukes
They are not processed or cooked, therefore it is important to make them slightly softer so that they can take in the taste that the brine imparts. Do this by put the cukes you've prepared in a bowl, then sprinkle with sugar and salt, and gently massage them for a few minutes, until they release some liquid and become somewhat flexible. It should be possible fold a slice of cucumber or stick roughly in half, without breaking.
Rinse your cukes
Brines are as basic as water, vinegar and salt. They can be made with sugar, like this does, and may also contain spices and herbs as well. Onions of all kinds such as shallot, scallion to Vidalia, work well to add flavor. Remember that using the red onions will make everything pink. The brine water should be sufficiently warm to dissolve sugar or salt completely. To get a fresh taste, try white vinegar or the rice wine vinegar. To add more flavor, try the apple cider vinegar. I don't recommend using red wine vinegar for pickles since it's expensive and can make the pickles look a bit muddy.
Place your pickles in a safe place.
They aren't made to be canned or processed, therefore it is important to store them in the fridge, and be prepared to consume them within the next week. While they're suitable to consume for a few weeks because of the high acid of the vinegar as well as their sugar levels, once about a week the texture becomes a little spongy and taste less delectable. This is why I only make what I think I'll need during the week.
1 note
·
View note
Text
Perennials for Shade that Bloom in Summer: Shade Stars

Perennials who thrive in shade and bloom throughout the summer are the most beautiful gifts from the natural world. They will continue to bloom every month, as well as year-after-year.
Incorporating these kinds of plants will bring the color of your lawn regardless of the heat storm. Additionally, they are perfect for bringing life into those areas of your lawn where flowers won't thrive.
Without further delay Here are 32 shade-loving perennials worth including in your collection this year.
01. Astilbe
Closeup image of astilbe pink plants
The Spruce / Evgeniya Vlasova
Astilbe blooms with feathery-like petals which adorn the plant throughout the late spring to the end of summer. It is a low maintenance and resistant to deer. It is possible to plant it under full sun, however it prefers shade in partial shade.
To keep this sturdy plant protected throughout the winter months Simply place 2 inches of mulch on the stem following it has had its first freeze. Astilbe is a slow-growing species This means that it will be blooming for several years before the division process begins.
Growing Conditions: Partial sunlight or shade neutral or acidic soil
USDA Hardiness Zones: 3-8
The Full Size is 6-24 inches. tall, 6-60 in. large, and 6-60 inches wide
02. Hosta
Hostas in the shade
The Spruce / LetAcia Almeida
Hostas thrive in shade. Their pastel-colored flowers bring a splash of bright light into dark spaces. They are blooming for as long as an entire month during the summer. However, its huge leaves remain beautiful even after the flowers fade away. Just trim the stalks after the flowers have over blooming.
When you plant hostas, make sure to plant in a an potting soil that is well-drained, particularly when you reside in an area with clay-like soil. Hostas require time to grow, and they mature in about four years.
Growing Conditions Shade or Full pH-neutral soil, well-drained and well-drained
USDA Hardiness Zones: 3-9
Full Size: 648 in. tall, 10-60 in. large, and 10-60 inches wide
03. Hellebore
Wirestock / Getty Images
Although it blooms most of the time in the fall and the early spring season, the plant's evergreen leaves still add colour and life to the garden in summer. The sprawling plant is growing slowly and matures in around three years.
Hellebores have a preference for partial or full sunlight in summer, however they require more sun in winter months to flourish.
Conditions for Growing: Shade in summer and sunshine in winter. Wet, well-drained soil, neutral alkaline.
USDA Hardiness Zones: 3-9
Full Size: 1-2 ft. tall, 1-2 ft. wide
04.Begonia
begonia flowering in shade
The Spruce / Jayme Burrows
If a begonia begins blooming in the summer months, it is possible to observe its blossoms up till the time of first frost. The plant is a fan of partial shade since too much sun will fade the color of the delicate flowers.
Begonias don't spread as quickly However, their growth rate and size will depend on the range. Begonias are available in a range of shades, including white, pink as well as red and orange.
Conditions for Growing: Partially shade to sun soil, slightly acidic and moist soil
USDA Hardiness Zones: 9-10
Total Size 6-12 inches. tall, 6-18 inches wide
05. Coral Bells (Heuchera)
coral bells in garden
The Spruce / Evgeniya Vlasova
Coral bells are renowned for their vibrant foliage and wispy blossoms that appear in mid-summer. The plant continues to blooming for two months following.
This perennial is quickly expanding, and therefore does require division about each three years.
Although coral bells thrive in shade, they are most successful in partial sunlight also. It is not necessary to perform many things to maintain coral bells, however deadheading will ensure that the plant blooms all through summer.
Growing Conditions: Partly shade well-drained, slightly acidic and well-drained soil
USDA Hardiness Zones: 4-9
The Full Size is 8-18 inches. tall, 12-24 in. tall, 12-24 inches wide
06. Bleeding Heart
Plant for the bleeding heart
The Spruce / Evgeniya Vlasova
A bleeding heart-shaped plant has heart-shaped flowers which grow from an arched plant, making it a gorgeous and enchanting garden accent.
The flowering starts in the late spring months and continues to bloom into the summer months, providing the possibility of up to 6 weeks bloom. It will grow at a steady pace and requires minimal maintenance.
It is recommended to plant bleeding hearts in areas that have a windbreak, since strong winds can harm the delicate vines.
Conditions for Growing: Partly shade well-drained, moist soil that is neutral or acidic
USDA Hardiness Zones: 3-9
Full Size: 1-3 ft. tall, 2-3 ft. wide
07. Lungwort
lungwort blooming in shade
The Spruce / Evgeniya Vlasova
Lungwort is a beautiful pink or blue flowers, and occasionally both. This is due to the changing acidity during the long blooming season that begins in the spring, and continues for approximately four weeks.
The plant is able to spread quickly and is why it is important to divide it during autumn or spring. Lungwort loves its soil well, so be careful about the possibility of it becoming excessively dry or wet.
Growing Conditions: Partially shade or full shade soil that is well-drained, moist and is neutral or alkaline.
USDA Hardiness Zones: 3-8
Large Size : 6- 12 inches. tall, 12-18 in. tall, 12-18 inches wide
08. Foxglove
Close-up of the foxglove
The Spruce / Evgeniya Vlasova
The Foxglove plant is a real spectacular display, thanks to its dramatic, tall blooms that are a mix of purple and pink. Foxglove blooms in the beginning of summer, and lasts for two until three months. Foxglove can be planted in partial sun, however it'll need sunshine to produce a good amount of flowers.
Conditions for Growing Full or partial sunlight well-drained, slightly acidic and well-drained soil
USDA Hardiness Zones: 4-10
Full Size: 2-5 ft. tall, 1-2 ft. wide
09. Hydrangea
Hydrangeas in purple
The Spruce / Claire Cohen Bates
With their huge and fluffy blooms The hydrangeas attract attention throughout the summer. They bloom in the spring, and continue to produce new flowers through the fall.
You can also keep the dried blooms on the plants to give some visual interest to your lawn in winter months. The plants grow rapidly and increase in approximately two feet in size every year.
Conditions for Growth Full or partial sunlight Well-drained and moist soil which is acidic neutral, or alkaline.
USDA Hardiness Zones: 5-9
Full Size: 2-20 ft. tall, 2-6 ft. wide
10. Rodgers Flower (Rodgersia pinnata)
Rodgers Flower (Rodgersia pinnata) flowering
The Spruce / Evgeniya Vlasova
The Rodgers flower plant is named after the magnificently large blooms that measure around three feet in height. The flowers appear in June and last through July. This plant is ideal in areas that get at least a little sunlight. They thrive best in moist soil, but well-drained.
Conditions for Growing Full sun to part shade, well-drained, rich and alkaline soil
USDA Hardiness Zones: 5-7
Full Size: 3 ft. tall, 5 ft. wide
11. Flowering Ginger (Hedychium)
flowering ginger
The Spruce / Heidi Kolsky
There are many kinds of flowersing ginger and each one has an incredibly distinctive look. They are available in shades of purple, pink white, brown, and.
Based on the variety you choose to plant, it'll flower in the summer or in the late spring, and continue to show color until the autumn. It is important to give your flowering ginger a good watering in the growing season than during the in the dormant period.
Conditions for Growing: Partly shade, well-drained, moist soil that is acidic or neutral
USDA Hardiness Zones: 7-10
Full Size: 4-5 ft. tall, 1-2 ft. wide
12. Daylily
Daylilies that are shaded
The Spruce / Evgeniya Vlasova
Daylilies are another type of plant which comes in many varieties. While the majority of daylilies like full sun, others prefer shade during the afternoon in hotter climates.
The flowers bloom in the months of June or July, and then continue to bloom up days to five weeks. It is only necessary to water these plants that require little maintenance when the weather is dry.
Growing Conditions: Partially shade to full sunlight, loamy soil and acidic soil
USDA Hardiness Zones: 3-10
The full size ranges from 6 inches. to 5 feet. tall, 2-4 feet. large.
0 notes
Text
When to Pick Cucumbers for Pickling: Perfect pickle

When is the best time to pick cucumbers for pickling?
First time that I started picking cucumbers I realized that I was not sure what time they were best to be picked. This isn't logical, but it would appear to be easy isn't it? I'd stare at these tiny cucumbers trying to figure out if they were small. I'd glance at the ones that were slightly bigger, thinking that they appeared to be larger than the ones that were in the jars at the supermarket.
Pickling vs slicing cucumbers
There are two primary varieties of cucumbers: pickling and cutting. Any kind of cucumber can be picked, however picking cucumbers are more effective.
Pickling cucumbers are designed to be picked when they are smaller and, naturally. However, when compared to cutting cucumbers, they have less skin, softer (crunchier!) flesh, smaller and less seeds, and are less bitter.
Cucumbers cut in slices aren't as crunchy, and the skin may become more brittle - which isn't so obvious when making relish. They are different in both shape and color in addition.
Pickling cucumbers are typically thinner and shorter (stockier) that are more suitable for gherkins as well as spears of pickles. They usually have a lighter hue than the usual dark-green slices of cucumbers. The colors of pickling cucumbers are typically light and creamy to medium green with spiny, bumpy skin.
When is the best time to harvest cucumbers for picking
Although you can let pickling cucumbers grow to the size of sandwiches, and harvest cucumbers by slicing them early to pickle but I'll focus on their intended purpose.
If you're interested in knowing how to harvest cucumbers for pickling specifically for pickling this article is written perfect for you. The best size for picking is determined by the method you choose to pickle them - gherkins, slices or spears.
Harvesting for gherkins
Pickling cucumbers are picked when they are small and still have a thin skin and crisp flesh.
If you're looking to make gherkins you'll need to harvest the cucumbers when they're tiny, to allow them to be steamed whole. Pick when they're 1.5 2- 2" length, which is about equivalent to the width of your finger.
With this size, they'll appear like they're spiky and bumpy which is normal. The cucumbers must also be solid and greenish (even lighter green). They shouldn't appear yellow, which is an indication that something has gone wrong during the process of growing, such as lack of pollination, watering or stress from heat.
Harvesting of pickles for slices / chips of pickles
If you're planning to make bread and butter pickles or slices of dill pickles you'll need to let the cucumbers develop until they're big enough to make perfect slices of around 1.25 to 1.75" wide.
A good way to determine the best time to harvest them is if they're only a little smaller than an average spice container. As a reference, most spice jars are around 1.75" thick and 4" long.
Certain varieties are smaller and more dense, while others are a bit longer and smaller. This is why I choose ones based on their size, not the length.
To make sliced pickles Pick the cucumbers at a time at a time when they are able to reach an approximate diameter of 1.25 inches. If they are that large the length of their slicing will be around 3.5 long. Another method of determining the size of a cucumber is to grab an ornamental plant tag on the ground (standard tags are four" long) and then compare it with the cucumber.
The most stringent standard for picking cucumbers, established by the USDA for pickling cucumbers, is an overall size of 1.25 inches, and not more than 3.5 inches. A lower grade can be sized up to 1 7/8th inch, but not more than 5.5 inches.
If you don't have to worry with commercial production you could also make use of cucumbers that aren't shaped properly to make pickles that are sliced. Nobody will be more knowledgeable!
Cucumbers harvested for spears
Pickle spears are generally preserved in mason jars that are the size of pints. These jars measure about 5.25 inches tall. Therefore, choose your cucumbers only when they are smaller than the container. For spears, cucumbers should be around one-third the height of spice containers or slightly bigger.
Pick the cucumbers when they're about 4 to five inches in length. The blossom ends are taken off prior to pickling as it is full of enzymes which can soften the cucumber when the cucumber is kept.
Many gardeners I've met don't deliberately pick their cucumbers to make spears, but instead use cucumbers that grow accidentally too big to use as spears. This is what happens at the final!
If the cucumber grows excessively long, a good 5 inches then you can reduce them to create spears that can fit into the size of a pint mason jar. Make sure to avoid using ones which are too big without cutting them into smaller pieces in the sense that most recipes for canning test on a particular size. The brine may not be able to penetrate larger spears.
What do you do with the excess cucumbers
Sometimes, your cucumbers for pickling will grow too large to pickle. You can make the form of a pickle relish, or make them fresh as you would with a slicing variety.
But, if the cucumbers are turning yellow, they're not suitable for eating. The yellow (or occasionally orange) color could be to indicate that the seeds within are completely mature. This means you can save seeds to plant next year, even if you're only growing one type of.
0 notes
Text
Linux Distros: Find the Top Linux Distributions

Linux has been around for quite a while, and it's at this point not the confusing, geek just working structure it used to be. Actually, the best Linux distros of 2024 are more user-friendly and flexible than ever before. In the event that you're a programmer, a novice, or someone expecting to revive an old PC, there's an ideal Linux distro out there for you. We should plunge into the universe of Linux and investigate the top conveyances of this current year! Why Choose Linux Distros? Most importantly, for what reason would it be recommended for you to try and think about changing to Linux? All things considered, Linux is open-source, and that indicates it's allowed to utilize and deeply adaptable. It's likewise known for its dependability and security, settling on it an extraordinary decision for both individual and expert use. Also, the Linux people group is huge and stable, so you won't ever be shy of assets or help. Best Linux Distro Programming In the event that you're into coding, you really want a dependable and strong climate. Ubuntu is often hailed as the best Linux distro programming. It's easy to understand and accompanies a colossal storehouse of programming. Ubuntu's vigorous bundle of executives, fantastic help for improvement instruments, and enormous local area pursue it as a top decision for engineers. Another great option is Fedora, which offers state of the art elements and customary updates, guaranteeing you're continuously working with the most recent innovation. The Rise of Remote Work: How to Stay Productive at Home Smallest Linux Distros Got an old PC lying around? The smallest Linux distros can breathe new life into older hardware. Puppy Linux lightweight distro that runs totally in Smash, and that implies it's really quick even on old machines. Another option is Lubuntu, a lighter version of Ubuntu designed for older computers. Lubuntu offers a perfect, straightforward point of interaction without the bulge, making it ideal for low-spec frameworks. Best Linux Distros Distributions for Beginners For those new to Linux, opportunity of purpose is essential. Linux Mint is in many cases suggested as the best Linux conveyance for novices. It has a natural work area climate, and it's out-of-the-crate experience is best in class. Mint's clear UI and pre-presented programming make it a breeze in any case. Zorin operating system is another fledgling well disposed distro that mirrors the look and feel of Windows, making the progress smoother for new clients. Who is Dhaval Buch? SEBI chief’s Husband Best Linux Distros Distribution for Old Laptop If you're expecting to revive an old PC, you truly need a distro that is lightweight and useful.. Xubuntu is an excellent choice. It depends on Ubuntu yet utilizes the lightweight Xfce work area climate, making it quick and responsive on more established equipment. Peppermint operating system is one more incredible choice, intended to be lightweight and proficient, ideal for maturing workstations. Best Linux Distro Server When it comes to servers, stability and security are key. CentOS is a top pick in the server world. It depends on Red Cap Undertaking Linux (RHEL) and offers endeavor level dependability and security. Debian is another top contender, known for its vigor and broad bundle storehouse. Both of these distros are unshakable and trusted by experts all over the planet. Best Linux Distros Distribution Desktop For regular work area use, you need something solid, simple to utilize, and outwardly engaging. Elementary OS is often touted as the best Linux distribution desktop. It offers an extraordinary, clean point of interaction enlivened by macOS, making it a delight to utilize. Pop!_OS, created by System76, is one more fabulous work area distro, known for its smooth plan and magnificent help for gaming and efficiency. Best Linux GNOME Distro In the event that you favor the GNOME desktop work area climate, Fedora is a top decision. It's known for giving an unadulterated Elf experience, with ordinary updates and the most recent highlights. Ubuntu GNOME likewise an incredible choice, offering the soundness of Ubuntu with the polish of Dwarf. Best Linux OS Gaming Gaming on Linux has come a long way, and the best Linux OS gaming distro has to be Pop!_OS. It's created by System76 and offers superb gaming execution out of the container. Pop!_OS incorporates support for Steam and Lutris, making it simple to play your #1 game. Manjaro is another strong gaming distro, with a moving delivery model that guarantees you generally have the most recent programming and drivers. Conclusion Choosing the best Linux distros can seem, by all accounts, to be overwhelming, yet it genuinely slips to your specific prerequisites and tendencies. Whether you're a designer, a juvenile, or someone expecting to resuscitate an old PC, there's a Linux dispersal out there for you. From the lightweight Doggy Linux to the amateur accommodating Linux Mint, the adaptable Ubuntu to the gaming force to be reckoned with Pop!_OS, Linux offers something for everybody. Make a plunge, investigate, and find the distro that feels like home. Unveiling the Surprising Benefits of the ZZ Plant Frequently Asked Question (FAQs):- 1. What are the most ideal decisions of Linux distro for programming in 2024? A. The best Linux distro programming in 2024 is Ubuntu, known for its easy to understand interface and broad programming vault. Fedora is likewise an extraordinary decision for state of the art elements and normal updates. 2. What is the best Linux distro for old PC? A. For more seasoned machines, Xubuntu and Lubuntu are brilliant decisions. Both are lightweight and efficient, ensuring good performance on older hardware. 3. Is Linux Mint a good choice for beginners? A. Yes, Linux Mint is highly recommended for beginners. Its familiar desktop environment and usability make it an extraordinary beginning stage for new Linux clients. 4. What is the best Linux Distros distribution for servers? A. CentOS and Debian are treated as the best Linux distros for servers, known for their solidarity, security, and expansive pack stores. 5. Is it possible to use Linux for gaming? A. Absolutely yes! Pop!_OS and Manjaro are top choices for gaming on Linux, offering phenomenal execution and support for gaming levels like Steam and Lutris. Read the full article
0 notes
Text
The Role of Gut Health in Overall Well-being: What You Should Know

The Role of Gut Health in Overall Well-being: What You Should KnowThe Role of Gut Health in Overall Well-beingAUGUST 2, 2024VAISHNAVI SAHDigestive Efficiency A healthy gut ensures proper digestion and nutrient absorption. It breaks down food effectively, providing your body with essential vitamins and minerals.img via CanvaImmune System SupportThe gut is home to a large portion of your immune system. A balanced gut microbiome helps protect against infections and strengthens your immune response. img via CanvaMental Health Connection The gut-brain axis links gut health to mental well-being. A healthy gut can reduce the risk of anxiety, depression, and other mood disorders. img via CanvaInflammation Regulation A balanced gut microbiome helps control inflammation in the body. This is crucial for preventing chronic diseases and maintaining overall health. img via CanvaMetabolic Function Gut health plays a key role in metabolism and weight management. A healthy gut helps regulate blood sugar levels and supports a healthy weight. img via CanvaSkin Health The state of your gut can affect your skin’s appearance. A healthy gut can lead to clearer skin and reduce conditions like acne and eczema. img via CanvaHormonal Balance Gut bacteria influence the production and regulation of hormones. Maintaining gut health can help balance hormones, impacting everything from mood to energy levels. img via CanvaNutrient Synthesis Certain gut bacteria synthesize essential nutrients, such as vitamins B and K. A healthy gut ensures these nutrients are available to your body. img via Canva Read the full article
0 notes