a personal use blog for writing, editing and rp resources, all made and/or compiled by cat.
Don't wanna be here? Send us removal request.
Statistics
We looked inside some of the posts by userbug and here's what we found interesting.
Average Info
Notes Per Post
140K
Likes Per Post
95K
Reblog Per Post
45K
Reply Per Post
107
Time Between Posts
8 days
Number of Posts By Type
Text
12
Note
4
Photo
1
Last Seen Tumblr Blogs


Fun Fact
12.7% of mobile users access Tumblr.
Text
How to make your writing sound less stiff
Just a few suggestions. You shouldn’t have to compromise your writing style and voice with any of these, and some situations and scenes might demand some stiff or jerky writing to better convey emotion and immersion. I am not the first to come up with these, just circulating them again.
1. Vary sentence structure.
This is an example paragraph. You might see this generated from AI. I can’t help but read this in a robotic voice. It’s very flat and undynamic. No matter what the words are, it will be boring. It’s boring because you don’t think in stiff sentences. Comedians don’t tell jokes in stiff sentences. We don’t tell campfire stories in stiff sentences. These often lack flow between points, too.
So funnily enough, I had to sit through 87k words of a “romance” written just like this. It was stiff, janky, and very unpoetic. Which is fine, the author didn’t tell me it was erotica. It just felt like an old lady narrator, like Old Rose from Titanic telling the audience decades after the fact instead of living it right in the moment. It was in first person pov, too, which just made it worse. To be able to write something so explicit and yet so un-titillating was a talent. Like, beginner fanfic smut writers at least do it with enthusiasm.
2. Vary dialogue tag placement
You got three options, pre-, mid-, and post-tags.
Leader said, “this is a pre-dialogue tag.”
“This,” Lancer said, “is a mid-dialogue tag.”
“This is a post-dialogue tag,” Heart said.
Pre and Post have about the same effect but mid-tags do a lot of heavy lifting.
They help break up long paragraphs of dialogue that are jank to look at
They give you pauses for ~dramatic effect~
They prompt you to provide some other action, introspection, or scene descriptor with the tag. *don't forget that if you're continuing the sentence as if the tag wasn't there, not to capitalize the first word after the tag. Capitalize if the tag breaks up two complete sentences, not if it interrupts a single sentence.
It also looks better along the lefthand margin when you don’t start every paragraph with either the same character name, the same pronouns, or the same “ as it reads more natural and organic.
3. When the scene demands, get dynamic
General rule of thumb is that action scenes demand quick exchanges, short paragraphs, and very lean descriptors. Action scenes are where you put your juicy verbs to use and cut as many adverbs as you can. But regardless of if you’re in first person, second person, or third person limited, you can let the mood of the narrator bleed out into their narration.
Like, in horror, you can use a lot of onomatopoeia.
Drip Drip Drip
Or let the narration become jerky and unfocused and less strict in punctuation and maybe even a couple run-on sentences as your character struggles to think or catch their breath and is getting very overwhelmed.
You can toss out some grammar rules, too and get more poetic.
Warm breath tickles the back of her neck. It rattles, a quiet, soggy, rasp. She shivers. If she doesn’t look, it’s not there. If she doesn’t look, it’s not there. Sweat beads at her temple. Her heart thunders in her chest. Ba-bump-ba-bump-ba-bump-ba- It moves on, leaving a void of cold behind. She uncurls her fists, fingers achy and palms stinging from her nails. It’s gone.
4. Remember to balance dialogue, monologue, introspection, action, and descriptors.
The amount of times I have been faced with giant blocks of dialogue with zero tags, zero emotions, just speech on a page like they’re notecards to be read on a stage is higher than I expected. Don’t forget that though you may know exactly how your dialogue sounds in your head, your readers don’t. They need dialogue tags to pick up on things like tone, specifically for sarcasm and sincerity, whether a character is joking or hurt or happy.
If you’ve written a block of text (usually exposition or backstory stuff) that’s longer than 50 words, figure out a way to trim it. No matter what, break it up into multiple sections and fill in those breaks with important narrative that reflects the narrator’s feelings on what they’re saying and whoever they’re speaking to’s reaction to the words being said. Otherwise it’s meaningless.
—
Hope this helps anyone struggling! Now get writing.
7K notes
·
View notes
Note
hi! i love your gifs and your tutorials, you explain things very well and i was wondering if you could explain how you make a template of gifs that are different sizes but in the same canvas? and then how you make the gifs and put them in each spot to make them all work properly? thank you so much in advance if you're able to do this :)
hey, thank you so much, i appreciate it!!
there are multiple ways to do it, but here's how i make layouts like this from scratch:
a basic knowledge on how to make gifs and layer masks is required, i'll link more resources and tutorials at the end too.
i'm sure there are simpler ways to do it, but it's how i do it lol, unless i'm using someone else's layout. i'm sorry if it's too in-depth! on and i use photoshop cs5 :)
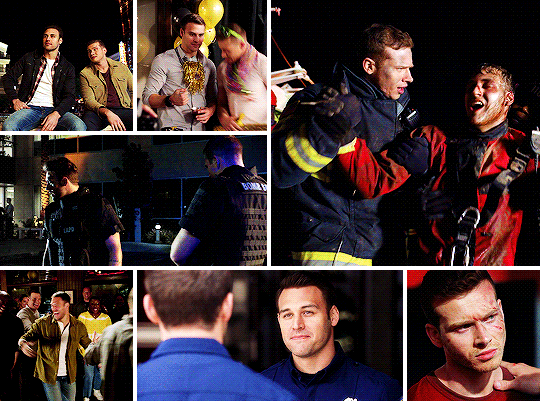
I. FIGURING OUT THE GIF SIZES
first things first, i need to figure out what kind of layout i wanna do. to do so i usually map it out i on paper because i'm super visual and it helps be figure things out. yes, we have to do (simple) match here, but it's nothing bad!
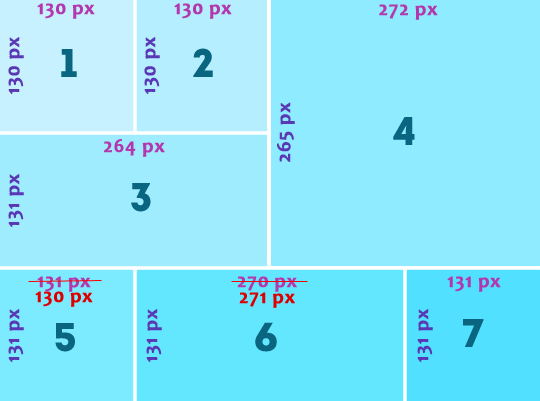
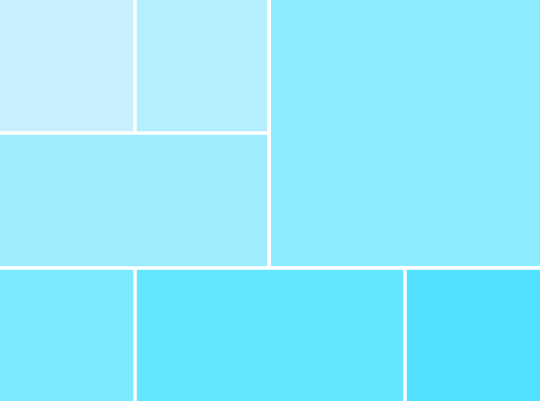
let's take this layout for example:

there are 3 different gif sizes to figure out here:
gifs 1, 2, 5, and 7
gifs 3 and 6
gif 4
to do that, you need to figure out which size you want your finished layout gif to have (540 x 540px, 540 x 450px, etc). in this case i chose a size i use all the time: 540px wide by 400px tall.
a very important thing to remember is that tumblr's transparent gutter between gifs is 4px wide, so we need to take that into consideration when we do our little math.
since we know that the gif will be 400px tall, we can right away easily figure out the height of all gifs except gif 4. since there are two 4px lines, let's remove 8 from 400 and we get 392. from there, we just need to divide it by 3: 130.67. we need numbers without decimals, so let's just say gif 1 and 2 will be 130 px tall, and gifs 3, 5, 6, 7 will be 131px tall.
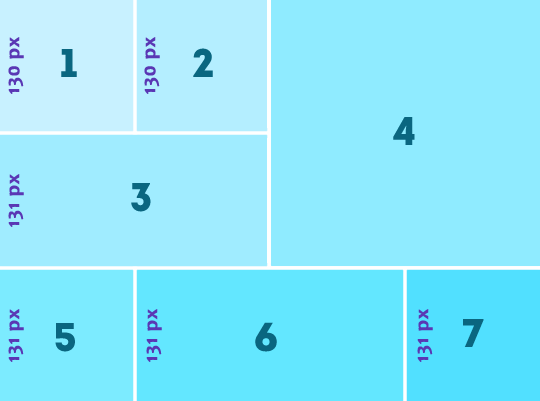
then we can figure out how wide gifs 1, 2, 5, and 7 are because they're square gifs, easy!
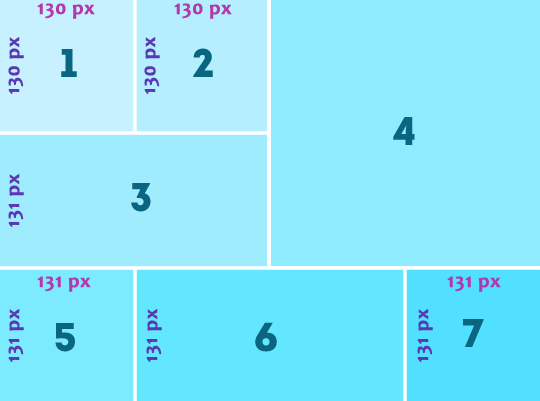
to figure how wide gifs 3 is, we can simply do 130 + 130 + 4 = 264px
for gif 6, let's do: 540 - (131 + 131 + 8) = 270px
then we only have gif 4's size to figure out. just more basic math:
height: 400 - (131 + 4) = 265
width: 540 - (130 + 130 + 8) = 272
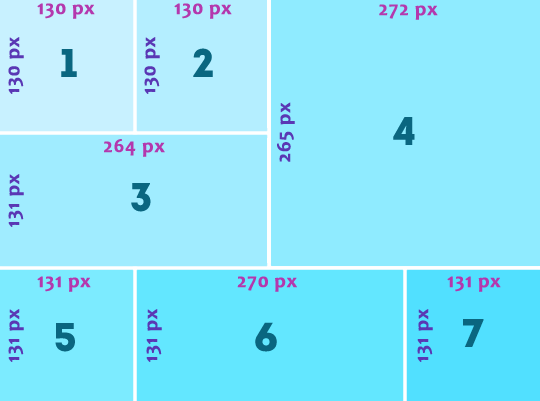
the only issue here is that i want gifs 1, and 5 to line up, so i'm just gonna adjust the sizes so they're the same:
once you have all of your gif's size figured out, you're ready to create the actual layout in photoshop, yay!
II. CREATING THE LAYOUT
create a new canvas and give it its size (540px width and 400px height), then create one group for each gif you're gonna have (in this case it's 7).

now time to make the shapes. with the marquee tool, change the style to: fixed size and enter gif 1's proportions (130 x 130px)

then click the top corner of the canvas and position the box in the top corner
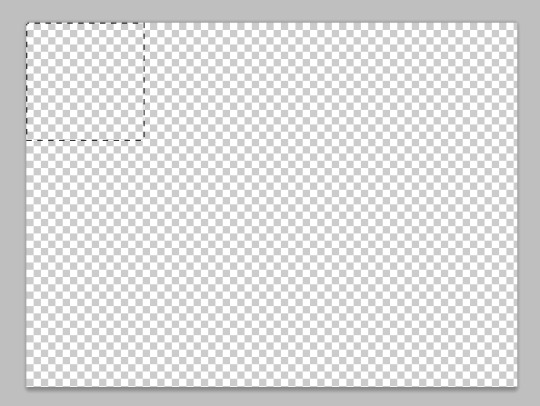
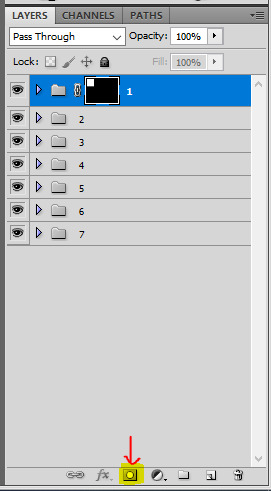
once the box is in the right spot, create a layer mask by selecting the first group and clicking on the layer mask button
then you can do the same for all the shapes: change the marquee tool's size, position the box, and create a layer mask for each group. you just need to make sure they are all 4px apart.
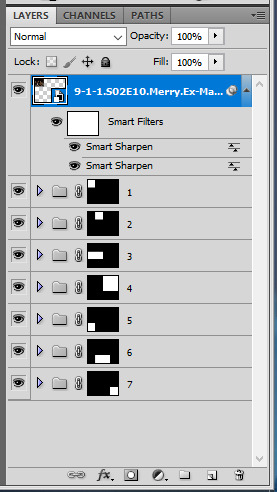
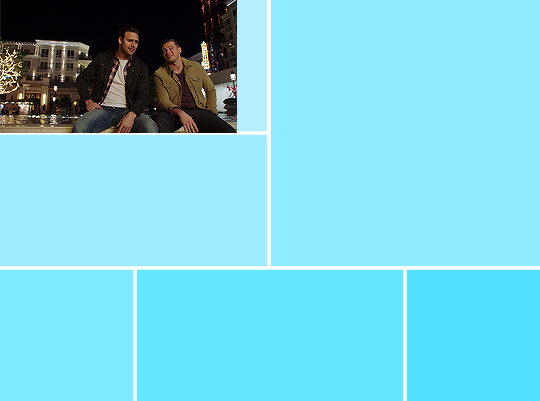
to do that you can select the group itself and just nudge it a bit with your keyboard's arrow key. to make things easier to see, i like to add a color fill layer in each group. once you've done it all, it should look like that:

III. MAKING THE GIFS
for the actual giffing part, what i like to do is to make my gifs as usual and sharpen them (i usually color later at this point).
resize this gif to the desired height to fit the layout (for example 130px for gif 1). make sure your gif is a smart object and then right click the layer > duplicate layer... > and choose your layout canvas.
obviously the gif should be in the group, so just slide it in the right group and delete the color fill.
if you don't like the gif's position, you can select this gif layer and move it around inside of the box by either sliding it around, using your keyboard's keys, or using ctrl + T to open the transform tool. if the gif is too big after duplicating it to the layout canvas, you can also resize it here with ctrl + T. it's usually what I do.


then you can do the exact same for all 6 other gifs

IV. COLORING
the last part, when everything is set, is to color! i prefer doing it at the end because it helps to make everything look cohesive. just make sure coloring layers are contained in each according group and voila!
MORE RESSOURCES
this technique with drawing the layout on paper first and then doing basic maths always work for me. you just gotta remember that the gutter size between gifs is always 4px, and choose a final gif dimension first. i hope i was clear enough, i know it's a lot of numbers 😅
here are more great layout tutorials:
fawad-khan's layout tutorial
payidaresque's layout tutorial
yenvergerberg's clipping mask layout tutorial
usergif's clipping and layer mask tutorial
237 notes
·
View notes
Note
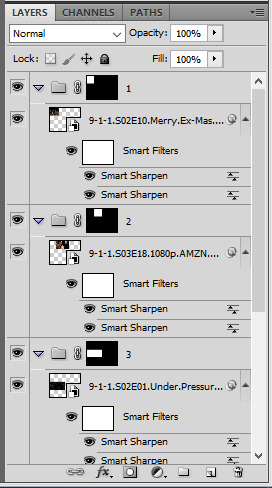
Hi! Very embarrassing gif-making question, feel free to ignore if it's too complicated, but how do you layer two gifs on top of each other like that? Whenever I try, one of them always freezes
Hi anon! Not embarrassing at all, I'm happy to show you how I layer two gifs on top of each other. I'll be using this gif from my recent ineffable husbands set as an example:

You'll need a basic knowledge of gifmaking and photoshop, and I'll put the rest of this under the cut in case it gets long.
Creating your gifs
So to start off, you want to create both your gifs in separate documents. Most of my gifmaking process happens in timeline mode, and you want to make sure that both your gifs are smart objects.
I like to have both gifs open side by side in windows so that I can make sure that my colouring is consistent and that both scenes have a similar brightness when I'm done colouring. This is important because to overlay/blend gifs, they need to have similar lighting for best results. (If your photoshop opens up the gifs as tabs, just click on where the file name is and drag the tab anywhere outside of the top bar so that it opens up as a window).
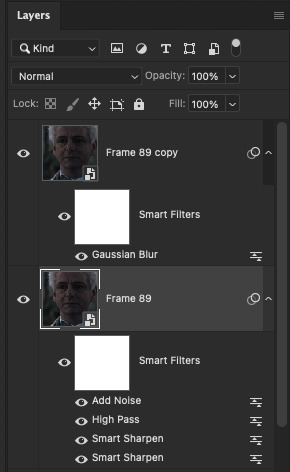
This is how my gifs look before colouring, and how each of the layers panels look (I've already added my sharpening, which is why each gif has two smart object layers).
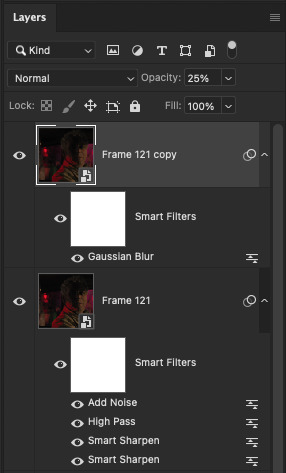
And this is how my gifs look after I add my base colouring + the yellow for this gifset:

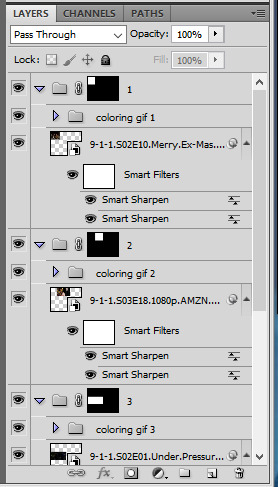
2. Making groups
Now from here on it's fairly simple. First we want to put all our gif layers in a group so that it's easier to transfer them to the same canvas while still keeping them easy to edit in case we need to make adjustments afterwards.
So select all your gif layers by holding the shift key and clicking on your first and last layer.

Then to make a group you can either use the command + g keys (ctrl + g on windows) while all the layers are selected, or you can click on the little folder icon at the bottom of the layers panel.

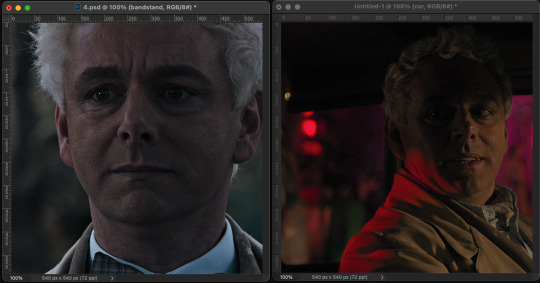
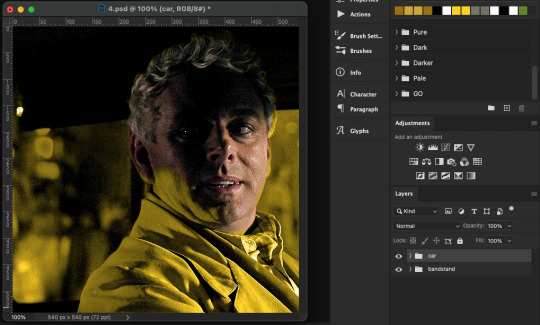
You can then double click on the group that was created and rename it. I like to put a word or phrase that describes the scene, so I've named these 'bandstand' for the gif on the left and 'car' for the gif on the right. At this point, your gifs are still in separate documents.
3. Overlaying the two gifs
Now all you have to do is copy and paste one of the groups onto the other gif's canvas. For me, it doesn't matter which group I copy, so for this I'm going to copy the 'car' group by selecting the group in the layers panel and using the command + c keys (ctrl + c).
I then click over to the other gif's canvas (you should see the other folder name in the layers panel, so in this case I'll see it say 'bandstand'). To paste, you just need to use command + shift + v (ctrl + shift + v). The shift key ensures that the positioning of your gif stays the same.
So now you should only see your second gif on the canvas, and both your groups in the layers panel, like so.
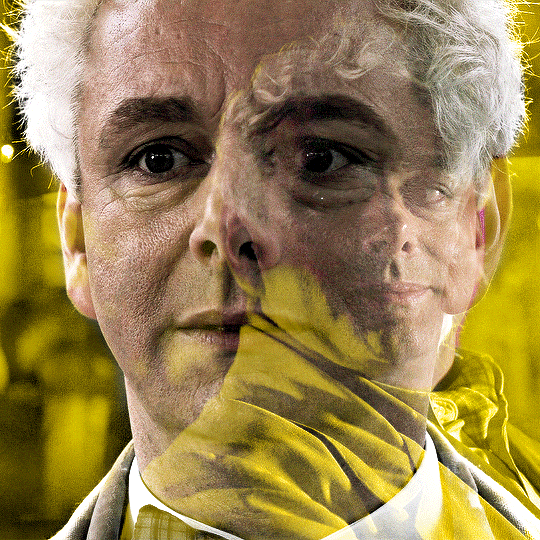
Making sure your top group is selected, change the blending mode of the group to either 'screen' or 'lighten' depending on your preferences (if you're working with really bright scenes, it might also be worth trying out 'multiply'). Your gifs should then overlay on top of each other, and play simultaneously when you scrub through the timeline and save the gif.

And this is how the gif looks when saved:
4. Final touches
If you're not happy with how the overlay looks, you can do a bunch of things to make it appear the way you want. I use a combination of resizing, layer masks, and painted layers to hide/show different portions of the gifs. You can also modify the colourings at this point, add text/overlays, adjust the brightness, and add painted colour layers. At the end, just convert back to frames and adjust the speed.
After all this, I end up with the final result which is this. As you can see, I darkened the side of his face in the smaller gif and made the brighter part stand out more clearly. I also adjusted the shade of yellow using an extra hue/sat layer.
I hope this helps anon! Please let me know if you still have questions or if you run into any trouble!
Here are some other blending/gif overlay tutorials that I found very helpful as well: 1, 2, 3
189 notes
·
View notes
Text
commonly confused words
accept: to receive except: with the exclusion of
advice: recommendation (noun) advise: to recommend (verb)
adverse: unfavorable averse: opposed to
affect: to influence (verb); emotional response (noun) effect: result (noun); to cause (verb)
aisle: space between rows isle: island
allude: to make indirect reference to elude: to avoid
allusion: indirect reference illusion: false idea, misleading appearance
already: by this time all ready: fully prepared
altar: sacred platform or place alter: to change
altogether: thoroughly all together: everyone/everything in one place
a lot: a quantity; many of something allot: to divide or portion out
angel: supernatural being, good person angle: shape made by joining two straight lines
are: plural form of "to be" our: plural form of "my"
accent: pronunciation common to a region ascent: the act of rising or climbing assent: consent, agreement
assistance: help assistants: helpers
bare: nude, unadorned bear: to carry; an animal
beside: close to; next to besides: except for; in addition
boar: a wild male pig bore: to drill a hole through
board: piece of wood bored: uninterested
born: brought into life borne: past participle of "to bear" (carry)
breath: air taken in (noun) breathe: to take in air (verb)
brake: device for stopping break: destroy; make into pieces
buy: to purchase by: next to; through the agency of
canvas: heavy cloth canvass: to take a survey; a survey
capital: major city capitol: government building
choose: to pick chose: past tense of "to choose"
clothes: garments close: to shut; near cloths: pieces of fabric
coarse: rough course: path; series of lectures
complement: something that completes compliment: praise, flattery
conscience: sense of morality conscious: awake, aware
corps: regulated group corpse: dead body
council: governing body counsel: advice; to give advice
dairy: place where milk products are processed diary: personal journal
descent: downward movement dissent: disagreement
dessert: final, sweet course in a meal desert: to abandon; dry, sandy area
device: a plan; a tool or utensil devise: to create
discreet: modest, prudent behavior discrete: a separate thing, distinct
do: a verb indicating performance or execution of a task dew: water droplets condensed from air due: as a result of
dominant: commanding, controlling dominate: to control
die: to lose life; one of a pair of dice dye: to change or add color
dyeing: changing or adding color dying: losing life
elicit: to draw out illicit: illegal, forbidden
eminent: prominent imminent: about to happen
envelop: to surround (verb) envelope: container for a letter (noun)
everyday: routine, commonplace, ordinary (adj.) every day: each day, succession (adj. + noun)
fair: just, honest; a carnival; light skinned fare: money for transportation; food
farther: at a greater (measurable) distance further: in greater (non-measurable) depth
formally: conventionally, with ceremony formerly: previously
forth: forward fourth: number four in a list
gorilla: animal in ape family guerrilla: soldier specializing in surprise attacks
hear: to sense sound by ear here: in this place
heard: past tense of "to hear" herd: group of animals
hoard: a hidden fund or supply, a cache horde: a large group or crowd, swarm
hole: opening whole: complete; an entire thing
human: relating to the species homo sapiens humane: compassionate
its: possessive form of "it" it's: contraction for "it is"
knew: past tense of "know" new: fresh, not yet old
know: to comprehend no: negative
later: after a time latter: second one of two things
lead: heavy metal substance; to guide led: past tense of "to lead"
lessen: to decrease lesson: something learned and/or taught
lightning: storm-related electricity lightening: making lighter
loose: unbound, not tightly fastened lose: to misplace
maybe: perhaps (adv.) may be: might be (verb)
meat: animal flesh meet: to encounter mete: to measure; to distribute
medal: a flat disk stamped with a design meddle: to interfere, intrude metal: a hard organic substance mettle: courage, spirit, energy
miner: a worker in a mine minor: underage person (noun); less important (adj.)
moral: distinguishing right from wrong; lesson of a fable or story morale: attitude or outlook usually of a group
passed: past tense of "to pass" past: at a previous time
patience: putting up with annoyances patients: people under medical care
peace: absence of war piece: part of a whole; musical arrangement
peak: point, pinnacle, maximum peek: to peer through or look furtively pique: fit of resentment, feeling of wounded vanity
pedal: the foot lever of a bicycle or car petal: a flower segment peddle: to sell
personal: intimate; owned by a person personnel: employees
plain: simple, unadorned plane: to shave wood; aircraft (noun)
precede: to come before proceed: to continue
presence: attendance; being at hand presents: gifts
principal: foremost (adj.); administrator of a school (noun) principle: moral conviction, basic truth
quiet: silent, calm quite: very
rain: water drops falling; to fall like rain reign: to rule rein: strap to control an animal (noun); to guide or control (verb)
raise: to lift up raze: to tear down
rational: having reason or understanding rationale: principles of opinion, beliefs
respectfully: with respect respectively: in that order
reverend: title given to clergy; deserving respect reverent: worshipful
right: correct; opposite of left rite: ritual or ceremony write: to put words on paper
road: path rode: past tense of "to ride"
scene: place of an action; segment of a play seen: viewed; past participle of "to see"
sense: perception, understanding since: measurement of past time; because
sight: scene, view, picture site: place, location cite: to document or quote (verb)
stationary: standing still stationery: writing paper
straight: unbending strait: narrow or confining; a waterway
taught: past tense of "to teach" taut: tight
than: used to introduce second element; compared to then: at that time; next
their: possessive form of "they" there: in that place they’re: contraction for "they are"
through: finished; into and out of threw: past tense of "to throw" thorough: complete
to: toward too: also; very (used to show emphasis) two: number following one
track: course, road tract: pamphlet; plot of ground
waist: midsection of the body waste: discarded material; to squander
waive: forgo, renounce wave: flutter, move back and forth
weak: not strong week: seven days
weather: climatic condition whether: if wether: a neutered male sheep
where: in which place were: past tense of "to be"
which: one of a group witch: female sorcerer
whose: possessive for "of who" who’s: contraction for "who is"
your: possessive for "of you" you’re: contraction for "you are" yore: time long past
commonly confused words part 2
7K notes
·
View notes
Text
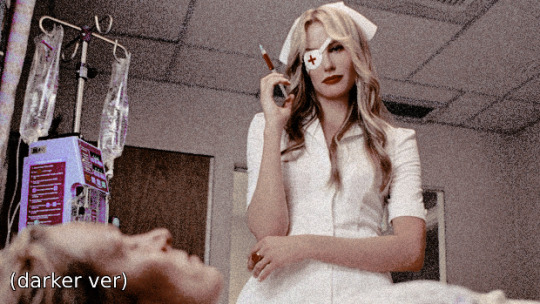
🪶 / in the source link below, you’ll gain access to #250 gifs of manny jacinto in the acolyte, s01e01-08 (2024). he was born in the year 1987 and is of filipino (bisaya), and chinese descent, so please cast appropriately when using my resources. all of these gifs were made from scratch, so you may edit these as much as you’d like, but please don’t redistribute or claim as your own. please refer to my rules for further information.
note: this pack is completely free and is also accessible through a zip file.


562 notes
·
View notes
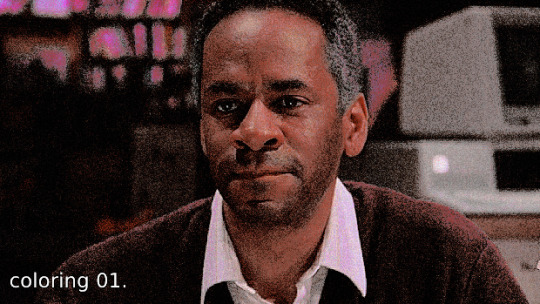
Text
click the source for 483 gifs of actress ASHLEY MOORE in RULE OF THIRDS (2024). please note that i do not approve of the 5+/- age rule. these were made from scratch and more will be added at my leisure. please don’t edit, repost or claim as your own or i will eat you. tag me if you’re posting edited gif icons for public use. give this post a like or reblog if useful. enjoy !


968 notes
·
View notes
Text
a list of 100+ buildings to put in your fantasy town
academy
adventurer's guild
alchemist
apiary
apothecary
aquarium
armory
art gallery
bakery
bank
barber
barracks
bathhouse
blacksmith
boathouse
book store
bookbinder
botanical garden
brothel
butcher
carpenter
cartographer
casino
castle
cobbler
coffee shop
council chamber
court house
crypt for the noble family
dentist
distillery
docks
dovecot
dyer
embassy
farmer's market
fighting pit
fishmonger
fortune teller
gallows
gatehouse
general store
graveyard
greenhouses
guard post
guildhall
gymnasium
haberdashery
haunted house
hedge maze
herbalist
hospice
hospital
house for sale
inn
jail
jeweller
kindergarten
leatherworker
library
locksmith
mail courier
manor house
market
mayor's house
monastery
morgue
museum
music shop
observatory
orchard
orphanage
outhouse
paper maker
pawnshop
pet shop
potion shop
potter
printmaker
quest board
residence
restricted zone
sawmill
school
scribe
sewer entrance
sheriff's office
shrine
silversmith
spa
speakeasy
spice merchant
sports stadium
stables
street market
tailor
tannery
tavern
tax collector
tea house
temple
textile shop
theatre
thieves guild
thrift store
tinker's workshop
town crier post
town square
townhall
toy store
trinket shop
warehouse
watchtower
water mill
weaver
well
windmill
wishing well
wizard tower
115K notes
·
View notes
Text
728 gifs of MELISSA BARRERA as Joey in Abigail (2024) [ click source link to view ]
This is a free public gif pack made for personal use. All gifs are made and edited by userbug. Please like and/or reblog if you wish to use them. CONTENT WARNINGS: food, guns, blood, violence, gore.


Consider supporting a small-time creator by tipping me on Ko-fi or by commissioning your own pack. Thank you! ♡
#gifsociety#neonhelper#gifhunthub#female fc#rpc#melissa barrera gif pack#rp resources#gif packs#mine: packs#*
139 notes
·
View notes
Text


⠀⠀⠀⠀⠀⠀*⠀⠀nightingale [ . . . ] 𝘽𝙔 𝔰𝔢𝔯𝔢𝔤𝟶𝔯𝔢 ! ⠀⠀⠀⠀ ⠀⠀⠀⠀⠀↳⠀⠀⠀$ 2.00+ ⠀⠀⠀⠀⠀⠀⠀⠀⠀⠀⠀ ⠀⠀⠀♱⠀⠀⠀payhip
[01]: includes a dropdown option for optional, darker coloring; poc friendly. [02]: credit is required on blog, in pinned or about / like or reblog if using. [03]: do not redistribute my psds or edit them to release as your own. [04]: you can DM to purchase directly via cashapp if you prefer. [05]: donations are not required but are greatly appreciated !
20 notes
·
View notes
Text
natasha behnam in the girls on the bus (episodes 1x01-02 = 117 gifs); for the link go to my discord server or ask me (off anon). use/edit however you want. reblog if you find the gif pack helpful.
34 notes
·
View notes
Note
hey! your gifsets are absolutely beautiful and i'm always so impressed by them, especially your choice of fonts. so i was wondering if you might wanna share the fonts you've used in your pinned post (your green ray pakorn gifset), because they're so gorgeous!
hey there! thank you so much! 💚💚💚 always happy to share with my fellow font hoarders!
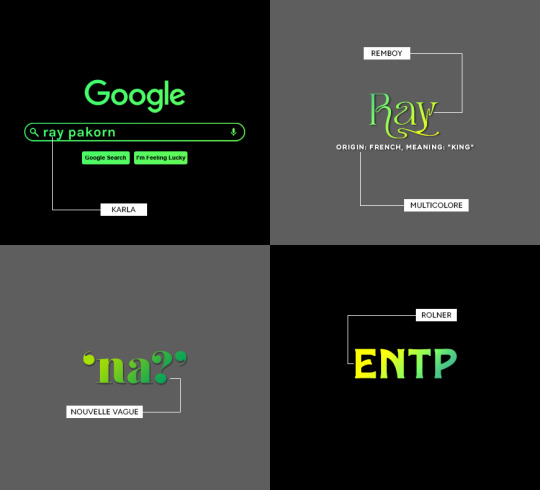
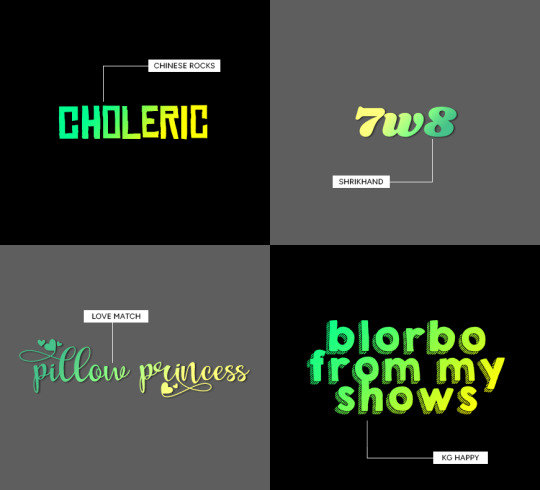
(click for larger image)
links to fonts under the cut!
karla (comes baked in with @cal-kestis' google overlay template! this is the same font used for 'chronic babygirlism')
multicolore (this is the font used for all of the white sans serif typo)
remboy
nouvelle vague
rolner
chinese rocks
shrikhand
love match
kg happy
hope this helps! happy creating!

445 notes
·
View notes
Text
GIF WITH A COLORED BACKGROUND TUTORIAL
hello! in this tutorial I will be explaining how I color backgrounds on gifs like this:
Keep reading
616 notes
·
View notes
Text

I had to delete my previous bokeh overlay pack because zight died on me and I no longer had the file, so here is a new one.
Please like or reblog if you use
Do not repost
Download
369 notes
·
View notes
Text
Advanced Synonyms for Your Novel
Cold - frigid, icy, chilling
Hot - sweltering, scorching, torrid
Small - minute, diminutive, petite
Big - vast, colossal, gargantuan
Smart - intelligent, astute, savvy
Dumb - obtuse, vacuous, dim-witted
Fast - swift, rapid, fleet
Slow - sluggish, lethargic, dilatory
Old - ancient, decrepit, venerable
Young - youthful, juvenile, fledgling
Good - excellent, superb, stellar
Bad - dreadful, atrocious, abysmal
Strong - robust, sturdy, formidable
Weak - feeble, frail, flimsy
Funny - humorous, witty, comical
6K notes
·
View notes
Text
Gif Pack: Natalia Dyer
By accessing the gif page linked below, you will find +90 gifs of Natalia Dyer as Chloe Lake in her entire apperance season 1 of Based on a True Story. All of these gifs were made by me. The sizes of the gifs are 268px in width and 150px in height (268x150). All of them are below 5.0 MB. My other gif packs of Natalia can be found here. While not necessary, a quick like or reblog if you found these gifs helpful would be appreciated! Furthermore, if you like my work, please consider buying me a coffee. Trigger/Content Warnings: Murder, Blood, Drinks Important Note: Do not repost or redistribute my gifs, claim my gifs as your own, remove my watermarks, repost my gifs in a gif hunt (link to my gif pack instead), or use my gifs to make crackship gifs. You may crop my gifs for personal use only after asking for and being granted my permission first.
► GIF PAGE ◄
215 notes
·
View notes
Note
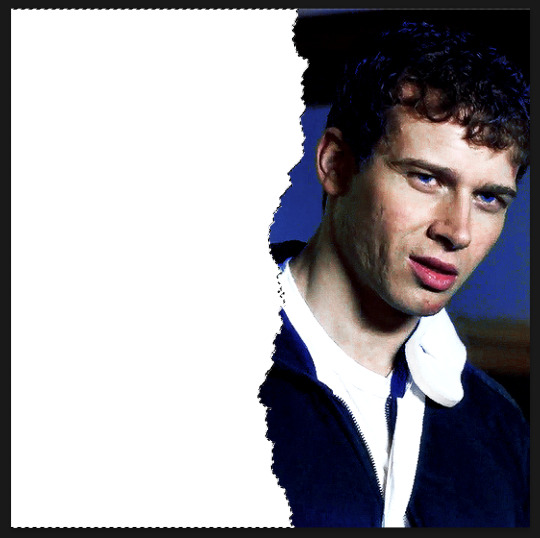
hi! i was wondering if you could share the overlay and/or explain how you made the first gif in the last set you posted? thank you very much in advance <3
Hi anon! I'd be happy to share how I created the ripped paper effect in this gifset !

You’ll need a basic knowledge of gifmaking and photoshop, and I’ll put the rest of this under the cut.
1) Creating your gifs
So to start off you're going to create your gifs in separate canvases. I work in timeline mode and I add my sharpening and colouring, and I put both gifs in groups (explained here).
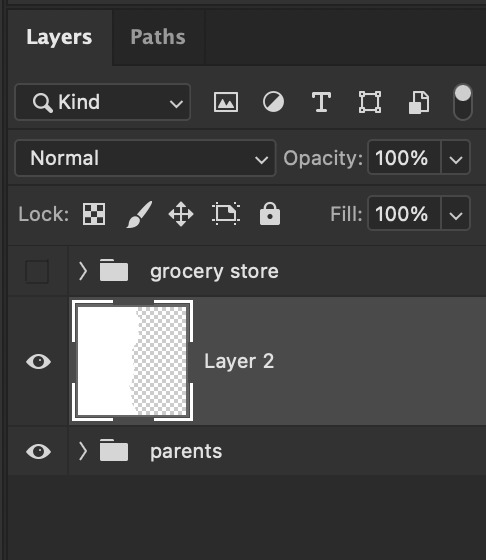
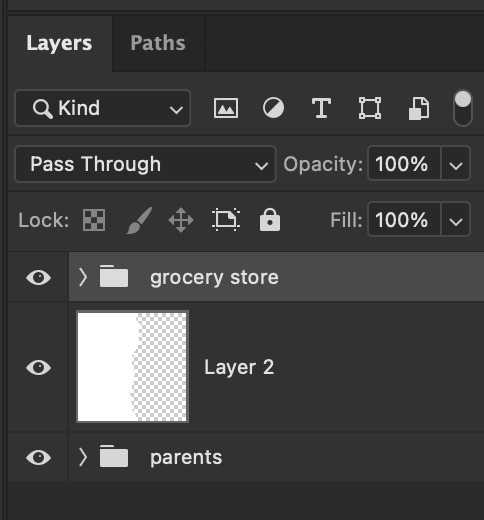
Here are my gifs on separate canvases. For reference, I've called the one on the left "grocery store" and the one on the right "parents".

You'll then want to copy and paste your gif groups onto the same canvas. This is what my canvas and layers panel looks like once that's done. From here, you're ready to start the ripped paper effect.


2) Ripped paper overlay
For this step, you want to obtain your ripped paper overlay. You can find various ripped paper textures/overlays using google, but I used these overlays by @peytonsawyers !
You open up the overlay you want to use, and either copy and paste or just drag it onto your gif canvas. You can then resize and rotate the texture and orient it where you want.
I then drag the ripped paper layer so that it's placed between my two gif groups. I also hid the top group just so that I can see the overlay, but this is only temporary. Your canvas and layers panel should now look like this:


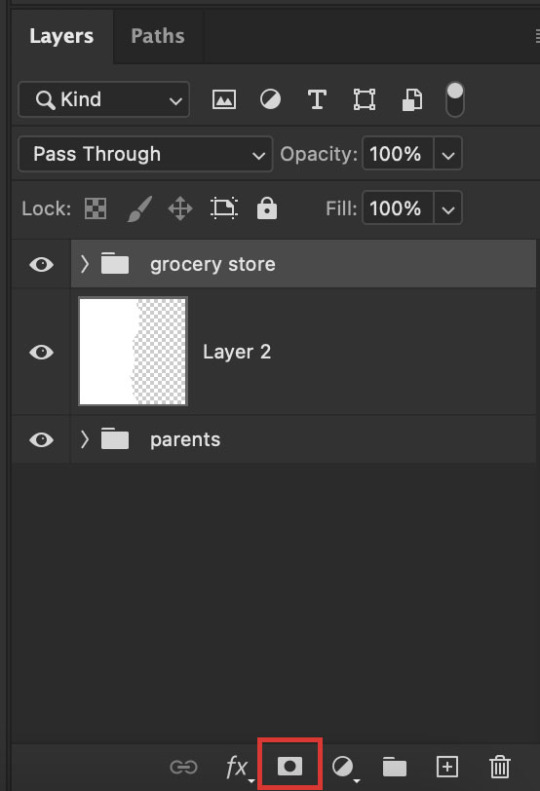
2.5) Filling in the overlay
So as you can see we have an issue because the ripped paper doesn't cover the entire area where we want our top gif to show. To fix this, I just use a white brush at 100% hardness and paint in the area that needs to be covered, making sure the ripped paper layer is selected (this doesn't have to be perfect, just make sure that the entire area is filled.
Now this is what it should look like:

3) Masking the top gif
Use the command (or ctrl) key and click on the thumbnail in the layers panel for your ripped paper layer (the square highlighted in white in that last screenshot). You should get a marching ants selection around the ripped paper like so:
Now reveal your top gif group (by clicking on the eye icon), and make sure you have the group selected in the layers panel. You should still see the selection around where your ripped paper is, like so:
Now go to the bottom of your layers panel and click on the little mask icon:
And now you should get a mask on your top group in the shape of the ripped paper, and you should be able to see both gifs simultaneously on the canvas:
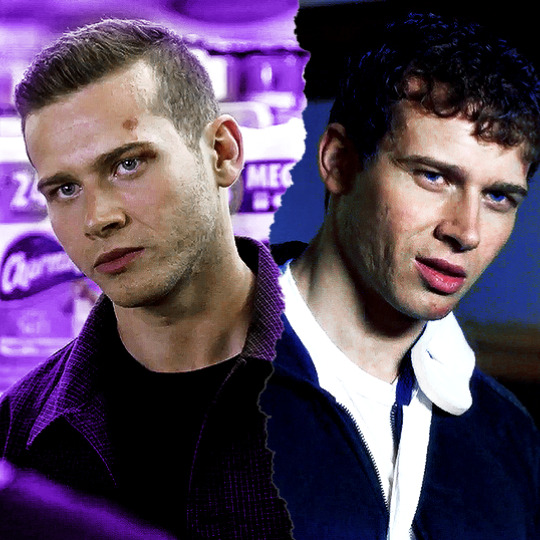

If the black and white areas on your layer mask are flipped after you click on the mask icon, just click on the layer mask and use the command + i (ctrl + i) keys to switch it back so that you can see both your gifs.
4) Final touches
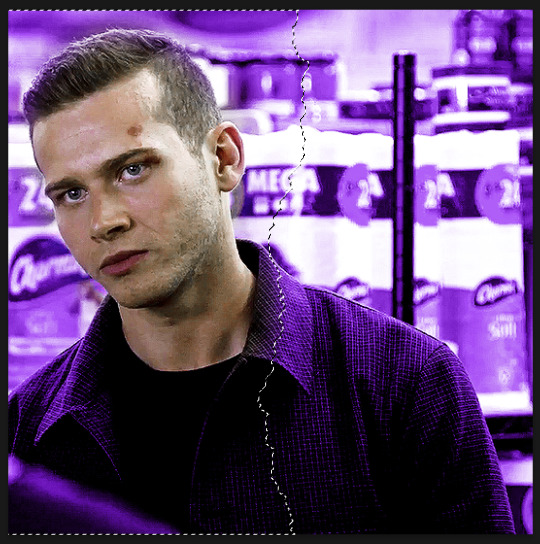
Now if you're happy with the result so far, you can absolutely stop here. However, I wanted to show the uneven rip (like how when you rip a piece of paper you can see some white bits on the edges).
To do this, select your move tool (shortcut: click the v key on your keyboard) and making sure your ripped paper layer (NOT the mask) is selected, use your arrow keys to move it slightly until it shows between the two gifs.


It currently looks a little too clean for my liking, so I like to move it slightly up/down as well so that it looks more uneven and natural. If your overlay is too small, just use the transform function (command + t or ctrl + t) to resize it so that it fills the canvas. This is what mine looks like after I mess around with it:

And you're done! If you want to adjust any colouring, just go into the gif group and you can edit the layers from there.
Hope this helps anon! Let me know if you have any questions!
301 notes
·
View notes
Photo
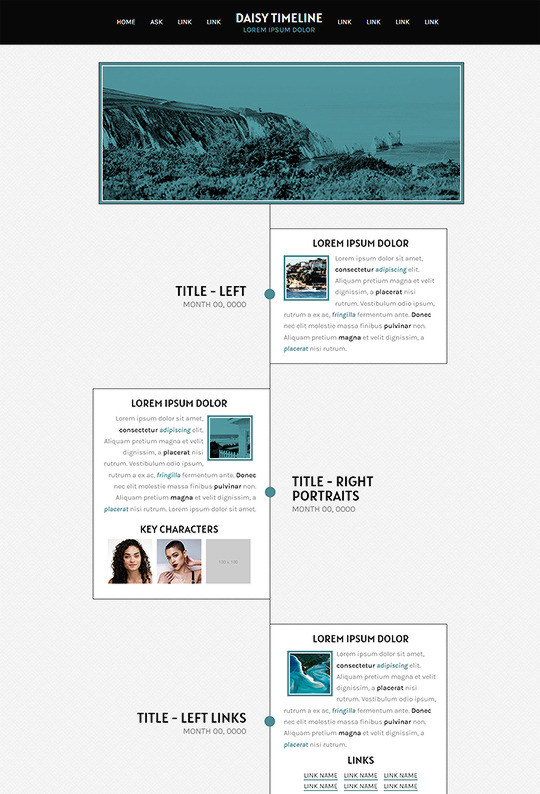
DAISY: TIMELINE PAGE BY ETHEREALTHEMES
preview - get the code on payhip ($2.50)
Buildable Timeline Page
Navigation: Home, Contact, +6 additional links
Color options for: background, text, one accents, topbar, content + more
Sections Include:
Left Side - Title and date on the left side with the text on the right
Left Side Portraits - Same as the basic left side with the addition of a character section
Left Side Links - Same as the basic left side with the addition of a link section
Right Side - Title and date on the right side with the text on the left
Right Side Portraits - Same as the basic right side with the addition of a character section
Right Side Links - Same as the basic right side with the addition of a link section
Photo Section - 650x200 banner style images
Text Section - Wide text section, similar to the photo and header section, with a title and text instead
Separator Section is used between sections to keep the middle line consistent and can be used once (or more) for a larger spacing between sections
Don’t use as base code, remove credit or claim as your own. Do edit any feature to make it your own.
Advanced HTML to edit colors and information as this is only available as an HTML page; box + table size changes not recommended. Let me know if you come across any issues.
142 notes
·
View notes