
Statistics
We looked inside some of the posts by walkinrollin and here's what we found interesting.
Average Info
Notes Per Post
1
Likes Per Post
0
Reblog Per Post
1
Reply Per Post
0
Time Between Posts
3 months
Number of Posts By Type
Text
10
Video
1
Last Seen Tumblr Blogs


Fun Fact
Tumblr has been banned in Indonesia for providing people with access to pornographic content.
Text
Engineer a Better World
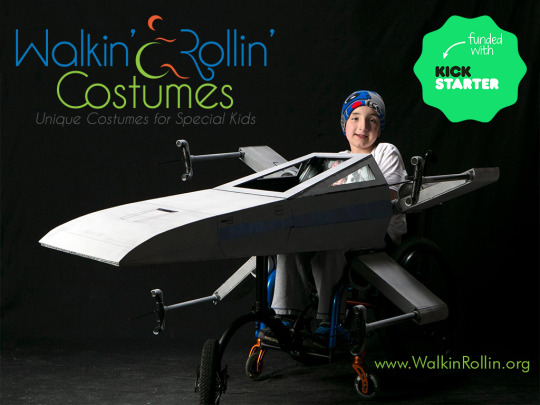
Walkin’ & Rollin’ Project Olathe Northwest HighSchool

(Side note from Walkin’ & Rollin’ Costumes: What follows is a detailed documentation of the class project that was completed by Olathe Northwest Engineer a Better World Capstone. This was written by the students with photographs by the students and teachers. This Tie Interdictor wheelchair costume was completed with guidance by Walkin’ & Rollin’ Costumes to be presented at Planet Comicon 2017. An amazing job well done by an equally amazing group of your adults. Thank you so much for your dedication to the project. - Lon Davis, Owner, Walkin’ & Rollin’ Costumes)
About
The 2016 - 2017 Olathe Northwest Engineer a Better World Capstone, as part of the Engineering Academy 21st Century Program in Olathe, is a team comprised of nine members. The capstone dynamically divides itself among different projects throughout the year, such as the Source America design project, the water baths project for the biology classes, the drip irrigation project for the horticulture classes, and, more notably, designing and building a costume for a child in a wheelchair in association with Lon Davis from Walkin’ & Rollin’ Costumes.
How We Met Mr. Davis
Our group met Mr. Davis through Mark Gash and the City of Olathe People with Disabilities Advisory Board. Shortly after our communication with Mark Gash and Lon Davis, Mr. Davis visited our team and presented his previous work and what his work means to him, as well as what his future goals are. We quickly established a project with Mr. Davis, deciding on a costume to make shortly after his visit. Throughout the design and construction of the costume, Mr. Davis would come in to visit and ensure the project was running smoothly, helping with various tasks all while continuing production of his own.

Team Members:
Henry Basile (Project Manager)
Henry is a junior at Olathe Northwest and was the Project Manager of this design. His main role was to facilitate the efficiency and time management of the group. He is interested in an occupation within the realms of engineering and architectural design and planning, and is undecided on which college he will attend. He participates in cross country and track and enjoys volunteering as the Membership Chair of ONW’s National Honor Society.
Chase Hartquist (Design Lead)
Chase is a senior at Olathe Northwest who will study Biomedical Engineering next year at Washington University in St. Louis. He focused on the design aspects and overall construction of the costume. He will continue to play football at the collegiate level as well. He also enjoys volunteering through his church and spending time with family and friends. He is also a wrestler, the Senior Class Vice President, and a Link Crew Commissioner at ONW.
Mrs. O’Gorman (Instructor)
Mrs. O’Gorman received her degree in chemistry from Loyola University, Chicago. She currently teaches College Chemistry, Materials Science and Engineering, and facilitates the Engineer a Better World capstone. She is also a coach for ACE Mentors and the SWE-Next sponsor.
Amy Leuszler
Amy is a senior who currently attends Olathe Northwest as a part of the Engineering Academy program. She attended mainly the wings on the costume. She worked through the design and construction phases. She plans on attending the University of Kansas to pursue a degree in Engineering. She is also involved in Technology Student Association and Senior Committee.
Zak Kulphongpatana
Zak is a senior who currently attends Olathe Northwest as a part of the Engineering Academy. He helped with building the wings and other parts through the design and construction phases. He will be attending the University of Kansas to pursue an engineering and business degree. He is also involved in Soccer, Technology Student Association and Science Olympiad.
Jace Kline
Jace is a senior at Olathe Northwest High School who plans on studying Computer Science at the University of Kansas next fall. He helped with many parts of the costume, including cutting PVC, shaping foam and cardboard, and spray painting. Jace played varsity basketball and varsity golf during his time at Northwest, and has been involved in Link Crew and National Honor Society.
Spencer Child
Spencer is a junior at Olathe Northwest. He focused on the design and details of the costume. He also focused on ensuring that all gaps of the costume are either sealed or painted. Spencer plans to attend Arizona State University and study Information Technology. Spencer enjoys playing music and working with computers and their security. He is also a member of National Honors Society and three-year member of the highest scoring CyberPatriot team in Kansas.
Logan Nagle
Logan Nogle is a Senior at a Olathe Northwest who will study Mechanical or Nuclear Engineering at Kansas State University next year. Logan worked on various parts of the project throughout its entirety, such as painting the wings and assembling the frame. He is also involved in the Marching Band program, and National Honor Society.
Parker Ost
Parker is a senior who currently attends Olathe Northwest as a part of the Engineering Academy program. He attended to the overall painting as well as some of the molding that went into the aesthetics of the superstructure. He worked through the design and construction phases. He plans to attend K-State in the fall, studying Business administration with a minor in the German language.
Austin Tracy
Austin Tracy is a senior at Olathe Northwest and attends the Engineering Academy there. He was responsible for most of the core frame design, PVC building, attachment mechanisms, and other small tasks. He is in his fourth year of EA and his first of Engineer a Better World program. Aside from the capstone, Austin is an avid member of the ONW Debate and Forensics Program, earning the national degree of Superior Distinction, several Varsity Letters, and was named the Impromptu Coach in their most recent season.
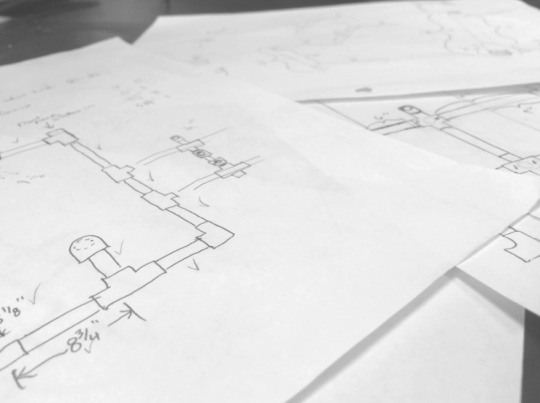
Brainstorming/ Design Plan
After gaining a basis of the parameters for the project, we had multiple sessions of which we focused on brainstorming together about possible designs for the costume. These sessions were extremely productive in making sure that everyone was on the same page for the design of the costume, as well as getting a chance for everyone to make their ideas and possible solutions known to the others on the project.
Before every meeting and before we set to work on the project as a group, we all had a chance to sit down and brainstorm in order to make sure that everyone had a productive task to begin once we set out to work. This allowed everyone to collaboratively work towards the same goal, as well as make sure that any concerns about the project are addressed before everyone began work on their own tasks. This initial approach limited design fixation because each individual created personal outlines and ideas before coming together to decide on one solution.
Cockpit
Materials:
16” Cylindrical Concrete Form Tube, Insulation Foam, Flex Seal, Spray Paint (grey), 1” PVC Pipe, 8-45 Degree 1” PVC Turns, PVC Primer/Glue, Vinyl, Phone (with music), Phone Holder, Wood Glue, and Liquid Nails
Description:
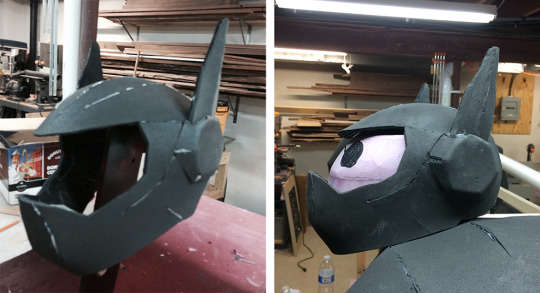
The cockpit was a crucial part of the costume. We constructed this piece first to relatively plan the size of the other parts and how we would attach them to the frame. We began our construction on a PVC ring that ran on the outside of the 16” concrete form tube in order to provide stability and attachment points for the frame. Simultaneously, we used a hot wire to cut the insulation foam in order to create a ring around the concrete form tube and mask the PVC ring. Once these pieces were complete, we glued and assembled them around the concrete form tube to create the initial frame of the cockpit. From there, we added attachments to the PVC ring that ran horizontally to serve as connections from the cockpit to the frame. We continued by covering the cockpit in Flex Seal and spray paint. Then, we bevelled and connected the front window to the cockpit using dowel rods and wood glue. Once everything was assembled and connected, we added the finishing touches: a vinyl window, vinyl buttons, foam attachments, and the phone accessories.
Challenges:
We experienced challenges throughout the construction of the cockpit that spawned from rookie mistakes. For example, while assembling the cockpit, we realized that we needed more foam to cover the entire width of the PVC ring. Also, we had to troubleshoot issues with connections between items that were already Flex Sealed, since many of our adhesives did not bond well to the Flex Seal. Although we had to overcome many difficulties in creating the cockpit, the challenges that we faced did not deteriorate from the quality of our product.
Attachment Points:
Extending backwards horizontally from the cockpit are two 1” PVC pipes that slide directly into the 1-¼” pipe that is used on the frame. This allows for easy detachment of the cockpit from the rest of the frame.
Frame
Materials:
1-¼” PVC Pipe, L Joints, T Joints, Adapters, Glue, and Primer; Nuts/Bolts (for connections); Zipties; Caster Wheels; Screws; Wood Blocks; Spray Paint
Description:
The frame was designed and built with flexibility and mobility in mind. Maintaining the client’s ability to move, as well as providing a platform that wouldn’t interfere with future expansion was a crucial part of the design process. Through many iterations, the frame focused on four key attachment points. First and foremost, the two extensions that held the handlebars were used as the primary mounting points. This allowed us to distribute weight easily, as well as give us the ability to make a square of sorts around the outside of the wheelchair, giving the user the flexibility to still access his wheels, and the designer the ability to build without fear of interfering with the design. The second set of attachment points were to the front wheel bars, allowing for secondary weight distribution. The first iteration was less than successful, ultimately being discarded for a few measurement mistakes, as well as the a non-functioning securement to the frame. The second iteration mad a few, mostly minor changes. It featured the same four point securement method from before, extending a few inches farther back. It featured a “Hook” system, where L joints and horizontal support latched onto the handlebars. Holes were drilled on both joint to be secured with zip-ties.
The frame featured T-Joints on the front, with openings facing outwards. This allowed for the 1” PVC of the front of the costume to be easily attached and detached, granting the ability to get in and out of the costume easily. Finally, the costume had two T-Joints on either side of the frame, allowing for the wings to be easily mounted and dismounted. Pins were set to ensure that the costume remained stable.

Challenges:
Measurements were the most crucial aspect of creating the frame. Since we could not have the physical wheelchair with us to work with each day, we had to adjust measurements during each visit. We also created a wooden wheelchair frame to act as our guide for measurements. With that being said, it was difficult to create a frame that fit every dimension exactly how it was meant to.
Attachment Points:
The frame is the attachment base; it too has three separate pieces that sprout from it. On the front, it has PVC attachments areas to slide the cockpit into place. On either side, it connects and is bolted directly to the barrels and wings.
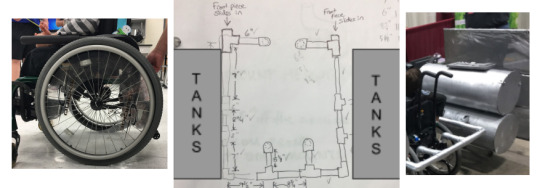
Barrels
Materials:
12” Concrete Form Tubes, Insulation Foam, Flex Seal, Spray Paint, Zip Ties, Bent Metal Connectors, Vinyl Stickers
Description:
The barrels were a simple part of the overall product design, but they were crucial to constructing a costume that physically embodied the chosen design. To begin with, after purchasing the barrels and cutting them to their respective lengths, we measured each tube to determine where the PVC would connect. For the bottom barrels, we cut holes that ran through the barrels that would hold PVC to support its weight. The top barrels only had two holes that vertical PVC would run through to hold them stationary. Once the holes were cut, we cut and glued the PVC to run horizontally through the bottom barrels, connecting to a tee joint that runs vertically into the top barrels. Then, we covered everything in Flex Seal and spray paint. After finishing the construction of the main aspects of the barrels, we individually measured the ends of each barrel to create covers for the bases. This challenged us because we experienced difficulties using adhesives between the covers and the barrels. We ended up using bent metal pieces and Zipties to attach them together. We then added vinyl stickers and bevelled portions to the fronts of each barrel. In the end, nuts and bolts were used to attach detailed pieces to the top of the sets of barrels.

Challenges:
The most troubling situation experienced while constructing the barrels dealt with attaching the covers to the ends of each barrel. We tried adding crossed beams and using countless adhesives (liquid nails, hot glue, wood glue), but none of these provided adequate support for the covers. By switching to metal pieces and Zip Ties, we eliminated the adhesive issue. The only other difficulties with this portion dealt with the structure of the barrels and how they would attach to the frame. By running the PVC frame through the barrels, we ended up creating stable and detachable pieces.
Attachment Points:
The two bottom cylinders attach to the main frame through the PVC pipe that runs through them. They connect to the main frame using bolts that run through drilled holes in the PVC. On the other side, the barrels are attached to the caster wheels and frame directly through the PVC output. The two top cylinders slide on top of the bottom cylinders though PVC which vertically cuts through the bottom cylinders.
Wings
Materials:
Pine trims, Tulle, Thin Silver Fabric, Foam, Flex Seal, Spray Paint, Staples, Bent Metal Connectors, Screws, Nails, Lexan, PVC/Connections, Nuts/Bolts, Stainless Steel Adjustable Clamps
Description:
The wings were a crucial part of the costume. We began dimensioning and design once the tanks and the cockpit were completed. The main goal was to make the lightest wing possible so that the costume could be stable. We started this task by drawing out what the wing would look like. We then referenced many images of the TIE Interdictor to make the wing more movielike. This is why we constructed the wings to be angled. The wood was cut with a miter to have the wing lean 15 degrees forward and taper in. Once the wood was cut, we glued and nailed the pieces together. Since, the joints were not very secure we ended up making metal bracket to fit on the joints that were screwed into both pieces of wood. We then cut out the foam for the inside of the wooden rectangle. After all of this was completed, we applied Flex Seal to the entire wing to make it weatherproof. Because the PVC had to intersect through the foam, we decided to reinforce the foam with Lexan sheets with two large holes as an insertion hole for the PVC. This piece was screwed into wood frame. Then, we stapled the tulle onto the frame. This was then covered by wood trim. Two caster wheels were attached to the middle of the connection PVC to the frame for increased stability and mobility. Everything was then spray-painted to arrive at the final product.
Challenges:
We definitely had a few challenges along the way. The first main challenge was the cutting of the miters for the wings because the cuts needed to be mirrored. In addition, we had issues with the cuts being exact which then hindered the stability of the joint. We then had issues with the wood splitting when the staple gun was used. Once the spray paint was applied, we had issues with the foam deteriorating in response. The fragility of the wings was also an issue when attaching them to the frame.
Attachment Points:
The wings attach to the frame with two bolts. PVC runs through the wings and is capped on one side and slides into larger PVC on the frame. We drilled holes through the inner PVC and the outer layer of PVC to allow for a bolt to secure them together.

Assembly Guide
The handlebars are taken off of the wheelchair.
The frame alone is attached to the wheelchair by zip ties. This helps secure all of the joints.
The wings are then attached to the parallel sets of PVC on the frame. The wings need to be pushed in until the holes line up to allow a bolt to secure the wing’s PVC into the frame PVC.
One bolt is placed in each hole and secured with a nut.
Step three and four are repeated on the other side for the other wing.
The two extra tanks are placed directly on top of the other two tanks that are attached to the wings. There are holes on the bottom of the two extra tanks that allow for them to be slid onto the PVC that is vertical and parallel. There should be two tanks on each side that are stacked on top of each other.
The front/cockpit slides into the frame on the left and right with the corresponding PVC connections.

Presentation
When we were approached by Mr. Davis with the idea for a project, we were offered the opportunity to present this project as a gift and somewhat of a surprise to a client during the opening ceremony of Planet Comicon. This reveal took place in front of around 100 people in person, and broadcast to around 10,000 throughout the convention, as well as on television. Our project manager and lead designer were given a moment to speak about our program, capstone, and project, as well as the design process and meeting with Davey and Mr. Davis.
Immediately following the opening ceremonies, we took the pieces to the actual convention floor and assembled them at the Walkin’ N’ Rollin’ booth. We ran into slight difficulties with attaching the zip ties, but were quickly able to fix them. We noticed that one of Davey’s wheels was also having trouble gaining traction, potentially due to the PVC-Caster Wheel attachments being attached too high. Davey’s father was able to successfully push him around, and after a group picture, our presentation was complete.

The Engineer A Better World 2016-2017 Group presenting during the opening ceremonies. We were accompanied by Walkin’ N’ Rollin’ founder Mr. Lon Davis, The Uria Family, Actor Spencer Wilding, and our client, Davey Uria.
Future Recommendations
Meeting with Client:
Be extremely thorough during the initial measurement of the wheelchair. Take plenty of pictures, and determine the attachment points.
Make sure to ask plenty of questions regarding the design the client wishes. Prepare compromises to impossible requests.
Always act like your current meeting is the last meeting you will have before your project is due.
Brainstorming:
Set a maximum amount of time for brainstorming of about one week. Most designs will be made as more of the design comes together. Don’t bog yourself down.
Finish an initial frame design first. Make sure it is at the exact height needed, and that it is level. Extra PVC can always be attached to a bare frame.
Split the project up into several parts that a few people can tackle.
Creating a material version of a preliminary design is an effective use of time. This allows you to diagnose problems early.
Build Phase:
PVC will be the most effective in holding the costume together. If items continually sag or fall off the costume, PVC is an effective solution.
If possible, avoid spray paint, it falls off of certain materials very easily.
Apply Flex-Seal last. It prevents adhesives from sticking, and therefore makes it very difficult to glue things together.
If an organization system is established, ensure that every team member is aware.
Management:
Spending time after school will almost certainly be necessary, do this early, as it will most definitely speed up the process and put you ahead of schedule.
Saturdays are also a very effective way to progress the status of the project.
Assign one or two people to the development of one individual part of the project. The Lead Designer’s job is to assist in making these individual parts cohesive.
No matter what your role is, DO SOMETHING!!! If you don’t know what to do, then ask your managers.
Closing Remarks
The 2016-2017 Engineer A Better World team would like to thank Mark Gash for putting us in contact with Lon Davis, and with providing us with many opportunities during the year. We would also like to thank Mr. Lon Davis and the Walkin’ & Rollin’ team for all the assistance during the actual design and construction process.
This experience was incredible for our team. To see the joy and excitement that our product brought to Davey’s face made the project worth it for everyone. Although we experienced challenges and difficulties throughout the design process, this project was a successful way to incorporate the fundamental principles of engineering to create a functioning and useful product.


1 note
·
View note
Text
RECAP: Walkin’ & Rollin’ Twisted Halloween Party!
Words cannot explain how thankful we are for the amazing turnout on Saturday, September 30, 2017. This was the first time we had attempted a fund raiser party and we were blown away by the experience we had. I’m sure some of the families that received costumes, the visitors and volunteers had some similar experiences too.
The highlights of the day were when we revealed our 3 newest wheelchair costumes to 3 local kids, Macy, Gaige and Madi.

Our first featured VIP child was Macy. This happy 4-year-old girl requested a “Wheel of Fortune” themed costume. The costume featured big sections of the famous wheel from the show on the sides of her wheelchair. Each side also featured blinking green lights around the sides. The frame of the costume was all purple with lots of jewels and bling all over it. Then above Macy was the puzzle being solved on the show. The puzzle was Macy’s favorite nursery rhyme, “Twinkle, Twinkle Little Star, How I Wonder What You Are.” This top section had pink lights around the frame. In the center of the costume, we included a spinning wheel right in front of Macy that she enjoyed spinning once she had the costume attached to her wheelchair. She could spin it the whole time she goes trick-or-treating. Macy enjoyed the costume and had fun wearing it at the party the rest of the time she was there.

Our second featured VIP child was Gaige. This amazing 4-year-old boy is a huge KU Jayhawk fan and loves to listen to KU Basketball games on the radio. The fact that Gaige was also blind, added a new design element to the costume that we hadn’t been exposed to. The whole costume needed to be pleasant to touch and feel and needed to also include sounds to interact with. So, we designed a special KU Basketball themed wheelchair costume for him with a giant 3D plush Jayhawk hooded fuzzy blanket over the top of the wheelchair. The wings wrapped around to Gaige’s shoulders. Then we included a board in front of Gaige that was orange with grooves carved into it that mimicked the black lines of a basketball. That way Gaige could trace his fingers along those lines to know what it was. At the front of the board was a Jayhawk basketball net hanging down with a removable bucket set down in it. The bucket was to hold all the candy Gaige was going to get at Halloween, but could be removed so Gaige could use it as just a basketball net. Also on top of the board, were 8 big bright buttons and a speaker. These were each assigned a different sound effect. There was the “Rock Chalk Jayhawk” chant, the final seconds of the 2012 Championship game (Gaige’s favorite to listen to) and then a few surprises for the family. Brain Hanni, the voice on the radio of Jayhawk basketball, recorded some play by play recordings of a fictional game where Gaige was the star player on the field. Each recording had Gaige interacting with different KU players and becoming the game’s MVP. The final button was a special recording made by Coach Bill Self, where he talked about Gaige and what an amazing kid he is. It was emotional for the family and I think for a few of the spectators as well.

Our third featured VIP child was Madi. This energetic 5-year-old girl loves airplanes. Any type of plane, she loves it. So, for her unique costume, we partnered up with Prairie Fire 4-H club to build this amazing costume for Madi. They started the reveal by announcing they went with an Amelia Earhart plane for a few reasons. She is a local hero from Kansas, she flew a pretty cool plane and did some amazing things herself. A perfect matchup for Madi. Then the team gave Madi some gifts. First a book about Amelia Earhart, then a full costume for her to wear that matched what Amelia Earhart wore. Then it was time for the reveal. The plane ended up being the largest costume reveal we did at the party. It had a wide wingspan, a spinning propeller in the front, and a tail behind that featured Amelia’s plane numbers, but Madi’s name painted on the back. It was amazing and Madi loved it.

The other events that happened at the party include an art table where kids could design any wheelchair costume they wanted to. There are some amazing ideas which we will be adding to our costume sketch database very soon. Keep an eye out for those.

There were many meet-and-greet cosplayers including Elsa, Cyclops, Elmo, Batgirl, Supergirl, a group of 4 Lego Superheroes, and many Star Wars characters from the 501st and the Rebel Legion. All the kids, and most adults made sure to get in there and have their pictures taken with them throughout the day.

We had a great caricature artist, Darryl Woods, who was turning many kids into zombies with his drawings. There were quite a few kids and adults who made sure to get their portraits done as well. Thank you, Darryl, for helping at our event.

We had some great face painters at the event who did a great job of decorating the faces with colorful designs and a few slightly frightening designs. The kids loved it.
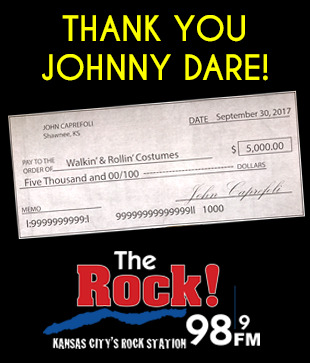
One of the biggest surprises came from Johnny Dare and his Morning Show. A few days before the event, Johnny Dare had us on his radio show to promote the event. After talking about what we do and what it means to the families, Johnny opened it up to his listeners to donate. Within 15 minutes, his listeners had raised $3,000 for Walkin’ & Rollin’ Costumes. Then at our event, Johnny Dare surprised us again by personally donating $5,000 to our organization! Thank you so much. That was a huge help and will allow us to make many costumes for kids.

We also had several vendors who helped make the event possible. Planet Comicon was so helpful in getting many of the cosplayers there for meet and greets, as well as having many of the volunteers to run the event. Thank you so much. They also kept the place hoping with music all day long. Find out more about Planet Comicon at: www.PlanetComicon.com
3rd Street Asylum haunted house was there passing out tattoos and having a couple of their masks on display for people to see. They also helped by sponsoring Macy’s Wheel of Fortune Costume. We look forward to partnering with them again with another costume they have already sponsored. Find out more about 3rd Street Asylum at: www.3rdStreetAsylum.com
Toynbee’s House of Horrors were there in full costume as some of the clowns from their haunted house. They posed for pictures and were kind enough to also sponsor another costume, the KU Basketball costume for Gaige. Find out more about Toynbee’s House of Horrors at: www.ToynbeesHouseOfHorrors.com
Kansas City Comic Con was also present to let people know about the upcoming comic con in November and give out little gifts to everyone who stopped by. Find out more about Kansas City Comic Con at: www.KansasCity-ComicCon.com
These costumes that we build, as well as the other costumes we are currently building for Halloween this year, are 100% funded by sponsors, and donors just like you. On average, these costumes cost about $250 in supplies, and if we need to ship them to the families, it averages another $100 in shipping fees. But the families that receive these costumes never pay for them. They are FREE to each family that requests a walker or wheelchair costume from Walkin’ & Rollin’ Costumes. All the builders we have are volunteers, and we have about 100 volunteers spread out across the United States and we are constantly adding more. We even have groups that have requested to build the costumes together, such as high school classes, 4-H clubs, advertising agencies, engineering companies, and many more. When we receive a costume request from our website, we try and pair them up with a volunteer builder or team in their area. If we don’t have a volunteer in their area, we will contact a volunteer that has the skills we need for a particular costume and then ship the costume to the family.
I would like to thank our many sponsors at the party. In addition to the vendors that were at the party, these additional sponsors support Walkin’ & Rollin’ Costumes.

First, I want to thank Michelle Hoffine with “Twisted Halloween” for hosting the party. What an amazing store and the way that Michelle helped us every step of the way, was truly appreciated. Thank you, Michelle. Her store is full of unique items for any fan of Halloween, whether that’s pieces for your costume, decorations for your house, or just hard to find costumes. I love this store and I highly recommend it to anyone. The “Twisted Halloween” store is located at: 12932 W. 87th Street Pkwy, Lenexa, KS 66215 There website is located at: www.twistedhalloweenkc.com
Thank you to Joe Tindall, the owner of “GrandMark Signs” in Lenexa, KS. Joe has been a tremendous help with our costumes for the past year, and continues to do so. GrandMark Signs has handled the printing of all of our graphics for the costumes onto vinyl stickers for easy application to the frames and wheel covers. This allows the graphics on our costumes to become vibrant in color and waterproof as well. The speed and quality has always been perfect as well. Thank you so much, Joe, for all that you do for Walkin’ & Rollin’ Costumes. If you need any printing done for your office signage or any other items that GrandMark Signs can help with, please consider using them. They are located at: 11080 Strang Line Road, Lenexa, KS 66215 and can also be found at www.grandmarksigns.com.
And finally, thank you to Joe Reitinger with “Muffler Mart.” Joe has agreed to sponsor one of our upcoming costumes. Joe also spent the entire day at our event helping out. Thank you so much. Muffler Mart is located at: 518 North 7th, Kansas City, KS 66101
Our goal is a lofty one. We want to build a costume for any child with special needs that requests one. Right now, we receive more requests than we are capable of building. But with more funding, and more volunteers, we can meet that goal and bring a smile to every child with special needs that we can.
Donating is easy. You can donate through our website at www.WalkinRollin.org, or our Facebook page at www.Facebook.com/WalkinRollin. You can sponsor a part of a costume, the shipping costs of a costume, or even an entire costume. Any amount helps.
Thank you, Lon Davis Owner Walkin’ & Rollin’ Costumes
#wheelchaircostume#Halloween#Fundraiser#Wheelchair#Wheelchaircosplay#Cosability#Cosplay4All#WalkinRollinCostumes#WRCBlog
0 notes
Text
Walkin’ & Rollin’ Twisted Halloween Party!
September 30, 2017, 10:00am – 8:00pm

We want to invite you to come see our creations first hand so you can experience the light in a child’s eyes when they see their wheelchair turned into something incredible! We want to give you every opportunity to learn how helping sponsor one of our wheelchair costumes impacts the lives of these kids and turns another holiday, into the BEST holiday they’ve ever had.
On September 30th, Walkin’ & Rollin’ Costumes will have their first fundraiser party. This isn’t your typical fundraiser. No, this FREE party is built with kids and families in mind. We will have character meet-and-greets, like Iron Man and Hera from “Star Wars Rebels.” We will have the talented Lucasfilm licensed Darryl Woods creating awesome caricatures for anyone.

There will also be raffles for some fabulous prizes such as tickets to Legoland, Paradise Park, and the upcoming Kansas City Comic Con in November 2017 and Planet Comicon in February 2018. Or if you are more adventurous, how about finding your way out of the KC Breakout Escape Room, or a visit to 3rd Street Asylum for some scares. We will have exclusive t-shirts for sale, only available at this party, designed by the Children’s Mercy Hospital artist, Donald Ross Scribe, and so much more!
The highlights of the day will be when we reveal our 3 newest wheelchair costumes to 3 local kids.
Our first featured VIP child is Macy. This happy 3-year-old girl requested a “Wheel of Fortune” themed costume. It will feature all kinds of special additions to make it fit perfectly for Macy. Macy’s costume will be revealed at 3:00 during the party!

Our second featured VIP child is Gaige. This amazing 4-year-old boy is a huge KU Jayhawk fan and loves to listen to KU Basketball games on the radio. So, we designed a special KU Basketball themed wheelchair costume for him. Gaige’s costume will be revealed at 4:00 during the party!

Our third featured VIP child is Madi. This energetic 5-year-old girl loves airplanes. Any type of plane, she loves it. So, for her unique costume, one of our costume building teams designed an Amelia Earhart plane for her to fly during Halloween. Madi’s costume will be revealed at 6:00 during the party!

These costumes, as well as the other costumes we are currently building for Halloween this year, were 100% funded by sponsors, and donors just like you. On average, these costumes cost about $250 in supplies, and if we need to ship them to the families, it averages another $100 in shipping fees. But the families that receive these costumes never pay for them. They are FREE to each family that requests a walker or wheelchair costume from Walkin’ & Rollin’ Costumes. All the builders we have are volunteers, and we have about 100 volunteers spread out across the United States. When we receive a costume request from our website, we try and pair them up with a volunteer builder in their area. If we don’t have a volunteer in their area, we will contact a volunteer that has the skills we need for a particular costume and then ship the costume to the family.
Our goal is a lofty one. We want to build a costume for any child with special needs that requests one. Right now, we receive more requests than we are capable of building. But with more funding, and more volunteers, we can meet that goal and bring a smile to every child with special needs that we can.
Donating is easy. You can donate through our website at www.WalkinRollin.org, or our Facebook page at www.Facebook.com/WalkinRollin. There will also be ways to donate at our party on September 30th. You can sponsor a part of a costume, the shipping costs of a costume, or even an entire costume.
At the “Walkin’ & Rollin’ Twisted Halloween Party!” you can see exactly what we are doing, learn how to get involved, sponsor a costume and have fun at the same time. This come-and-go party is Saturday, September 30, 2017, from 10:00 am to 8:00 pm, inside the “Twisted Halloween” store located at:
Twisted Halloween 12932 W. 87th Street Pkwy Lenexa, KS 66215

Twisted Halloween has generously offered to donate a portion of their entire day’s sales to Walkin’ & Rollin’ Costumes. So if you need to pick up some Halloween costumes, please come by Twisted Halloween on September 30th.
We hope to see everyone there.
#wheelchaircostume#Halloween#Fundraiser#wheelchair#wheelchaircosplay#cosability#WalkinRollinCostumes#WRCBlog
0 notes
Text
Building a Time Machine

One of the most iconic vehicles in movie history, is the “Back to the Future” Delorean. So building a wheelchair costume that captured the look and feel of this piece of nostalgia was a little daunting at first. But here is how we did it for 2 year old Noah.

The first step was to build a base for the costume to sit on that wouldn’t interfere with Noah’s ability to drive his chair around. Since his chair didn’t use armrests, there were limited places to attach the costume. So we used a 1″ x 4″ board running under Noah’s chair that rested on his footrest and over the axle of his back wheels. The board was bolted through the slits in his footrest to lock it down. Then a PVC frame was built around the chair and over the back of his seat. We also built a shelf in the back for all of the time traveling components. This PVC frame allows for the shell of the Delorean to be screwed into the PVC pipes and not into his wheelchair.


The shell of the Delorean was made out of 1/4 inch Bebond with an aluminum coating to one side. This gave the Delorean the stainless steel look while keeping the weight very low. We also added lawn mower wheels to the PVC frame, pointed down to give the illusion of the Delorean when it was flying in the 2nd movie. We could have used larger wheels to make the proportions better, but we wanted to make sure the costume would still fit through a doorway if needed. That determined how big of wheels we could use. Under the wheels, we added tap lights for nighttime effects, and blue cellophane for added blue lights.
The next step involved adding the shelf of black foam board in the back, and grey foam board cut and folded to make the back end of the Delorean. We also added the hood to the Delorean made out of the same Bebond as the sides. The grill and front end of the car were also made of foam board. The side panels and hood were the only parts of the costume made with Bebond to help reduce the overall weight of the costume.

Now that the initial shape and design of the costume were in place, it was time for all the details. The back fins were made completely out of black foam board and then hot glued together. They were shaped to simply slide down on top of the back end of the Delorean so they didn’t need to be glued to it. (This also allowed for the costume to come apart and easily shipped.)

Different sized black boxes were made for the back to give some depth to all the components in the back. The Flux Capacitor was 3-D printed and made for a great touch of detail. An old vacuum cleaner hose helped as well.
The next step were to make the graphics for the front and back of the Delorean. These were made in Adobe Illustrator and then printed as vinyl stickers to apply to the costume. They went on perfectly and added helped give a level of polish to the costume.

Next step was to add the details and lights. We used blue foam board to make the glowing panels in the front and back. Then we ran battery powered lights behind the blue boards and as the tubes of lights running down the sides of the Delorean. The tube lights were attached with black Command Strip hooks (not in the pictures below). That way it was easy to remove all the lights for shipping and storing, but the Command Strip hooks stayed in place to you always knew where to put the lights back. Old computer cables were used wrapped in the same glowing mesh as the tube lights and plugged in to different sections in the back. The more things going on in the back, the better.

The final costume with Noah and all the lights on. Noah made an amazing Marty McFly.


0 notes
Video
tumblr
Zaylee sees her “Butterfly Queen” costume for the first time!
0 notes
Text
The Butterfly Queen

When Zaylee first approached us at a convention about making a costume for her wheelchair, she wasn’t sure what she wanted it to be. But a few hours later, she returned to our booth so excited because she had come up with the perfect costume. She always had a love for butterflies and wanted to know if we could do a butterfly costume with butterflies all over. So we immediately got started on ideas.
First thing we needed to do was come up with a concept. We knew that we wanted to do something very nature centered and woodsy. We didn’t want to use any panels of foam board or anything that would take away from that concept.

Zaylee was thrilled with our initial sketch, but we knew this was just a simple concept idea that would have much more going on than just what was in the sketch. That would come later as a surprise for Zaylee.
“The Butterfly Queen” costume was one of the costumes assembled during our workshop. We had plenty of volunteers willing to help on this one, and we needed them. We planned on assembling by hand, over 100 butterflies made of wire and different swatches of iridescent fabrics. This was a time consuming process but with all the volunteers, it went pretty fast as an assembly line process.


Another group of volunteers were working on assembling the sticks and twigs together to make a frame work for all of the butterflies to be attached to on the wheelchair. There were round pieces made to go around the wheels. Then the completed butterflies were added to the sticks and spokes of the wheelchair.
A fan of sticks were assembled to be on the back of the wheelchair looking almost like a throne for the Butterfly Queen. This fan extended above where Zaylee’s head would be so that butterflies could be surrounding her.


After the costume was fully assembled, Zaylee was able to see it for the first time. What she didn’t know was that we added multiple fiber optic lights to the costume. There were fiber optic butterflies clips that she was able to wear in her hair. There was a butterfly crown for the queen that had lights on it. She even received butterfly wings that had fiber optics running through them as well. The entire costume looked great in the daylight, but it looked completely different at night with all of the fiber optics lighting her up.

Thank you to the volunteers who helped assemble this Butterfly Queen for Zaylee.


0 notes
Text
Inspired by Your Generosity and Willingness to Help

2016 has been all about growth. In the past 6 weeks, we have doubled the number of volunteers willing to help out. We have raised more money for additional costumes in the last month, than we raised the prior 11 months combined. We have been featured on radio stations nationwide, and television stations worldwide. We have been approached about setting up our first franchise location in Louisiana, and we have our first volunteers signed up from Europe. I never imagined this little non-profit we started in January 2015, would touch so many people. Thank you, to everyone.
#GIVINGTUESDAY Over the past few days, we have been showcasing some of the costumes we built this Halloween. These have been for #GivingTuesday which is today, November 29th. This is to help promote this day as a day of giving to a charity. Please help us spread the message and let people know about Walkin’ & Rollin’ Costumes and what we do for kids. We have been running this campaign on our Facebook, Twitter and Instagram sites.
I look forward to 2017 and all of the new opportunities that will open up for Walkin’ & Rollin’ Costumes. I want to thank everyone for their continued support and help in sharing with others what we do. It’s through everyone’s excitement that we have been able to grow in the way that we have and the more kids we can help, the better. We have some “BIG” things planned for next year, so be sure and follow us on Facebook, Twitter and Instagram to get the latest information.
www.WalkinRollin.org
Thank you, Lon Davis Owner Walkin’ & Rollin’ Costumes
0 notes
Text
An Ant-Man and his Ant

The Ant-Man costume has been one of our most popular costume to date. It was the first costume we made that featured moving parts, none of which were motorized. They were moved simply by the child moving in his wheelchair. Here is how we did it.
We started with a basic PVC frame around the wheelchair that would hold the legs, head and back of the giant ant.

We were also handling the initial brainstorming of how to make the ant legs move.


On top of that, we began building the helmet out of foam floor mats. There were so many pieces of the helmet. We used Modge Podge to seal every piece of the helmet.

The unpainted helmet constructed without the eye lenses.

The secret to making the legs move? Roller Blade Wheels! Roller blade wheels were cut apart and each wheel was screwed into a PVC cap.

Here are the pieces that make up one side of the Ant-Man Antony legs, with Roller blade wheels attached to each leg.

A board was placed on the Masonite wheel cover to serve as a bump for the Roller blade wheels to lift each leg up individually as it rolled over the bump.

The wheel cover is tied onto the wheel of the chair with zip ties.

The legs are attached with the Roller blade wheels resting on the Masonite wheel cover.

Additional PVC is added to the front and back with posts to hold up the foam carved head and back end of Antony. The foam is then covered in batting to smooth out the edges.


All the pieces are ready to be painted black.

Black fabric was wrapped and sewn around the foam sculpted head and back end.

The eyes for Antony were made from a clear plastic ball that were spray painted on the inside. The antennae (not shown here) were wooden dowel rods spray painted black and inserted into the top of Antony’s head.

The completed Ant-man and Antony wheelchair costume.

Here is the completed costume in motion.
youtube
0 notes
Text
An Amazing and Humbling First Year

It has been one year since we launched Walkin’ & Rollin’ Costumes and had our lives changed for the better. We didn’t know what kind of attention or impression we would make on the world. We hoped we would get some smiles from the kids that we helped, but we never expected the amount of love and support that came our way. We were humbled every step of our journey.
In January 2015, we decided to take our love of building wheelchair costumes for our son and expand it to start making costumes for other kids in wheelchairs and walkers. We were asked to showcase our work at Planet Comicon in Kansas City. So for the first few months, we worked on many designs for costumes and built a special costume our son to wear at Planet Comicon. Our booth featured multiple costumes on display, plus posters of many more costumes we had made over the years. We hoped to send a little spark into the city letting people know that we build these costumes for kids in walkers and wheelchairs, free of charge to the families. Every single person that stopped by our booth was amazed at what we were taking on, and each one of them opened their wallets to make a donation, or to sign up to help build the costumes later that year. We were amazed by the generosity of the Planet Comicon attendees. We were even featured on the evening news and made national headlines.
We launched a Kickstarter campaign in the summer, to help fund the cost of 5 costumes for kids in special needs equipment. We were hoping to raise $1,000 over 30 days. We ended up achieving that goal in only 2 days!!! We announced that the more money we raised, the more costumes we would be able to build. We ended up raising just under $3,000!!! We were featured again on websites and even in a few European print magazines.
We were honored to be invited to the Kansas City Comic Con in August where we debuted our most ambitious costume yet, the Baymax costume from Disney’s “Big Hero 6” movie. Our son wore the costume for three days and loved all the attention he was getting. We received even more attention and it helped us recruit artists from the comic con floor to design new costumes for us. We received many more donations and had more volunteers sign up for our upcoming costume builds.
By the end of August, we had selected 10 kids from the many that sent requests in, that we were building custom designed costumes for their wheelchairs. We sketched out the designs and had the parents approve them. Then we had our first Costume Workshop hosted by the Kansas City Woodworkers Guild. They donated a large space for us to build 6 costumes with about 35-40 volunteers from all ages. We had a second workshop where we finished out the remaining 4 costumes and had them all either shipped to the families or delivered locally.

All of the families had their costumes well before Halloween and sent us pictures and letters of smiling children, laughing in their costumes. It was amazing to help out, even in such a small way. Some of those costumes even won costume contests for the children.

Right before Halloween, we received another special gift. Finding My Way Books had been working on a children’s book about our son, Reese, and the costumes we build for him. The book was finished and is now at Barnes & Noble and Amazon.com. It is titled, “Reese Has A Halloween Secret” and it shows our entire process of how we come up with a costume idea, our research on how to build it, how we gather the supplies and how we all work together as a family to build the costume for our son. This same process is what we do with every costume from Walkin’ & Rollin’ Costumes. We take pride in what we do and hope to grow into a larger non-profit company for 2016.

Our goals for 2016 are to find more volunteers willing to help, feature additional workshops where volunteers can come and learn how to build these costumes for these kids, have additional artists around the globe help design these amazing costumes, raise additional funds to help support this endeavor and hopefully some corporate sponsors willing to sponsor 1, 2 or more costumes.
Last year we made 10 costumes, but there were many more requests that came in. Unfortunately, we didn’t have the resources or volunteers to help make all of them. We hope to get to a point where we don’t have to turn kids away and can easily make each costume for each special child.
Help us achieve our goal for 2016 by donating, volunteering and sharing our story on social media. Find out more about Walkin’ & Rollin’ Costumes at www.WalkinRollin.org.
Thank you,
Lon Davis Owner Walkin’ & Rollin’ Costumes
0 notes
Text
A Peacock Princess

When we were first contacted by Raygan’s parents, Raygan wasn’t sure which type of costume she wanted. She had been looking at our website of sketches and was drawn to the Cinderella Pumpkin Coach design. However, she had always had a love for Peacocks. So we suggested making something original for her that would be a Peacock Princess.

Raygan loved the idea and we went to work starting on sketches and color patterns for her new chariot. We knew that everything would be based on the colors and designs of a peacock feather, so we gathered as many actual feathers that we could, and then fabric and felt that matched the colors the closest. All of the supplies were brought to one of our workshops where we had numerous volunteers working on multiple costumes. The team began assembling the parts of the costume.

First step was to build a light PVC frame for the peacock throne that wouldn’t interfere with Raygan’s ability to drive her chair.

Next, we cut out as many teardrop shapes of the different colors of felt. (Saphire, blue, emerald, and kelly green)

We assembled them with hot glue into feather like patterns for the back of the chair as well as wheel covers.

We began adding the actual peacock feathers on top of the felt teardrops.


While all the pieces were being assembled, we also had some volunteers working on the peacock tule skirt that Raygan would wear. It featured an elastic waste band that Raygan would wear over bright blue leggings.

Finally, the assembly began and putting it all together on the wheelchair.


With all the pieces in place, here is the (almost) completed costume for Raygan.

Before we shipped the costume, we decided that the costume needed a bit more bling. So in the photos below, you will see how jewels were added to many places on the costume. These were hot glued onto the felt parts of the costume and really helped elevate the costume to “princess” status for Raygan’s Peacock Princess.

The final costume was shipped to Raygan and she loved it. She ended up winning a local costume contest with it. Congratulations, Raygan!!!

0 notes
Text
Baymax from “Big Hero 6″

The Baymax costume was a bit of a technical experiment. We wanted to give the illusion that Baymax was flying and the child was dressed as Hiro riding on Baymax’s back, just like in the movie. But how do you make a 6 foot tall costume lay horizontally and be stable? We learned a lot of new techniques while building this costume. Here is how we did it.

We needed a way to attach the frame work to Reese’s wheelchair. We created 6 attachment points since we were also using the wheelchair armrests for the last 2 points of attachment. 2 painted connection points at the bottom front, and 4 painted connection points for the back of the wheelchair.

A PVC frame for the front of the wheelchair.

Experimented with a 3D paper model to create the head of Baymax, and a paper model of the chest of Baymax ended up being too small to fit the frame we built. We needed to scale up the model to 128%.


Building out the chest, head, hips and one thigh out of floor mat foam.

Most parts completed and glued. Ready for sanding, priming, and painting.

Baymax head 2.0. The head was too small and the detail was not as good. So we rebuilt it to match the scale of the rest of the body. We added a foam head inside the helmet to help keep the form.
Pink insulation foam board were used for support in the legs. They are lightweight and rather sturdy. The costume began to take shape as we assembled it onto a wooden frame built to match the size and dimensions of the wheelchair.

After caulking all the seams, we now started painting them red.

All the red parts get their first coat of many coats of paint.

Black fingers getting ready for fist bumps. Feet, joints and knees were painted black.

A finished helmet, and the hands are assembled. Reese shows off his completed Baymax helmet.

As we worked on the mechanism to hold the wings and support the weight of the arms, we needed to build a wooden frame in the chest of Baymax.

Some assembly required. The neck was built to get just the right angle for Baymax’s head.

The legs are built up from the ground.

Completed legs with hips. Foam insulation is sticking out the top.

Added spray foam inside the arms to fill in all the holes. Once the spray foam stopped expanding and hardened, we trimmed it back and then painted it black.

The completed Baymax costume still on the temporary frame to match the wheelchair.

When the costume is standing upright, it is quite tall. I am 6 foot tall just for reference.

Add two tap lights to the feet with velcro. $4.00 for both lights. Almost a no-brainer to go this route to make the feet light up.

Added some purple to complete the look. The finished costume made its debut at Kansas City Comic Con 2015.

0 notes