
Don't wanna be here? Send us removal request.
Statistics
We looked inside some of the posts by webscraping-python-ak and here's what we found interesting.
Average Info
Notes Per Post
0
Likes Per Post
0
Reblog Per Post
0
Reply Per Post
0
Time Between Posts
11 hours
Number of Posts By Type
Text
9
Last Seen Tumblr Blogs


Fun Fact
Total funding amounts to $125.3M.
Text
Web Scraping — An Introduction with Python and BeautifulSoup for Mac
Tutorial by Agnes Kleinhans · July 2020
Web scraping is a technique for extracting huge amounts of data from a website. The process of downloading data is done automatically. Web scraping makes it easy to gather and store data from websites. Without web scraping, a lot of time is spent with clicking and downloading manually data. For this tutorial, we will break down the process of web scraping into a simple introduction and hands-on tutorial. We will be extracting different articles from the following website:
https://www.thewhitereview.org
The White Review is a literature magazine based in London and was founded in 2011. It features different text types like reviews, fiction poetry and literature. In our tutorial, we will focus on the published articles within the category fiction.
0 notes
Text
1 – Building a Corpus
A corpus describes a collection of machine-readable texts of written or spoken natural language (James Pustejovsky: Natural Language Annotation for Machine Learning, O’Reilly, 2012 p.8). Initially, the research question and the aim of corpus building has to be outlined. Depending on your purpose of building a new corpus, some decisions regarding the corpus size, the kind of text (and genre), the balancedness and the representativeness must be made. Especially corpus linguistic representativeness and balancedness of a corpus has to be taken into account. A corpus therefore has to be representative for the language variety it is supposed to represent. The representativeness is closely related to the balance of a corpus: Balance refers to the range of categories of a corpus by its intended uses. For more information on this I recommend reading the following PDF: https://www.lancaster.ac.uk/fass/projects/corpus/ZJU/xCBLS/chapters/A02.pdf
In our project, however, we will create a corpus of all the articles in the category fiction from the the white review. A possible research question could be, how the articles changed over time: Can we detect a pattern? Are there dominant topics? This is a more explorative approach for an analysis of a corpus. However, we will have to determine precisely which data we want to scrape besides the article’s content. This metadata might give answer to the following example questions:
1 – Who is the author? 2 – When was it published? 3 – Who published it? 4 – In which language is it written?
For the purpose of our tutorial, we will extract the text itself, the title, the author and the publishing date of the article. However, you may want to collect different data, such as the artists’ birthday, the date on which the article was modified of the article or the author’s birthday. Whatever data you would like to collect, you need to find out how it is described by the DOM (Document Object Model) of the web page.
0 notes
Text
2 – Brief introduction to HTML
Before getting started, we need to get comfortable with the website structure. Current websites usually consist of HTML, CSS and JavaScript. When we do web scraping our main interest lies in the content of a web page, so we primarily look at the HTML source code. HTML is a mark up language. It consists of several elements, which tell the browser how and what to display. Here is a simple HTML structure:
<!DOCTYPE html> <html> <head></head> <body> <h1>headline</h1> <p>paragraph</p> </body> </html>
The element <!DOCTYPE html> marks the beginning of the HTML document. The HTML code is captured between the tags <html> and </html>. The tag is usually used for metadata and script declaration, whereas the main content of a web page lies in between the two <body> tags. Titles are described by the <h1>
to <h6> elements. A frequently used tag is also the paragraph tag <p>. There are many tags with different use cases. For a complete list of HTML tags, look here: https://www.html.am/tags/.
<p id="author" class="blue-text">Simone de Beauvoir</p> <p id="date" class="blue-text small-text">January 9, 1908</p>
Class attributes are often used to describe equal styles for tags with the same class. However, the class attribute can help to refer to a specific tag and precisely locate the needed data for web scraping.
To scrape from a web page it is necessary to uniquely identify those HTML elements which contain the desired content. We will make great use of the class attribute that further specifies the element. Classes, however, are not unique and can be assigned to multiple tags concurrently. Scraping elements by class usually yields a list of elements. In addition to classes, HTML elements can be attributed by ids which uniquely identify an element. (More information on HTML: https://www.w3schools.com/html/html_intro.asp)
0 notes
Text
3 – Technical Perquisites
1 – Code Editor
Before working on your corpus and web scraping, you should have a code editor installed on your computer (for example Visual Studio Code).
2 – Install Python
Check if Python is installed on your machine. Open your terminal (or in Visual Studio Code: menu > terminal > new terminal). Type into the terminal:
python --version
and hit enter. As a result, the Python version should be displayed. For this tutorial, we need at least Python version 3. If you don’t have python installed or an older version, please download the latest version at: (https://www.python.org/downloads/).
3 – Install Beautiful Soup
The next step is to install the Python library Beautiful Soup. Beautiful Soup is designed for parsing data and therefore provides an easy solution of navigating, searching and modifying through HTML and XML data on websites (more on that in the next section). To install Beautiful Soup on mac, type into the terminal:
pip install beautifulsoup4
Documentation: https://www.crummy.com/software/BeautifulSoup/bs4/doc/
4 – Install Requests
Request enables python to make a request to a web page. Type into the terminal:
pip install requests
Install urllib.request
Make sure you have the module urlilib.request installed. urlilib.request defines methods required to open and read URL. Type into the terminal:
pip install urllib.request
0 notes
Text
4 – Getting started
First we have to import the following libraries. Note: The time library is part of Python’s standard libraries and allows you to handle dates and time (more on that later).
from bs4 import BeautifulSoup import requests import urllib.request import time
Next, we have to set the URL we want to scrape from. In our case, we want to collect all the articles in the category fiction (https://www.thewhitereview.org/fiction/). To access the site, we make use of the requests library. (You can verify whether everything folded so far: if you type print(response) the result should ideally be 200, which means it connected successfully.)
Next step is to parse the HTML source code of the web page with BeautifulSoup. The goal of HTML-parsing is to be able to easily extract the text. For example: <p>Hello World</p> will be converted to Hello World. The BeautifulSoup constructor needs two arguments: First a String of the web page (response.text), and second a parser (html.parser).
# Parse HTML and save to BeautifulSoup object soup = BeautifulSoup(response.text, "html.parser")
The complete code so far:
from bs4 import BeautifulSoup import requests import urllib.request import time # Set the URL you want to webscrape from # articlelinklist url = 'https://www.thewhitereview.org/fiction/' # Connect to the URL response = requests.get(url) # Parse HTML and save to BeautifulSoup object soup = BeautifulSoup(response.text, "html.parser")
0 notes
Text
5 — Create a list of article links
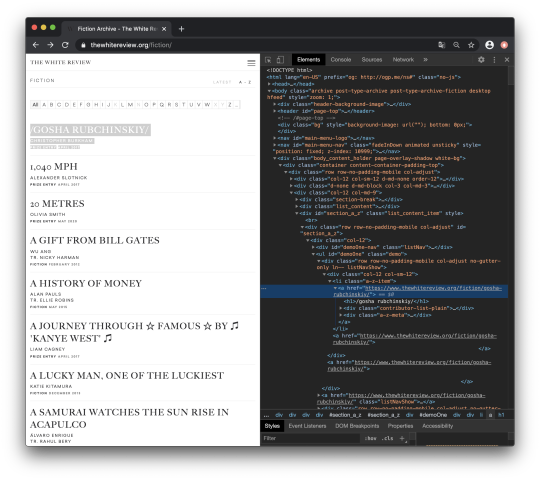
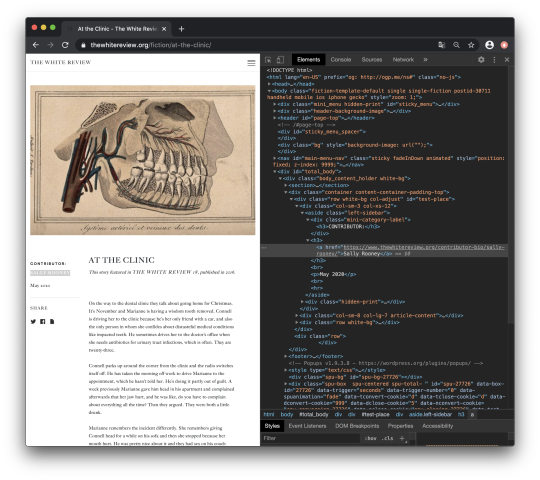
Now let’s get back to our website and analyse where the data we want to collect is located. The website already provides a list of all published articles in the category fiction. However, we need to get the individual links to every single article. In order to find out where the links are located in the HTML source code of the web page, we need to right-click in our browser (e.g. Chrome browser) one of the articles. Under the tab Untersuchen or Inspect a console should pop up:
This allows us to see the raw code of the website. However, the only thing important for us is to locate the links. Links in HTML are usually marked by the anchor elements <a> </a> and the hyper reference attribute href.
<a href=”https://www.thewhitereview.org/fiction/gosha-rubchinskiy/”></a>
We can find our first article link named /GOSHA RUBCHINSKIY/ (it’s the actual title between slashes!) right here:
If we look closely at the structure of the HTML code, we can see that all the article URLs are nested in the following <li> list item element:
<li class="a-z-item">...</li>
We can use the class name a-z-item to grab the list item tag. So let’s start with the code:
First we need a list in which we can store all the article links. Therefore, we create an empty list called links:
li_items = soup.find_all('li','a-z-item')
Example of our li_items content:
<li class=”a-z-item”> <a href=”.../fiction/20-metres/”>20 METRES</a> </li> <li class=”a-z-item”> <a href=”.../fiction/gosha-rubchinoskiy/”>/Gosha Rubchinoskiy/</a> </li> <li class=”a-z-item”> <a href=”.../fiction/1040-mph”>1,040 MPH</a> </li> ...
Next we want to extract every article’s URL. Therefore, we loop over every list item. With the BeautifulSoup method .find we can grab the first anchor tag (Notice: We only needed the first anchor element.The method .find returns the first found element, even if more elements match our search criteria. With the anchor tag found, we extract its attribute href with the method .get. Finally, we append the extracted URL to our list of links.
for link in li_items: link = link.find('a') # get first anchor url = link.get('href') # get hyper-reference attribute links.append(url) # add url to list of links
The code so far:
from bs4 import BeautifulSoup import requests import urllib.request import time url = 'https://www.thewhitereview.org/fiction/' response = requests.get(url) soup = BeautifulSoup(response.text, 'html.parser') links = [] li_items = soup.find_all('li','a-z-item') for link in li_items: link = link.find('a') url = link.get('href') links.append(url)
The result by now should be a list of all the article links:

0 notes
Text
6 — Scraping single articles and metadata
The next step is to extract the text itself and the metadata from the single articles:
author, date, title, text.
Before getting started, we have to take a closer look at the website. Where do we find the data we want to collect? In order to figure out where the data is located, we have to open one of the articles.
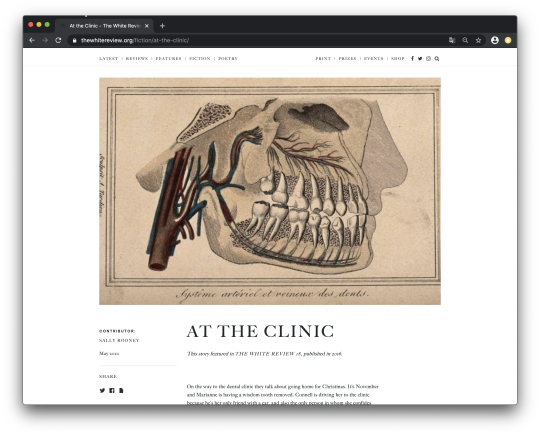
On the left side of the page a small box is located – it shows the contributor (Sally Rooney) and the date (May 2020). In the middle of the article page we can find the title. Right underneath the text itself is located.
1 – Author
By right-clicking the author’s name and clicking on untersuchen (inspect), the html source code comes up.
As we can see, the author’s name is located in an anchor element right underneath a h3-tag. If we follow the hierarchy structure upwards, we can also see the author's name is located inside an aside element:
<aside class='left-sidebar'></aside>
The aside element refers to the sidebar and has a characteristic class attribute named left-sidebar.

To grab the sidebar, we use the method .find for our soup object for and set the arguments to aside and left-sidebar. Inside the sidebar, we want to collect all the h3 tags. However, the author is located in the second h3 tag, so we only need the second h3-tag (authorheadline[1]). Finally, we save the author’s name as a String.
sidebar = soup.find('aside', 'left-sidebar') authorheadline = sidebar.find_all('h3') author = authorheadline[1] author = author.text
2 – Date
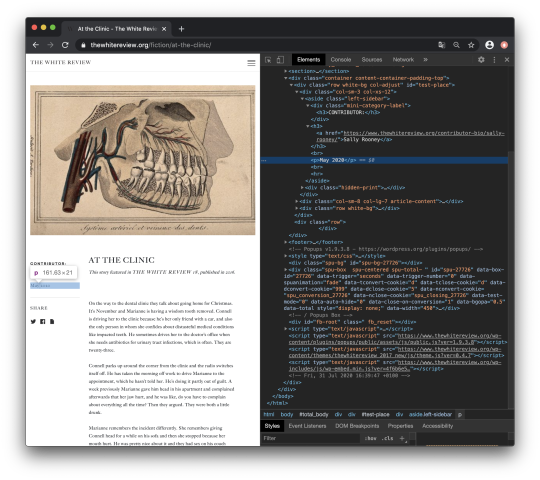
The format of the date is displayed as followed:
May 2020
As the author, the date is located inside the left sidebar. As we can see, it is nested inside the first paragraph (p element) inside the sidebar:
<p>May 2020</p>
Next, we have to grab the first paragraph element with .find and store it in the variable date.
date = sidebar.find('p')
3 – Title
The title of the article is located inside a <div> element with the class name article-title-name. To get rid of unnecessary white spaces on the left and right side of the title, we can use the method .strip(). We also have to be careful with special characters.
title = soup.find('div', 'article-title-name') title = title.text.strip()
4 – Text
Finally, we will be scraping the text itself. Therefore, we locate the text’s position in the HTML source code of the web page nested inside a <div> with the class name article-content. The article is divided into several paragraphs marked by the <p> element. However, some paragraphs are empty or contain metadata. With the help of a loop, we filter every paragraph which is empty or contains the metadata “This story is featured in”. Finally, to maintain the original structure of the article, we will add a line break after every paragraph. Line breaks can be easily matched by regular expressions with \n.
content = soup.find('div', 'article-content') #find all <p> in content paragraphs = content.find_all('p') #create an empty string variable to store the paragraphs text = '' #filter empty paragraphs or metadata for p in paragraphs: if p.text != ' ' and 'This story featured in' not in p.text: #add a line break after every paragraph text += p.text + '\n'
Finally, we have to assemble the single parts into a loop to get the author, date, title and text of every article. To achieve this, we follow the same procedure as at the beginning of our tutorial: First, we grab every URL of the articles in our list links and connect to the URLs with our Response library . Afterwards, we parse and save the data into a soup object. The Python method .sleep() allows us to suspend our execution for the defined number of seconds. You want to make sure that the content of the website has fully loaded before you start scraping.
for link in links: response = requests.get(link) soup = BeautifulSoup(response.text, "html.parser") time.sleep(3)
The code so far:
from bs4 import BeautifulSoup import requests import urllib.request import time # Set the URL you want to webscrape from url = 'https://www.thewhitereview.org/fiction/' # Connect to the URL response = requests.get(url) # Parse HTML and save to BeautifulSoup object soup = BeautifulSoup(response.text, "html.parser") links = [] li_items = soup.find_all('li','a-z-item') for link in li_items: link = link.find('a') url = link.get('href') links.append(url) for link in links: response = requests.get(link) time.sleep(3) soup = BeautifulSoup(response.text, "html.parser") #author sidebar = soup.find('aside', "left-sidebar") authorheadline = sidebar.find_all('h3') author = authorheadline[1] author = author.text #date date = sidebar.find('p') date= date.text.split(' ') months = ['January', 'February', 'March', 'April', 'Mai', 'June', 'July', 'August', 'September', 'October', 'November', 'Dezember'] month = str(months.index(date[0]) + 1) if len(month)
0 notes
Text
7 – Save Data
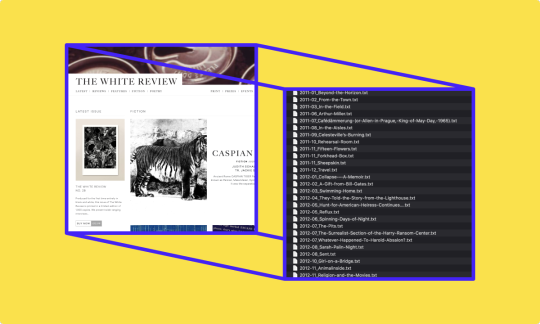
Finally, we have to store the results. The desired file format and data structure highly depends on your use case. For this tutorial, we will create a plain text file in the .txt format. For each article we are going to create a new file, give it an appropriate file name and fill it with the scraped text paragraphs. We prepend the article with metadata that we scraped and prefix it with a defining key.
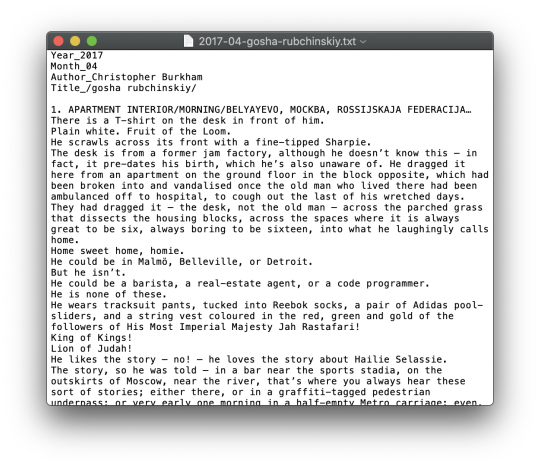
To create a new text file in python, we need a filename first. Keep in mind how multiple files are presented and organized in your file browser. We want to sort our output files by date, so my goal is to create the following taxonomy:
YYYY-DD_title-of-the-article.txt
First, we want to get the year and month of the publishing date for our filename. Since we only scraped a literal string such as “May 2020”, we have to tinker a little to transform our string.
We split the string May 2020 into two slices at the space character with .split(' '). The result should be: date[0] = May and date[1] = 2020. Remember that date is a BeautifulSoup object, and we have to call .text to work with the element’s text content.
#split date at space date = date.text.split(' ')
Instead of literal months, a two-digit month representation easily sortable and doesn’t need to be translated. We create the list months which contains all the names of the months. Next, we let python find our literal month, which is stored in date[0] with the .index function. Caution: we have to increase the returned index value by 1, as list indices start with zero, months however start at 1. Finally, we convert this index to a string which allows us to add a leading zero for month digits smaller than 10. For example: The fifth month May will now be named 05 instead of 5.
#create list months months = ['January', 'February', 'March', 'April', 'May', 'June', 'July', 'August', 'September', 'October', 'November', 'December'] #convert the month date[0] into the respectively number of the month month = str(months.index(date[0]) + 1) #if the length of the String is less than 2, add a leading 0 if len(month)
Obtaining the year is relatively straightforward: we take the second slice of the date date[1] and convert it into a string:
#get the year as a string from date year = str(date[1])
The final element of our filename is the title of the article. We already scraped the title. However, file names should not contain special characters or spaces, as some software applications do not recognize such files. Thus, we replace spaces with dashes and trim any slashes from the tile and store our transformed title in the new string filetitle. Now we are ready to manufacture our file name by concatenating year, month and filename, separated by dash or underscore and suffixed by the plain text file type .txt
#replace spaces with dashes and trim slashes filetitle = title.replace(' ', '-').replace('/', '') #manufacture the filename from the scraped and transformed metadata filename = year + '-' + month + '_' + filetitle + '.txt'
With our name we can create a new file variable f with the open command. The second argument refers to the mode in which the file is opened: w is the write mode, as we are going to write lines to our file. With the file opened, we write our data to the file line by line. Notice the \n on each line end. This expression adds a line break after each string. We use it twice on the 'Title_' line in order to separate our metadata from the article text with an empty line.
#create an article file f = open(filename,'w') f.write('Year_' + year + '\n') f.write('Month_' + month + '\n') f.write('Author_' + author + '\n') f.write('Title_ ' + title + '\n\n') f.write(text) f.close()
8 — The final code
from bs4 import BeautifulSoup import requests import urllib.request import time # Set the URL you want to webscrape from # articlelinklist url = 'https://www.thewhitereview.org/fiction/' # Connect to the URL response = requests.get(url) # Parse HTML and save to BeautifulSoup object soup = BeautifulSoup(response.text, "html.parser") links = [] li_items = soup.find_all('li','a-z-item') for link in li_items: link = link.find('a') url = link.get('href') links.append(url) for link in links: response = requests.get(link) time.sleep(3) soup = BeautifulSoup(response.text, "html.parser") #author sidebar = soup.find('aside', "left-sidebar") authorheadline = sidebar.find_all('h3') author = authorheadline[1] author = author.text #date date = sidebar.find('p') date= date.text.split(' ') months = ['January', 'February', 'March', 'April', 'May', 'June', 'July', 'August', 'September', 'October', 'November', 'December'] month = str(months.index(date[0]) + 1) if len(month) < 2: month = "0" + month year = str(date[1]) #title title = soup.find('div', "article-title-name") title = title.text.strip() filetitle = title.replace(" ", "-").replace("/", "") #text content = soup.find('div', 'article-content') paragraphs = content.find_all('p') text = "" for p in paragraphs: if p.text != " " and "This story featured in" not in p.text: text += p.text + "\n" filename = year + '-' + month + '_' + filetitle + '.txt' f = open(filename,'w') f.write('Year_ ' + year + '\n') f.write('Month_ ' + month + '\n') f.write('Author_ ' + author + '\n') f.write('Title_ ' + title + '\n\n') f.write(text) f.close()
0 notes