
My blog for anything that looks like art but is really technology- or wait- anything that looks like technology but is really art...
Don't wanna be here? Send us removal request.
Statistics
We looked inside some of the posts by willoslab and here's what we found interesting.
Average Info
Notes Per Post
81K
Likes Per Post
48K
Reblog Per Post
33K
Reply Per Post
38
Time Between Posts
1 month
Number of Posts By Type
Text
11
Last Seen Tumblr Blogs


Fun Fact
Tumblr has 411 employees.

Text
Project Three
Project Three! Not was I was expecting.
Here was my original pitch: You send messages from one piece of ceramic to another using vibrations. The vibrations are sensed by a piezo pickup on one piece, and sent to a web server. A p5.js application reads from the web server, and tells another Arduino when the piezo reads vibration. The receiver Arduino drives a speaker to match the frequency picked up by the piezo. The piezo could be read by following an Arduino knock sensor example (6).
Now in retrospect, there are several things that make this idea a lot of trouble. First, the piezo pickups I have are noisy and unpredictable, and generate a very low amount of signal. Secondly, there are three different points of failure in communicating from one Arduino to the other. The web server, p5.js app, and serial server must all work in tandem to send one message.
I did a lot of research to make the above idea possible.
First, the piezo was not providing usable values. I explored amplifying the signal with a transistor, but eventually discovered a great resource about op-amps (5). The resulting signal with the same piezo was so much clearer and true-to-life that it made the idea feasible again for some time.
Second was web communication. I used the modified example WiFiNINA web server by W Michelle Harris (10). The edits in this example assume you will be connecting to the RIT WiFi, like I was, but it is built on the general example web server, which is extremely helpful.
Third was p5.js communication with the web server. I got my professor's help on this one and no matter what we tried, it never worked. The p5.js httpGet example (9) was able to connect to the example website, but very few others. Sometimes it would run into CORS errors, but in the case of my Arduino's server's IP address, it just failed to fetch and gave no explanation.
In a last ditch effort, I switched to serial communication between two Arduinos, using a very good video tutorial (8). In spite of the video's clarity and the simplicity of the task, I was never able to trigger a response in the receiver Arduino. I could tell data was being sent and received using the serial monitor and logging the messages received by the receiver Arduino. However, data sent from the transmitter never registered as equal to itself in an if/else statement. I really don't know what could have gone wrong.
This is why my final project is missing serial or web communication. I did all I could with the time and experience that I could bring to the project. I'm very embarrassed about this because I love the idea, and all the various methods of Arduino communication have gripped my curiosity from the learning I did. I cannot get it done in time.
So what did I do? Earlier in the year I started building a very simple synthesizer using the Arduino tone library (2). I was still excited to work with the resonance in ceramic bowls and other pieces, so I blended these things together.
To get the synthesizer put together, I needed to figure out those breadboard buttons whose use had eluded me. There's a good tutorial on them (3).
Next, I decided I could use the piezo sensor as a controller for the keyboard instead of the set of buttons. Then, even if there was no serial communication, I could at least have two interactable bowls. I set up a circuit to take analog input from the piezo and then activate the circuit with PWM. This worked alright until I noticed that after a few beeps, the Arduino would lose connection to the computer and stop functioning. This usually followed a high reading on the piezo. I don't know what it is about my circuit, but I believe I was overloading the analog input.
It was after this, too, broke down that I decided to put my original tone keyboard back together, leave the piezo, and come in with something that I could show. It was 11:30 PM and I had been working straight through the last two days.
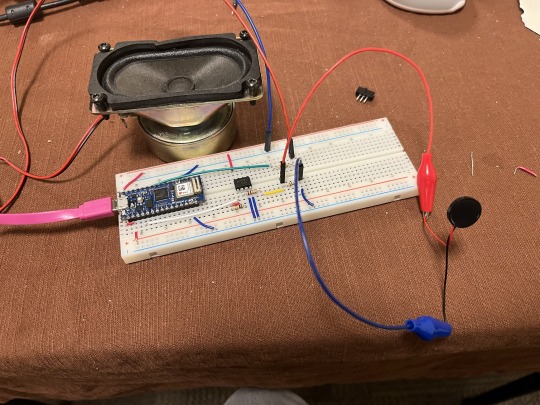
Here's a photo of my next-to-final project- the IC in the center is my op-amp, amplifying the signal from the piezo. The other side of the breadboard drives the speaker.
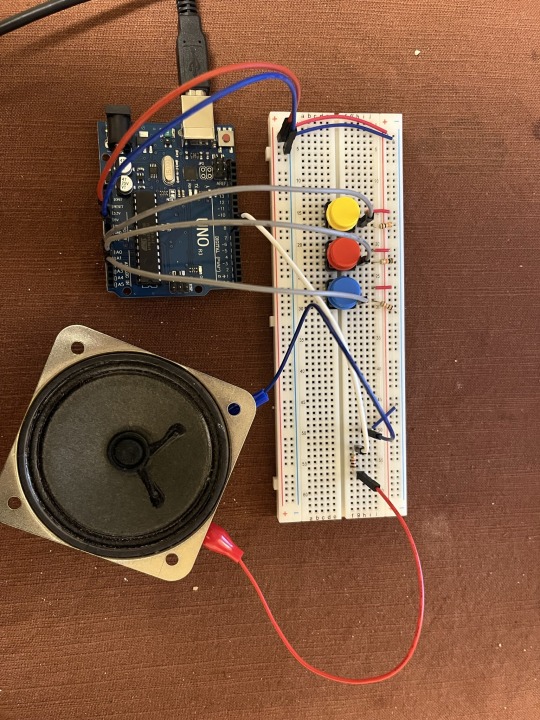
My final project is the example keyboard. The code for my final piece is taken from reference 2 and written by Tom Igoe. The schematic of my breadboard and wiring is also roughly the same, but I have also attached a photo of the circuit.
References:
http://thezhut.com/?page_id=1437
Arduino Tone Keyboard Example
good button tutorial
resistor color code calculator (this isn't cited I just need it all the time)
Op-amp Basics
Arduino Knock Sensor Example
datasheet for my AS358p op-amp
'How to make two arduino boards talk to each other' on YouTube
httpGet p5.js reference
the modified example WiFiNINA web server by W Michelle Harris
0 notes
Text
SPONGE GAME
This game is a duel- whoever gets hit with a sponge first is defeated. The sponges are launched by modified toasters. They are modified because the timer functions inside are controlled by staplers. When someone connects the metal parts of a stapler by pushing it down, it sends a signal to the toaster. The timer is set to however long the stapler is held down and the connection is made. The Rules:
Players load two sponges into their toasters and point them at each other.
When the game begins, both players trigger the staplers at the same time. They should do this behind their backs so the other player cannot see.
Players can hold the stapler connection for as much or as little time as they want.
Players may also duck once, for one second or less. Otherwise they cannot move and must face each other.
Eventually the sponges will fly, and the player hit by the fewest sponges wins!
0 notes
Text
“To sit alone or with a few friends, half-drunk under a full moon, you just understand how lucky you are; it’s a story you can’t tell. It’s a story you almost by definition, can’t share. I’ve learned in real time to look at those things and realize: I just had a really good moment.”
— Anthony Bourdain, in his final interview
37K notes
·
View notes
Text
Project 2 - Pumkin
Here's project 2!
I drifted between a few ideas before settling. All of them centered around the audience getting to interact with something cute, but with a disorienting aspect. I just wasn't sure what kind of object to build around. Then the Halloween mood started to creep up on me, and I got a little foam pumpkin to carve. At first, the plan was to carve the pumpkin, and then reassemble it with some sensors inside so the audience could 'carve' the pumpkin themselves and see their progress on the screen. I also wanted the pumpkin to spin around. Spinning around was the first thing I set up, using this resource: https://docs.arduino.cc/learn/electronics/servo-motors
Only while setting this up did I realize the pumpkin was not hollow! It was going to be very hard to carve out a face in it. I had to pivot. My thought process in generating a new idea was to encourage the player to enjoy feeling the pumpkin as it was. The pumpkin: - has a soft felt surface - is round - spins around - and the motor spinning makes a sound like snoring. The snoring made me think about 'waking up the pumpkin for Halloween' as a theme. The next thing I did was wire up a pullup resistor with two pieces of foil tape, because I knew I wanted that kind of switch. I just wasn't sure how to theme it yet. This webpage was invaluable for that: https://learn.sparkfun.com/tutorials/pull-up-resistors/all

The servo code contains long loops to move the motor back and forth, so the pullup input pin only reads at the end of a rotation. I knew I was going to have to either use interrupts, or tie in this quirk to be part of the interaction.
After experimenting a frustrating amount over how I was going to attach the pumpkin to the servo (I settled on super glue), it dawned on me that I felt like a mad scientist making extremely harebrained guesses about how to bring this inanimate object to life. That gave me the emotional lead I needed to tie everything together! This is the point where I wrote the opening text.
Here is how the circuit turned out:

After a lot of investigation into why my serial port would not open, I pieced together the sequence of events that you see in the video. The Arduino and the p5.js app share the same sequence, but the p5 app follows the cues the Arduino gives it. The next hour or so was a blur- I finished programming the different stages on the screen, and the project was complete! I filled out more flavor text for the story, made a real bottle of Secret Life Juice, and troubleshooted all the connections that were made with tape. Here is my video:
And here is a link to my p5.js code: https://editor.p5js.org/willoslab/sketches/unpA_KCb1 Here's a link to my arduino code: https://drive.google.com/file/d/1i44UfdcMRMra_3DtATzKCI1Gu4alw7T5/view?usp=share_link
Thanks for reading and Happy Halloween!!
0 notes
Text
Return to Blink
Things went better this time! The board now has a SECOND LED and it can remember light values!
The other big change is that there is now a SWITCH (pardon the big words, I'm really proud I could get any of this to work). The switch toggles whether the second LED should follow the first one, or enter it's own SPECIAL MODE. When the second LED switches to its special mode, it maintains the light value it had when the switch was flipped.
This video basically demonstrates what's going on, although I fumble with the switch for a lot of the time. Once I get it right, the second LED saves a value while the first one keeps changing!
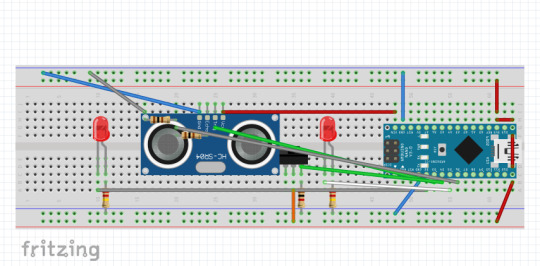
Here's an image of the schematic I made in Fritzing. I'm still trying to get the hang of Fritzing, but I believe this is close to the real thing. One thing I know is wrong is the LEDs- the bent leg needs to go to power, not ground.
To download my arduino code, follow this link: https://drive.google.com/file/d/1jL8pfcS_Yn6DRcl5E2HQFiHblhSF_IR5/view?usp=sharing
The arduino code also includes credit to the value smoothing example I followed. That was my other big improvement- I used the smoothing code to make the light value much less jumpy.
And last but not least here is a video of my board doing the thing!
0 notes
Text
I Am Not Done Yet Hopefully This Will Suffice
My arduino broke.
This was probably because I unplugged it several times while using the serial plotter. It rejected any new sketches I tried to send to it, and so I looked up how to do a factory reset. For future reference, this is how:
There's a small white button on a square mount in the middle of the board- pressing it twice in quick succession (while the arduino is connected to power) resets it to a blank slate. Then it's recommended (from what I saw) to send an empty sketch to it before trying anything big, just to ease it back to normal. After getting the board working I got back to setting up an interaction. I worked off the sonar example code (big thanks to WMH) and got the distance sensor to control the brightness of an LED. I want to mix this input with a button to make it a more interesting interaction, and also work on smoothing the output from the distance sensor.
0 notes
Text
Moar Digital Ins and Outs
My little arduino invention, Blinky.
For my homework to get more interesting with my digital inputs and outputs, I decided to mix the blink demo and the switch demo. First I got the two switches to each control one of two lights. Then I brought in the code from the blink demo, and set the delays to use a variable rate. When flipped, each switch performs an operation on the rate to make it a smaller number. The two switches combined bring the rate down to such a fast refresh that the light appears to be a solid color!
Here is the code:
// constants won't change. They're used here to set pin numbers: const int buttonPin = 2; // the number of the pushbutton pin const int buttonPin2 = 8; const int ledPin = 5; // the number of the LED pin const int ledPin2 = 7;
// variables will change: int buttonState = 0; // variable for reading the pushbutton status int buttonState2 = 0; int rate = 500;
void setup() { // initialize the LED pin as an output: pinMode(ledPin, OUTPUT); pinMode(ledPin2, OUTPUT); // initialize the pushbutton pin as an input: pinMode(buttonPin, INPUT); pinMode(buttonPin2, INPUT); }
void loop() { // read the state of the pushbutton value: buttonState = digitalRead(buttonPin); buttonState2 = digitalRead(buttonPin2);
// the LED blinks at the given rate digitalWrite(ledPin, HIGH); digitalWrite(ledPin2, LOW); delay(rate); digitalWrite(ledPin, LOW); digitalWrite(ledPin2, HIGH); delay(rate);
rate = 500;
// check if the pushbutton is pressed. If it is, the buttonState is HIGH: if (buttonState == HIGH) { rate = rate / 10; }
if (buttonState2 == HIGH) { rate = rate / 5; }
}
0 notes
Text
youtube
digital art installation highlight: Plane White by Carina Ow
Carina Ow is a designer and architect who has created several digital art installations. Her installation Plane White proposes a new method for a gallery to exhibit a painting- instead of the entire piece hanging static on a plain wall, this illusion of an empty wall reveals the work gradually as the audience interacts with it and pays attention to it.
In this installation, she uses Wassily Kandinsky's painting Composition VIII, and the gallery wall is a big sheet. The sheet might be using pressure sensors or a camera to find the gallery-goer's hands, I do not know. Somehow it senses where the sheet is being touched and the artwork appears in that general area. More than one person can interact with the painting at a time, and it highlights specific areas that people have to touch before the painting will fully reveal itself. Those qualities make it a social experience, and elevate it from a one-way interaction into a much more interesting interplay between the art and the audience, who become performers in order to see it.
more about Carina Ow here: https://www.behance.net/carinaow
0 notes
Text
babe. be real with me. if i were a plain little rock on a beach would you pick me up and turn me over in your hand and marvel over how wonderfully ordinary i am. like really take the time to ponder how there isn't necessarily anything special about me but that the very deed of choosing me out of countless other rocks raises me to a precious, almost sacred level of irreplaceability that is only accessible through the act of being seen and loved?
41K notes
·
View notes