
winterstormcosplay
my cosplay tutorial blog
My own cosplay and tutorials i've found to help
beginners
396 posts
Don't wanna be here? Send us removal request.
Last Seen Blogs

bondagewithbarbiee
I'm Not Ashamed, You're Entertained

cradle-quill
CradleQuill

probcraft
Probcraft
williamshamspeare
William Shamspeare

qs-monstera
Monstrous Mansion
Link
I found this video and it’s really dope, I know there are cosplayers that make props and such out of this foam and I hope this would help people making such things.
2 notes
·
View notes
Text
So I think i figured out how to make the gambol shroud actually move by itself like in rwby. Only an extremely poor rough draft though
0 notes
Text
Thigh armor
I ran into a couple of issues when crafting the thigh pieces, the first one was the opening a bit too small for myself but the overall length for the piece was fine. So I just modified it myself by cutting it and adding some extra foam making it wider, the second issue was related to me wanting the flaps to move showing the thigh rockets. On the file I found there was a blank section where I’m guessing the rockets popped out and showed themselves. However since this file was just the armor skin it had the missiles there but no place where I can attach them to. so after figuring out the custom shape for that blank area the rest went smoothly and did the standard seal and paint. After that has dried I attached on the inside of the armor some nylon webbing with some verlcro so I can have the armor piece being held up by the waist harness
After painting the areas and letting it fully dry I started on the hinge/servo placement, there isn’t a specific place that I could tell you to put it where it would be perfect so all I can say is just play around with the placement and when you find the spot that suits you. Just mark it off with something that either wont be seen or can be removed without damaging the paint.
For the thigh rockets, I designed and printed them off myself then airbrushed them to get that burnt look like they have been fired off. The holder for the missile itself I just painted flat black, nothing to fancy. When designing the missile/holder they would pop into it and could just stay there, but with me being me I just superglued them in there to make sure they wont accidentally fall out when I would be moving around.
Shin armor
This armor was a little tricky but not that difficult, as you can see from the shape of it would be difficult to slide your foot through it without forcing it. If you didn’t want to force your foot through it you would have to scale it up but then you would mess with the size being too tall. So the way I got around this was simply adding a zipper to the back of the armor where the blue tape is located. To attach it wasn’t that bad, all I did was put a few layers of barge cement on both the inner part of the foam and the cloth part of the zipper. Make sure you are covering the zipper part with some sort of tape so no contact cement gets into it which will make it difficult to open/close. The details I did was just burned in using a wood burner tool.
Just repeat like any other of the foam pieces, heat seal it, plastidip it, and spray paint it. Now make sure to keep the tape on the zipper so there wont be any plastidip that seeps into the zipper making it unable to open up latter. To keep my life simple I just spray painted the whole thing black and went in there with a gold krylon paint marker. I swear I love that paint marker, it helps out so much with the little details.
Boots
I wanted to get boots that I could easily slip into and out of that would not require myself to use my hands, these boots were bought on amazon and spray painted gold. I tried sewing a gold cover for it but alas I do not have very good sewing skill so I just opted to spray paint these and gluing the foam armor onto them with barge cement. To add on to the gluing of the armor, I used multiple layers of barge cement, around 3 or 4 depending how I felt about the area which it was going to be added to. Do not be alarmed if some of the paint comes off on the area where you placed the glue, it is fine That is also why I added multiple layers of barge cement. Now when The final layer of glue has become tacky to the touch carefully and I mean carefully add the armor pieces to the boots. If there are some pieces that aren’t flush with the boots that is okay, I had the same issue and I used used an xacto knife evening them out and where you could see the color of the foam I just used painted on flexbond on the areas and when that dried applied some black acrylic to those areas.
Amazon Link: Boots
The next post will be going over the construction of the wings and how I was able to get them to move.
Pictures and videos are on my site here is the direct link
0 notes
Text
Pharah build part 2
So this is all my fault, I thought I published it but I didnt... It is available right now to view on my website and will be on tumlr tomorrow
Link
0 notes
Text
Part 2 of my Pharah build will be coming out in a few days!!!
2 notes
·
View notes
Text
Anubis write up part1

Before I get into the write up of the Pharah Anubis armor, I want to give a quick shout out to a few cosplayers that basically inspired me to do this build:Before I get into the write up of the Pharah Anubis armor, I want to give a quick shout out to a few cosplayers that basically inspired me to do this build: Germia, Kuma Cosplay , and JusCosplay & Props. These guys basically kept me going when I felt it was too difficult to do and wanted to give up. Also depending where you are reading this there are video clips showing off certain parts of the armor or giving a demonstration of it that will be included on my website within the write up or you could either look for the video on my instagram winterstormcosplay or on my website Winterstormcosplay. I will be uploading this in segments to make it easier on myself.
All right for a quick run down of the materials I used here is a list of the supplies
TntCosplay 4, 6, and 8mm Foam
Plastidip
Rustoleum flat Gray Primer, Flat black, and Gold spray paint
Airbrush black, red, gold, and silver
Gold and silver paint marker
CosplaySupplies Transparent worbla
Standard black zippers
Nylon cord/ elastic
Barge contact cement
Angle brackets
CONDOR Ronin Chest Rig
Climbing Harness
Wood
Flexbond
Corrugated plastic
Electronic portion(this list will be changing some time in the future since I am upgrading certain elements)
Adafruit 16-Channel 12-bit PWM/Servo Shield
ELEGOO UNO R3 Board
DC Momentary Reversing Rocker Switch
16 AWG Gauge Stranded Hook-Up Wire Kit
High Speed Linear Actuator, 12V, 6″ Stroke
Quick Wire Splice Taps and Insulated Male Quick Disconnect Terminals
Wire Terminal Crimp Connectors
Cordless screwdriver 12v battery
Heat shrink tubing
5v AA battery holder
Simple RF M4 Receiver – 315MHz Momentary Typ
Keyfob 4-Button RF Remote Control
Micro Servo Motor 9G
Adjustable Buck Converter
Standard servo – TowerPro SG-5010 – 5010
LED strips
Panel Toggle Switch
For crafting the armor itself I decided I wanted to have the wings and missile flaps move, so with those pieces I had to keep that in mind with a way to mount them for the power and other various cables. I will go more in depth later on, but something I should bring up is the torso portion of the armor. Basically if you have the game files and want to work off of that go for it, but you will most likely run into some issues due to Pharah having such a thin waist. No need to fret, there are various people online that have modified it to be worn by real people of sizes and JusCosplay & Props made modified set that will help you out immensely (well it did for me). Or you can freestyle it and hand make the patterns on a mannequin which if you can, I respect you since I am horrible at that.
Anubis Helmet/Omnic head

It was made of all foam varying from 4mm to 8mm in thickness. The difficulty of making it would be around medium, there are small pieces that have to be cut on various angles which can be annoying if you don’t have a sharp enough blade. For sealing it I first heat sealed it and went with flexbond instead of plastidip, since there are crevices that plastidip could not reach it was easier to just use a brush and apply it directly. When painting I primed it with some flat gray until I could not see the color of the foam. When painting the helmet I used airbrush paint for better control of the area, I started off with the gold areas first so when they dry I could just put some painters tape on them then color the remaining areas in black then sealed it up when everything dried thoroughly. At a certain part of the build I decided to not to do a genderbend of Pharah but an omnic squad member from her military days.
Shoulder Pauldrons

They were around medium difficulty to complete, unlike the helmet there is a lot of angular cuts on this to get its form, for certain areas on the foam I used a wood burner to burn certain designs into it if they were too big for the cut and heat method. On Pharahs armor the shoulder pieces have a flap that would open showing missiles. To have the flap move I 3d printed a hinge to the servo mount that I modified it to fit inside of the armor piece, for the cable connected to the servo I made a small hole on the underside of the armor piece so it would have a straight shot getting connected to the board. The missiles instead of using foam I made in fusion 360 that were printed on my 3d printer giving it a solid look. I made a modification where the missiles are so they can be removed in case I needed to get to the servos. For the underside of the missiles I added a strip of black 2mm foam holding them in place. This time I used plastidip to seal it instead of flexbond, but I did tape off an area where I attached a buckle so I could be hooked up to the harness i was wearing so I didn’t need to worry about it falling off. Painting was pretty straight forward, for the areas that had the designs with the wood burner I used a paint marker that matched the gold paint for fine detail painting.
Forearms
The forearms were one of the easiest parts to make besides the armor around the boots, as long as you scaled the right length of your arm there would be no real problems. Though you may need to cut away foam to have your arm pass through it easier. The right forearm that does not hold the wrist rocket that Pharah is able to launch is where I added a control unit for power. In my whole armor build I had multiple things getting powered that were located on the jetpack where the battery was. Now I did have an extra battery to replace it incase it died but being able to take off the jetpack to replace would be more work than it needs to be. So i decided to have a control unit where I can simply turn on and off the different parts of the electronics when I needed to use them. To get this done I used a Panel Toggle Switch that is meant for cars. What I liked about this it has a kill switch controlling all the power for the sub accessory switches, plus it just looked cool on the armor too. I had the power control of the whole suit suit so I had wires running up my arm to the jetpack and a rocker switch running to my hand which controlled the actuator for the wings.
For the other forearm which houses the wrist rocket, unfortunately I could not make it fireable like some other cosplayers had. So with that being that I modeled a rocket with some text on it saying, “To Whom It May Concern” in cursive. I also wanted to try having it in hieroglyphics but it did not work out so I just kept it in english.
Torso

For the torso this was kinda a pain in the butt for me, I tried making custom patterns with a torso mannequin I modded to be similar to me, but I could not achieve it. So I turned to the in game patterns and hit a wall since my body shape is no where near Pharas. Either the waist was fine, but it would be way too big everywhere else or have a way too small waist to make the rest fit, with that I gave up. So I did some research and found a cosplayer I listed in the beginning of this write up and bless him with the holy cosplay gods for making a male torso version of Pharahs torso. This thing helped so much and wasn’t too bad making, I did make custom modification to it to make it easier putting it on. To actually wear it I did not make it a closed piece, I have the opening of the torso in the back where the spine is located having it close with some buckles connected to elastic bands.
The next part to be uploaded will be the foam armor from the waist down and the type of harness I used to connect the pieces to it so they stay in place.
0 notes
Text
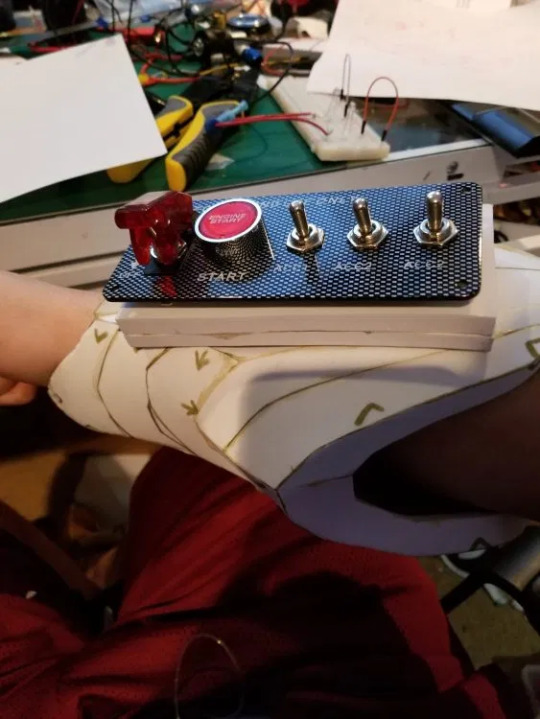
In the coming week I will be doing a build write up on my Pharah anubis cosplay
However here is a picture what I’m currently working on with my 3d printer to hold you over until then.

2 notes
·
View notes
Link
going to be trying this out soon for my overwatch cosplay, here’s hoping it turns out well
6 notes
·
View notes
Text
update
i know i have been dead for a while, but i’m weird and don’t want to have post update on my progress unless i’m at a stage where i wont be spending a long time figuring out how to do it. So that means im gonna start updating soon.
In case you didn’t know i’m working on 2 things, one is a destiny hunter spektar armor the other one is pharah anubis armor. the pharah one is gonna be a huge challenge for me but i would like to thank germia so much for her pics and hydroid props for the files for the armor.
literally those pictures and files have saved my life T_T anyway even though i’m looking off of her pics for some stuff i am doing some other cool stuff and doing different approaches then she did.
I’ll be sure to post updated pics and answer any questions people may or may not have. Also i apologize for my horrible grammar.
1 note
·
View note
Text
YALL.

CALL YOUR REPS!
https://twitter.com/TheBoneHeadClan/status/940369097052827654
174K notes
·
View notes
Photo


Queadlunn- Here’s another practice build!
Since things had gone well with my polycarbonate carving in the recent past (Gem, Arc Sword, Glass Knife), I though I’d try a more complex shape.
I sketched the shape of a simple dagger out on some masking tape stuck to the PC plate (~30cm x 30cm x 1cm) to make sure it’d fit, then transferred that to paper to fully draw the design out.
To cut the initial work piece out I used a small drill bit and perforated along the outer edge of the dagger. I then used a saw blade on my Dremel (a bit dangerous, like this one) and cut the dagger free. Then it was a good couple hours with the bench sander getting it into shape. Check the Glass Knife build for more details on the shaping.
I used the same tinted future finish as I had before (~100ml Future, 4 drops blue food coloring, 1 drop green), and in about 4 good coats it was looking great. I used a sheet of ABS to make the two side plates, then red oak for the grip sides and brass plate for the decorative bits. The rivets are bronze rod that I had on hand. The carving on the guard was done with a ball engraving bit (like this) burnished clean with a bit of ABS rod and painted with some gold paint (link).
For the grips, after they were sanded into shape, I used the same tinted future again (~100ml, 3 drops red, 2 drops blue) and got to that shade after 5 coats.
The brass plates on the blade were dremeled into shape, cleaned up and then I used a dangerous [REDACTED]. Once that was done, I used some brass blackener to highlight the etching on the plates. I polished them up a bit and added them to the dagger.
Overall, this took about 3 weeks of work (less, really, not much hobby time right now). Polycarbonate is a great material. At some point I might use this same technique to make something like an ebony blade from Skyrim.
699 notes
·
View notes
Text
UPADTE
hey yo, i just did an update on my exo head cosplay. WHAT YOU DIDNT KNOW ABOUT IT, then stroll on by my site and check it out at winterstormcosplay.com
1 note
·
View note
Link
a good read if anyone wants to into working with this material
0 notes
Link
began a new build of a destiny exo head
1 note
·
View note
Text
destiny cosplay ideas
so i have a few armor sets narrowed down to choose from, i’m leaning toward the snow angel armor but i would like some input.
the first one is “Snow Angel Armor”

the second one is “Lion’s Vigil Armor”

the third one is “Spliced Nanomania Armor”

the last one is “Spektar Armor”

1 note
·
View note